IN ENGLISH:
A big hello to the community of Hive Motors Today I am debuting in this wonderful community where we can learn many things that can help us to repair from our domestic appliances to the engines and auto parts, so I consider this community to be a real school. Today I want to make my contribution to the community, this time I am going to the automotive industry, because I want to show you how to repair the "Stop-neutral" or Parking-Neutral sensor of your car, this is a piece that is very common in vehicles that have computers with automatic transmissions, it is a piece that is usually damaged and causes many problems to the car's transmission, many people even come to repair the transmission of their car thinking that it had been damaged, and it was not like that, it was simply a malfunction in the neutral stop, for this reason, it is important to know when it is damaged and how to repair it.
EN ESPAÑOL:
Un gran saludo a la comunidad de Hive Motors Hoy estoy debutando en esta maravillosa comunidad donde podemos aprender muchas cosas que nos pueden servir para reparar desde nuestros artefactos domésticos hasta los motores y piezas automotrices, de manera que considero esta comunidad es una verdadera escuela. Hoy quiero hacer mi aporte a la comunidad, esta vez me voy al ramo automotriz, porque quiero mostrarles como reparar el sensor "Pare-neutro" o Parking-Neutro de su carro, esta es una pieza que es muy común en los vehículos que poseen computadoras con transmisiones automáticas, es una pieza que suele dañarse y causar muchos problemas a la transmisión del auto, incluso, muchas personas llegan a reparar la transmisión de su automóvil pensando en que se había dañado, y no era así, era simplemente un desperfecto en el pare-neutro, por esta razón, es importante saber cuando esta dañado y como repararlo.
 own images
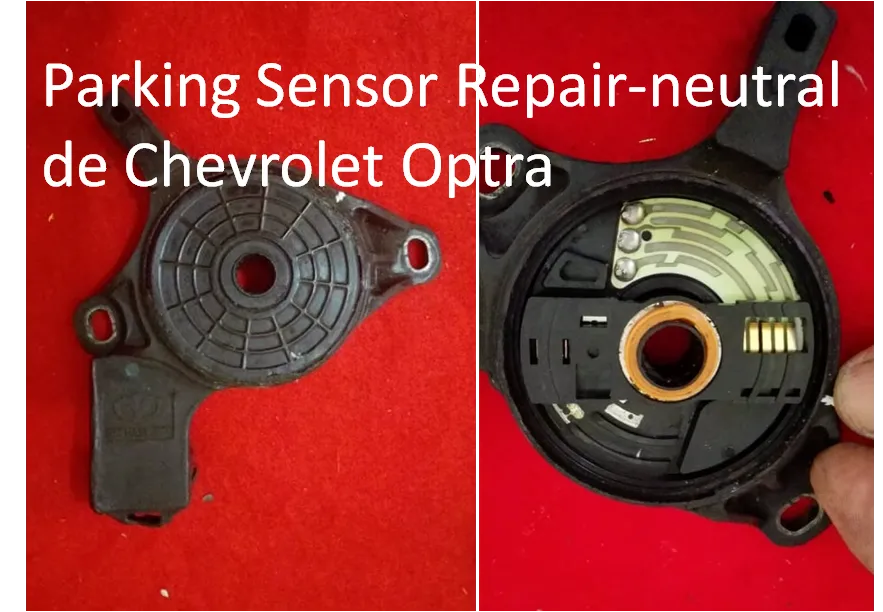
How to repair the "Parking-neutral" Sensor of your car // Como reparar el Sensor "Parking-neutro" de su automóvil
| As I said at the beginning, this part is usually damaged and causes a series of problems for the vehicle, among them is the loss of power to start, generally when the "Parking-neutral" is damaged, the HOLD flashing light appears, indicating that something is wrong in the gearbox, more than anything the electrical part, you will notice that the car does not take over drive, that is to say that it stays in third gear, if you try to increase the speed above 80 KM/H you will see that the revolutions begin to exceed 3000 rpm which could cause overheating and therefore damage to the engine, so be aware of this. | Como les decía al comienzo, esta pieza suele dañarse y ocasionar una serie de problemas al vehículo, entre ellos esta la perdida de fuerza para arrancar, generalmente cuando el "Parking-neutro" se daña aparece la luz intermitente del HOLD lo que indica que algo anda mal en la caja de velocidad, mas que todo la parte eléctrica, podrás notar que el auto no agarra el over drive, es decir que se queda en tercera, si tratas de aumentar la velocidad por encima de 80 KM/H podrás ver que las revoluciones comienzan a superar las 3000 rpm lo que podría causar un recalentamiento y por consiguiente daños al motor, así que pendiente con esto. |
|---|
| What to do if you suspect that the "Parking-neutral" is damaged? | ¿Que hacer si sospechas que el "Parking-neutro" esta dañado? |
|---|
| The first thing we must do is check its plug connectors, many times they get dirty and lose contact, another detail is to check the graduation screws that hold this sensor, if any of these screws loosen, the sensor will move and lose the calibration, being out of position, in this case you will be able to observe that when you move the gear lever, for example, in R right away a strange knock sounds and the hold light appears, you will also be able to observe that in * D* the box is neutralized and with a few small movements it manages to apply the speed, which indicates that the stop-neutral needs calibration. But let's assume that we are sure that the neutral is broken and needs to be replaced, well friends, the idea is to try to repair it, because most of the time the internal contacts get dirty and with a simple cleaning we managed to get it back, so it's worth a try. | Lo primero que debemos hacer es revisar sus conectores del enchufe, muchas veces se ensucian y pierde contacto, otro detalle es revisar los tornillos de graduación que sujetan este sensor, si alguno de estos tornillos se afloja, el sensor se va a mover y perderá la calibración, quedando fuera de posición, en este caso usted podrá observar que al mover la palanca de cambios, por ejemplo, en R enseguida suena un golpe raro y aparece la luz hold, también podrás observar que en D la caja se neutraliza y con unos pequeños movimientos logra aplicar la velocidad, lo que indica que que el pare-neutro necesita calibración. Pero vamos a suponer que estamos seguros que el pare-neutro esta averiado y necesita ser reemplazado, bueno amigos, la idea es intentar repararlo, porque la mayoría de las veces los contactos internos se ensucian y con una simple limpieza logramos recuperarlo, así que vale la pena intentarlo. |
|---|
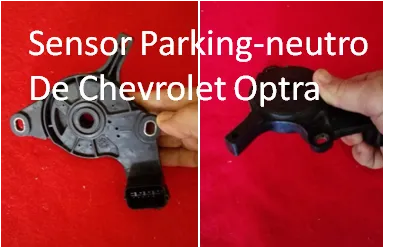
Procedure for the repair of the Sensor "Parking-neutral / Procedimiento para la reparación del sensor "Pare-neutro"
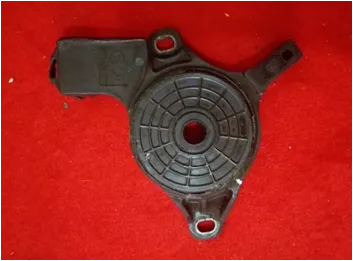
| In this case I am going to use a stop-neutral from a Chevrolet Optra car, although most of these sensors, regardless of the vehicle model, start from the same principles, there is not much difference in terms of their internal mechanism. | En este caso voy a utilizar un pare-neutro de un Automovil Chevrolet Optra, aunque la mayoría de estos sensores, independientemente del modelo de vehículos, parten de los mismos principios, no hay mucha diferencia en cuanto a su mecanismo interno. |
|---|
 own images
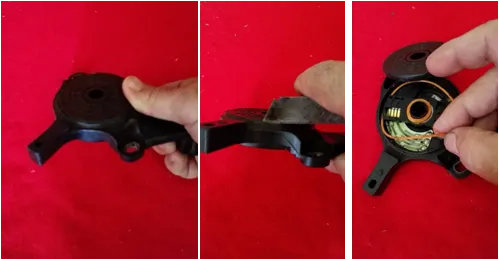
| Step-1: Once the sensor is removed, we proceed to open it very carefully so as not to break the plastic or the oring, we can use a knife or cutter: | Paso-1: Una vez retirado el sensor se procede a abrirlo con mucho cuidado para no romper el plástico ni el oring, podemos usar una navaja o cutter: |
|---|
 own images
| Step-2: By removing the cover we can mark the position of the rotating piston, its position is stop, which is when the metal brushes are raised and separated from the circuit track: | Paso-2: Al quitar la tapa podemos marcar la posición del émbolo giratorio, su posición es en pare, que es cuando se levantan las escobillas metálicas y se separan de la pista del circuito: |
|---|
 own images
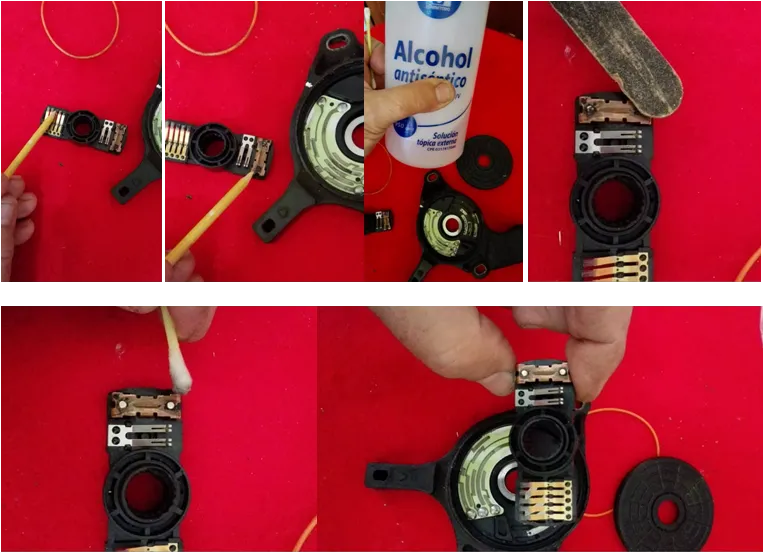
| Step-3: Now we remove the rotating plunger to proceed to clean the contacts with the use of alcohol and a nail file: | Paso-3: Ahora retiramos el émbolo giratorio para proceder a limpiar los contactos con el uso de alcohol y con una lima de uñas: |
|---|
 own images
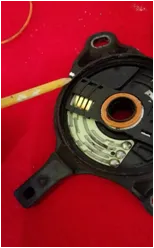
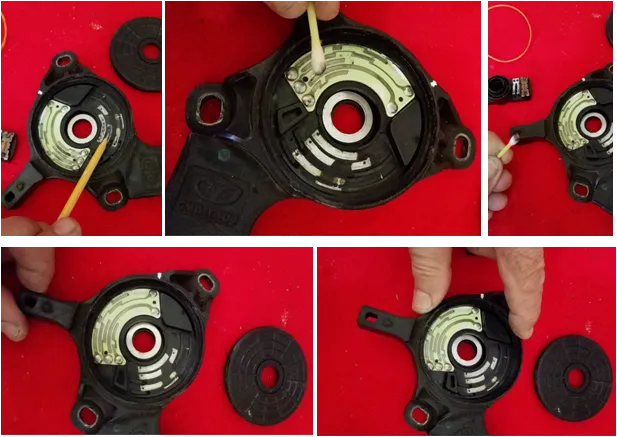
| Step-4: The next thing will be to clean the track of the circuit where the pins of the rotating piece sit, we will do this with alcohol to remove all the carbon, so that there is good contact between these two pieces: | Paso-4: Lo siguiente será limpiar la pista del circuito donde asientan los pines de la pieza giratorio, esto lo haremos con alcohol para remover todo el carbón, para que haya buen contacto entre estas dos piezas: |
|---|
 own images
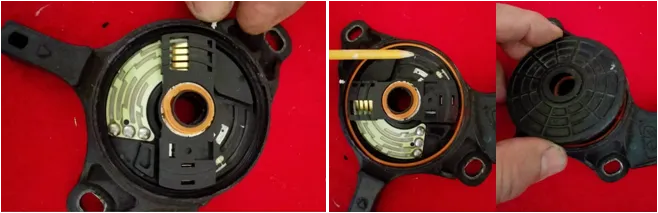
| Step-5: After cleaning, we now proceed to assemble the piece by placing the rotating disk in the stop position, which is at the end of the track where we made the mark, although that has a stop, but better is to place it before placing the lid, then we place the oring and the lid: | Paso-5: Después de la limpieza, ahora procedemos a armar la pieza colocando el disco giratorio en posición de pare que es al final de la pista donde hicimos la marca, aunque eso lleva un tope, pero mejor es colocarlo antes de colocar la tapa, luego colocamos el oring y la tapa: |
|---|
 own images
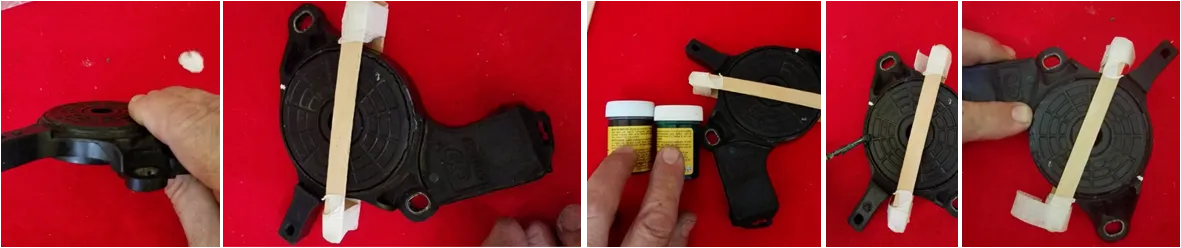
| Step-6: In this step, we stick the lid with glue, the lid should press on the rotating system, so you need to hold it while the glue dries, I put some popsicle sticks on both sides and tie them with a sticky tape : | Paso-6: En este paso, colocamos la tapa con pegamento, la tapa debe hacerle presión al sistema giratorio, por lo que es necesario sujetarla mientras seca el pegamento, yo le pongo unas paletas de helados en ambos lados y los amarro con una cinta adhesiva: |
|---|
 own images
| Well friends, most of the time I have only cleaned the internal Parking-neutral system and I have managed to get it to work again, but in some parts I have found that the track of the circuit has worn out due to friction, in these cases, it is that the repair is more complicated, because inside there you can't weld to fill, but we rarely come across this situation, so if your vehicle presents any of the faults that I have indicated, I recommend that you try to open the parking sensor. -Neutral, don't be afraid, you'll see that this is easy, and I'll tell you another thing, I prefer to repair an original neutral bumper, than buy an imitation one, especially for Optra and Aveo cars, on one occasion a friend assembled it. a new sensor and it only lasted me a few weeks and he brought me the original, we uncovered it and it only had a dirty contact, we put it together and it's been almost 3 months and so far it's going very well. | Bueno amigos, la mayoría de las veces solo he limpiado el sistema interno del pare-neutro y he logrado que vuelva a funcionar, pero en algunas piezas, he encontrado que la pista del circuito se ha gastado por la fricción, en estos casos, es más complicado la reparación, porque allí dentro no se puede soldar para rellenar, pero rara vez nos encontramos con esta situación, de manera que si su vehículo presenta alguna de las fallas que le he indicado, les recomiendo que intenten abrir el Sensor Pare-neutro, no tengan miedo, ya verán que esto es fácil, y les digo otra cosa, yo prefiero reparar un pare-neutro original, que comprar una imitación, sobre todo para los automoviles Optra y Aveo, en una oportunidad un amigo montó un sensor nuevo y solo le duró unas semanas y me trajo el original lo destapamos y solo tenia un contacto sucio, lo montamos y han pasado casi 3 meses y hasta ahora esta funcionando muy bien. |
|---|
Parking-neutral sensor ready to install: / Sensor Parking-neutro listo para instalar:
 own images
| In a future publication, I will explain how to calibrate the Pare-neutral sensor, I hope this tutorial will be very useful, I really learned to repair these sensors thanks to a friend who taught me how to do it, and I also want others to learn , it's good to have this wonderful Hive Motors community in #hive that allows us to share our experiences in different areas related to mechanics in general, I want to take the opportunity to greet @josuemonterola and his team of moderators @jesustiano @elizabeths14 | En una próxima publicación, les explicaré como calibrar el sensor Pare-neutro, espero que este tutorial les sea de gran utilidad, en verdad yo aprendí a reparar estos sensores gracias a un amigo me enseñó como hacerlo, y así también quiero que otros aprendan, que bueno tener en #hive esta maravillosa comunidad de Hive Motors que nos permite compartir nuestras experiencias en diferentes áreas relacionadas con la mecánica en general, quiero aprovechar la oportunidad para saludar a @josuemonterola y a su equipo de moderadores @jesustiano @elizabeths14 |
|---|