Ps: Esto es un tutorial, soy yo mostrando mi trabajo en la plataforma hive y me encantaría recibir comentarios al respecto.
Antes de proceder a mostrar las fotos y videos, me gustaría mencionar algo antes de que se me olvide.
Sólo quiero decir que estoy agradecida por todas las palabras de ánimo que he recibido en mis anteriores posts sobre maquillaje y las palabras de ánimo sobre mi escritura hasta ahora.
A veces, me juzgo a mí misma y me quedo atrás, pero cuando recuerdo las palabras, me siento animada a dar lo mejor de mí.
Una de las cosas que he aprendido hasta ahora en la vida es que todo lo que vale la pena hacer, vale la pena hacerlo bien.
En lo que respecta al maquillaje, creo que está bien inspirarse en el contenido de otras personas, incluso cuando decidas recrear un look, no lo hagas para ser exactamente como la persona en la que te inspiraste, en lugar de eso, haz tu mejor trabajo, quieres hacer un trabajo que la gente admire, quieres asegurarte de que tu firma se vea.
No luches por ser otros, en lugar de eso, disfruta del proceso de convertirte en ti porque lo que te hace diferente te hace especial.
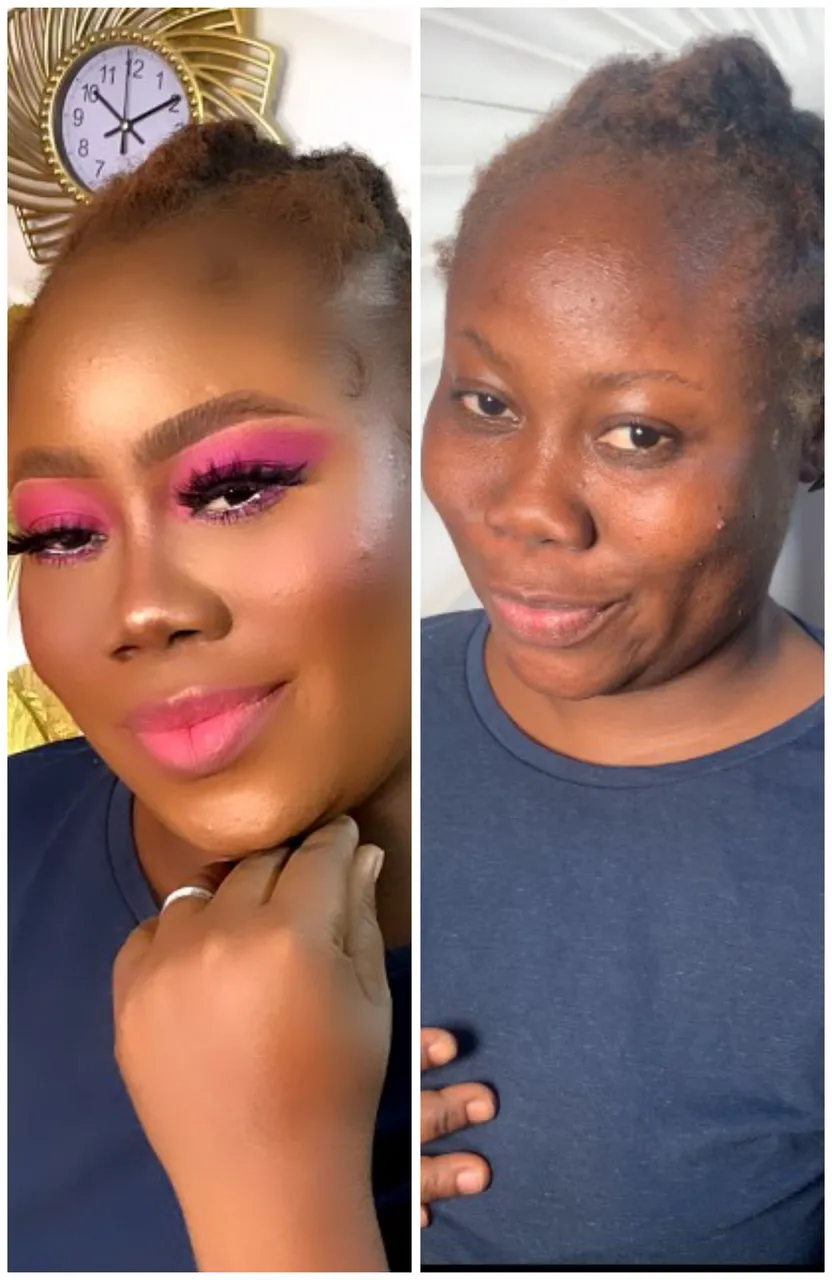
El día que trabajé en el rostro de mi clienta me enfrenté a dos retos y el reto fue el hecho de que su piel no era tan suave. Si estáis familiarizados con las palabras que dicen los maquilladores, entenderéis el término 'piel como la leche'.
Así que, la piel de mi cliente no era como la leche, y para ser honesta, me sentí desanimada para trabajar en ella, sin embargo, tuve que recordarme a mí misma que soy una artista del maquillaje, aunque el maquillaje no es como hacer una cirugía en la piel, al menos realza la belleza.
El segundo reto fueron los granos que tenía en la cara, algunos eran grandes.
Después de acceder a su piel, empecé a prepararla.
Nótese que es un error aplicar el maquillaje directamente sobre la piel, si es una piel problemática la que estás trabajando, los químicos de los productos de maquillaje la empeorarán, esa es la razón por la que tiene que haber una barrera antes de aplicar el maquillaje.
Mis pasos para preparar el rostro suelen ser
- limpiar la piel con agua micelar y toallitas.
- aplicar el bloqueador de sudor
- aplicar la crema hidratante generosamente
- aplicar la imprimación.
Esos son mis pasos de preparación hasta ahora. Una cosa importante a tener en cuenta es que cada producto tiene que secarse completamente en la piel primero antes de añadir otro.
El maquillaje es una habilidad divertida para mí, disfruto trabajando en el rostro de las personas y siempre me enamoro del aspecto final que creo.
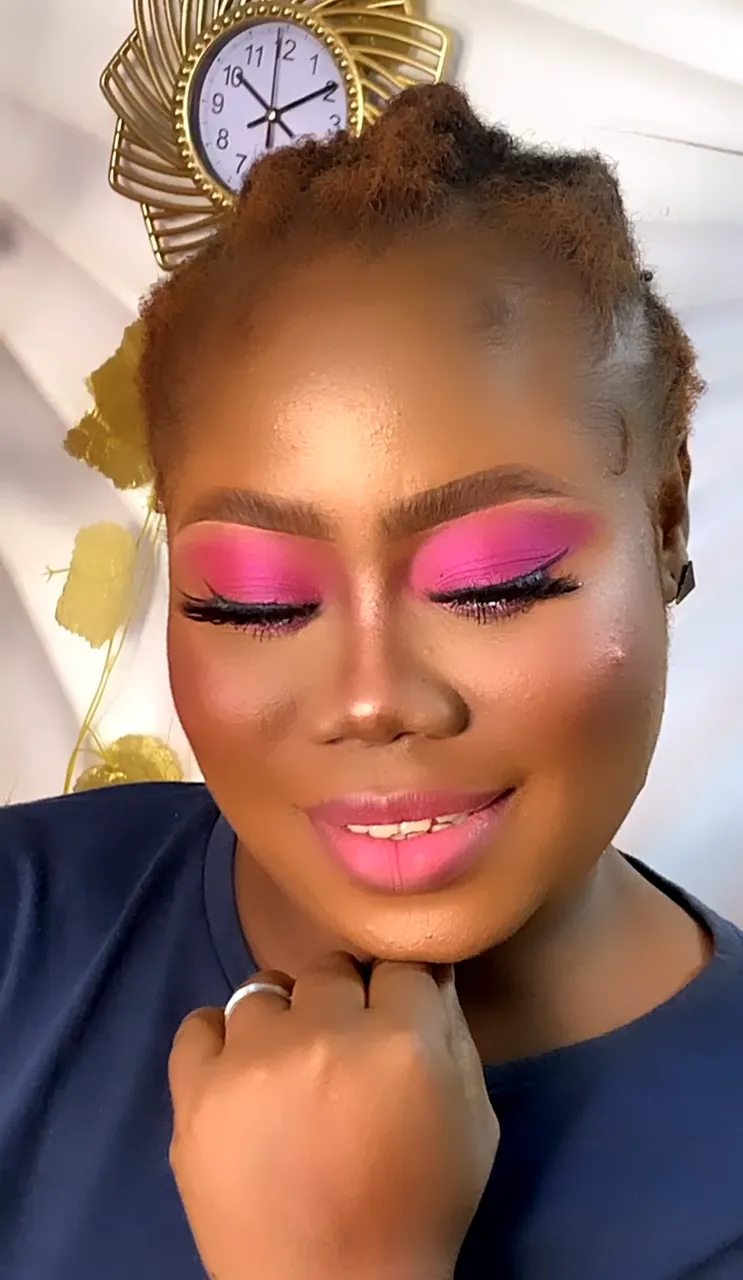
Después de la preparación, utilizo la base de maquillaje, el contorno en crema y el colorete en crema antes de aplicar el corrector y, por último, fijo el rostro.
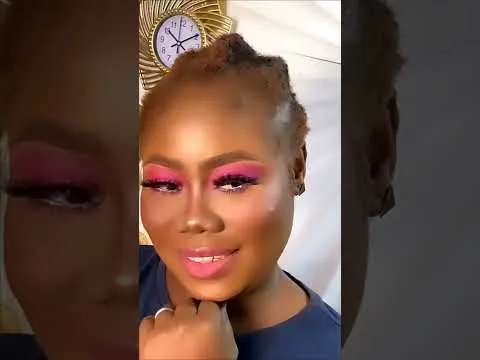
Lo siguiente que hago siempre después de ese proceso son las cejas, y luego la sombra de ojos. Lo último son los labios antes de dar el toque final.
Aquí tenéis un vídeo mío que he subido a youtube, no he querido pasar por 3speak porque he descubierto que a algunas personas les cuesta ver los vídeos desde allí.
Por favor, mirad el vídeo, vuestros comentarios significan mucho para mí.
Si has visto el vídeo que he editado ahí arriba, gracias y me gustaría leer tus comentarios.
Espero poder tener mi estudio pronto para poder hacer todo lo que quiero como quiero. El contenido del video con una amiga mía que tiene un estudio donde una buena cámara y luces también. Ella una bendición para mí, soy capaz de crear nuevos contenidos gracias a ella.
Las ventas de maquillaje de San Valentín están actualmente en, lo que significa que es el momento de comprar algunos productos más I el final del precio con talento, a partir de hoy hasta el 14 de febrero, estoy h, con la esperanza de tener algo bueno del dinero para comprar algunos productos antes del final de la venta.
Aquí es un antes y después de la mirada del cliente, he trabajado.
Y así, usted ha llegado al final de este post.
Agradezco su tiempo aquí.
También publicado aquí
Los vídeos y las fotos son míos. Gracias.
Traducción realizada con la versión gratuita del traductor www.DeepL.com/Translator
Ps: This is not a tutorial, this is me showcasing my work on the hive platform and I would love to get feedback on it.
Before I proceed to show the pictures and videos, I would like to mention something before I forget.
I just want to say that I'm grateful for all the encouraging words I've been getting on my previous makeup posts and the encouraging words about my writing so far.
Sometimes, I was to judge myself and stay back but when I remember the words, I feel encouraged to do my best.
One of the things I've learned so far in life is that whatever is worth doing at all, is worth doing well.
When it comes to makeup for me, I feel it's okay to be inspired by other people's content, even when you decide to recreate a look, don't do it to be exactly like the person you got the inspiration from, instead, do your best work, you want to do a work that people will admire, you want to make sure that your signature is seen.
Don't struggle to be others, instead, enjoy the process of becoming you because what makes you different makes you special.
I was faced with two challenges on the day I worked on my client's face and the challenge was the fact that her skin wasn't so smooth. If you are familiar with the words makeup artists say, you will understand the term 'skin like milk'.
So, my client's skin wasn't like milk, and to be honest, I felt discouraged to work on her, however, I had to remind myself that I'm a makeup artist, even though makeup isn't like doing surgery on the skin, it at least enhances beauty.
The second challenge was the pimples she had on her face, some were large.
After accessing her skin, I started prepping it.
Note that it is wrong to apply makeup directly on the skin, if it's problematic skin you're working on, the chemicals in the makeup products will make it worse, that is the reason why there has to be a barrier before the makeup is applied.
My steps to prepping the face are usually
- cleaning the skin with micellar water and wipes.
- apply sweat block
- apply the moisturizer generously
- apply the primer.
Those are my prepping step so far. An important thing to note is that each product has to get completely dried on the skin first before another one is added.
Makeup is a fun skill for me, I enjoy working on people's face and always fall in love with the final look I create.
After prepping, I go in with the foundation, cream contour, and cream blush before concealer then I finally set the face.
The next thing I always do after that process is the brows, then the eyeshadow. The last is the lips before I do my final touch.
Here is a video of mine I uploaded on youtube, I didn't want to go through 3speak because I discovered that some people find it difficult to watch videos from there.
Please watch the video, your feedback means a lot to me.
If you watched the video I edited below, thank you and I would like to read your feedback.
I'm hoping to be able to have my studio soon so I can do all I want to do the way I want. The video contents with a friend of mine who has a studio where a good camera and lights too. She a blessing to me, I'm able to create new content because of her.
Valentine makeup sales are currently on, which means it's time to buy some more products I the end of the talented price, from today till February 14, I'm h, hoping to have some good some of the money to buy some products before the end of the sale.
Here is a before and after look of the client, I worked on.
And just like that, you have come to the end of this post.
I appreciate your time here.
Also published here
The videos and pictures are mine. Thank you.