Hola amigos, no se si recordarán que hace unos días les decía que la nevera de mi apartamento había dejado de enfriar en el área de la conservación de alimentos, bueno mis amigos, en esa publicación también les decía que cuando quité la tapa que cubre el evaporador, pude observar que tenia mucho hielo en todo el serpentín, lo cual impedía que el ventilador succionara el aire frio para enviarlo por la ventanilla hacia el otro compartimiento de la nevera.
También les comentaba, que generalmente cuando se forma mucho hielo en el evaporador, es porque ha dejado de funcionar la resistencia de descongelamiento, en esos casos, lo más seguro es que el bimetálico o el sensor de temperatura ( termistor) se haya dañado, de manera que en el caso de mi nevera, lo primero que hice fue localizar el sensor de temperatura para reemplazarlo, pero al encontrarlo noté que no estaba haciendo buen contacto con la tubería, por lo que pensé que probablemente esta era la causa del problema, así que lo que lo único que hice fue mover este sensor hacía un lado de la tubería gruesa para que quedara más ajustada y tuviera mejor contacto, bueno, así lo hice y han pasado 6 días desde que hice este trabajo y la nevera ha funcionado muy bien.
IN ENGLISH:
Hi friends, I don't know if you remember that a few days ago I told you that the refrigerator in my apartment had stopped cooling in the food storage area. Well, my friends, in that post I also told you that when I removed the cover that covers the evaporator, I could see that there was a lot of ice all over the coil, which was preventing the fan from drawing in the cold air and sending it through the window to the other compartment of the refrigerator.
I also told you that generally when a lot of ice forms on the evaporator, it is because the defrost resistor has stopped working, in those cases, it is most likely that the bimetallic or the temperature sensor (thermistor) has been damaged, so in the case of my refrigerator, the first thing I did was locate the temperature sensor to replace it, but when I found it I noticed that it was not making good contact with the pipe, so I thought that this was probably the cause of the problem, so the only thing I did was move this sensor to one side of the thick pipe so that it would fit more snugly and have better contact, well, that's what I did and it's been 6 days since I did this work and the refrigerator has worked very well.
Cuando su nevera deje de enfriar, y vea escarchas en las paredes del congelador, revisa el sensor de temperatura // When your refrigerator stops cooling, and you see frost on the freezer walls, check the temperature sensor.
Ya han pasado 5 días desde que reubiqué el sensor de temperatura y gracias a Dios, la nevera ha estado funcionado muy bien, de manera que el problema era porque el sensor de temperatura no estaba haciendo buen contacto con la tubería, por esta razón no enviaba la señal a la tarjeta para que esta a su vez, activara la resistencia del deshielo.
It's been 6 days since I relocated the temperature sensor and fortunately the refrigerator has been working very well, so the problem was because the temperature sensor was not making good contact with the pipe, for this reason it was not sending the signal to the card so that it in turn would activate the defrost resistance.
Hasta el momento, mi nevera está funcionando muy bien

Bueno mis amigos, les confieso que después de la reparación de mi nevera, estuve todos los días revisando el ambiente interior del mismo, porque no estaba seguro si el termistor estaba bueno o malo, recuerden que solo reubiqué el sensor en la tubería, pero bueno gracias Dios, la nevera funcionó bien y no fue necesario volver a desarmarla para revisar dicho sensor, pero aunque no fue necesario revisar este sensor, he decidido enseñarles un método fácil y sencillo para que ustedes lo puedan hacer, en caso que se le presente una falla similar en su nevera, a continuación les mostraré este método a través de imágenes y un video.
Well my friends, I confess that after the repair of my refrigerator, I was checking the interior environment every day, because I was not sure if the thermistor was good or bad, remember that I only relocated the sensor in the pipe, but well thank God, the refrigerator worked well and it was not necessary to disassemble it again to check the sensor, but although it was not necessary to check this sensor, I have decided to teach you an easy and simple method so that you can do it, in case you have a similar failure in your refrigerator, below I will show you this method through images and a video
Cómo comprobar el estado de funcionamiento del bimetálico de la nevera // How to check the working status of the refrigerator's bimetallic
En realidad, la falla que presentó mi nevera no fue porque el sensor de temperatura estaba malo, sino porque no estaba haciendo buen contacto con la tubería de retorno, la verdad es que este caso es atípico, porque generalmente cuando el evaporador se llena de hielo y no enfría el área de conservación de los alimentos, es porque este sensor se ha dañado o la resistencia de deshielo está en mal estado, lo extraño es que esta nevera la compramos hace un año, es prácticamente nueva, y ahora fue que presentó esa falla, por lo que ese sensor de temperatura siempre estuvo ubicado en ese lugar y la nevera funcionaba bien, pero lo extraño es que la mitad del sensor estaba sobre una cinta aislante, creo que eso fue lo que provoco el mal contacto entre con la tubería, pero lo que si tenemos que saber es que cuando se presenta esta falla lo primero que hay que revisar es este sensor de temperatura, por esta razón quiero incluir en esta publicación un método muy sencillo para comprobar el estado de funcionamiento de un bimetálico el cual es un dispositivo muy similar al sensor de temperatura o "termistor".
Actually, the fault that my refrigerator presented was not because the temperature sensor was bad, but because it was not making good contact with the return pipe, the truth is that this case is atypical, because generally when the evaporator is filled with ice and does not cool the food conservation area, it is because this sensor has been damaged or the defrost resistance is in poor condition, the strange thing is that we bought this refrigerator a year ago, it is practically new, and now it was that it presented that fault, so that temperature sensor was always located in that place and the refrigerator worked well, but the strange thing is that half of the sensor was on an insulating tape, I think that was what caused the bad contact between with the pipe, but what we do have to know is that when this fault occurs the first thing to check is this temperature sensor, for this reason I want to include in this publication a very simple method to check the operating status of a bimetallic which is a device very similar to the temperature sensor or "thermistor".
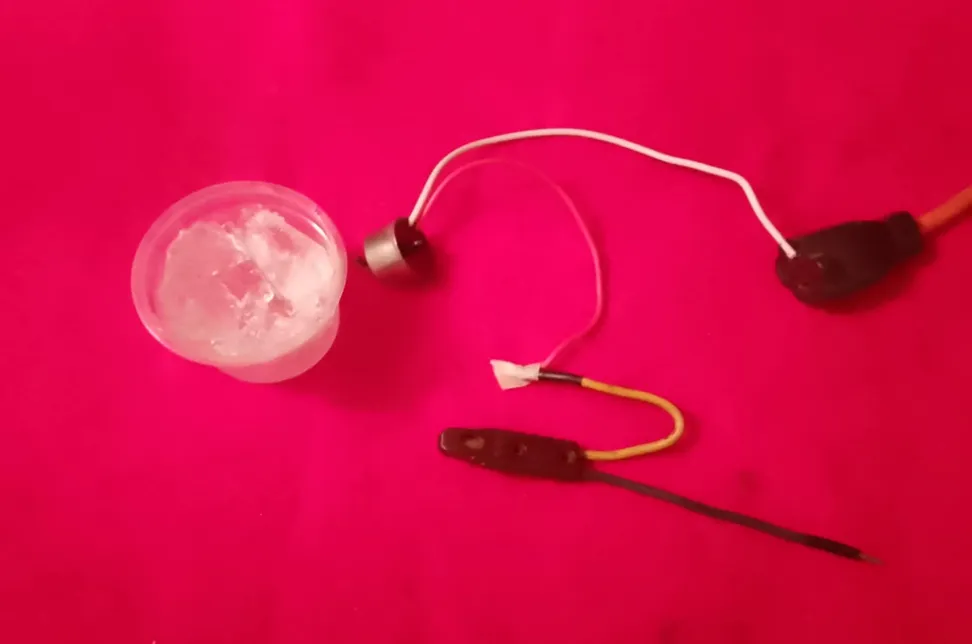
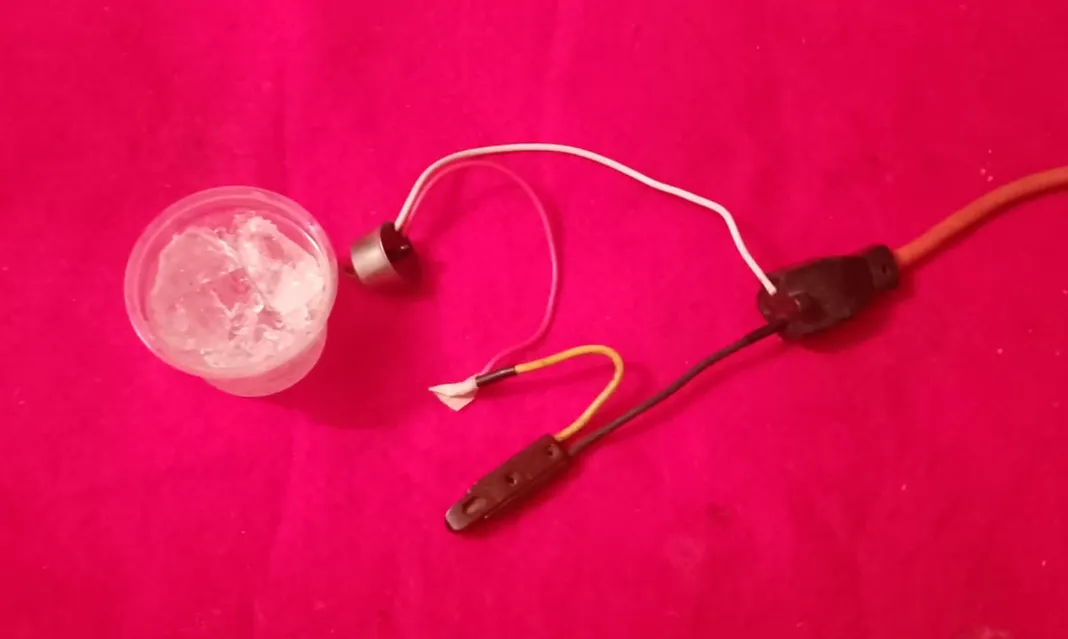
Método de prueba con el uso de un probador de luz y un vaso con hielo
Para realizar la prueba solo se necesita un vaso con hielo y un probador de luz, vamos a realizar dos pruebas:
Test method using a light tester and a glass of ice
To perform the test, you only need a glass of ice and a light tester. We'll perform two tests:
Primera prueba:
En esta primera prueba, conectaremos un cable del comprobador a un cable del elemento bimetálico, luego el otro cable a la fase positiva del tomacorriente y, finalmente, el otro cable del elemento bimetálico al neutro del tomacorriente. Una vez realizadas estas conexiones, colocaremos el elemento bimetálico dentro del vaso con hielo. Al entrar en contacto con el hielo, el circuito interno se cierra inmediatamente, permitiendo que la corriente fluya a la resistencia de descongelación. De esta manera, si la luz del comprobador se enciende, podemos indicar que el elemento bimetálico está en buen estado. Si, por el contrario, no se enciende, el elemento bimetálico está defectuoso y debe reemplazarse. En este caso, la luz de la lámpara de prueba se encendió, indicando que el elemento bimetálico está en buen estado.
First test:
In this first test, we will place one lead of the tester on a wire of the bimetallic element, then place the other lead on the positive phase of the outlet, and now place the other lead of the bimetallic element on the neutral of the outlet. Once these connections are made, we place the bimetallic element inside the glass of ice. Upon contact with the ice, the internal circuit immediately closes, allowing current to flow to the defrost resistor. This way, if the tester's light comes on, we can say that the bimetallic element is in good condition. If, on the other hand, it does not, the bimetallic element is defective and must be replaced. In this case, the test lamp light came on, indicating that this bimetallic element is in good condition.
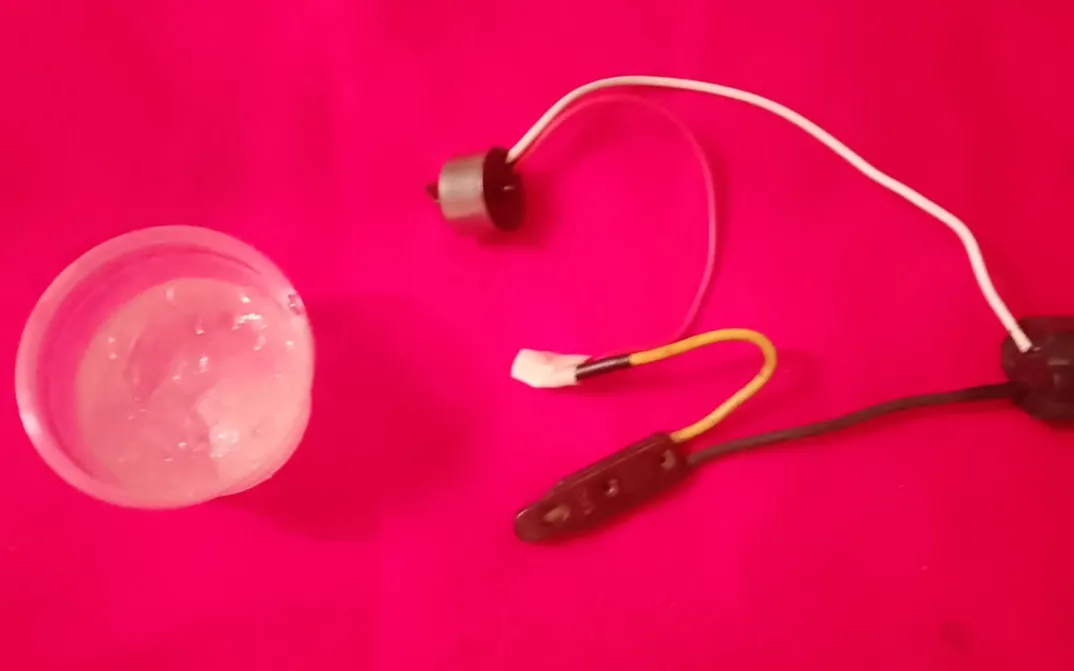
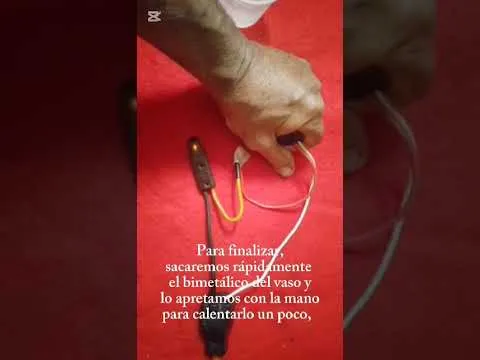
Segunda prueba:
En la primera prueba, se encendió la luz de la lámpara de prueba, lo que indica que el elemento bimetálico estaba en buen estado, ahora, retiramos rápidamente este elemento bimetálico del vaso con hielo y lo dejamos reposar a temperatura ambiente o simplemente lo apretamos con la mano para que se vaya calentando, después de unos segundos, la luz de la lámpara de prueba debería apagarse, de ser así, entonces el elemento bimetálico está en buen estado. Sin embargo, si la luz de la lámpara de prueba no se apaga, podemos decir que el circuito interno del elemento bimetálico está cerrado y, por lo tanto, debe reemplazarse. En este caso, la luz de la lámpara de prueba se apagó, lo que significa que el elemento bimetálico con el cual hice la prueba, está en buen estado.
Second Test:
In the first test, the test lamp light came on, indicating that the bimetallic element was in good condition. Now, we quickly remove this bimetallic element from the glass of ice and let it sit at room temperature or simply squeeze it with our hand to warm it up. After a few seconds, the tester light should turn off. If so, the bimetallic element is in good condition. However, if the tester light does not turn off, we can say that the internal circuit of the bimetallic element is closed and therefore needs to be replaced. In that case, the test lamp light went out, which means the bimetallic element is in good condition.
Video original: // Original video:
Mis queridos amigos de #Homesolutions, quería insistir en explicarles un poco más sobre este tipo de fallas, debido a que son las fallas muy comunes en los refrigeradores y antes de que ocurran, es bueno tener algunos conocimientos sobre ellas, para estar preparados, porque nunca se sabe cuando se pueden presentar, debido a que son piezas que sufren desgastes y en cualquier momento se dañan.
My dear friends at #Homesolutions, I wanted to insist on explaining a little more about these types of failures, because they are very common failures in refrigerators and before they occur, it is good to have some knowledge about them, to be prepared, because you never know when they can occur, because they are parts that suffer wear and tear and can be damaged at any time.