¡Hola!
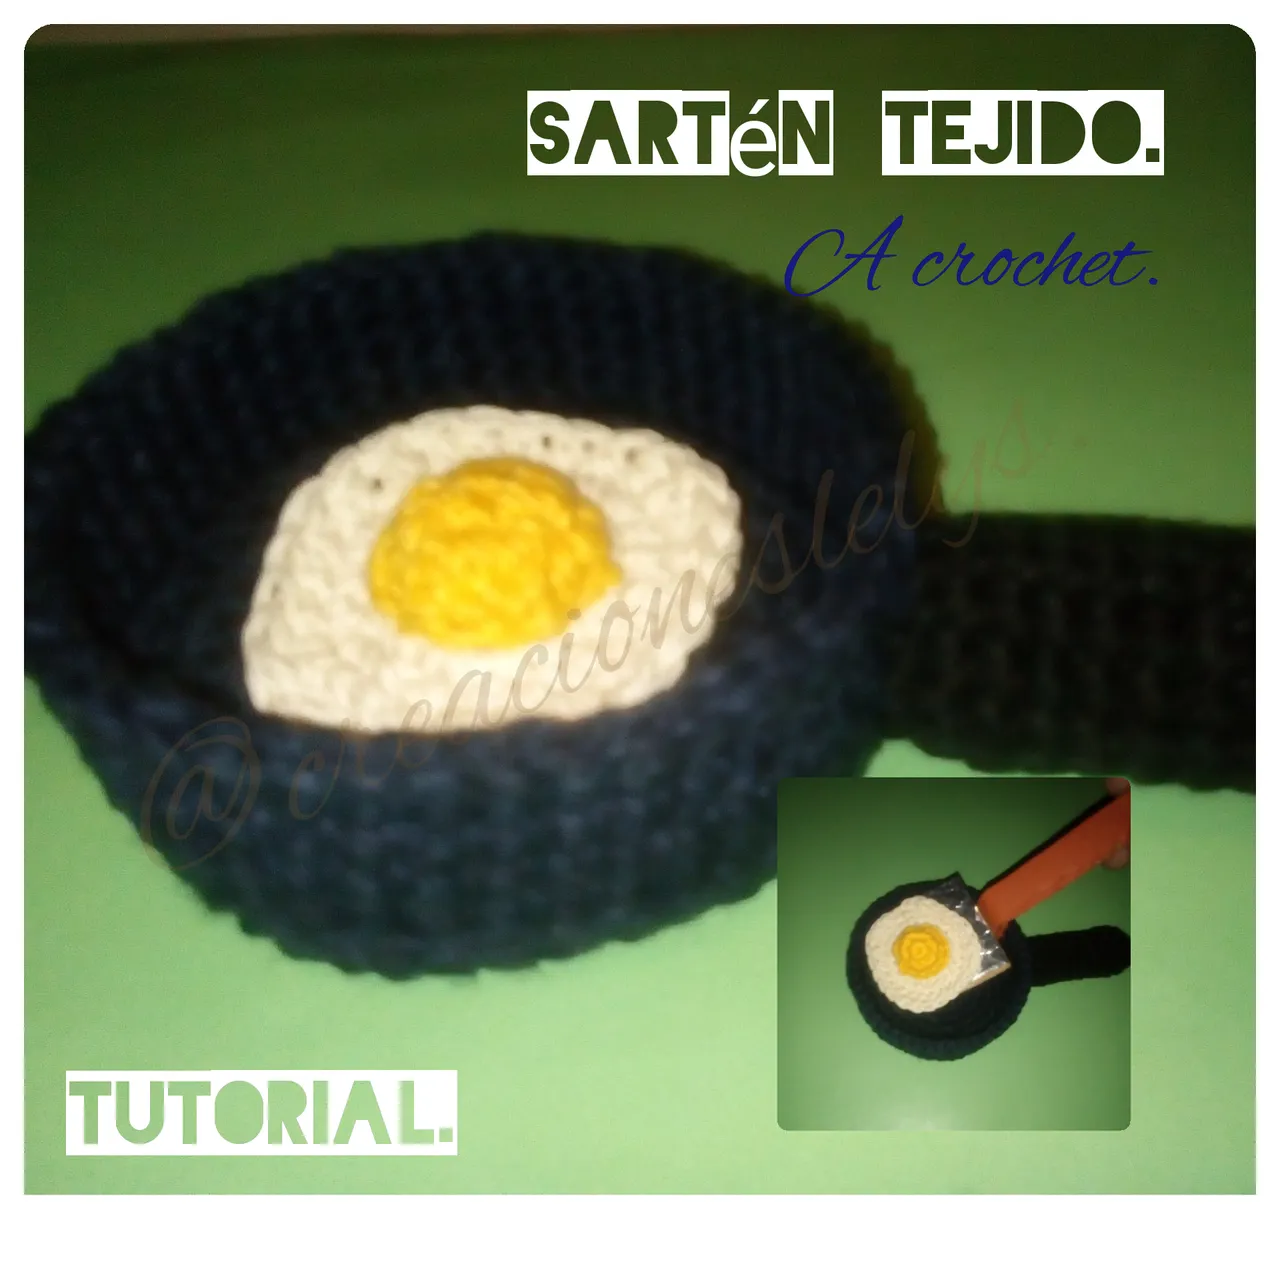
Soy Lelys 🤝 BIENVENIDOS. Espero que estén muy bien. Yo me siento muy contenta hoy. Una de mis vecinas pasó a buscar algún detalle para regalar. Quedó encantada con mis creaciones elaboradas con material reciclado. Le gustó mucho la cocina que hice con cartón hace unos días, preguntó con qué utensilio se puede cocinar allí 🤔 y me dejó pensativa. Así que no esperé mucho e inicié mi nuevo proyecto 👏 Ya está listo y quiero compartirlo con todos ustedes. Deseando que sea de su agrado y utilidad. ¡Comencemos!
Hello!
I'm Lelys 🤝 WELCOME. I hope you all are okay. I feel very happy today. One of my neighbors went to look for something to give as a gift. She was delighted with my creations made with recycled material. He really liked the kitchen I made with cardboard a few days ago, he asked with what utensil can you cook there 🤔 and it left me thinking. So I didn't wait long and started my new project 👏 It's ready and I want to share it with all of you. Hoping that it is to your liking and usefulness. Let's get started!
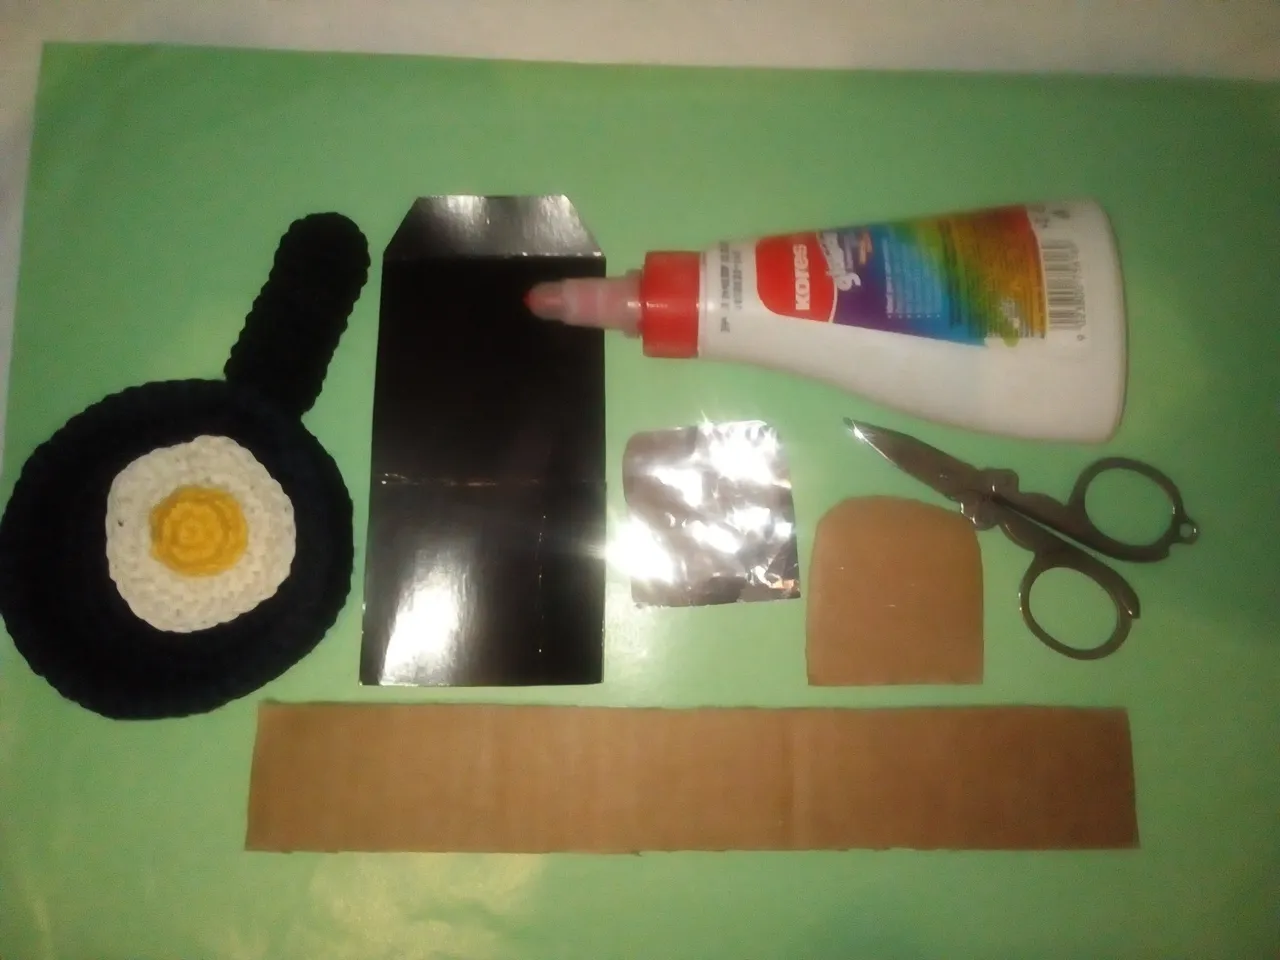
🍳 Los materiales que utilicé son:
❗ Pabilo. Azul oscuro, negro, blanco perla, amarillo.
❗ Aguja de crochet de 2,5 mm.
❗ Aguja lanera.
❗ Tijeras.
Este proyecto amerita conocimiento de los puntos básicos de crochet: pb (punto bajo), pd (punto deslizado), pa (punto alto), pma (punto medio alto). Se me ha dificultado conseguir pabilo en color blanco blanco. Se vería mucho mejor el huevito con ese color. 🍳
🍳 El procedimiento es sencillo. Cuando desees crear tus propios patrones, imagina tu proyecto, dibújalo e inicia lo más pronto posible. En mi caso aprovecho cada idea que vaya surgiendo, con la emoción del momento las ideas y los puntos fluyen de manera espontánea.
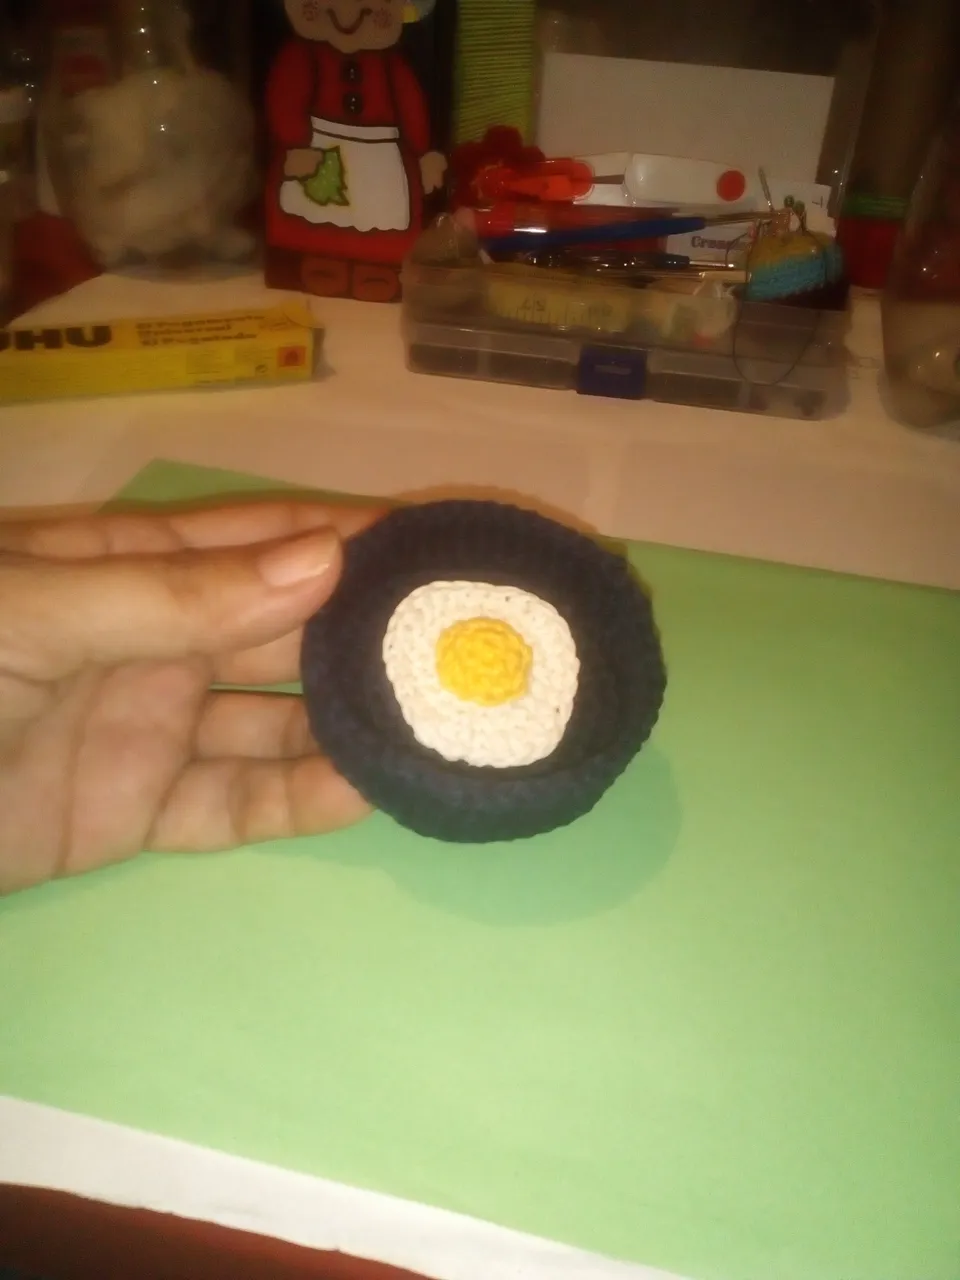
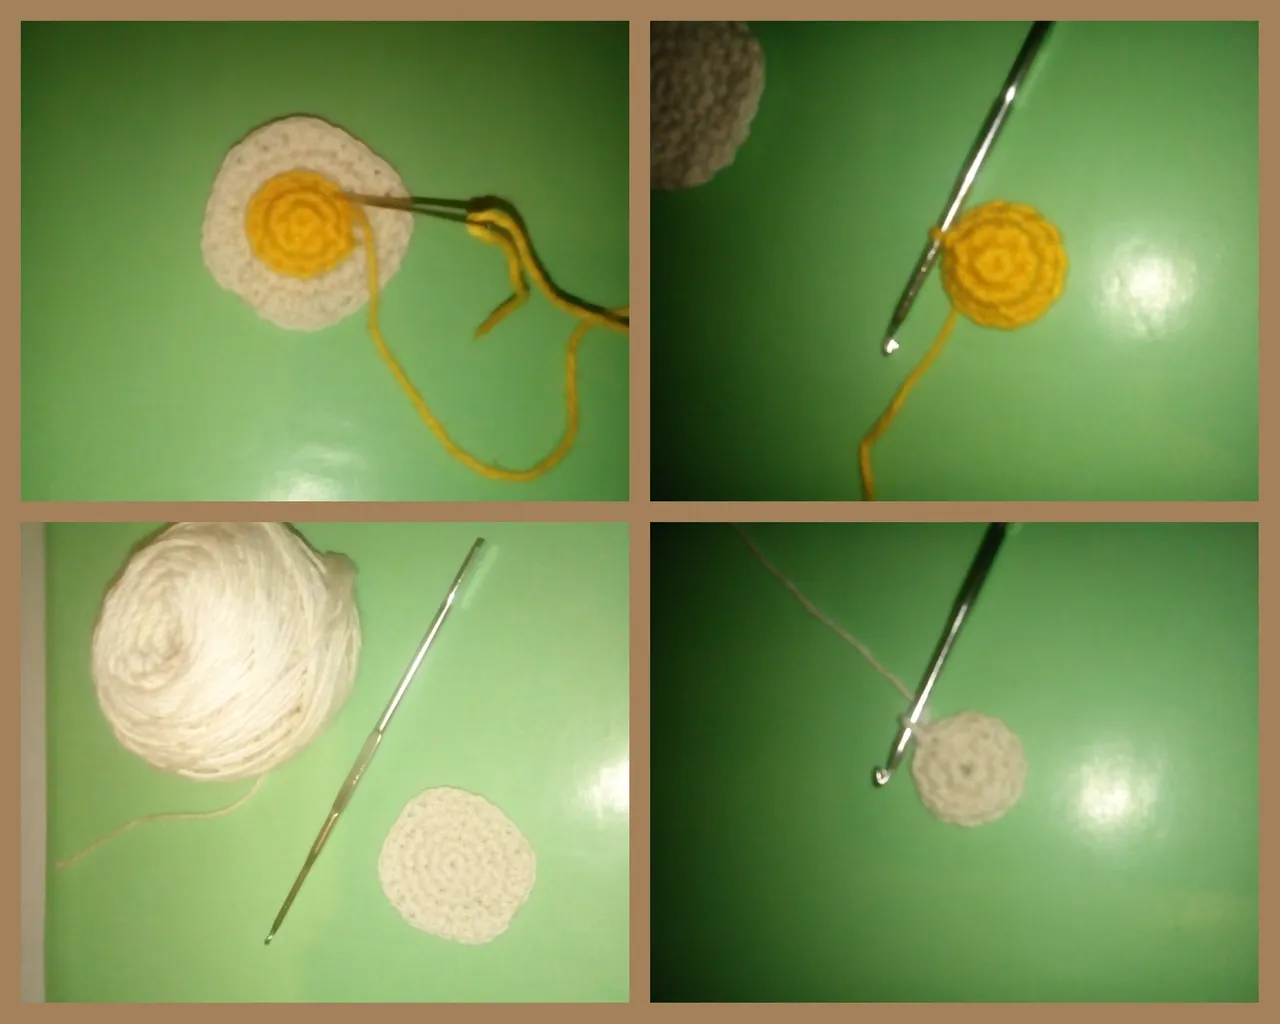
❗Empezamos tejiendo el huevo frito. Inicia con 6 pb en am.
❗ Haz 6 aum de pb.
❗ 1 pb-1 aum.
❗ 2 pb-1 aum.
❗ Repite la secuencia
1pb-1pma-2pa-1pma-3pb. Cierra la vuelta con 2paj luego del último pma.
❗ En color amarillo teje la ñema del huevo. Inicia con 6pb en am.
❗ Haz 6 aum de pb.
❗ Haz una vuelta de sólo pb.
❗ Cierra y deja la hebra larga para coser.
🍳 Cose la ñema en el centro de la clara. Usa la aguja lanera.

🍳 The materials I used are: ❗ Wick. Dark blue, black, pearl white, yellow.
❗ 2.5mm crochet hook.
❗ Yarn needle.
❗ Scissors.
This project requires knowledge of the basic crochet stitches: sc (single crochet), sl (slipped stitch), tr (double crochet), dc (medium double crochet). It has been difficult for me to get wick in white white color. The egg would look much better with that color. 🍳
🍳 The procedure is simple. When you want to create your own patterns, imagine your project, draw it and start as soon as possible. In my case, I take advantage of each idea that arises, with the emotion of the moment the ideas and points flow spontaneously.
❗We start by weaving the fried egg. Start with 6 sc in am.
❗ Do 6 inc of sc.
❗ 1 sc-1 inc.
❗ 2 sc-1 inc.
❗ Repeat the sequence 1bp-1pma-2pa-1pma-3pb. Close round with 2dc after last htr.
❗ In yellow color, knit the yolk of the egg. Starts with 6bp in am.
❗ Do 6 inc of sc.
❗ Make a round of just sc. ❗ Close and leave the long strand to sew.
🍳 Sew the yam in the center of the white. Use the yarn needle.
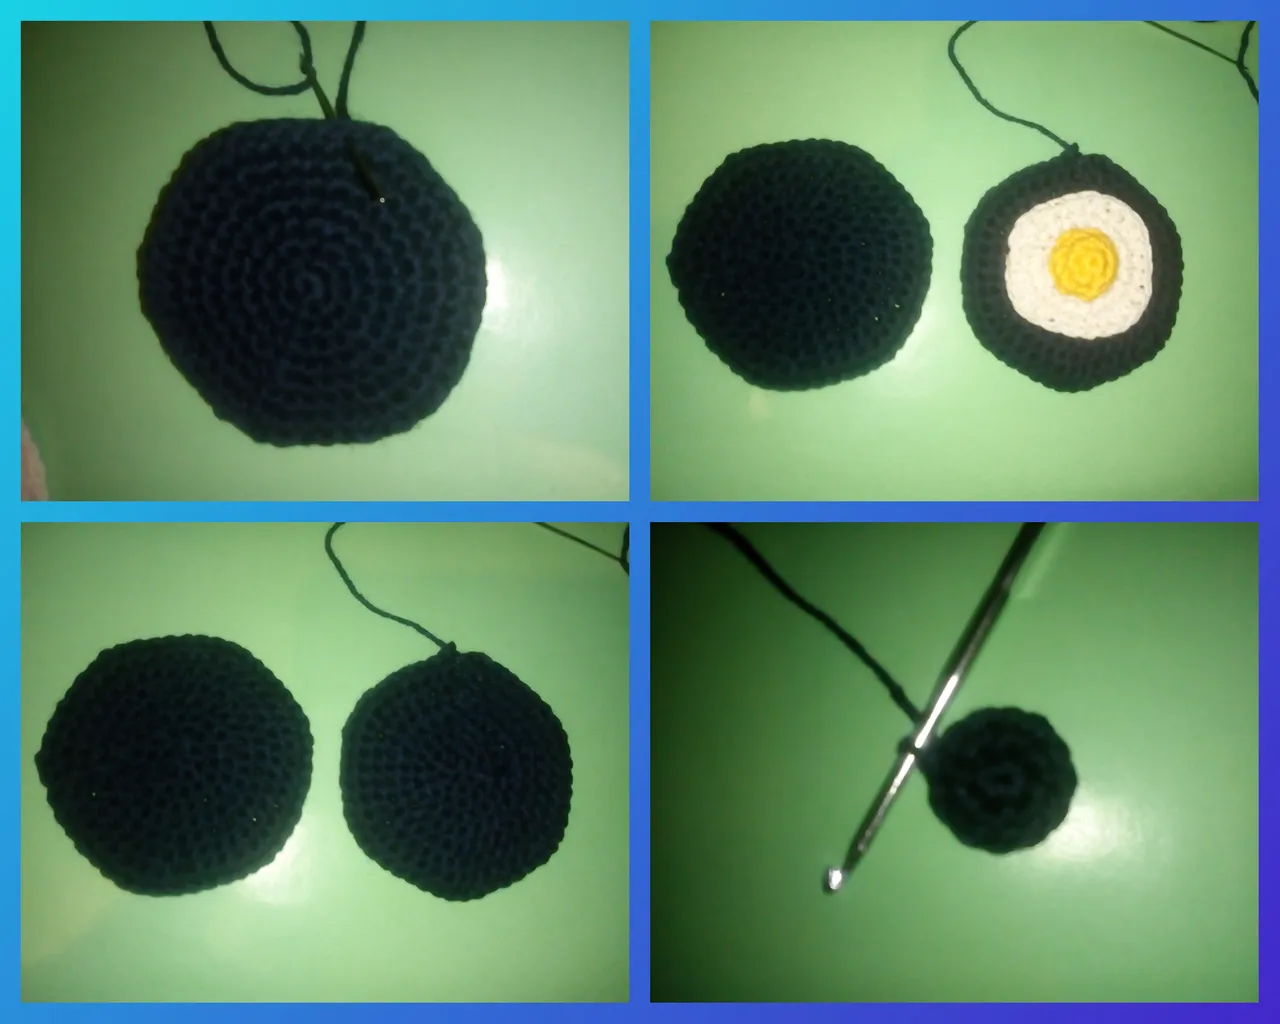
🍳 Para hacer el sartén usé hilo de color azul oscuro. Inicié por la base. Vamos a tejer dos piezas idénticas.
❗ Iniciamos con 6 pb en am.
❗ 6 aum de pb.
❗ Haremos 6 vueltas de aumentos. Empezando por el primero 1pb-1aum.
❗ Al terminar las seis vueltas de aumentos cerramos y rematamos.
❗ En una de las piezas dejaremos hebra para coser ambas piezas. La idea es hacer una base gruesa y dura.
❗ Colocamos reverso con reverso de ambas piezas y cosemos punto por punto con la aguja lanera.
❗ No olvides comprobar que el huevo frito entra cómodamente en el sartén 😁
🍳 To make the pan I used dark blue thread. I started at the base. We are going to knit two identical pieces.
❗ We start with 6 sc in am.
❗ 6 bp inc.
❗ We will do 6 rounds of increases. Starting with the first 1sc-1aum.
❗ At the end of the six rounds of increases, we close and finish.
❗ In one of the pieces we will leave a thread to sew both pieces. The idea is to make a thick and hard base.
❗ We put back to back of both pieces and sew point by point with the wool needle. ❗ Don't forget to check that the fried egg fits comfortably in the pan 😁
🍳 Enganchamos el hilo azul nuevamente e iniciamos las vueltas de pb. La primera la haremos tomando sólo la hebra de atrás.
❗ Levanta tres vueltas más de solo pb.
❗ Termina con una vuelta de pd.
❗ Cierra y remata.
❗ No olvides esconder las hebras sobrantes.
🍳 We hook the blue thread again on we start the rounds of sc. We will do the first one by taking only the back strand.
❗ Pick up three more rounds of just sc.
❗ Finish with a st turn.
❗ Close and finish.
❗ Don't forget to hide the excess strands.
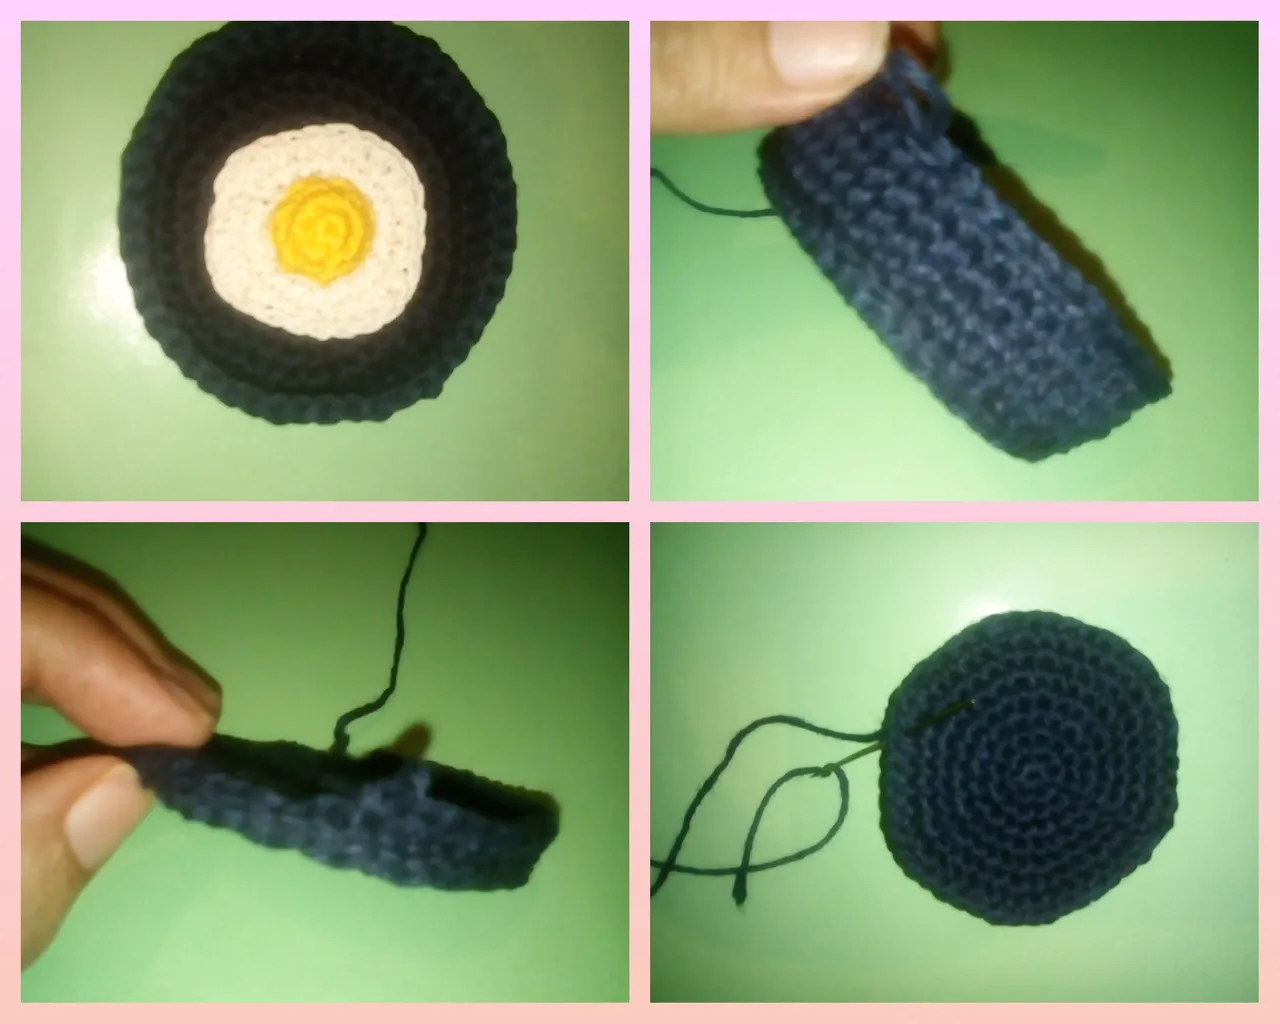
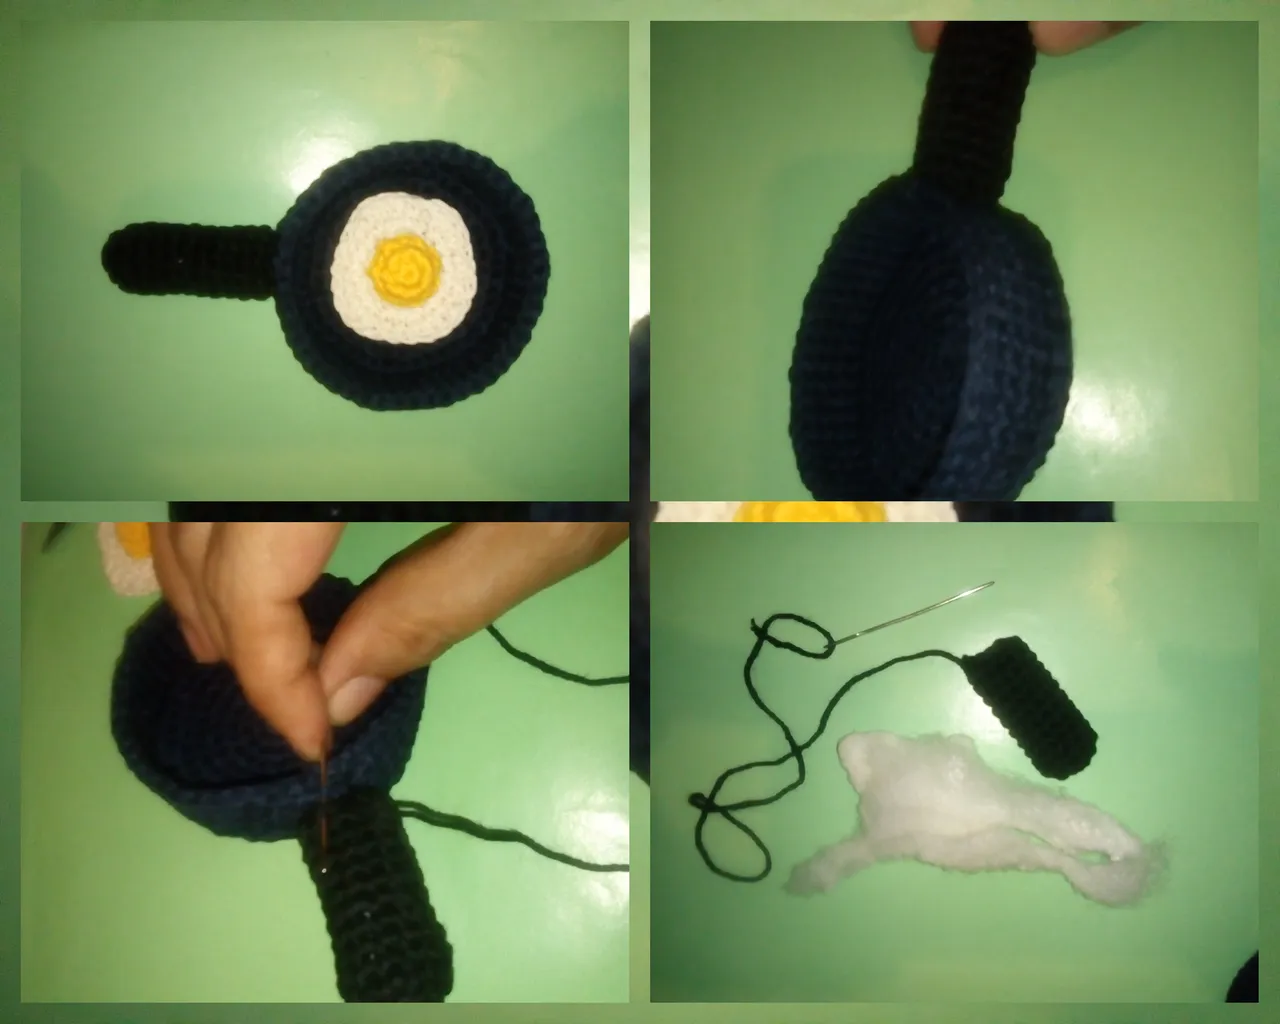
🍳 El asa o el mango del sartén lo tejí con hilo negro. Inicié con 6pb en am.
❗ Hice una vuelta de 6 aum de pb.
❗ Tejí diez vueltas de sólo pb.
❗ Coloqué algodón sintético.
❗ Cerré y dejé hebra para coser al sartén.
❗ Para coserlo utilicé la aguja lanera.
🍳 I wove the handle or the handle of the pan with black thread. I started with 6sc in am. ❗ I did a round of 6 inc of sc. ❗ I wove ten rounds of just sc. ❗ I placed synthetic cotton. ❗ I closed and left thread to sew to the pan. ❗ To sew it I used the wool needle.
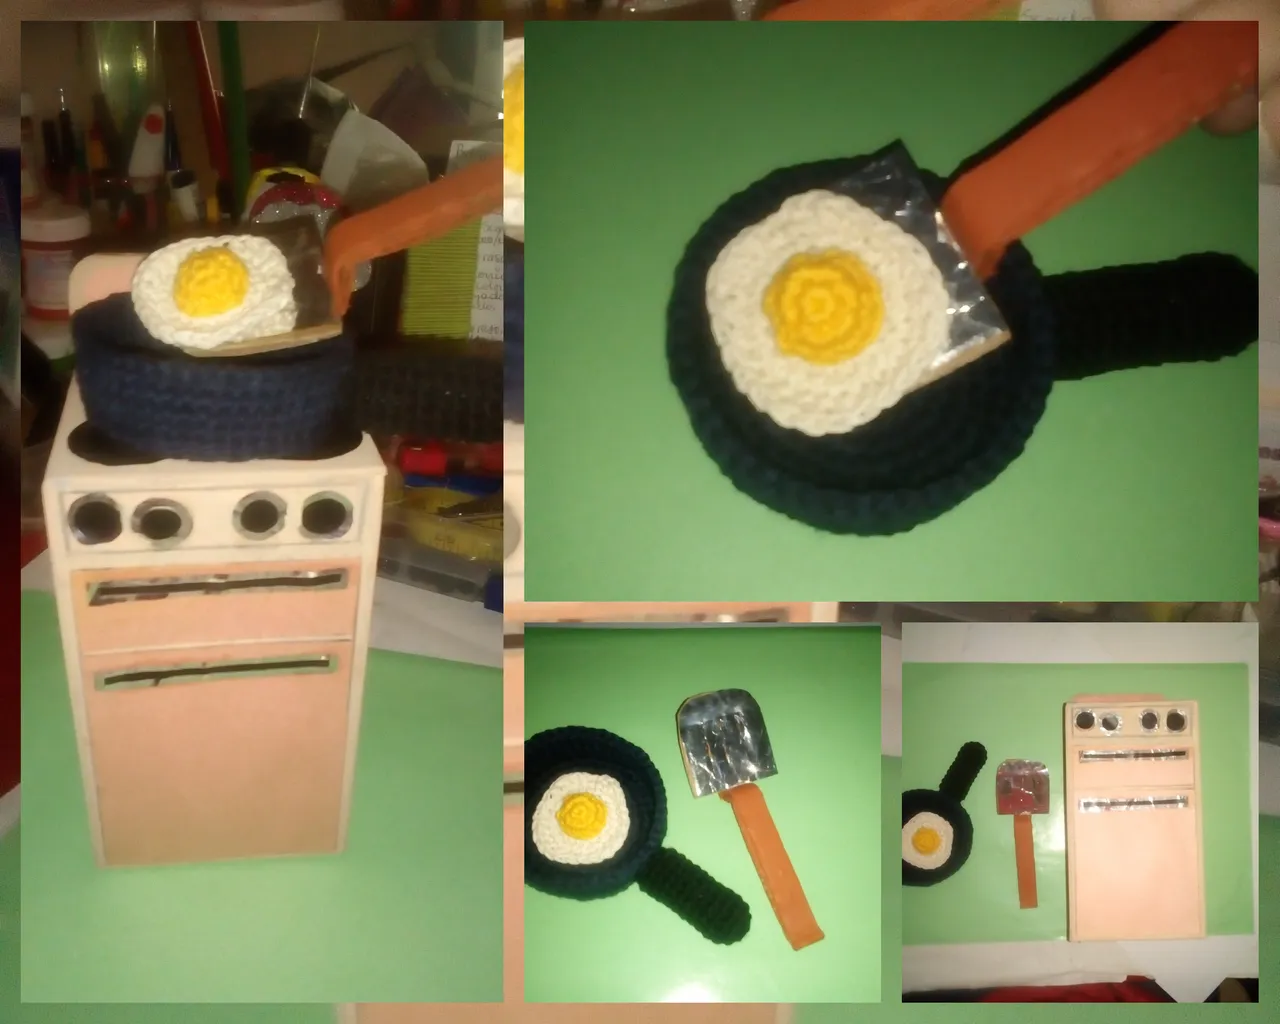
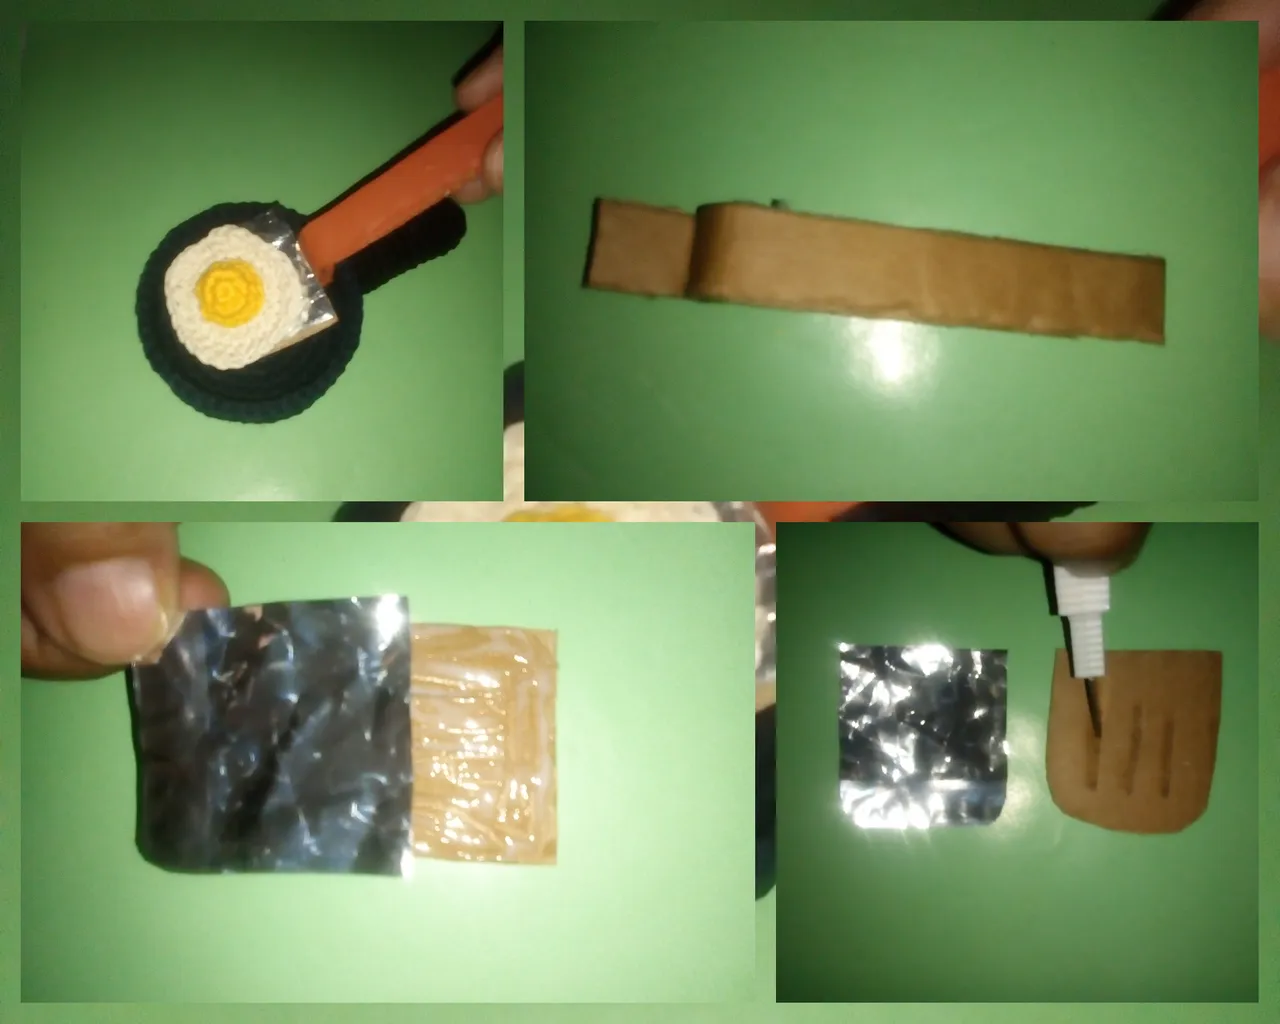
🍳 Cómo está muy caliente el huevito necesitamos un utensilio para sacarlo 😋
🍳 Con un poquito de cartón, papel de Pepito o Dorito plateado, pegamento, tijeras haremos el saca huevos.
🍳 I wove the handle or the handle of the pan with black thread. I started with 6sc in am. ❗ I did a round of 6 inc of sc. ❗ I wove ten rounds of just sc. ❗ I placed synthetic cotton. ❗ I closed and left thread to sew to the pan. ❗ To sew it I used the wool needle.
🍳 Recorta del mismo tamaño un trozo en cartón y en papel plateado.
🍳 Traza y corta tres líneas en ambos trozos.
🍳 Pega el papel sobre el cartón.
🍳 Haz el mango con cartón grueso. Procurando hacer el doblés (ver imagen)
🍳 Pega el mango al trozo de cartón. ¡Listo!
🍳 Cut a piece of cardboard and silver paper to the same size. 🍳 Draw and cut three lines on both pieces. 🍳 Glue the paper onto the cardboard. 🍳 Make the handle out of thick cardboard. Trying to do the double (see image) 🍳 Glue the handle to the piece of cardboard. Ready!
📸 Fotos de mi propiedad. Uso siempre traductor de Google. Edité con Polish, InCollage. Me gusta mucho compartirles mis creaciones. ¡Hasta pronto!
📸 Photos of my property. I always use Google translator. I edited with Polish, InCollage. I really like to share my creations with you. See you soon!