¡Bienvenido a mi blog!
Feliz día Domingo por la mañana a todos los que forman parte esta linda comunidad #needlework, deseo que hayan amanecido bien, junto a toda su familia. Dios les bendiga.
Welcome to my blog!
Happy Sunday morning to all of you who are part of this beautiful #needlework community, I wish you a good morning, along with all your family. God bless you all.
Tenía tiempo sin participar en esta hermosa comunidad, pero llegó el día.
No soy experta en costura, pero me gusta y siempre estoy comprando telas, algunas prendas que he hecho me salen bien y otras no tan bien. Pero se que con perseverancia e insistencia algún día lo lograré.
Hoy quiero mostrar como hacer una linda falda larga de tubo , sin patrón , de forma sencilla y rápida.
La confeccionó para mi , las faldas en forma de tubo , son muy linda , las veo puesta a otra persona y me llaman mucho la atención. Esta falda como es para mi no la haré tanto de tubo, pero sí explicaré qué deben hacer para que le quede completamente de esa forma.
Espero que le gusten, no tiene ningún grado de dificultad al hacerla , solo se necesitan ganas y mucho amor por la costura.
¡Ahora a la confección!
I had some time without participating in this beautiful community, but the day has come.
I am not an expert in sewing, but I like it and I am always buying fabrics, some garments that I have made come out well and others not so well. But I know that with perseverance and insistence someday I will succeed.
Today I want to show you how to make a nice long tube skirt, without pattern, in a simple and quick way.
I made it for me, the skirts in the form of tube, are very cute, I see them put to another person and call me much attention. This skirt as it is for me I will not make it so much tube, but I will explain what to do to make it completely that way.
I hope you like them, it has no degree of difficulty to make it, you only need desire and love for sewing.
Now to the confection!
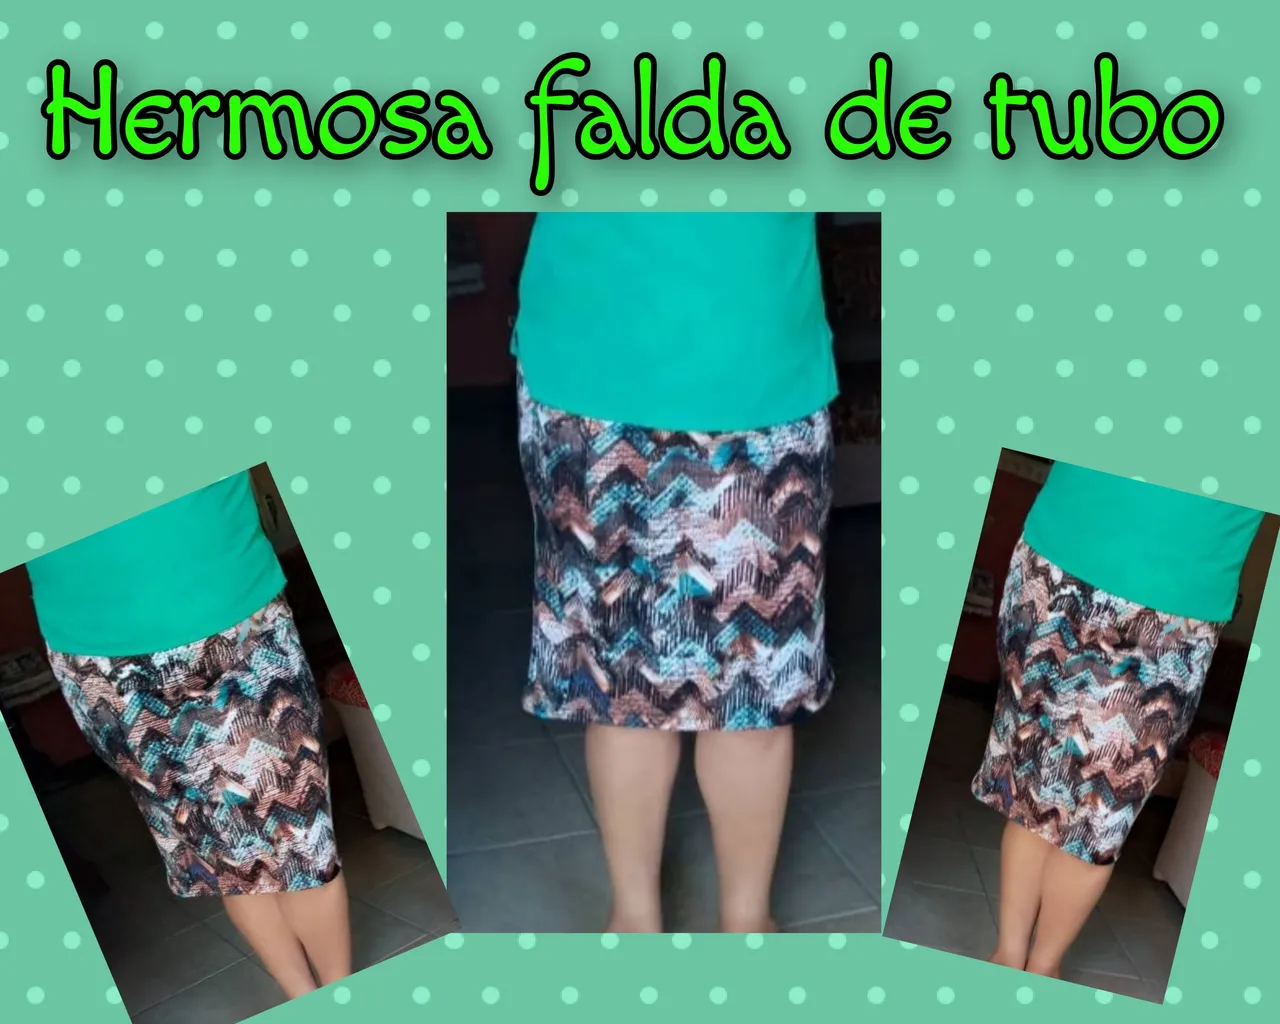
Hermosa falda de tubo sin patrón con elástico,sencilla y rápida de hacer.
Beautiful tube skirt without pattern with elastic, simple and quick to make.
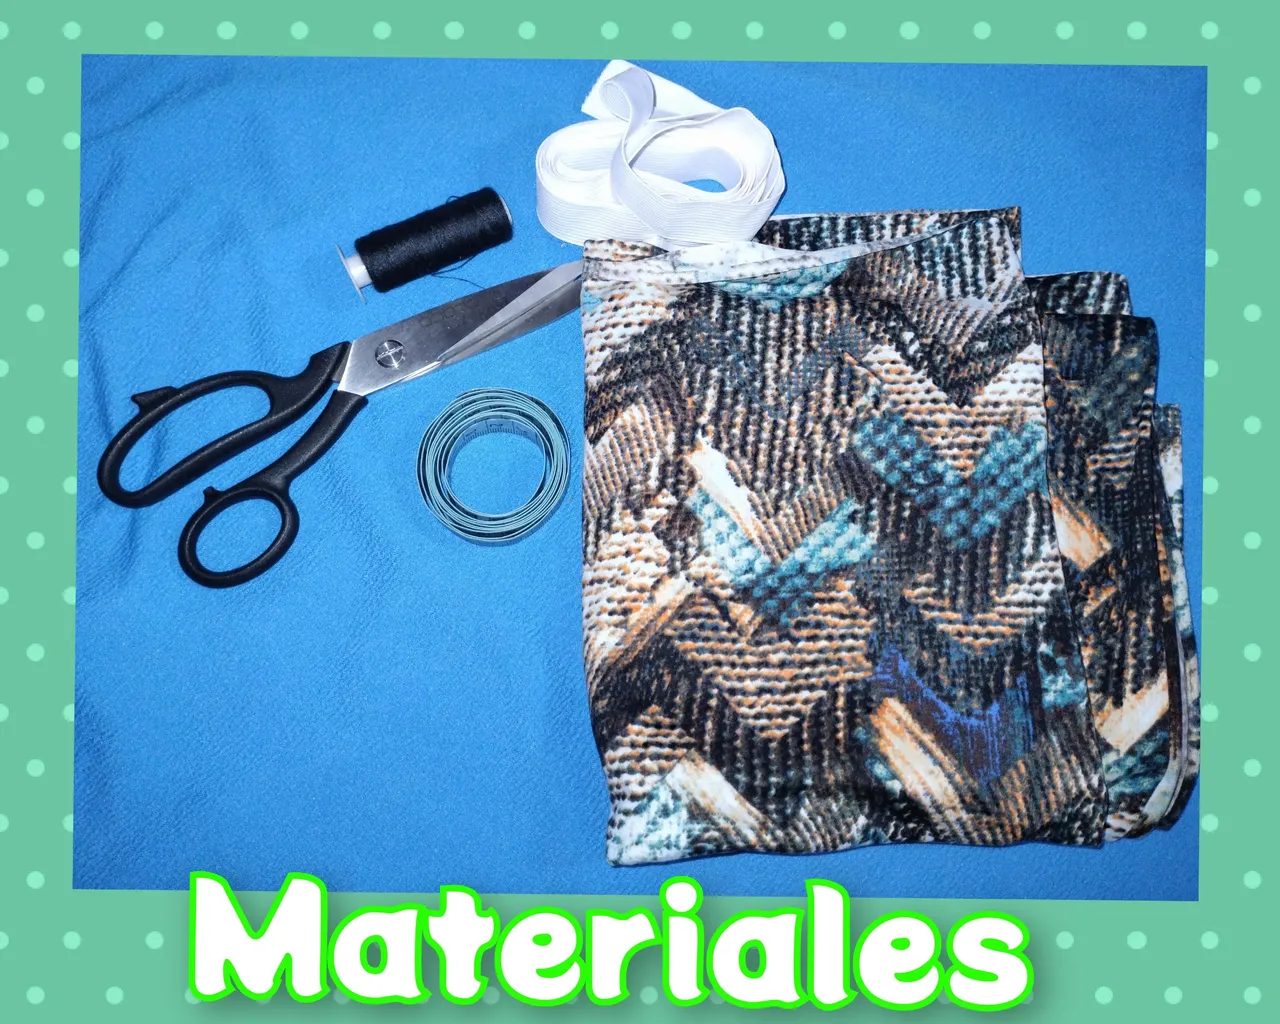
Materiales para la confección de la falda:
- 70 cm de tela beverly estampada.
- Tijera.
- 1 metro de elástico.
- Hilo color negro.
- Cinta métrica.
Materials for making the skirt:
- 70 cm of printed beverly fabric.
- Scissors.
- 1 meter of elastic.
- Black thread.
- Measuring tape.
Paso a paso para la confección de la falda:
Para la confección de la falda utilicé la tela llamada Beverly estampada ,es una tela elástica y gruesa , sirve para realizar faldas y pantalones, quedan muy bonitos.
Paso 1:
La falda es sin patrón , utilicé otra falda como medida.
Doblar la tela a lo largo del ancho, colocamos la falda doblada por la mitad ,sobre la tela también doblada, haciendo coincidir el doblez de la tela con el doblez de la falda.
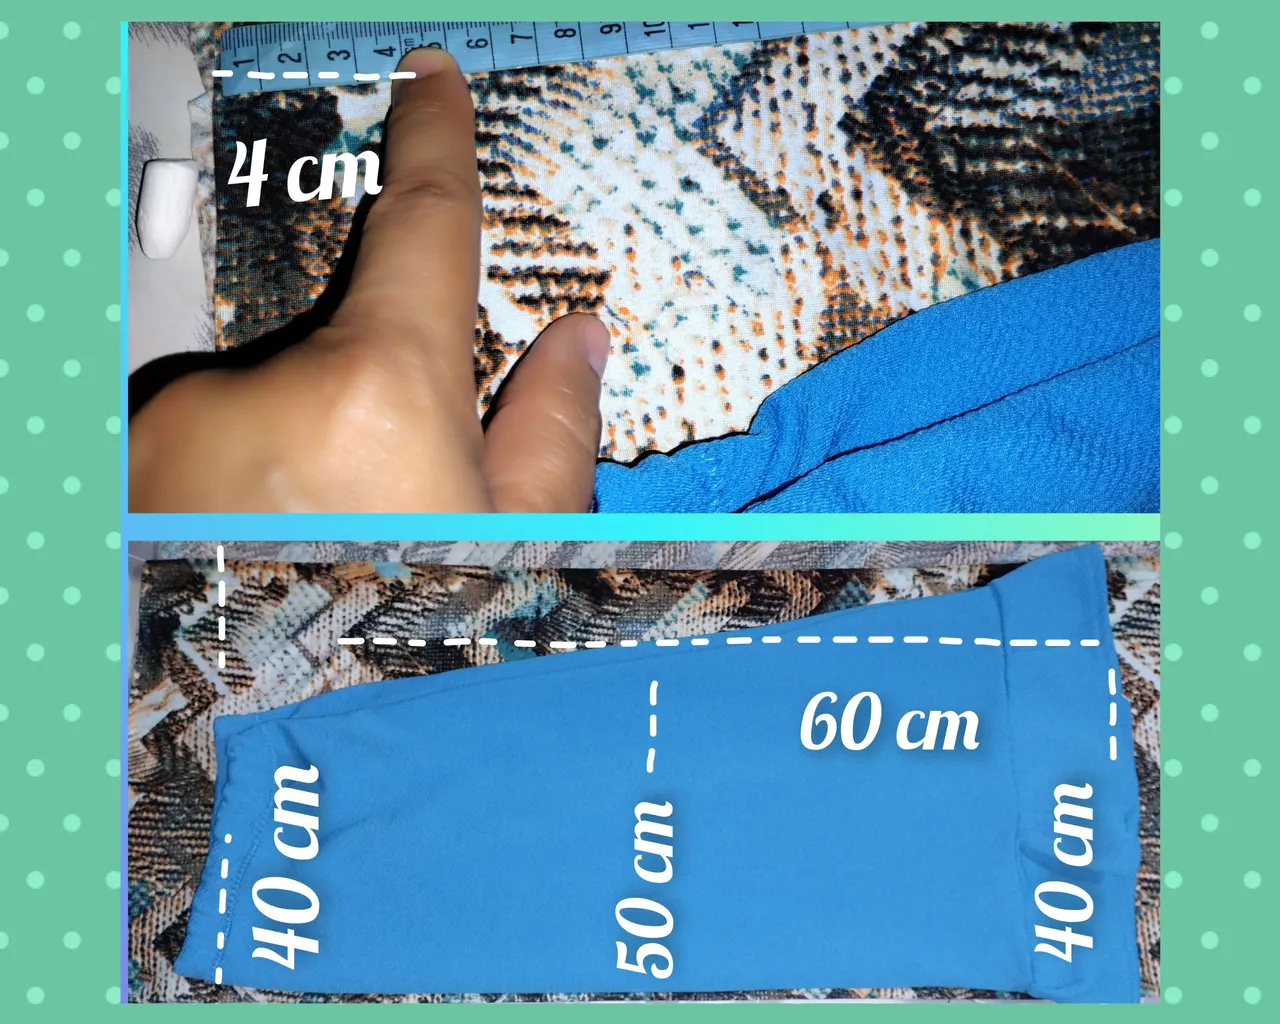
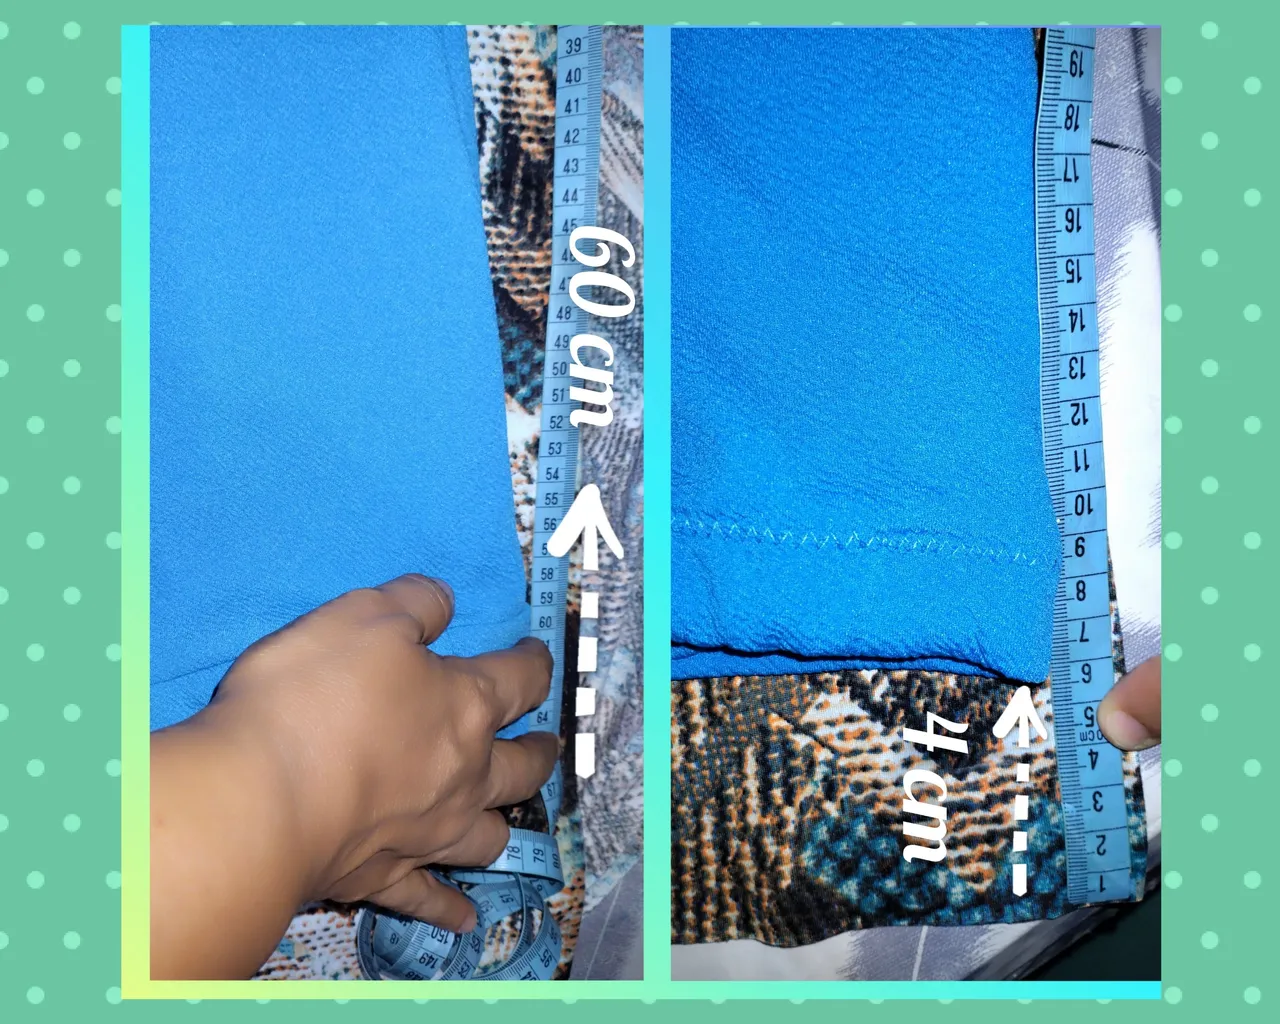
Medimos con la cinta métrica 4 centímetros en la parte de arriba , esto es para poner el elástico, luego de aquí medimos el largo : 60 centímetros.Ahora marcamos el margen superior de la falda 40 cm y la curva de la cadera: 50 cm .
Y para la parte de abajo : 40 cm.
Nota: todas estas medidas son para mi , deben adaptar sus medidas, si vana realizar una falda ( cintura, cadera , largo y dependiendo que tubo la quieran)
Step by step for the making of the skirt:
For the making of the skirt I used the fabric called Beverly printed ,it is an elastic and thick fabric , it is used to make skirts and pants, they look very nice.
Step 1:
The skirt is without pattern, I used another skirt as a measure.
Fold the fabric along the width, place the skirt folded in half, on the fabric also folded, matching the fold of the fabric with the fold of the skirt.
We measure with the measuring tape 4 centimeters at the top, this is to put the elastic, then from here we measure the length: 60 centimeters, now we mark the top margin of the skirt 40 cm and the curve of the hip: 50 cm.
And for the bottom : 40 cm.
Note: All these measurements are for me, you must adapt your measurements if you are going to make a skirt (waist, hip, length and depending on which tube you want it).
Paso 2:
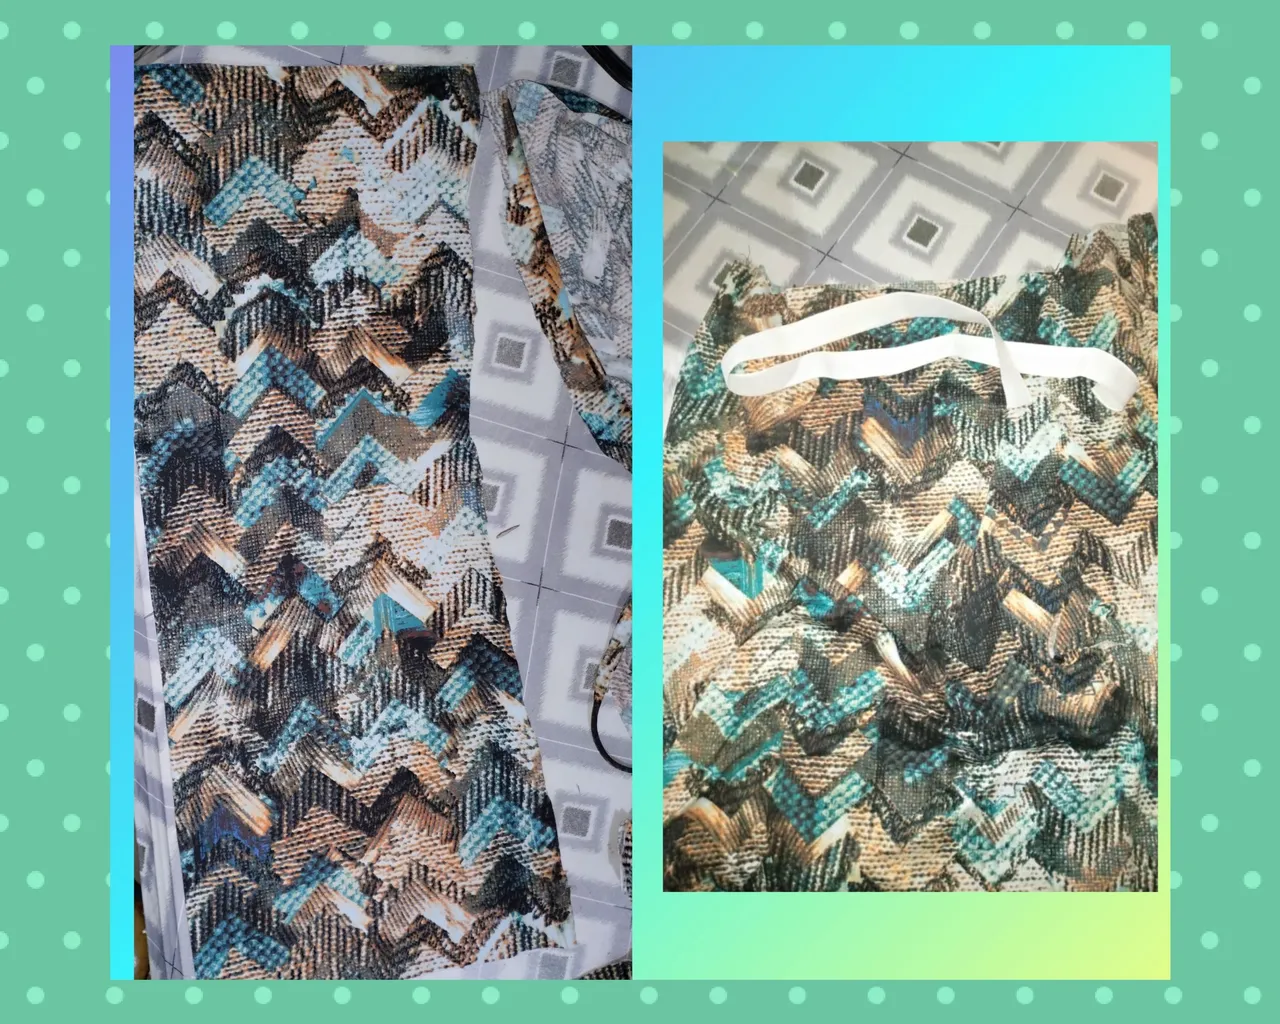
Con la tijera cortar la tela marcada , dejar un centímetro para la costura, esto sería la parte delantera, corta otro pedazo de tela igual que esta para la parte trasera.
Step 2:
With the scissors cut the marked fabric, leave one centimeter for the seam, this would be the front part, cut another piece of fabric the same as this one for the back part.
Paso 3:
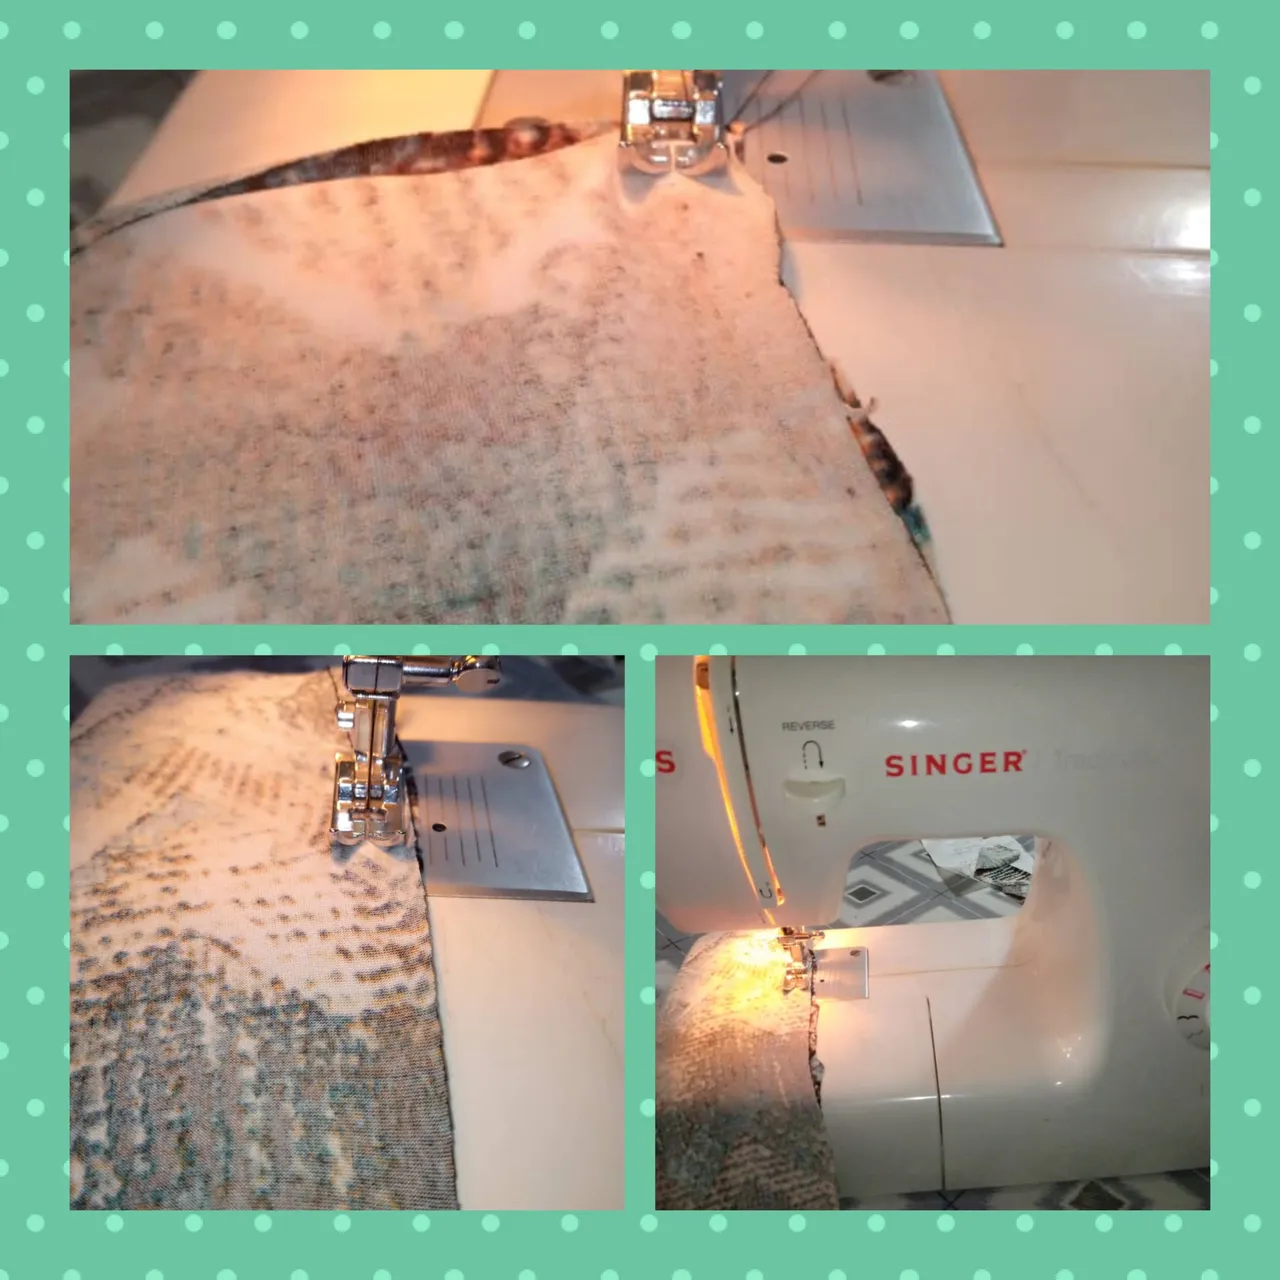
Después de cortada las dos piezas de la tela, colocar derecho con derecho y comenzar a coser por los bordes en ambos lados. Coloque un zigzag por la orilla de la tela.
Step 3:
After cutting the two pieces of fabric, place right sides together and start sewing along the edges on both sides. Place a zigzag along the edge of the fabric.
Paso 4:
Continuamos con la confección de la falda para las personas que le gustan las faldas pegadas en la parte de las piernas , pueden coser mas, osea reducir centímetros.
Medimos el contorno de la parte superior de la falda o de cintura para cortar el elástico en mi caso es 40 cm , deben dejar 3 cm más para un total de 43 centímetros.
Para pegar el elástico ,unir las puntas con costura.
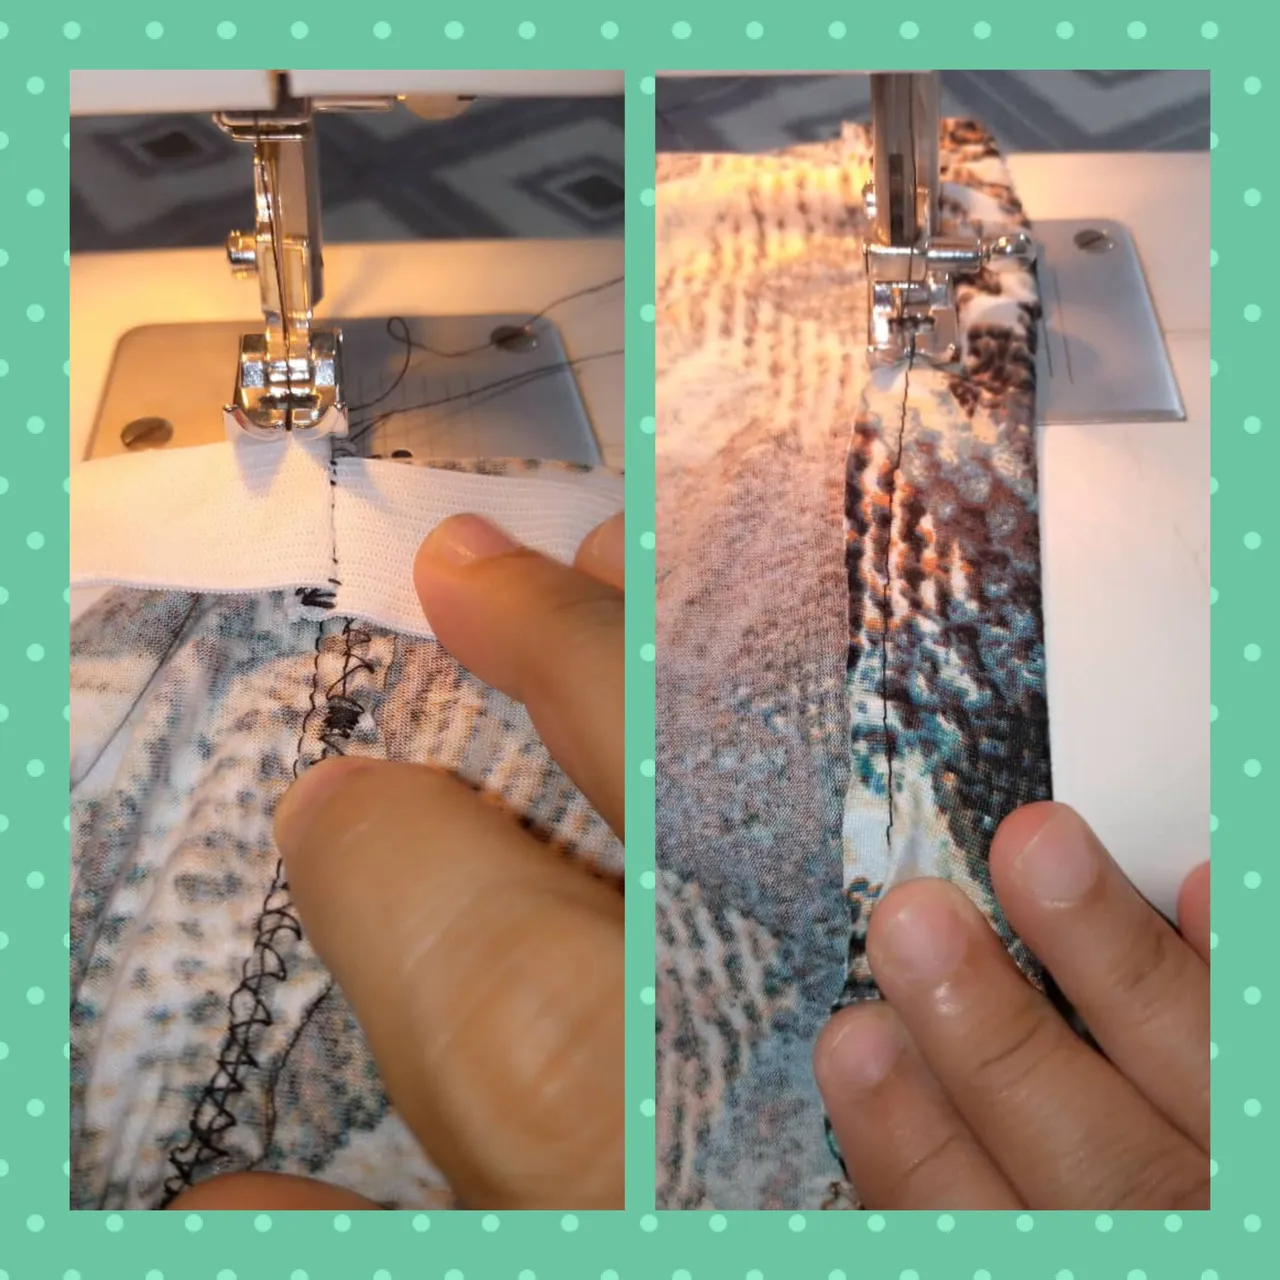
Marcar los cuartos del elástico en la falda, coser una puntada en cada lado de la falda, luego hacia el frente y hacia atrás, esto es para que el elástico esté bien distribuido en la falda, cosemos una puntada en forma de zigzag por el margen superior de la falda , luego doblamos la parte superior y cosemos otro zigzag en la parte que doblamos.
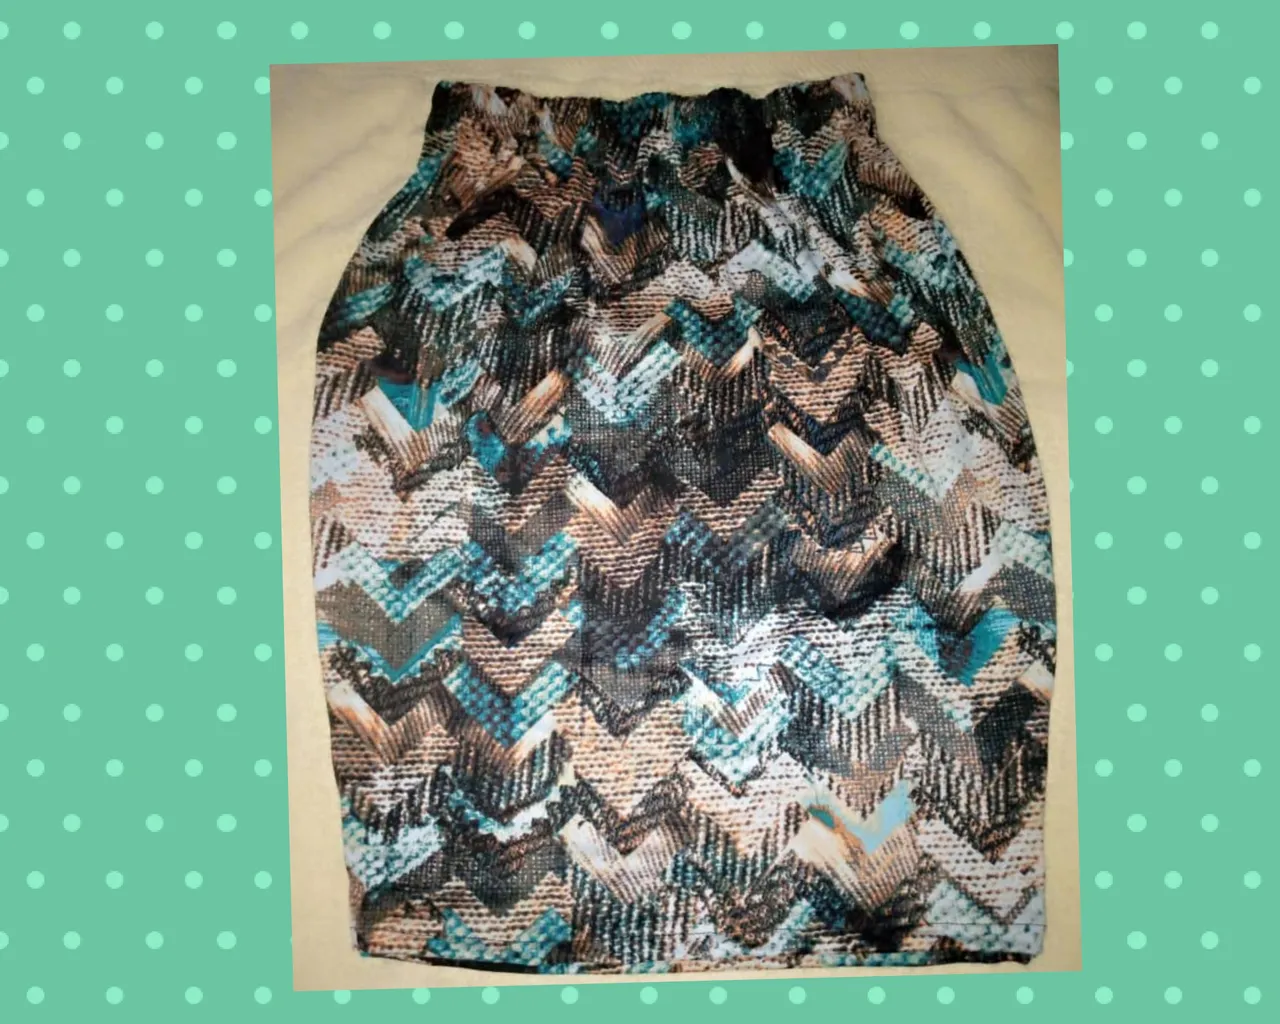
Y ya está lista la falda de tubo.
Step 4:
We continue with the making of the skirt for people who like the skirts attached in the part of the legs, you can sew more, ie reduce centimeters.
We measure the contour of the top of the skirt or waist to cut the elastic in my case is 40 cm, should leave 3 cm more for a total of 43 centimeters.
To attach the elastic, join the ends with stitching.
Mark the quarters of the elastic on the skirt, sew a stitch on each side of the skirt, then to the front and back, this is so that the elastic is well distributed in the skirt, sew a zigzag stitch along the top edge of the skirt, then fold the top and sew another zigzag on the part that we folded.
And the tube skirt is ready.
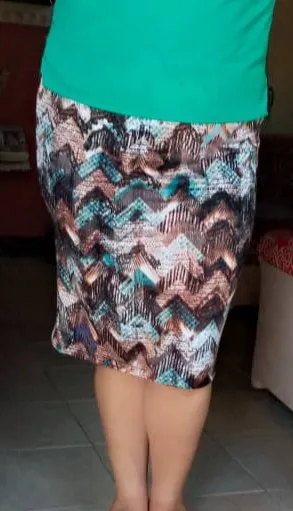
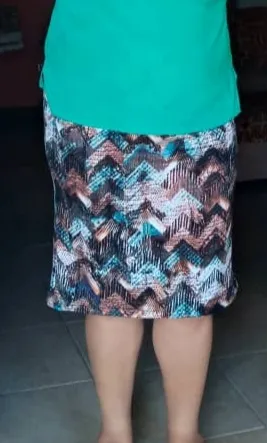
Resultado final de la falda de tubo , vieron lo linda que se ve.
End result of the tube skirt, you saw how cute it looks.
Gracias por leer mi post, espero que les guste, muchas bendiciones, hasta la próxima.
Thank you for reading my post, I hope you like it, many blessings, see you next time.

Las fotos son mías , tomadas con telefono Infinix, editadas con incollage y traducidas con DEEPL.
The photos are mine, taken with Infinix phone, edited with incollage and translated with DEEPL.