Hello friends I hope you are well, many times we need to cut a little wood to make an arrangement in the house and we do not have a saw at the moment, well friends, so you do not have those problems, today I am going to give you a great idea with Just use a soda lid, a screw and two washers, it's that simple, what I want to teach you to do is a small disk to cut wood and plastics, with this disk you can cut wood up to 5 millimeters thick, I invite you to that you try to do it yourself and you will be surprised of its usefulness without spending money.
Hola amigos, espero que estén bien, muchas veces necesitamos cortar algunas maderas para hacer algún arreglo en la casa y no tenemos para el momento una sierra, bueno amigos, para que no tengan esos inconvenientes, hoy les voy a dar una magnifica idea con tan solo usar una tapa de refresco, un tornillo y dos arandelas, así de sencillo, lo que quiero enseñarles a hacer es un pequeño disco para cortar madera y plásticos, con este disco podrán cortar maderas hasta de 5 milímetros de espesor, los invito a que intenten hacerlo ustedes mismos y se quedarán sorprendidos de su utilidad y sin tener que gastar dinero.
How to Make a Serrated Disc for Cutting Wood and Plastics.||Cómo hacer un disco dentado para cortar madera y plásticos.
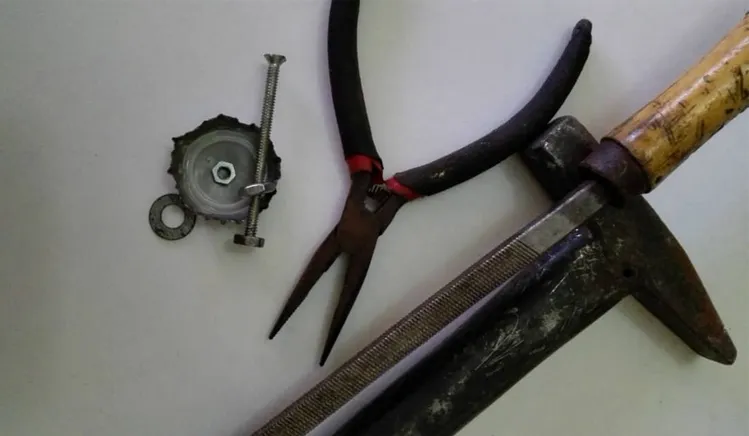
| Materials and tools: | Materiales y herramientas: |
|---|---|
| - A metal soda lid | - Una tapa metálica de refresco. |
| - A bolt 6 cm long and 3 mm thick, with a nuts and two washers. | - Un tornillo de 6 cm de largo y 3 mm de espesor, con una tuerca y dos arandelas. |
| - Hammer. | - Martillo. |
| - Iron file . | - Lima de hierro. |
| - Electric drill. | - Taladro eléctrico. |
| Process: | Proceso |
|---|---|
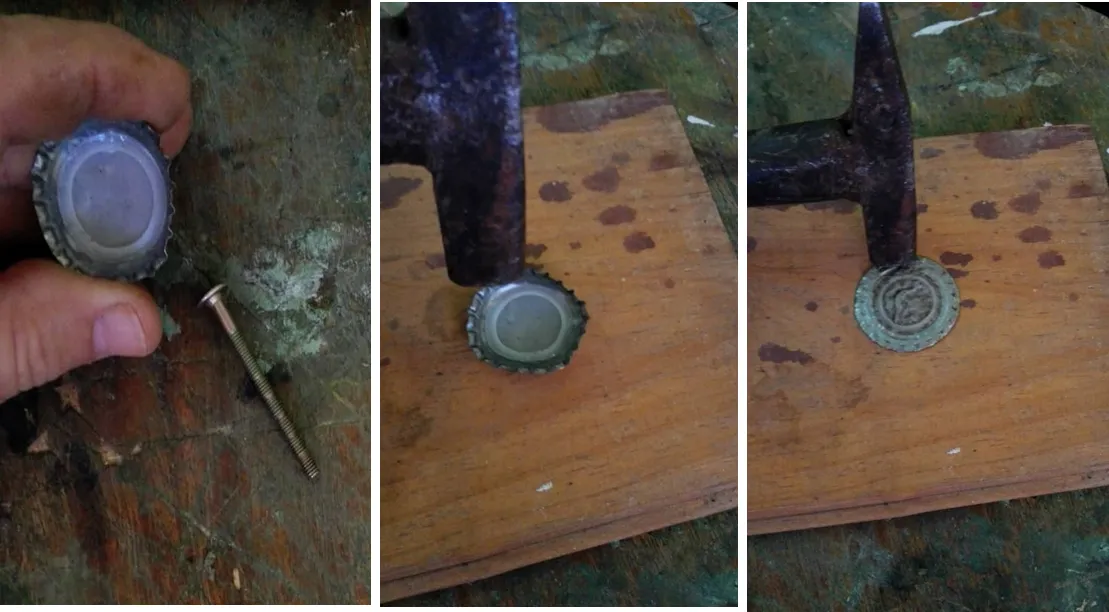
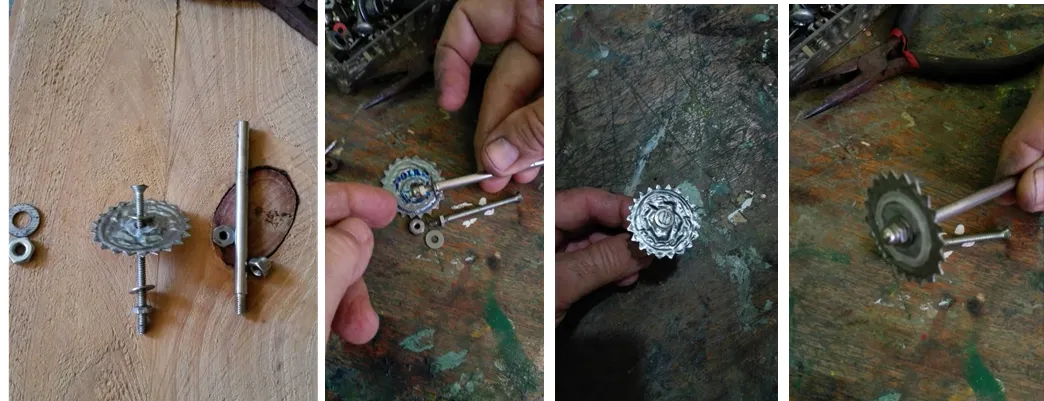
| Step-1: The first thing we would do is the easiest, find a small soda cap, now we try to flatten it with the use of the pliers and the hammer, we must make sure that the lid is well stretched, after this simple process we can see that the lid has become a disk. | Paso-1: Lo primero que haríamos es lo más fácil, buscar una pequeña tapa de refresco, Ahora intentamos aplanarla con el uso de la pinza y el martillo, debemos asegurarnos que la tapa esté bien estirada, luego de este simple proceso podemos ver que la tapa se ha convertido en un disco. |
| Step-2: In this step we are going to drill the center of the disk that we have just made, taking into account the diameter of the screw that we are going to use. | Paso-2: En este paso vamos a perforar el centro del disco que acabamos de hacer, teniendo en cuenta el diámetro del tornillo que vamos a utilizar. |
|---|
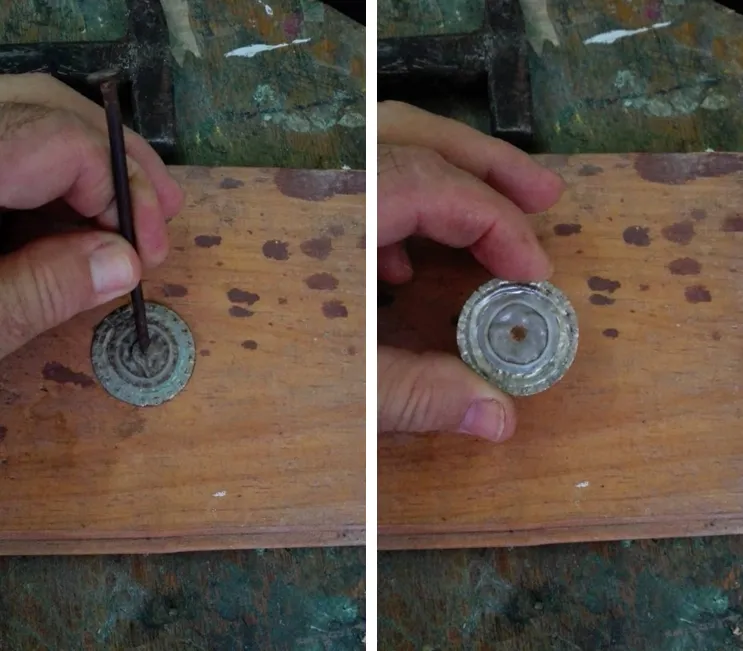
| Step-3: If you look carefully at the disk we just made, we can see some small stripes on the edge, these marks will serve as guides to make the teeth of this disk. To make these teeth we are going to use the file, with this tool we will carefully open some triangular grooves so that the teeth are formed, as you can see in the images: | Paso-3: Si observas con cuidado el disco que acabamos de hacer, podemos ver unas pequeñas rayas en el borde, estas marcas nos servirán de guías para hacer los dientes de este disco. Para realizar estos dientes vamos a utilizar una lima, con esta herramienta abriremos con cuidado unas ranuras triangulares para que se formen los dientes, como podéis ver en las imágenes: |
|---|

| Step-4: Well friends, since we have the disc with its teeth and with the hole in the center, the next thing will be to fix this toothed disc on the screw, the screw can be completely threaded or only on the tip and the rest smooth, as you can see in the images, but with either of these two options it works. To assemble the disc, First we place one of the washers on the screw, then the disc and finally, we place the other nut with washer and tighten it well. | Paso-4: Bueno amigos, ya que tenemos el disco con sus dientes y con el agujero en el centro, lo siguiente será fijar este disco dentado en el tornillo, el tornillo puede ser con rosca completa o solo con rosca en la punta y el resto liso, como puedes ver en las imágenes, pero con cualquiera de estas dos opciones funciona. Para armar el disco, primero colocamos una de las arandelas en el tornillo, luego el disco con la otra tuerca con arandela y la apretamos bien. |
|---|
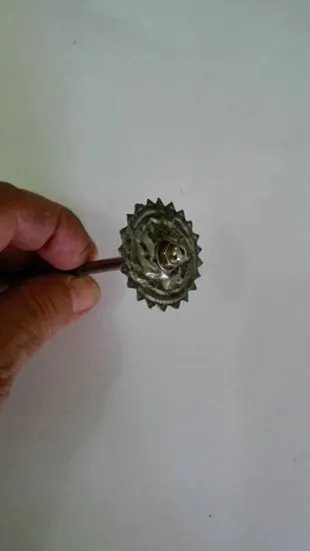
Images of the final finish of the toothed disc for cutting wood and plastics. || Imágenes del acabado final del disco dentado para cortar maderas y plásticos.
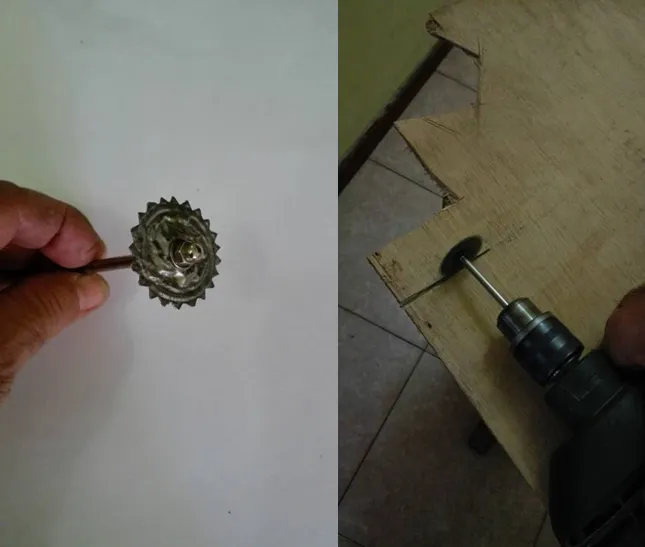
Use of toothed disc with electric drill:
Now that the toothed disc is ready, let's do a practice, for this it is necessary to place this piece in the chuck of the electric drill and find a piece of wood to make several cuts and thus be able to show you that it is worth It is worth having this piece at home, let's see the images:
Uso del disco dentado con taladro eléctrico:
Ahora que el disco dentado está listo, hagamos una práctica, para ello es necesario colocar esta pieza en el mandril del taladro eléctrico y buscar una pieza de madera para hacer varios cortes y así poder demostrarte que vale la pena tener esta pieza en casa, veamos las imágenes:

I hope you liked the idea of this album and you can do it yourself at home, greetings and God bless you.
Espero que les haya gustado esta idea de este disco y puedan ustedes mismos hacerlo en casa, saludos y que Dios los bendiga.
The content of this publication is 100% original
El contenido de esta publicació es 100% original