Hello my loves I hope you are all well and I welcome you once again to my blog, tonight I want to present a nice and practical craft work where one of the main recycling materials, how is the plastic specifically a soda bottle, then I came up with the idea of developing a nice and practical gift box where we will allow us to introduce in the same some detail of candy, chocolates, clothes, watch, jewelry, among others, this work is ideal to give to that special person in our life, at some special moment to celebrate or share with that loved one, so I encourage and invite you to join me during the development of this publication and the most important thing is that you can put it into practice in your homes and surprise that loved one.
Hola mis amores espero que todos se encuentren bien y les doy la bienvenida una vez más a mi blog, la noche de hoy quiero presentarles bonito y práctico trabajo de manualidades donde uno de los principales materiales de reciclaje, cómo es el plástico específicamente una botella de refresco, pues se me ocurrió la idea de elaborar una bonita y práctica cajita de regalo dónde nos va a permitir introducir en la misma algún detalle de caramelos, chocolates, prendas, reloj, joyas, entre otras, este trabajo es ideal para obsequiar a esa persona especial en nuestra vida, en algún momento especial a celebrar o compartir con ese ser amado, así que les ánimo e invito a que me acompañen durante el desarrollo de esta publicación y lo más importante es que ustedes puedan ponerla en práctica en sus hogares y sorprendan a esa persona querida.
Materials:
Empty plastic soda bottle, pencil, marker, scissors, exacto, red/white frosted foami, red ribbon, recycled box cardboard, thin red ribbon, Pearl type rhinestones, silicone, thread, needle.
Materiales:
Botella plástica de refresco vacía, lápiz, marcador, tijera, exacto, foami escarchado rojo/blanco, cinta roja, cartón de caja reciclada, cinta delgada roja, pedrería tipo Perla, silicón, hilo, aguja.
Step by step:
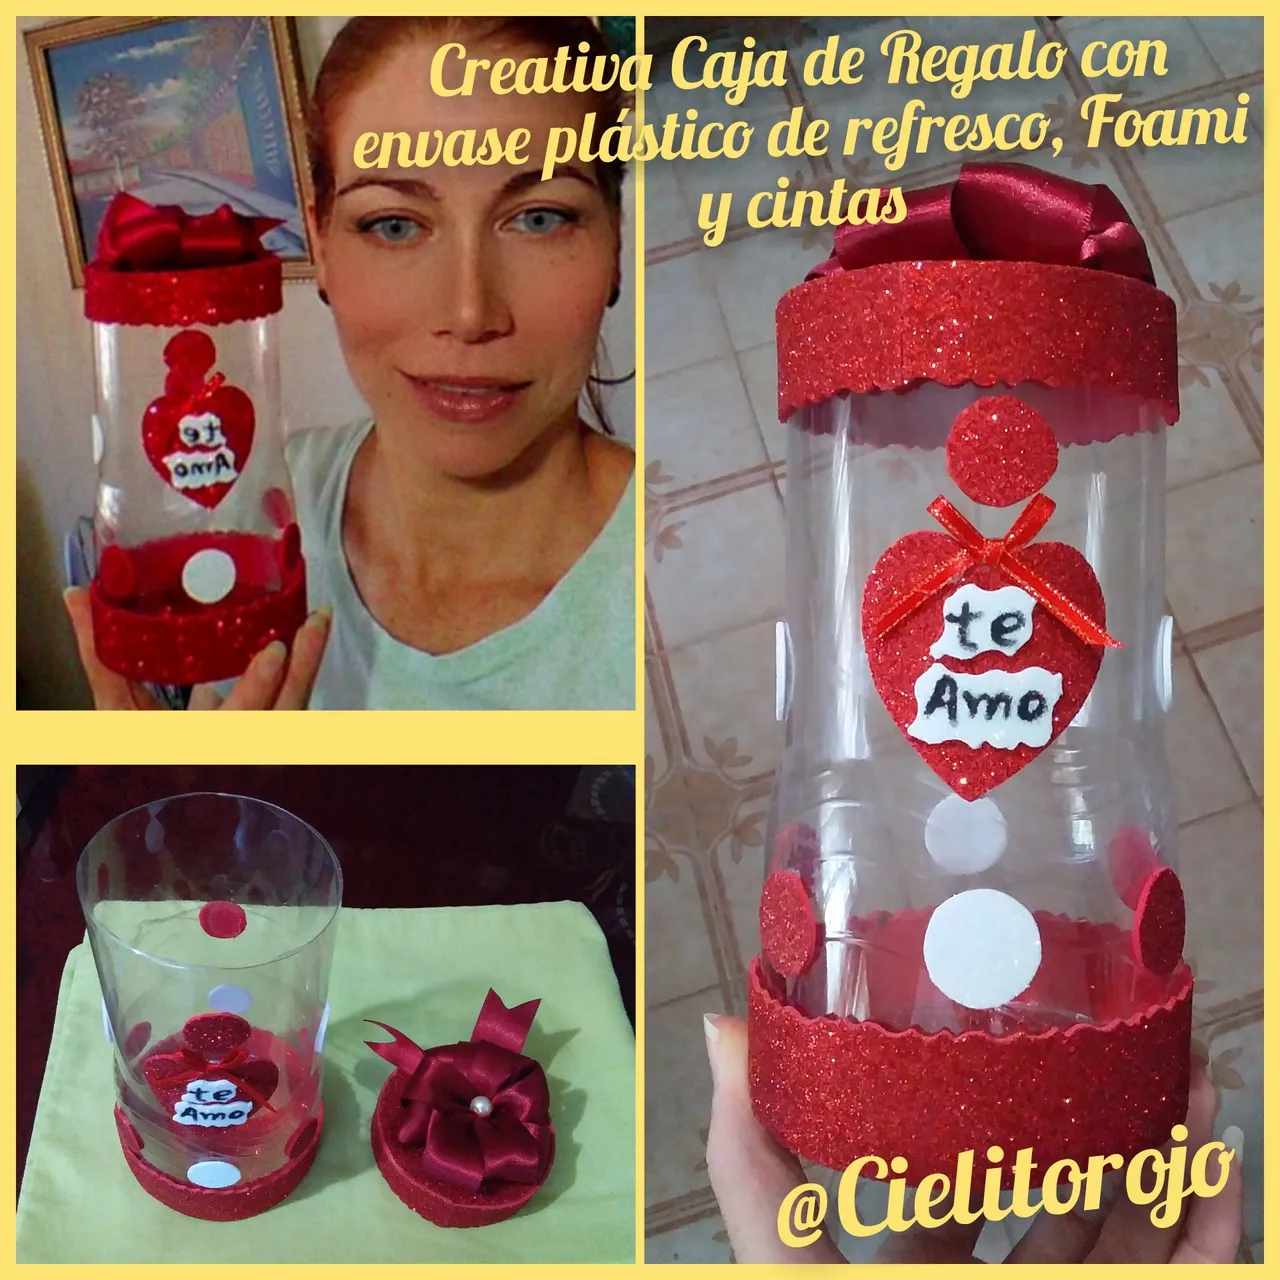
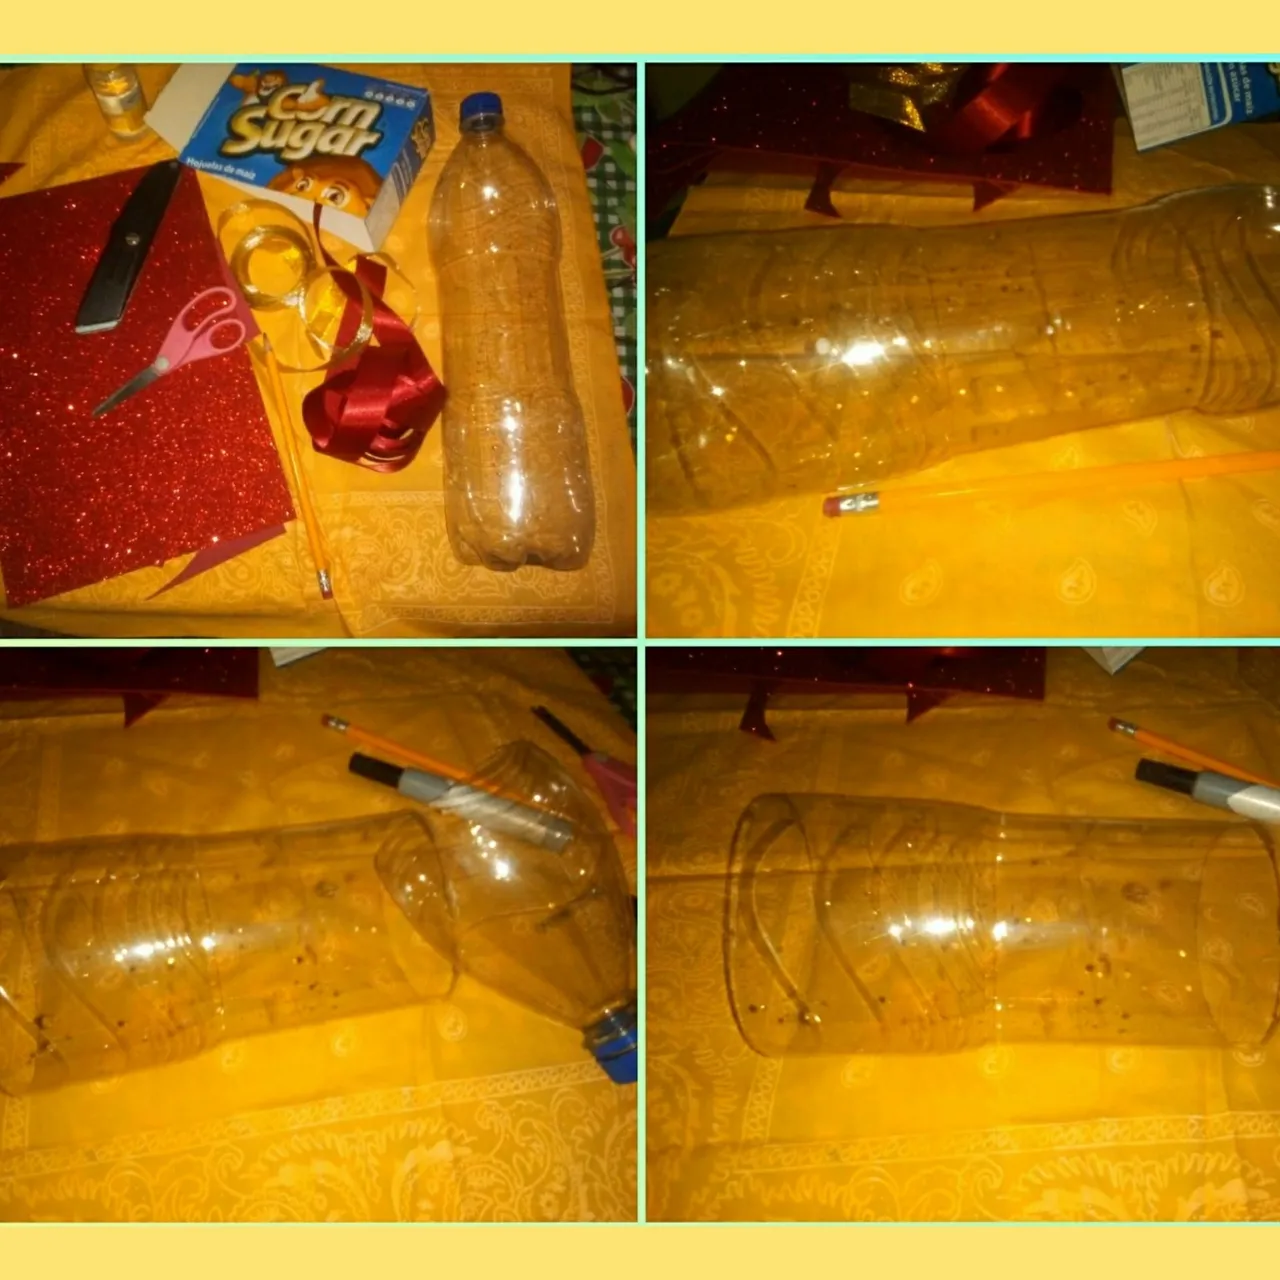
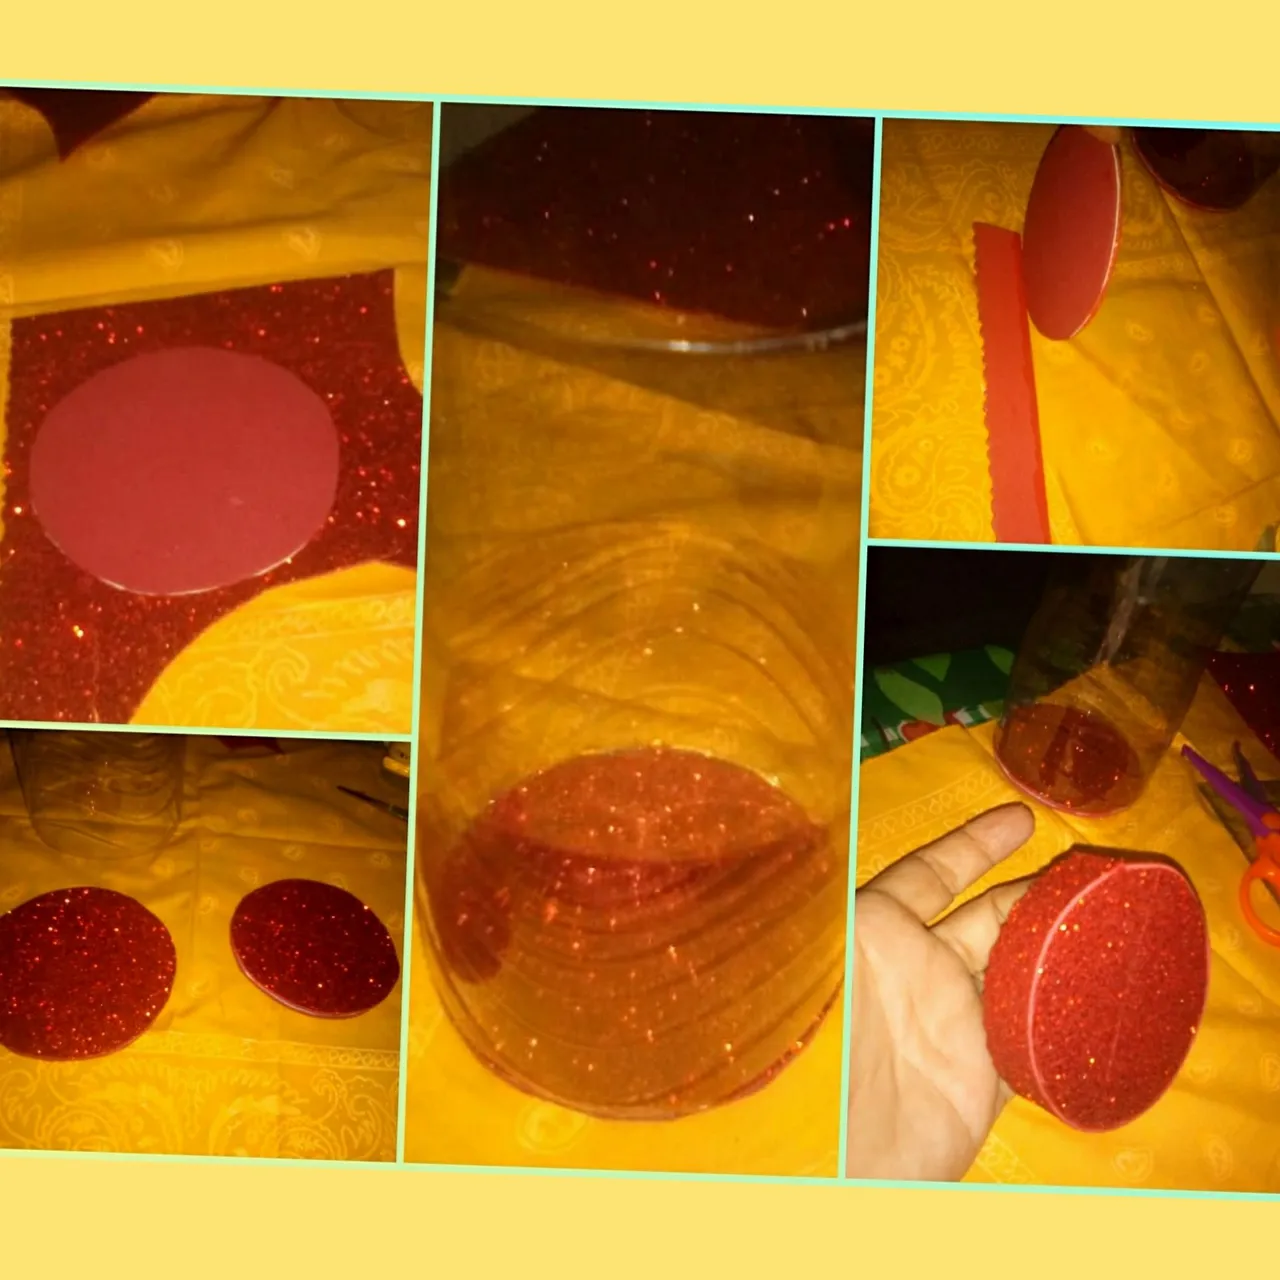
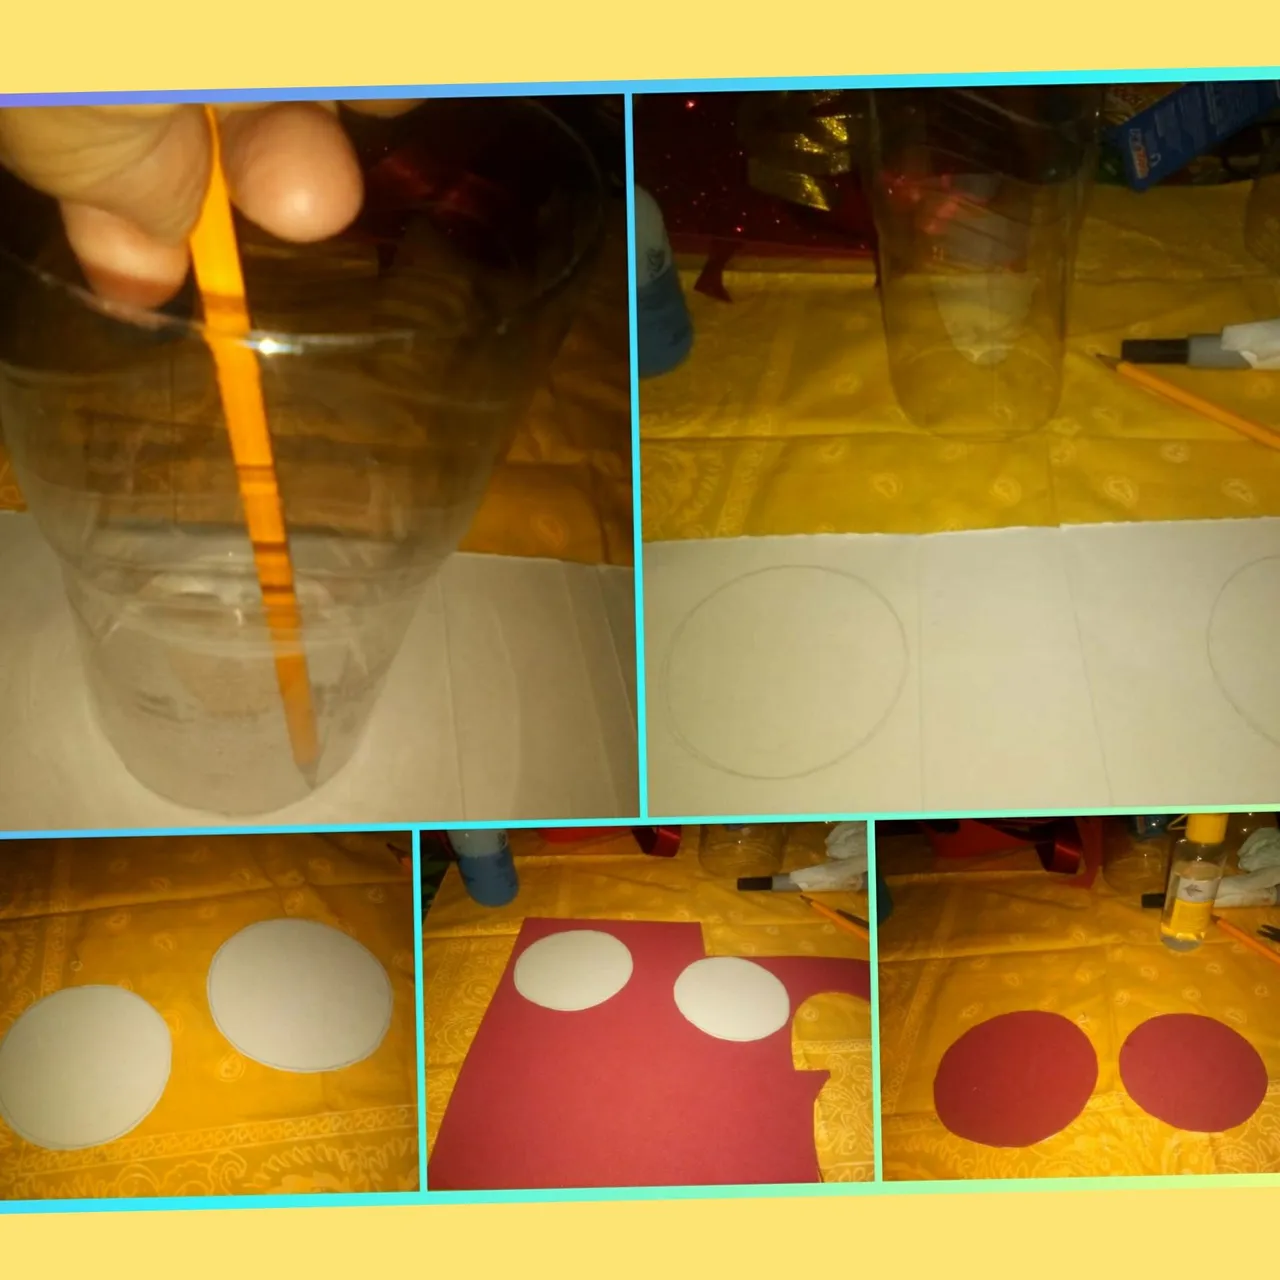
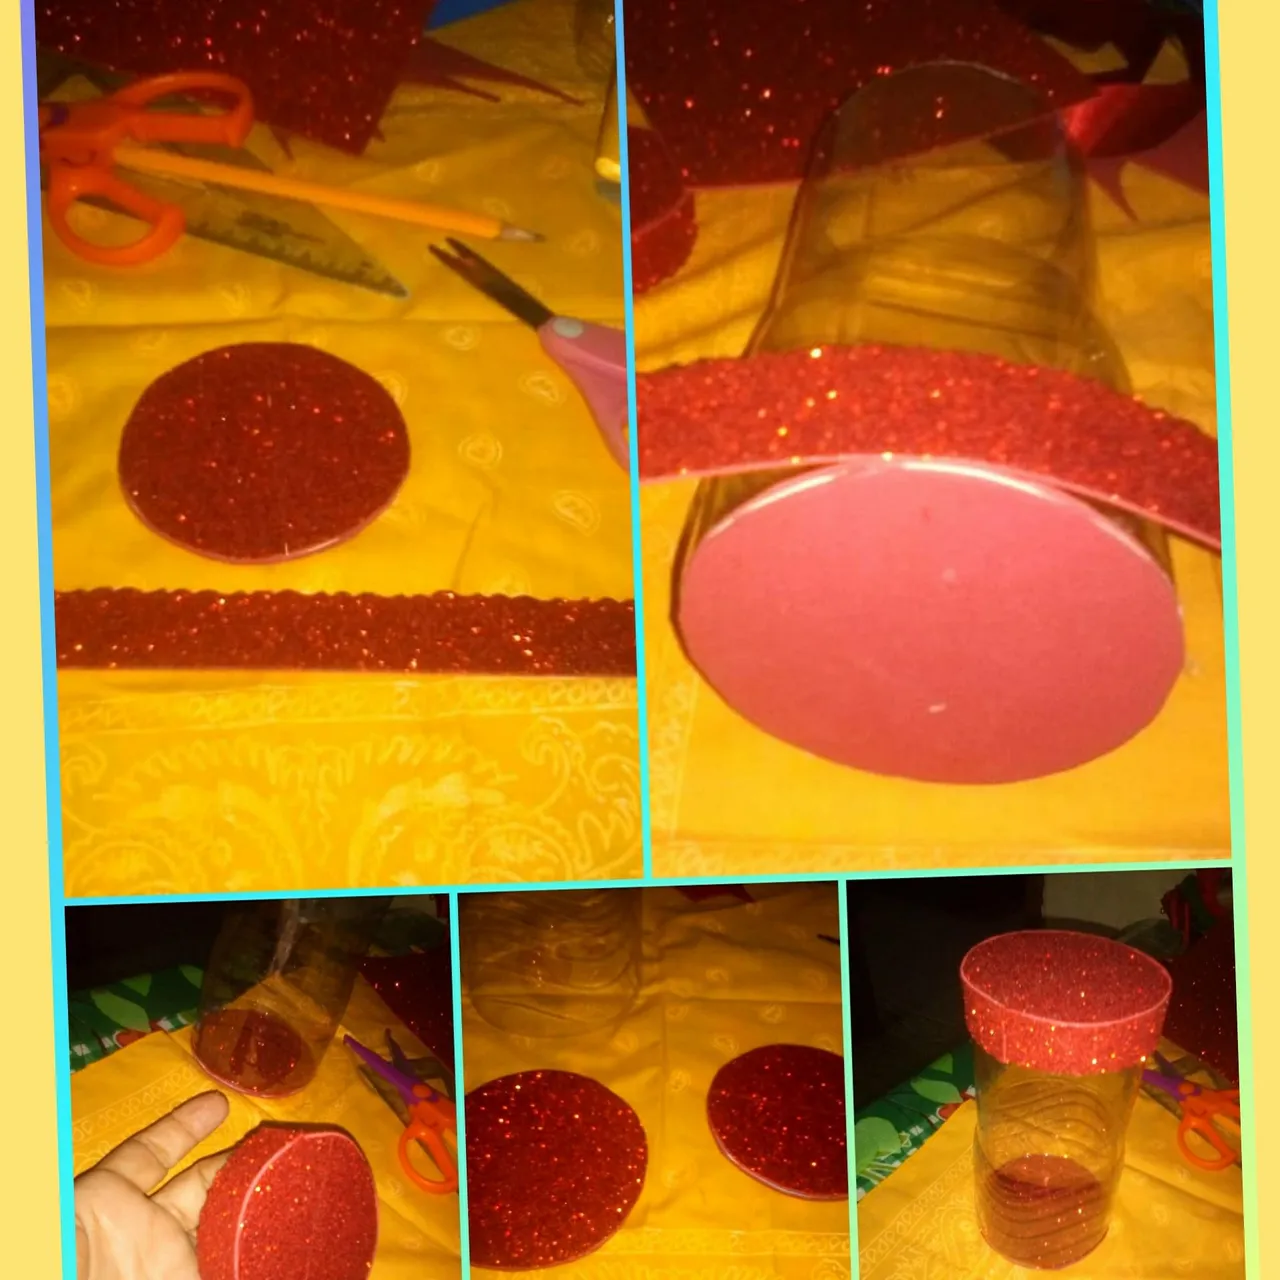
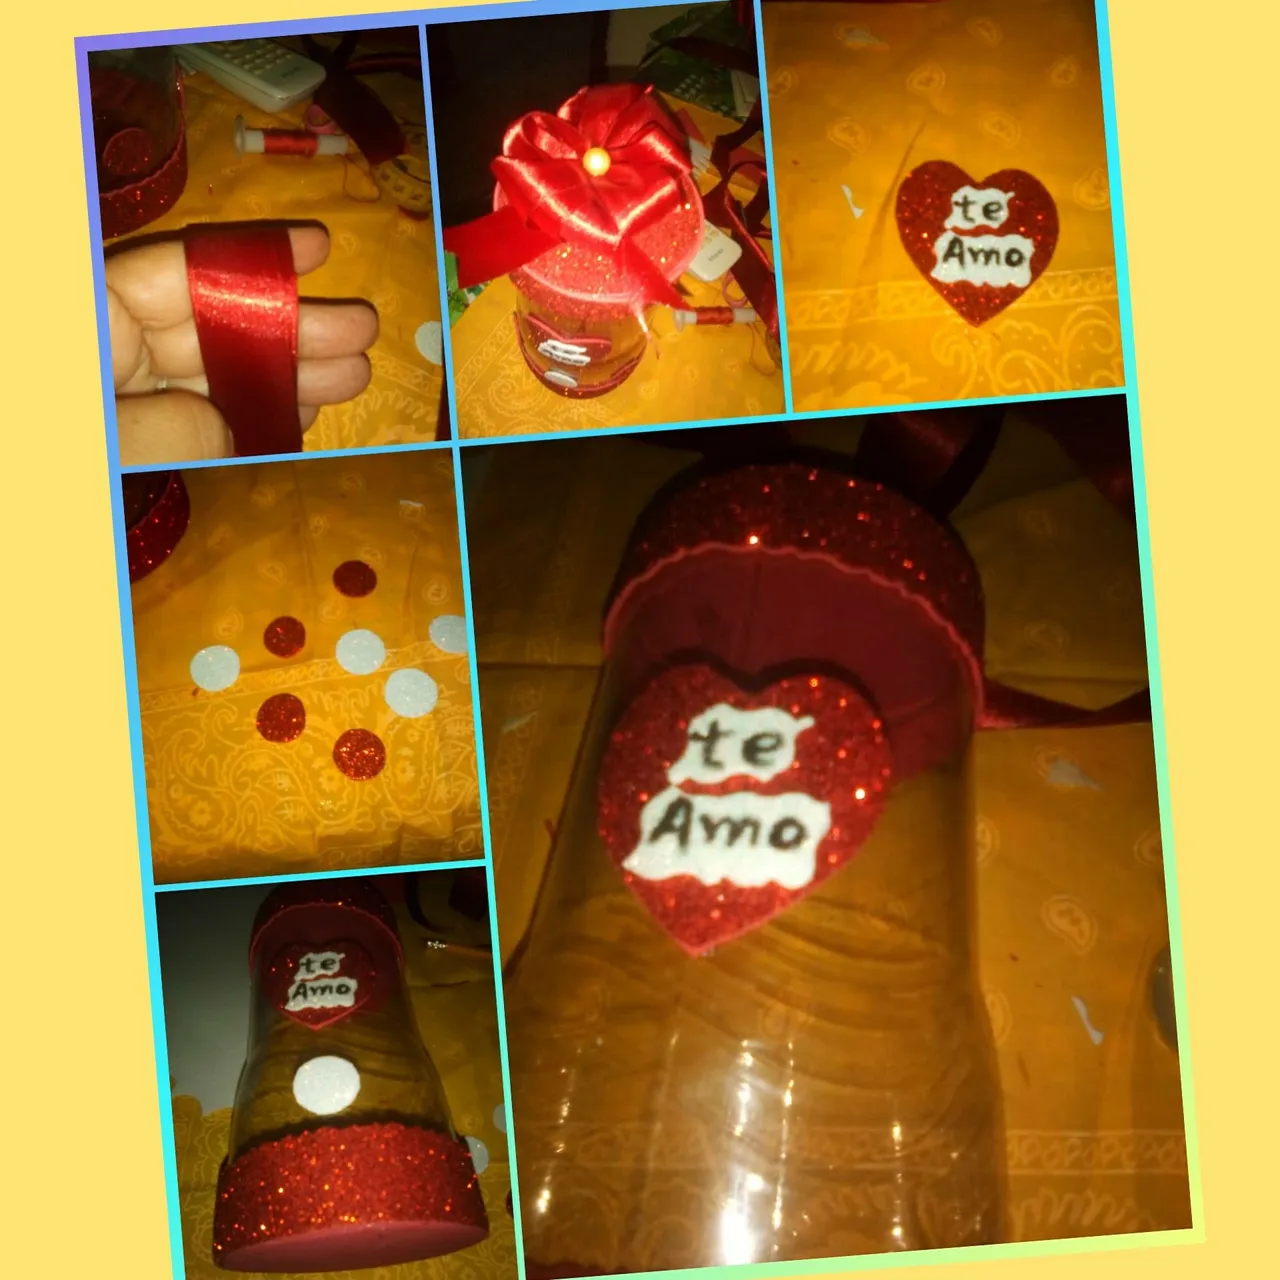
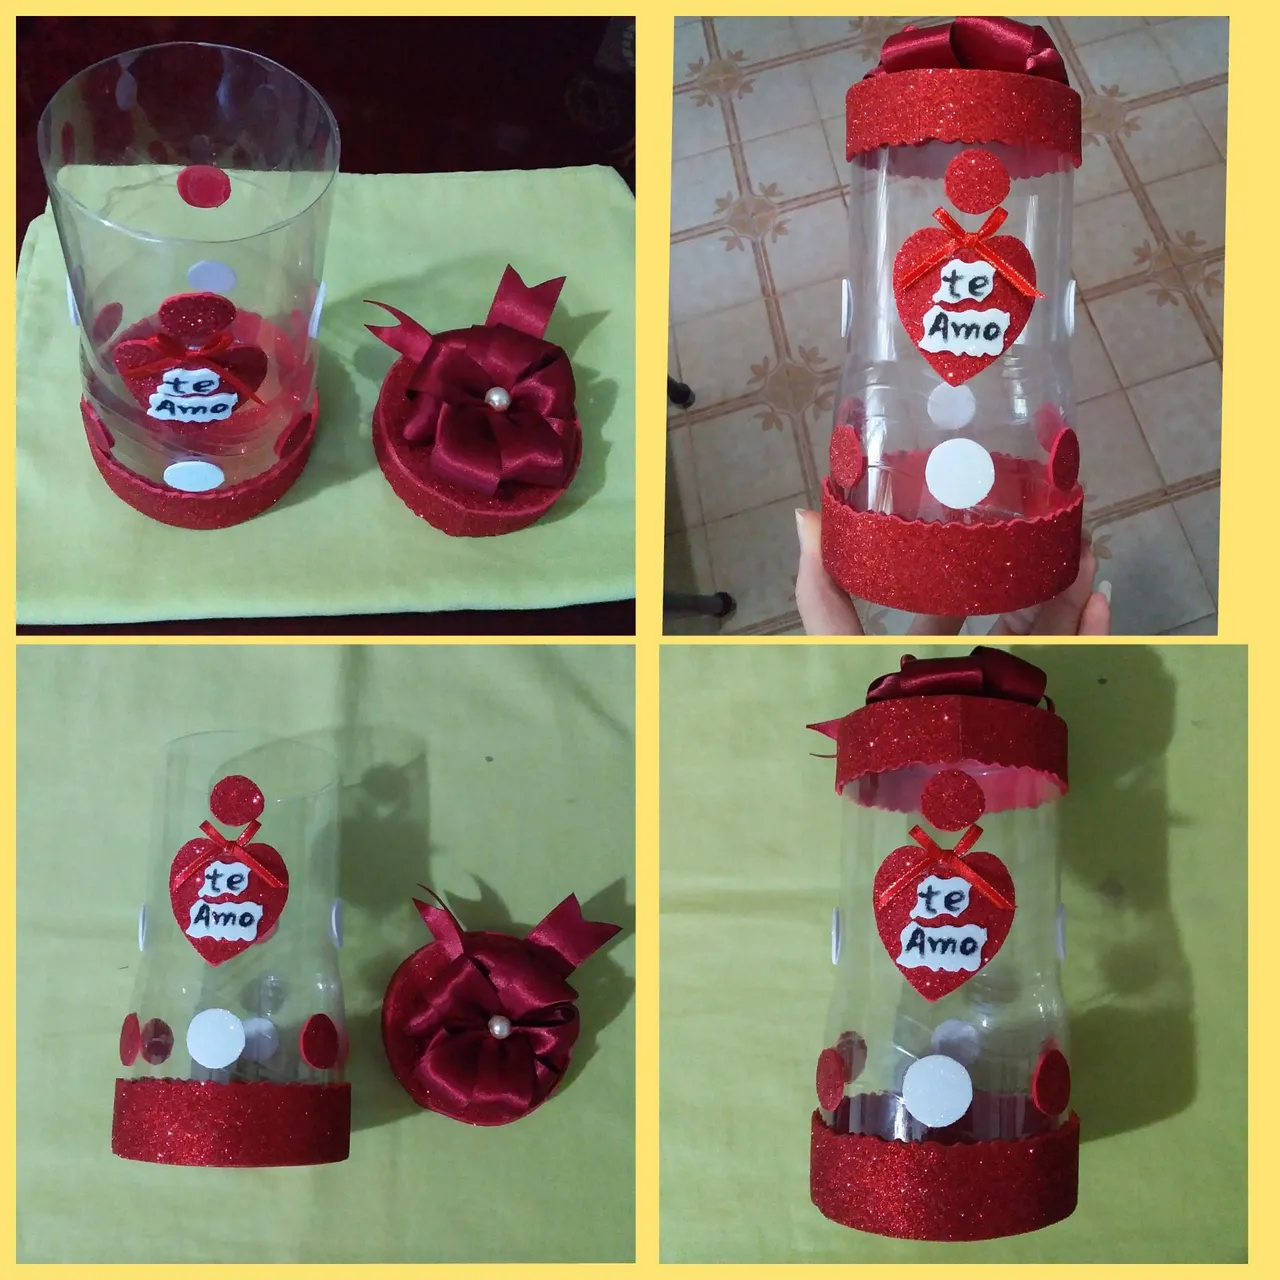
We start this work by marking on the plastic bottle the following measure 17 cm and we are going to cut with an exact the bottom and top of the bottle we will work specifically with what would be mostly the center of the same then we mark 2 circumference of 8 cm in the recycled cardboard box we proceed to cut them we will also mark 4 more circumferences in the frosted red foami then cut them and in turn we will paste two of these foami on each side of the circumference before cut out of cardboard, one of this circumference we are going to paste it on the bottom of the hole of the bottle and the other we are going to grab it for the lid also on the other hand, we will mark some strips in the frosted foami with the following measures 16 x 3 cm the same we have to cut also with a scissors of peak on one of the sides we are going to cut to make designs, these ribbons we begin to paste it or not in the lower part of the outside of the bottle and the other ribbon we are going to paste it to the other circumference and in this way we are going to make the lid then we are going to take out several mini circumferences and a heart in the red and white foami previously we are going to mark then to cut out, Finally we are going to glue on the outside and central part of the bottle also in the white foami with the help of a marker we are going to write the word I love you, cut it out and we are going to glue in the central part of the heart and with a thin red ribbon we are going to make a small ribbon and glue it to it with the purpose of decorating our little box. Then with a red ribbon we will make several folds and then sew in the central part of it to make a beautiful bow and in the central part as a cocoon we will sew a rhinestone in this way we will give a better appearance and attractiveness to our beautiful gift box, This is how I show you in the images.
Paso a paso:
Iniciamos este trabajo de marcando en la botella plástica la siguiente medida 17 cm y a la misma le vamos a cortar con un exacto la parte inferior y superior de la botella vamos a trabajar específicamente con lo que sería mayormente el centro de la misma luego marcamos 2 circunferencia de 8 cm en la caja de cartón reciclada procedemos a recortarlas también vamos a marcar 4 circunferencias más en el foami rojo escarchado seguidamente recortamos los mismos y a su vez vamos a pegar dos de estos foami por cada uno de los lados de la circunferencia antes recortada del cartón, una de esta circunferencia la vamos a pegar en la parte inferior del orificio de la botella y el otro lo vamos a agarrar para la tapa además por otro lado, marcaremos unos listones en el foami escarchado con las siguientes medidas 16 x 3 cm los mismos tenemos que recortar también con una tijera de pico por uno de los lados vamos a recortar para hacerle diseños, estos listones comenzamos a pegarlo o no en la parte inferior de afuera de la botella y el otro listón lo vamos a pegar a la otra circunferencia y de esta manera vamos a realizar la tapa luego vamos a sacar varias mini circunferencias y un corazón en los foami rojo y blanco previamente se va a marcar después a recortar, por último vamos a pegar en la parte de afuera y central de la botella también en el foami blanco con ayuda de un marcador vamos a escribir la palabra te amo recortaremos y vamos a pegar en la parte central del corazón y con una delgada cinta roja vamos hacer un pequeño lazo y pegar al mismo con la finalidad de decorar nuestra cajita después con una cinta roja vamos hacer varios dobleces luego cosemos en la parte central del mismo para realizar un bello lazo y en la parte central como capullo le cosemos una pedrería de esta manera vamos a darle una mejor apariencia y vistosidad a nuestra bella caja de regalo, quedando así como les muestro en las imágenes.
Thank you for reading me and your valuable support.
The photos are from me @cielitorojo
Gracias por leerme y su valioso apoyo.
Las fotos son de mí @cielitorojo
Traducido con traductor de Deepl.