

Saludos nuevamente amigos del DIY, el día de hoy traigo el paso a paso de una reparación que realice ayer. Y menos mal que aprecio esto porque el tema de las manualidades con corchos está un poco estancada. Por supuesto, no quiero decir que me alegra que a alguien se le rompa un equipo para yo arreglarlo y de paso sacar hacer una publicación para Hive, 😉. Lo que pasa es que este tipo de publicaciones fluyen solas porque algunas de estas reparaciones las hago casi en piloto automático.
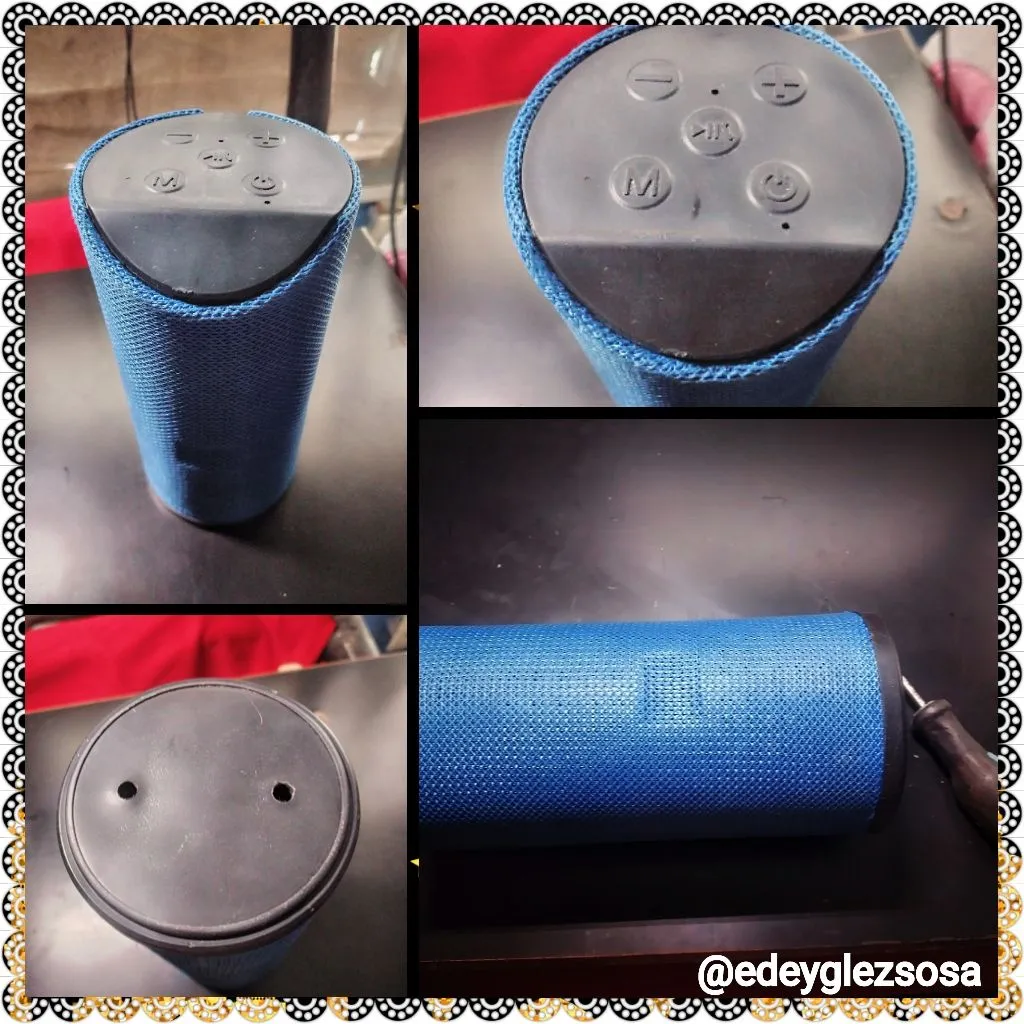
Pues bien, resulta que el día de ayer llego a mis manos esto, y le digo “esto” porque por mucho que lo intente no pude identificar la marca o modelo. Así que por ahora llamémoslo bocina bluetooth. En serio, si alguien sabe quién fabrico esta cosa, favor de decírmelo. A simple vista no se le ve la marca del fabricante y ya de por sí les adelanto que por dentro no dice nada tampoco. Los síntomas eran simples, el quipo se apagaba al estar un rato con el volumen a máximo. Al escuchar esto le pregunté al dueño que si con el volumen bajo no se apagaba y su respuesta fue que sí, pero que duraba un poco más.
! [English Version Here]
Greetings again DIY friends, today I bring the step by step of a repair I made yesterday. And thank goodness I appreciate this because the topic of crafts with corks is a bit stagnant. Of course, I don't want to say that I'm happy that someone breaks a piece of equipment for me to fix it and in passing take out to make a publication for Hive, 😉. It just so happens that these types of posts flow on their own because some of these repairs I do almost on autopilot.Well, it turns out that yesterday I got my hands on this, and I say "this" because no matter how hard I tried I couldn't identify the make or model. So for now let's call it a bluetooth speaker. Seriously, if anyone knows who made this thing, please let me know. At first glance you can't see the manufacturer's mark and I'll tell you that the inside doesn't say anything either. The symptoms were simple, the equipment turned off after a while with the volume at maximum. When I heard this I asked the owner if with the volume down it didn't turn off and his answer was yes, but it lasted a little longer.
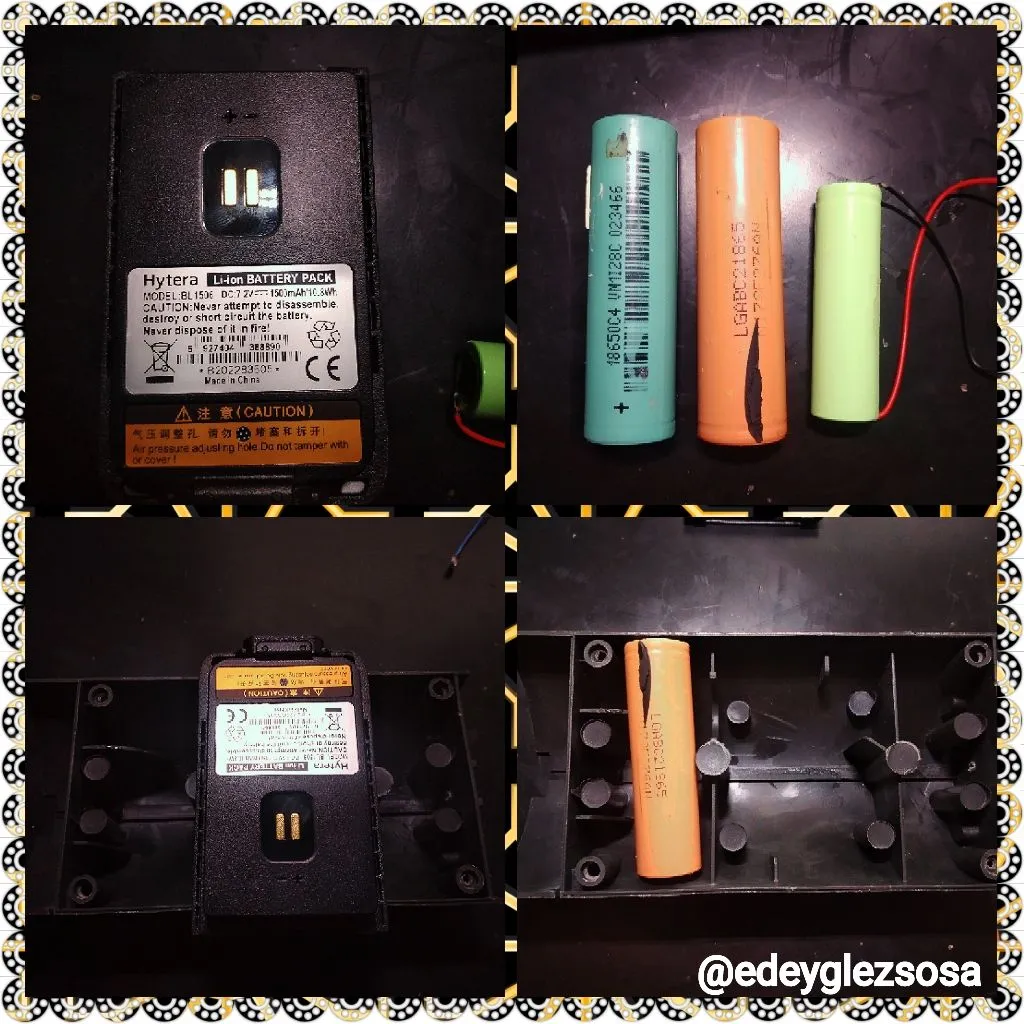
Mientras más escuchaba los síntomas más me convencía de que era la batería, sí o sí. Suponiendo eso, el dueño me trajo una batería de walkie-talkie que le habían regalado. Yo le advertí que los voltajes no eran compatibles, ya que estas bocinas suelen tener batería de litio de 3.6 V y la batería del walkie-talkie es de 7.2v. Que no tiene nada que ver porque todos estos quipos vienen con un regulador de voltaje, así que en teoría debería funcionar. El problema en sí era a la hora de cargar, pues la bocina se carga con 5v y si a eso le sumamos el regulador de voltajes interno estaríamos cargando una batería de 7.2v con 3.6v a lo máximo. Pero bueno, a tanta insistencia accedí a reemplazar la batería, pues el dueño insistía en que un amigo le dijo que si funcionaba. Por suerte yo tenía dos baterías de litio, ya verán porque.
! [English Version Here]
The more I listened to the symptoms the more I became convinced that it was the battery, yes or yes. Assuming that, the owner brought me a walkie-talkie battery he had been given as a gift. I warned him that the voltages were not compatible, since these horns usually have a 3.6V lithium battery and the walkie-talkie battery is 7.2V. That has nothing to do because all these devices come with a voltage regulator, so in theory it should work. The problem itself was at the time of charging, because the horn is charged with 5v and if we add the internal voltage regulator we would be charging a 7.2v battery with 3.6v at most. But well, at such insistence I agreed to replace the battery, because the owner insisted that a friend told him that if it worked. Luckily I had two lithium batteries, you will see why.
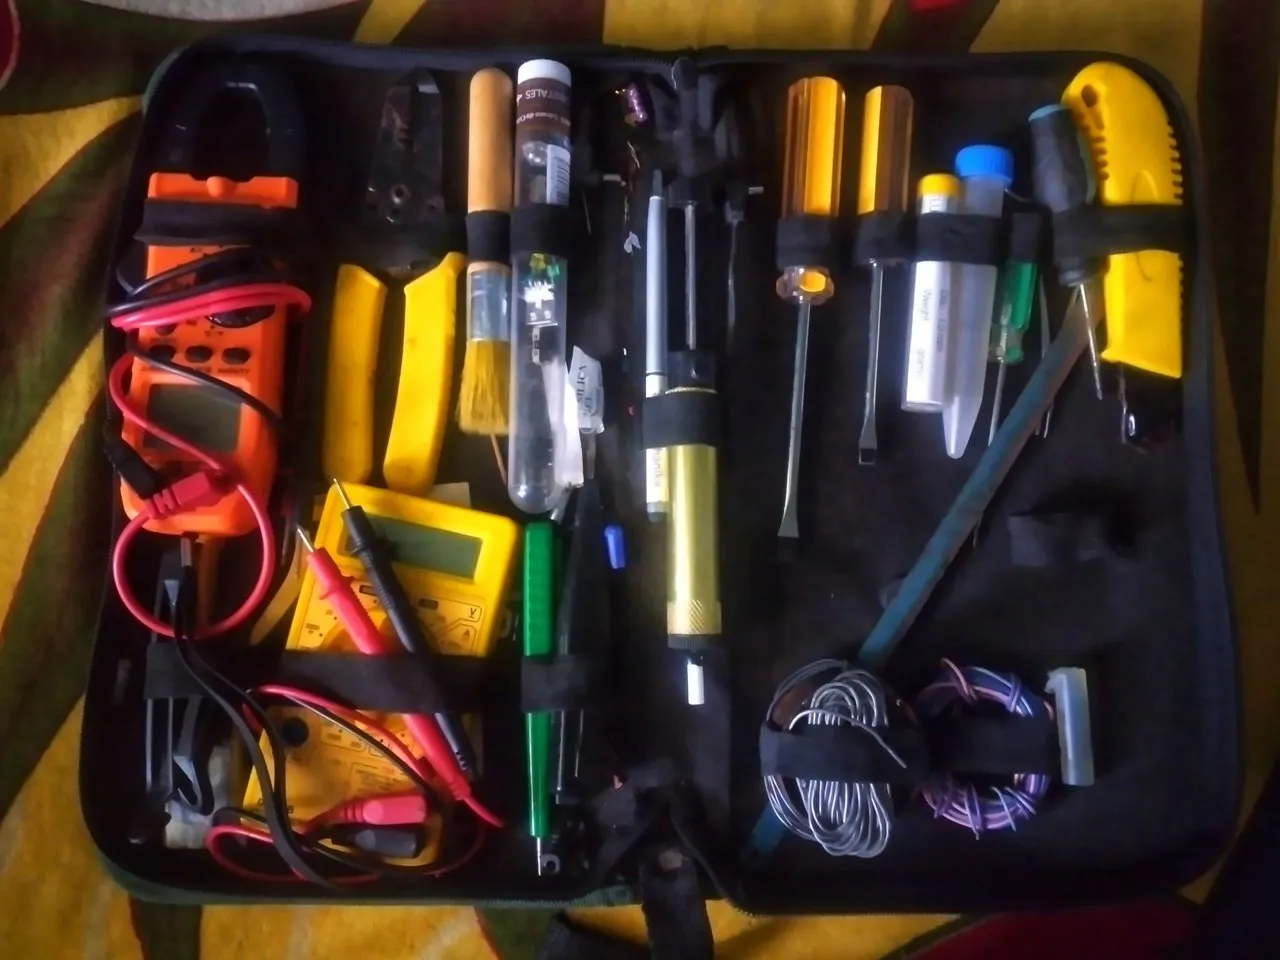
Para realizar la reparación utilicé como materiales mi maletín de técnico, el cual está equipado con las herramientas básicas para realizar trabajos de electrónica. Pero creo importante decir que el soldador o cautín, los desarmadores, el voltímetro y el cúter fueron imprescindibles.
! [English Version Here]
To carry out the repair I used as materials my technician's briefcase, which is equipped with the basic tools to carry out electronic works. But I think it is important to say that the soldering iron or soldering iron, the screwdrivers, the voltmeter and the cutter were essential.
Bien, lo primero que hice fue retirar las tapas platicas de los lados con ayuda de los desarmadores. Mientras lo hacía me iba dando cuenta cada vez más de lo mal hecho que estaba el equipo. La calidad en los plásticos, la tela azul que simulaba una malla protectora, los botones de control, todo era un 1/10. Para mi sorpresa, desarmarla fue mucho más fácil de lo que imagine. La estructura en sí era un cilindro plástico partido en dos unidos por la tela azul.
! [English Version Here]
Well, the first thing I did was to remove the plastic covers from the sides with the help of screwdrivers. As I did so, I realized more and more how poorly made the equipment was. The quality of the plastics, the blue fabric that simulated a protective mesh, the control buttons, everything was a 1/10. To my surprise, disassembling it was much easier than I imagined. The structure itself was a plastic cylinder split in two joined by the blue fabric.

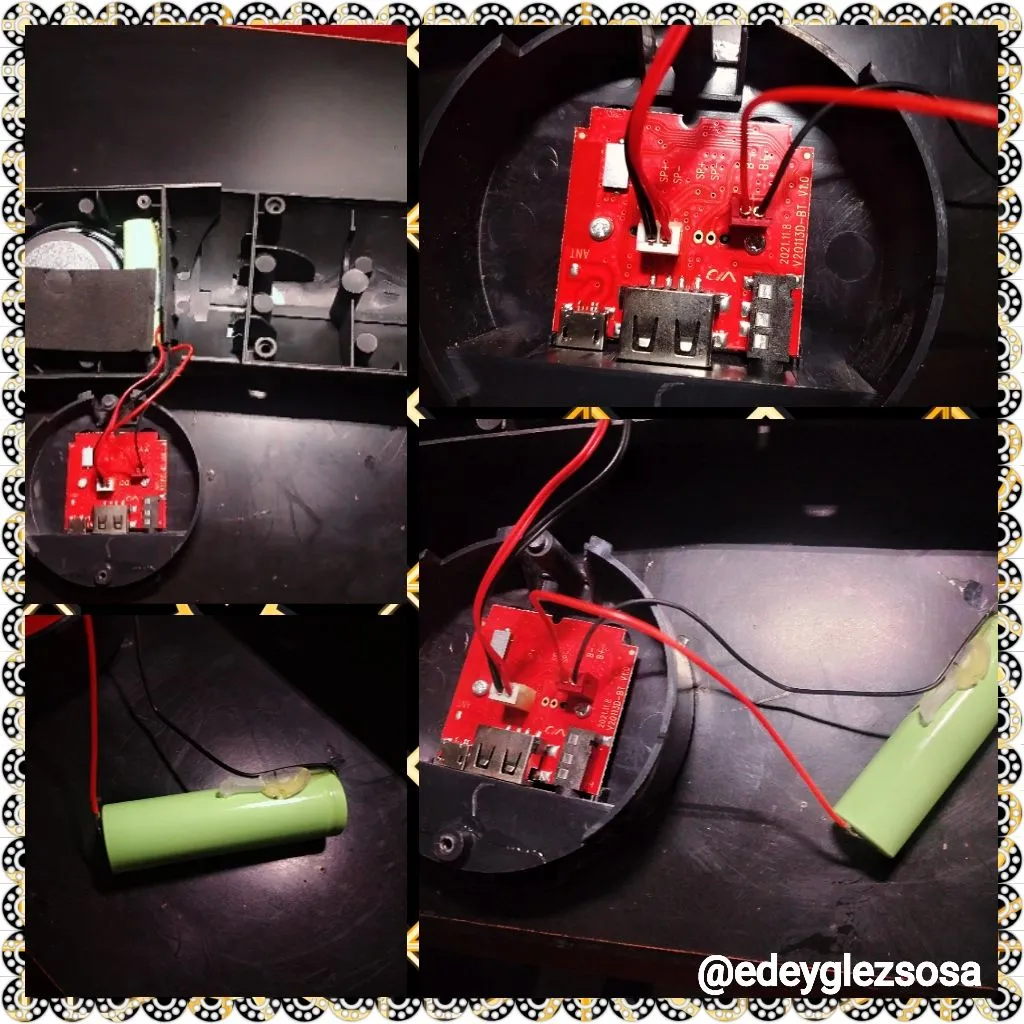
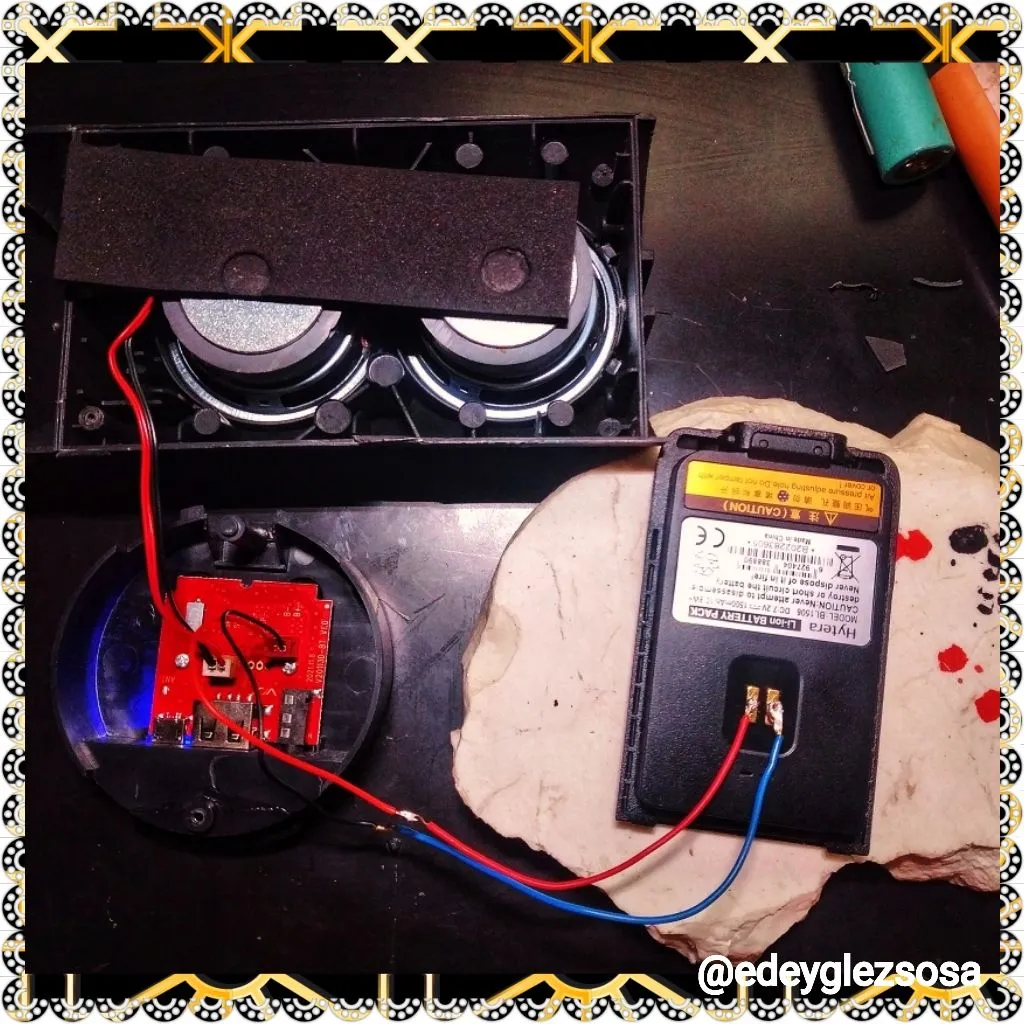
Una vez realizado el desarme quedaron expuestos, la placa principal, las bocinas y la mini batería. Digo mini porque a simple vista parece una pila AAA. Si pudiese describir con una frase, lo que pensé al abrir la bocina sería algo así como: “¿y esto que eeeessss?". Empecemos diciendo que la mitad del cilindro plástico estaba vacía, las bocinas estaban sueltas y la mini batería estaba pegada en una esquina cerca de la bocina. En fin, un desastre. Y por si fuera poco, los tornillos de sujeción que unían las dos mitades plásticas dl cilindro no estaban.
! [English Version Here]
Once the disassembly was done, the main board, the speakers and the mini battery were exposed. I say mini because at first glance it looks like a AAA battery. If I could describe in one sentence what I thought when I opened the horn, it would be something like: "and what's this? Let's start by saying that half of the plastic cylinder was empty, the horns were loose and the mini battery was stuck in a corner near the horn. All in all, a disaster. And to top it off, the retaining screws that joined the two plastic cylinder halves were missing.
Pero bueno, el objetivo no era rediseñar el equipo en sí. Lo que venía a hacer era reemplazar la batería. Y en este momento de la historia es donde peco por apurado. Como venía a reemplazar la batería inmediatamente quité la que estaba y pongo la del walkie-talkie y sorpresa todo funcionaba bien. Seguidamente, conecto el equipo vía bluetooth para ponerlo a funcionar y se mantiene sonando alrededor de 20 minutos para luego apagarse. Yo de inocente pienso que eso se debe a que la batería de walkie-talkie no estaba completamente cargada y ahí es donde me doy cuenta de mi error de novato.
! [English Version Here]
But well, the goal was not to redesign the equipment itself. What I came to do was to replace the battery. And at this point in the story is where I sin in a hurry. As I came to replace the battery I immediately removed the existing one and put the one from the walkie-talkie and surprise everything worked fine. Then, I connect the equipment via bluetooth to put it to work and it keeps ringing for about 20 minutes and then it turns off. I innocently think that this is because the walkie-talkie battery was not fully charged and that's where I realize my rookie mistake.
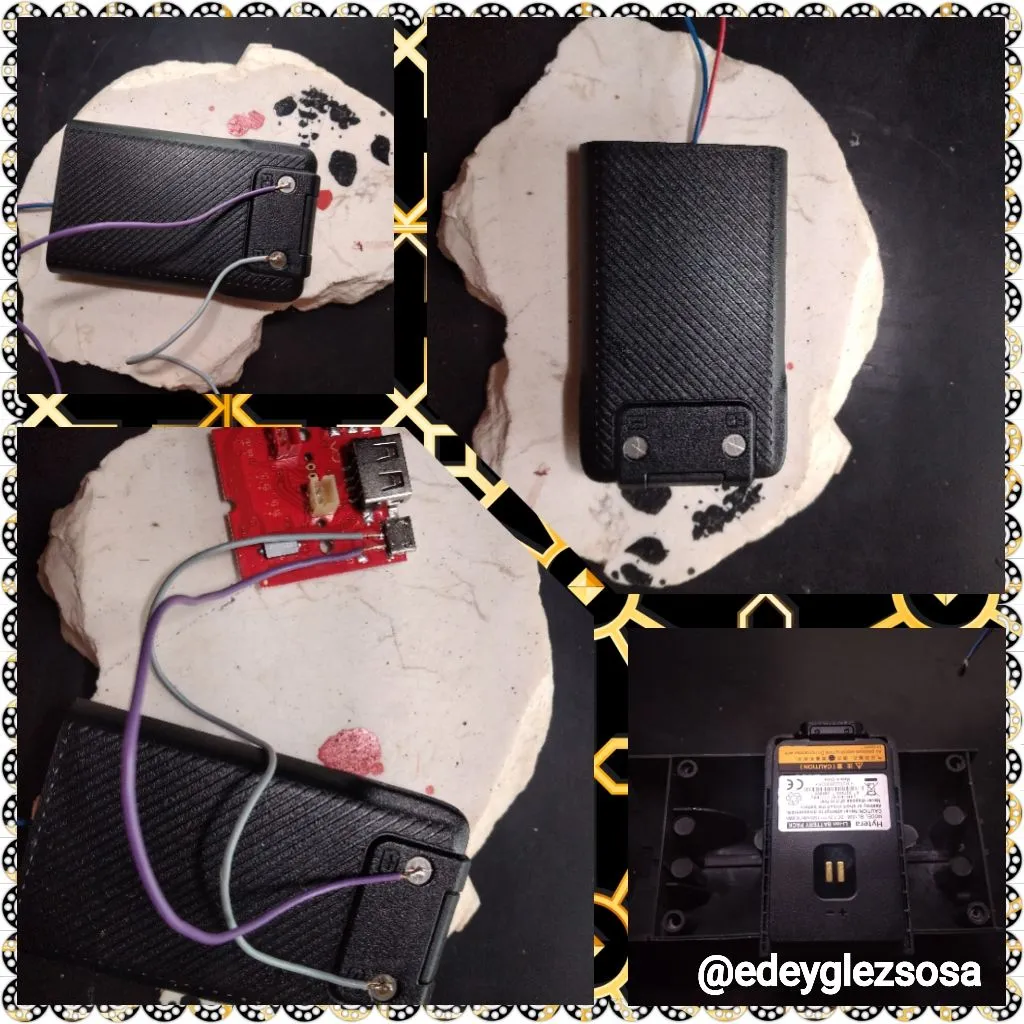
Resulta ser que esta batería del walkie-talkie no aceptaba carga bidireccional (no sé si este término exista, yo me refiero que no carga por donde mismo se descarga). Así que me dispuse a hacer un puente desde la toma de carga micro usb de la bocina hasta las conexiones de carga de la batería de walkie-talkie que como podrán ver son plateadas, no como las de descarga que son doradas. Por suerte no llegue a probar esta solución chapucera, ya que de haberlo hecho quizá hubiese quemado placa, pues si en algún momento ponían a cargar la bocina encendida se hubiese creado un circuito cerrado y bum a echar humito.
! [English Version Here]
It turns out that this walkie-talkie battery did not accept bi-directional charging (I do not know if this term exists, I mean that it does not charge where it discharges). So I decided to make a bridge from the micro usb charging socket of the horn to the charging connections of the walkie-talkie battery which as you can see are silver, not like the discharge connections which are gold. Luckily I did not get to try this botched solution, because if I had done it I might have burned the board, because if at some point they put the horn on to charge it would have created a closed circuit and boom to smoke.
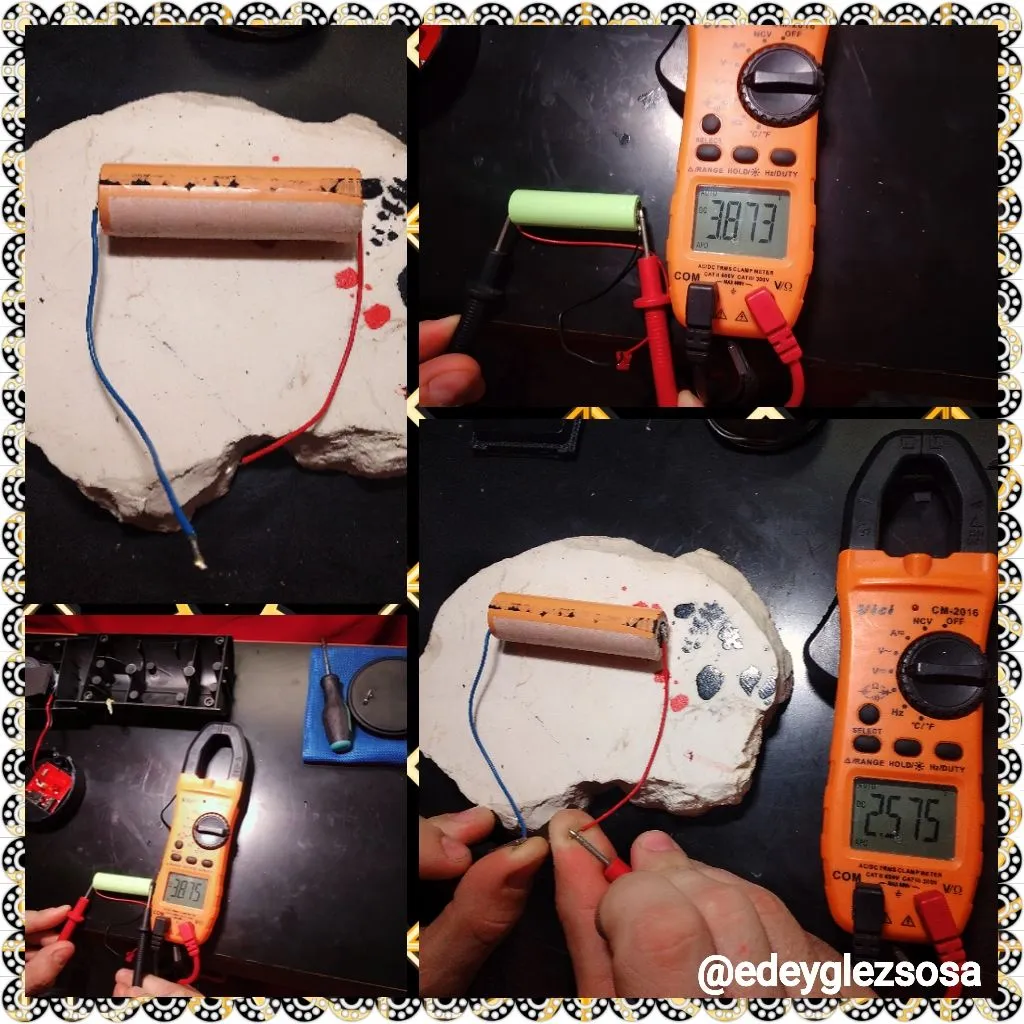
Llegados a este punto, la batería de walkie-talkie estaba descartada, así que solo quedaba improvisar con las pilas de litio que tenía a mano. Y aquí es por lo cual al principio dije que menos mal que tenía algunas de repuesto. El procedimiento fue el mismo, soldé los cabes del conector de la placa a la batería de litio, pero esta vez le agregué la batería que venía con el equipo. Esto se debe a que tras una medición me di cuenta de que no estaba en tan mal de estado y de paso ayudaba un poco a la que puse yo qué nueva no era. Sé que alguno pensará que porque uso baterías que no son nuevas y de ser así quiero recordarles que yo no cobro por estos servicios son meramente favores. Y tampoco engaño a nadie, el dueño del equipo sabe que la batería instalada es de uso y que en un futuro tendrá que reemplazarla.
! [English Version Here]
At this point, the walkie-talkie battery was out of the question, so all that was left was to improvise with the lithium batteries I had on hand. And this is why I said at the beginning that it's a good thing I had some spare ones. The procedure was the same, I soldered the board connector pins to the lithium battery, but this time I added the battery that came with the equipment. This is because after a measurement I realized that it was not in such a bad state, and by the way it helped a little to the one that I put, which was not new. I know that some will think that because I use batteries that are not new and if so I want to remind them that I do not charge for these services are merely favors. And neither I deceive anybody, the owner of the equipment knows that the installed battery is of use and that in a future he will have to replace it.
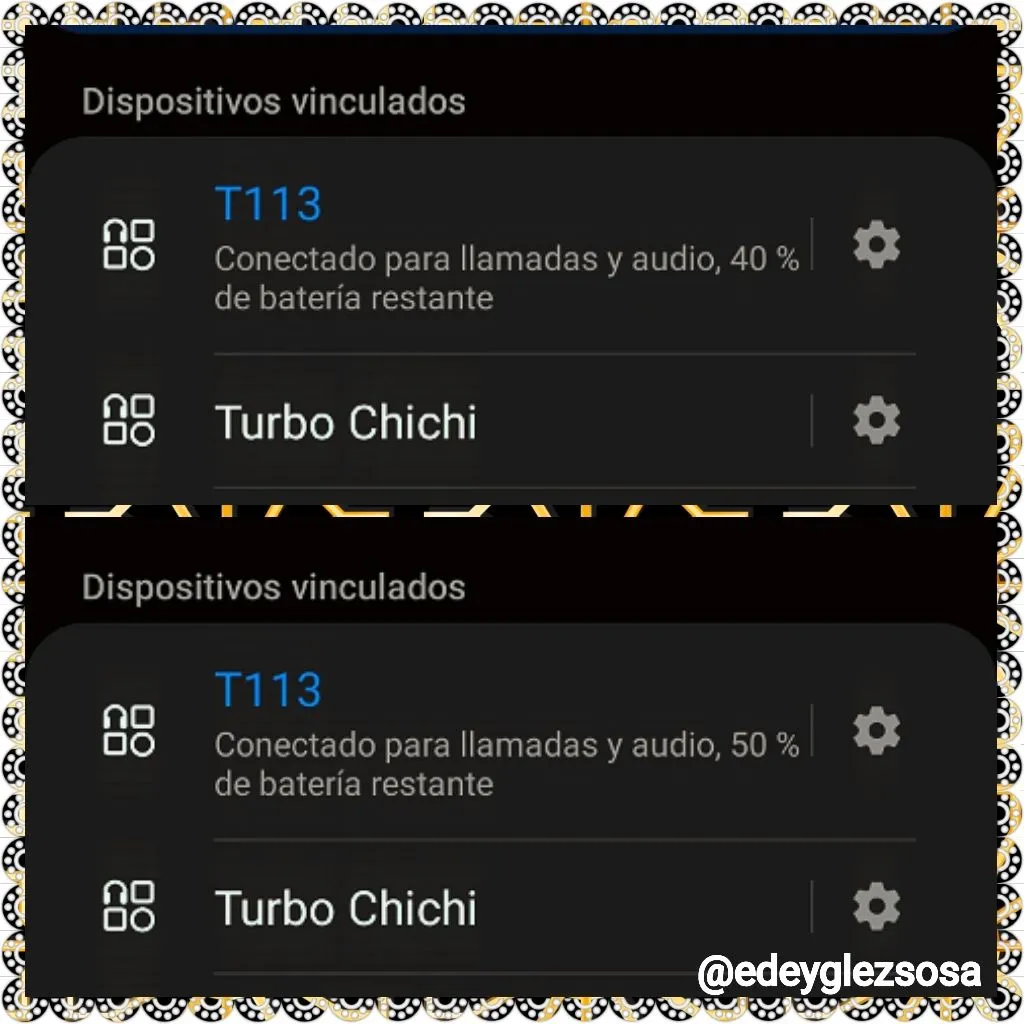
Pues bien, ya tenía todo conectado y listo para probarlo. Encendí el quipo, lo conecte a mi teléfono, hice captura de pantalla del % de la batería, espere 15 minutos y volví a hacer captura de pantalla. Al parecer esta vez si cargaba, todo funcionaba bien y estuvo un buen rato encendido sin apagarse. Todo parecía indicar que había dado con el problema y le había dado solución. Y pues así fue, no tiene sentido seguir con la intriga 😁. Solo faltaba buscar un lugar donde poner las baterías que antes era una y ahora son dos en paralelo.
! [English Version Here]
Well, I had everything connected and ready to test it. I turned on the device, connected it to my phone, took a screenshot of the battery %, waited 15 minutes and took another screenshot. Apparently this time it did charge, everything worked fine and it was on for a while without shutting down. Everything seemed to indicate that I had found the problem and had given a solution. And so it was, there is no point in continuing to create intrigue 😁. I just needed to find a place to put the batteries that before was one and now are two in parallel.
Como les decía solo faltaba ubicar las baterías y armar el equipo. Esta parte se supone que sería fácil, pues como ya les comente anteriormente, la mitad del cilindro estaba vacía. Y esto sería sencillo de acomodar si yo de lelo y por apurado no hubiese cortado la parte vacía usando como medida la batería de walkie-talkie. Pues nada, ahí estaba yo con dos baterías relativamente medianas y un boquete donde tenía que ponerlas. La solución que encontré fue pegar las dos baterías de litio entre sí y luego pegarlas a la base de la mitad del cilindro de plástico. Y pues quedo así.
! [English Version Here]
As I said, the only thing left to do was to place the batteries and assemble the equipment. This part was supposed to be easy, because as I mentioned before, half of the cylinder was empty. And this would be easy to accommodate if I had not cut the empty part using the walkie-talkie battery as a measure. Well, nothing, there I was with two relatively medium-sized batteries and a hole where I had to put them. The solution I found was to glue the two lithium batteries together and then glue them to the base of the middle of the plastic cylinder. And so that's how it turned out.
Y pues nada solo quedaba hacer el proceso inverso al desarme que consistía en unir los dos cilindros plásticos con la tela azul y atornillar las tapas superior e inferior. Una vez hecho eso solo queda cruzar los dedos y esperar que al apretar el botón de encendido todo funcionara correctamente. Para mi suerte así fue.
! [English Version Here]
And then nothing was only left to do the reverse process to the disassembly that consisted of joining the two plastic cylinders with the blue cloth and screw the top and bottom covers. Once that was done, I just had to cross my fingers and hope that when I pressed the ignition button everything worked correctly. For my luck it did.
Hasta aquí el paso a paso de la reparación, espero que haya sido de su agrado. Yo como siempre contento de poder ayudar a alguien no por considerarme un super buen samaritano sino porque aprendo cada día más a la vez que hago feliz a alguien. Porque recuerden que la vida te devuelve en grandes cantidades lo que tú das. Chao y hasta la próxima.
! [English Version Here]
So far the step by step of the repair, I hope you liked it. I as always happy to be able to help someone not because I consider myself a super good samaritan but because I learn more every day while making someone happy. Because remember that life gives you back in large quantities what you give. Bye and see you next time.

Muchas gracias por leer mi post. Si te gustó, por favor deja un comentario y considera seguirme para no perderte mis próximas publicaciones. Me encantaría saber tu opinión y tus ideas sobre el tema que traté en este post. ¡Nos vemos en el próximo!
Thank you very much for reading my post. If you liked it, please leave a comment and consider following me so you don't miss my next posts. I'd love to know your opinion and your thoughts about the topic I discussed in this post, see you in the next one!
Cover page created in Canva
Logo and banner property of @hive-130560 and Hive Diy Community
Translated by DeepL