Buenas noches queridos amigos.
Bienvenidos sean todos a mi blog.
Por motivos de salud estuve ausente pero ya estoy de vuelta y feliz de compartir con ustedes un tutorial que espero les sea de utilidad.
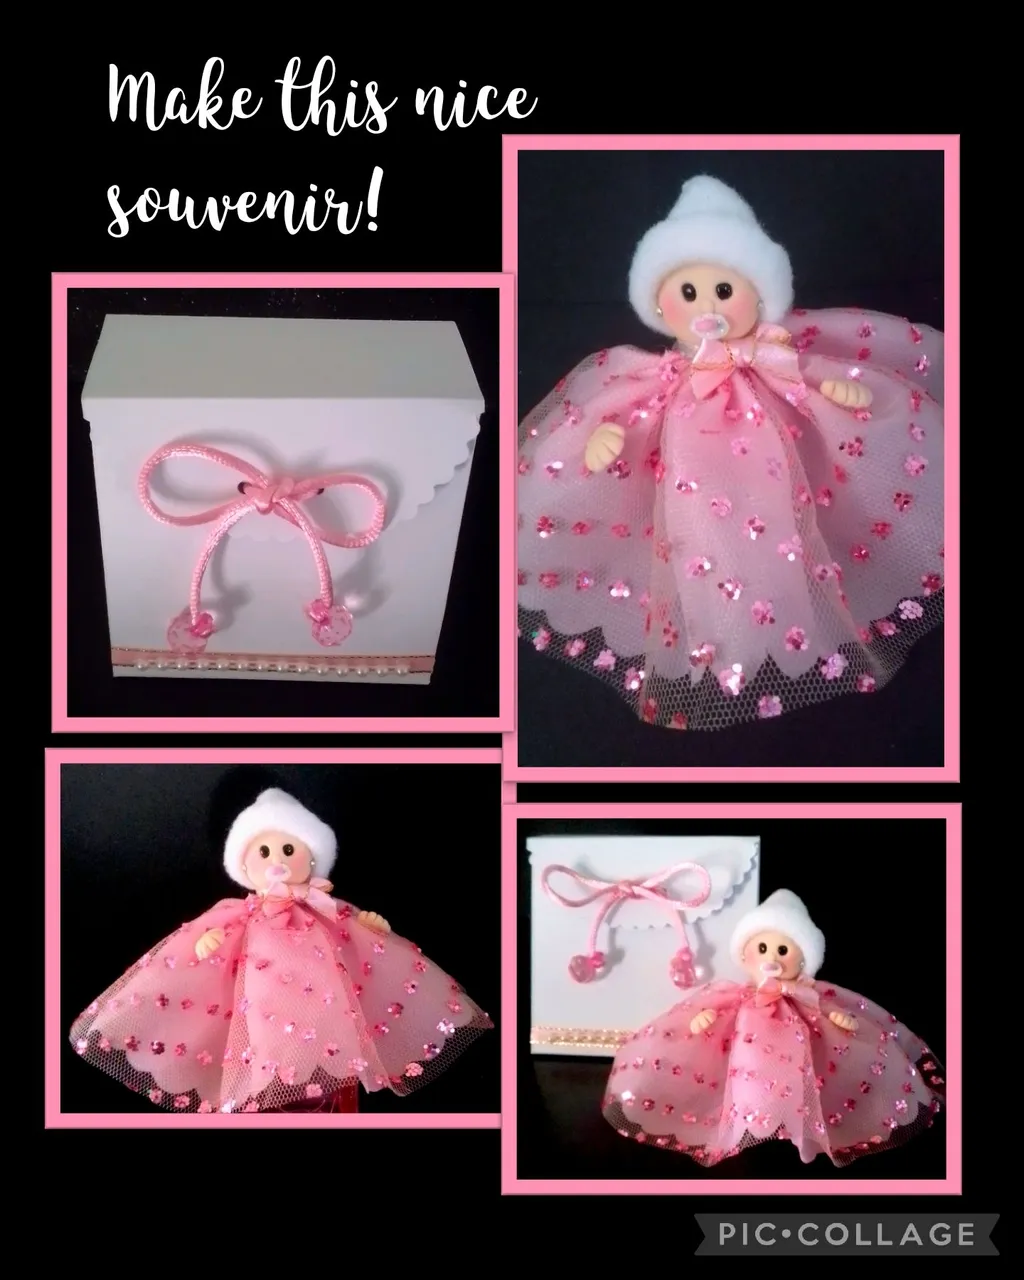
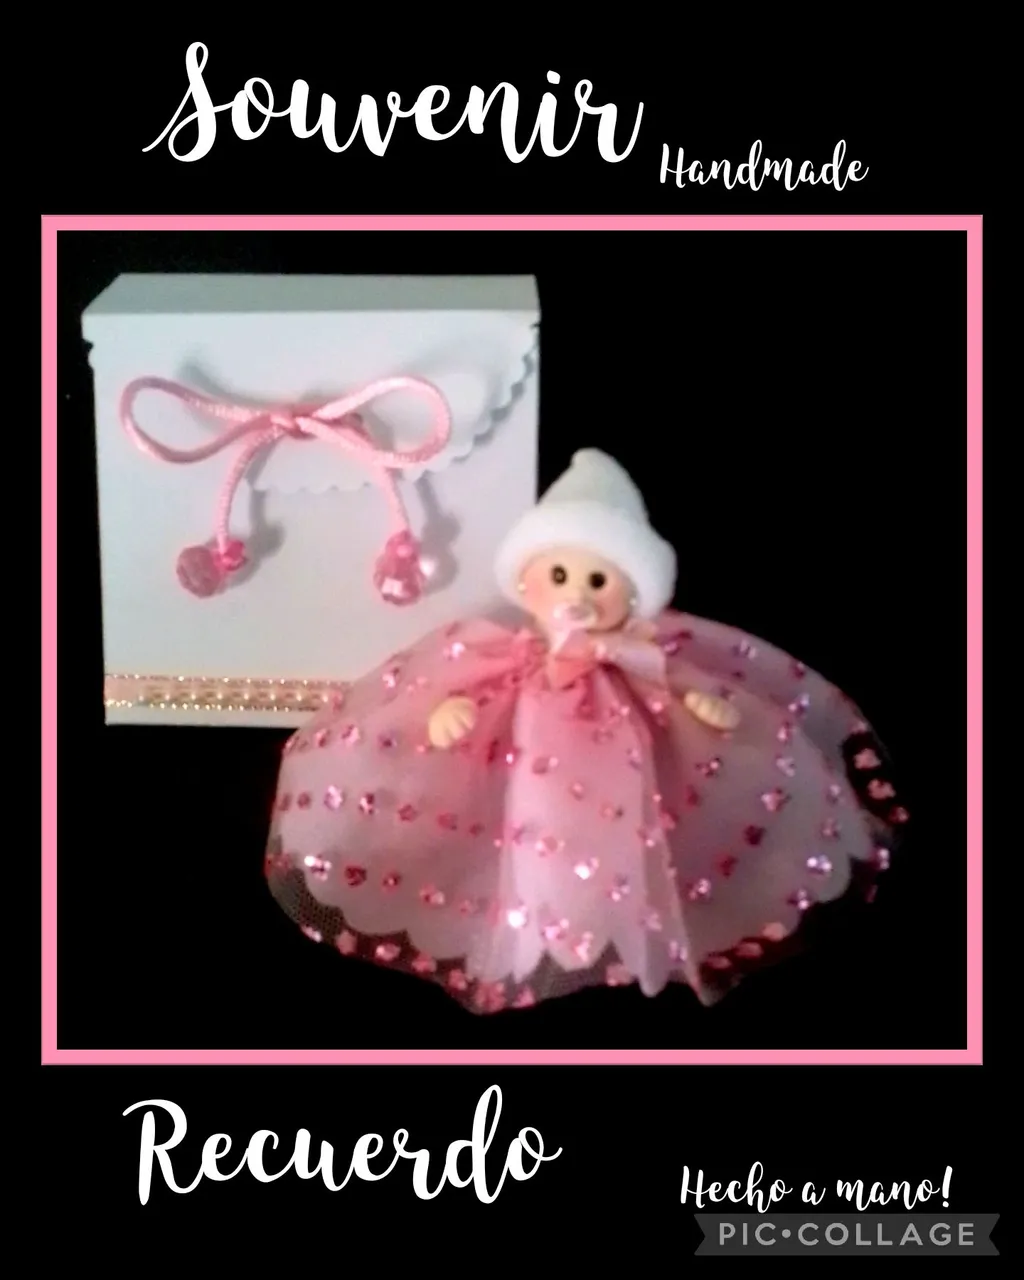
Hoy les voy a mostrar como elaboré un lindo recuerdo para el bautizo de una bebé, pero que también le puede servir para cualquier otra ocasión, es una muñequita hecha con masa flexible y le realicé un fácil y lindo vestido con unos retacitos de tela,
también te enseñaré como transformar un molde de una caja que me encantó pero, para la muñequita no me servía ya que es muy angosta y que más adelante verás lo sencillo que es.
Así que te invito a que lo hagamos juntos.
Necesitarás:
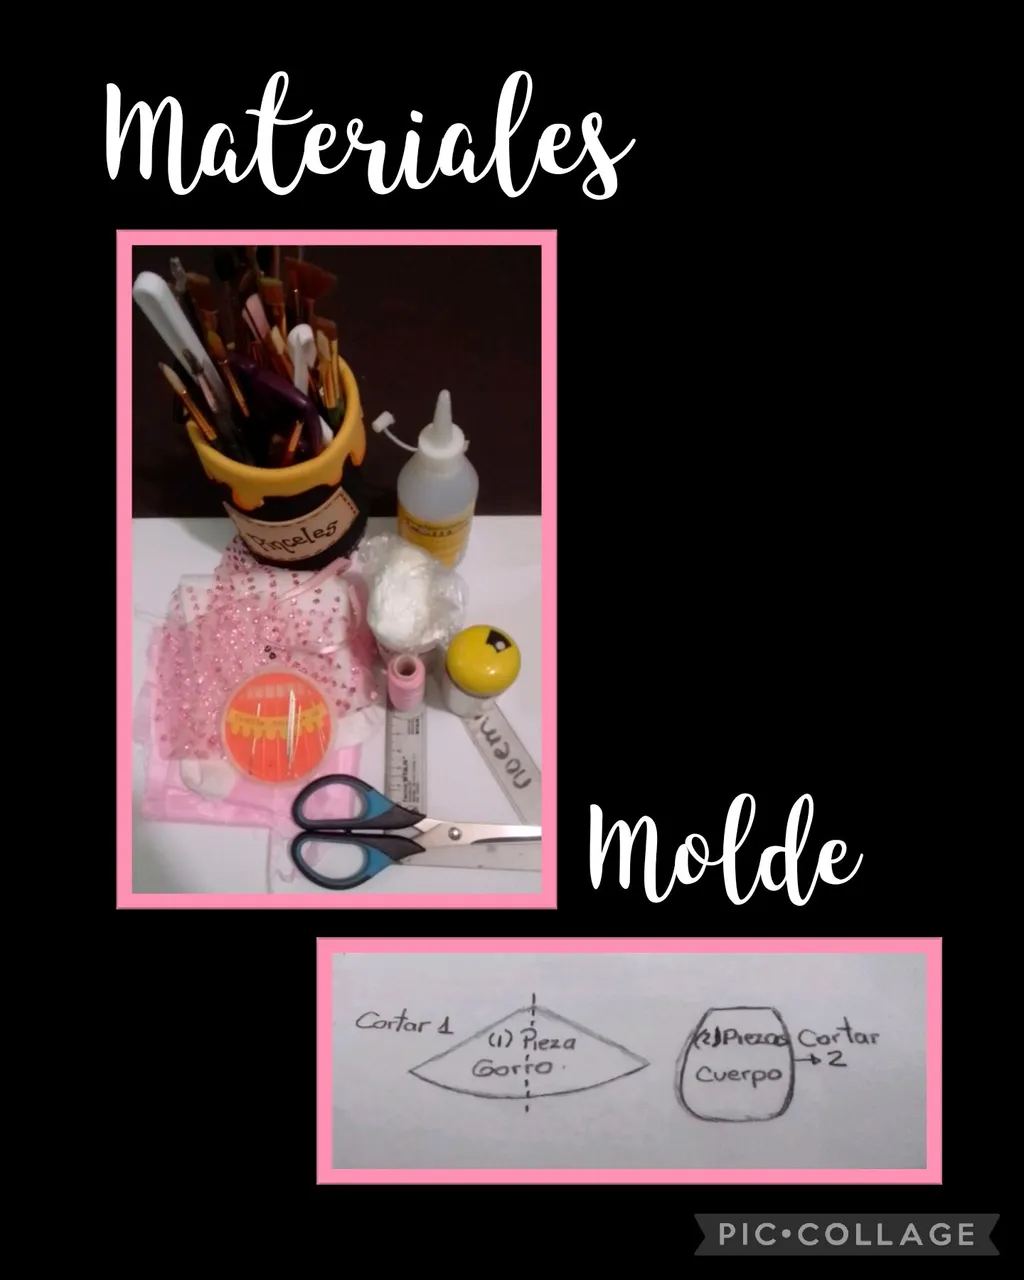
| Masa flexible | Pintura color piel | Pinceles |
|---|---|---|
| Telas (recortes) | Algodón relleno | Hilos |
| Agujas y alfileres | Tijera | Cinta |
| Regla | Palillos | Mostacillas negras |
| Cartulina escolar blanca | Tiza | goma espuma |
| Espátula plástica | Rabo de ratón | Pedrería |
| Molde o patrón |
Paso 1:
Hacer carita:
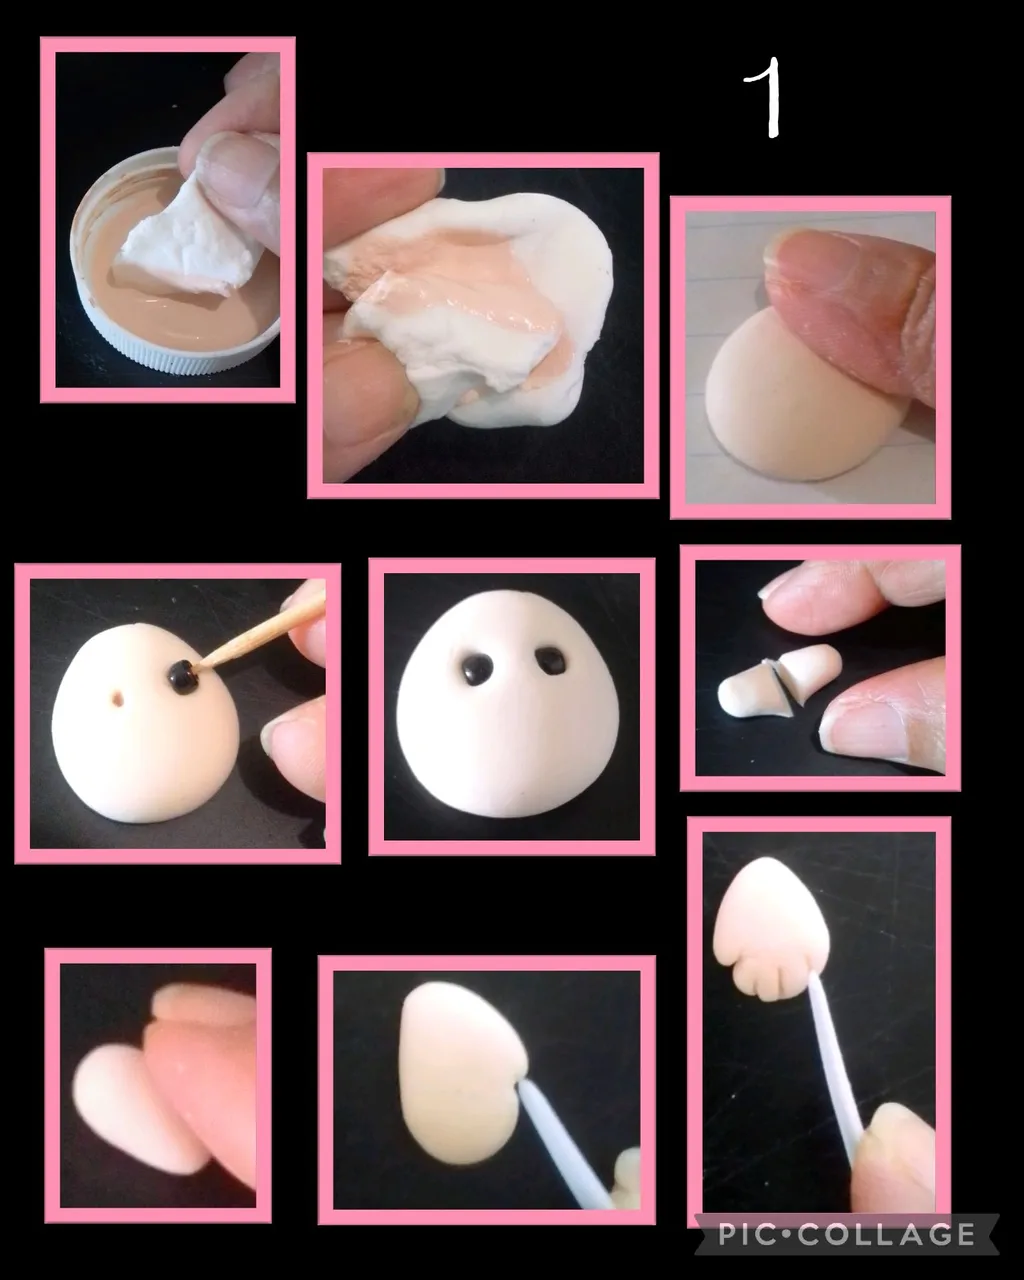
- Toma una porción de masa, moja en pintura color piel y amasa hasta unificar el color, luego haz una esfera y dale forma de gota.
- Coloca sobre la mesa y haz un poco de presión en la parte superior donde luego con un palillo harás dos pequeños orificios e insertarás las mostacillas empujando con un palillo hasta que entren.
- Luego haz un pequeño cilindro y corta a la mitad, igual dale forma de gota, a un lado haz un pequeño corte con una espátula para formar el dedo pulgar y después marca los otros dedos con la espátula.(ver foto).
Paso 2:
Cortar coser y armar gorro y cuerpo.
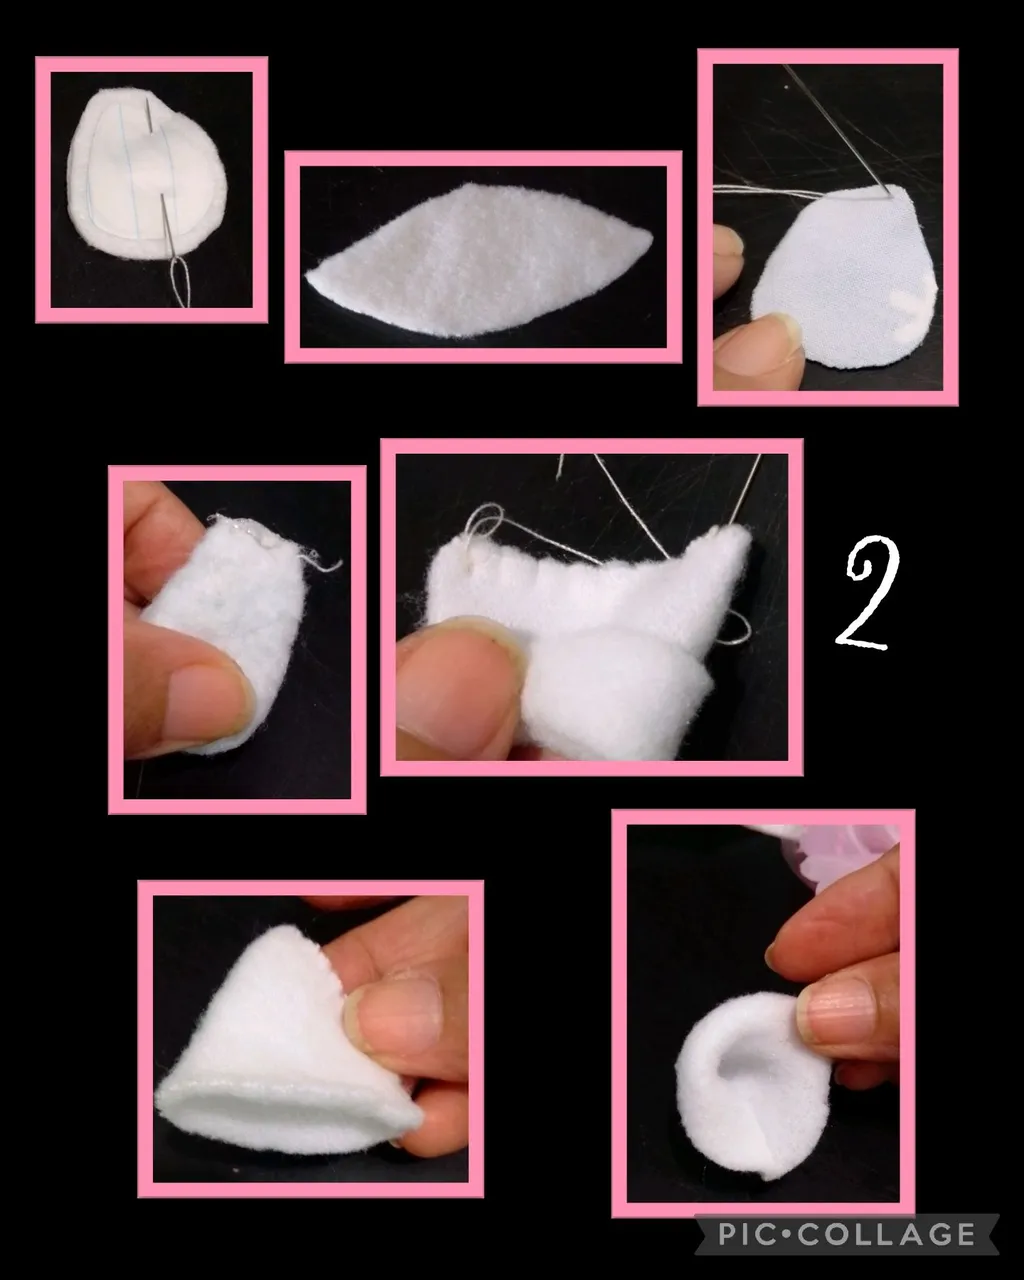
- Después que seque la cabecita, mide el contorno de esta y diseña un triángulo pero redondeando un poco la parte inferior (ver foto).
- Igualmente dibuja el cuerpo un poco mas alto que la cabeza, recorta el molde y fija a la teja y recorta ambas piezas.
- Recorta el cuerpo y gorro por los moldes y comienza cosiendo con punto ojal o utiliza la puntada que prefieras.
Paso 3:
Cortar, coser y armar vestido.
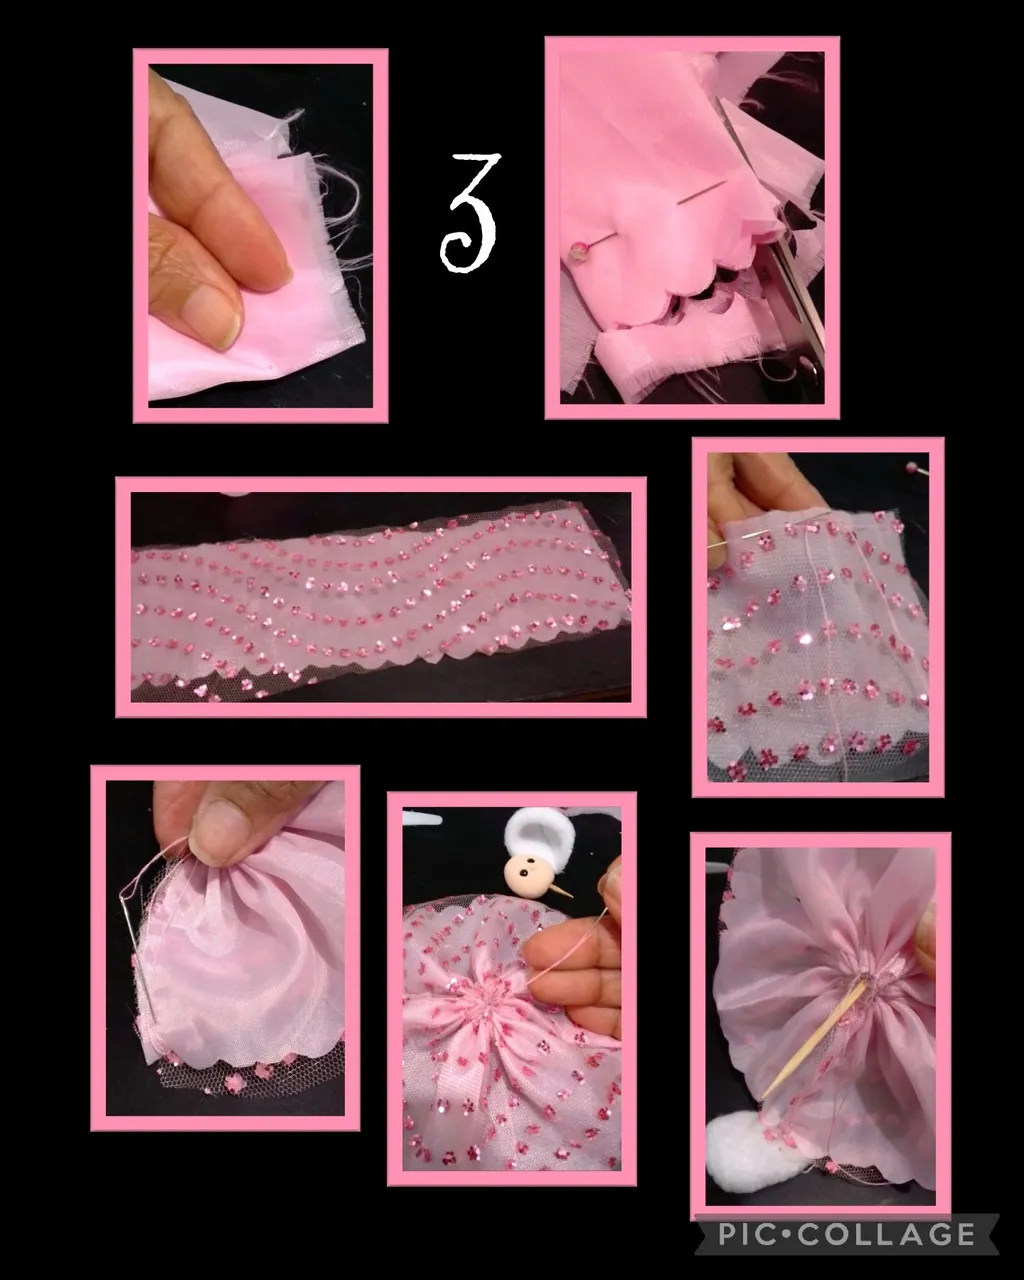
- Dobla la tela del forro en seis partes de 5cms c/u que serán 30cm, fija con un alfiler y recorta haciendo ondas luego y recorta a la altura que necesites, te quedará un rectángulo.
- Ahora recorta en la tela escarchada otra pieza igual e hilvana por la parte superior todo el contorno de la tela y hala para arruchar.
- Une los extremos y cose para cerrar la pieza, luego inserta el palillo que está dentro de la cabecita.
Paso 4:
Coser cuerpo al vestido y pegar manitos.
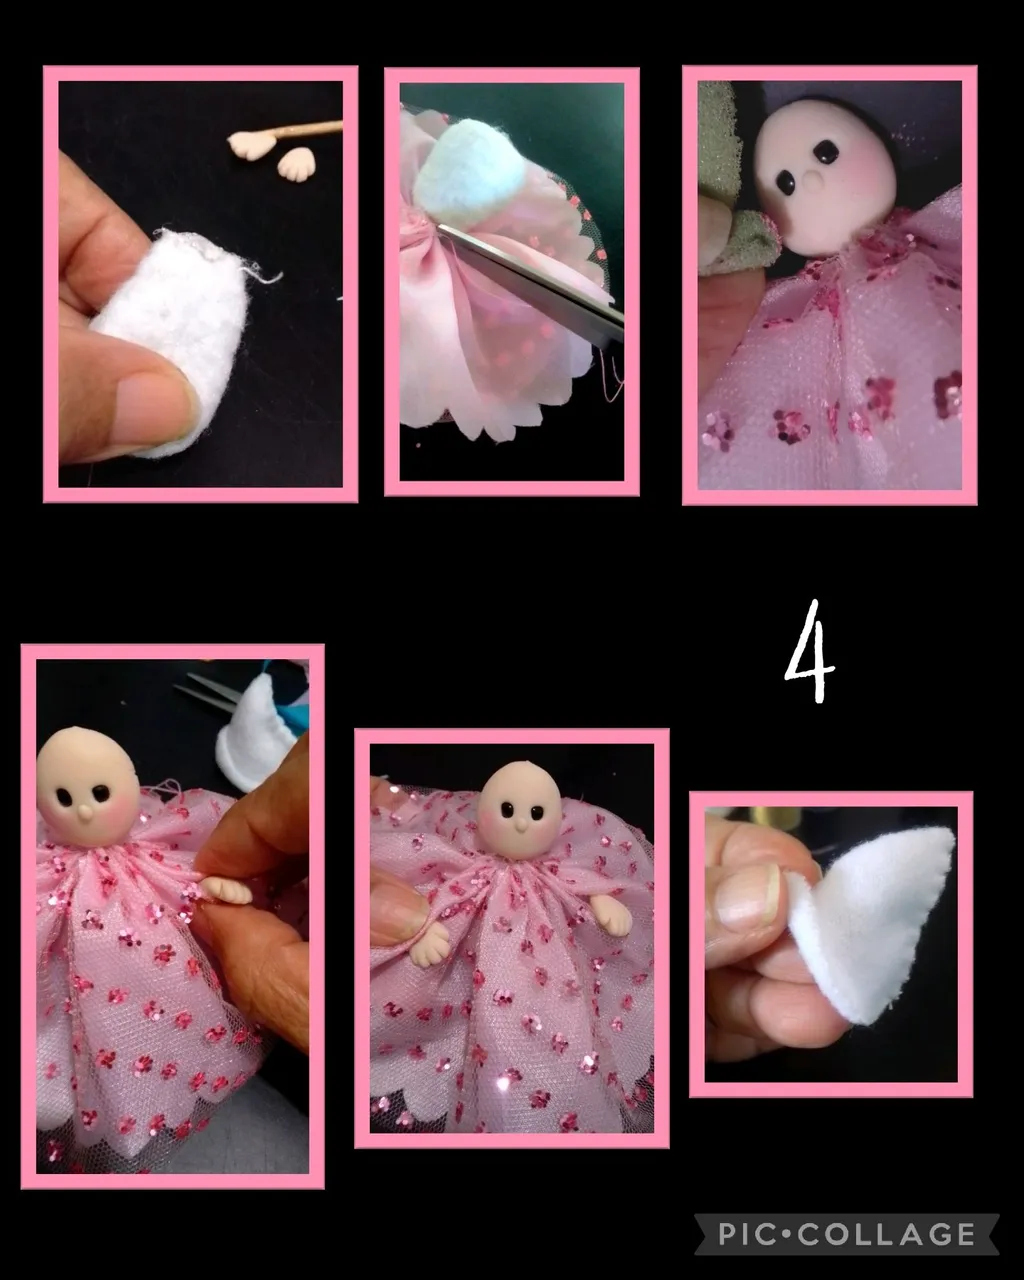
- Después de rellenar el cuerpo inserta en el palillo y cose la parte de arriba del cuerpo al vestido haciendo pequeñas puntadas.
- Con una esponjita y tiza dale color a las mejillas, luego aplica silicón en la parte superior de las manitos y pega la tela que parezca que son mangas.(ver foto)
- Ahora dobla la orilla del gorrito hacia arriba.
Paso 5:
Hacer chupón y decorar muñequita.
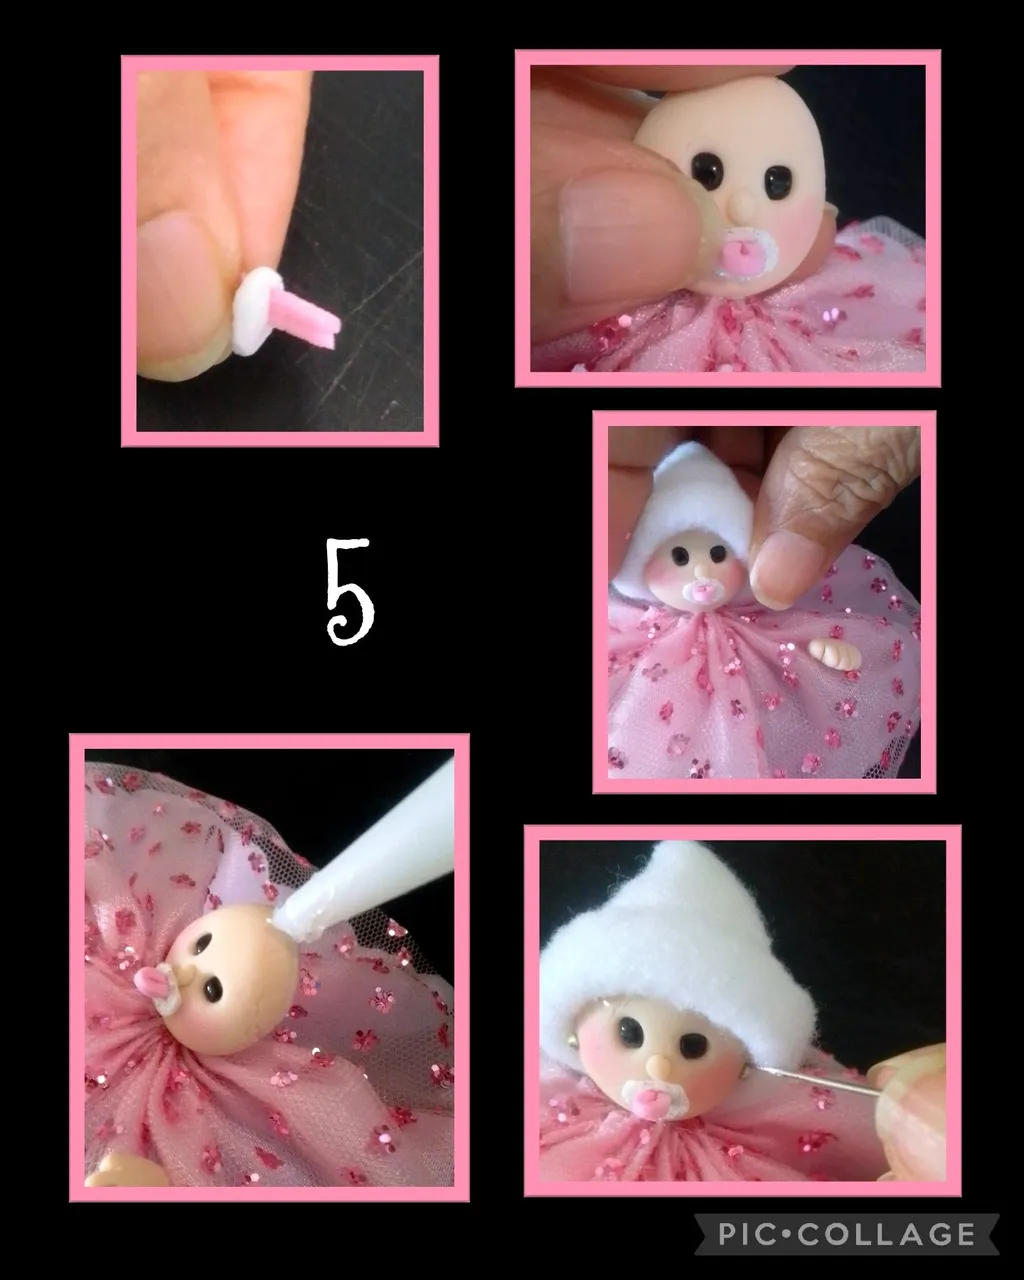
- Recorta en foami un mini óvalo, haz una pequeño corte e inserta una tirita de foami, recorta el restante y pega justo debajo de la nariz.
- Aplica silicón en la cabeza y pega el gorrito luego aplica dos puntos de pegamento a los lados y pega unos brillanticos como zarcillos, presiona con una aguja hasta que peguen.
Paso 6:
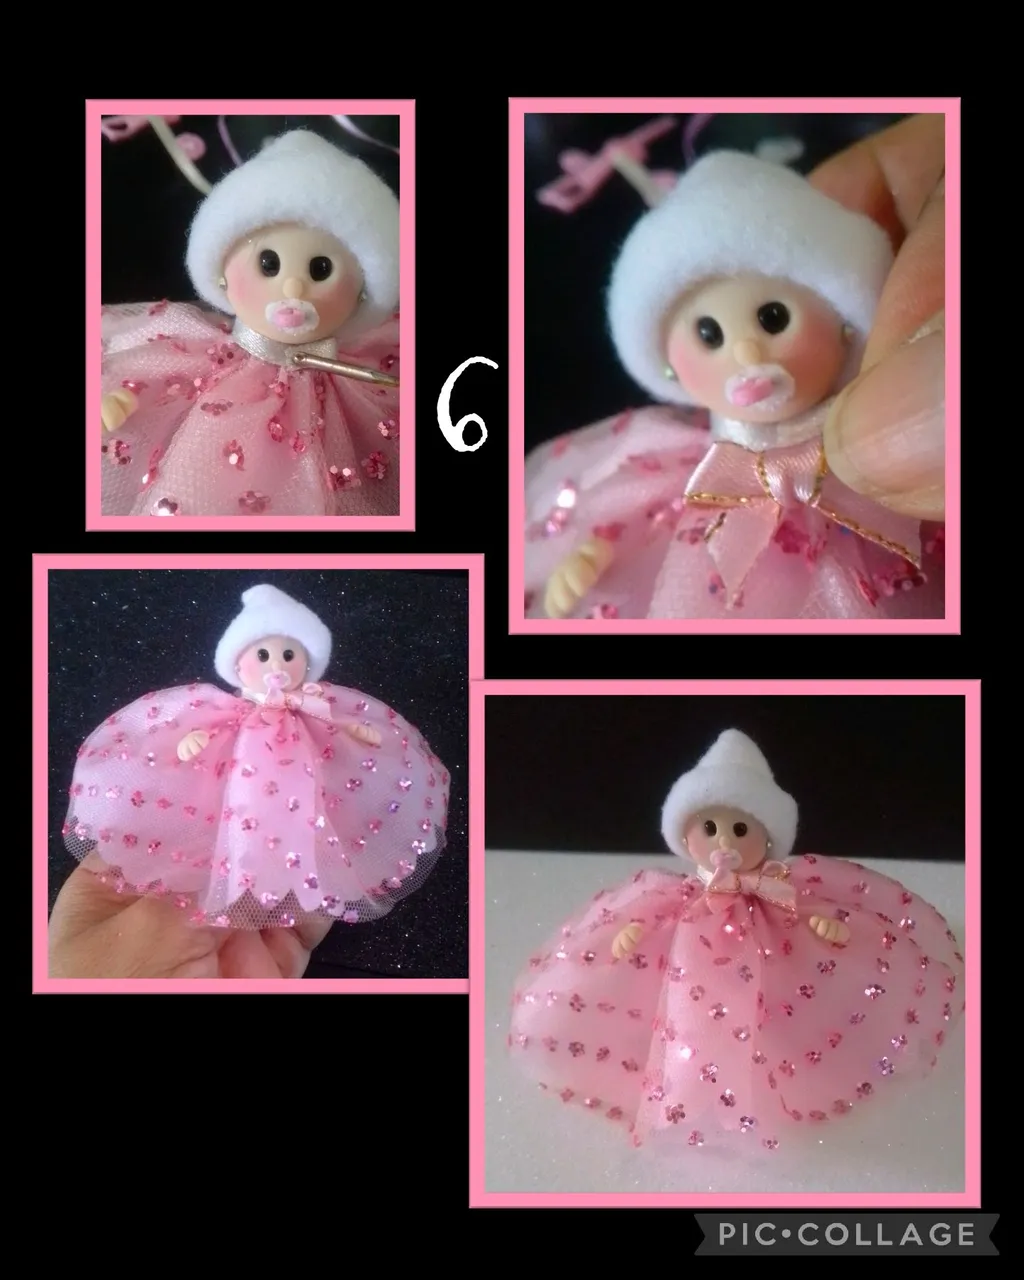
- Para tapar el fruncido, coloca una cinta alrededor del cuello, aplica silicón y pega, luego haz un lacito y pega en el cuello.
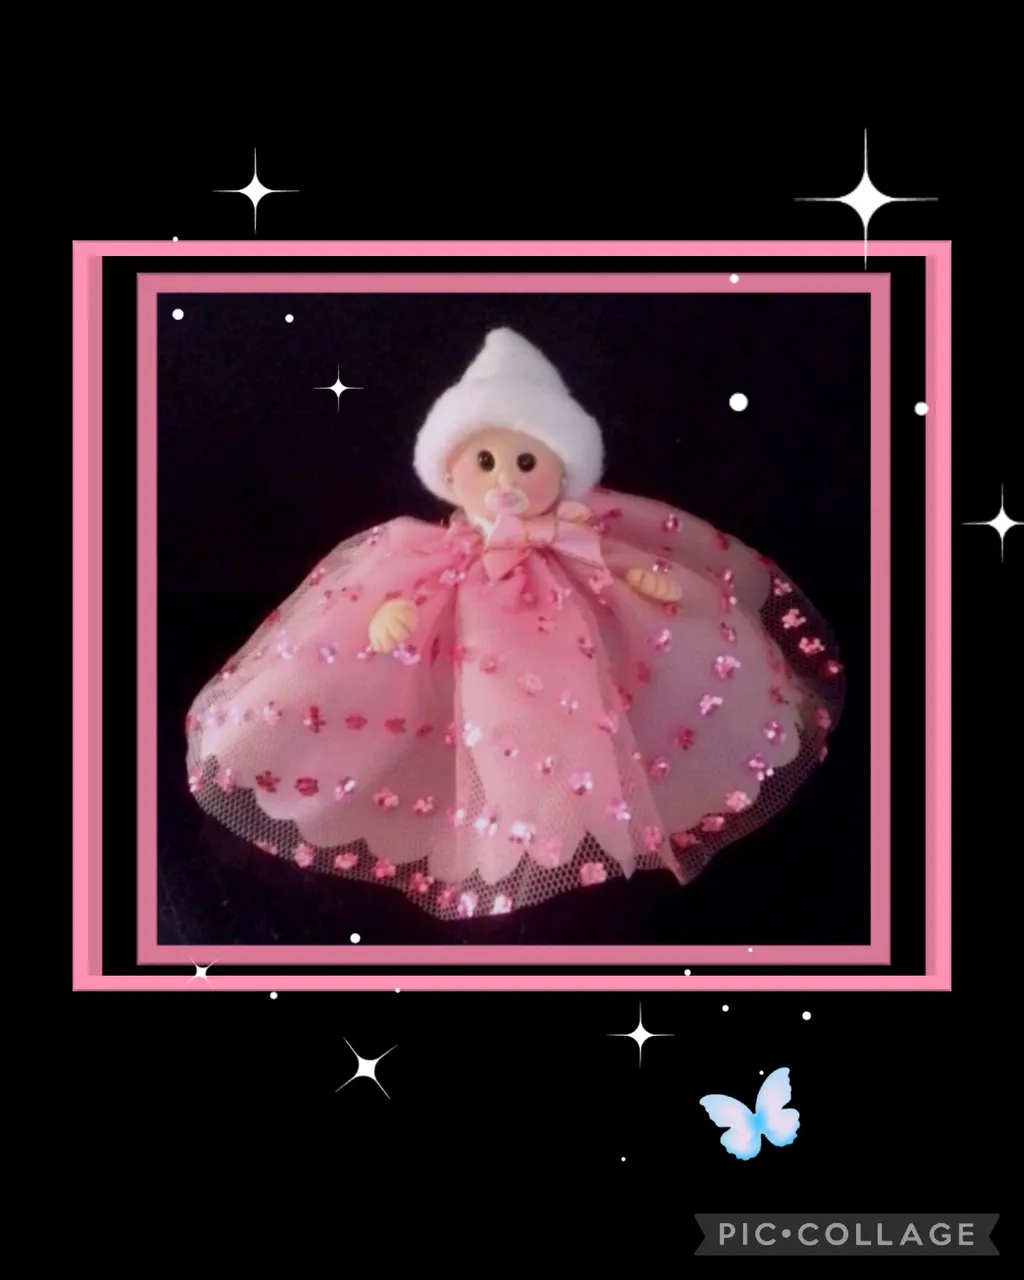
Y así quedará terminada esta linda muñequita.
Paso 7:
Transformar y aumentar medidas del patrón.
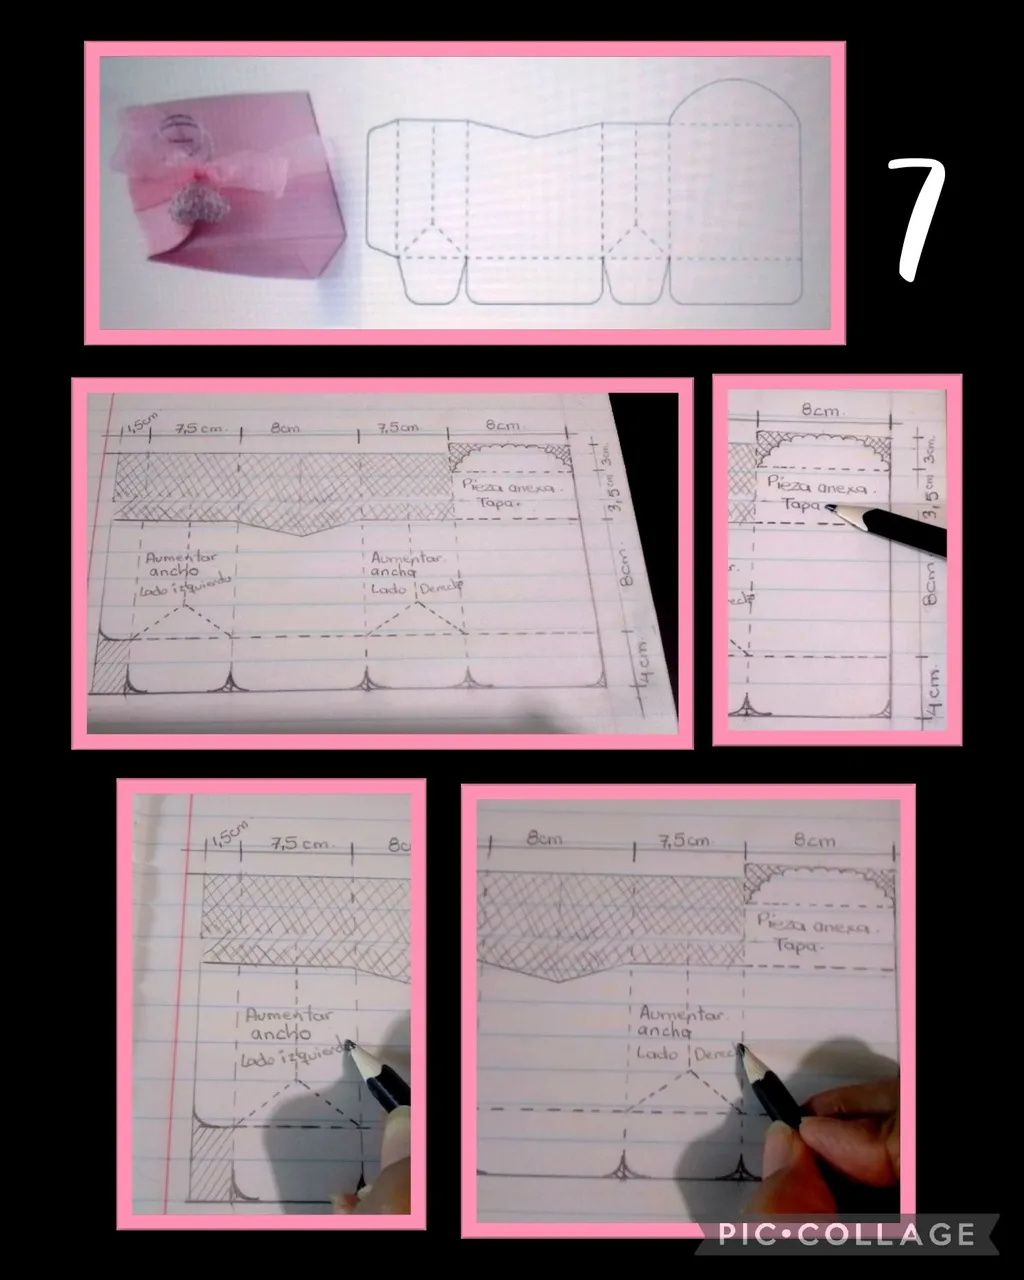
- Lo primero que harás será:
1- Tomar las medidas del artículo que vas a colocar dentro de la caja.
2- Después comenzarás a trazar en una hoja para hacer tu patrón, como ven la caja modelo es delgada entonces lo que hice fue aumentar el ancho casi al doble pero realicé las mismas divisiones del patrón original.
3- Al aumentar el ancho, debes aumentar proporcionalmente también el ancho de las pestañas inferiores para que al doblar cierren totalmente la caja.
Ejemplo: si los laterales miden 8 cm las pestañas inferiores deben medir aproximadamente 4,5 o 5cm c/u.
4- También tendrás que anexar a la pestaña de la tapa, una parte con el ancho que desees para la parte de arriba como la muestro en la 3ra foto, ya que si la cierras sin hacer el aumento, puede dañar el recuerdo ya que no tiene mucha altura.
Como puedes ver solo cambié el ancho y anexe una pieza a la tapa.
Paso 8:
Armar caja.
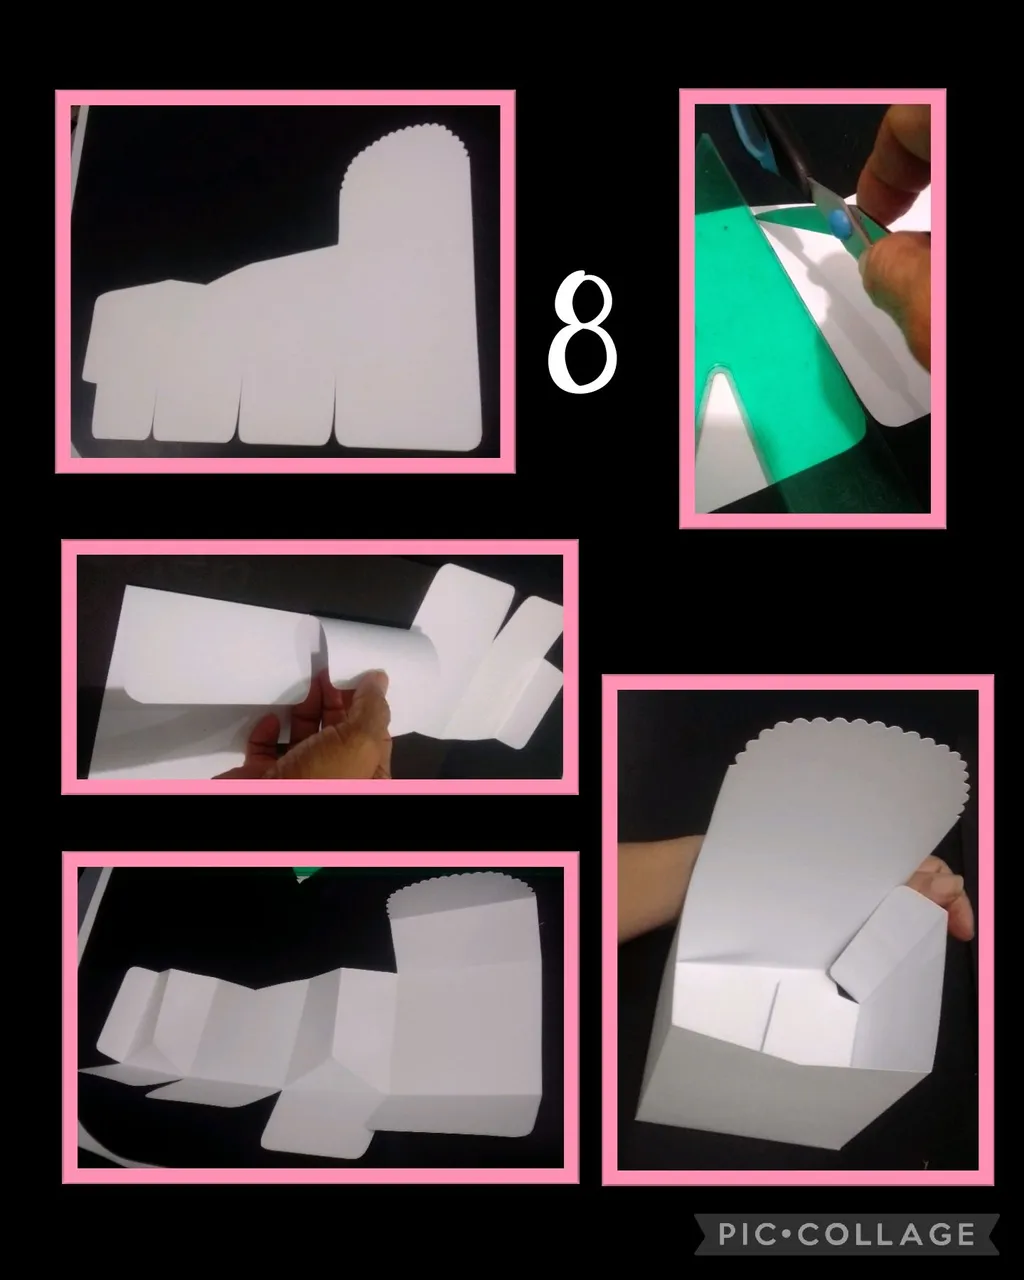
- Recorta el patrón de la caja y transfiere a la cartulina.
- Recorta todo el contorno, luego recorta la tapa con una tijera de ondas y con la punta de la tijera pasa las líneas divisorias ayudándote con una escuadra para que las líneas queden perfectas.
- Ahora comienza a hacer todos los dobleces.
Paso 9:
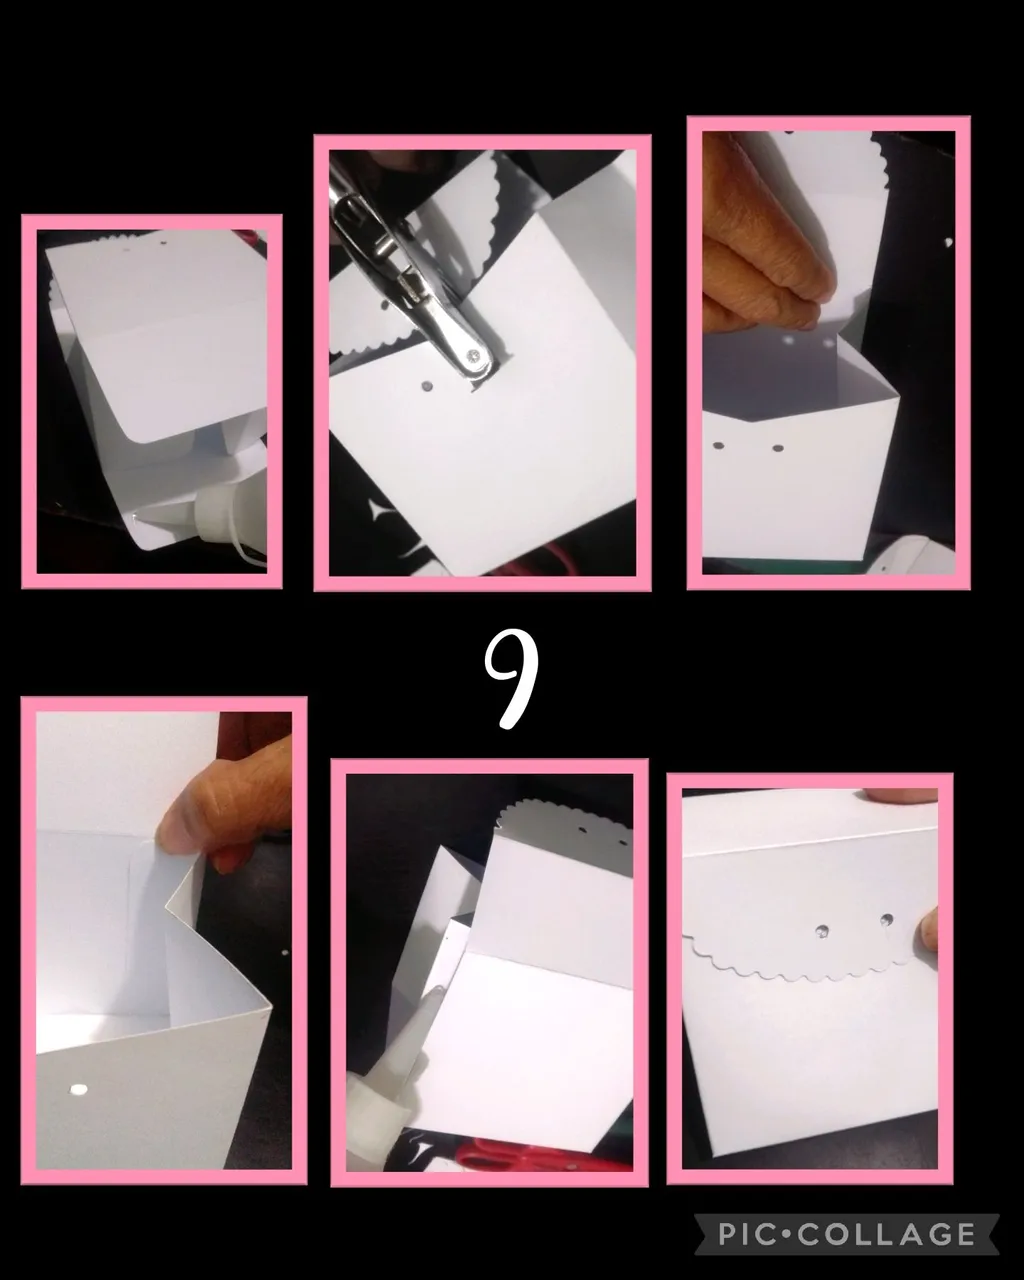
- Con una saca bocado haz 2 orificios en la tapa y luego cierra y marca en la parte frontal para que coincidan a la hora de meter el cordón o cinta.
Aplica silicón y pega para armar la cajita.
Paso 10:
Decorar la caja.
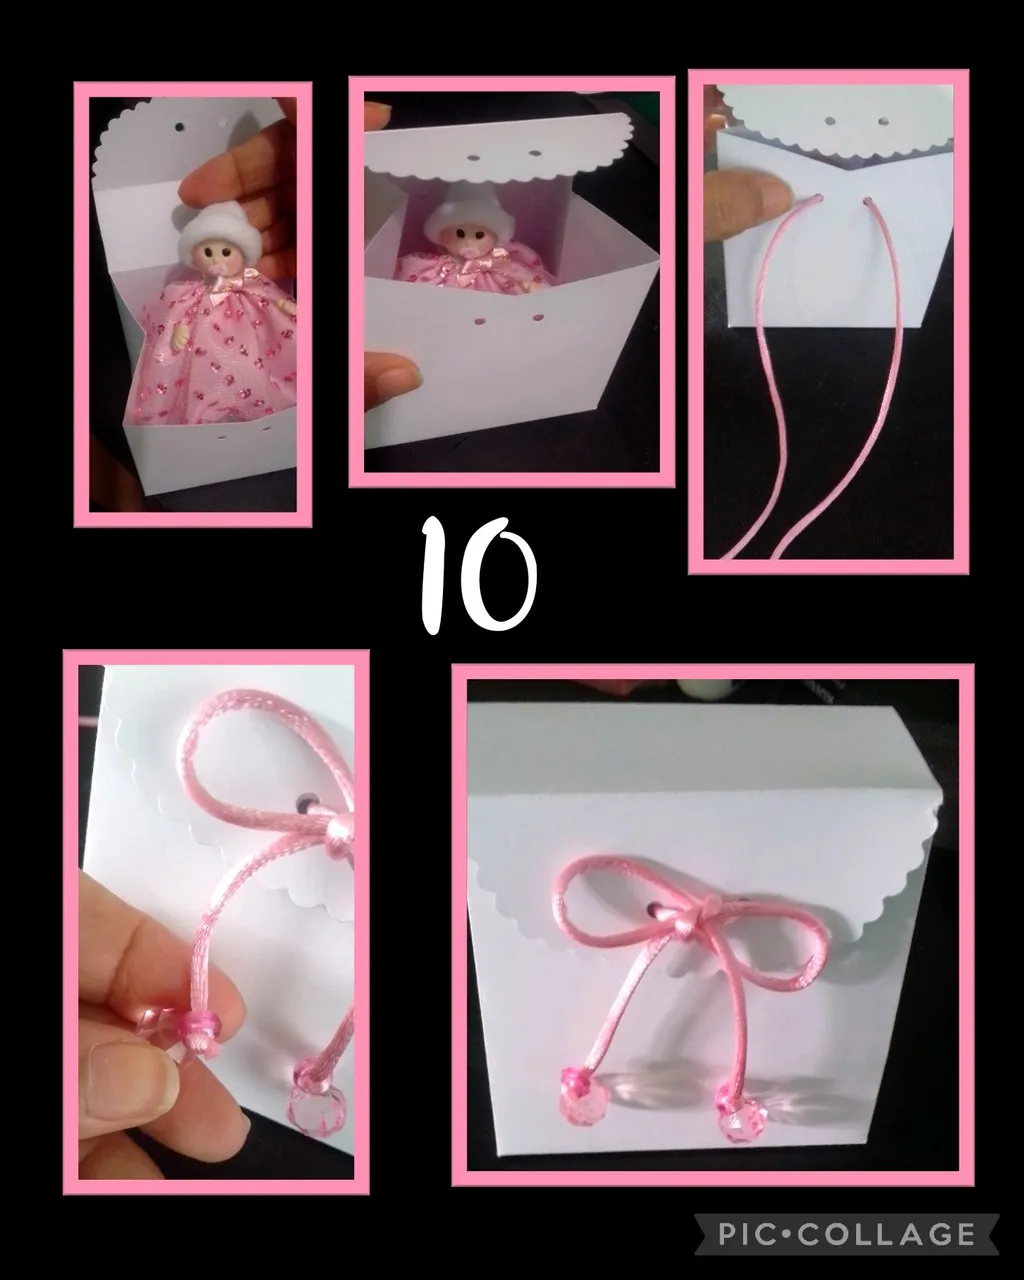
- Ahora mete la muñequita dentro de la caja.
- Mete el cordón por los cuatro orificios y haz un lacito, puedes decorar en las puntas del cordón con una piedritas rosadas.
Paso 11:
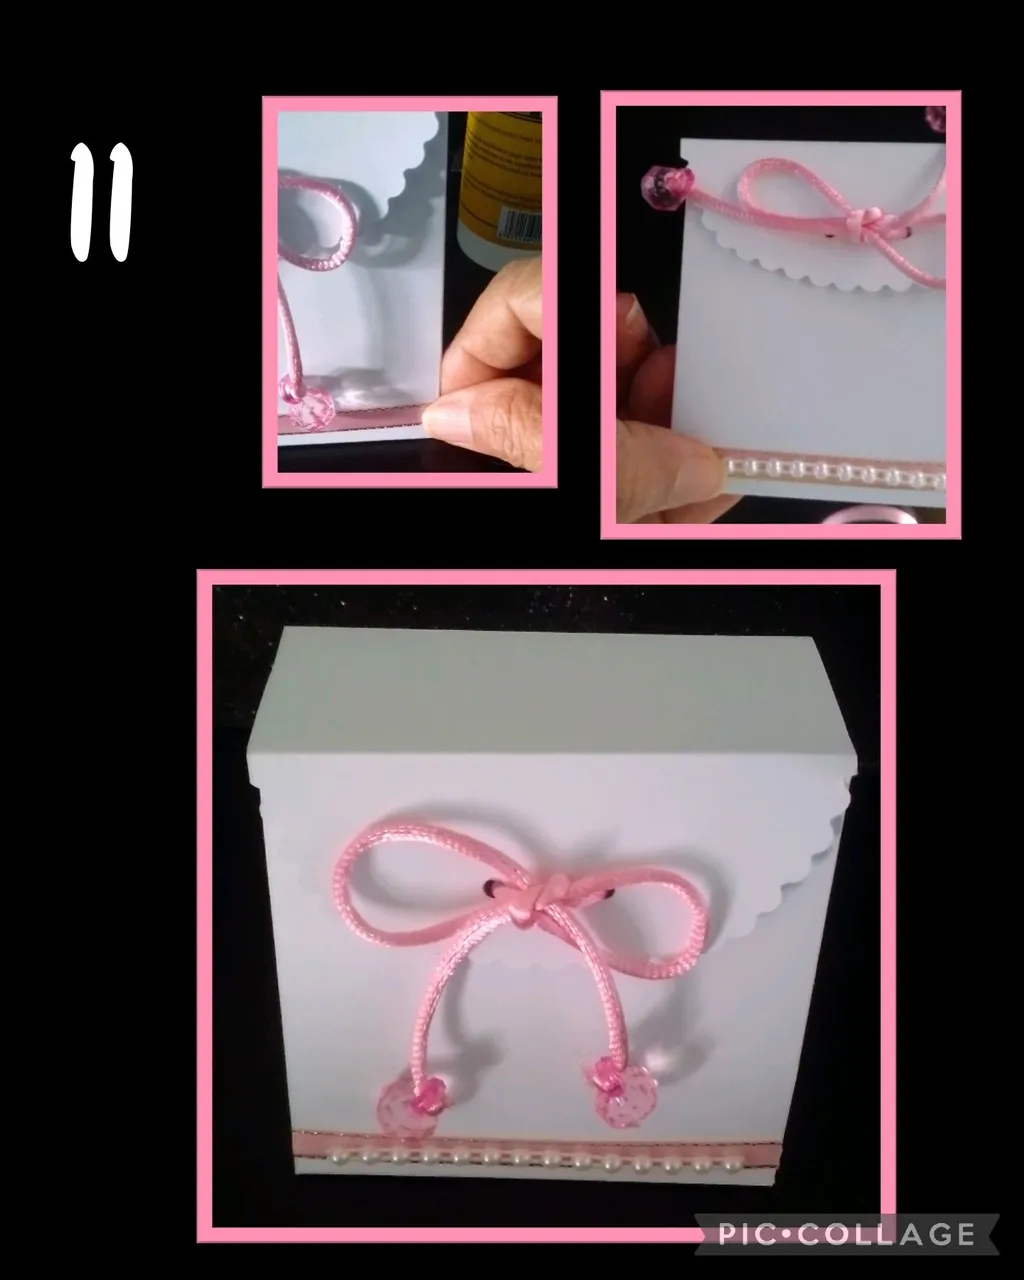
Por último pega una cinta en la parte inferior de la caja, deja secar y bueno dentro de mis materiales conseguí un pedacito de perla corrida y la pegué sobre la cinta, creo le quedó muy bonita.
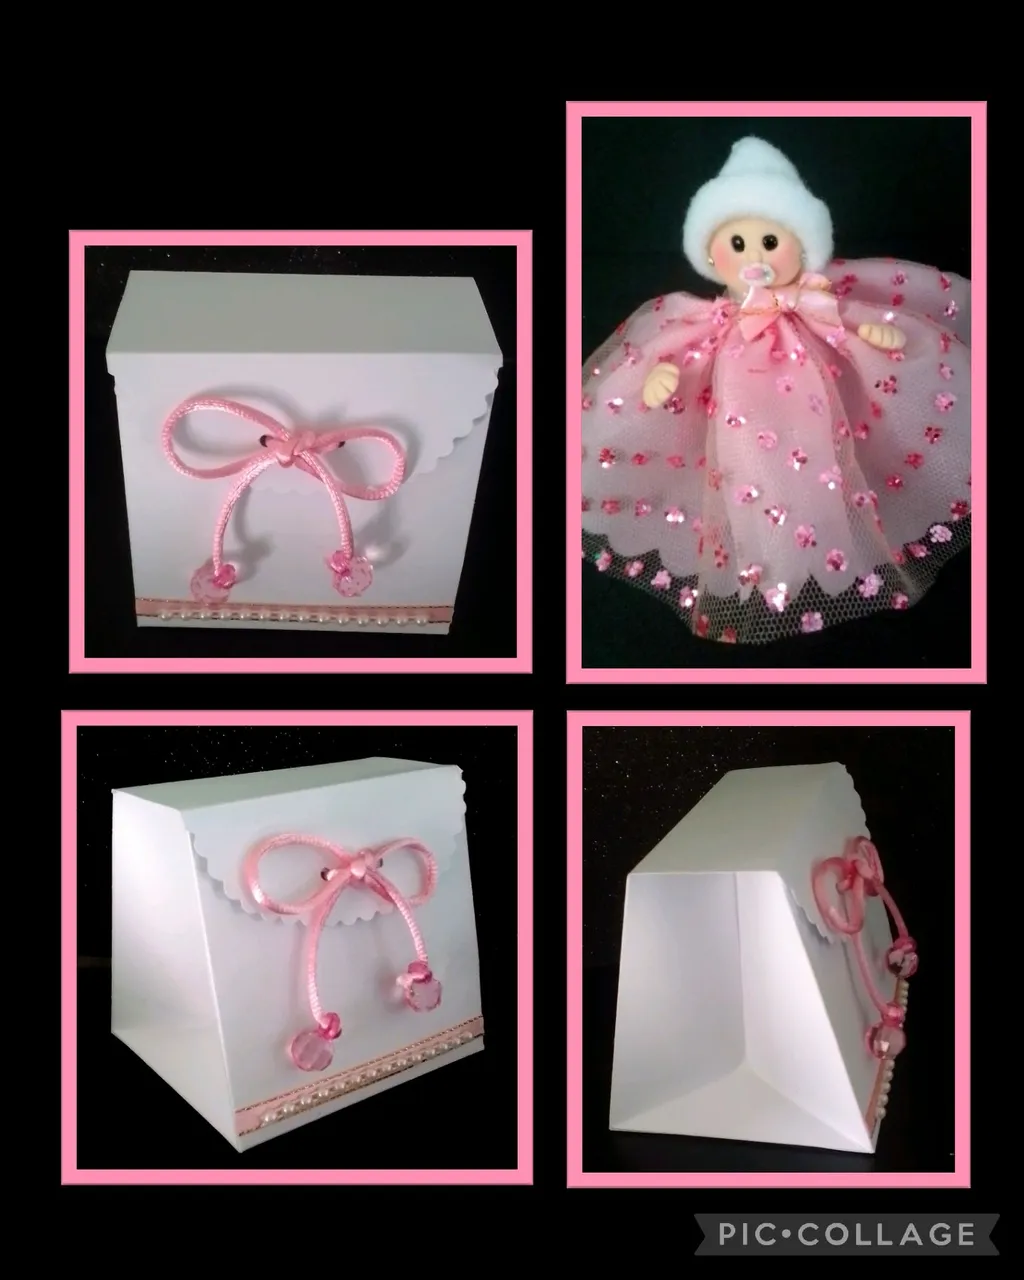
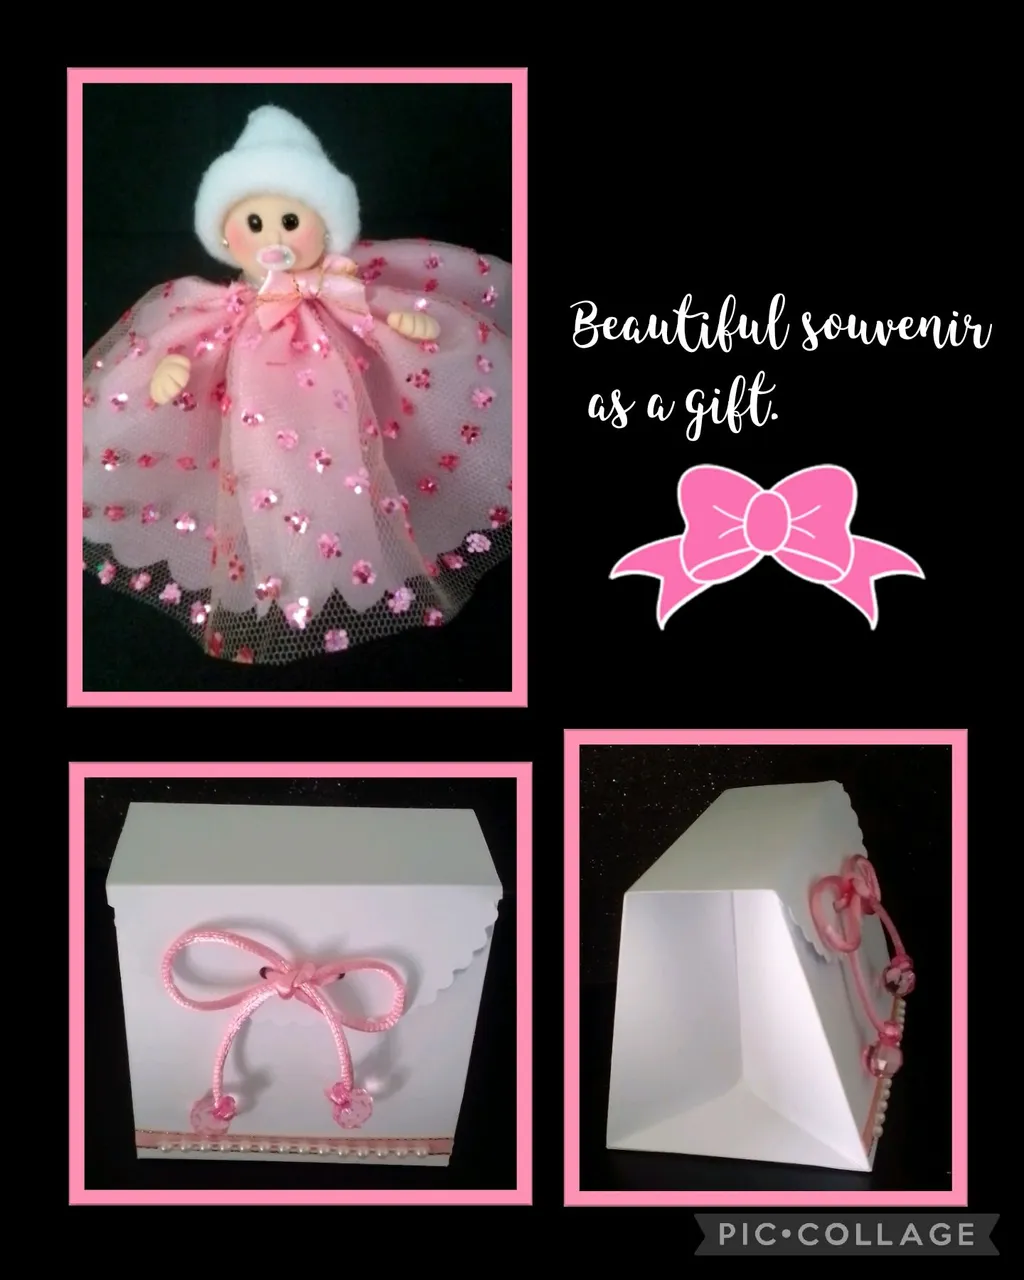
Y ahora te muestro el resultado de mi publicación, espero te guste este Recuerdo que puedes regalar en la ocasión que prefieras.!
Fuentes:
https://www.pinterest.es/pin/476255729356221837/?nic_v3=1a6XHDGLn
https://www.pinterest.com/pin/490892428115206105/?nic_v3=1a6XHDGLn

Y ya para despedirme les diré que usé el Traductor DeepL, también las Etiquetas HTML y las fotos las capturé con mi Blu G5 y edité con Pic Collage.
Espero sea de utilidad este tutorial que hice con mucho cariño para ti y hayas aprendido como puedes hacerlo tu mismo.
Si tienes alguna duda, estoy a tu orden, y muchas gracias por visitarme y apoyarme.
Feliz fin de semana.
Saludos.
English:
Good evening dear friends.
Welcome everyone to my blog.
For health reasons I was absent but I'm back and happy to share with you a tutorial that I hope you find useful.
Today I'm going to show you how I made a cute souvenir for a baby's christening, but it can also be useful for any other occasion, it's a doll made with flexible dough and I made an easy and cute dress with some fabric scraps,
I will also show you how to transform a mold of a box that I loved but, for the doll I did not use it because it is very narrow and later you will see how simple it is.
So I invite you to do it together.
You will need:
| Flexible dough | Skin-colored paint | Brushes |
|---|---|---|
| Fabrics (cut-outs) | Filled cotton | Threads |
| Needles and pins | Scissors | Tape |
| Ruler | Chopsticks | Black beads |
| White school cardboard | Chalk | Foam rubber |
| Plastic spatula | Mouse tail | Rhinestones |
| Mold or pattern |
Step 1:
Make a face:
- Take a portion of dough, dip it in skin-colored paint and knead until the color is even, then make a sphere and shape it into a drop.
- Place it on the table and make a little pressure on the upper part where you will make two small holes with a toothpick and insert the beads pushing with a toothpick until they fit.
- Then make a small cylinder and cut it in half, make a drop shape, on one side make a small cut with a spatula to form the thumb and then mark the other fingers with the spatula (see picture).
Step 2:
Cut sew and assemble cap and body.
- After the head is dry, measure the outline of the head and draw a triangle but round the bottom a little (see photo).
- Also draw the body a little higher than the head, cut out the mold and attach it to the tile and cut out both pieces.
- Cut out the body and hat from the molds and start sewing with buttonhole stitch or use the stitch of your choice.
Step 3:
Cut, sew and assemble dress.
- Fold the lining fabric in six parts of 5cms each which will be 30cm, fix with a pin and cut making waves and then cut to the height you need, you will have a rectangle.
- Now cut another piece of the same size out of the frosted fabric and baste all the way around the top of the fabric and pull to gather.
- Join the ends and sew to close the piece, then insert the toothpick that is inside the little head.
Step 4:
Sew body to the dress and attach little hands.
- After stuffing the body, insert the toothpick and sew the top of the body to the dress, making small stitches.
- With a little sponge and chalk color the cheeks, then apply silicone on the top of the little hands and glue the fabric to make it look like sleeves (see photo).
- Now fold the edge of the beanie upwards.
Step 5:
Make pacifier and decorate doll.
- Cut out a mini oval in foami, make a small cut and insert a strip of foami, cut out the rest and glue just below the nose.
- Apply silicone on the head and glue the hat, then apply two dots of glue on the sides and glue some sparkles as tendrils, press with a needle until they stick.
Step 6:
- To cover the ruffle, place a ribbon around the neck, apply silicone and glue, then make a bow and glue on the neck.
And this is how this cute little doll will be finished.
Step 7:
Transform and increase the measurements of the pattern.
- The first thing you will do is:
1- Take the measurements of the item you are going to place inside the box.
2- Then you will start tracing on a sheet of paper to make your pattern, as you can see the model box is thin so what I did was to increase the width almost double but I made the same divisions of the original pattern.
3- When you increase the width, you must also increase proportionally the width of the lower tabs so that when folded they close the box completely.
Example: if the sides measure 8 cm, the lower tabs should measure approximately 4.5 or 5 cm each.
4- You will also have to attach to the flap of the lid, a part with the width you want for the top as I show in the 3rd photo, because if you close it without making the increase, it can damage the souvenir as it does not have much height.
As you can see I only changed the width and attached a piece to the lid.
Step 8:
Assemble box.
- Cut out the box pattern and transfer to cardstock.
- Cut out the entire outline, then cut out the lid with a wave scissors and with the tip of the scissors pass the dividing lines helping you with a square so that the lines are perfect.
- Now start making all the folds.
Step 9:
- With a hole punch make 2 holes in the lid and then close and mark on the front so that they coincide at the time of inserting the cord or ribbon.
Apply silicone and glue to assemble the box.
Step 10:
Decorate the box.
- Now put the doll inside the box.
- Put the string through the four holes and make a bow, you can decorate the ends of the string with a pink pebble.
Step 11:
Finally glue a ribbon on the bottom of the box, let it dry and well within my materials I got a little piece of pearl and glued it on the ribbon, I think it was very nice.
And now I show you the result of my publication, I hope you like this souvenir that you can give as a gift in the occasion that you prefer!
Sources:
https://www.pinterest.es/pin/476255729356221837/?nic_v3=1a6XHDGLn
https://www.pinterest.com/pin/490892428115206105/?nic_v3=1a6XHDGLn
And now to say goodbye I will tell you that I used the Translator DeepL, also the HTML Tags and the photos were captured with my Blu G5 and edited with Pic Collage.
I hope this tutorial that I made with much love for you is useful and you have learned how you can do it yourself.
If you have any questions, I'm at your service, and thank you very much for visiting and supporting me.
Happy weekend.
Greetings.