(ENG)
Hello everyone, I hope you are well enjoying a nice weekend, full of a lot of tranquility and family union. I am pleased to be with you today, it is this great community, full of great content creators. Today I will show you a simple and very nice project, where I put the crochet technique into practice, to make a nice and delicate arrangement of flowers, which well, you could use to decorate any space. The invitation is to follow me and I will show you how to do it.

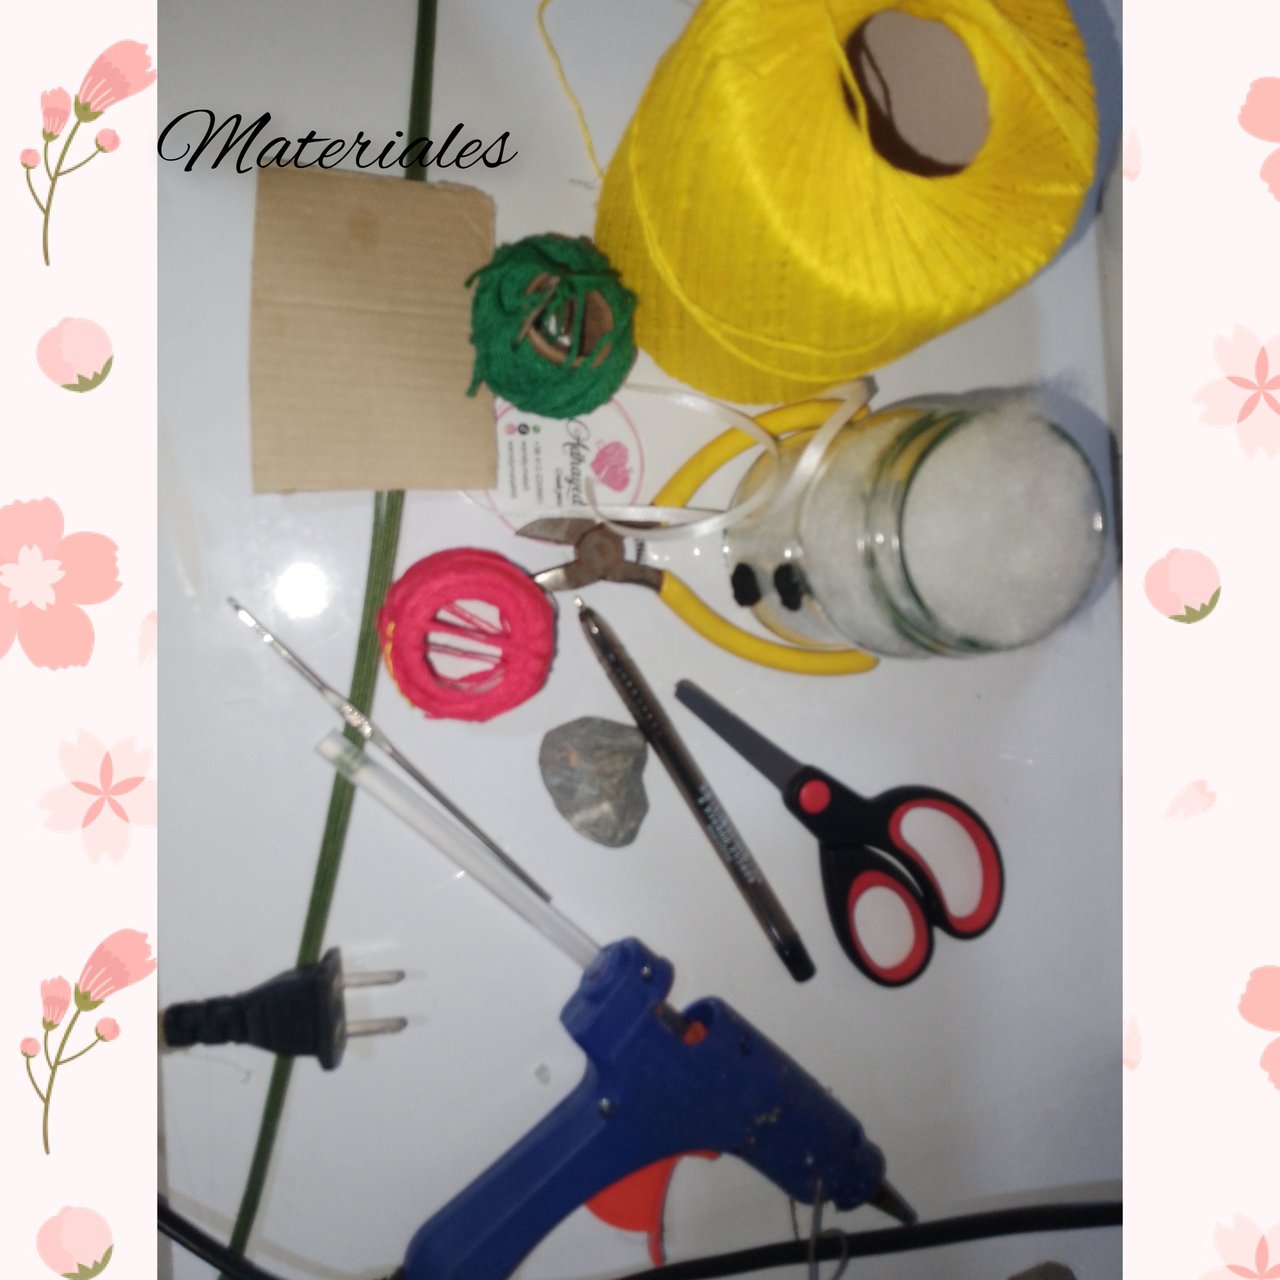
Used materials:
. Threads for weaving, colors (white, yellow, green and red).
. Florist wire.
. Knit needle.
. Piece of cardboard.
. Stuffed.
. Glue.
. Silicone
. Scissors.
. Pencil.
. Waterfall.
Creative process:
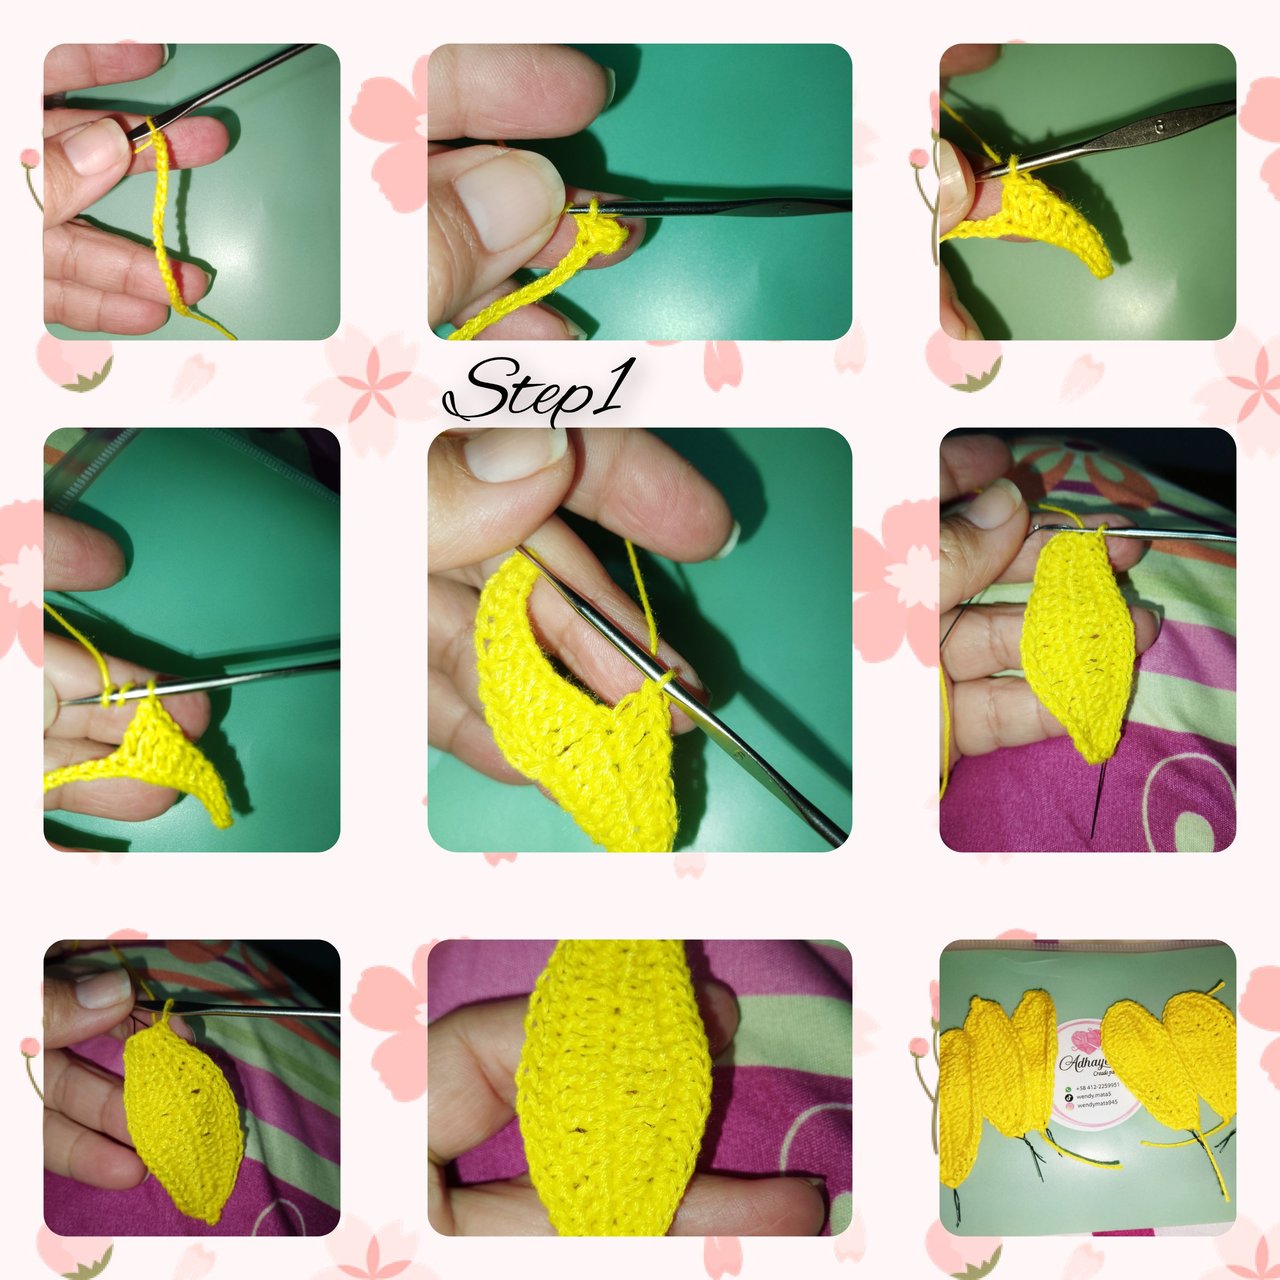
1.) Tejo, twenty points chains, I make a three -point increase and I advance weaving half a point at each point chains, in this way, I travel both sides, until you reach the starting point. I take a second round, and I start using florist wire, covering it, simultaneously with each point. I start weaving, four points, four double points, four six high points, four double points and two media points, in this way, weave on the next side, to form a long and colorful petal, I repeat and weigh five more petals.
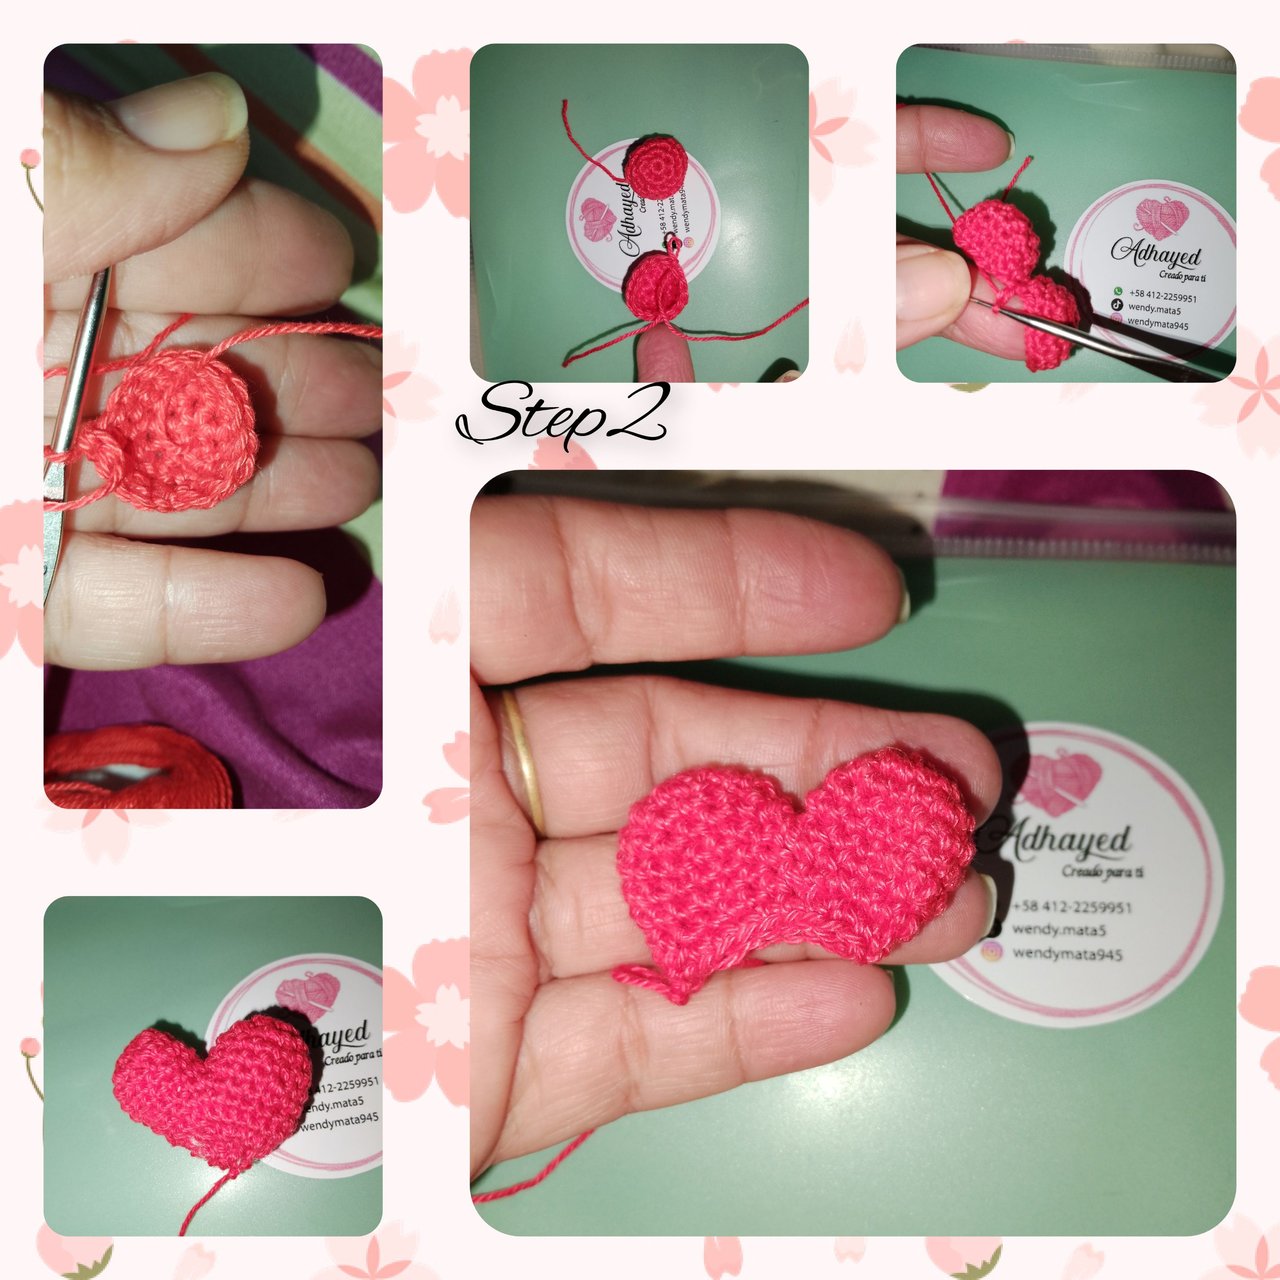
2.) Using the red thread, I make a magical ring, within the six media points, weigh two laps of twelve points, weigh one more and one, continues to weaving to form a small heart, fill and introduce by placing some of glue, a piece of height sticks.
3.) I start traveling, the heart, hitting the petals and leaving it, locked up. I open the petals and formed a flower.
4.) To form a second flower, weigh four circles, start weaving eight media points. And then eight increase for sixteen points. For the next one, an increase after one point, for the next pass, weaves an increase after two media points, in this past, Hire placing florist wire, until the route is completed, short the residual wire and finished. To assemble the pistils, short three pieces of wire, bend in two, and turn around, at the ends, leaving a small hole in the upper part, I place in this yellow thread part and the lower part, cover with green thread, also applying silicone points.
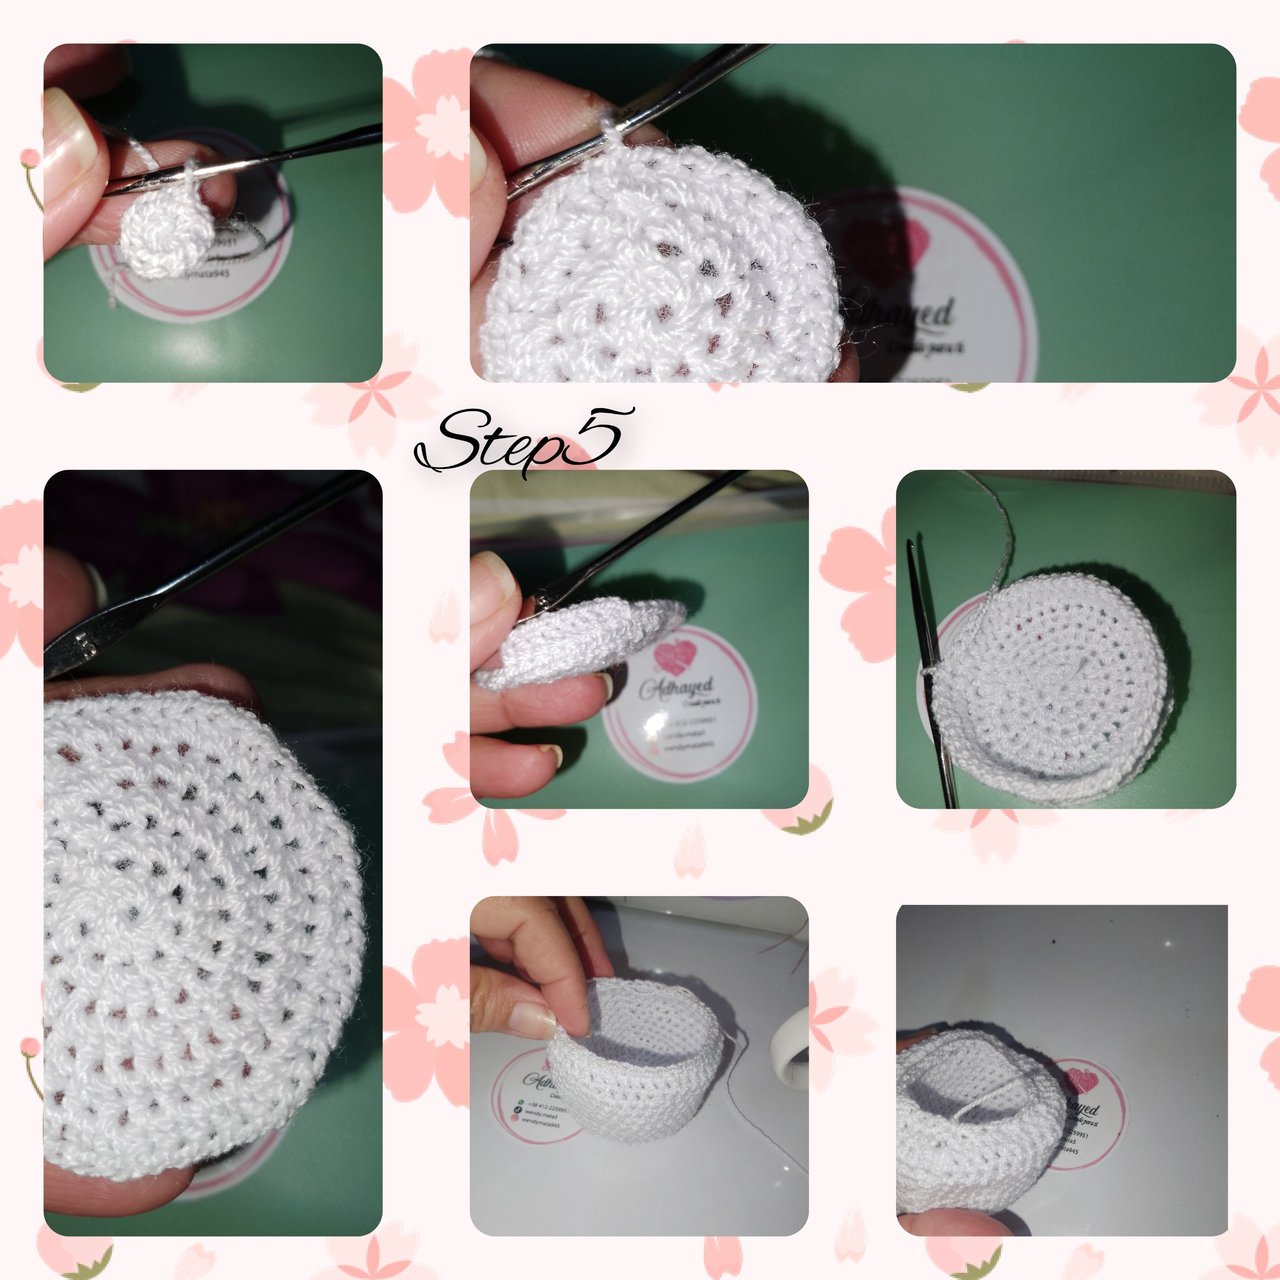
5.) In a magical ring, weigh six media points, and making increases, weaves six consecutive laps, and reached a total of thirty -mid -points, taking the back strand, I make a break and weigh ten laps of 30 half points. Weigh a return making a reduction, after a half point, short the thread and remote.
In this way, weed the pot.
6.) Cardboard frame a circle ofThe same size to the bottom of the pot and introduce the circle. Using the green thread, weighing, as the bottom of the pot and sewing, with the walnut needle hit the lid
7.) For the heart flow Half, I stop and place the leaves. Continuous, silicone applied at the bottom and hit the center of the pot. For the second flower, wears a small leaves, I repeat and hit the pot.
In this way, I conclude the project of today, I wish it has been to your liking.
. All the photos are of me property.
. Use colorless to show the steps.
. Use language translator.
Grateful you have followed me until the end. They will always be welcome to me blog. It will be up to an upcoming opportunity.
( ESP)
Hola a todos, espero se encuentren bien disfrutando de un lindo fin de semana, lleno de mucha tranquilidad y unión familiar. Me complace estar hoy con ustedes, es esta gran Comunidad, llena de grandes creadores de contenidos. Hoy les mostraré un sencillo y muy lindo proyecto, dónde puse en práctica la técnica de crochet, para realizar un lindo y delicado arreglo de flores, que bien, podrías usar para decorar cualquier espacio. La invitación es a seguirme y le mostraré como hacerlo.
Materiales usados:
. Hilos para tejer, colores (blanco, amarillo, verde y rojo).
. Alambre de floristería.
. Aguja de tejer.
. Trozo de cartón.
. Relleno.
. Pegamento.
. Silicón.
. Tijeras.
. Lápiz.
. Aguja lanera.
Proceso creativo:
1.) Tejo, veinte puntos cadenas, hago un aumento de tres puntos y avanzo tejiendo medio punto en cada punto cadenas, de esta manera, recorro ambos lados, hasta llegar al punto de partida. Doy una segunda vuelta, y comienzo a usar alambre de floristería, cubriéndolo, simultáneamente con cada punto. Comienzo tejiendo, cuatro medios puntos, cuatro medios puntos dobles, cuatro seis puntos altos, cuatro puntos dobles y dos medios puntos,de esta manera, tejere en el siguiente lado, hasta formar un larga y vistoso pétalo, repito y tejo cinco pétalos más.
2.) Usando el hilo de color rojo, hago un anillo mágico, dentro de el seis medios puntos, tejo dos vueltas de doce puntos, tejo uno más y uno, continuo tejiendo hasta formar un pequeño corazón, relleno e introduzco colocando un poco de pegamento, un trozo de palillos de altura.
3.) comienzo a recorrer, el corazón, pegando los pétalos y dejándolo, encerrado.abro los pétalos y formó una flor.

4.) Para formar una segunda flor, tejo cuatro círculos, comienzo tejiendo ocho medios puntos. Y luego ocho aumento para dieciséis medios puntos. Para la siguiente, tejere un aumento luego de un punto, para la, siguiente pasada, tejere un aumento luego de dos medios puntos, en esta pasada, hire colocando alambre de floristería, hasta completar el recorrido, corto el alambre residual y remato. Para armar los pistilos, corto tres trozos de alambre, doblo en dos, y doy vueltas entre sí, en los extremos, dejando un pequeño hoyo en la parte superior, coloco en esta parte hilo de color amarillo y el la parte inferior, cubrire con hilo de color verde, aplicando además puntos de silicón.

5.) En un anillo mágico, tejo seis medios puntos, y haciendo aumentos, tejere seis vueltas consecutivos, y alcanzó un total de treinta medios puntos, tomando la hebra de atrás, hago un quiebre y tejo diez vueltas de 30 medios puntos. Tejo una vuelta haciendo una reducción, luego de un medio punto, corto el hilo y remato.
De esta manera, tejo la maceta.
6.) Marco sobre el cartón un circulo de igual tamaño a el fondo de la maceta e introduzco el círculo. usando el hilo de color verde, tejo, tal cual tejo el fondo de la maceta y coser, con la aguja lanera pegarle la tapa
7.) Para la flor de corazón, tejo tal cual los pétalos, Pero solo dando dos vueltas tejidas y colocando el alambre en la primera pasada., aplicó pegamento y comienzo a cubrir con hilo de color verde, llegado a un poco menos de la mitad, hago un alto y coloco las hojas. Continuo, aplicó silicón en la parte inferior y pego en el centro de la maceta. Para la segunda flor, tejo una hojas pequeñas, repito y pego en la maceta.
De esta manera, doy por concluido el proyecto de el día de hoy, deseo hay sido de su agrado.
. Todas las fotos, son de mí propiedad.
. Use incollage para mostrar los pasos.
. Use traductor lenguaje.
. Use gifs video, para la presentación de el proyecto.
Agradecida me hayas seguido hasta el final. Siempre serán bienvenidos a mí blog. Será hasta una próxima oportunidad.