(ENG)
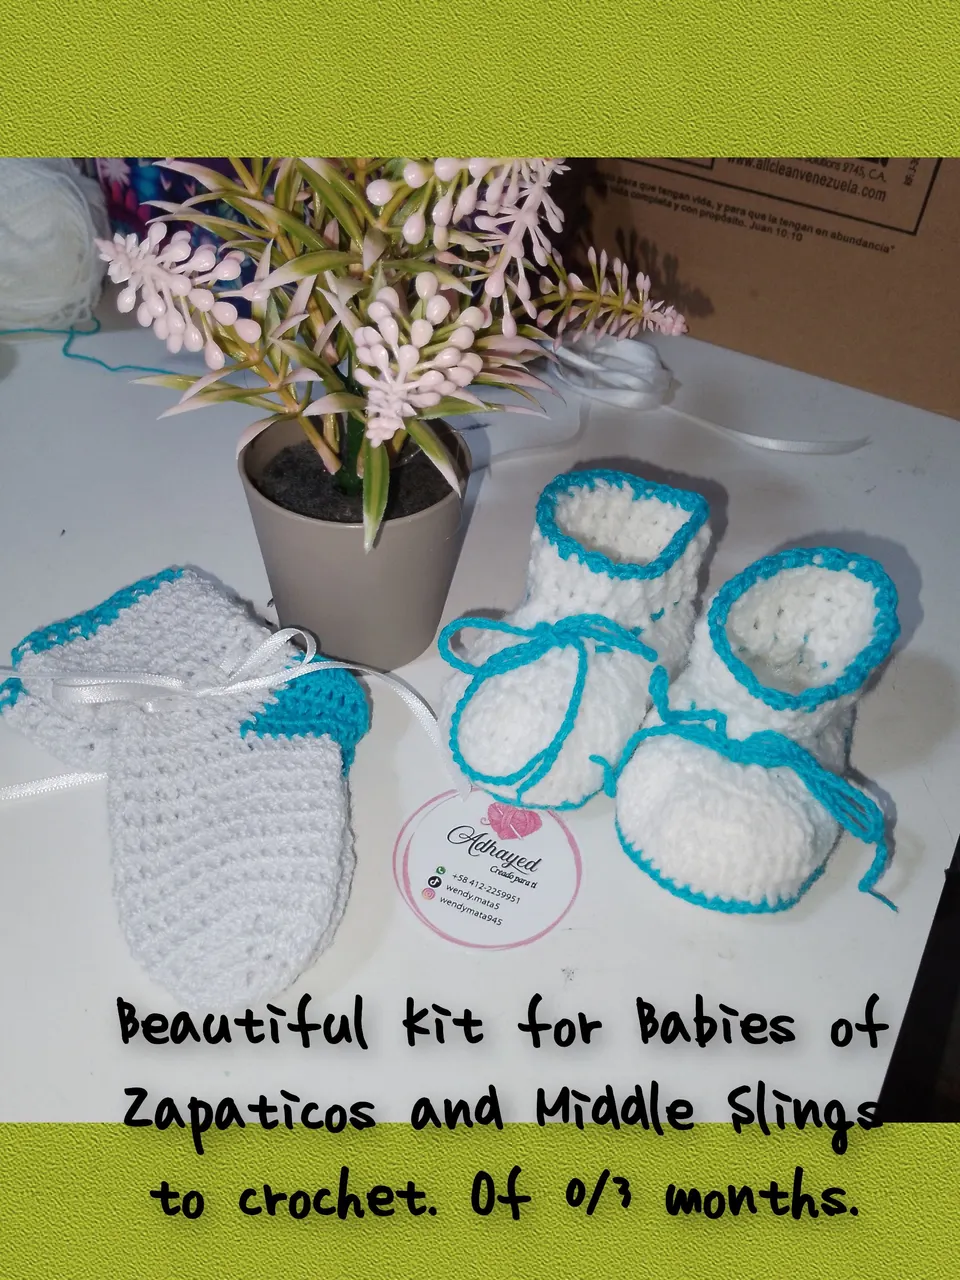
Hello everyone in @HIVEDIY, I am pleased to be with all of you this opportunity, to show a very simple and easy steps, using the basic crochet points. I speak to you that how to make a child kit, for children of 0/3 months of births, these delicate shoes or booties will make them look very cute, tender and delicate, the socks or average. I invite you to follow me, and you will see how easy to create, no matter, your crochet experience, they will surely be great.
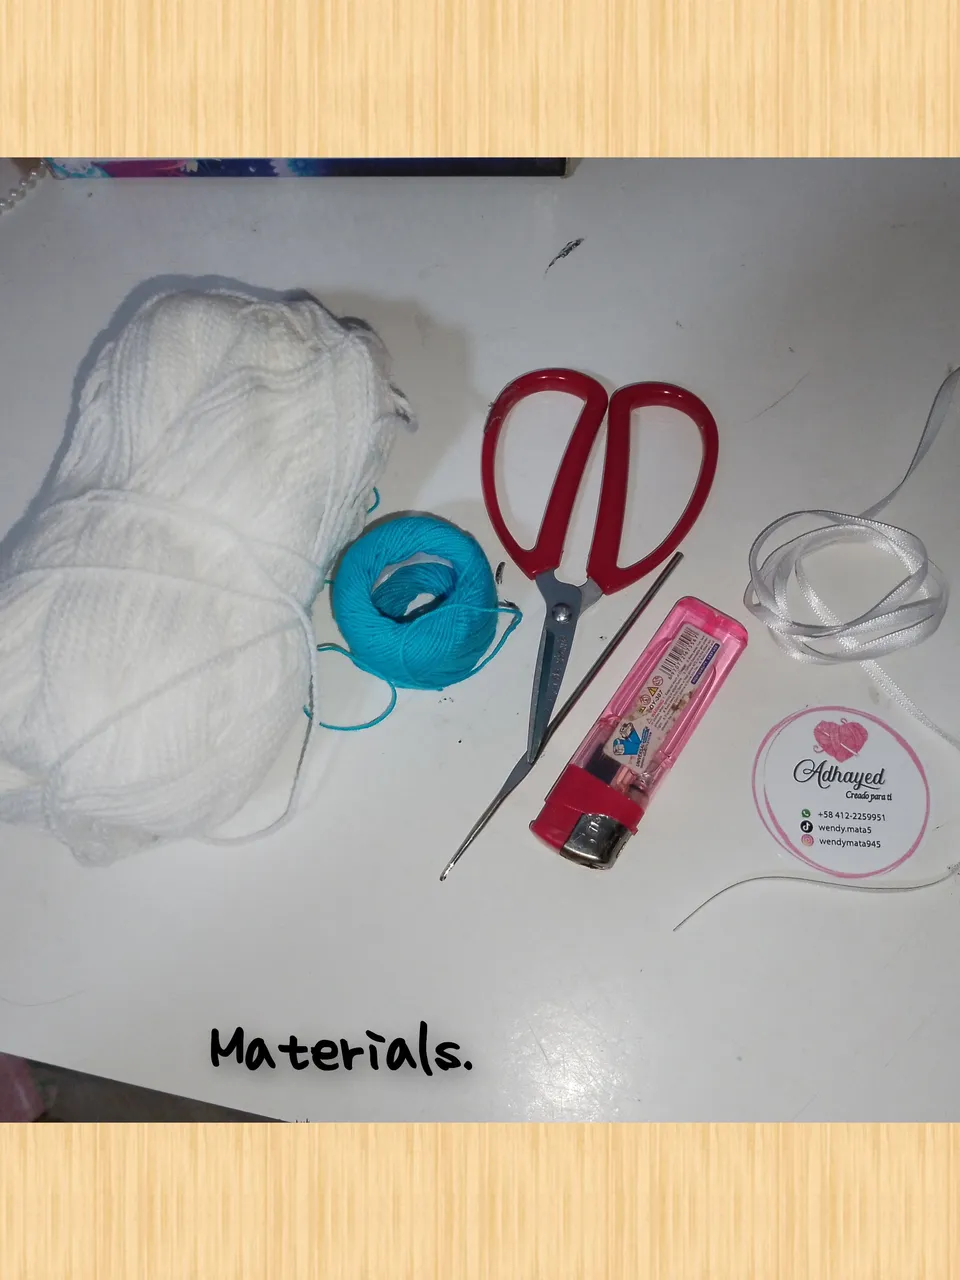
Used materials:
. Antiallergic wool for baby, white.
. Blue and white weaving thread.
. Needle to weave.
. Thin white silk tape.
. Scissors.
. YESKERO.
Steps to follow:
1.) I will start, weaving the shoes: Tejo, twelve points and at the first end, weigh seven points, I advance weaving and weighing in the next ten points a high point, at the next end weigh the seven increases, and I go on the other side, with high points. Weave in the next two laps, making increases in each increase in the extremes. For the fourth return, weave in the tracera strand, high points, I make the route, this time, I will not increase, but the detainee must go, taking an inclined form, when reaching the route, I weave a return more of high points.
2.) I begin the process of shaping the shoe in the front, so beginning, to make decreases in half, of the shoe, so I will take, two high points and close together, so it will be in the entire front of the shoe. And in the back, Iave high points.
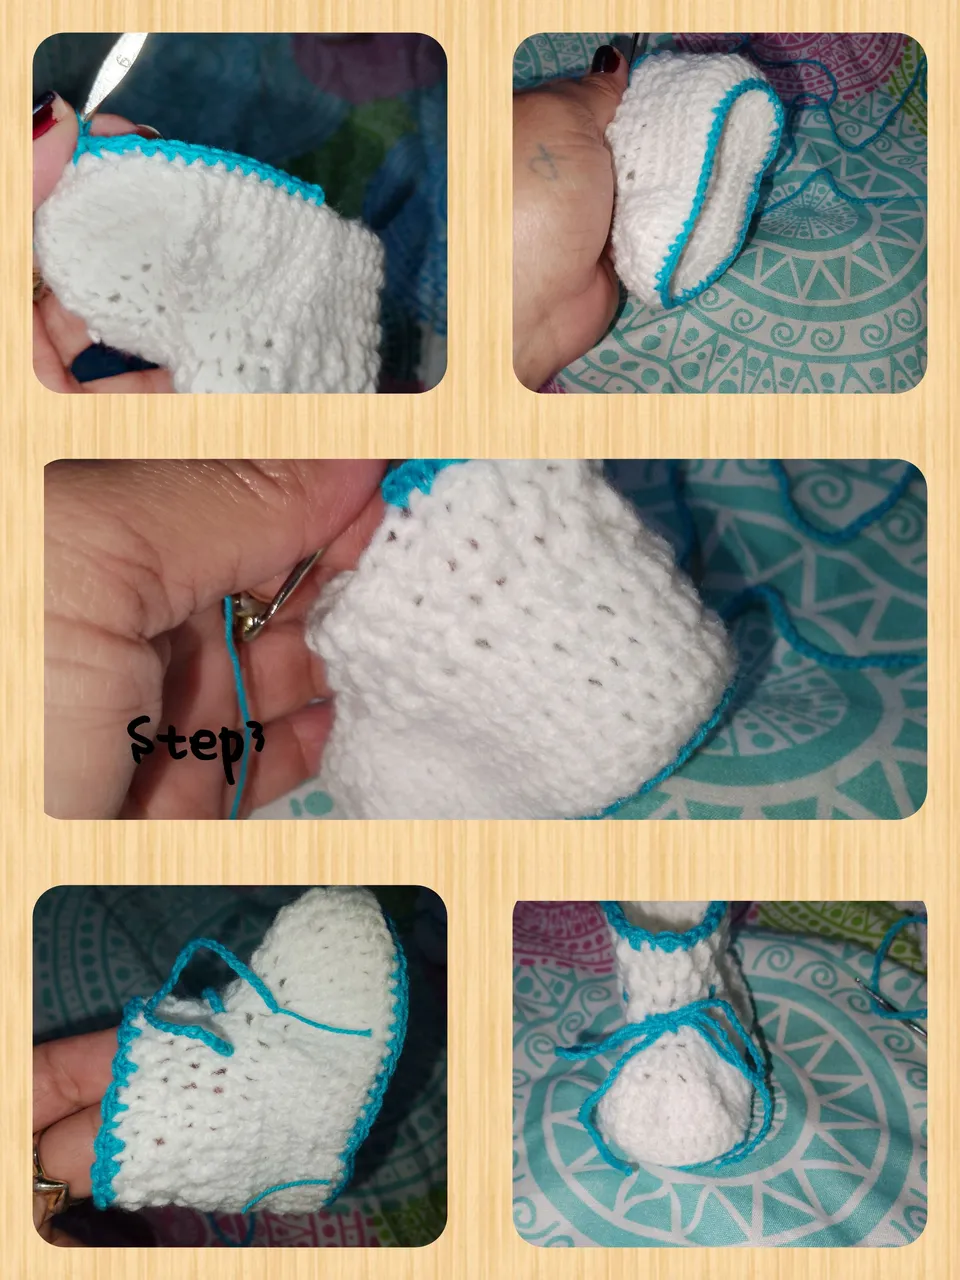
3.) Done the above, I will take three laps to give height, to El Zapicos, this I will do, weaving points in relief, one below and one above, then finally, I will take a tour of the edge the boot and in the zuela with blue thread. The shoe is ready. Repeating the process, to complete the pair.
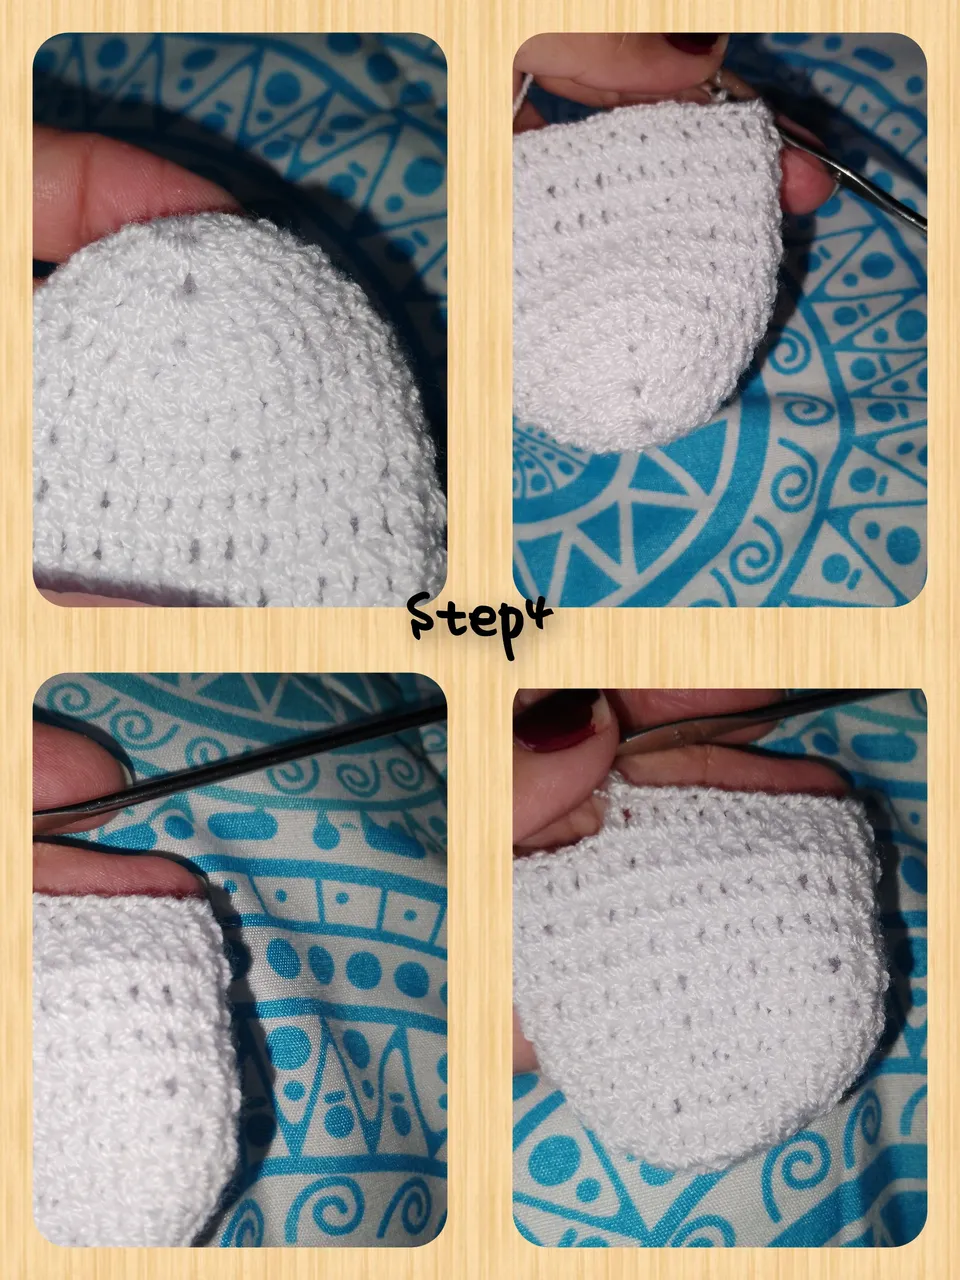
4.) For the socks or socks, I will make a magical ring, inside the Tejo, six points high a chain point and six points, then a chain and with a slide one to the next end and close the ring. I continue to weaving two more laps, six points and at the chain point, there is two high points a chain and two high points, likewise in the following chains, for (18p.a) continuous, and in the next round I repeat the increases in the spaces of separation of chains and for (26p.a), then weave seven laps of 26 points.
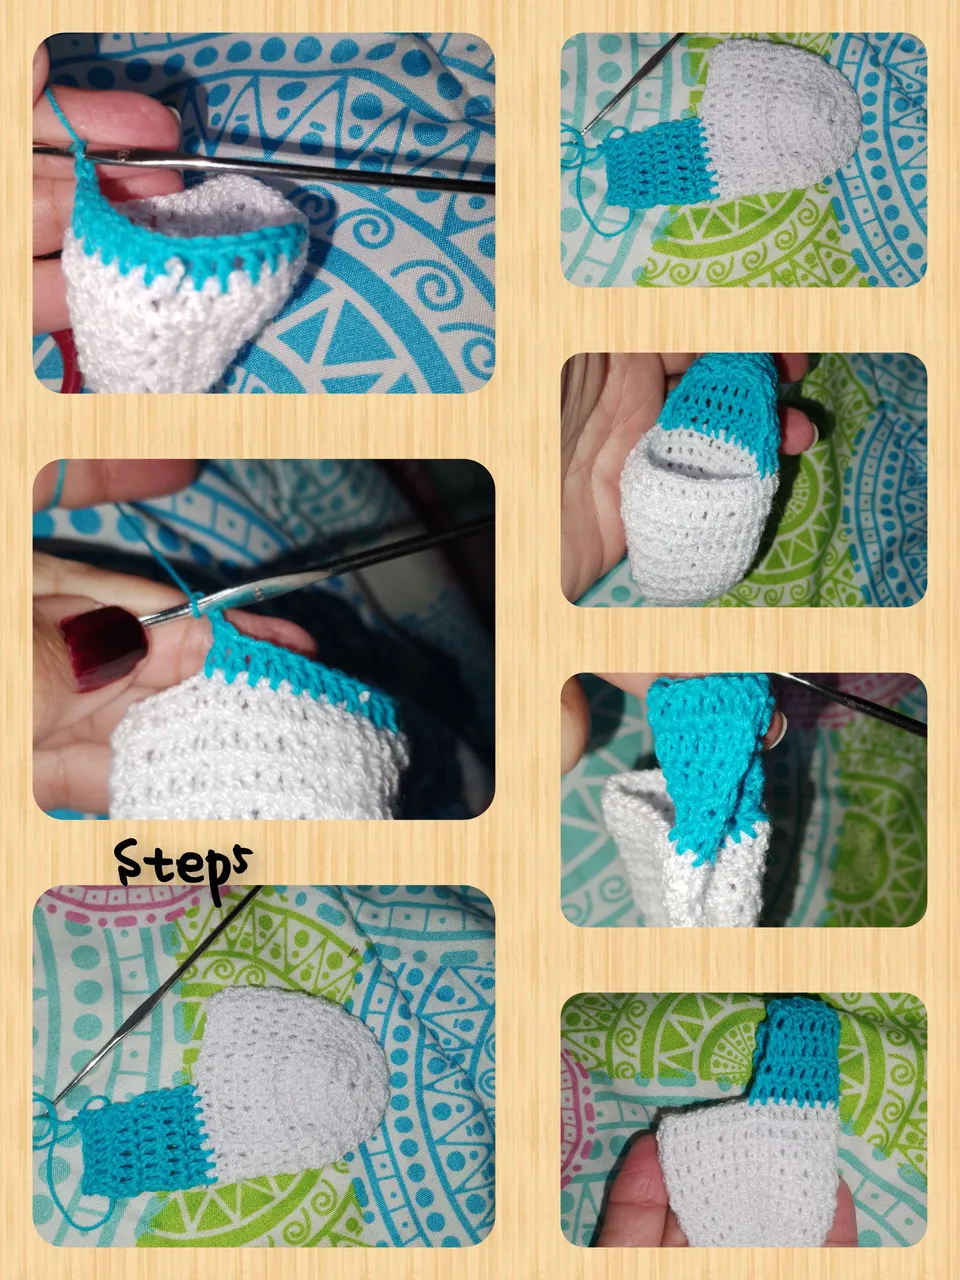
5.) Placing, chain separation points, chains points, aligned them, both sides and I will take thirteen points, to weave the heel, so changing to the blue thread, weigh six laps of 13 high points. Tissues one, turned with sliding points. I refer and short thethread.
6.) I will change the thread in white, and weave the entire route in high points. Then, a tape step, two high points and a chain point, always leaving a space. I weigh a high points, then weave, to give the height and weigh seven points in relief, one above and below. For the next lap, I wave for a relief points. I refer and short the thread.
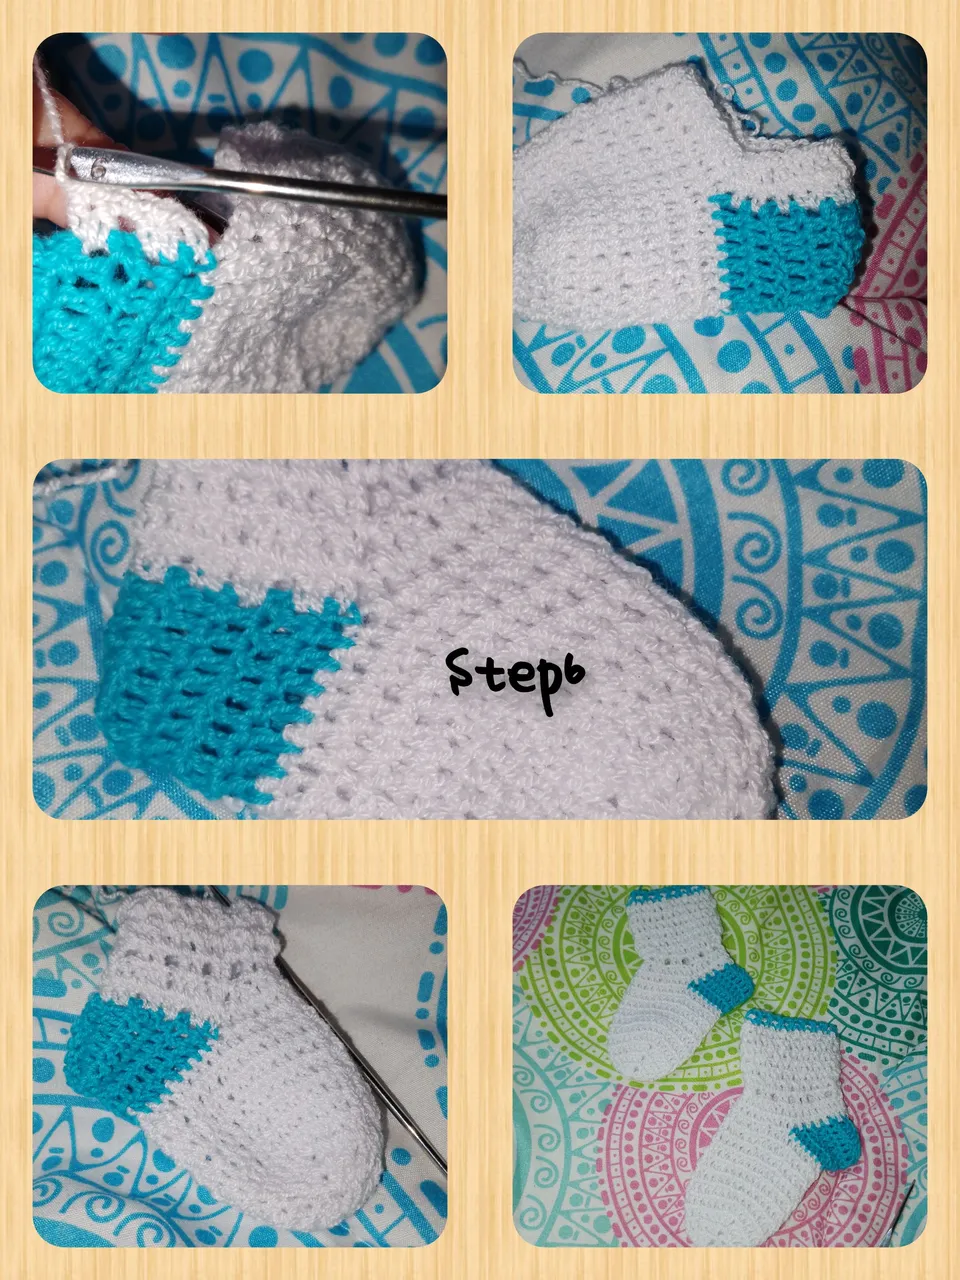
Remaining in this way the sock is alist.
7.) Short two pieces of tape, I put a little fire. And I pass by the ribbons, leaving both tape ends on the same side to make a small bow, for the next sock I must make sure that it is on the opposite side ...
. All photos are from me property.
. Use colorless.
. Use language translator.
Grateful you have seen and visited my blog. I always please, show my projects.
(Esp)
Hola a todos en @hivediy, me complace estar hoy con todos ustedes está oportunidad, para mostrar un muy sencillo y faciles pasos, usando los puntos básicos de crochet. Les hablo que como realizar un kit infantil, para niños de 0/3 meses de nacidos, estos delicados zapatitos o botitas los hará lucir muy lindos, tiernos y delicados, así mismos los calcetines o medias. Te invito a seguirme, y verás lo fácil de crear, no importa, tu experiencia en crochet, seguro te quedarán geniales.
Materiales usados:
. Lana antialérgica para bebes, color blanca.
. Hilo para tejer color azul y blanco.
. Aguja para tejer.
. Cinta delgada de seda Color blanca.
. Tijeras.
. Yeskero.
Pasos a Seguir:
1.) Comenzaré, tejiendo los Zapatitos: tejo, doce puntos cadenas y en el primer extremo, tejo siete medios puntos, avanzo tejiendo y tejo en las siguientes diez puntos cadenas un punto alto, en el siguiente extremo tejo los siete aumentos, y recorro el otro lado, con puntos altos. Tejere en las siguientes dos vueltas, haciendo aumentos en cada aumento de los extremos. Para la cuarta vuelta, tejere en la hebra tracera, puntos altos, hago el recorrido, en esta oportunidad, no haré aumento, Pero el detenido debe ir, tomando una forma inclinada, al alcanzar el recorrido, tejere una vuelta más de puntos altos.
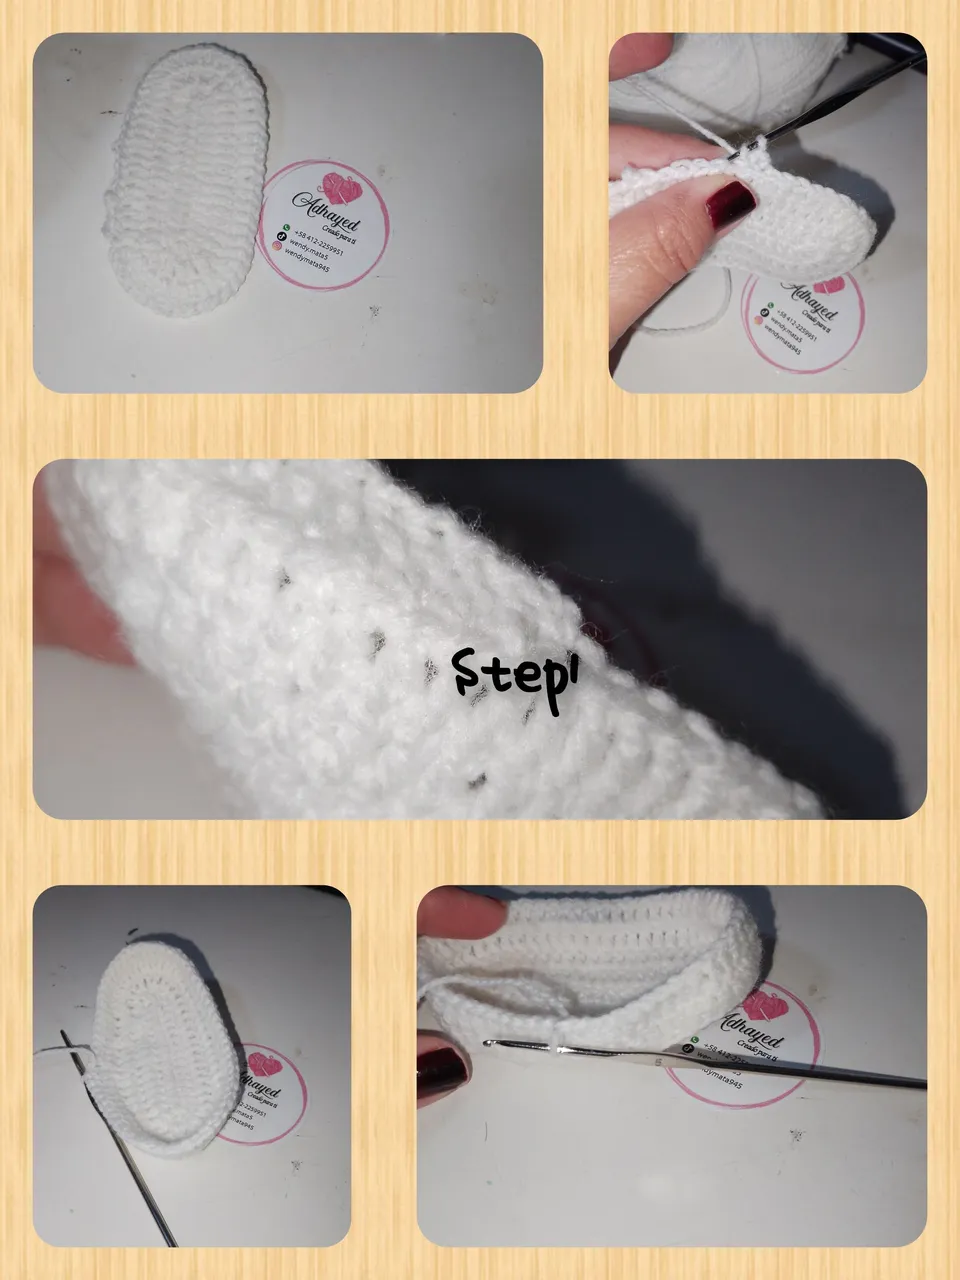
2.) Comienzo el proceso de dar forma a el zapato en la parte delantera, así que comienzo, a hacer disminuciones a la mitad, de el zapato, así que tomare, dos puntos altos y cerraré juntos, así será en todo el frente de el zapato. Y en la parte de atrás, tejere puntos altos.
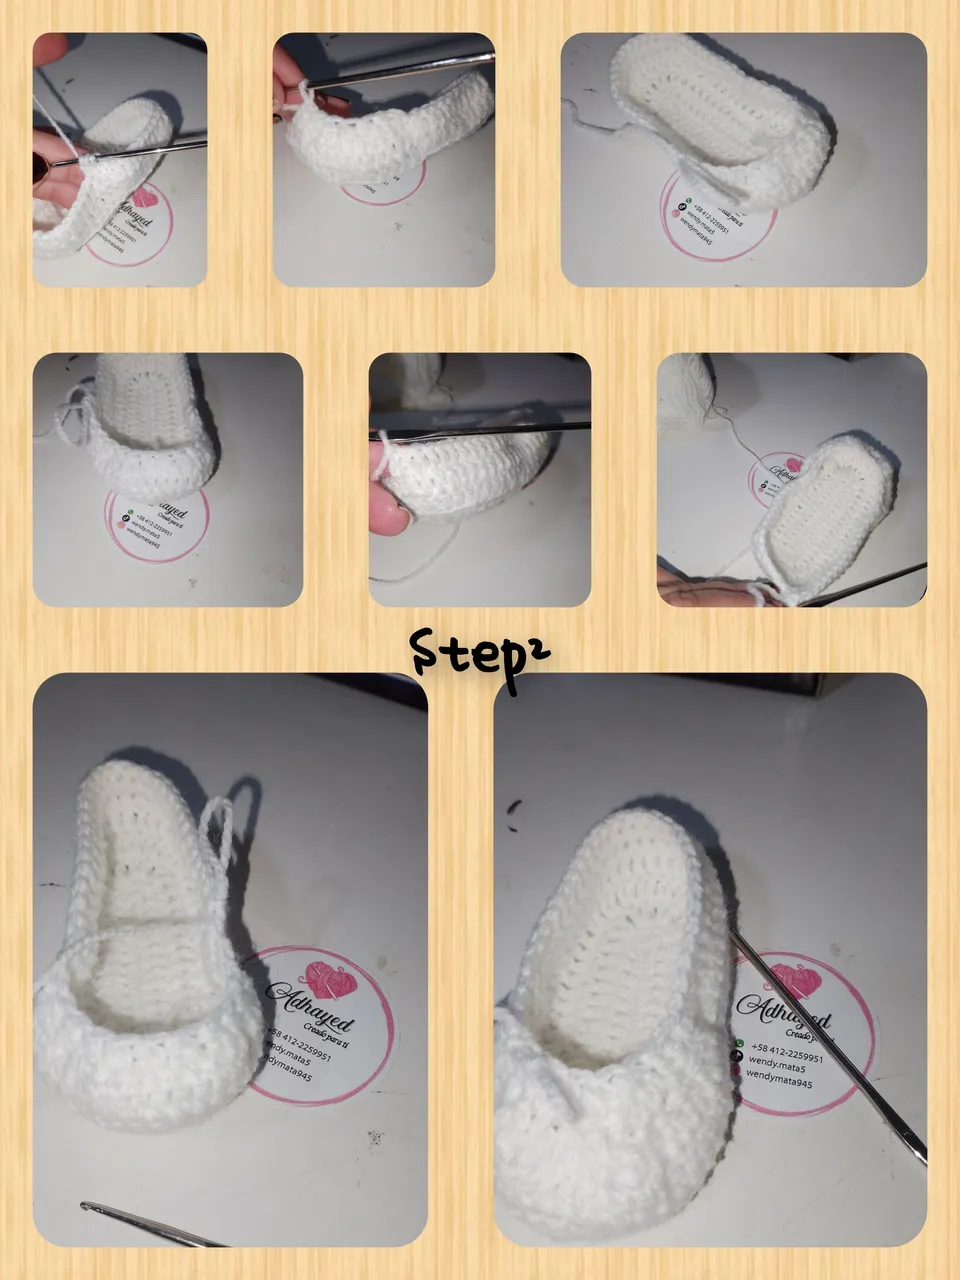
3.) Hecho lo anterior, daré tres vueltas para dar altura, a el zapaticos, esto lo hare, tejiendo puntos en relieve, uno por debajo y uno por arriba, luego para finalizar, daré un recorrido en el borde la la bota y en la zuela con hilo de color azul. Quedando así listos el zapatito. Repitiendo el proceso, para completar el par.
4.) Para, las medias o calcetines, haré un anillo mágico, dentro de el tejo, seis puntos altos un punto cadena y seis puntos, luego una cadena y con punto deslizado uno a el siguiente extremo y cierro el anillo. Continuo tejiendo dos vueltas más, de seis puntos y en el punto cadena, tejere dos puntos altos una cadena y dos puntos altos, así mismo en la siguiente cadenas, para (18p.a) continuo, y en la siguiente vuelta repito los aumentos en los espacios de separación de cadenas y para (26p.a), a continuación, tejere siete vueltas de 26 puntos.
5.) Colocando, los puntos de separación de cadenas, de los puntos cadenas, los alineó, ambos lados y tomaré trece puntos, para tejer el talón, así que cambiando a el hilo de color azul, tejo seis vueltas de 13 puntos altos. Tejidos uno las, vueltas con puntos deslizados. Remato y corto el hilo.
6.) cambiaré el hilo a color blanco, y tejere todo el recorrido en puntos altos. Seguidamente, tejere un paso cinta, de dos puntos altos y un punto cadena, siempre dejando un espacio. Tejo un recorrido de puntos altos, luego tejere, para dar la altura y tejo siete puntos en relieve, uno por arriba y por debajo. Para la siguiente vuelta, tejere un recorrido de puntos relieve. Remato y corto el hilo.
Quedando de esta manera alisto el calcetín.
7.) Corto dos pedazos de cinta, pongo un poco de fuego. Y paso por el pasa cintas, dejando ambos extremos de cinta en mismo lado para hacer un pequeño lazo, para la siguiente calcetín debo asegurarme de que quede de el lado contrario...

. Todas las fotos son de mí propiedad.
. Use incollage.
. Use traductor lenguaje.
Agradecida hayas visto y visitado mí blog. Siempre me complace, mostrar mis proyectos.