(ENG)
Very nice evening everyone, I am pleased to be with you again, seeing that we are inspired and very motivated by Christmas at @hivediy, it is a pleasure for me to share a very simple, but easy tutorial, on how to make a nice ornament, to decorate at Christmas, inspired by the well-known Snow Tree. For its preparation, use recyclable and problem materials. So I invite you, to show you, this ornament that I lovingly created for all of you.

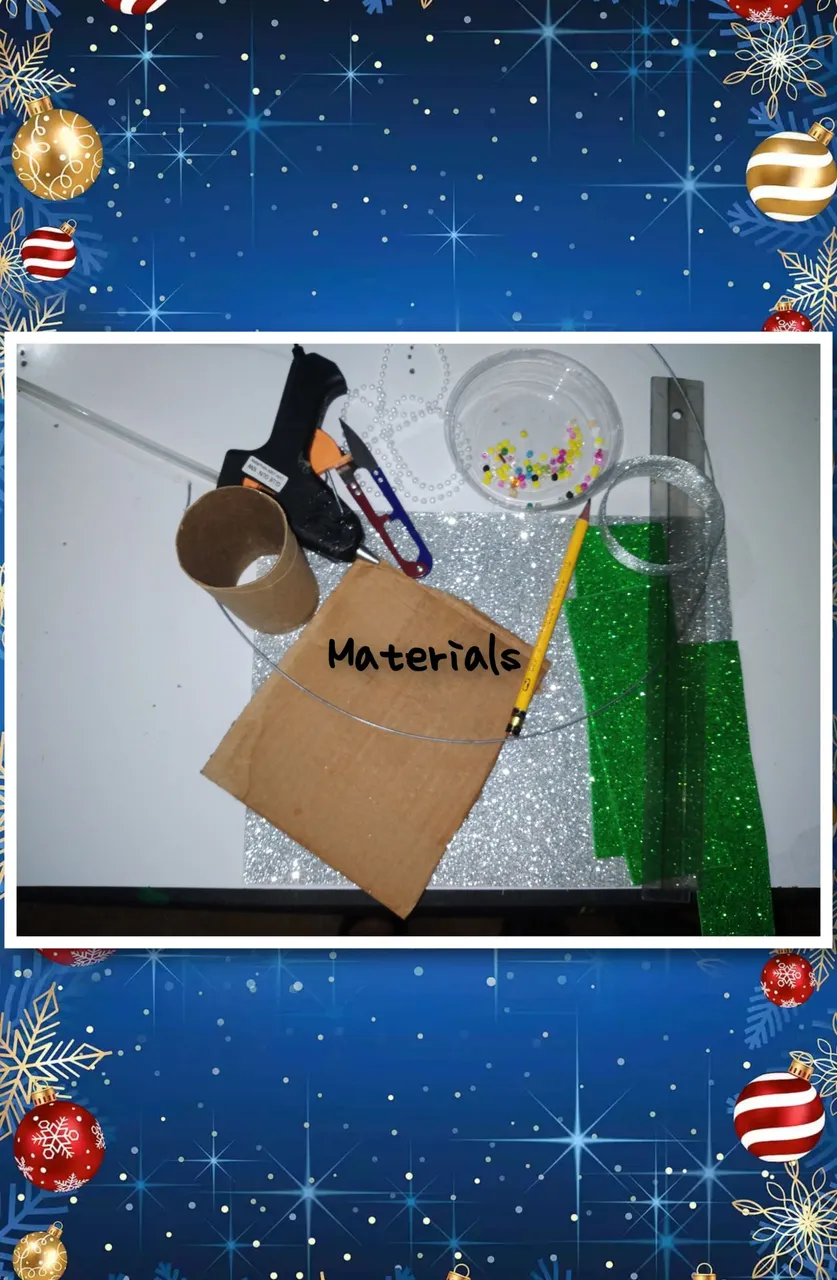
MATERIALS.
. A Royo of toilet paper (cardboard).
. Cardboard cutouts.
. Frosty white foam. . Hot glue.
. Silver ribbon.
. 1/2 construction wire.
. Small running pearls. . Colored beads.
. Pencil
. Ruler.
. Scissors.
STEPS.
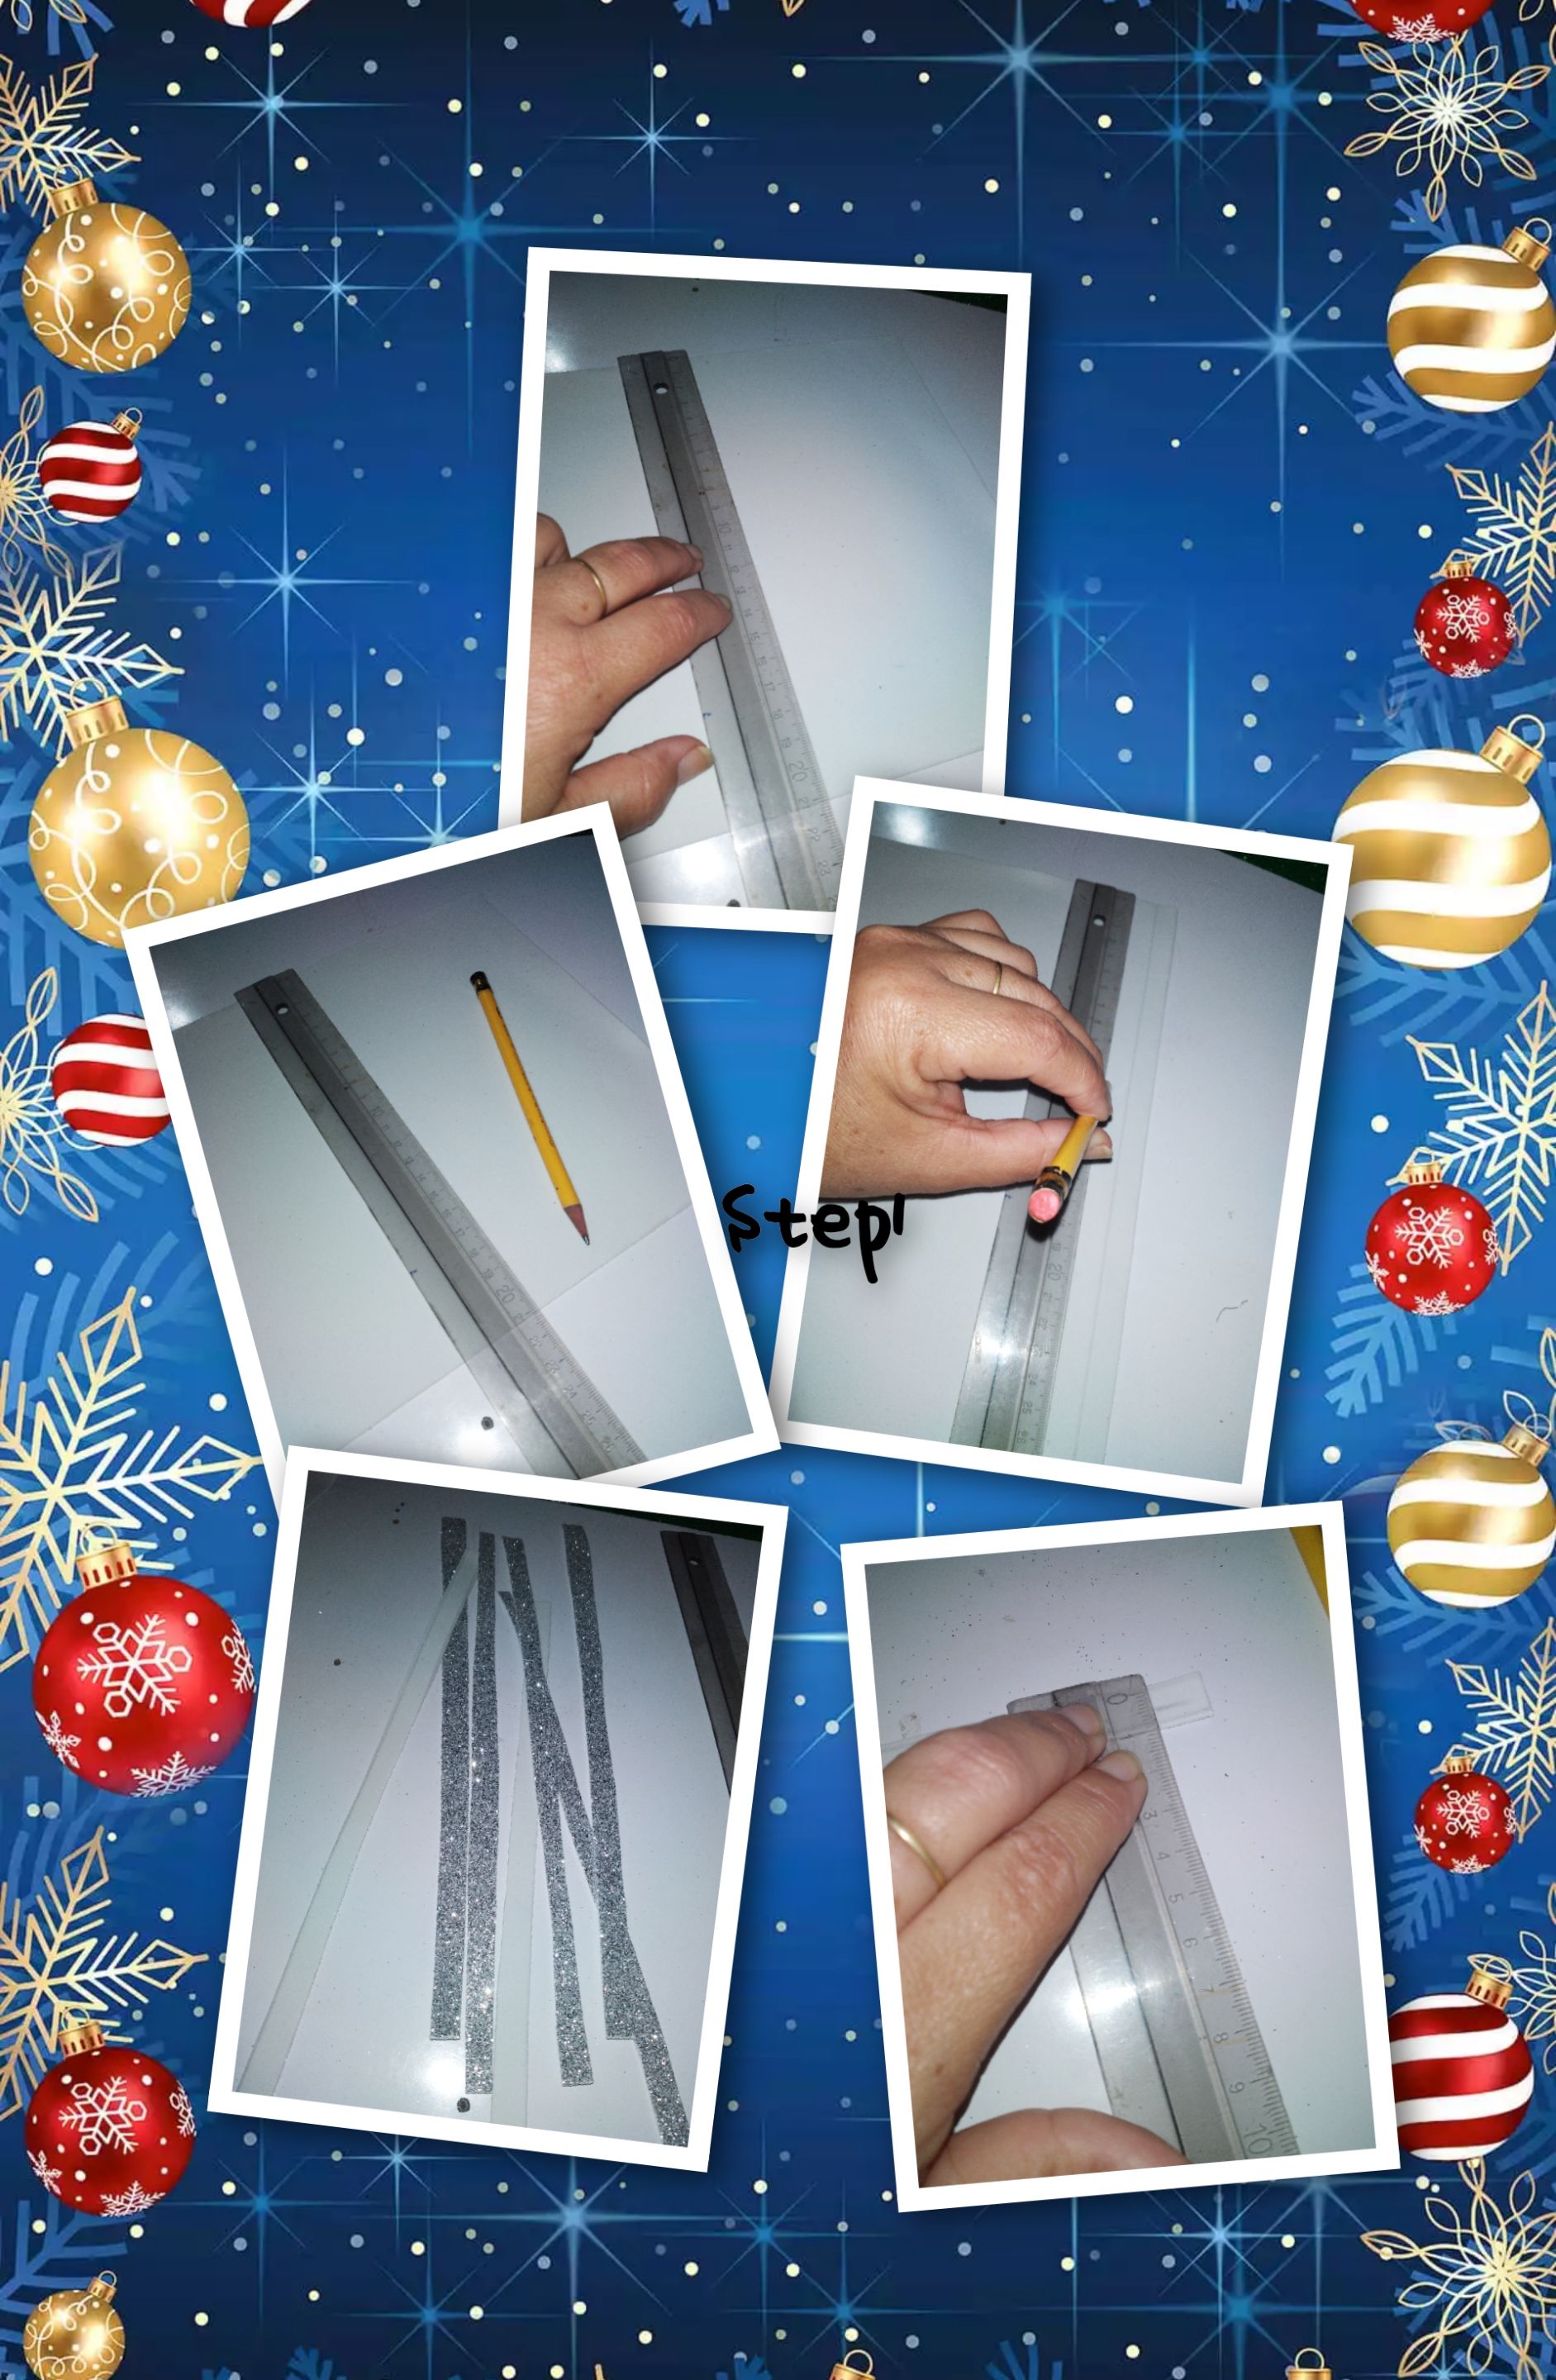
1.) With the ruler and pencil, I mark 1cm wide strips on the back of the foam, and taking the total length of the foam sheet, it is in particular a letter type.

2.)After marking, cut with scissors, making 0.6cm cuts across the width of each of the strips.
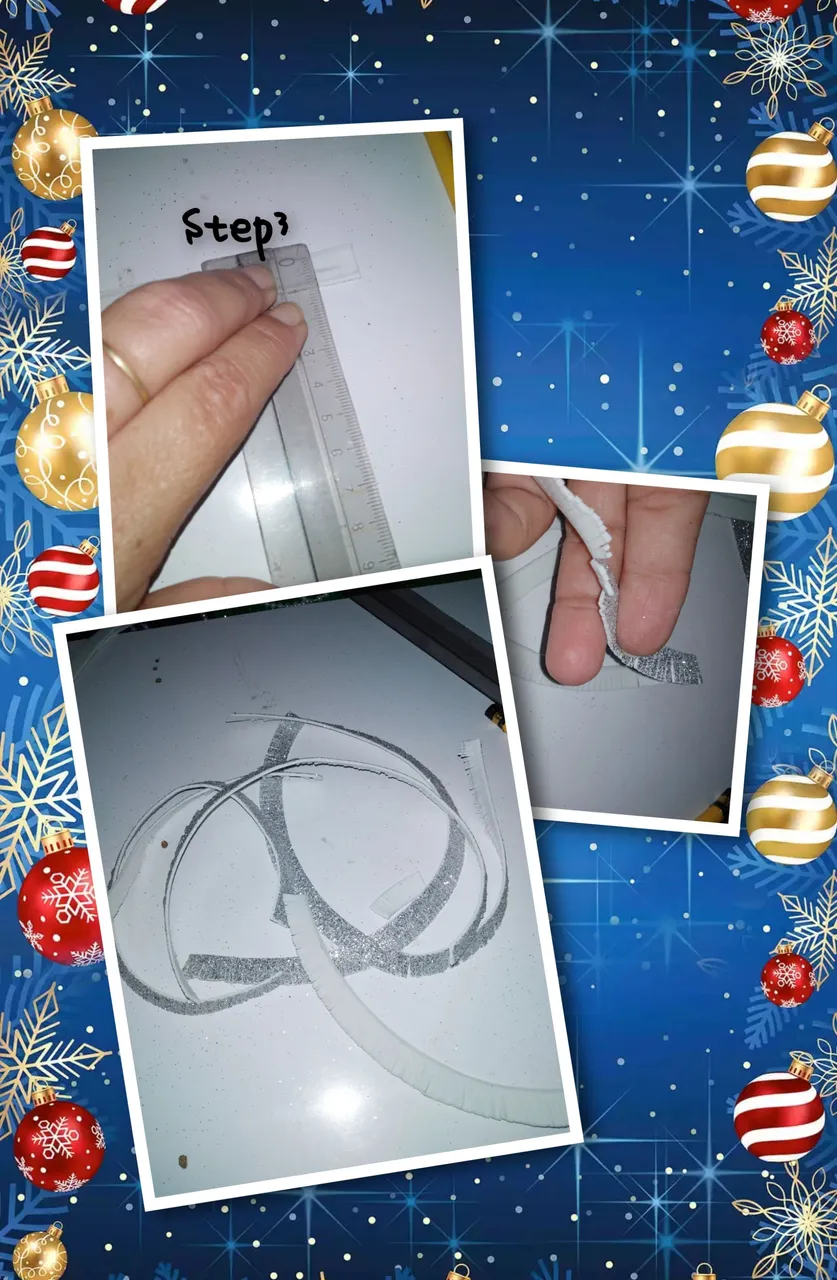
3.) I take the construction wire, from one of its ends, applying silicone, I begin to glue the foam strips, this should go in a spiral taking reference from the part without cuts. It is important that the part of the cuts you make in the previous step should not be attached to the wire. In this way, I cover 1/2 of my industrial wires.
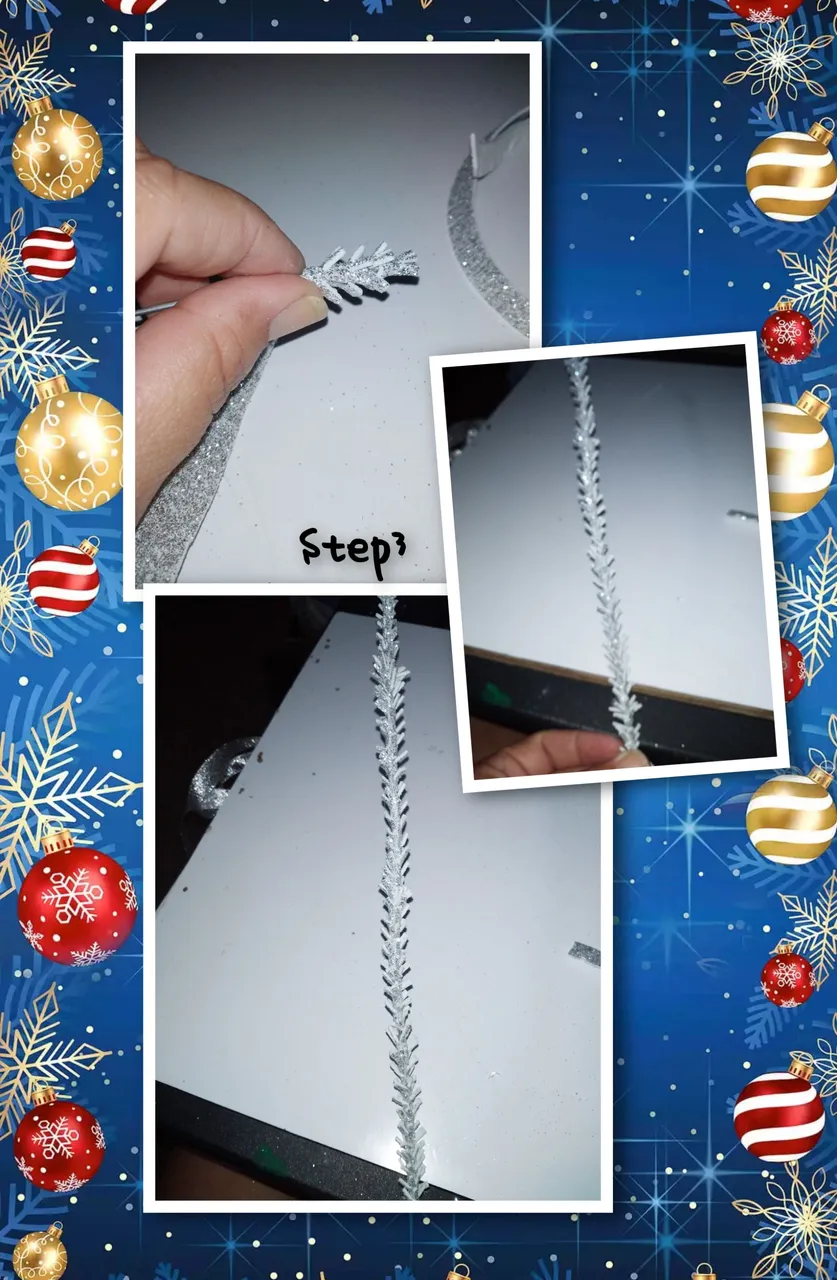
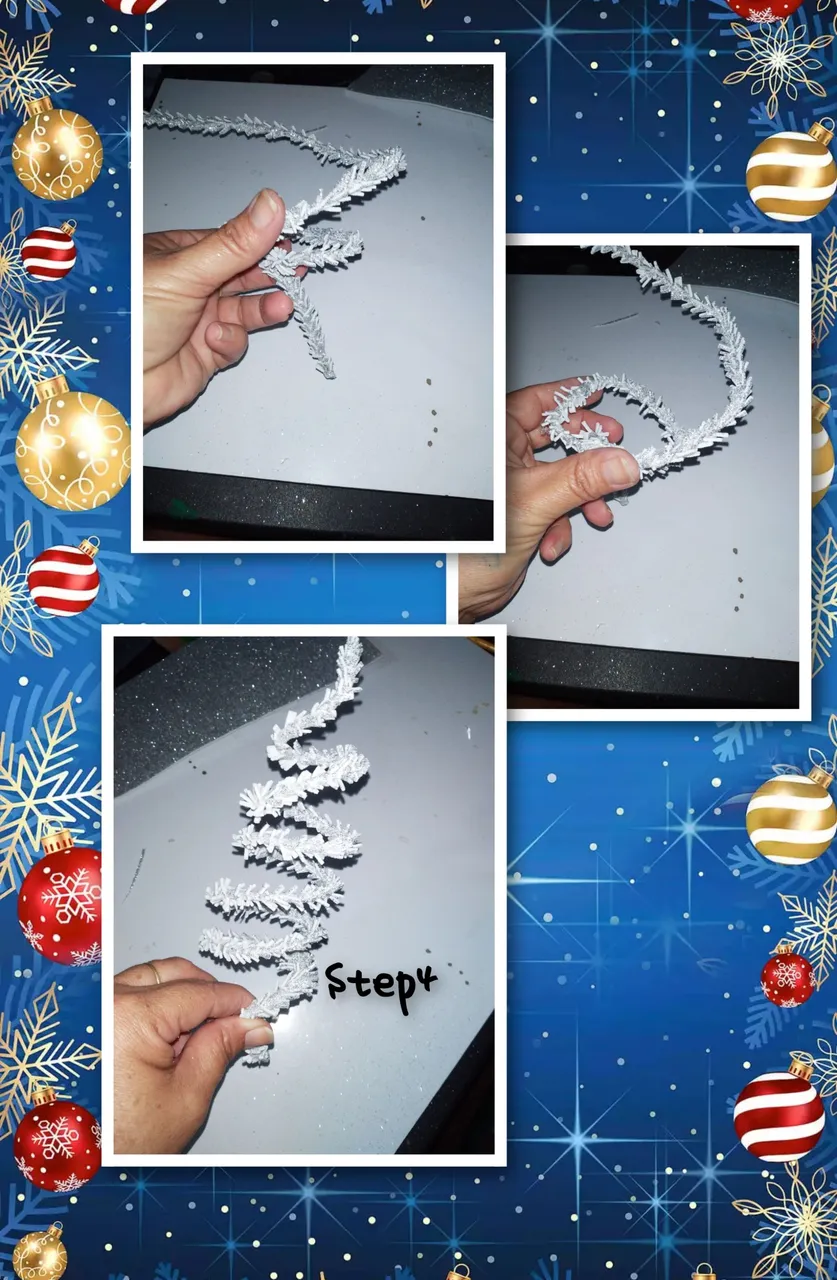
4.) Once the entire wire is covered, I begin to form a spiral, which simulates the snow tree.
5.) Subtract two centimeters, from the total length measurement, of the toilet paper tube, and short, to only unify it with 6cm in height, likewise midiby short, 6cm wide by 8cm long cardboard, then, applying I covered both pieces with plenty of silicone with frosty white foam, cut off the foam residue, and placed a thin strip of foam around the flat piece of cardboard. I also take one of the edges of the toilet paper Royo, and glue a cardboard cover and line it with foam.
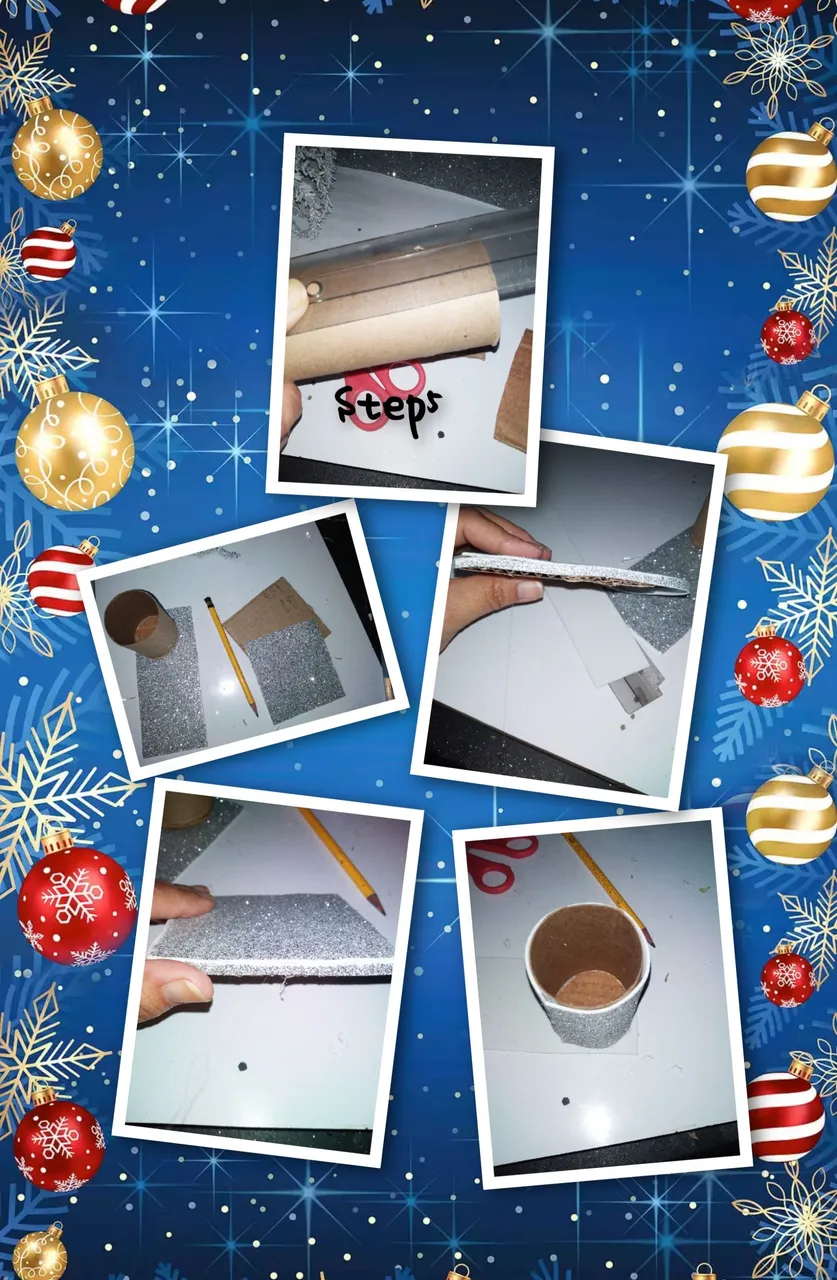
6.) I glue pearls running along the top to the Royo and to the lined cardboard I glue pearls along the edges, continue, gluing both pieces, after gluing them on the cardboard base, I make a hole in the Royo with the help of the scissors. or tube, I applied plenty of silicone and glued the tree. Likewise, I drew and cut out a star and glued it to the top of the tree.
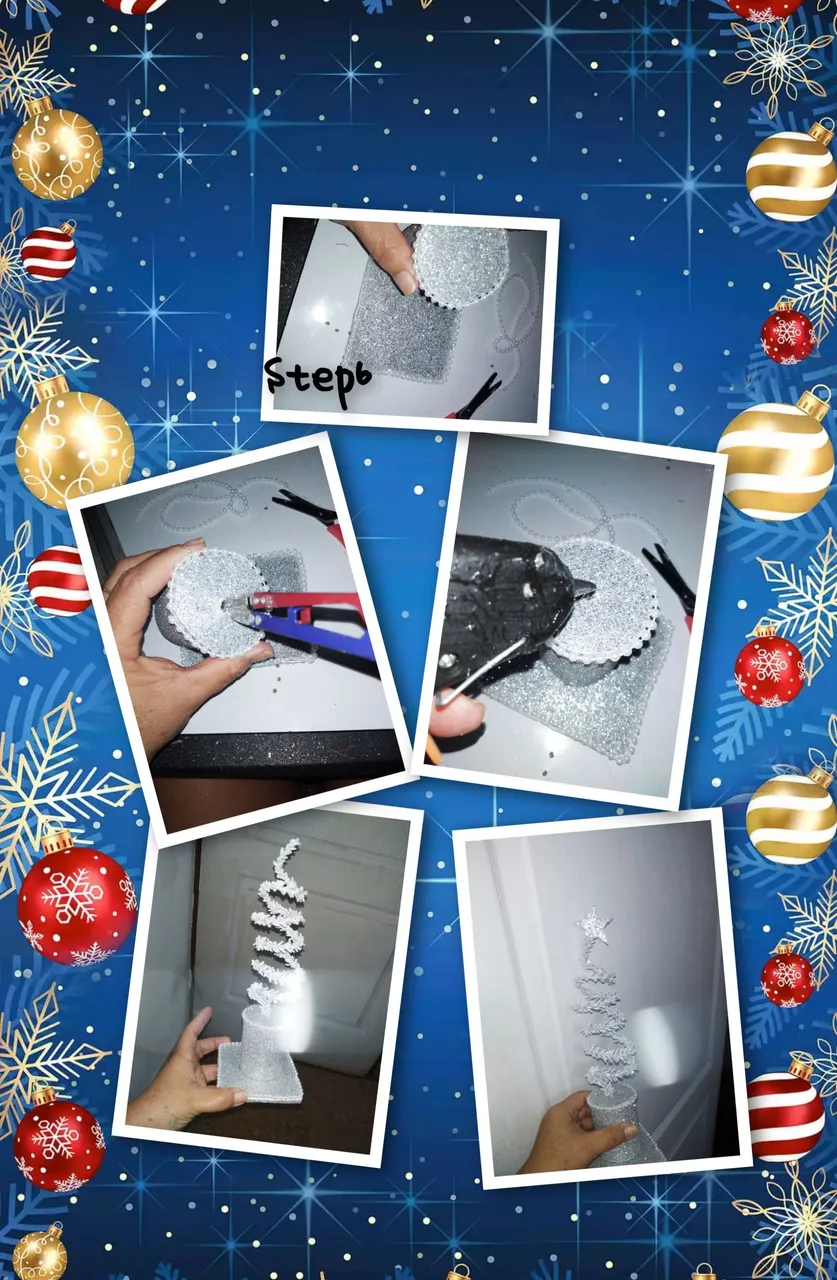
7.) To finish, I go around the trunk of the tree on its lower part, using the silver ribbon and make a small and delicate bow, which will define its front part like the star, continuing, alternating and gluing thecolored beads within its snowy branches.

In this way, I conclude with today's project, hoping it will please him, and motivate him to do his own, to decorate. While I am very happy with the final result.
Use GIF video, for demonstration and cover.
. Use InShot . Use language translator It will be until a next opportunity, grateful for your visit to my blog.
It will be until an approximate opportunity.
Very nice evening everyone, I am pleased to be with you again, seeing that we are inspired and very motivated by Christmas at @hivediy, it is a pleasure for me to share a very simple, but easy tutorial, on how to make a nice ornament, to decorate at Christmas, inspired by the well-known Snow Tree. For its preparation, use recyclable and problem materials. So I invite you, to show you, this ornament that I lovingly created for all of you. MATERIALS. . A Royo of toilet paper (cardboard). . Cardboard cutouts. . Frosty white foam. . Hot glue. . Silver ribbon. . 1/2 construction wire. . Small running pearls. . Colored beads. . Pencil . Ruler. . Scissors. STEPS. 1.) With the ruler and pencil, I mark 1cm wide strips on the back of the foam, and taking the total length of the foam sheet, it is in particular a letter type.  2.)After marking, cut with scissors, making 0.6cm cuts across the width of each of the strips. 3.) I take the construction wire, from one of its ends, applying silicone, I begin to glue the foam strips, this should go in a spiral taking reference from the part without cuts. It is important that the part of the cuts you make in the previous step should not be attached to the wire. In this way, I cover 1/2 of my industrial wires. 4.) Once the entire wire is covered, I begin to form a spiral, which simulates the snow tree. 5.) Subtract two centimeters, from the total length measurement, of the toilet paper tube, and short, to only unify it with 6cm in height, likewise midiby short, 6cm wide by 8cm long cardboard, then, applying I covered both pieces with plenty of silicone with frosty white foam, cut off the foam residue, and placed a thin strip of foam around the flat piece of cardboard. I also take one of the edges of the toilet paper Royo, and glue a cardboard cover and line it withfoami. 6.) I glue pearls running along the top to the Royo and to the lined cardboard I glue pearls along the edges, continue, gluing both pieces, after gluing them on the cardboard base, I make a hole in the Royo with the help of the scissors. or tube, I applied plenty of silicone and glued the tree. Likewise, I drew and cut out a star and glued it to the top of the tree. 7.) To finish, I go around the trunk of the tree on its lower part, using the silver ribbon and make a small and delicate bow, which will define its front part like the star, continuous, alternating and gluing the colored beads within its snowy branches. In this way, I conclude with today's project, hoping it is to your liking, and motivates you to do yours, to decorate. While I am very happy with the final result. Use GIF video, for demonstration and cover. . Use InShot . Use language translator It will be until a next opportunity, grateful for your visit to my blog. It will be until an approximate opportunity. (ESP) Very nice evening everyone, I am pleased to be with you again, seeing that we are inspired and very motivated by Christmas at @hivediy, it is a pleasure for me to share a very simple, but easy tutorial, on how to make a nice ornament, to decorate at Christmas, inspired by the well-known Snow Tree. For its preparation, use recyclable and problem materials. So I invite you, to show you, this ornament that I lovingly created for all of you. MATERIALS. . A Royo of toilet paper (cardboard). . Cardboard cutouts. . Frosty white foam. . Hot glue. . Silver ribbon. . 1/2 construction wire. . Small running pearls. . Colored beads. . Pencil . Ruler. . Scissors. STEPS. 1.) With the ruler and pencil, I mark 1cm wide strips on the back of the foam, and taking the total length of the foam sheet, it is in particular a letter type.  2.)After marking, cut with scissors, making 0.6cm cuts across the width of each of the strips. 3.) I take the construction wire, from one of its ends, applying silicone, I begin to glue the foam strips, this should go in a spiral taking reference from the part without cuts. It is important that the part of the cuts you make in the previous step should not be attached to the wire. In this way, I travel 1/2 of my soulsindustrial. 4.) Once the entire wire is covered, I begin to form a spiral, which simulates the snow tree. 5.) Subtract two centimeters, from the total length measurement, of the toilet paper tube, and short, to only unify it with 6cm in height, likewise midiby short, 6cm wide by 8cm long cardboard, then, applying I covered both pieces with plenty of silicone with frosty white foam, cut off the foam residue, and placed a thin strip of foam around the flat piece of cardboard. I also take one of the edges of the toilet paper Royo, and glue a cardboard cover and line it with foam. 6.) I glue pearls running along the top to the Royo and to the lined cardboard I glue pearls along the edges, continue, gluing both pieces, after gluing them on the cardboard base, I make a hole in the Royo with the help of the scissors. or tube, I applied plenty of silicone and glued the tree. Likewise, I drew and cut out a star and glued it to the top of the tree. 7.) To finish, I go around the trunk of the tree on its lower part, using the silver ribbon and make a small and delicate bow, which will define its front part like the star, continuous, alternating and gluing the colored beads within its snowy branches. In this way, I conclude with today's project, hoping it is to your liking, and motivates you to do yours, to decorate. While I am very happy with the final result. Use GIF video, for demonstration and cover. . Use InShot . Use language translator It will be until a next opportunity, grateful for your visit to my blog. It will be until an approximate opportunity.
(ESP)
Muy bonita noche a todos me complace estar, nuevamente con ustedes, viendo que estamos inspirados y muy motivados por la Navidad en @hivediy, me es placentero, pasar a compartir un muy sencillo, pero y fácil tutorial, de cómo hacer un lindo adorno, para decorar en Navidad, inspirada por el tan conocido Árbol de Nieve. Para su elaboración, utilice, materiales reciclable y de problecho. Así que les invito,para mostarles, este adorno que con mucho cariño, cree para todos ustedes.
MATERIALES.
. Un Royo de papel higiénico (cartón).
. Recortes de cartón.
. Foami blanco escarchado.
. Pegamento caliente.
. Cinta plateada.
. 1/2 alambre de construcción.
. Perlas corridas pequeñas.
. Chaquiras de colores.
. Lápiz
. Regla.
. Tijeras.
PASOS.
1.) Con la regla y el lápiz, marco por el revez de el foami, tiras de 1cm de ancho, y tomando el tardo total de la lámina de foami, está en particular es tipo carta.
2.)Luego de marcada, recortó con las tijeras, haciendo cortes de 0.6cm a lo ancho de cada una de las tiras.
3.) Tomo el alambre de construcción, desde uno de sus extremos, aplicando silicón, comienzo a pegar las tiras de foami, esto deber ir en espiral tomando referencia de la parte sin cortes. Es precio que la parte de los cortes que realice en paso anterior, no debe ir pegadas a el alambre. De esta manera, recorro el 1/2 me almabres industrial.
4.) Cubierto todo el alambre, comienzo a formar un espiral, que simule al árbol de nieves.
5.) Resto dos centímetros, de la medida total de largo, de el tubo de papel higiénico, y corto, para solo unilizarlo con 6cm de altura, así mismo midiby corto, 6cm de ancho por 8cm de largo de cartón, seguidamente, aplicando abundante silicón forro ambas piezas con foami blanco escarchado, corto los residuos de foami, y a lnapieza plana de cartón coloco, delgada tira de foami por el alrededor. Tomo además uno de los bordes de el Royo de papel higiénico, y pego una tapa de carto y forro con foami.
6.) Pego a el Royo perlitas corridas por la parte superior y al carton forrado pego perlitas por los borde, continuo, pegando ambas piezas, luego de pegadas sobre la base de cartón,hago con oaboujta de la tijera, una perforación a el Royo o tubo, aplico abundante silicón y pego el arbol, así mismo, dibujo y recortó una estrella y pego en la parte superior de el árbol.
7.) Para finalizar, recorro el tronco de el árbol en su parte o ferior, usando l acinta plateada y hago un pequeño y delicado lazo, que definirá al igual de la estrella su parte frontal, continuo, alternando y pegando las chaquiras de colores dentro de sus ramas nevadas.
De esta manera, concluyo con el proyecto de el día de hoy, esperando sea de su agrado, y motive a hacer el suyo, para decorar. Mientras yo muy contenta con el resultado final.
Use video GIF, para la demostración y portada.
. Use InShot
. Use traductor lenguaje
Será hasta una próxima oportunidad, agradecida por su visista a mí blog. Será hasta un aproxima oportunidad.
(ESP)
Muy bonita noche a todos me complace estar, nuevamente con ustedes, viendo que estamos inspirados y muy motivados por la Navidad en @hivediy, me es placentero, pasar a compartir un muy sencillo, pero y fácil tutorial, de cómo hacer un lindo adorno, para decorar en Navidad, inspirada por el tan conocido Árbol de Nieve. Para su elaboración, utilice, materiales reciclable y de problecho. Así que les invito,para mostarles, este adorno que con mucho cariño, cree para todos ustedes.
MATERIALES.
. Un Royo de papel higiénico (cartón).
. Recortes de cartón.
. Foami blanco escarchado.
. Pegamento caliente.
. Cinta plateada.
. 1/2 alambre de construcción.
. Perlas corridas pequeñas.
. Chaquiras de colores.
. Lápiz
. Regla.
. Tijeras.
PASOS.
1.) Con la regla y el lápiz, marco por el revez de el foami, tiras de 1cm de ancho, y tomando el tardo total de la lámina de foami, está en particular es tipo carta.
2.)Luego de marcada, recortó con las tijeras, haciendo cortes de 0.6cm a lo ancho de cada una de las tiras.
3.) Tomo el alambre de construcción, desde uno de sus extremos, aplicando silicón, comienzo a pegar las tiras de foami, esto deber ir en espiral tomando referencia de la parte sin cortes. Es precio que la parte de los cortes que realice en paso anterior, no debe ir pegadas a el alambre. De esta manera, recorro el 1/2 me almabres industrial.
4.) Cubierto todo el alambre, comienzo a formar un espiral, que simule al árbol de nieves.
5.) Resto dos centímetros, de la medida total de largo, de el tubo de papel higiénico, y corto, para solo unilizarlo con 6cm de altura, así mismo midiby corto, 6cm de ancho por 8cm de largo de cartón, seguidamente, aplicando abundante silicón forro ambas piezas con foami blanco escarchado, corto los residuos de foami, y a lnapieza plana de cartón coloco, delgada tira de foami por el alrededor. Tomo además uno de los bordes de el Royo de papel higiénico, y pego una tapa de carto y forro con foami.
6.) Pego a el Royo perlitas corridas por la parte superior y al carton forrado pego perlitas por los borde, continuo, pegando ambas piezas, luego de pegadas sobre la base de cartón,hago con oaboujta de la tijera, una perforación a el Royo o tubo, aplico abundante silicón y pego el arbol, así mismo, dibujo y recortó una estrella y pego en la parte superior de el árbol.
7.) Para finalizar, recorro el tronco de el árbol en su parte o ferior, usando l acinta plateada y hago un pequeño y delicado lazo, que definirá al igual de la estrella su parte frontal, continuo, alternando y pegando las chaquiras de colores dentro de sus ramas nevadas.
De esta manera, concluyo con el proyecto de el día de hoy, esperando sea de su agrado, y motive a hacer el suyo, para decorar. Mientras yo muy contenta con el resultado final.
Use video GIF, para la demostración y portada.
. Use InShot
. Use traductor lenguaje
Será hasta una próxima oportunidad, agradecida por su visista a mí blog. Será hasta un aproxima oportunidad.