Muy buenas mis queridos lectores, deseo que se encuentren excelente. ¡Llegó el posh más esperado por ustedes! En Twitter realice una encuesta sobre si querían que les escribiera un tutorial de Como hago mis MINIATURAS, bueno amigos aquí se los traigo, espero que les sea de mucho ayuda .
Si es así, no olviden comentarme cualquier duda que tengan .
Ahora si, sin más nada que decir ¡Comencemos!
Very good my dear readers, I hope you are feeling great, the most awaited posh for you has arrived! On Twitter I made a poll on whether you wanted me to write a tutorial on How I make my MINIATURES, well friends here I bring it to you, I hope you find it very helpful.
If so, do not forget to tell me any questions you have.
Now, without further ado, let's get started!

¿Que app usos ?
Usualmente antes solía usar ambas aplicaciones por separado, hacia miniaturas tanto en PicSart y en Canva, pero nunca las usaba juntas, no se porque antes no lo hacía la verdad, pero al descubrir la excelente idea de usar ambas simultáneamente ha resultado muy beneficioso y han hecho de mis portadas en #hive una belleza, al menos para mí.
Porque ambas ¿? Porque Canva tiene herramientas y opciones que PicSart no tiene, mientras que PicSart tiene también opciones que no tiene la misma, entonces uso ambas y esto ha hecho que mis portadas se vean más atractivas visualmente.
Es bueno seguir un patrón ¿?
Es bueno seguir el mismo patrón más no la misma tonalidades o concepto, pero lo que he estado haciendo últimamente es utilizar la misma tipografía y agregarle un marco blanco, este refleja que tengo un feed en mi Blog bastante ordenado y lindo. Esto aplica incluso en las redes sociales, para que no se vea un desastre, es por ello que recomiendo utilizar algunas cosas que los identifique en sus miniaturas para mantener cierto orden en todas ellas .
Picsart .
Empecemos con esta app, en ella existen varias funciones que la verdad en algunas me encantan y en otras no, pero en si les puedo decir que esta app te ofrece diferentes opciones para sacarle mucho provecho.
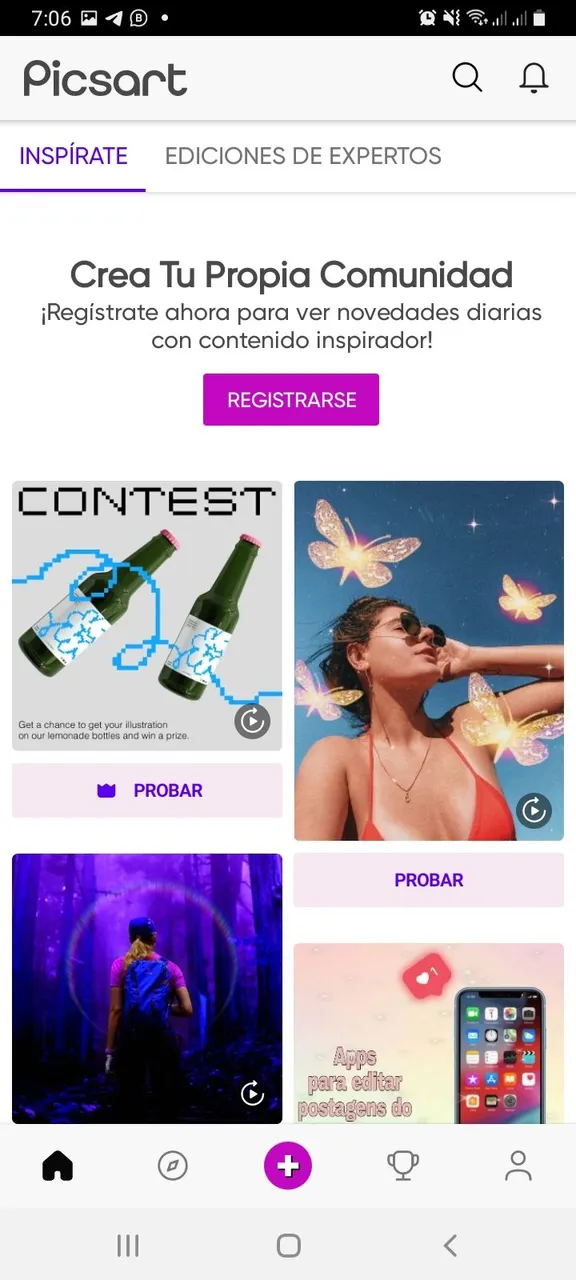
Pasos:
Lo primero que hago es agregar una foto en la parte del circulo de "+" al hacerlo yo usualmente hago es ir a "herramientas" ahí saldrá diferentes opciones, lo que hago yo para que la foto no pierda calidad es optar por la opción de "Ajustar" ahí podrán jugar con el brillo, contraste y claridad ect . Después puedes agregar un efecto para darle más color, al terminar le das a la opción de "Recorte" ahí aparecerá una barrera de diferentes opciones para decidir que deseas recortar, sin embargo al hacerlo deberás hacer manualmente el quitar aquello que no te gustó, con mucho cuidado .
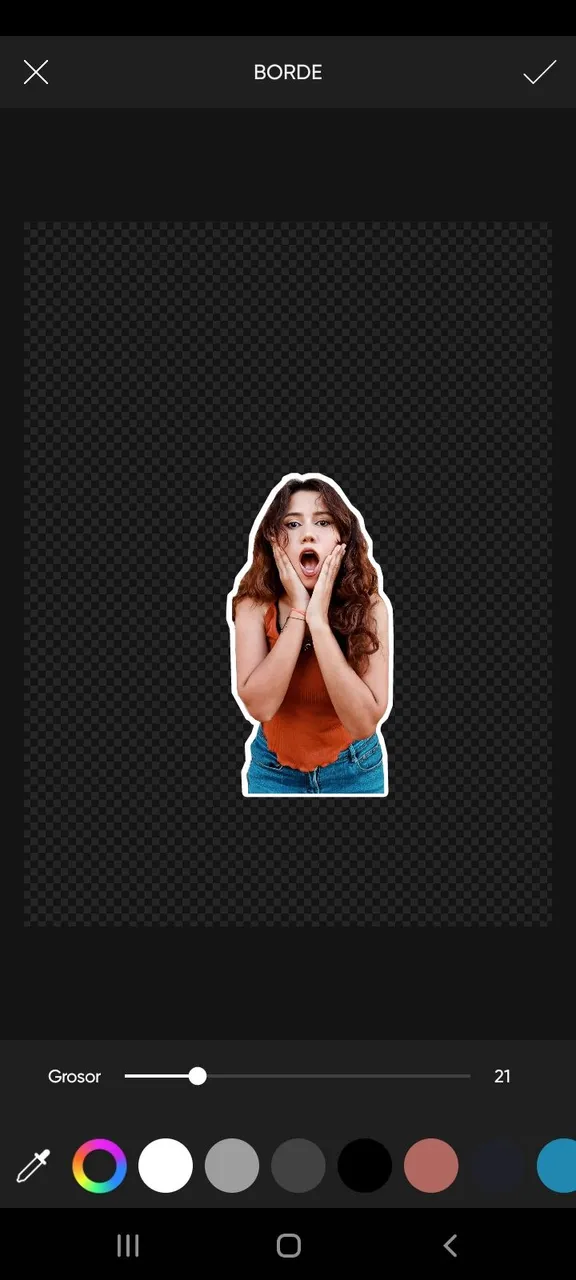
Después de tener nuestra foto sin fondo, viene el siguiente paso que muchos me han preguntado y es ¿Como haces para colocar las líneas blancas? Fácil, también verán la opción de "Borde" y ya tendrán su foto con bordes del grosor y color que desees .
Ahora toca es agregar un fondo, eliges el que tu desees, PicSart te da muchas opciones o si quieres algo más personal solo agrega una foto y ahí veras como difuminarlo o no hacerlo.
Which app do you use?
Usually before I used to use both applications separately, I used to make thumbnails in both PicSart and Canva, but I never used them together, I don't know why I didn't do it before, but discovering the excellent idea of using both simultaneously has been very beneficial and has made my #hive covers a beauty, at least for me.
Why both? Because Canva has tools and options that PicSart doesn't have, while PicSart also has options that PicSart doesn't have, so I use both and this has made my covers look more visually appealing.

Is it good to follow a pattern?
It is good to follow the same pattern but not the same tonalities or concept, but what I have been doing lately is to use the same typography and add a white frame, this reflects that I have a feed in my Blog quite tidy and nice. This applies even in social networks, so it doesn't look like a mess, that's why I recommend using some things that identify them in their thumbnails to keep some order in all of them .
Picsart .
Let's start with this app, in it there are several functions that the truth in some I love and others not, but if I can tell you that this app offers different options to get a lot out of it.

Steps:
The first thing I do is add a photo in the part of the circle of "+" to do so I usually do is go to "tools" there will come out different options, what I do so that the photo does not lose quality is to opt for the option of "Adjust" there you can play with the brightness, contrast and clarity ect . Then you can add an effect to give it more color, when you finish you give the option "Crop" there will appear a barrier of different options to decide what you want to crop, however in doing so you must manually remove what you did not like, very carefully.
After having our photo without background, comes the next step that many have asked me and that is how do you place the white lines? Easy, you will also see the "Border" option and you will have your photo with borders of the thickness and color you want.
Now it's time to add a background, choose the one you want, PicSart gives you many options or if you want something more personal just add a photo and there you will see how to blur it or not.
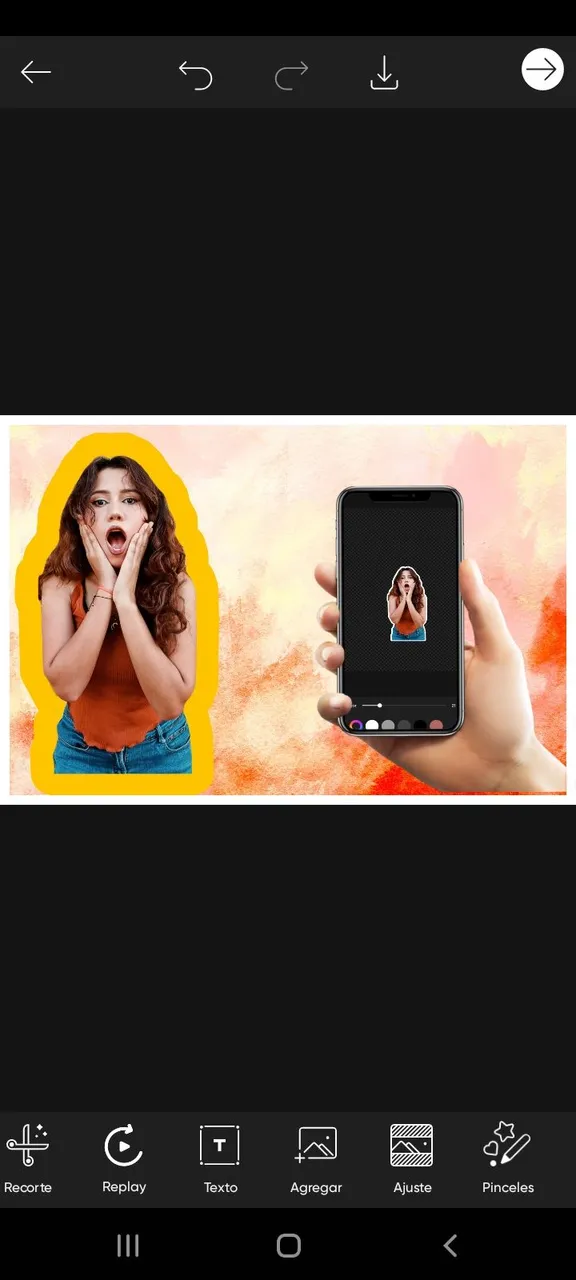
Lo excelente de PicSart es que tiene sticker muy buenos, que te servirán para hacer algo bien elaborado, como por el ejemplo el del Teléfono, hay varios que te harán decidír por uno.
¿Que hago yo? Para dar la ilusión del Teléfono, lo primero es agregar una foto, en mi caso tome un capture y lo recorte, tu decides que tamaño lo deseas y así encima pones el sticker del teléfono, lo ajustas y listo .
Canva .
Antes solía hacer muchas miniaturas en Canva, la verdad me encantaba hacerlas ahí por diferentes razones, sentía que podía fluir mi creativa al ver tantas plantillas que me inspiraban mucho a saber que quería crear, sin embargo esas opciones fueron disminuyendo para mi, al ver que ya no me funcionaba para hacer algo propio .

Herramientas útiles.
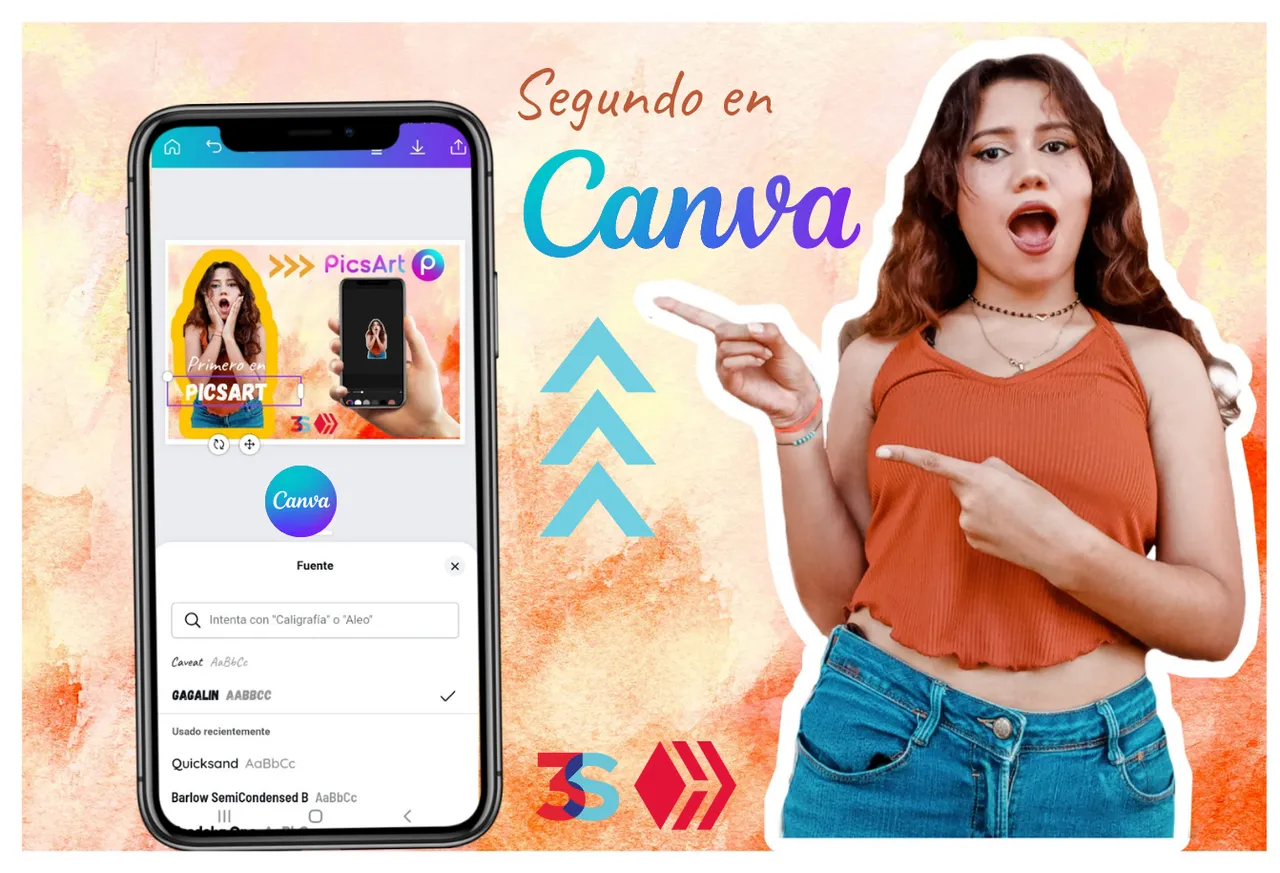
La variedad de fuentes de letra que tiene Canva es increíble, de verdad tienen para elegir y quedar más que satisfecho, además de los excelente sticker que te ofrecen para agregar a tus fotos y se vean más profesionales o modernos
Considero importante como mencioné antes, tener un tipografía fijo para tus portadas, eso refleja tu personalidad y marca personal. Cuando vean tus miniaturas dirán "Eso lo hizo tal" y eso que lo que queremos lograr, dejar una huella visualmente en tus posh .
The excellent thing about PicSart is that it has very good stickers, which will help you to make something well elaborated, as for example the Phone, there are several that will make you decide for one.
What do I do? To give the illusion of the Phone, the first thing to do is to add a photo, in my case I took a capture and cut it out, you decide what size you want and then you put the phone sticker on top, adjust it and it's ready.
Canva .
Before I used to make many thumbnails in Canva, the truth is I loved to make them there for different reasons, I felt that I could flow my creative to see so many templates that inspired me a lot to know that I wanted to create, however these options were decreasing for me, to see that no longer worked for me to make something of my own.
Useful tools.
The variety of fonts that Canva has is incredible, you really have to choose and be more than satisfied, in addition to the excellent stickers that they offer to add to your photos and look more professional or modern.
I consider it important as I mentioned before, to have a fixed typography for your covers, it reflects your personality and personal brand. When they see your thumbnails they will say "That's what so-and-so did" and that's what we want to achieve, to leave a visual imprint on your posh .

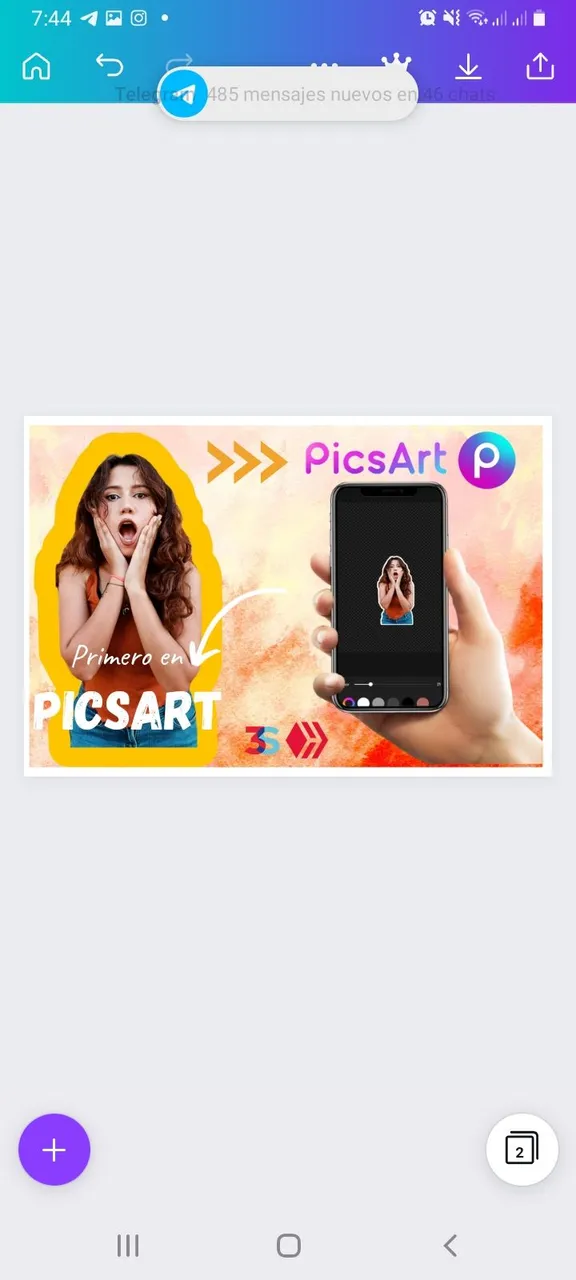
Lo que usualmente hago después de hacer todo lo que quería en PicSart me voy a Canva, en esta app las herramientas que suelo usar es; tipografía, elementos y estilo .
Juega con cada una de ellas, lo bueno de esta app es que te da muchas opciones de plantillas por si no sabes que hacer, solo debes cambiar color y otras cosas a tu gusto, pero si buscas hacer algo desde cero lo que te recomiendo es jugar con sus herramientas y buscar inspiración en otras app externas.
Deja fluir tu creatividad .
Dejar fluir nuestras creatividad es lo que debemos hacer cuando estamos creando una miniaturas, se que no es fácil, pero algo que les puede servir es escuchar música, en lo personal me ayuda a estar llena de energía para crear diseños, música que te inspire, inténtalo y me dices si te sirve .
Busca inspiración.
Como dije anteriormente en música, en redes sociales, videos ect es bueno también adquirir conocimiento sobre la colometria y el significado de cada color, así podrás elegir el color correcto ya sea para transmitir una emoción ect también saber combinarlos, aprender sobre diseño es lo mejor que podemos hacer nosotros como creadores de contenido, trabajamos con la escritura pero también con el diseño y estructura de nuestros posh, y no crean que es fácil, es un proceso que toma tiempo pero al final cuando ya sabes como diseñar tus miniaturas te sentirás mejor.
Bueno amigo eso fue todo por el tutorial, espero que les haya sido de gran ayuda, de verdad fue un gusto compartir mi conocimiento de esto a ustedes .
Gracias por leerme, nos vemos en la próxima, se les quiere mucho.
What I usually do after doing everything I wanted in PicSart I go to Canva, in this app the tools I usually use is; typography, elements and style .
Play with each of them, the good thing about this app is that it gives you many options of templates if you do not know what to do, just change color and other things to your liking, but if you are looking to do something from scratch what I recommend is to play with their tools and look for inspiration in other external apps.
Let your creativity flow.
Let our creativity flow is what we must do when we are creating a miniature, I know it is not easy, but something that can help is to listen to music, personally it helps me to be full of energy to create designs, music that inspires you, try it and tell me if it helps you.
Look for inspiration.
As I said before in music, social networks, videos ect is also good to acquire knowledge about the colormetry and the meaning of each color, so you can choose the right color either to convey an emotion ect also know how to combine them, learn about design is the best thing we can do as content creators, we work with writing but also with the design and structure of our posh, and do not think it is easy, it is a process that takes time but in the end when you know how to design your thumbnails you will feel better.
Well my friend that was all for the tutorial, I hope it has been of great help, it was really a pleasure to share my knowledge of this with you.
Thanks for reading, see you in the next one, I love you very much.
Traducido en: DeepL
Portada hecha en Canva PicSart