🇪🇸Spanish🇪🇸
La graduación de primaria de mi hija fue hace unos días, entre tantas cosas por hacer para que todo quedará bonito decidí realizar un cintillo con el motivo: "Mamá orgullosa" para mí. Era una forma de mostrar mi alegría por un logro más de mi princesa.
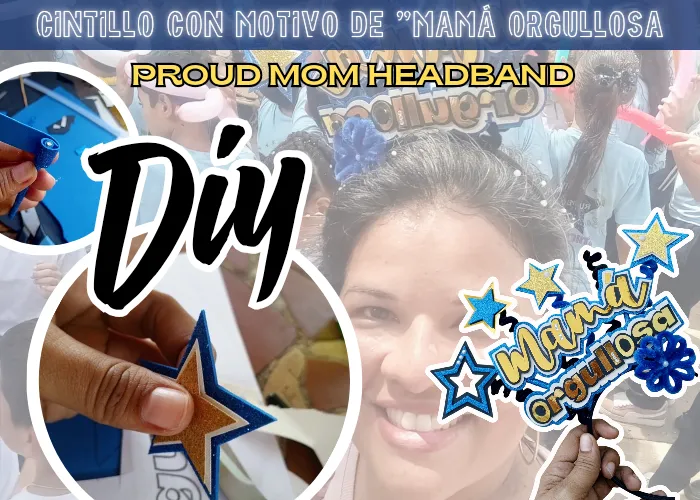
Los birretes de los niños se enviaron a realizar todos iguales, así que no tuve la oportunidad de realizar el de mi hija, así que necesitaba hacer alguna cosa que resaltará más que todo para el día del último timbre, que es una actividad más informal, llena de diversión, así que el cintillo quedaría perfecto 💯. Les muestro paso a paso como se realizó...👇
Materiales
🔅Cartulina escolar blanca
🔅Retazo de cartulina metalizada o espejo dorada
🔅Cartulina escolar negra.
🔅Retazos de foami azul rey.
🔅Cinta doble cara.
🔅Pegamento en barra.
🔅Silicón fino en barra - Pistola de silicón.
🔅Palillos de altura.
🔅Patrones.
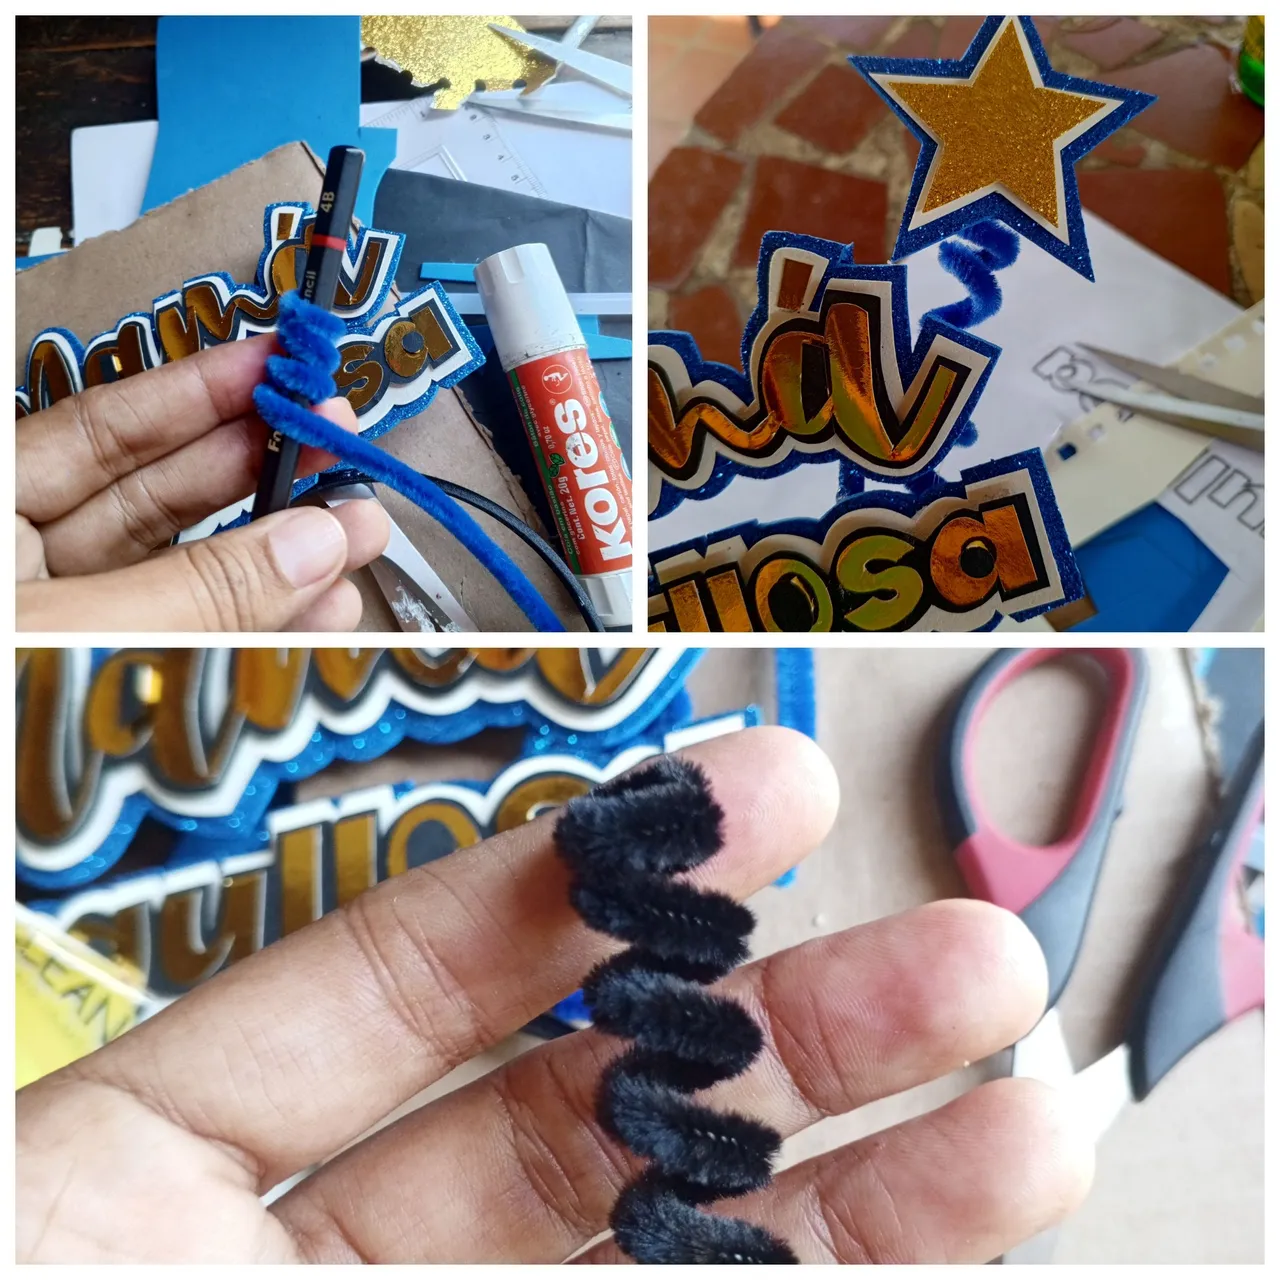
🔅Chenille color negro y azul (limpia pipas)
🔅Reglas.
🔅Tijeras.
🔅Bisturí de corte.
🔅Cintillo forrado negro.
El procedimiento
Paso I📝
Lo primero que se debe realizar es sacar los patrones, aprovechando que la pantalla de la computadora es una TV de buen tamaño, lo copié directamente de allí con las medidas deseadas, ésto dependerá de cada persona. Éste proceso fué para las letras de "Mamá orgullosa", para los patrones de estrellas 💫 utilicé una aplicación que se llama "Tracing paper" para fijar la imagen en mi teléfono, evitando que se mueva, pude copiar las imágenes en hojas blancas para sacar patrones de diferentes tamaños.
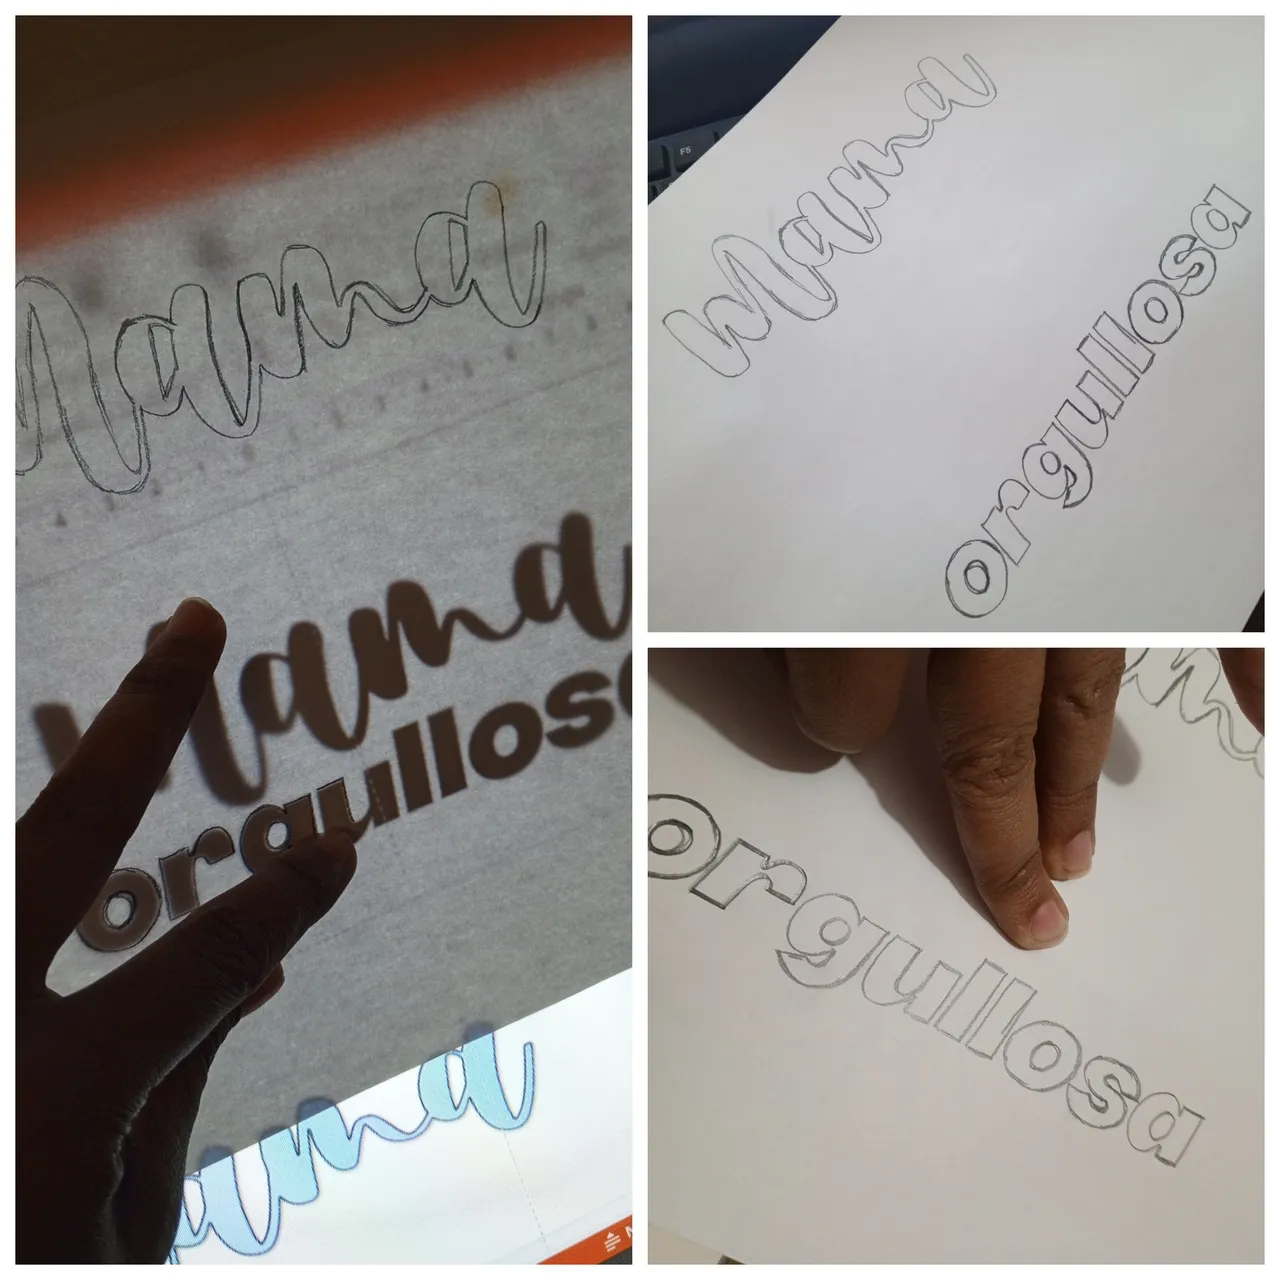 Paso II📝
Lo siguiente será pasar las letras de los patrones a las cartulinas. Las letras principales fueron en el retazo de la cartulina dorada metalizada. Para marcar las letras lo que hice fue repasar con lápiz las letras en los patrones hechos en hojas blancas sobre la cartulina, de manera que se vea el marcado.
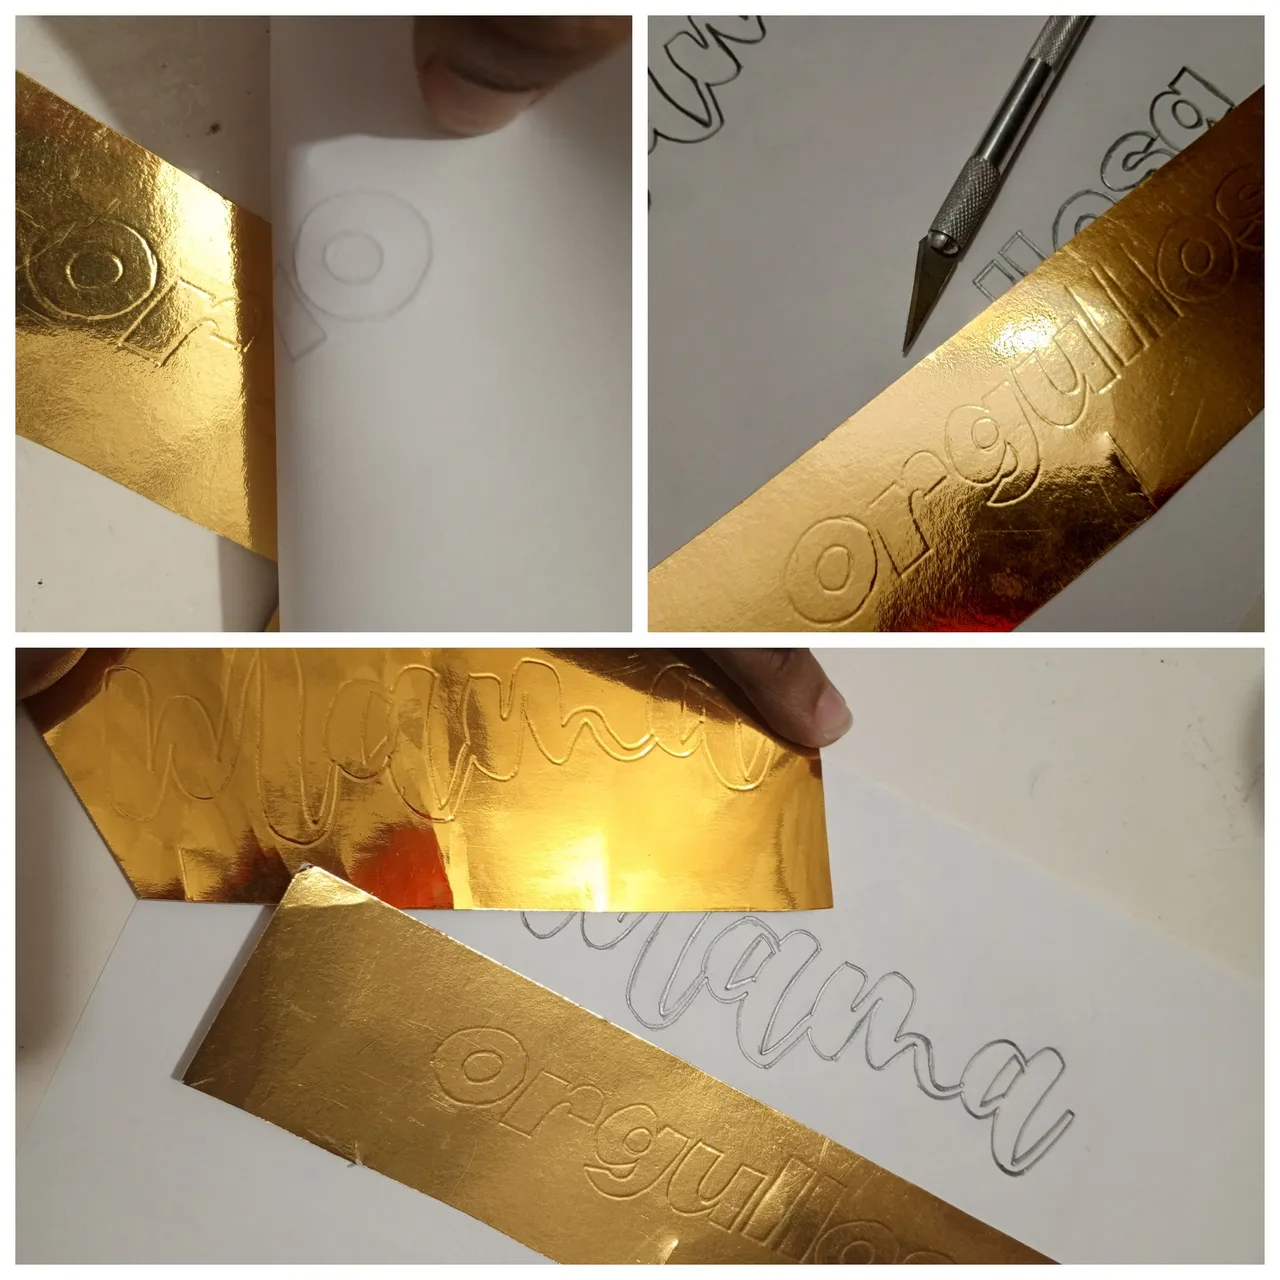 Paso III📝
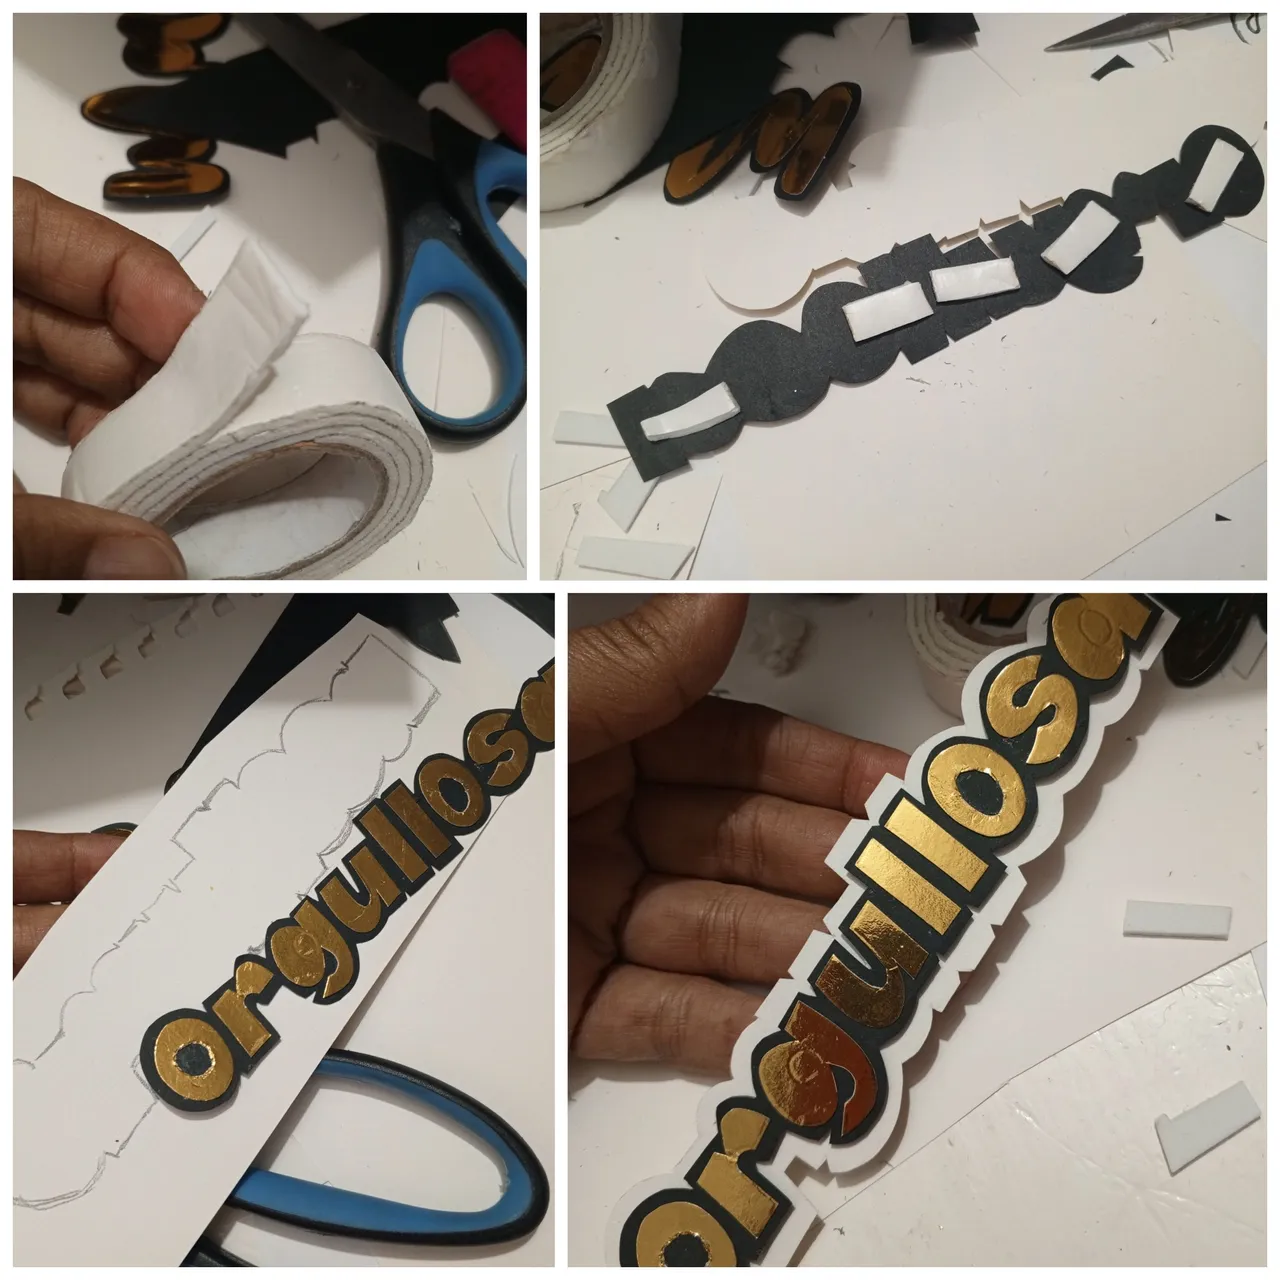
Recortar no es lo más fácil pero tampoco imposible, requiere precisión y detalle a fin de que los cortes de las letras se vean prolijos, más cuando se hace a mano, no con impresoras de precisión que existen en el mercado que facilitan éste tipo de trabajo. El caso es que traté lo más que pude de hacer cortes que no se vieran defectuosos, considerando que en la cartulina espejo se notan mucho los detalles. Para comenzar a darle más vista pegue las letras sobre cartulina escolar color negro, esto permite construir un bonito borde.
 Paso IV📝
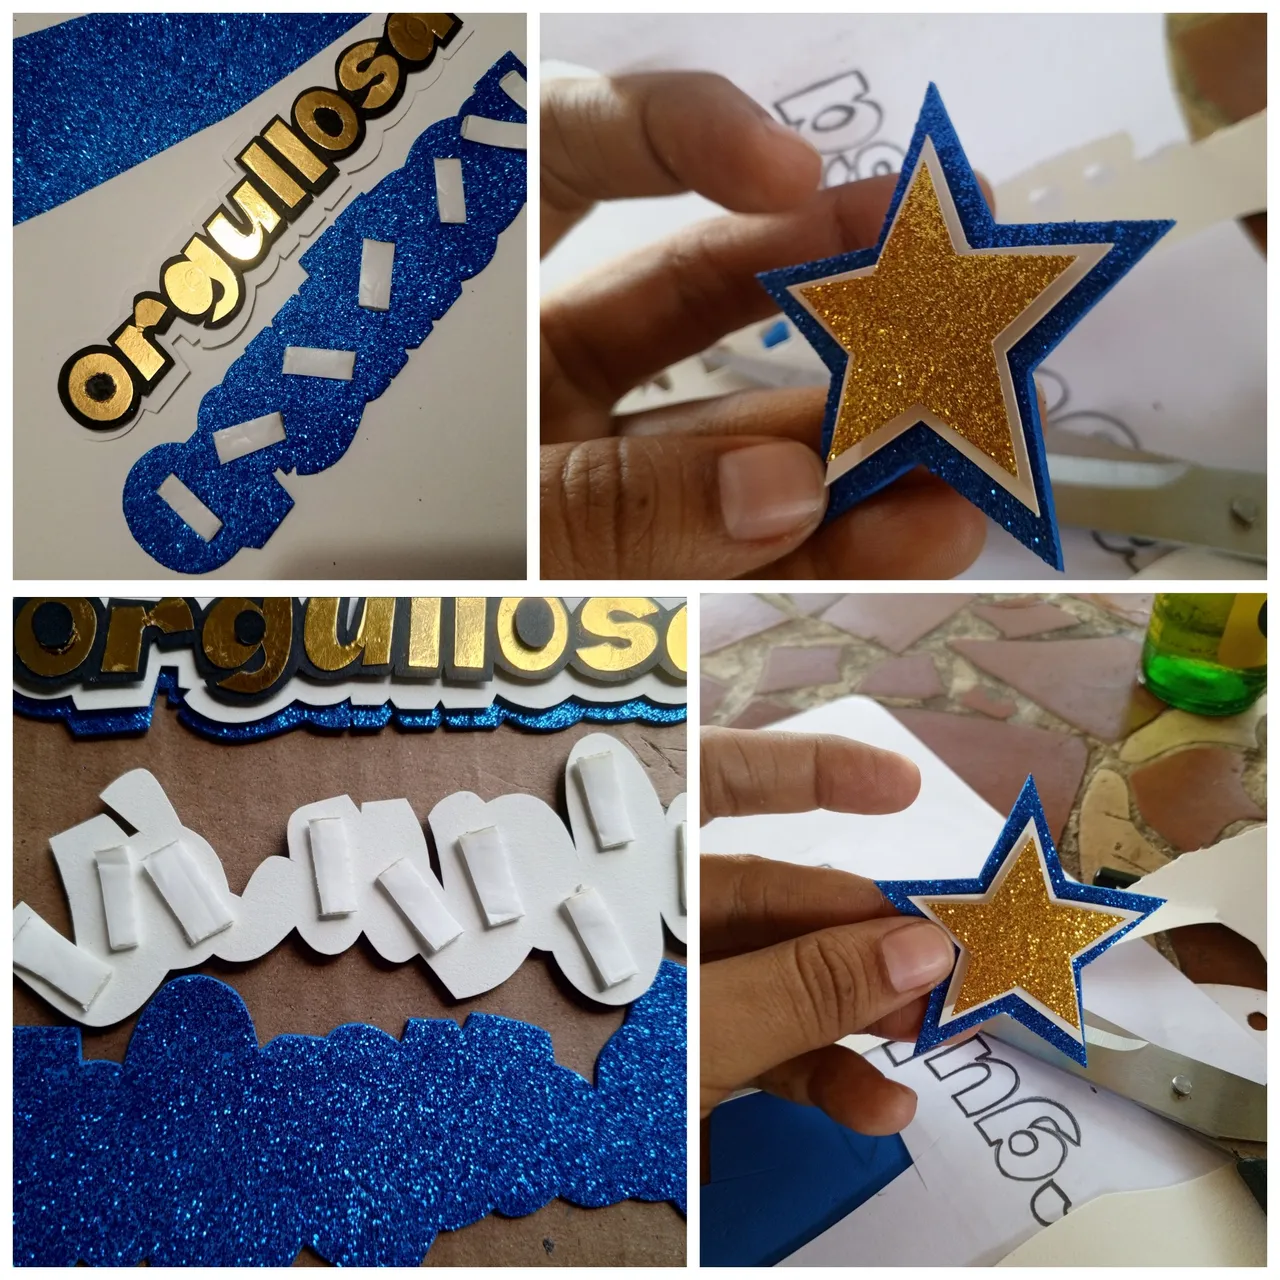
Como quería que las letras sobresalieran aún más, utilicé cartulina escolar blanca para formar un nuevo borde, ésto con ayuda de cinta doble cara, de ésta manera se crea visualmente un relieve.
 Paso V📝
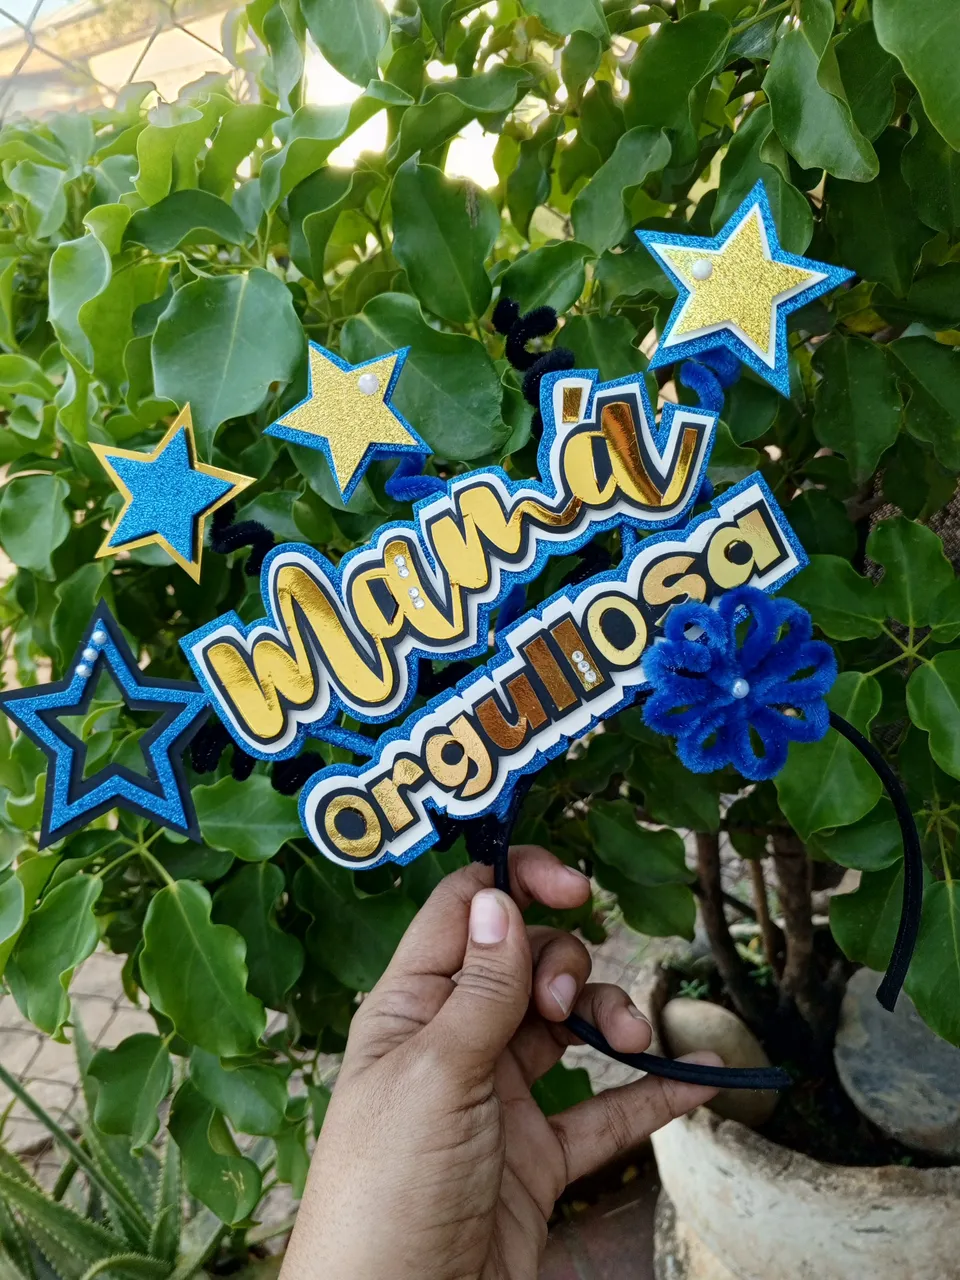
Para terminar con las letras, en foami escarchado azul 💙, ocurre la maravilla del relieve final. También la cinta doble cara hizo su magia en éste proceso. Para las estrellas que formarían parte de la decoración se llevó a cabo el mismo proceso que las letras, por capas.
 Paso VI📝
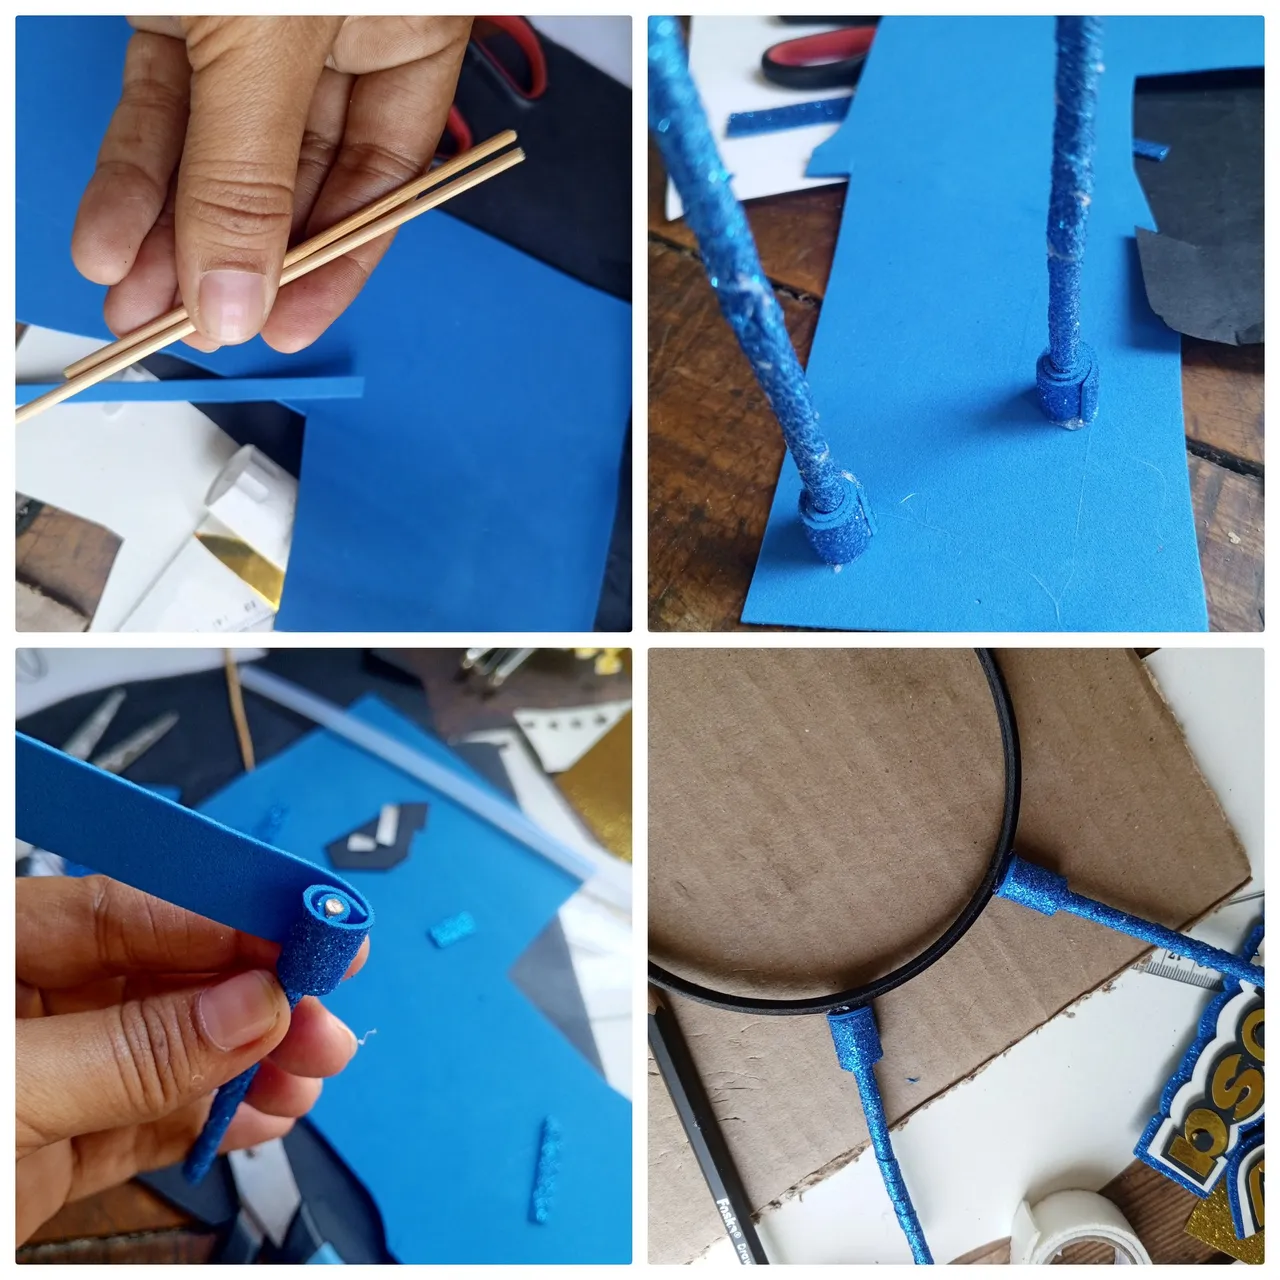
Para construir la base sobre el cintillo forrado, utilicé dos palillos de altura, cortando aproximadamente unos 15 cm en cada uno. Estos palillos fueron forrados con foami azul cortado en tiras de 1/2 cm 💙, también se le formó una especie de soporte en uno de sus extremos, para lograr asegurar con silicón caliente sobre el cintillo.
 Paso VII📝
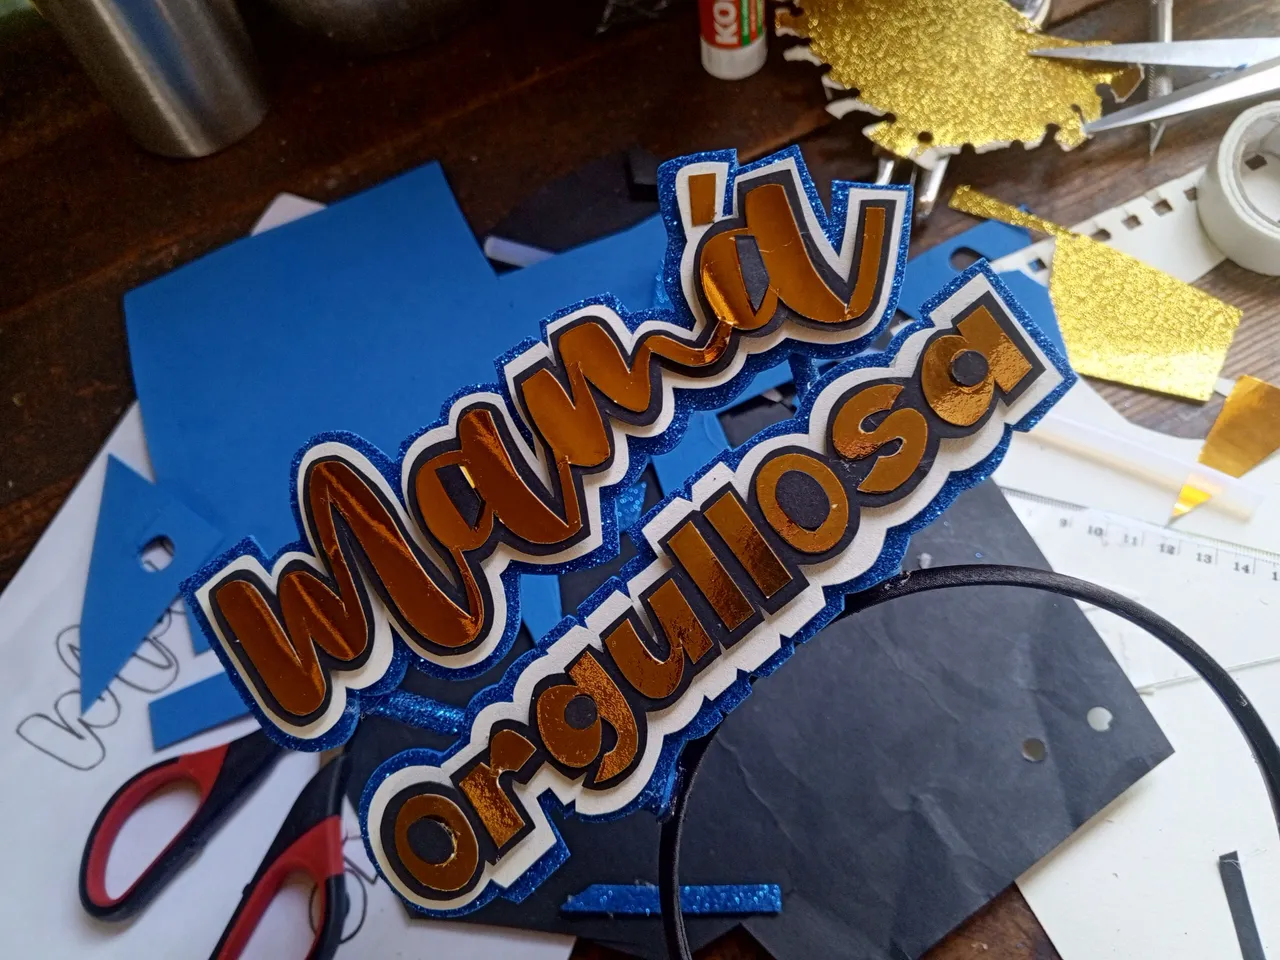
En éste punto, las letras se aseguran con silicón caliente a las bases formadas con los dos palillos.
 Paso VIII📝
Los detalles en la decoración, en éste caso las estrellas en relieve, se sujetaron a uno de los extremos del chenille. Éste material es fácil de moldear, con ayuda de un bolígrafo o lápiz se le da forma de resortes, así se pueden mover las estrellas, no son antes asegurarlo a la base del cintillo.
 Paso IX📝
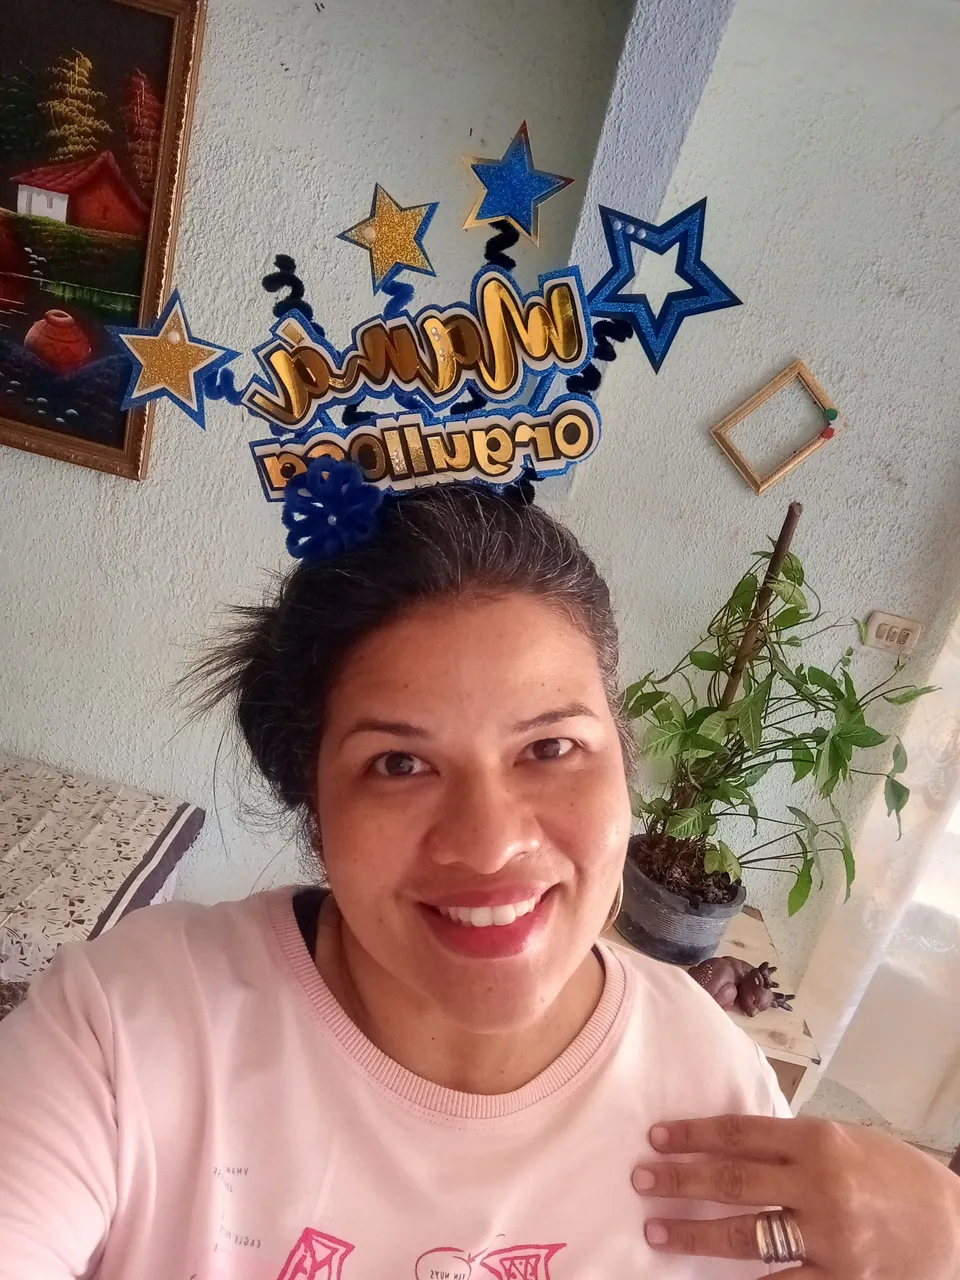
Finalmente, agregamos todos los detalles, las estrellas, chenille enroscados, éste cintillo es un detalle especial para celebrar el final de un año escolar.
Fue un trabajo bonito, fácil de realizar también necesita precisión para los cortes. Si se hace una buena base, bonita, quizás no sea necesario otro material para cubrir detalles como en éste caso. Considero que quedó bellísimo, además de que fue un proyecto #hechoconmuchoamor ❤️ porque lo utilicé durante la fiesta del último timbre de mi hija, era la única que llevaba éste tipo de accesorio, así que a muchas personas llamo su atención, una "Mamá orgullosa" de los logros de su hija por finalizar su etapa escolar con éxitos. Éste accesorio teniendo uso, incluso ya para el próximo año, mi sobrino irá a su acto de graduación y mi hermana será la mamá orgullosa, Jejeje.
Es todo por éste tutorial. Gracias por visitarme 🫂📝☝️.
🇺🇸 English🇺🇸
My daughter's elementary school graduation was a few days ago, among so many things to do to make everything look pretty I decided to make a headband with the motif: "Proud Mom" for myself. It was a way to show my joy for another of my princess's accomplishments.
The children's caps were all sent out to be made the same, so I didn't get a chance to make my daughter's. I needed to do something that would stand out more for the day of the final bell, which is a more informal, fun-filled activity, so the headband would be perfect 💯. I'll show you how it was done step by step... 👇
Materials
🔅White school cardstock
🔅Remnants of metallic or gold mirror cardstock
🔅Black school cardstock
🔅Remnants of royal blue foam
🔅Double-sided tape
🔅Glue stick
🔅Thin silicone stick - Hot glue gun
🔅Tall toothpicks
🔅Patterns
🔅Black and blue chenille (pipe cleaners)
🔅Rulers
🔅Scissors
🔅Cutting knife
🔅Black lined headband
The procedure
Step I📝
The first thing to do is to take out the patterns, taking advantage of the fact that the computer screen is a good-sized TV, I copied it directly from there with the desired measurements, this will depend on each person. This process was for the "Proud Mom" letters. For the star patterns, 💫 I used an app called "Tracing Paper" to capture the image on my phone, preventing it from moving. I was able to copy the images onto white paper to create patterns of different sizes.
Step II📝
Next, I'll transfer the pattern letters to the cardstock. The main letters were made from the scrap metallic gold cardstock. To mark the letters, I traced the letters in the patterns made on white sheets of cardboard with a pencil so that the markings are visible.
Step III📝
Cutting isn't the easiest task, but it's not impossible either. It requires precision and detail so that the letter cuts look neat, especially when done by hand, rather than with the precision printers available on the market that make this type of work easier. The thing is, I tried my best to make cuts that didn't look flawless, considering that the details are very noticeable on mirrored cardstock. To start giving it more visibility, I glued the letters onto black school cardstock; this allows for a nice border.
Step IV📝
Since I wanted the letters to stand out even more, I used white school cardstock to form a new border, using double-sided tape. This visually creates a embossing.
Step V📝
To finish with the letters, in blue frosted foam 💙, the wonder of the final embossing happens. The double-sided tape also worked its magic in this process. For the stars that would be part of the decoration, the same process was followed as for the letters, in layers.
Step VI📝
To build the base on the lined headband, I used two toothpicks, cutting approximately 15 cm off each one. These chopsticks were covered with blue foam cut into 1/2 cm strips 💙, and a kind of support was also made at one end, so they could be secured with hot silicone to the headband.
Step VII📝
At this point, the letters are secured with hot glue to the bases formed with the two toothpicks.
Step VIII📝
The details in the decoration, in this case the embossed stars, were attached to one end of the chenille. This material is easy to shape. With the help of a pen or pencil, you can shape it into springs so the stars can move. You just need to secure it to the base of the headband first.
Step IX📝
Finally, we add all the details: the stars and twisted chenille. This headband is a special gift to celebrate the end of the year. school.
It was a beautiful project, easy to do, and it also requires precision for the cuts. If you make a nice, pretty base, you might not need other material to cover details like in this case. I think it turned out beautiful, and it was a #madewithlove project ❤️ because I used it during my daughter's last-year bell party. I was the only one wearing this type of accessory, so it caught many people's attention. A "Proud Mom" of her daughter's achievements for successfully completing her school years. This accessory is already being used, even going so far as to go next year. My nephew will be attending his graduation ceremony and my sister will be the proud mom, hehe.
That's all for this tutorial. Thanks for visiting 🫂📝☝️.
Creditos - Credits
Traductor English translator
Stickers realizado en Bitmoji | Stickers made in Bitmoji.
Fotografias capturadas con mi teléfono Tecno Spark 10 pro | Photos captured with my Tecno Spark 10 pro phone.