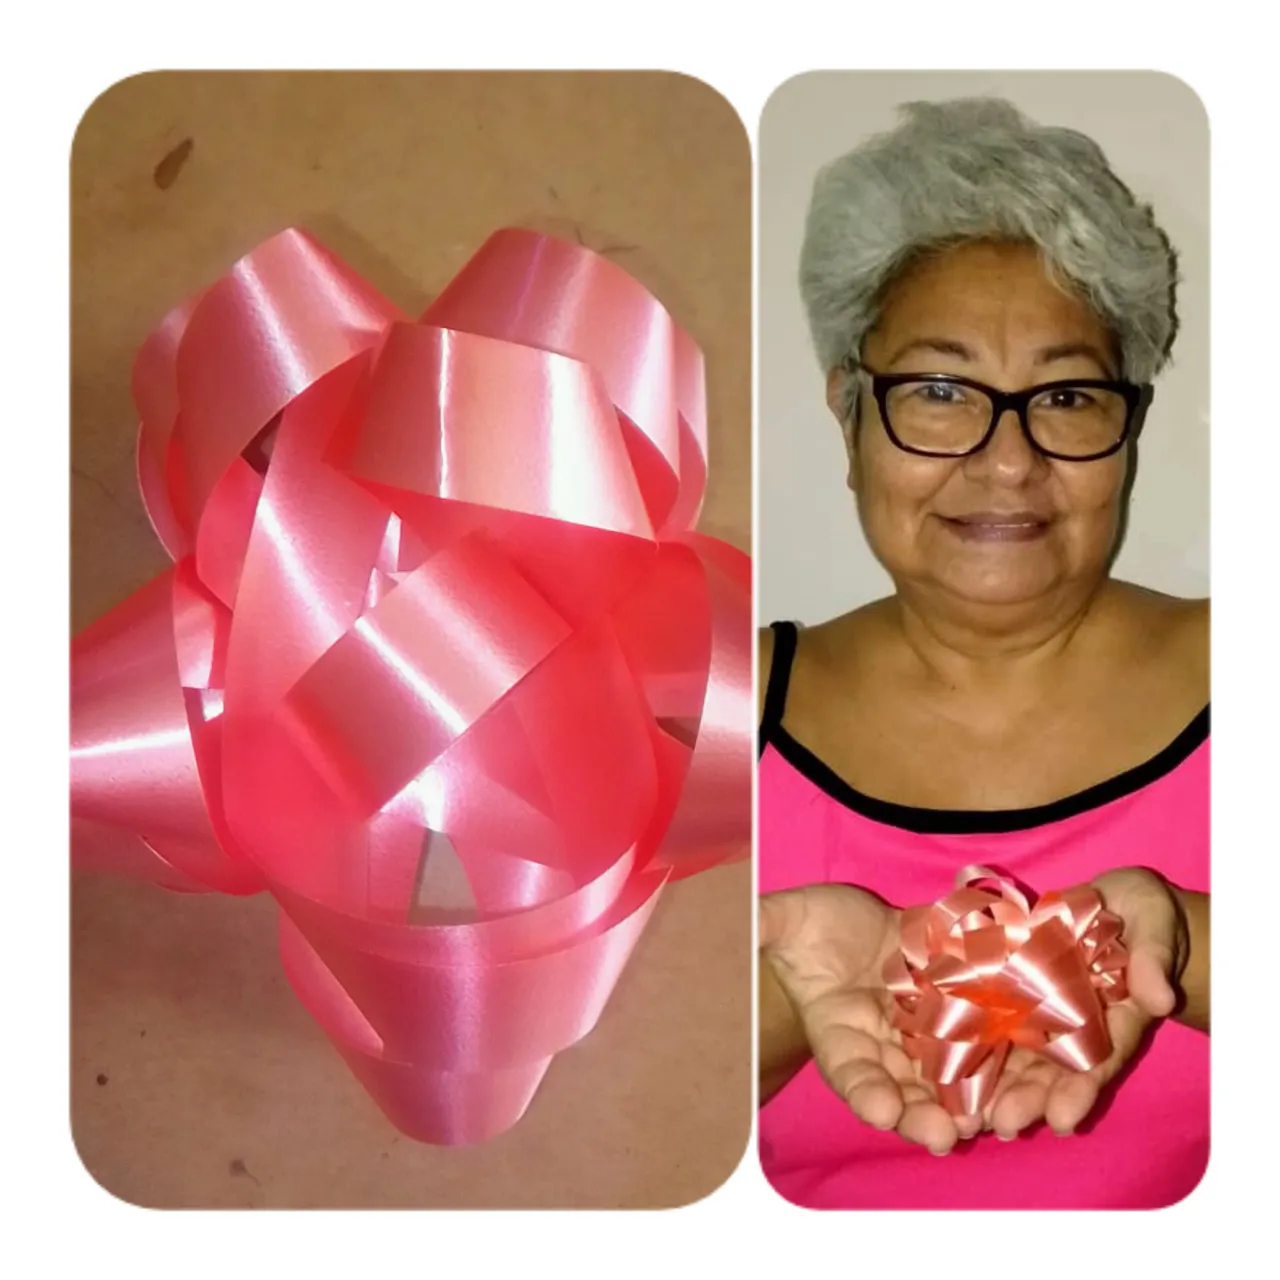
Hello to all friends of #HIVEDIY a pleasure to greet you I hope you are well with your beautiful families and in advance I wish you a happy start of Christmas with peace, welfare, prosperity and lots of life and health, here I bring you the step by step of a beautiful bow made with ribbon ribbon where I show you how to make the mold to not complicate it is very easy once you do it.
MATERIALES A UTILIZAR:
MATERIALS TO BE USED:
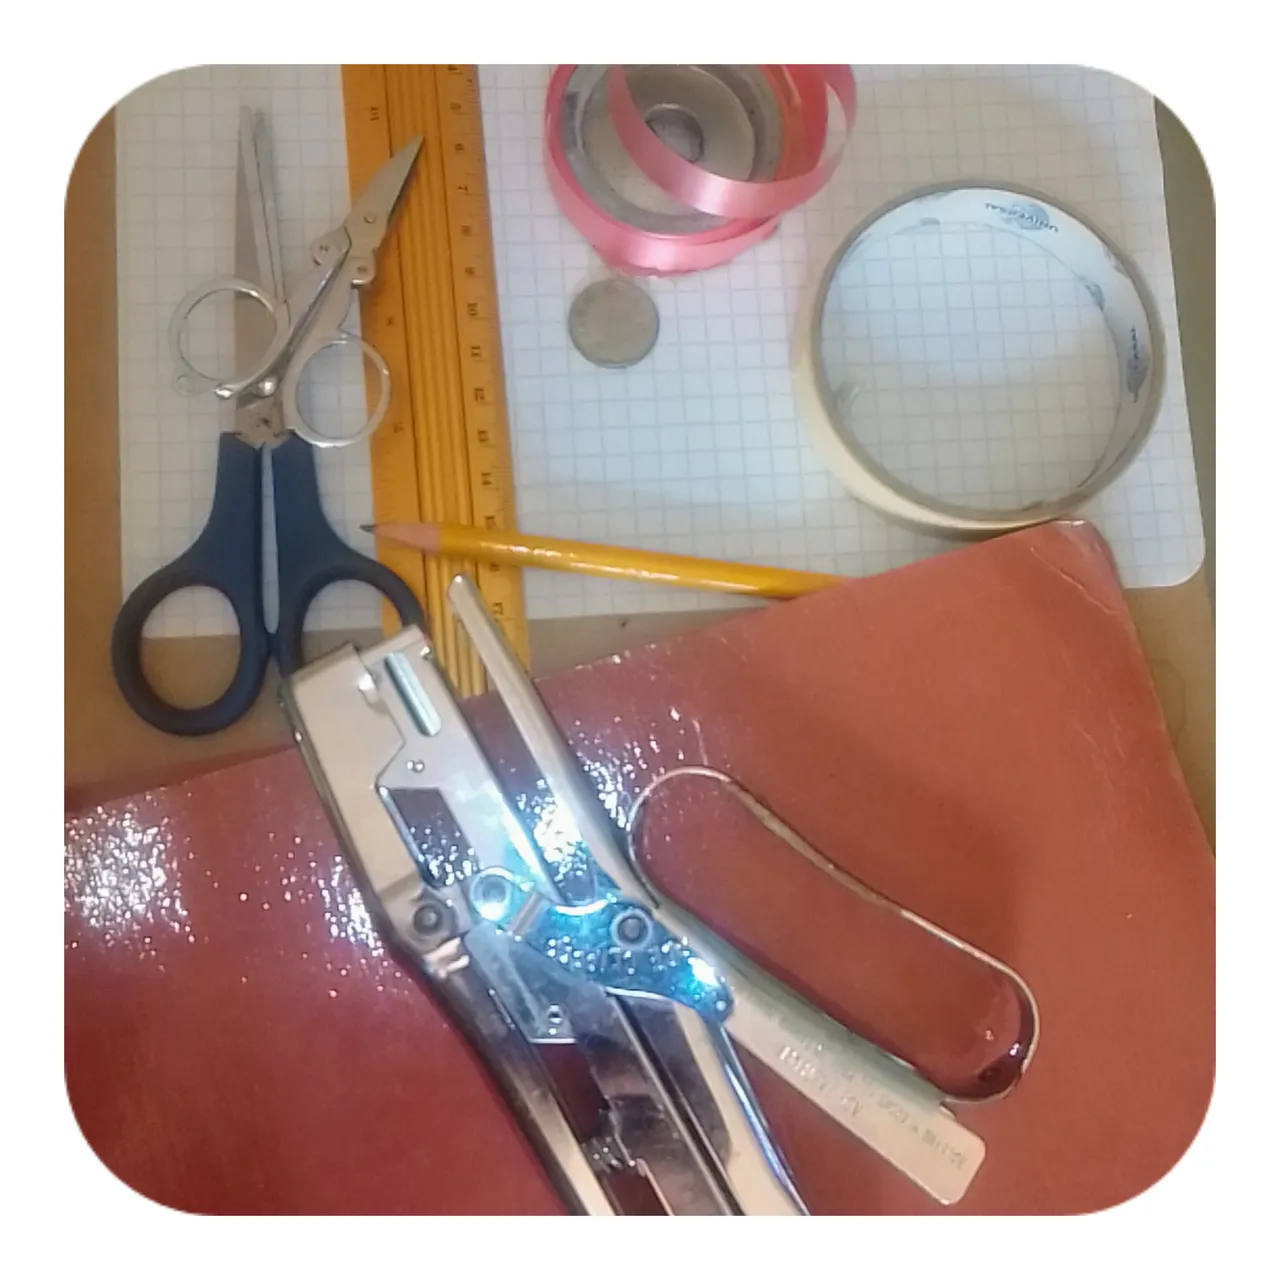
- Un hoja de cuadriculado
- Tijeras
- Tirro
- Cartón
- Grapadora
- Cinta para lazos
- Una regla
- Un lápiz de creyón.
- Una moneda.
- A sheet of graph paper
- Scissors
- String
- Cardboard
- Stapler
- Tape for ribbons
- A ruler
- A crayon pencil.
- A coin.
PROCEDIMIENTO:
PROCEDURE:
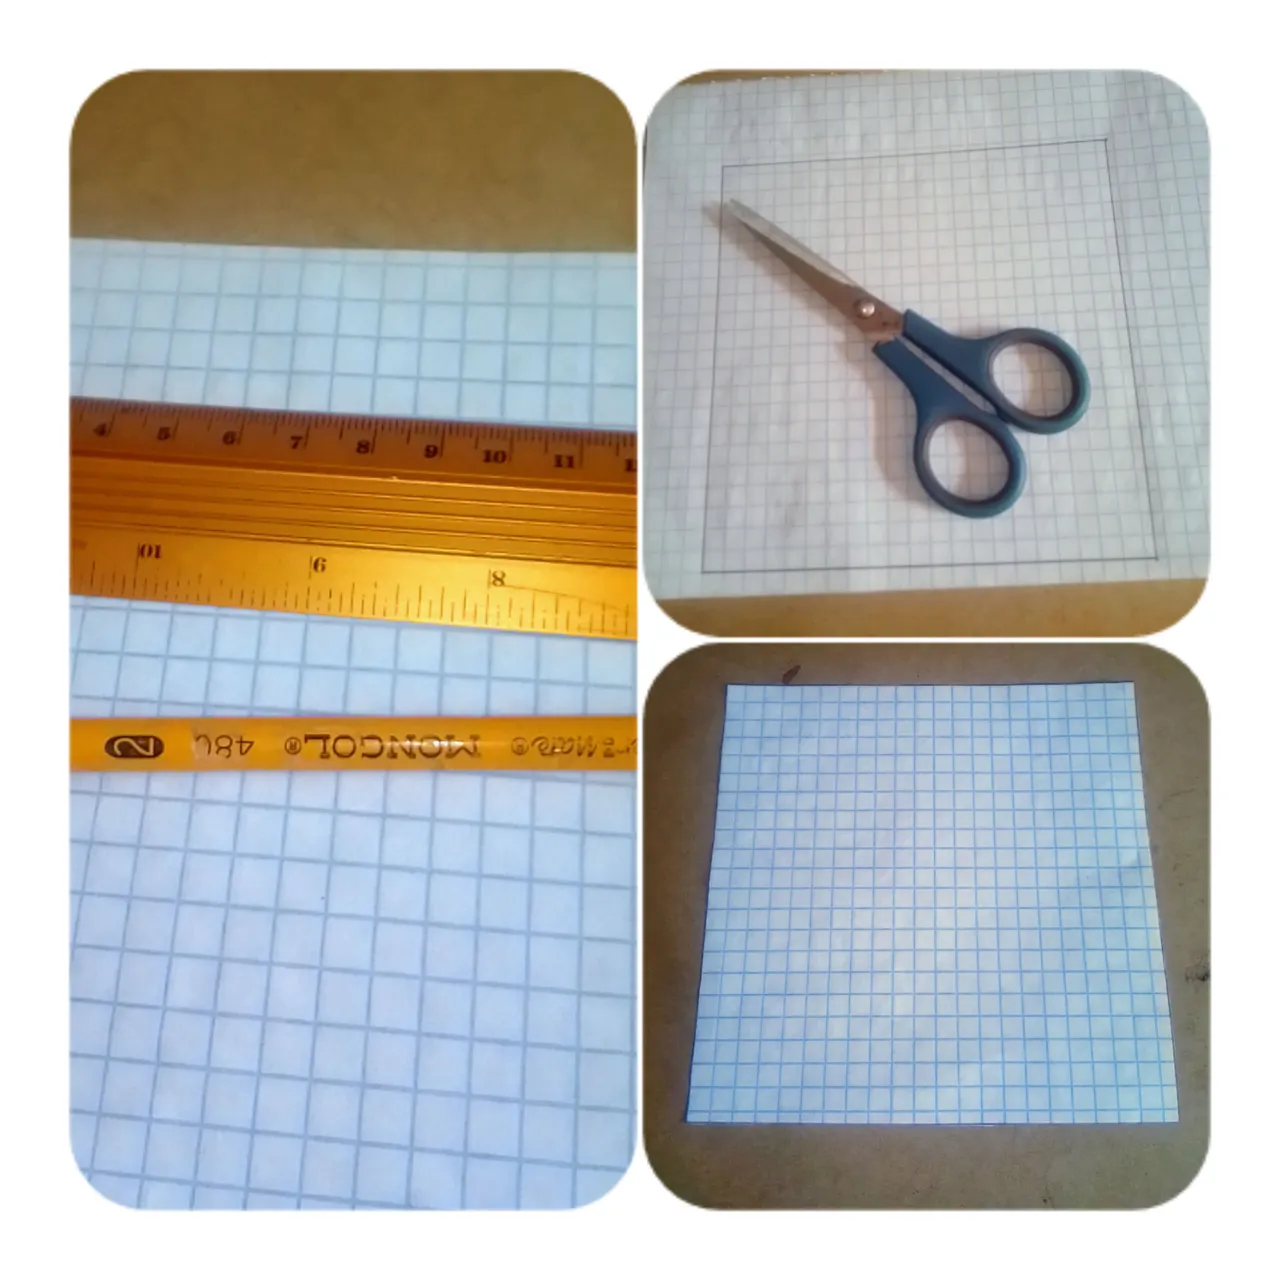
PASO 1
STEP 1
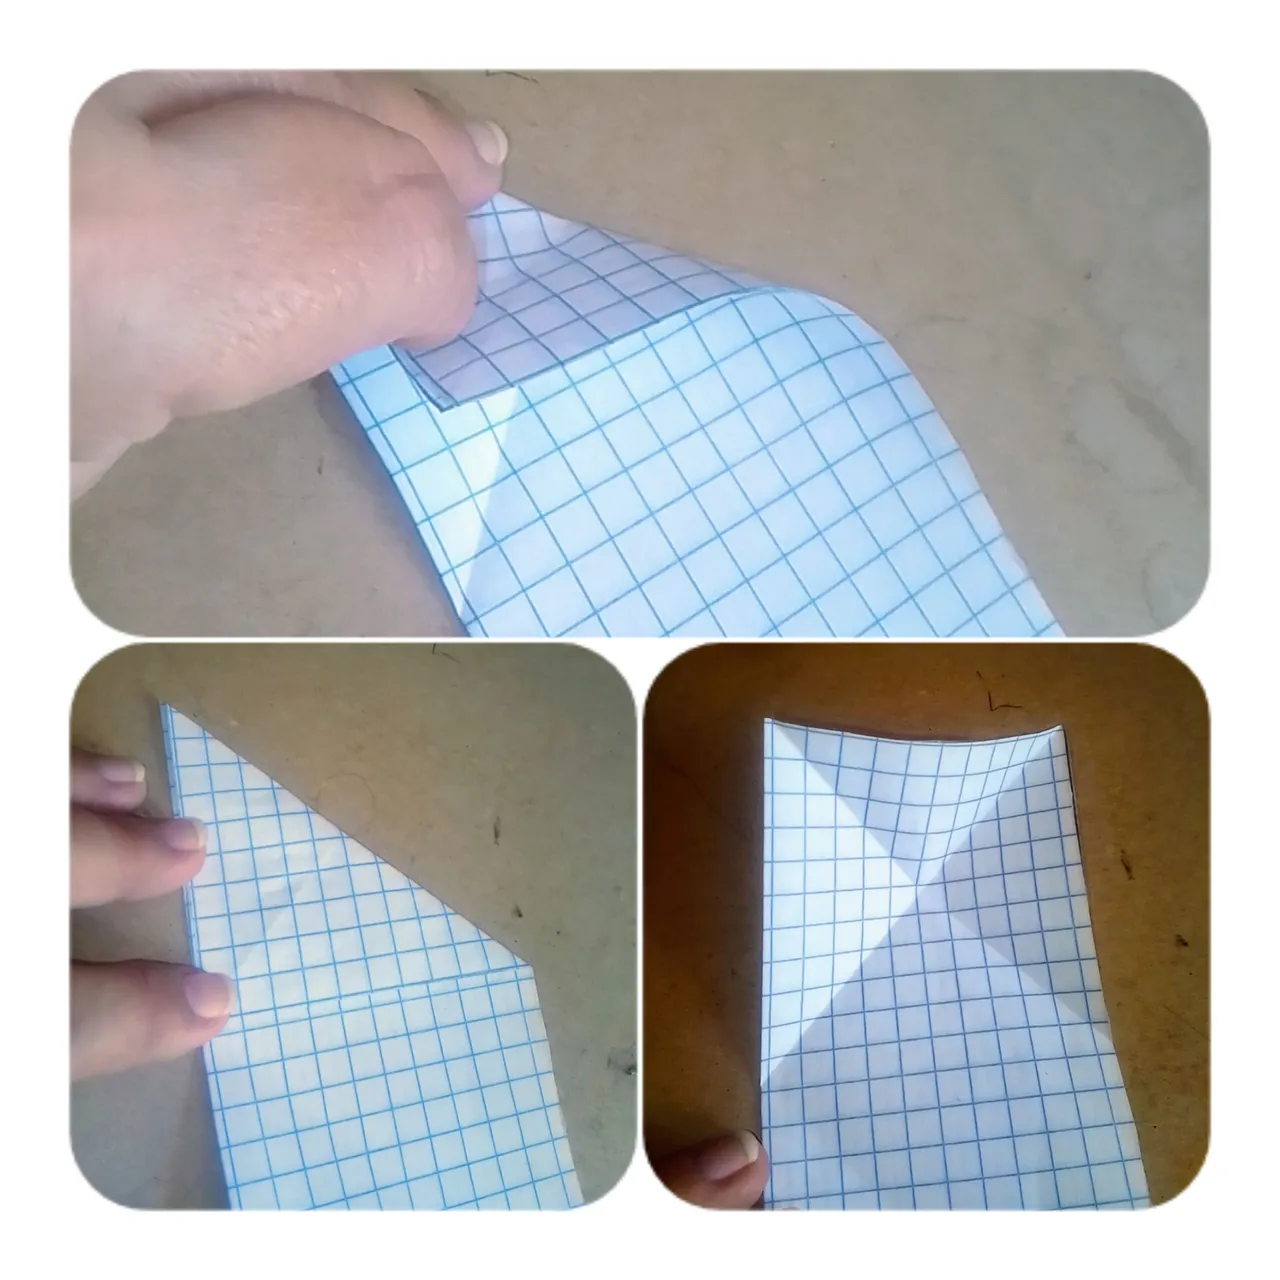
Primero vamos a empezar hacer el molde para realizar el moño tomamos la hoja de cuadriculado, la regla y el lápiz para marcar las medidas que son 14 X 14 una vez marcadas las medidas con la tijera recortamos el cuadrado que hicimos.
First we are going to start making the mold to make the bow we take the grid sheet, the ruler and the pencil to mark the measurements which are 14 X 14 once the measurements are marked with the scissors we cut the square we made.
PASO 2
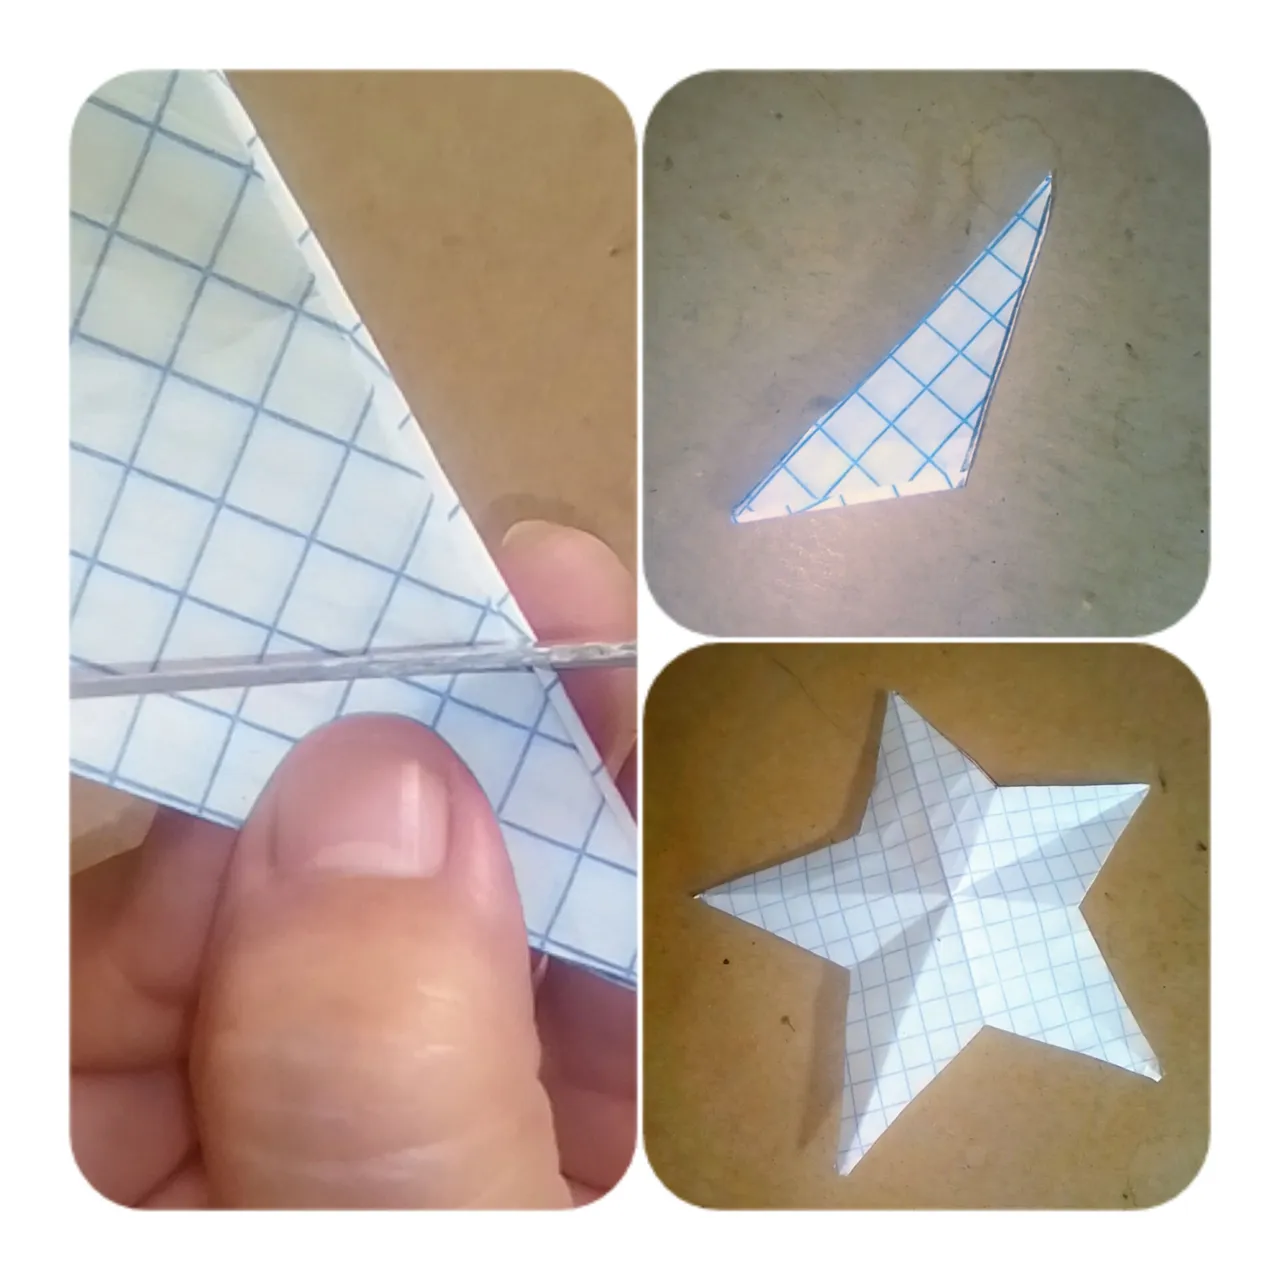
Luego tomamos el cuadrado que hicimos en la hoja la vamos a doblar a la mitad exactamente una vez doblada vamos a un extremo de la punta y hacemos un dobles llevamos esa punta hacia el otro lado y hacemos presión al dobles.
Then we take the square that we made on the sheet we are going to fold it in half exactly once folded we go to one end of the tip and make a double we take that tip to the other side and make pressure to the double.
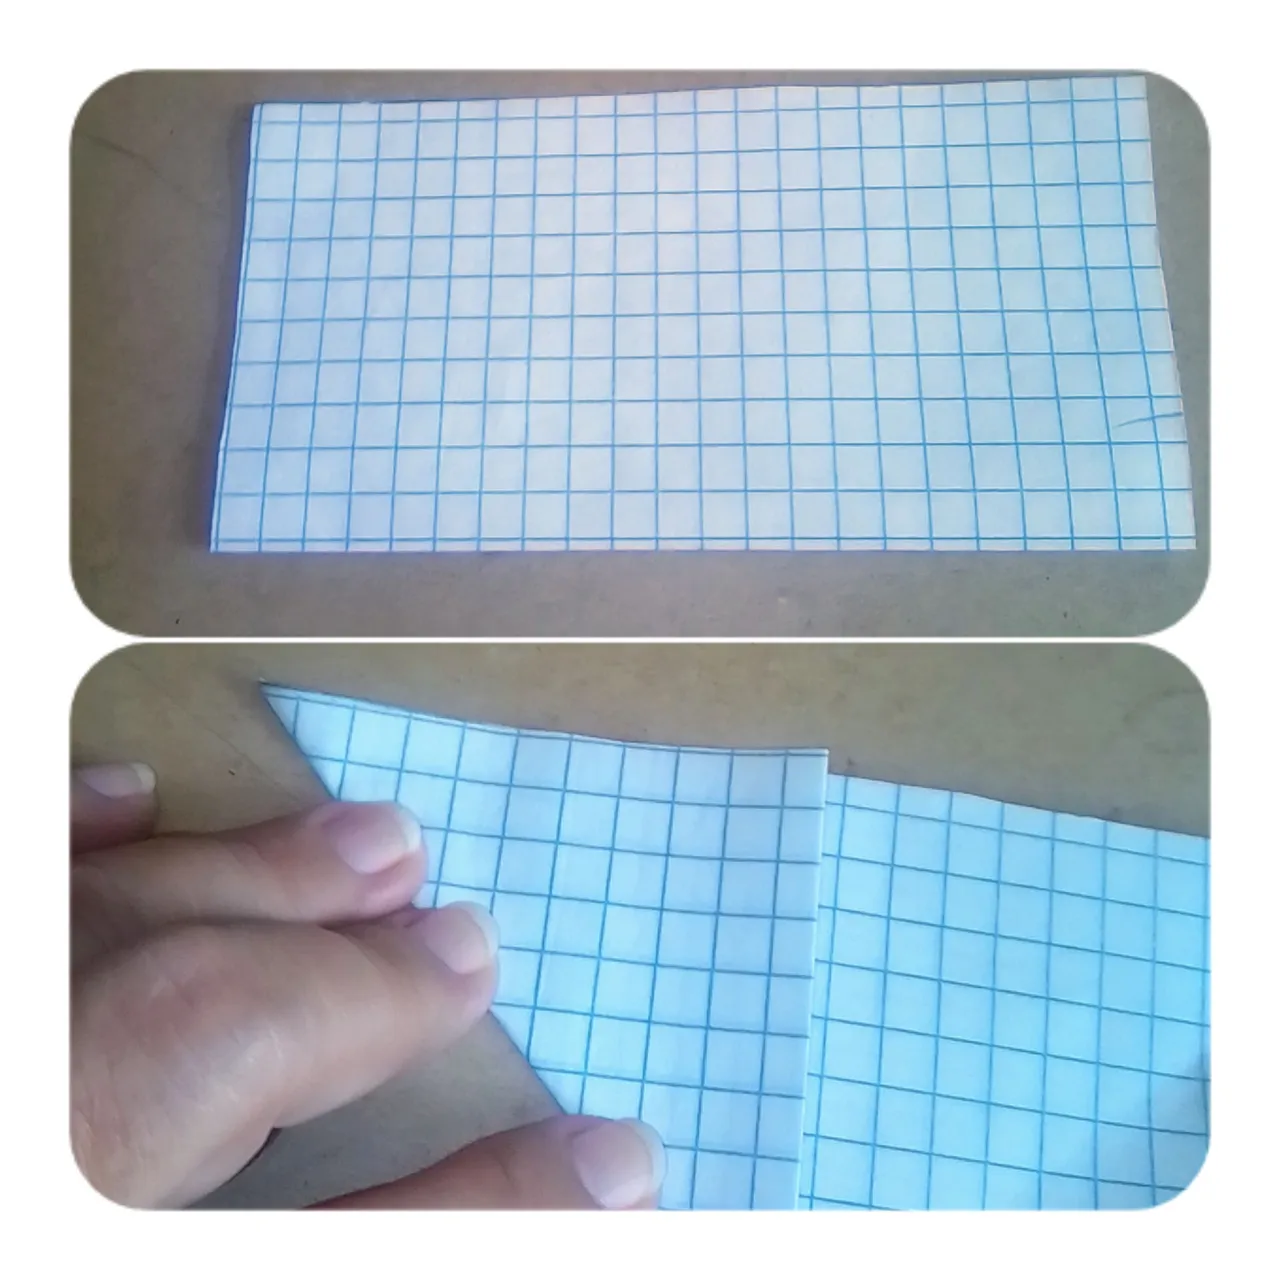
PASO 3
Ahora vamos a hacer dobles del mismo lado pero de la otra esquina y la llevamos hacia el otro extremo y luego desdobla y ve que te queda una X esta va hacer tu guía.
Now we are going to make doubles on the same side but from the other corner and take it to the other end and then unfold and see that you are left with an X. This will be your guide.
PASO 4
Luego acá vamos a tomar la punta del lado que no hemos doblado y la llevamos al centro de donde empieza el dobles de la X y doblas después esa misma que llevaste a la X vas a doblar la esquina y te queda de esta forma.
Then here we are going to take the tip of the side that we have not folded and take it to the center of where the fold of the X begins and then fold that same tip that you took to the X you are going to fold the corner and it will look like this.
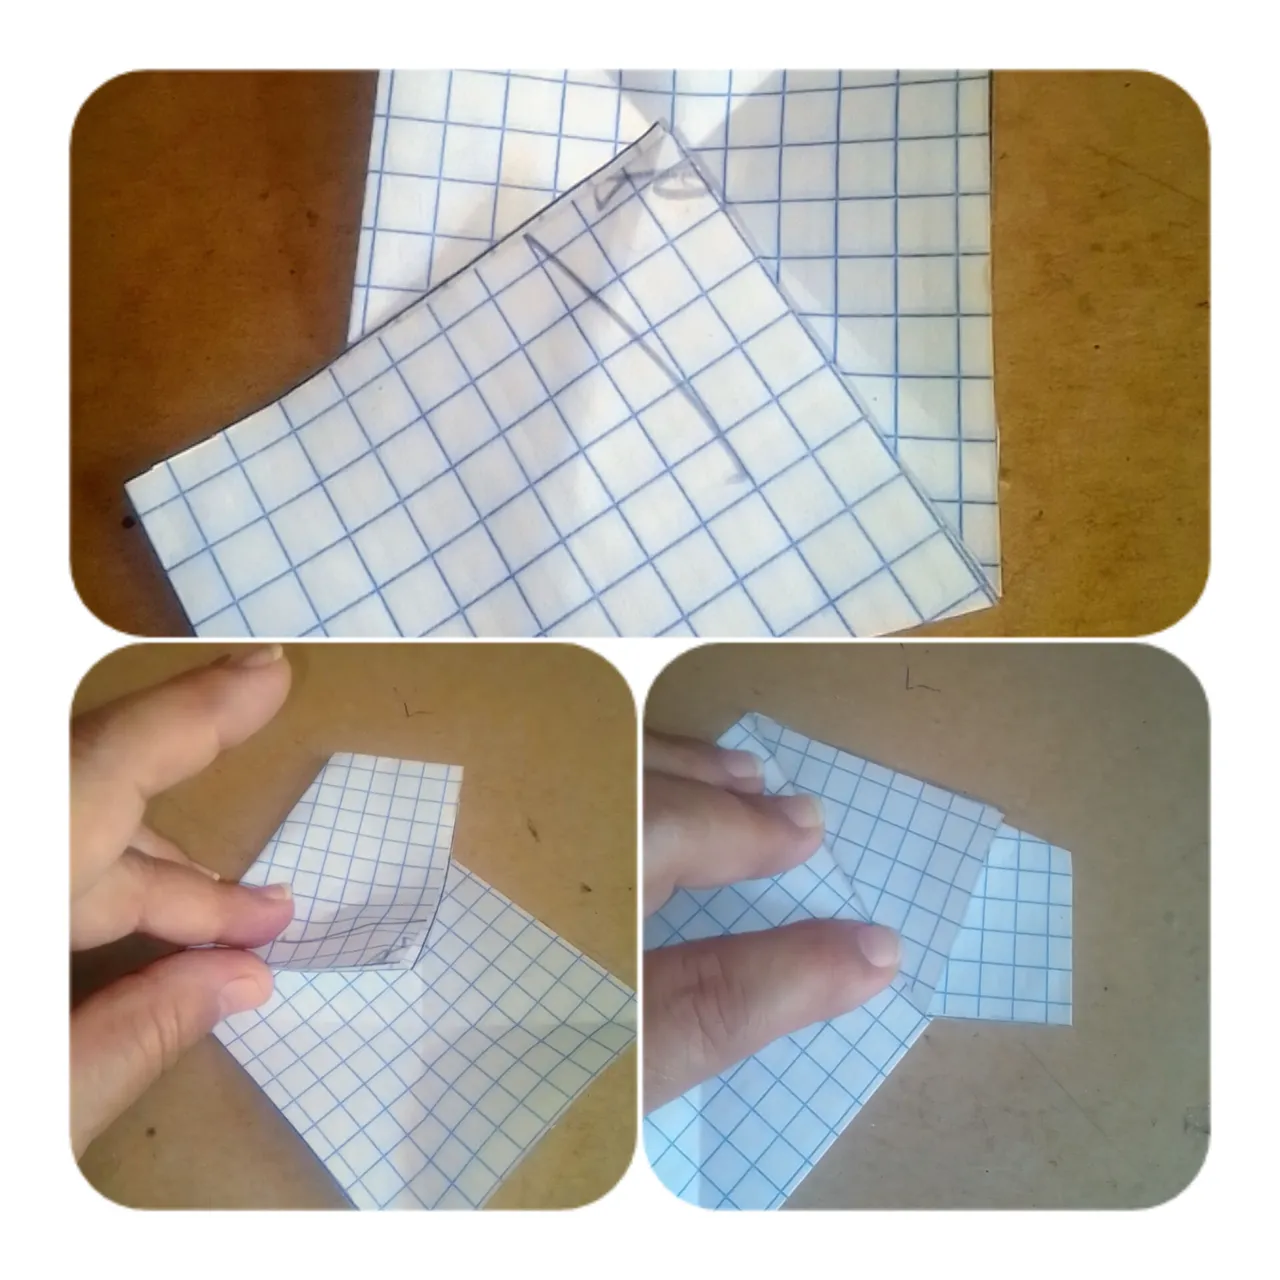
PASO 5
Aquí ahora vas a llevar el otro extremo donde hiciste la X a unirla con la otra mitad y allí muestro como vas a realizar el dobles siguiente y allí los unes y te queda de esta forma.
Here now you are going to take the other end where you made the X to join it with the other half and there I show how you are going to make the next double and there you join them and you have this shape.
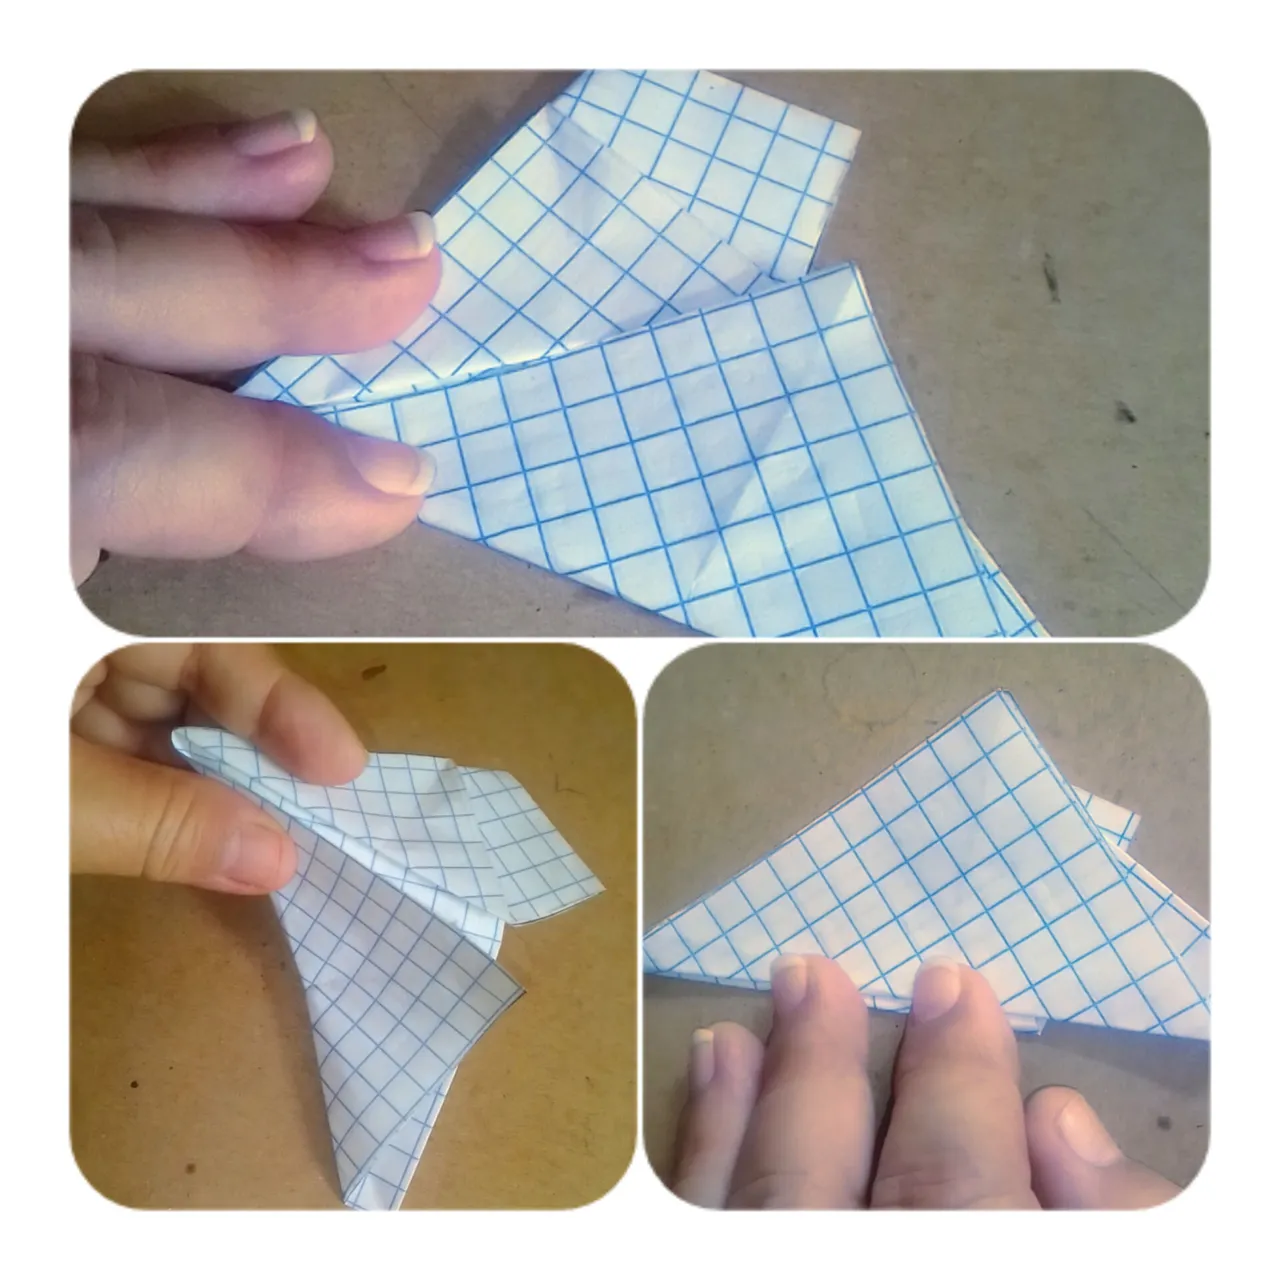
PASO 6
Luego acá cuando ya tienes esta forma con la regla vas a medir de un extremo 6 cms marcas y hacia el otro extremo mide 3 cms luego pasas una línea.
Then here when you have this shape with the ruler you are going to measure from one end 6 cms marks and towards the other end measures 3 cms then you pass a line.
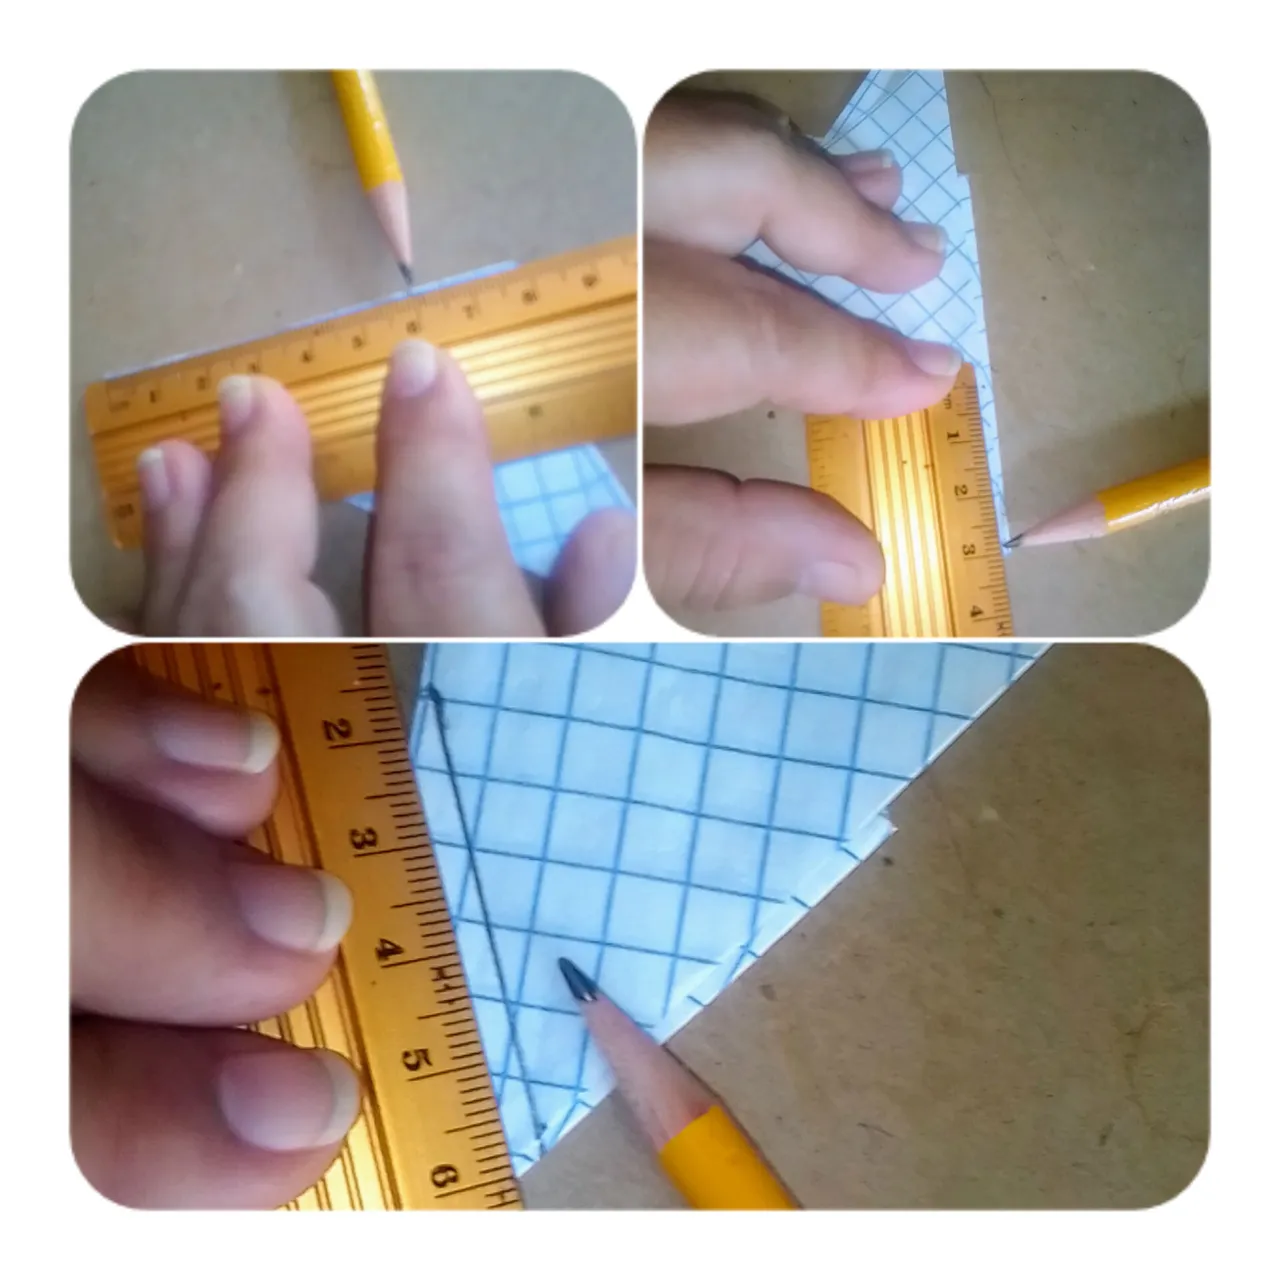
PASO 7
Y una vez que ya has marcado la línea con la tijera cortas el excedente y te queda de esta manera y después lo abres y te sale esta estrella de 5 puntas verdad que es excelente y fácil con este paso a paso de realizar.
And once you have marked the line with the scissors you cut the excess and it looks like this and then you open it and you get this 5-pointed star. It is really excellent and easy to make with this step by step.
PASO 8
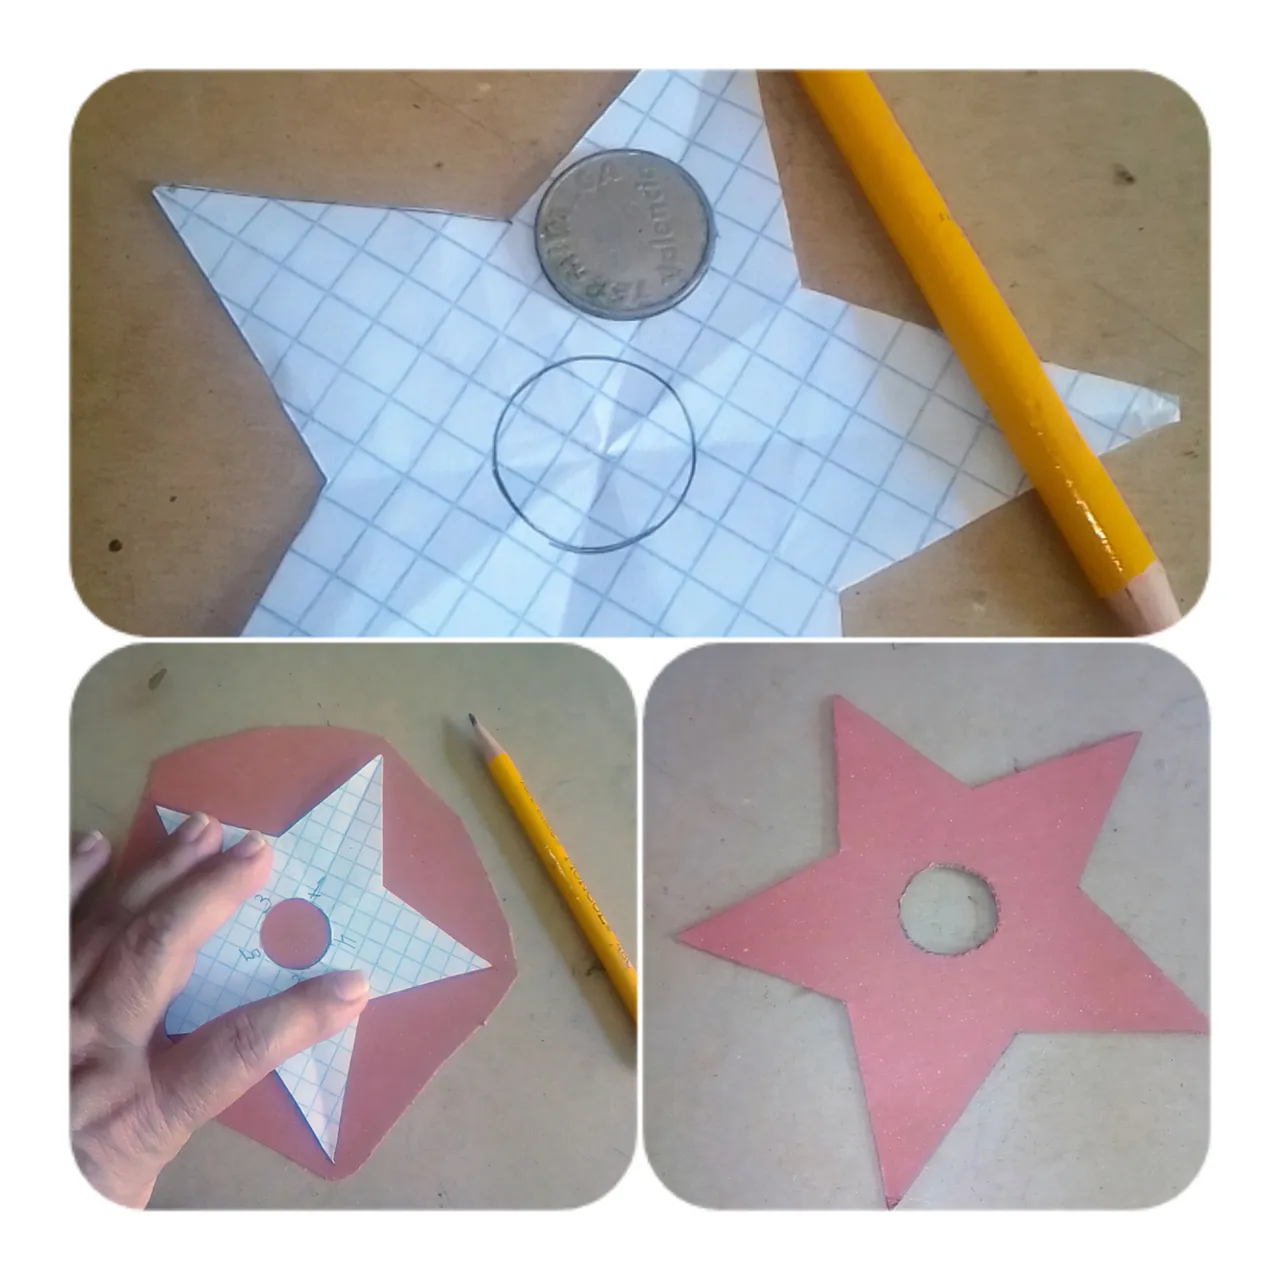
Ahora voy hacerle el centro con una moneda y le hago el círculo y después corto esta va hacer el molde de allí lo transfiero al cartón y una vez copiado saco el molde y me queda de esta forma y con esta voy hacer mi moño.
Now I am going to make the center with a coin and I make the circle and then I cut this to make the mold from there I transfer it to the cardboard and once copied I take out the mold and I have this shape and with this I am going to make my bow.
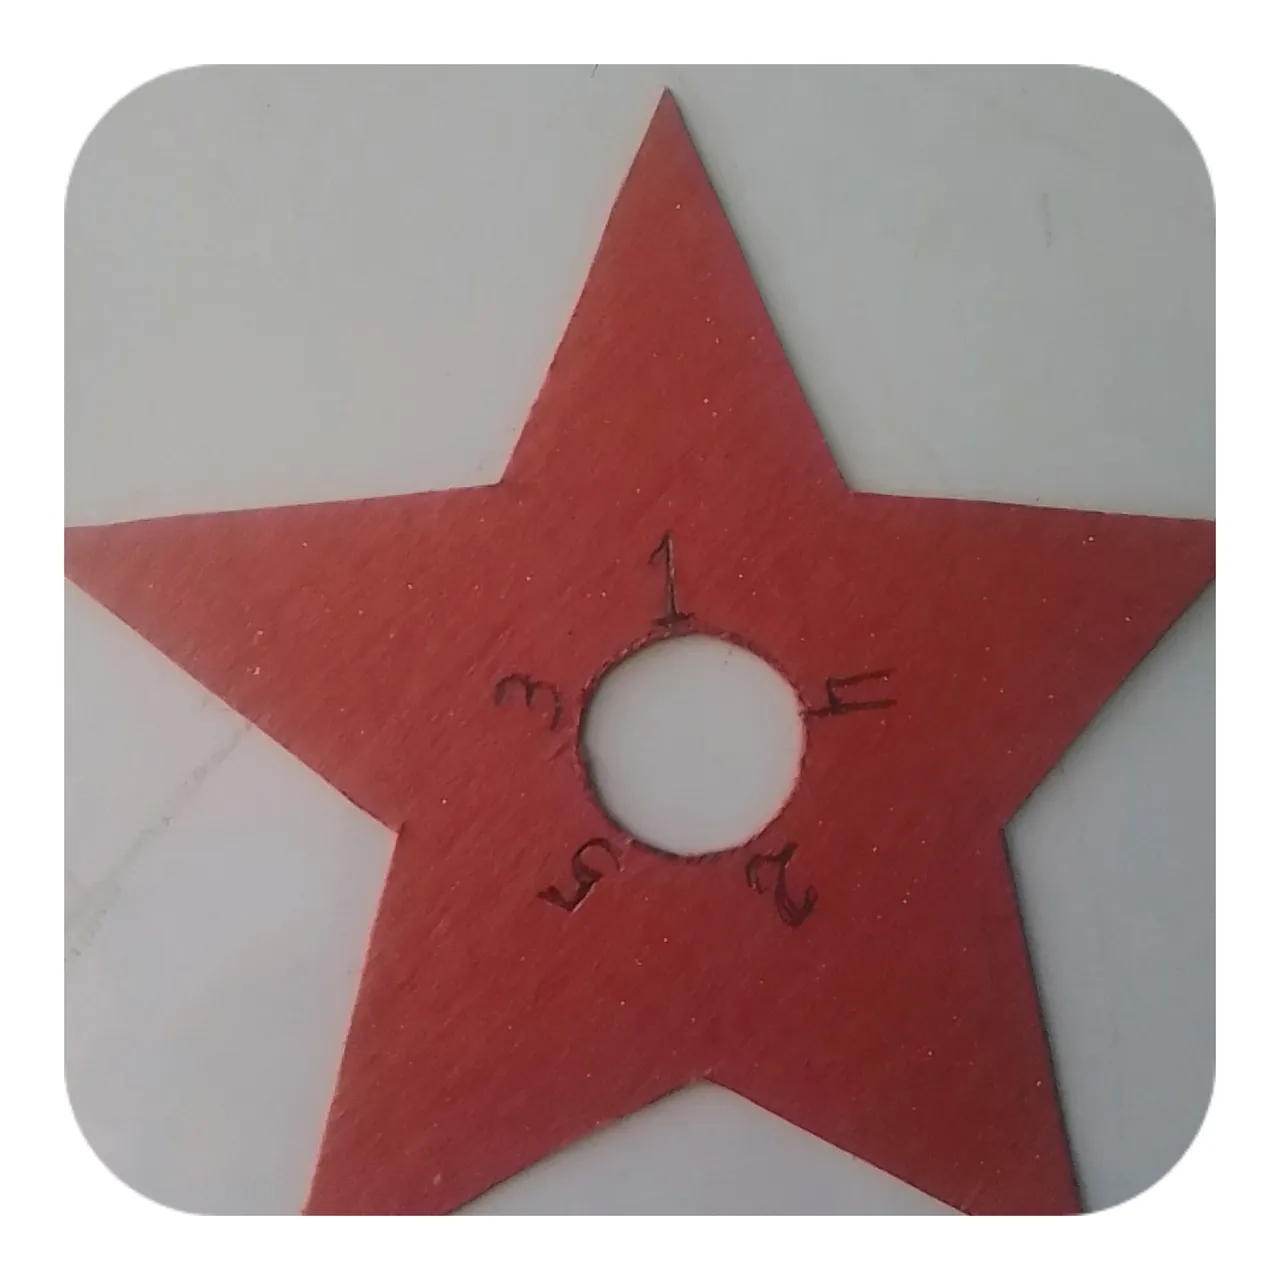
PASO 9
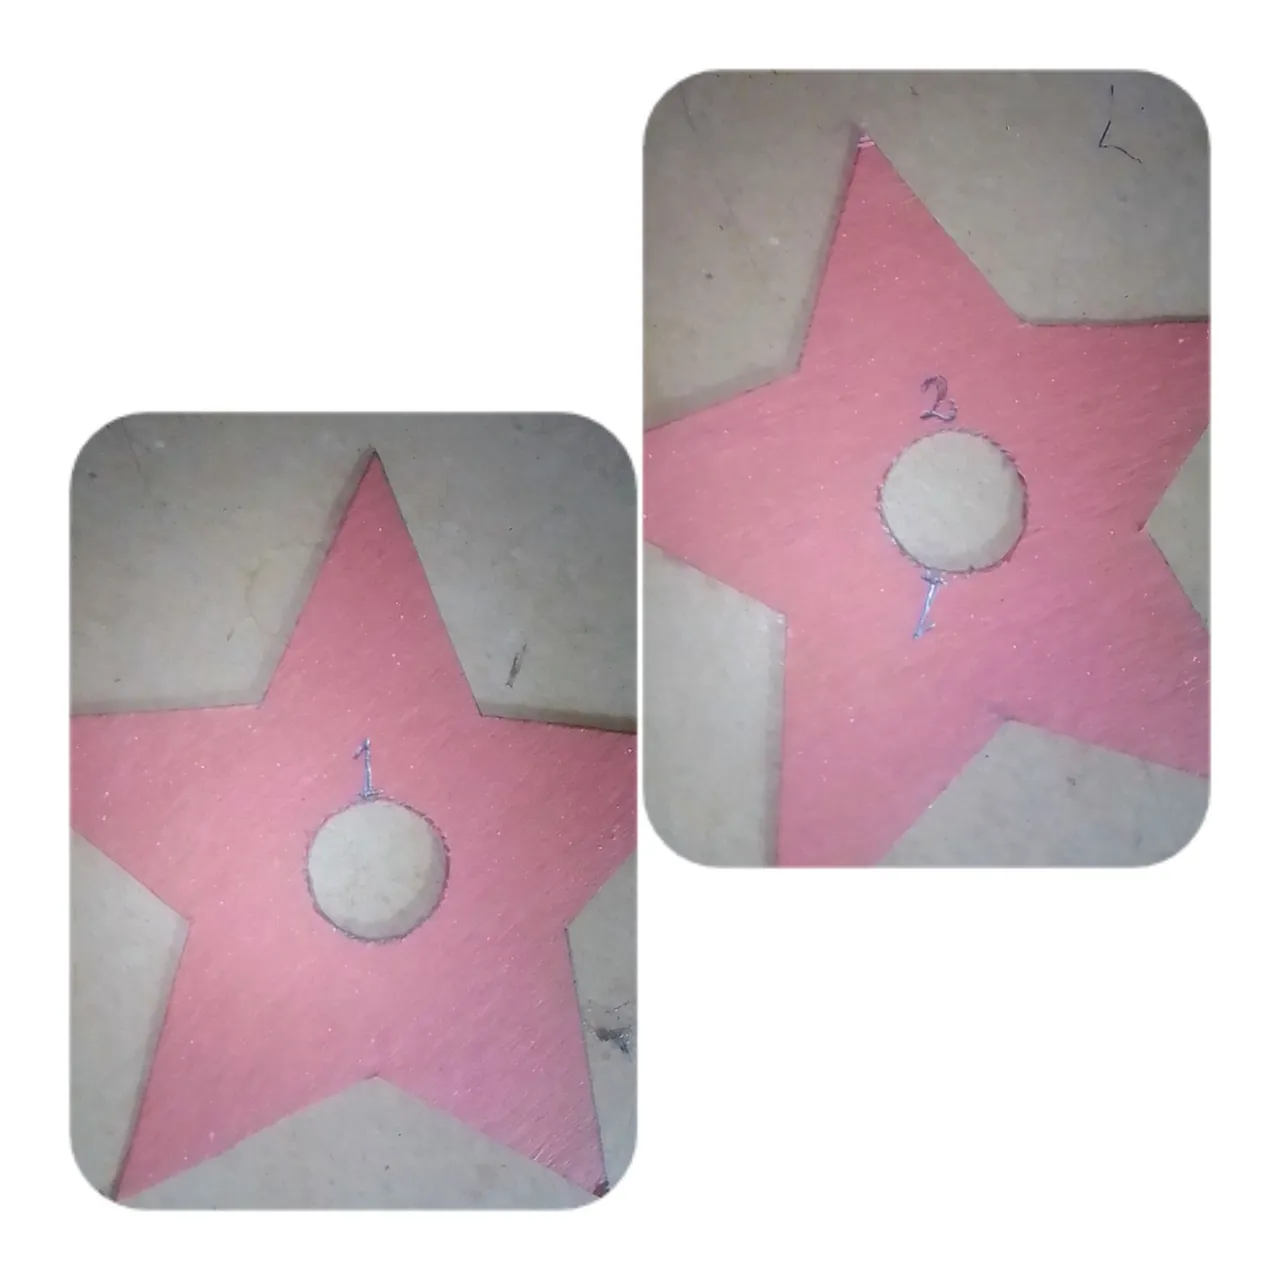
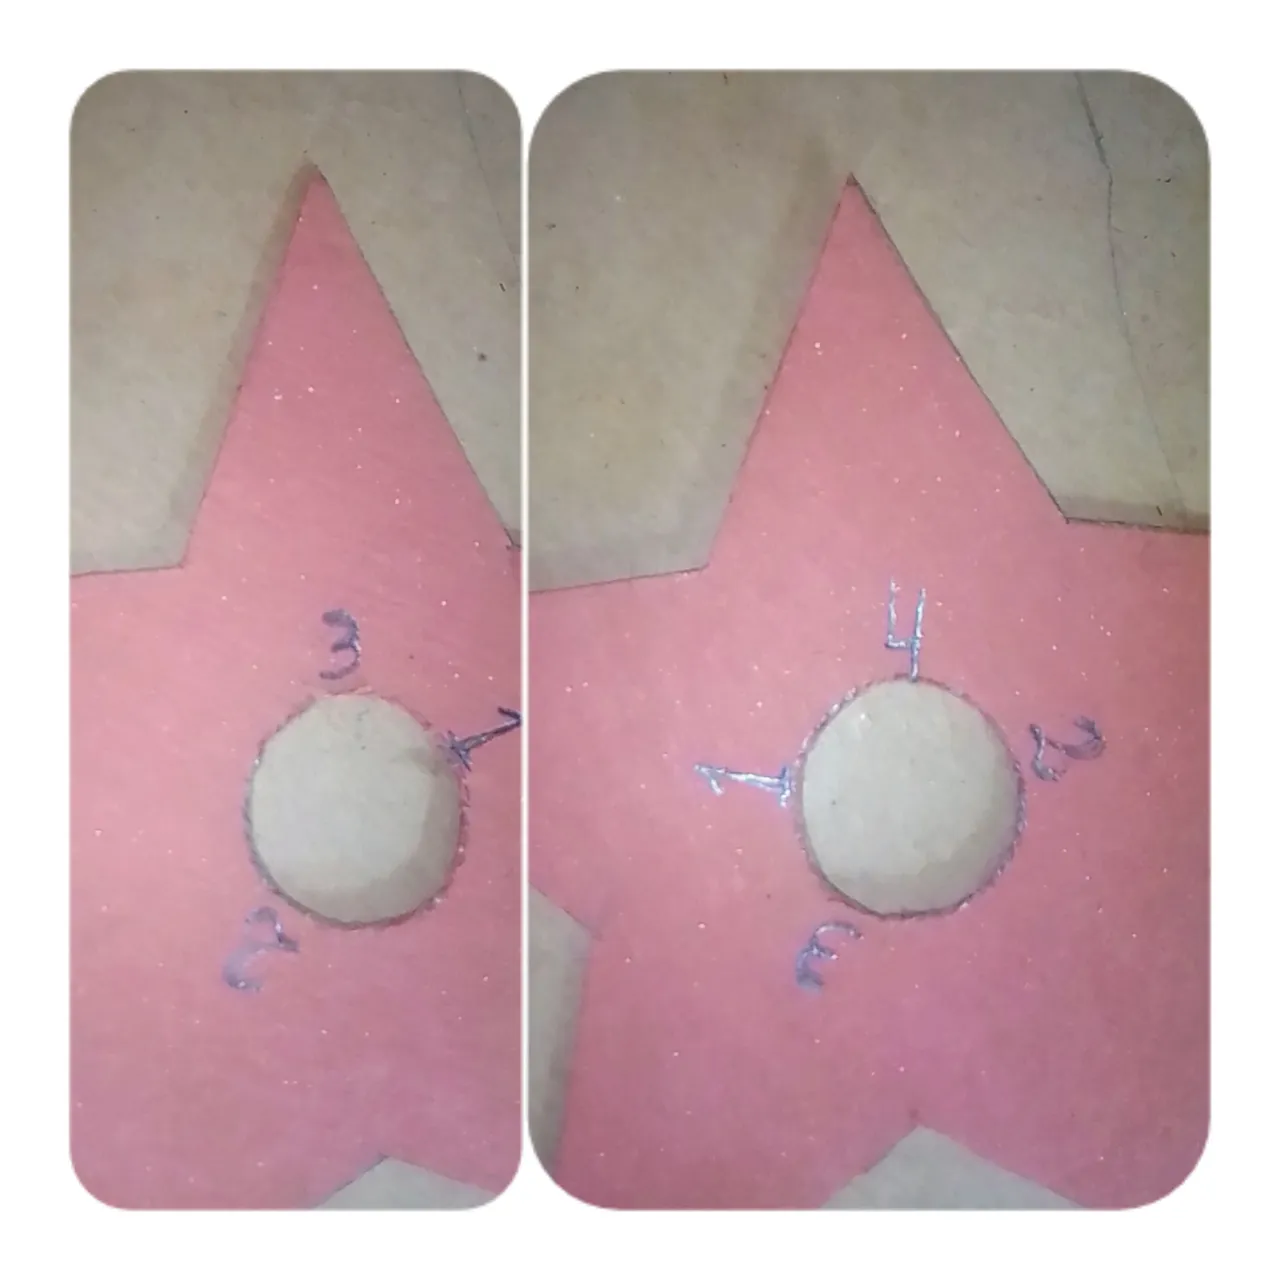
Observen que se va hacer las numeraciones para poder hacer el moño por cualquiera de las puntas de la estrella vas a colocar el número 1 luego para el sguiente número vas a contar la punta del numeral 1 hasta 3 y allí colocas el 2 en esa punta fíjate el molde.
Note that you are going to make the numbering to be able to make the bow by any of the tips of the star you are going to place the number 1 then for the next number you are going to count the tip of the number 1 to 3 and there you place the 2 in that tip, notice the mold.
PASO 10
Acá cuentas la punta de la estrella 2 hasta 3 y colocas el numeral 3 observa el molde como va desarrollando el proceso y así continúa para colocar el numeral 4.
Here you count the tip of the star 2 to 3 and place the numeral 3, observe the mold as it develops the process and so continue to place the numeral 4.
PASO 11
Y acá tenemos completo todos los números de las 5 puntas ya verán como va hacer el procedimiento de esta estrella.
And here we have completed all the numbers of the 5 points and you will see how to do the procedure of this star.
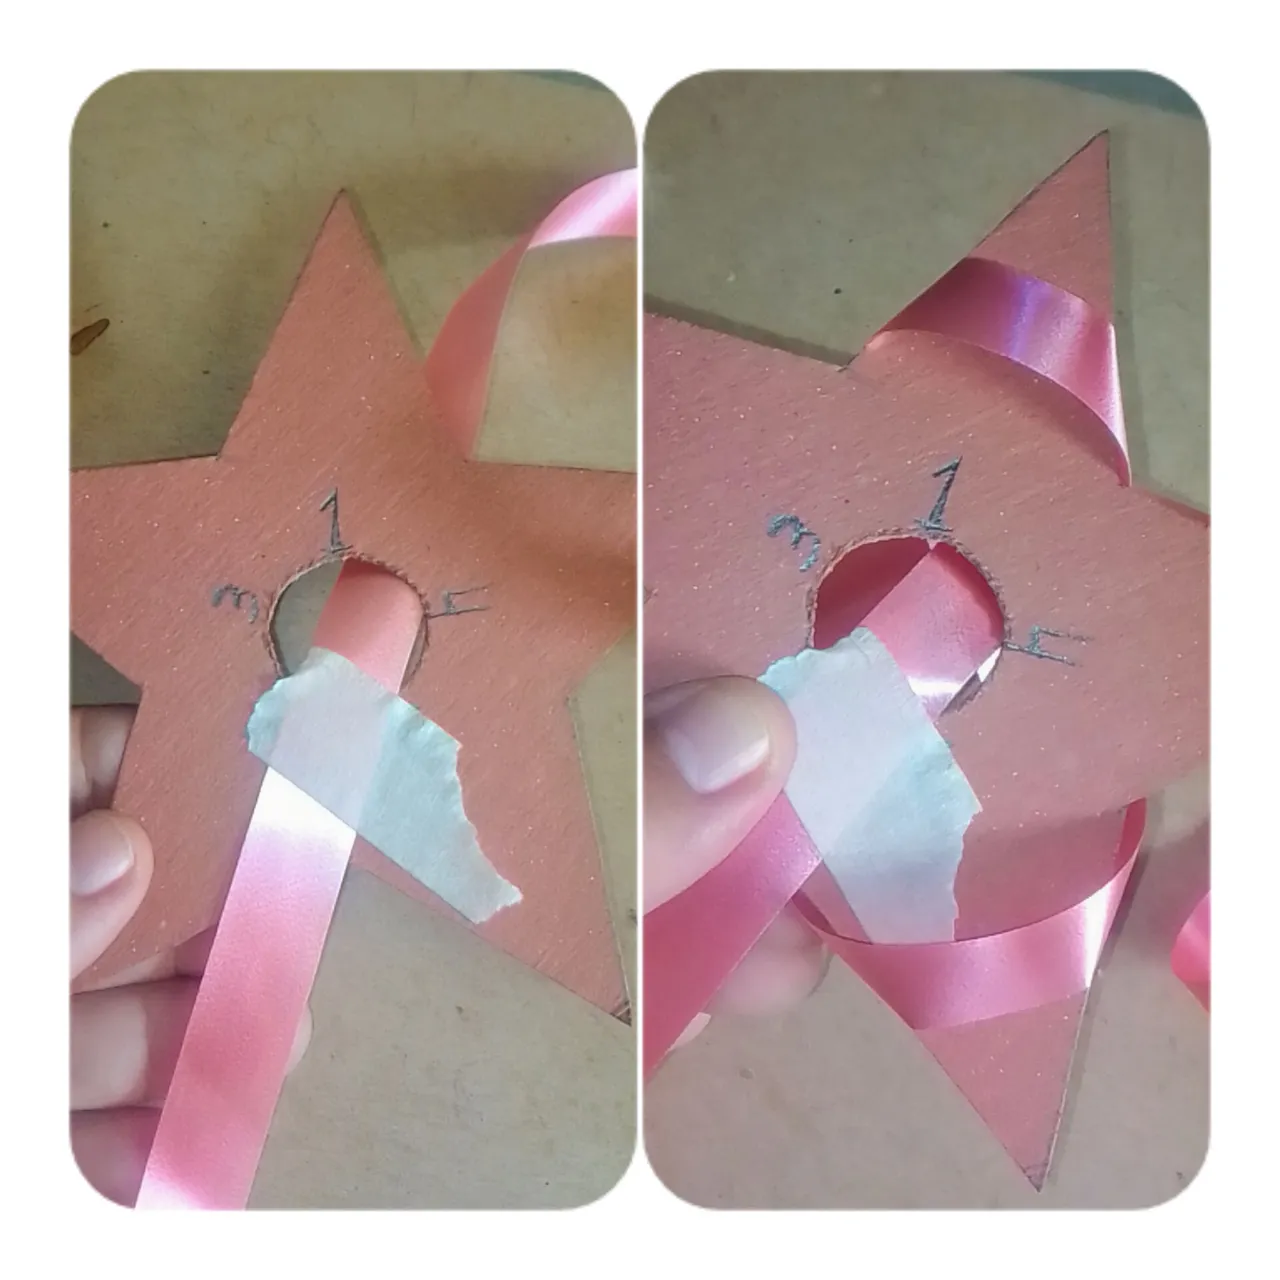
PASO 12
Ok comenzamos a realizar el moño tomamos la cinta y la metemos por debajo y la sacamos hacia arriba donde te indican los números allí vas a dejar un pedazo para hacer un rulo haz el rulo y eso es lo que vas a dejar le colocas un pedazo de tirro o puede ser cinta transparente lo que tengas a la mano para fijar, luego donde está el número 1 por allí enrollas la cinta y luego lo pasas por el número 2 ella va tomando la forma de la punta de la estrella.
Ok we begin to make the bow we take the ribbon and we put it underneath and we take it out upwards where the numbers indicate you there you are going to leave a piece to make a curl make the curl and that is what you are going to leave you put a piece of tape or it can be transparent tape what you have at hand to fix, then where the number 1 is there you roll the ribbon and then you pass it through the number 2 it will take the shape of the tip of the star.
PASO 13
Y como puedes observar ya se ha pasado la cinta por cada numeral yo le di 4 vueltas a cada punta y con el número correspondiente al terminar de pasar la cinta la volteas y ve como se observa.
And as you can see the tape has already been passed through each numeral I gave 4 laps to each end and with the corresponding number at the end of passing the tape flip it and see how it is observed.
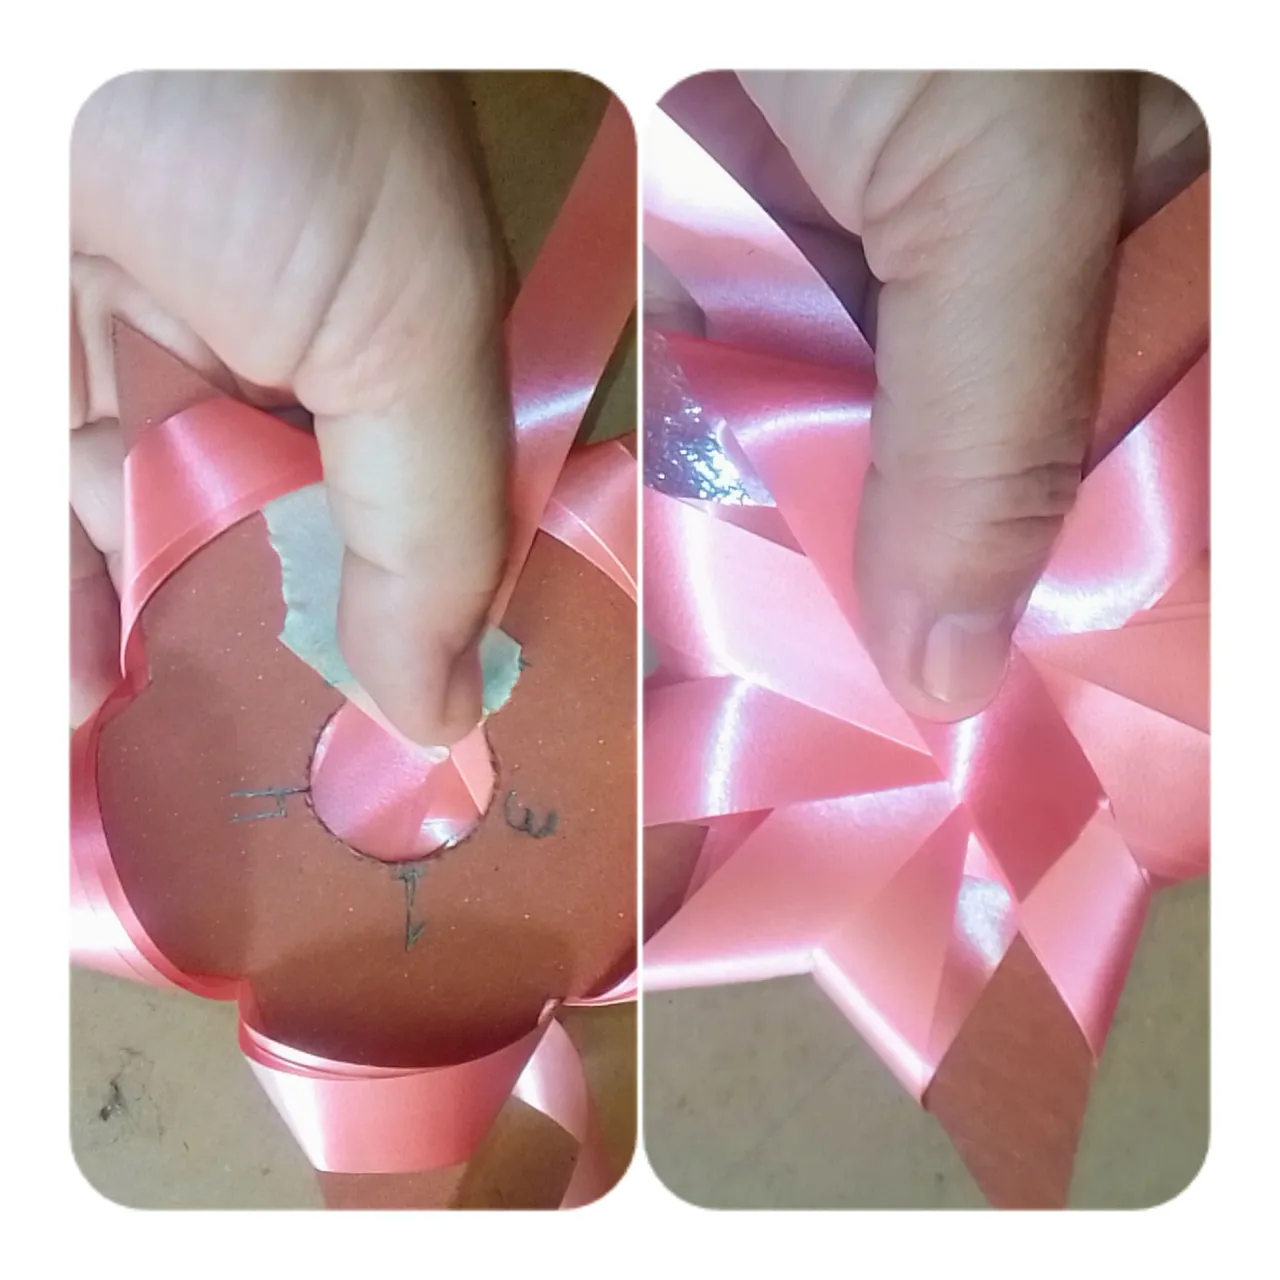
PASO 14
Al voltearla le cortas el excedente y allí lo fijas con un pedazo de tirro y por donde está el numeral en todo el medio vas a colocarle dos grapas en forma de cruz para asegurar.
When you turn it over, cut off the excess and fix it there with a piece of string and where the numeral is in the middle you will place two staples in the shape of a cross to secure it.

PASO 15
Luego acá empezamos a sacar la cinta de cada pico de la estrella y te queda de esta forma y después la cinta que dejamos para el rulo lo hacemos y lo pegamos con tirro y después vamos a ir poco a poco soltando de cada pico las 4 vueltas que hicimos dándole forma que te quede esponjoso.
Then here we begin to remove the ribbon from each peak of the star and you get this shape and then the ribbon that we left for the curl we do and we glue it with tyro and then we will go slowly releasing each peak of the 4 turns we did giving it a fluffy shape.
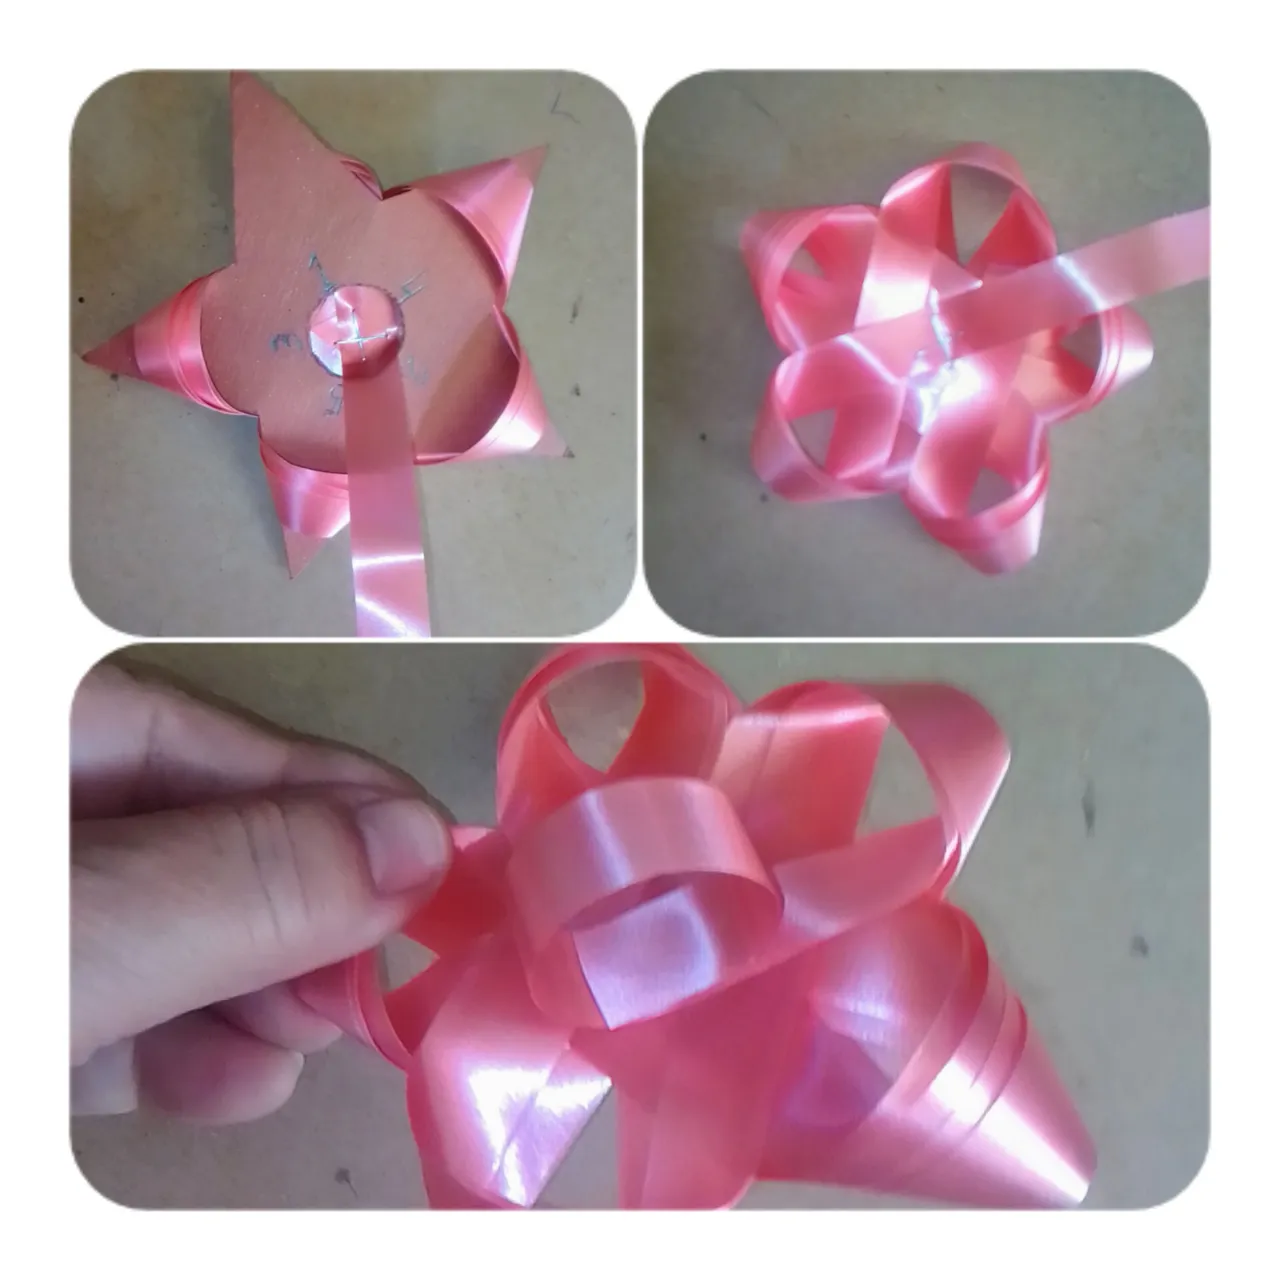
PASO 16
Y así de hermoso queda nuestro moño ve que es fácil de hacer y con poco material a utilizar.
And this is how beautiful our bow tie looks, it is easy to make and with little material to use.
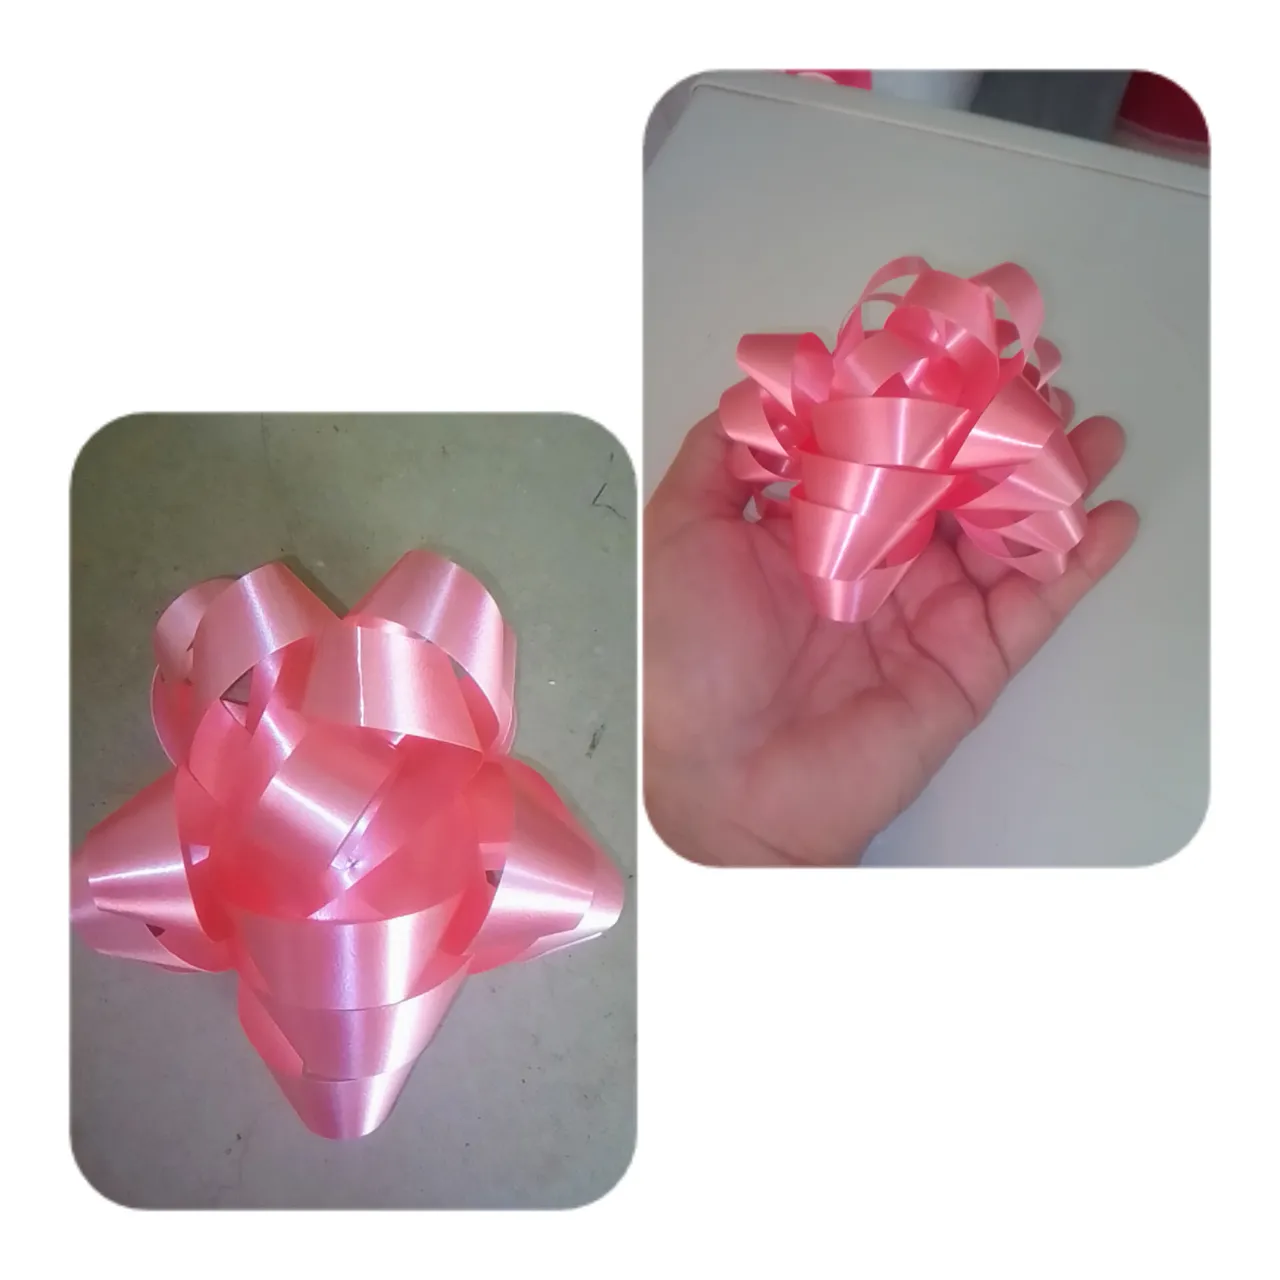
Hasta acá he llegado al final de este tutorial del paso a paso de este hermoso Moño hecho con cinta de hacer lazos para que puedas decorar tus regalos, tu arbolito de navidad, decorar bolsas y u otros objetos y es muy rápido y fácil de elaborar, GRACIAS POR SU VISITA Y SUS COMENTARIOS.
So far I have reached the end of this step by step tutorial of this beautiful bow made with ribbon to decorate your gifts, your Christmas tree, decorate bags and other objects and is very quick and easy to make, THANK YOU FOR YOUR VISIT AND YOUR COMMENTS.
Todas las imágenes son tomadas con mi celular logicl55b editada con la aplicación INSHOT COLLAGE.
Traducido con DEEPL TRANSLATE.
All images are taken with my logicl55b cell phone edited with INSHOT COLLAGE application.
Translated with DEEPL TRANSLATE.
SALUDOS Y BENDICIONES.
GREETINGS AND BLESSINGS.