✏️ ¡Buen día, amigos de Hive! Espero que estén teniendo un agradable día. Y si no es así, espero poder alegrarlos un poco con uno de mis dibujos.
Hoy continuamos con la creación de stickers, así que aquí les traigo la parte 2. La primera parte les gustó mucho y de verdad quiero agradecerles todo el apoyo que me dieron en ese post, no pensé que mis stickers fueran tan bien recibidos, así que como agradecimiento quiero compartir más de ellos con ustedes.
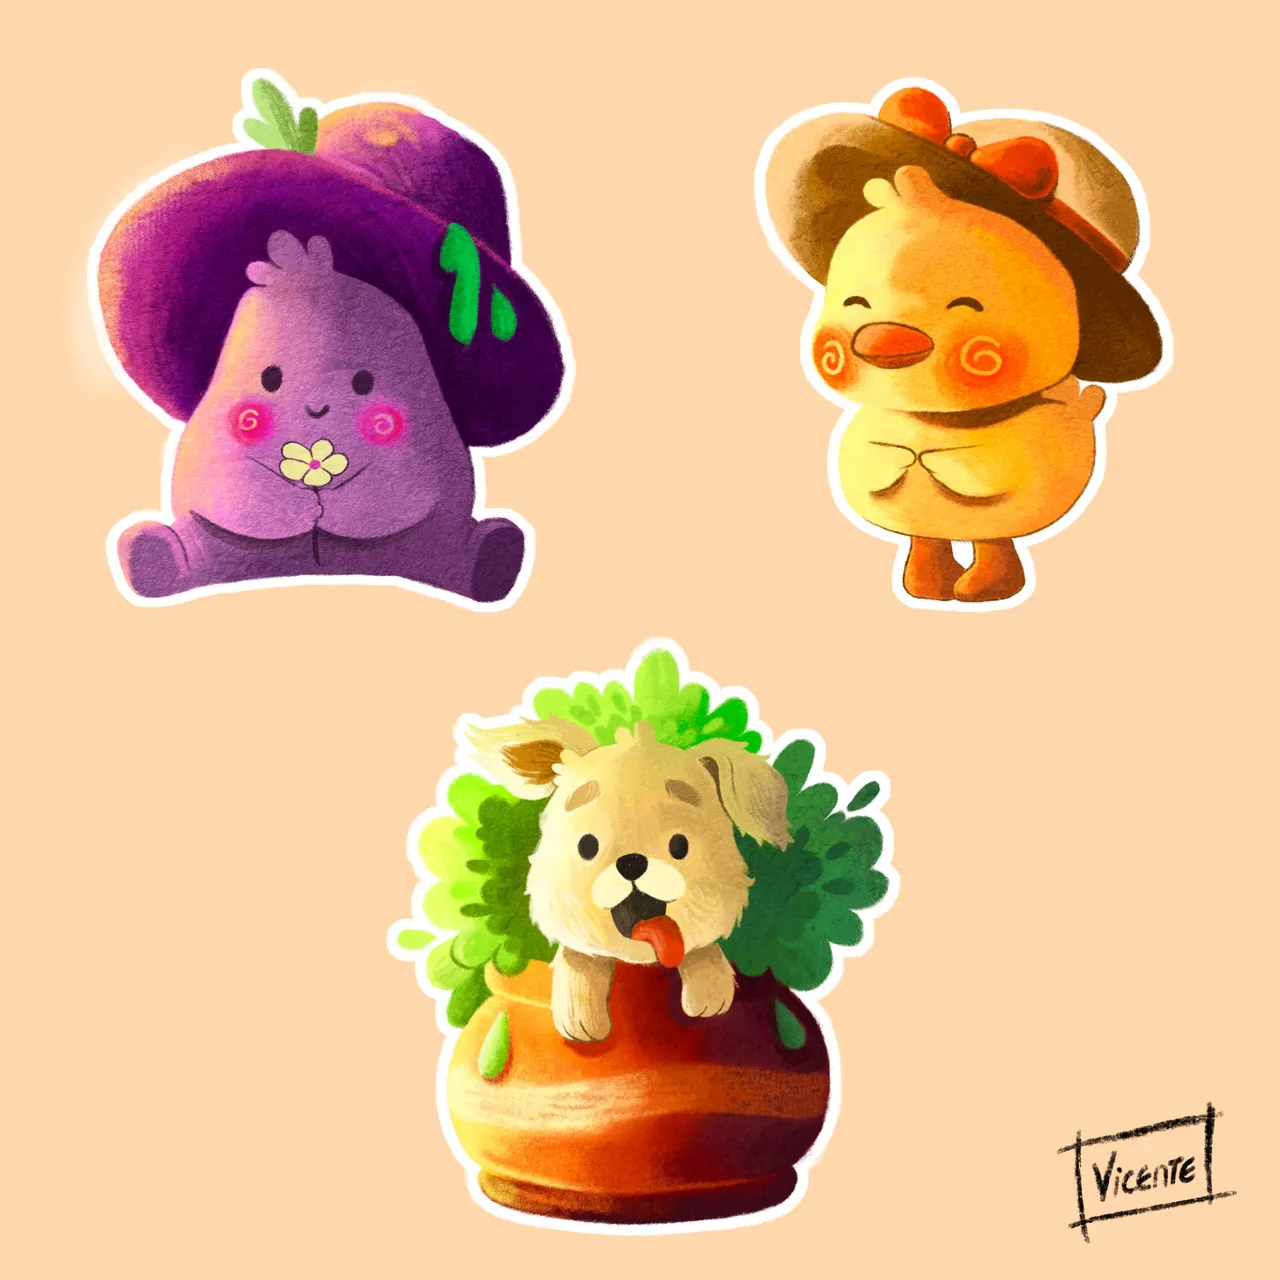
En esta ocasión también hice 3 stickers, pero solo 1 es un personaje de un dibujo antiguo, los otros dos son creaciones nuevas. El primero es un pequeño honguito morado que sale junto al monstrito amarillo de la primera parte, en este caso lo hice sentado con una margarita en la mano y sinceramente se ve muy tierno. El segundo es un pollito, quise hacer un pollito o en este caso una pollita porque es un apodo que tengo con mi pareja, también decidí hacerle las plumas con la típica forma de los deditos que juntan jaja. Y por último quise hacer a mi perrita, se volvió parte esencial de mi vida y es una perrita a la que amo muchísimo, así que como gesto de amor decidí hacerle su propio sticker. Ahora vamos con el proceso.
- ✏️ Good morning, friends of Hive! I hope you're having a nice day. And if not, I hope I can cheer you up a bit with one of my drawings.
- Today we continue with the creation of stickers, so here I bring you part 2. You liked the first part a lot and I really want to thank you for all the support you gave me in that post, I didn't think my stickers would be so well received, so as a thank you I want to share more of them with you.
- This time I also made 3 stickers, but only 1 is a character from an old drawing, the other two are new creations. The first one is a little purple mushroom that is next to the yellow monster of the first part, in this case I made him sitting with a daisy in his hand and honestly he looks very cute. The second one is a chick, I wanted to make a chick or in this case a chick because it is a nickname I have with my partner, I also decided to make the feathers with the typical shape of the little fingers that join together haha. And finally I wanted to make my dog, she became an essential part of my life and she is a dog that I love very much, so as a gesture of love I decided to make her her own sticker. Now let's go through the process.
PROCESO | PROCESS
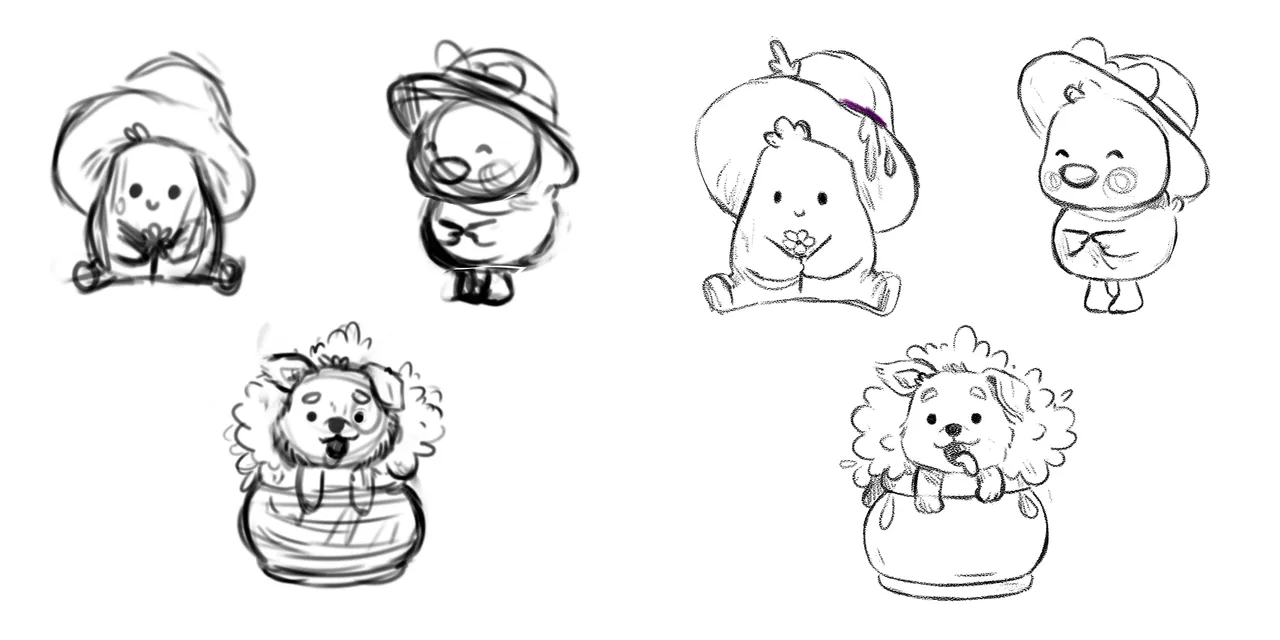
Para el boceto primero hice algunos bocetos sucios de los tres personajes y al final me quedé con esos que ven en pantalla, luego, en una capa diferente, los fui mejorando poco a poco hasta quedar el resultado fuera algo limpio y sencillo.
- For the sketch I first made some dirty sketches of the three characters and in the end I kept the ones you see on the screen, then, in a different layer, I improved them little by little until the result was something clean and simple.
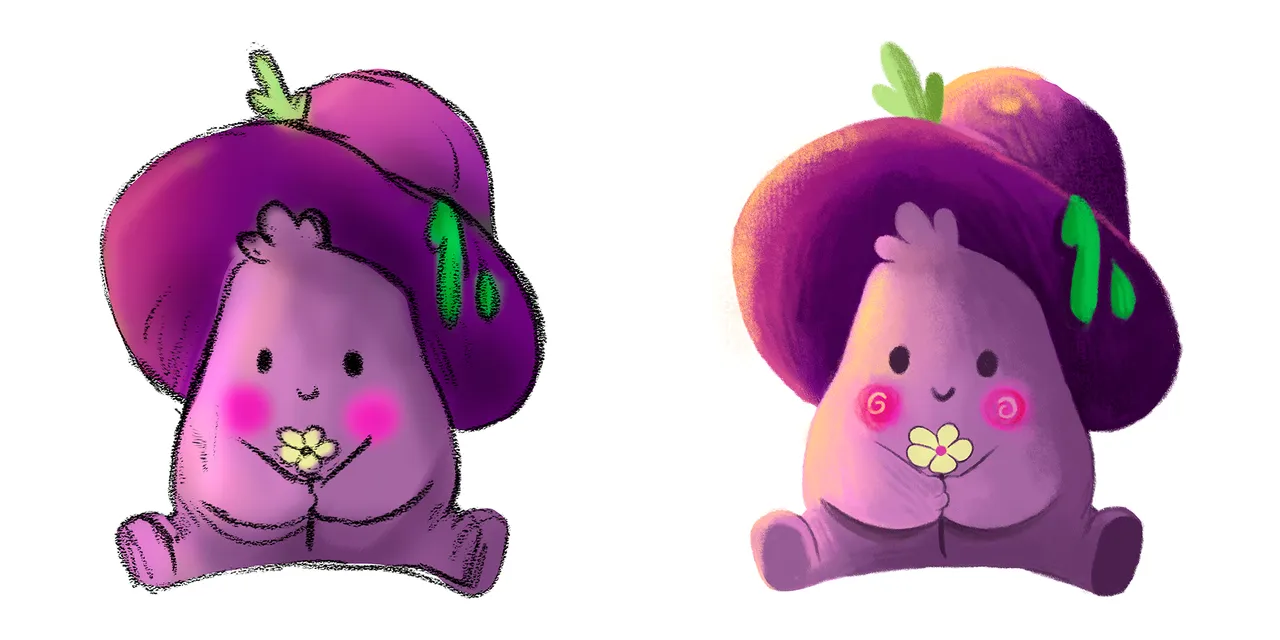
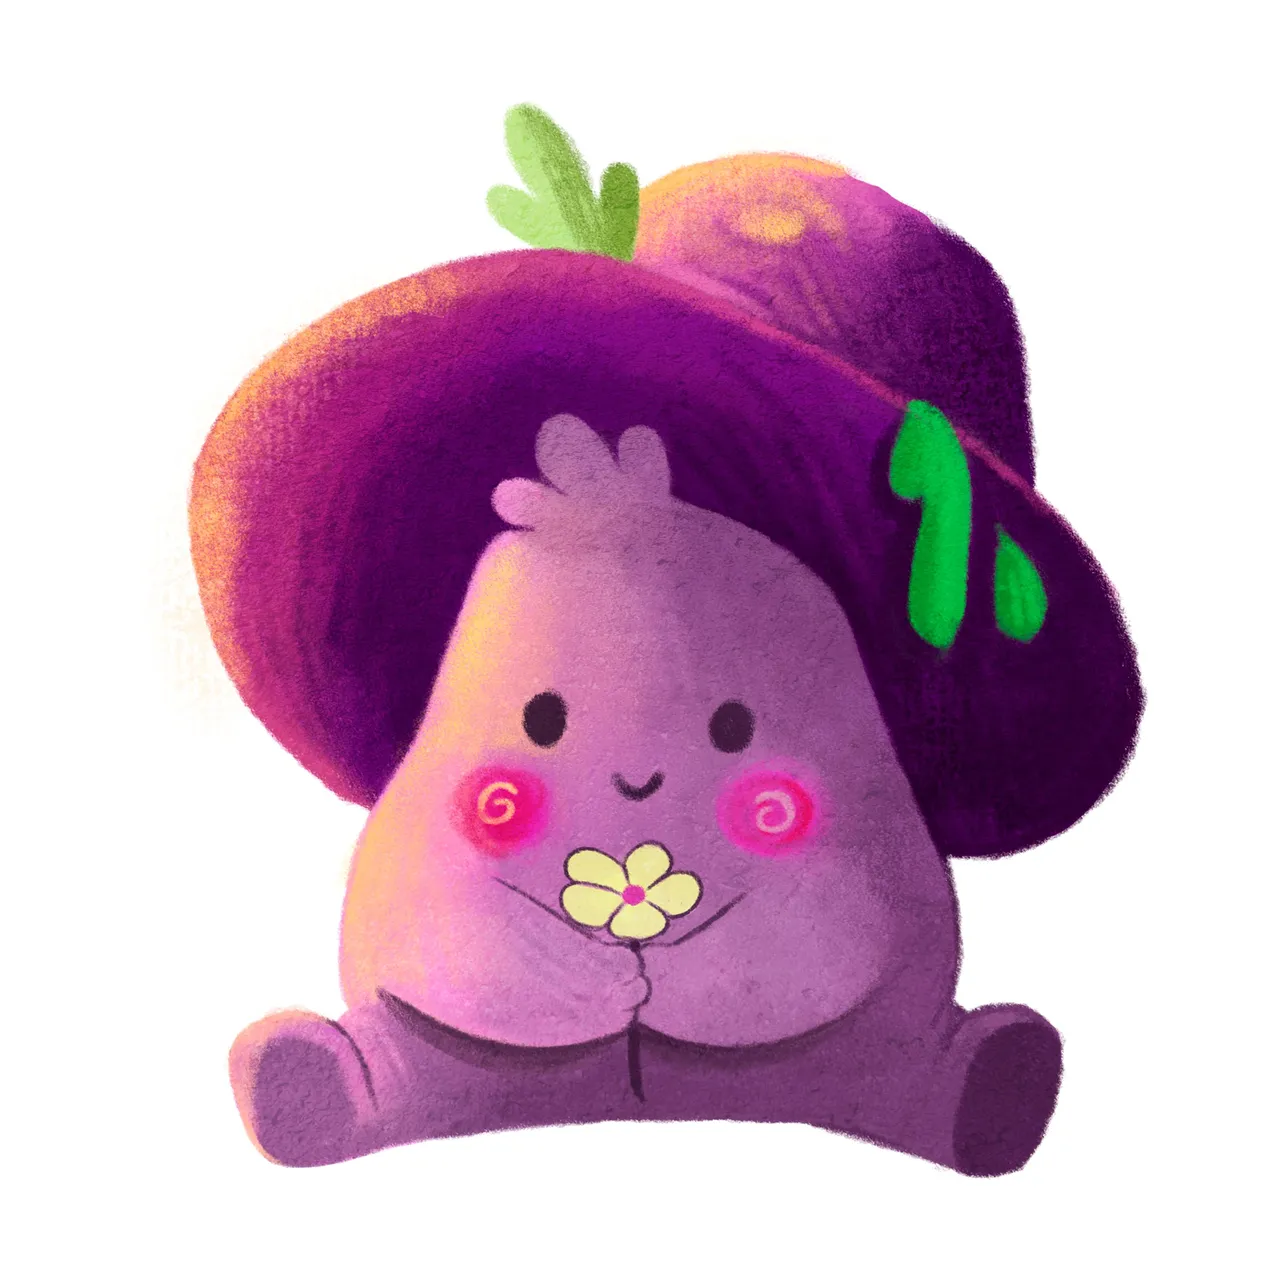
Una vez que tenía el boceto listo empecé a colorear a los personajes. Primero fue el turno del honguito morado. Empecé haciendo el estudio de color para tener una idea de los colores que iba a utilizar, porque a pesar de que él ya tiene una paleta de color específica, decidí experimentar un poco, para ello le agregué algunas hojas en color verde porque es el color complementario del morado y aparte de que queda bien porque son hojas. Luego de hacer el estudio de color procedí a colorear el honguito, siempre me tomo mi tiempo a la hora de colorear stickers, me gusta que queden perfectos. Por último, agregué algunas luces en color amarillo, tanto en la parte superior del hongo como en el rostro.
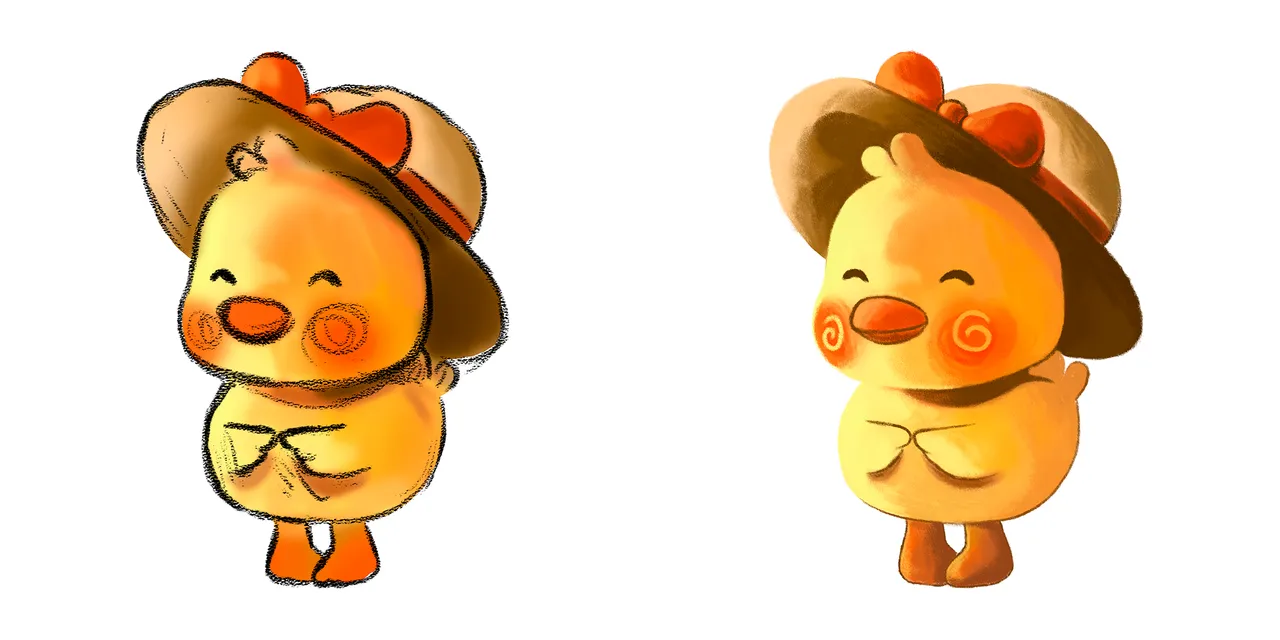
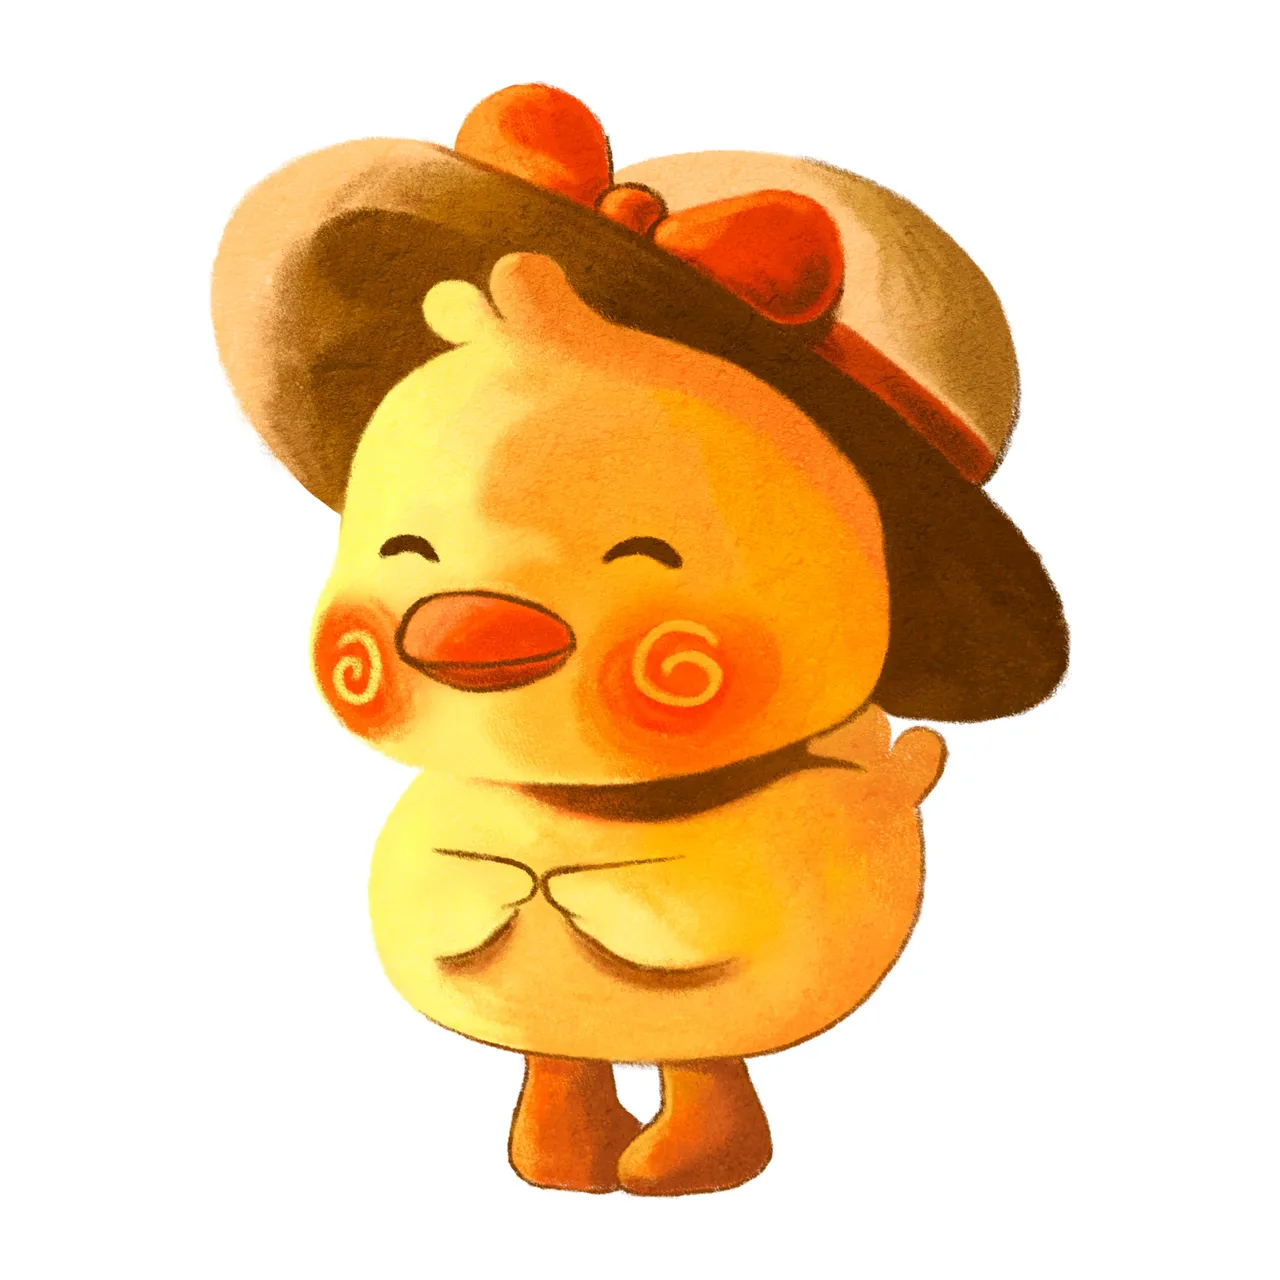
Luego de haber hecho al honguito me puse a colorear a la pollita. También empecé por el estudio de color, este fue más fácil, ya que el color de los pollitos es amarillo, también agregué tonos marrones, naranjas y rojos para complementarlos de una manera óptima y que se viera armonioso, por último agregué las luces en un color más claro y empecé a colorear. Fue superdivertido colorearla, en específico me gustó mucho colorear el sombrero, puesto que así puedo practicar para futuras ilustraciones. Luego agregué algunas luces y sombras y delinee algunas partes como el borde de la cola, las piernas y las alitas con esa forma tan divertida.
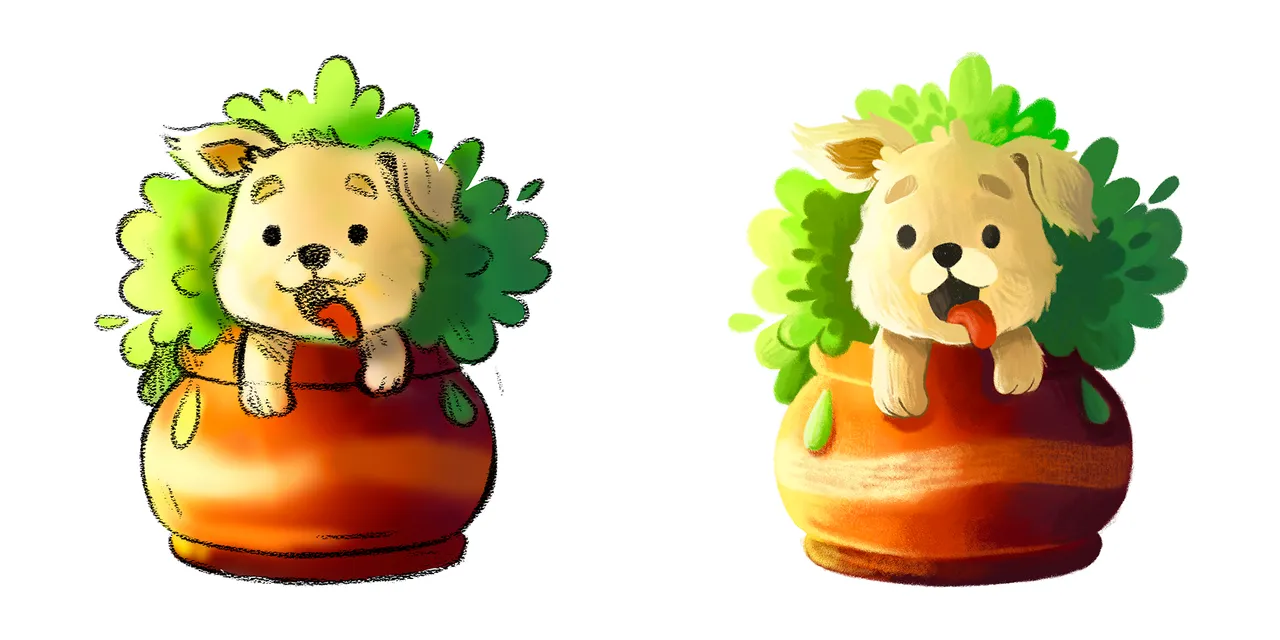
Y para finalizar hice a mi perrita, como es tremenda la hice metida en una macet. Para el estudio de color utilicé los colores típicos de una maceta con flores, verdes y marrones. También utilicé un color crema para mi perrita porque ella es de ese color. Luego agregué luces y sombras y empecé a colorear. Lo más divertido fue colorear la maceta, quería darle una textura bonita y creo que lo logré, también me encanta el contraste que hay entre las luces muy claras y las sombras un poco oscuras. Luego coloreé las hojas, que también tienen un lindo contraste de luces y sombras. Por último coloreé a mi perrita, fue divertido, pero tomó un poco de tiempo, puesto que hacer los pelos fue un poco tardado, quería que se viera perfectos y dure ahí varios minutos. Pero al final valió la pena porque el resultado fue increíble.
- Once I had the sketch ready I started to colour the characters. First it was the turn of the little purple mushroom. I started doing the colour study to get an idea of the colours I was going to use, because although he already has a specific colour palette, I decided to experiment a bit, so I added some green leaves because it is the complementary colour of purple and besides that it looks good because they are leaves. After doing the colour study I proceeded to colour the mushroom, I always take my time when colouring stickers, I like them to be perfect. Finally, I added some yellow lights, both on the top of the mushroom and on the face.
- After I had done the mushroom, I started colouring the chick. I also started with the colour study, this was easier, as the colour of the chicks is yellow, I also added brown, orange and red tones to complement them in an optimal way and to make it look harmonious, finally I added the lights in a lighter colour and started colouring. It was super fun to colour it, in particular I really liked colouring the hat, as I can practice it for future illustrations. Then I added some lights and shadows and outlined some parts like the edge of the tail, the legs and the funny shaped wings.
- And to finish I made my dog, as she is a tremendous dog I made her in a flower pot, for the colour study I used the typical colours of a flower pot with flowers, greens and browns, I also used a cream colour for my dog because she is of that colour. Then I added lights and shadows and started colouring. The most fun was colouring the flowerpot, I wanted to give it a nice texture and I think I did it, I also love the contrast between the very light lights and the shadows a bit dark. Then I coloured the leaves, which also have a nice contrast of lights and shadows and finally I coloured my little dog, it was fun, but it took a bit of time, as making the hairs was a bit time consuming, I wanted them to look perfect and I was there for several minutes. But in the end it was worth it because the result was amazing.
Eso fue todo por el post de hoy, los stickers quedaron geniales. Espero que sean de su agrado y que hayan entendido el paso a paso.
Cómo último consejo quiero recomendarles una app que se llama Sticker Maker, que la pueden encontrar en la Play Store, así pueden crear sus Stickers e importarlos a WhatsApp. También les dejaré los stickers en formato PNG por si quieren utilizarlos.
¡Un saludo! Y nos vemos en el próximo post.
- That was all for today's post, the stickers turned out great. I hope you like them and that you understood the step by step.
- As a last tip I want to recommend an app called Sticker Maker, which you can find in the Play Store, so you can create your Stickers and import them to WhatsApp. I will also leave you the stickers in PNG format in case you want to use them.
- Regards! And see you in the next post.

Instagram:@byvicente99
Separador y Fotos editadas en Canva
Photos edited in Canva