Me gusta mucho poder ver y apender cosas nuevas y pues esta cartuchera sera la primera que tendra mi niña y es una inspiración para mi en todos los sentidos, tambien lo sera para mi hija y su nueva etapa, como lo es su comiezo de clases maternales
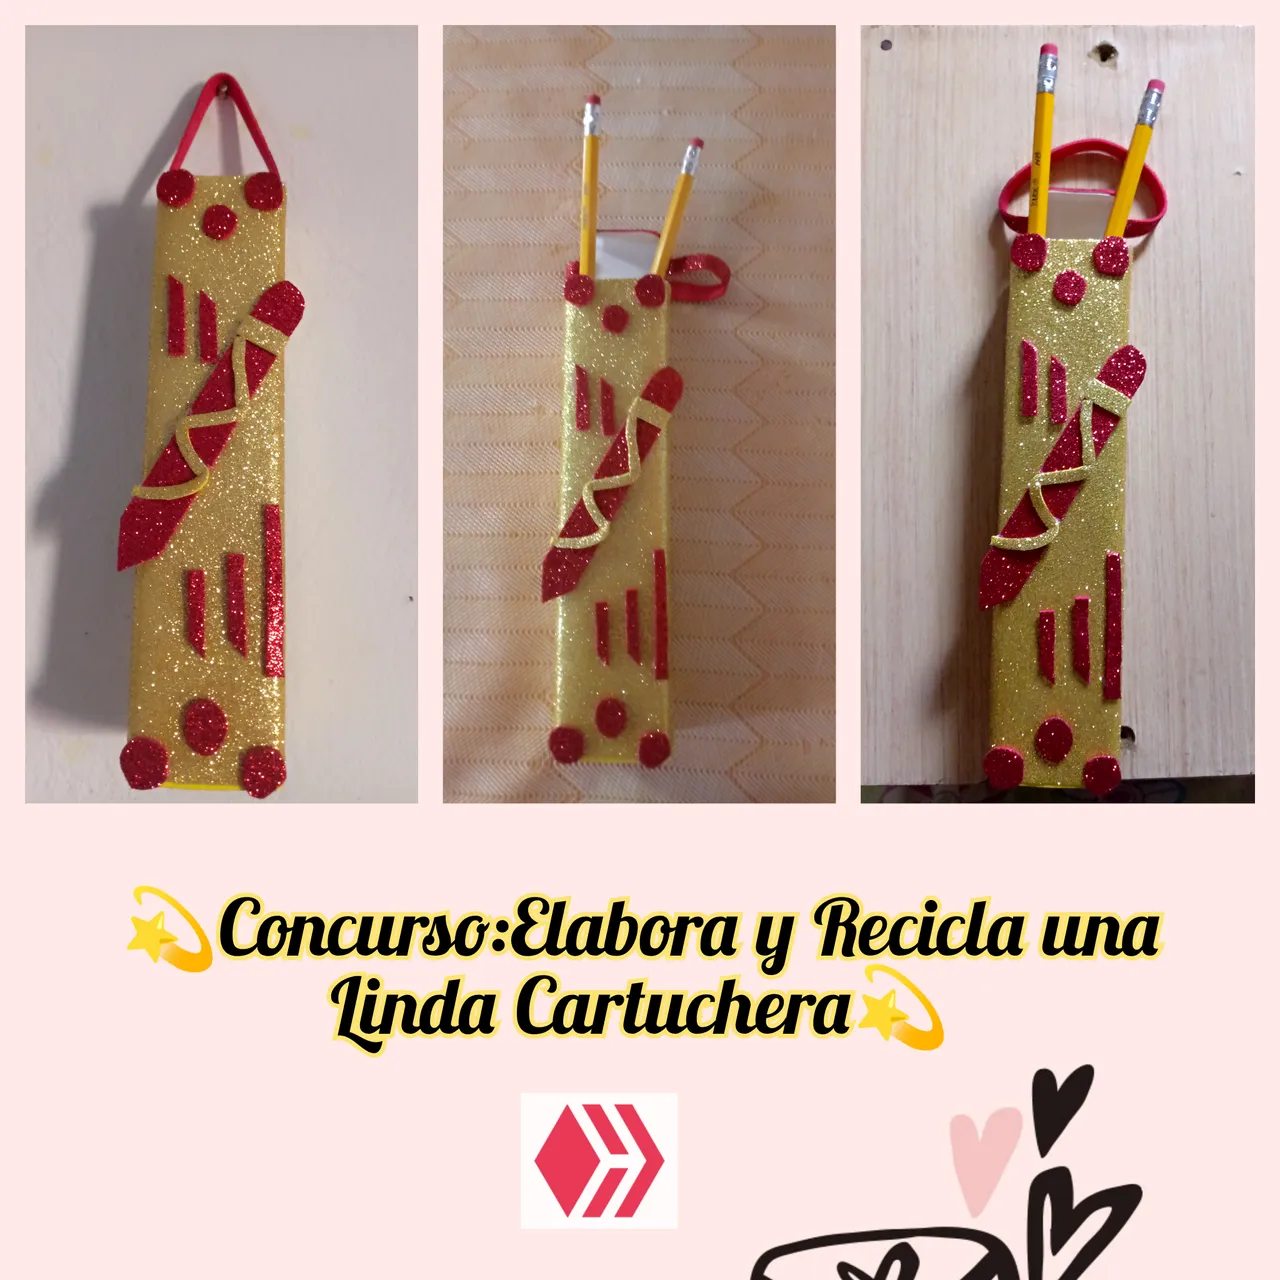
Esta cartuchera es muy linda, sencilla y es muy coqueta, me gusto mucho ya que la podemos tener o guindar en cualquier parte, solo con tener una pequña caja, esta vez de crema para dientes, podemos reutilizarla para hacer esta cartuchera.
Materiales:
- Foamy escarchado dorado
- Foamy escarchado rojo
- Silicon
- Tijera
- caja de crema dental

Paso a paso:
Lo primero que vamos hacer tomar el foami escarchado amarillo y de la parte trasera solo vamos a remarcar, luego tomamos la caja de crema dental y esta la vamos a medir de esta forma tiene que verse


Tomamos el silicón y le vamos a agregar en las partes de la caja pequeños puntos y poco a poco iremos pegando


Una vez ya forrada, lo que haremos sera recortar con mucho cuidado, esto para no salirnos de las lineas ya marcadas y darle un buen corte. Y con esos mismos trozos de foami haremos dos cuadritos Y eso lo vamos a pegar en la parte de abajo y de arriba de la caja

Una vez ya lista en la parte de la tapa, seguiremos con la parte inferior, vamos a recortar pedacitos de foami rojo en forma de cuadrado y este lo vamos a pegar de la siguiente manera:


Con el foami escarchado rojo vamos a recortar un pedazo de tira y este será el colgante de nuestra cartuchera, debemos recortar el foami con mucha delicadeza y debe ser delgado la tira para que así sea mejor al sostener.


Luego de haber terminado la caja ya lista con el foami escarchado dorado, vamos a tomar otro pedazo de foami rojo y vamos a recortar círculos pequeños, seran 6 en total.


Ahora con otra tira de foami rojo, vamos a recortar una tira del mismo tamaño, este será para la parte del lápiz, tomaremos otro trozo de foami escarchado dorado, vamos a recortar de esta manera qué será la parte del borrador después tomamos unas tiras doradas la más mínima para hacer el Zig zag del lápiz.


Ahora lo que vamos hacer es recortar 5 tiras pequeñas para que se pongan en la parte de arriba del lado izquierdo y las tres en la parte de bajo de lado derecho y así rellenar un poco más nuestra cartuchera escolar


De esta manera he terminado una cartuchera escolar muy creativa y también reciclado, me gusta formar y crear manualidades de una manera diferente que tengan partes de reciclaje, espero que sea de su agrado y gracias por permitirme participar en este bonito concurso de cartucheras escolares.
Hasta la Próxima Participacion👍
Las imágenes son de mi propiedad y fueron tomadas por mi teléfono tecno spark go 2023
traductor utilizado :Deelp traslate
las imágenes son editadas mediante la aplicación editor de fotos.

I love to see and learn new things and this pencil case will be the first one my daughter will have and it is an inspiration for me in every way, it will also be for my daughter and her new stage, as it is the beginning of her maternity classes
This pencil case is very cute, simple and very flirty, I liked it very much because we can have it or hang it anywhere, just having a small box, this time of toothpaste, we can reuse it to make this case.
Materials:
- Gold frosted foamy
- Red frosted foamy
- Silicon
- Scissors
- box of toothpaste
Step by step:
The first thing we are going to do take the yellow frosted foami and from the back we are just going to highlight, then we take the toothpaste box and this we are going to measure it this way it has to look like this.
We take the silicone and we are going to add small dots in the parts of the box and little by little we will be gluing
Once the box is lined, what we will do is to cut it out very carefully, so as not to go out of the lines already marked and give it a good cut. And with those same pieces of foami we will make two squares and we will glue them on the bottom and top of the box.
Once the lid is ready, we will continue with the bottom part, we will cut out pieces of red foami in the shape of a square and we will glue it in the following way:
With the red frosted foami we will cut a piece of strip and this will be the pendant of our pencil case, we must cut the foami very delicately and the strip must be thin so that it is better to hold.
After finishing the box with the gold frosted foami, we are going to take another piece of red foami and cut out small circles, there will be 6 in total.
Now with another strip of red foami, we are going to cut a strip of the same size, this will be for the part of the pencil, we will take another piece of gold frosted foami, we are going to cut this way what will be the part of the eraser then we take some golden strips the most minimal to make the Zig zag of the pencil.
Now what we are going to do is to cut 5 small strips to put on the top of the left side and the three on the bottom of the right side and thus fill a little more of our school bag.
In this way I have finished a very creative school pencil case and also recycled, I like to form and create crafts in a different way that have recycling parts, I hope you like it and thank you for allowing me to participate in this nice school pencil case contest.
Until the next participation👍
Images are my property and were taken by my tecno spark go 2023 phone.
translator used :Deelp traslate
the images are edited using the photo editor application.