
CLOSE RANGE was the focus of last week's Battle Mage Secrets challenge and I would like to continue that theme with another battle that is showcasing this particular ruleset albeit in a completely different format as the previous battle. I shall not go deep into explanation of the ruleset as this was already covered in the previous post which you can find here.
Instead I will focus more on the monster's abilities this time round which was "masterfully" utilize (at least that is what I think I did 😅) in the below battle that I shall go into shortly.

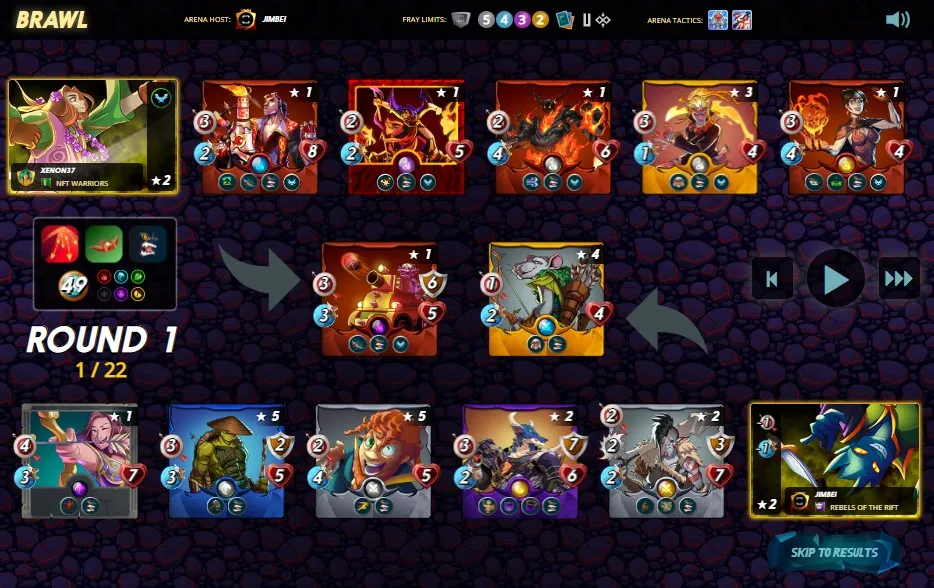
The Battle
In my alt account, jimbei, I was able to engage in an interesting battle during the recently concluded Guild Brawls. To get right into the action, the battle link can be found here. Otherwise, do read on as I go into more details regarding the lineup and fight.

First up, let us run through the ruleset. We have Going the Distance, which will only allow monsters with Ranged attack to be use in the battle. And of course, the main highlight of the previous challenge, the Close Range ruleset that was discussed in the previous post. Lastly, we have the Ferocity ruleset which grants all monsters with the Fury ability, allowing enemies to apply double damage against any monster with the Taunt ability. A 49 mana capped battle with only the Life Splinter being banned.

As mentioned, this battle was done in a Guild Brawl hence there were additional limitations imposed depending on the fray you are participating in. The fray that I'm playing has a Silver League level caps with all cards playable only from the Untamed and Chaos Legion set.

Summoner, Quix The Devious - I chose Quix as this was an all Ranged monsters only battle with the Going the Distance ruleset. Moreover, with the Close Range ruleset complementing it, all Ranged monsters are now able to effectively attack from any position. Therefore, Quix The Devious is definitely a great summoner in this fight thanks to his ability to to reduce the speed and range damage of all opposing monsters!
P.S. this is my go-to summoner whenever I get the Going the Distance ruleset (if Dragon Splinter is playable)

First Position, Venari Marksrat - Venari Marksrat is definitely not a tanker you expect to usually see in the first position by any means. It is used here as a fodder unit and especially for its Martyr ability which would grant adjacent monsters with +1 to all Stats when it dies. This is a strategy I often deploy and I absolutely love it.
Second Position, Drybone Raider - I mentioned in my previous post on how Hybrid monsters are the undisputed winners under such rulesets and this battle clearly shows why. With the strategy of having the Martyr boost when Venari Marksrat dies, the Drybone Raider becomes an utter beast. With its Double Strike and Shatter abilities, we are looking at dealing 12 damages per round 😍 (3 Ranged 3 Melee Damages after the Martyr boost + Double Strike ability)

Third Position, Berix Snakeye - Selecting the Berix Snakeye due to its high armor and pretty decent Ranged damage. It will help serve as the much needed tank for the rest of the backline when the Drybone Raider falls. I would not usually play this card since the mana cost is pretty high and its abilities wouldn't serve much purpose in this particular battle.
Fourth Position, Supply Runner - Playing the Supply Runner for a +1 Speed boost. Since I was expecting the opponent to also play Quix the Devious, the speed boost was needed to neutralize the debuff.

Fifth Position, Swamp Spitter - Loving this Soulbound card for its Repair ability. It is extremely useful in this battle as it is an all Ranged monster only battle and having that armor repaired could easily make the difference in the outcome. Ultimately, it is only useful if you have monsters with armors for which my 2 tankers (Drybone Raider and Berix Snakeye) are fully equipped with,
Last Position, Edith Emberstar - What is a Guild Brawl without the use of a Gladius Card and especially when she is also being featured in this week Social Media Challenge's Cover Image 😂 Choosing Edith Emberstar for its high range damage and placing it in the last position so as to fully utilize the Bloodlust ability which will then further increase the range damage should it defeat any opponent.
The Analysis
I definitely didn't expect to see a Brighton Bloom being played and that is the reason why I had multiple misses in the battle. However, the strategy of employing the Venari Marksrat as a fodder unit to give Drybone Raider the stat boost was a masterstroke! With the Repair ability from Swamp Spitter, it kept my Drybone Raider from dying and I didn't even have to utilize my second tanker - Berix Snakeye. By the end of the battle, Edith Emberstar with its Bloodlust ability had gained 2 additional range damage (total 6 range damage) from defeating the opposing monsters. Ultimately, the battle ended in Round 3 as the damages that were dished out in every single round proves too much for the opponent's team to handle 👊

If you made it this far, I sincerely appreciate your time and value your encouragement. Please feel free to leave any comments or suggestions so that we can discuss about other strategies. Thinking about giving Splinterlands a try but haven't signed up yet? Feel free to use my referral link: https://splinterlands.com?ref=ak08, and be sure to reach out to me if you have any questions!
Are you interested in reading some of my future writings? Don't forget to follow me! In the meantime, here are some of my most recent blogs (actually this is only my 2nd Splinterlands post 🤣) if you'd like to view them:
- Battle Mage Secrets - A battle analysis, featuring the Close Range ruleset!
All banners, dividers card and battle images used in this article are open source and obtained from the Splinterlands team or made by @flauwy. Do check out his link for other amazing designs!