
Hello friends of Splinterlands for another week. As I mentioned last week, I've been improving my Chaos Legion collection by leveling up cards that I believe are essential in the game. One of them has been Wave Brood, a unique card that allows us to control the game. In the following post, I'm going to tell you about this card and why I think it's necessary to have it at its maximum level in my collection. But first, let's look at the end-of-season rewards.
Finally, after buying 30 Card Draw(s) - Standard Rare, I managed to get Janni Rebel to the maximum level. I now have all the common and rare cards at their maximum level. I only have Thanalorian Blade left to level up to the maximum from the epic cards, and I'm making an effort to get all the legendary ones I can. I opened 10 Card Draw(s) - Standard Legendary, and for another week, I got a gold card 🤩
Hola amigos de Splinterlands una semana mas. Como ya comenté la semana pasada, he estado mejorando mi colección Chaos Legion subiendo de nivel cartas que creo son imprescindibles en el juego. Una de ellas ha sido Wave Brood una carta única que nos permite controlar el juego. En el siguiente post voy a hablaros de ésta carta y porqué creo que es necesaria tenerla al máximo en mi colección. Pero antes veamos las recompensas del final de temporada.
Finalmente después de comprar 30 Card Draw(s) - Standard Rare he conseguido Janni Rebel al máximo nivel. Ya tengo todas las cartas comunes y raras al máximo. Sólo me falta por subir al máximo a Thanalorian Blade de las cartas épicas y estoy haciendo un esfuerzo en conseguir todas las que pueda legendarias. Abrí 10 Card Draw(s) - Standard Legendary y una semana más conseguí una carta dorada 🤩


WAVE BROOD

Those who have been playing Splinterlands for a while know that many factors influence the game. Speed, battle conditions, card levels, and of course, monster abilities are all decisive.
However, there is one ability that allows us to control the flow of the game a bit: Taunt. With this ability, we force our opponent to attack the card with the ability, allowing us to control the game in the early turns. I have a special fondness for cards with this ability, and the time had come to get Wave Brood to its maximum level for the following reasons.
This card is perfect to use when the battle condition is Going the Distance. It can attack from the first position, has incredible vitality, and is also good against magic and ranged attacks.
Los que llevéis tiempo jugando a Splinterlands sabréis que son muchos factores los que influyen en el juego. La velocidad, condiciones de batalla, niveles de cartas y por supuesto las habilidades de los monstruos son determinantes.
Pero hay una habilidad que nos permite un poco controlar el flujo de juego y es Taunt. Con esta habilidad obligamos a nuestro rival a atacar a la carta con la habilidad y así podemos controlar los primeros turnos el juego. Siento una especial devoción por cartas con esta habilidad y había llegado el momento de conseguir a Wave Brood al máximo nivel por las siguientes razones.
Esta carta es perfecta para usar cuando la condición de batalla es Going the Distance. Puede atacar desde la primera posición, tiene una vitalidad increíble y además es buena contra ataques mágicos y a distancia.
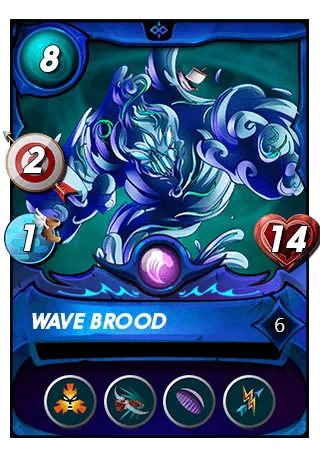
At level 6, Wave Brood has 2 points of ranged attack, 1 point of speed, and 14 points of health. Its mana cost is 8 points.
A nivel 6 Wave Brood dispone de 2 puntos de ataque a distancia, 1 punto de velocidad y 14 puntos de vitalidad. Su coste de es 8 puntos de maná.
EXAMPLE COMBAT
Wave Brood has a special synergy with our summoner Kelya Frendul and cards with abilities like Triage or Repair, which help this card last long enough for the rest of our creatures to deal heavy damage to the enemy while staying safe.
Wave Brood es una carta con una especial simbiosis con nuestro invocador Kelya Frendul y cartas con habilidades como Triage o Repair que hagan a esta carta aguantar el tiempo suficiente para que el resto de nuestras criaturas golpeen con dureza al enemigo y estén a salvo.
 | vs. Water | Up to Eleven |
In today's battle, I'm going to put one of my favorite strategies into practice. I'll use Wave Brood in the last position, and Swamp Bitter to repair the shield provided by my summoner Kelya Frendul. I'll launch powerful attacks with Kulu Mastermind and Baakjira, who will act as both a defender and an attacker.
The first turn begins, and both my enemy and I use two cards with Taunt; in their case, Mycelic Slipspawn. All my attacks are directed at this creature, which is heavily damaged by the end of the turn. I am well-protected in the first position with Baakjira and in the last with Wave Brood, which makes my strategy a real headache for my opponent.
At the beginning of turn two, I manage to destroy two enemy monsters in a row, Mycelic Slipspawn and Katrelba Gobson, which completely eliminates my enemy's strategy. I miss many of my attacks on my opponent's flying creatures.
In the third turn, everything stays the same. I can barely hit the enemy monsters, but I'm not in any danger, as my enemy can barely damage my creatures.
By the fourth turn, I destroy Goblin Psychic, which eliminates the healing support it was providing to Pelacor Mercenary.
It's the fifth turn, and I finally destroy Pelacor Mercenary, but all my attacks on Chaos Dragon are missed.
It isn't until the seventh turn that I can destroy Chaos Dragon in a battle where, despite having the upper hand, I missed many attacks.
En el combate de hoy voy a poner en práctica una de mis estrategias favoritas. Usar a Wave Brood en última posición, hacer uso de Swamp Bitter para reparar el escudo que me ofrece mi invocador Kelya Frendul y hacer ataques poderosos con Kulu Mastermind y Baakjira que actuará como defensor y atacante.
Comienza el primer turno y tanto mi enemigo como yo usamos 2 cartas con Taunt en su caso Mycelic Slipspawn. Todos mis ataques van dirigidos hacia esta criatura que al finalizar el turno queda muy dañada. Yo estoy bien protegido en primera posición con Baakjira y en última posición con Wave Brood que hacen de mi estrategia un quebradero de cabeza para mi enemigo.
Al comienzo del turno dos consigo destruir a dos monstruos enemigos seguidos, Mycelic Slipspawn y Katrelba Gobson con lo que la estrategia de mi enemigo queda totalmente eliminada. Fallo muchos de los golpes hacia las criaturas voladoras de mi enemigo.
En el turno tercero sigue todo igual apenas puedo golpear a los monstruos enemigos aunque no corro peligro, mi enemigo apenas daña mis criaturas.
Ya en el cuarto turno destruyo a Goblin Psychic con lo que el soporte de curación que le daba a Pelacor Mercenary queda eliminado.
Quinto turno en el que por fin destruyo a Pelacor Mercenary pero que todos mis golpes hacia Chaos Dragon son fallidos.
No es hasta el turno séptimo en el que puedo destruir Chaos Dragon en un combate en el que aunque he llevado la delantera, he errado muchos golpes.
