This week the weekly challenge set given by the #Splinterlands team is to use "Dragons" element cards with any other element cards. But unfortunately, I don't have any dragon element card yet, so I decided to use the "Diemonshark" card instead, which is in some way close to dragons in looks and shape.
Diemonshark Card Skills and Abilities:
|
|
|
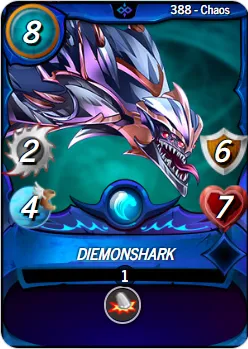
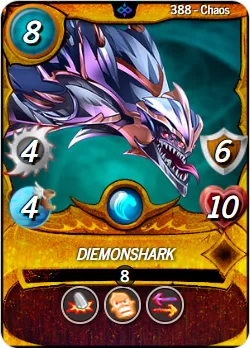
Splinter = Water
Rarity = Rare
Card Type = Regular and Gold Foil
Mana Consumption = 8
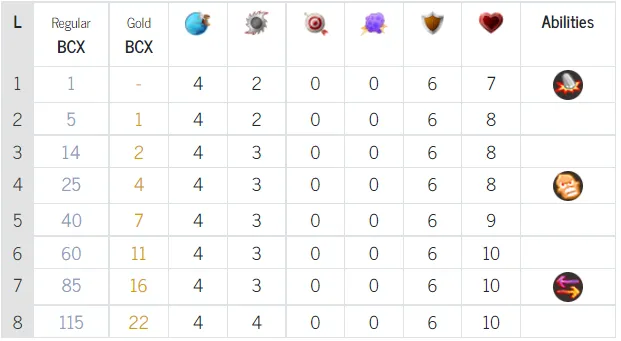
Attack = 2 up to level 2, 3 up to level 7, and 4 at level 8
Armor = 6 from level 1 to 8 (No change in armor rating)
Speed = 4 from level 1 to 8 (No change in speed)
Life = 7 at level 1, 8 from level 2 to 4, 9 at level 5, 10 from level 6 to 8
Special Abilities:
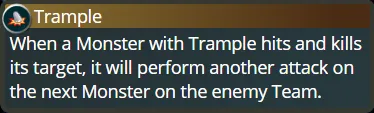
|
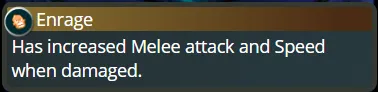
|
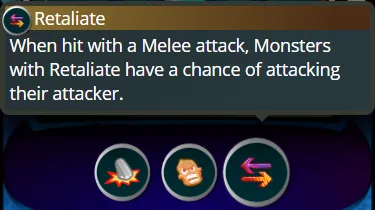
|
Battle Lineup:

Summoner used Drake of Arnak (Level 1)
1 - Diemonshark
2 - River Nymph (Level 1)
3 - Merdaali Guardian (Level 1)
4 - Deeplurker (Level 1)
5 - Albatross (Level 1)
Battle Commentary / Strategy:
Before diving into battle commentary, let's watch this battle video to understand the battle strategy.
My team is battling against fire element monsters, there is one neutral card in the enemy team as well. 'Tarsa' is the enemy side summoner, she boosts +1 attack and +1 HP of her entire team, which is quite dangerous for my team.
My team is led by 'Drake of Arnak', he adds +1 armor to the entire team, which protects from melee and ranged attacks, and this card provides a selection of any element to prepare a team from.
The battle spans 9 rounds, and each round is very thrilling to watch.
Round 1
The first round starts with an attacking stance by Diemonshark because of the speed advantage, Antoid Platoon (first in line from the enemy side) loses all of the armor, while Diemonshark also loses 3 armor.
Round 2
Anotiod Platoon is using shield ability which means it will take one less damage from melee and ranged attacks, but a final blow from Deeplurker dispatches Antoid Platoon back to hell. The last hit of Round 2 by Living Lava removes Diemonshark's armor.
Round 3
It is time for Radiated Scorcher to leave the battlefield, as Deeplurker uses his massive opportunity attack to kill Radiated Scorcher. Living Lava is using a lethal blow on Diemonshark, which makes Diemonshark bleeds heavily, he now stands tall with 1 HP
Round 4
Diemonshark breaks Living Lava's armor and then survives a spear throw by Goblin Chariot, but the magic attack by Djinn Apprentice gives him an eternal sleep, now River Nymph faces Living Lava, and she loses her armor in the end.
Round 5
River Nymph fights valiantly, but attacks from Goblin Chariot and Djinn Apprentice destroy her, Deeplurker targets Goblin Chariot and lands them a killer blow. Merdaali Guardian comes in front of Living Lava, LL attacks her but she dodges this time.
Round 6
Djinn Apprentice throws a magic ball at Merdaali Guardian, and she loses her health but next instance she immediately recovers her health to the fullest. Deeplurker attacks Living Lava leaving him to 2 HP only, then LL hits Merdaali Guardian and removes her armor.
Round 7
Djin Apprentice again uses a magic attack on Merdaali Guardian, but she instantly recovers all HP. Suddenly Deeplurker sees a great opportunity to finish Living Lava, now Djinn Apprentice comes in front of Merdaali Guardian.
Round 8
Djinn Apprentice shocks Merdaali Guardian with the magic attack, but she knows how to survive a battle. Deeplurker is always ready to attack, he reduces Djinn Apprentices HP to 2.
Round 9
Djinn Apprentice attacks Merdaali Guardian, but her healing powers are strong enough to recover her wounds immediately. Finally, a devastating blow flattens Djinn Apprentice, and then the victorious team sings chants of glory.
Diemonshark As a Tank Yes or No?
Definitely 'Yes', because it has not only survived half of the battle but also provided backline fighters opportunities to knock their enemies before its dismissal from the battle. Diemonshark is a very useful rare card if fully leveled up, an armored tank card that has massive armor, superior attack, and beefy HP.
If you like the Diemonshark card and its useful skills, do write about your experience with this card in your battles.

Credits:
Images taken from Splinterlands.com
Main Image is courtesy of @splinterlands's Contest post