🐲Hello My Friends🐲
Welcome to another strategy guide that I will present to you. Thinking about different ways to win a match is often essential for a quick and easy victory. Much more than just placing cards and hoping they attack first or praying for a miss to win the game.
I will show you now a victory that I obtained and found it very interesting.

🐲Before The Battle🐲
The Rules: 32 Mana, Life, Death, Water and Earth enabled.
Healed Out: All healing abilities are removed from monsters and summoners.
Noxious Fumes: All monsters start the battle poisoned.

Here I thought the following before the beginning:
- The rules of this battle disable any card with healing ability and the poison that takes 2 life from all monsters (ignoring shield) is pure evil. Here I've already started to think of something to take advantage of this, since tanks with healing ability (Sea Monster) or Crustacean King, for example, would not be used.
- I assumed my opponent would come with the water or earth element. Death element? I honestly didn't think, if he came with the same strategy as mine, I might have lost the match.
- As there was no possibility of healing, I imagined that any card that reduces the maximum life of monsters would be very well used here.
- I also thought that my opponent could come with the element of life, making his monsters gained +1 armor and with it the possibility of him not knowing that the poison hits life directly.
- I also played around the Venari Wavesmith, who has entered the water decks numerous times, his protect ability gives +2 armor to allied monsters. My opponent might feel safe with this or think the shield blocks the poison.

🐲Line Up🐲
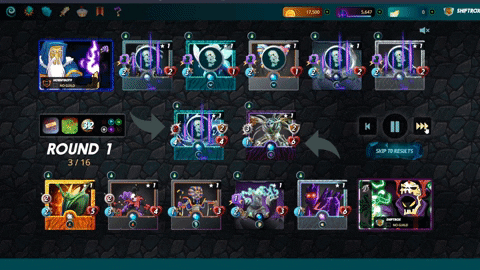
Below, how the battlefield was set up:

Here you can already see the damage that will happen, after the buffs and debuffs, the first round started as shown in the screenshot. Note that the opposing monsters are already with 1 or 2 health, so at the end of the turn receiving 2 damage from poison will be defeated.
1) Bone Golem > I believe to be one of the best tanks of the death element, with 6 health, 2 armor and void ability (assuming my opponent would come with magic), which decreases the magic damage taken. Remembering that the strategy here was not to fight, but to let the poison do the dirty work.
2) Onyx Sentinel > A card that is perhaps very underrated, I put it in this position due to sniper attacks. Its role would be to handle the damage and protect the Undead Priest.
3) Venari Bonesmith > I can't say enough how I like this card. Its ability to increase 1 hit point makes it very versatile to enter combat in various ways. In this case, your life leech ability is not affected by the healed out, you can become a second tank, came in this position to also protect the Undead Priest.
4) Undead Priest > The icing on the cake, I left it in this position because I believed I was already well protected and the fight would end quickly if my strategy proved successful. If it went wrong, the cards that were after him would be more protected to continue focusing on cards with magic attack or ranged.
5) Twisted Jester > A very used card, has a good body and sniper skill is great for defeating spell cards and opponent distance. The objective was precisely that, to focus on this type of letter.
6) Mantoid > A great card, with decent body and sniper ability, I put it to combo with Twisted Jester and thus focus on the weakest opponent's cards.
🐲Battle🐲
In round 1 the strategy of holding the enemy worked out, with my Bone Golem receiving only 1 damage from the enemy. The sniper combo still managed to defeat an opposing monster, withdrawing its shield and then taking it down.
GIF Source
At the start of the second round the poison takes its victims, simply ending my Bone Golem with 1 life and taking 4 opposing monsters. Note that they had 2 shield which would make my victory very difficult if I was just going up with the attacks. A purely strategic victory!

GIF Source
The stroke of mercy was given by Venari Bonesmith.
🐲Conclusion🐲
The replay can be seen in full here: https://splinterlands.com?p=battle&id=sl_7288d0264f28c195fd112f84691726f7&ref=shiftrox
This was a very well thought-out victory and it can even become a routine if we act with caution before each fight. I believe my way of building the team was great and precise, letting the ☠️Poison☠️ do all the work.
GIF Source
Obviously nothing and no one is perfect, everything could have gone wrong, but it's often surprising the opponent as soon as we get good victories!
👊I hope that somehow I help the community! See you next time👊

If you want to know my work better, follow my last three posts:
[EN / PTBR] My Future / Meu Futuro
I reached a new mark in my POB stake! What's the next goal?
Journey Progress #18 + Opening a Pack Of Cards
If you want to learn more about HIVE games, you can start playing:
👨🌾DCROPS👨🌾
⭐RISING STAR⭐
🐲SPLINTERLANDS🐲
Footer Designed With Canva
