Greatings
NEATNESS IS NEXT TO GODLINESS
The statement above has been in existence for so long with people giving it different meanings. One of the most popular meaning given to this statement is that people has the moral duty to keep their houses and environment clean. Speaking of houses and environment, what do you consider as your house and environment? From my opinion, I believe ones environment is anywhere he/she founds themselves. If we are obligated to keep our living rooms, and streets clean because we are mostly found in them, how about the platform where we relate with people and even get paid for it? For this reason this post will cover up areas that has to do with cleanliness in creating post on the hive platform. I understand that the awareness of posting professionally has been spoken and written of several times, yet over 50% of hivians still publishes post unformated. This post covers 7 areas which is very helpful while creating a post.
These areas are:
- Headings
- Boldness
- Italics
- Centralizing
- Sourcing/Referencing
- Left and right image wrapping
- Justification
Okay, let's start with th first four using the statement in the picture below.

If we study the statement in the above picture carefully, we will notice that the first four (heading, bold, italics and centralize) mentioned above are all implemented. Now to the first.
Heading
For better understanding of this post, I will put every explanations in a layman terms.
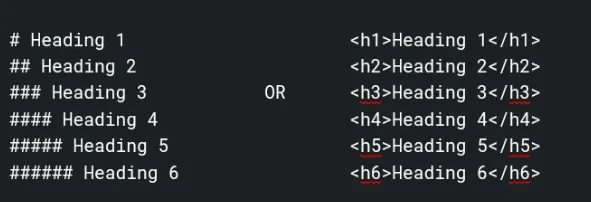
Headings are very important in breaking down posts into different segments. In hive platform, there are six headings with the html tags H1-H6. The difference in these headings are their sizes in representing text with the largest text size being H1, decend to H6. Below shows how each heading represents text
Heading 1
Heading 2
Heading 3
Heading 4
Heading 5
Heading 6
The picture below shows how these headings are achieved. Note: for the # syntax, there is a space between the # & the text
ITALICS
Italics can also be used to give texts different look while creating post on hive. It can also be used to highlight a "specific area" in a write up. To achieve the implementation of italics is quite simple. To achieve italics, simply put * "before and after the text; make sure there's no space between the * 's and the text" as show in the picture below.

Italics can be implemented on a whole write up, specific paragraph, selected sentence or selected text, it all depends on what you want.
Bold
Just like italics, bolding a text is quite simple. To achieve that simply put 2 ** BEFORE AND AFTER THE TEXT as shown in below picture.

We have discussed, headings, italics and bold, now let's proceed with centralizing a text
Centralizing a text
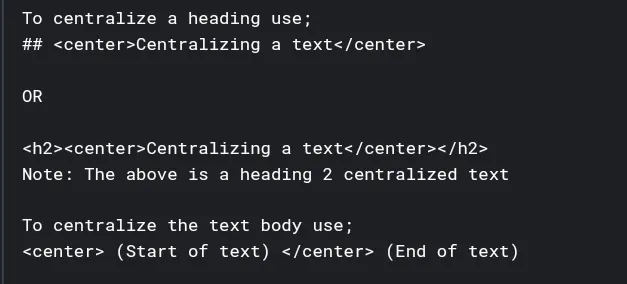
Also, the four formatting style (heading, Italics, bold and centralize) that has been discussed so far can be combined to achieve a more specified aim. Check the image below for how I achieved the first statement in this write up. You can go back up to view the effects the below image had on the text.

The next one is pretty simple and it's very important if you want to stay out of trouble in hive platform. This is the sourcing or referencing phase which deals with plagiarism in the platform.
Sourcing/Referencing
As education entails, every idea collected from an external body while making a write up should be credited to the external body. However, to do this in hive platform, there are few simple steps. First, if it's a picture, try and make your own design or get a picture from a copyright free site. Check the two image below.

Every picture has a unique Alphanumeric code it brings out when uploaded. So put to the reference/source, open and close a block bracket [ ], put the name of the source in it and then open normal curved bracket (), and put the URL link of the picture just as I did above. Same applies to text referencing, put [source](URL link) without space in-between the two bracket.
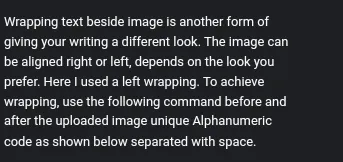
Left and right image wrapping.

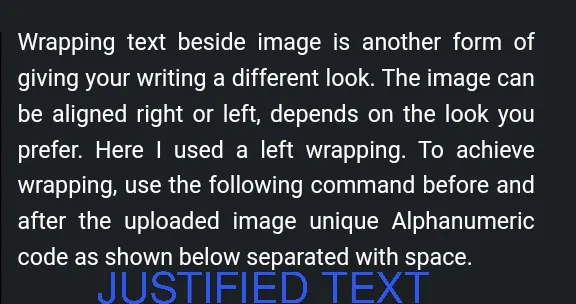
Wrapping text beside image is another form of giving your writing a different look. The image can be aligned right or left, depends on the look you prefer. Here I used a left wrapping. To achieve wrapping, use the following command before and after the uploaded image unique Alphanumeric code as shown below separated with space.

For right image wrapping, change the left in the pull-left to right
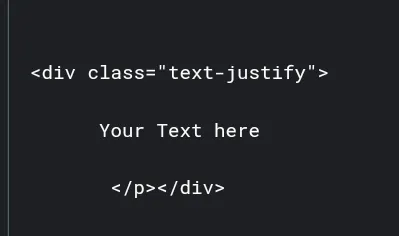
Justification.
Justification is always the final touch when typing whether on Ms word or here in the platform. it's a very helpful tool to make your work more neat and attract readers to yourself. The computer achieves justification by adjusting the lines in-between text. View below for example of a justified and non-justified text.
If you carefully view the both image above, you will observe that the left is justified. Both the left and right side of the text is in-line with each other while the left image has a scattered right text because it's not justify rather Left aligned. View below image for how justification is done
Conclusion
Post formatting is very important as it makes your work neat and enticing to the reader. The step by step section of this post will help you achieve a whole lot when making posts. There are also other materials which can help in areas not covered in this post. For such material, you can check out a previous post by @themarkymark on how to post professionally. I'm grateful to him because his material has been of help since my two months hive experience. I Also hope this post can help others who haven't learnt these formatting tricks and make the hive platform better and a more professional environment. Finally I want to call out to colleagues @queenpriscilla @anointingaz @emmanuel222 @olivemarcel @channell1 @stevequest84 @ozedfausin and others who got to hear of hive through me to visit this post and make proper use of it