NOTE! The steps below are no longer valid. See this official video from the project to see the updated setup procedure. I'm aiming to update the article to correspond with the video when I have time.
In this tutorial we take a step by step approach to setting up a VSC node. Almost no prerequisites are required, and in theory you should be able to follow along regardless of your technical skill level. This is intended to compliment the official doc pages and the video Install VSC node via ansible, to provide additional details in the setup of a VSC node and hopefully make running a node more accessible to even more people.
This post was posted on: Feb 25, 2024
Last updated: April 3, 2024
I have yet to update the full post. See the cheat sheet section at the bottom for useful commands and info (for the updated setup guide).
1. Prerequisites
Since you're reading this, I assume you already know what @vsc.network is and what a witness node is. Other than that, you'll need:
- A dedicated HIVE account
- A computer to run the software. Either;
- a Raspberry Pi 4B with at least 2GB RAM or better and a memory card with at least 20GB storage space. AND a casing for your Raspberry Pi – avoid the "original" casing at all costs! I recommend the one you see in the header, the "Akasa Gem Pro Case", for completely silent and passive but effective cooling.
- a computer with at least 4 CPU cores, 4GB of RAM and at least 20 GB*
*hardware requirements may increase in the future. Check official doc pages (link at the top) for up-to-date details.
2. Install the OS (Ubuntu Server)
Installation generic computer
I won't be covering a general installation of an Ubuntu server here, as there are plenty of good tutorials available for that (and it's not very difficult). Here's a brief outline of the process though;
- Step 1: Download the Ubuntu server image and create a bootable USB drive: https://ubuntu.com/server/docs/installation
- Step 2: Install Ubuntu to your server computer
- Step 3: Install and configure SSH, so that you'll be able to control your server from your main computer (this isn't strictly necessary, but it will make everything so much easier down the line, when it comes to things like copy/pasting etc.)
Installation on a Raspberry Pi:
- Install Raspberry Pi Imager on your main computer.
- Insert the memory card you'll be using into your computer
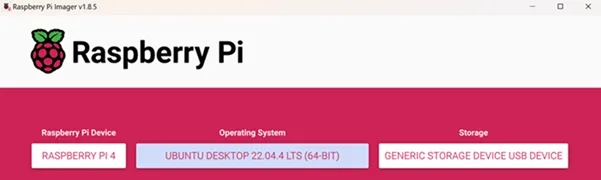
- Open the Raspberry Pi Imager and select the kind of Pi Device you have, and your storage device
- Under Operating System, select Other general-purpose OS > Ubuntu > Ubuntu 22.04 LTS (64-bit) (If there's a newer "LTS" release available, select that instead.)
- Now use the keyboard shortcut Ctrl + Shift + X (or click the cogwheel if you can see it) to bring up the Advanced menu. This is where we configure the OS so you can access it via your main computer later, once it's all booted up.
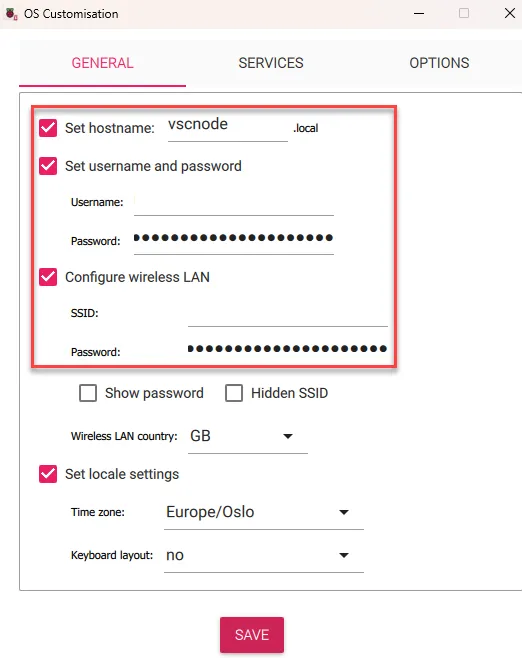
- Tick Set hostname: and type in a name for your node.
- Tick Set username and password and select a username and password for your node
- Tick Configure wireless LAN and type inn the name and password of your WIFI network.
- Under the Services tab, tick Enable SSH.

Now you can click Save > Next and write everything to your memory card. This process will take a few minutes. When the process is done, remove the memory card from your computer and insert it into your Raspberry Pi.
Now all you need to do is to plug in the power cord and it will boot up.
3. Identify your server's local IP Address
The easiest way to do this is probably to log into the router of your local network and check what the IP address of your server is. You should be able to find this somewhere under Connected devices - look for the hostname you selected when you set up your server.
Note: This is a general pointer, as all router interfaces are different - look it if you need further assistance, there are plenty of resources for any router out there).
In my case, I found that my server IP was 192.168.1.108
4. Log in to your server
You'll be interacting with your server through a terminal window on your main computer/workstation. To bring up a terminal window;
- On Windows: Hit the Windows button and type in
cmd, then Enter. - On Mac: Open a terminal window (should be located somewhere under Applications > Accessories or similar)
In the terminal type in the username and the the local IP Address of your server. In my case I chose the username mp and the IP Address is 192.168.1.108, so the command I have to use is
ssh mp@192.168.1.108
Hit Enter and you should be prompted to type inn your password (even if it seems like nothing is happening when you type, it's being registered). Then press Enter again and your terminal window should look something like this:

If you've made it this far, give yourself a pat on the back! The hard part is done, and now we've got everything ready for setting up our node.
5. Run a full system update
Before we can do any serious work, we need to run a full system update. To do this, copy the following command, right click in your terminal window to paste it. Then Enter to run the command.
sudo apt update && sudo apt upgrade && sudo apt dist-upgrade
You'll be prompted for your password again. Then you may be prompted several times to input either Y or N. Type Y and Enter every time. This process will take some minutes.
When all the upgrades are done and you return to the command prompt, it's a good idea to reboot your server when all the upgrades are complete. Do this with the command
sudo shutdown -r now
6. Install various useful/needed packages
'lm-sensors' will allow us to monitor the system's temperature. 'git' is necessary to sync the VSC repository. 'sshpass' is required to set up the node. To install all three, run this command:
sudo apt install lm-sensors git sshpass
7. Install Docker
Run these three commands in order.
sudo apt install docker docker-compose
sudo usermod -aG docker $USER
sudo service docker start
8. Install Python and Pip
Run command;
sudo apt install python3-pip
9. Install Ansible
Run command;
python3 -m pip install --user ansible
If you require further details or run into issues, here's Ansible's official documentation.
10. Sync VSC repository
To fetch all necessary files from the VSC repository, run this command.
git clone https://github.com/vsc-eco/vsc-node
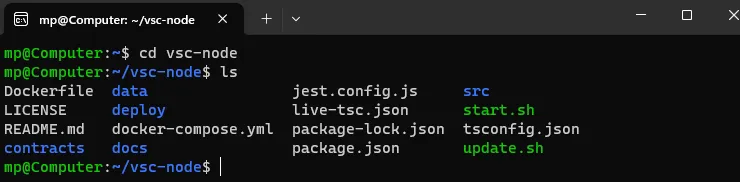
This creates a new folder in your home folder. To enter that folder, run
cd vsc-node
Your prompt will change, indicating that you're now in the vsc-node-folder. To view its contents, run ls, like so:
11. Configure your node
First run this command;
echo -e "[defaults]\nhost_key_checking = false" > ansible.cfg
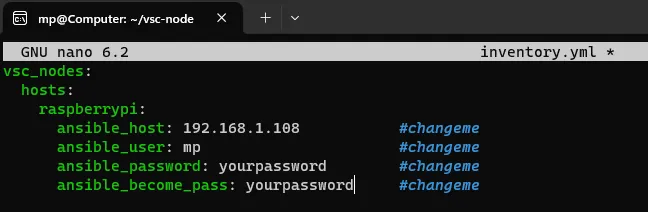
Then copy the following lines of text;
vsc_nodes:
  hosts:
    raspberrypi:
      ansible_host: 192.168.0.100           #changeme
      ansible_user: pi                      #changeme
      ansible_password: <mypassword>        #changeme
      ansible_become_pass: <mypassword>     #changeme
Then run the command
nano inventory.yml
This creates and opens a new, empty yml-file in your vsc-node folder. Right click in your terminal window to paste the text copied from the previous step.
Edit each line and replace what's already there with your own data. The password in both password fields should be the same. It should look something like this when you're done.
When you're done editing:
- Ctrl + o, then Enter to save the file
- Ctrl + x to exit the text editor
12. Deploy your node
Copy and execute the following command:
ansible-playbook deploy/ansible/docker_install/playbook.yml -i inventory.yml
You will now be prompted for your nodes' Hive Account Name, Posting key and Active key (the Private keys, not the Public ones). Enter one at a time,
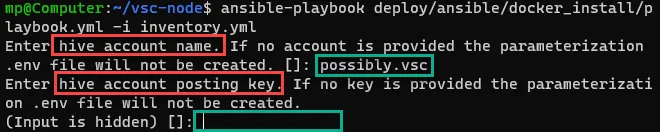
Check the video from timestamp 02:01 if you want to see how this process should unfold. It can take several minutes. If you end up back at your regular prompt without errors and see something like this, congrats! You're node should now be up and running.

13. Check that everything's working
Run the command docker ps to see which docker processes are running. There should be 3; vsc-node, ipfs/kubo and mongo.

To view your node logs live, enter this command:
docker logs vsc-node --follow --tail=10
As long as it's updating regularly and looks something like this, it means everything is working as intended.

When you're done watching the log file, hit Ctrl + C to return to the command prompt.
You can now start looking for your node in the VSC Witnesses List.
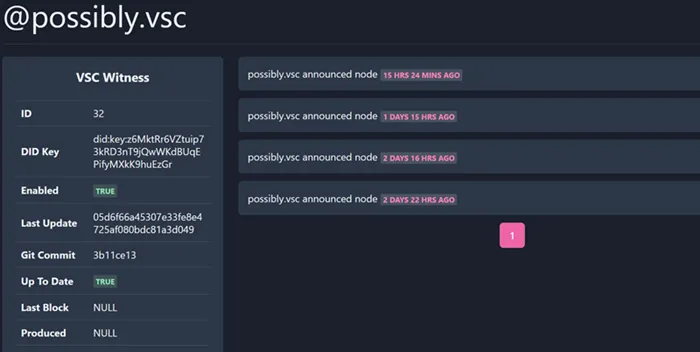
Note that it may take some time before it says "Enabled" and "Up to Date" . Notice those highlighted fields in the screenshot of the log above, "blockLag" and "parseLag". These numbers will decrease with time, until they reach zero. And your node may not appear before that. This can take several hours.
14. Manual updates
Automatic should happen automatically, but in my case they have not on a couple of occasions already, leaving my node with this status (enabled: True - Up to date: False)

It's crucial that your node is up to date, so in cases like this you'll need to update it manually. To run the update, make sure you're in the vsc-node-folder;
cd vsc-node
and then run the the update.sh-script with;
./update.sh
Errors and solutions
Couldn't find env file

If you get this error you need to manually create your .env file and insert your keys into that file. To do that do the following:
cp .env.example .env
then open the file with
nano .env

Fill in the node account name, posting key and active key, then save the file with Ctrl + o, then Ctrl + x. Now try to run the update script again.
Please commit your changes or stash them (git issue)

This most likely means you've made local changes in your vsc-folder. To fix, run this command, then try the update script again.
git reset --hard
15. Operational Commands & Tips (Cheat Sheet)
Here are some general commands that are good to have at hand while maintaining your server. The VSC software itself should update automatically, so you shouldn't need to worry about that.
Command history:
If you use the Up (and Down) Arrow keys, you can scroll through your command history. This way you usually don't need to type out every command every time.
Run a full server update:
sudo apt update && sudo apt upgrade && sudo apt dist-upgrade
Restart your server:
sudo shutdown -r now
Check the temperature of your CPU
sensors
Check status of docker processes
docker ps
Check your docker logs
docker logs vsc-node --follow --tail=10
Manual update
Sometimes your node don't update by itself, so it's necessary to do it manually. To do this we first need to remove all docker containers. This is done with the following command.
docker rm $(docker ps -aq) -f
Then, in vsc-node-folder, run
sudo ./update.sh

Thank you for reading!
What is Hive?
To learn more about Hive, this article is a good place to start: What is Hive?. If you don't already own a Hive account, go here to get one.