Greetings to all, fellow sketchers. This time I bring you a digital drawing that I made last night. For some time now I have been practicing a lot and I think I have achieved good results despite the short time I have been practicing both digital drawing and drawing on paper.
Of course, it is more time I have spent on digital drawing; also, I consider myself better in this area than in traditional drawing, so I feel more comfortable drawing on my computer than on a piece of paper. This is the reason why I made this drawing; I wanted to know how much I have improved and I think I have improved a lot.
Below I leave you a video where I show you the step by step of the whole drawing, which I made in Photoshop. Below, in a brief description, you will find detailed images of the whole process.
Enjoy.
Saludos a todos, compañeros dibujantes. En esta ocasión les traigo un dibujo digital que hice anoche. Desde hace un tiempo he estado practicando bastante y creo que he logrado buenos resultado a pesar del poco tiempo que llevo practicando tanto dibujo digital como dibujo en papel.
Desde luego, es más el tiempo que he dedicado al dibujo digital; además, me considero mejor en esta área que en el dibujo tradicional, por ello me siento más cómodo dibujando en mi computador que en un pedazo de papel. Este es el motivo por el que hice este dibujo; quería saber hasta donde había mejorado y creo que he mejorado bastante.
A continuación les dejo un video en donde les muestro el paso a paso de todo el dibujo, el cual hice en Photoshop. Más abajo, en una breve descripción, encontrarán imágenes detalladas de todo el proceso.
Que los disfruten.
Well, to make this drawing, to start with the drawing the first thing I did were some strokes on a white background, this helped me to mark where the eye, nose and eyebrow would be.
Bien, para hacer este dibujo, comenzar con el dibujo lo primero que hice fueron unos trazos en un fondo blanco, esto me ayudó a marcar dónde quedaría el ojo, la naríz y la ceja.

After this process, I started to color the background of the drawing; previously I selected the color palette that I would use for the different skin tones, shadows, etc....
Después de este proceso, comencé a colorear el fondo del dibujo; previamente seleccioné la paleta de colores que usaría para los distintos tonos de la piel, sombras, etc...
 |  |
|---|
After that I continued adding the corresponding shadows in the appropriate places.
Después de esto continué agregando las sombras correspondientes en los lugares adecuados.
 |  |  |
|---|
The eyebrows were a bit more complicated than the shadows and skin colors.
Since I already had the line to follow for the eyebrows, I simply followed it making some variations, as I realized that the line was too big for my taste so I made the eyebrow a little smaller.
Las cejas fueron un poco más complicadas que el asunto de las sombras y los colores de la piel.
Como ya tenía el trazo a seguir para las cejas, simplemente lo seguí haciendo algunas variaciones, pues me di cuenta que el trazo era demasiado grande para mi gusto así que hice la ceja un poco más pequeña.

The next thing I did was to shape the eyebrow, making those little hairs that the eyebrow has on the edges; also, I lightened it a little bit because it was a very intense black.
Lo siguiente fue darle forma de ceja, haciendo esos pequeños pelos que tiene la ceja en los bordes; además, aclaré un poco pues era un negro muy intenso.
 |  |
|---|
To make it as real as possible, without wanting to do something hyper-realistic, I simply did hair by hair, one by one until I achieved the desired effect.
Para que fuese lo más real posible, sin llegar a querer hacer algo hiperrealista, simplemente hice pelo por pelo, uno por uno hasta que logré el efecto deseado.

Well, at this point it's time to work on the central part of the drawing, as is the eye itself.
To do this I followed the line I made before and filled the whole area with white color, then I made the lines of the eyelids and their respective shadows.
Bien, en este punto ya es hora de trabajar en la parte central del dibujo, como es el ojo en sí.
Para hacerlo me guié por el trazo antes hecho y rellené toda el área con color blanco, luego hice las líneas de los parpados y sus respectivas sombras.
 |  |  |
|---|
Below you can see an image of the drawing up to this point, with some corrections in the shadows and eyelids.
A continuación pueden ver una imagen de cómo está el dibujo hasta este punto, con ciertas correciones en las sombras y en los parpados.

One more thing I had to do, although it might go unnoticed by some, is the tear trough. This small part of the eye, located in the inner corner, I did it as if it were shadow, adding some small pink and reddish lines that can only be seen if the image is enlarged.
Algo más que debía hacer, aunque pase desapercibido por algunos, es el lagrimal. Esta pequeña parte del ojo, ubicada en la esquina interna la hice como si fuese sombra, agregando algunas pequeñas líneas de color rosado y rojizo que solo se ven si se amplía la imagen.
 |  |  |
|---|
Once I had finished the eyelid and everything that corresponds, I started to outline the thick part of the eyebrow, where I should place the eyelashes.
Una vez terminé el parpado y todo lo que corresponde, comencé a delinear la parte gruesa de la ceja, donde debía colocar las pestañas.

Next was to add the shadows around the eye to add depth or volume to the lashes.
Lo siguiente fue agregar las sombras alrededor del ojo para dar mayor profundidad o volumen a las pestañas.

Once these shadows were done, I started drawing the lashes. I made numerous thick lines at the bottom and thinner towards the end, like the eyelashes we all know.
I placed lashes on the top and on the bottom; in the case of the bottom I placed small lashes outside the pink line I had made for the inner eyelid. If you enlarge the second image below, you can see the result:
Una vez hecha estas sombras, comencé a dibujar las pestañas. Hice numerosas líneas gruesas en la parte de abajo y mas finas hacia el final, como las pestañas que todos conocemos.
Coloqué pestañas en la parte superior y en la parte inferior; en el caso de la parte inferior coloqué pequeñas pestañas fuera de la línea rosa que habia hecho para el parpado interior. Si se amplía la segunda imagen a continuación, pueden ver el resultado:
 |  |
|---|
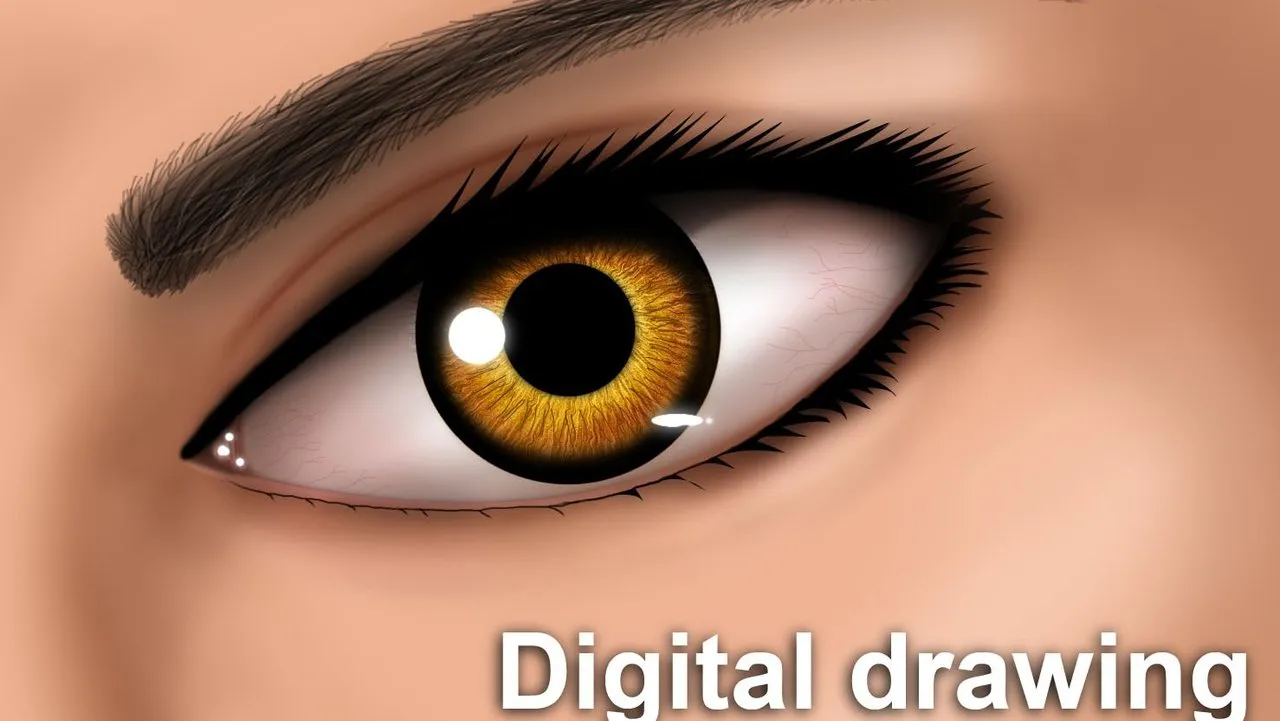
Ok, time for the best part of the whole drawing, the iris. Of course, I say this not because it is the most important thing, the eyelashes and eyebrows were also very difficult to do and all that, but being honest the part that gives more life to the whole drawing is that, the iris.
To make it I started with a totally black circle, then I made a circle, smaller for the colorful part of the iris; in this case, of a yellow color, to which I made a few gradients to darken it and give a more realistic touch to the eye.
Bien, hora de lo mejor de todo el dibujo, el iris. Claro, esto lo digo no porque sea lo más importante, las pestañas y las cejas también fueron muy difíciles de hacer y todo eso, pero siendo honesto la parte que más vida da a todo el dibujo es eso, el iris.
Para hacerla comencé con un circulo totalmente negro, luego hice un circulo, más pequeño para la parte colorida del iris; en este caso, de un color amarillo, al cual le hice unos cuantos degradados para oscurecerlo y darle un toque más realista al ojo.
 |  |  |
|---|
Below is a preview of how the eye will look once the black pupil is placed.
A continuación les muestro un avance de cómo va quedando el ojo una vez que se le coloca la pupila negra.

I did this because I know how to do this effect, but not everyone knows how, and in the video I show you more or less how I did it, because I could not record the process; however, there in the video you can see in more detail this effect I did on the iris of the eye to give it a simply great effect.
Esto lo hice porque sé cómo hacer este efecto, pero no todos saben y en el video les muestro más o menos cómo lo hice, pues no pude grabar el proceso; sin embargo, ahí en el video pueden ver con más detalle este efecto que hice en el iris del ojo para darle un efecto sencillamente genial.

After this I placed more shadows on the eye and the characteristic veins it has.
Después de esto coloqué más sombras en el ojo y las venas características que este tiene.
 |  |
|---|
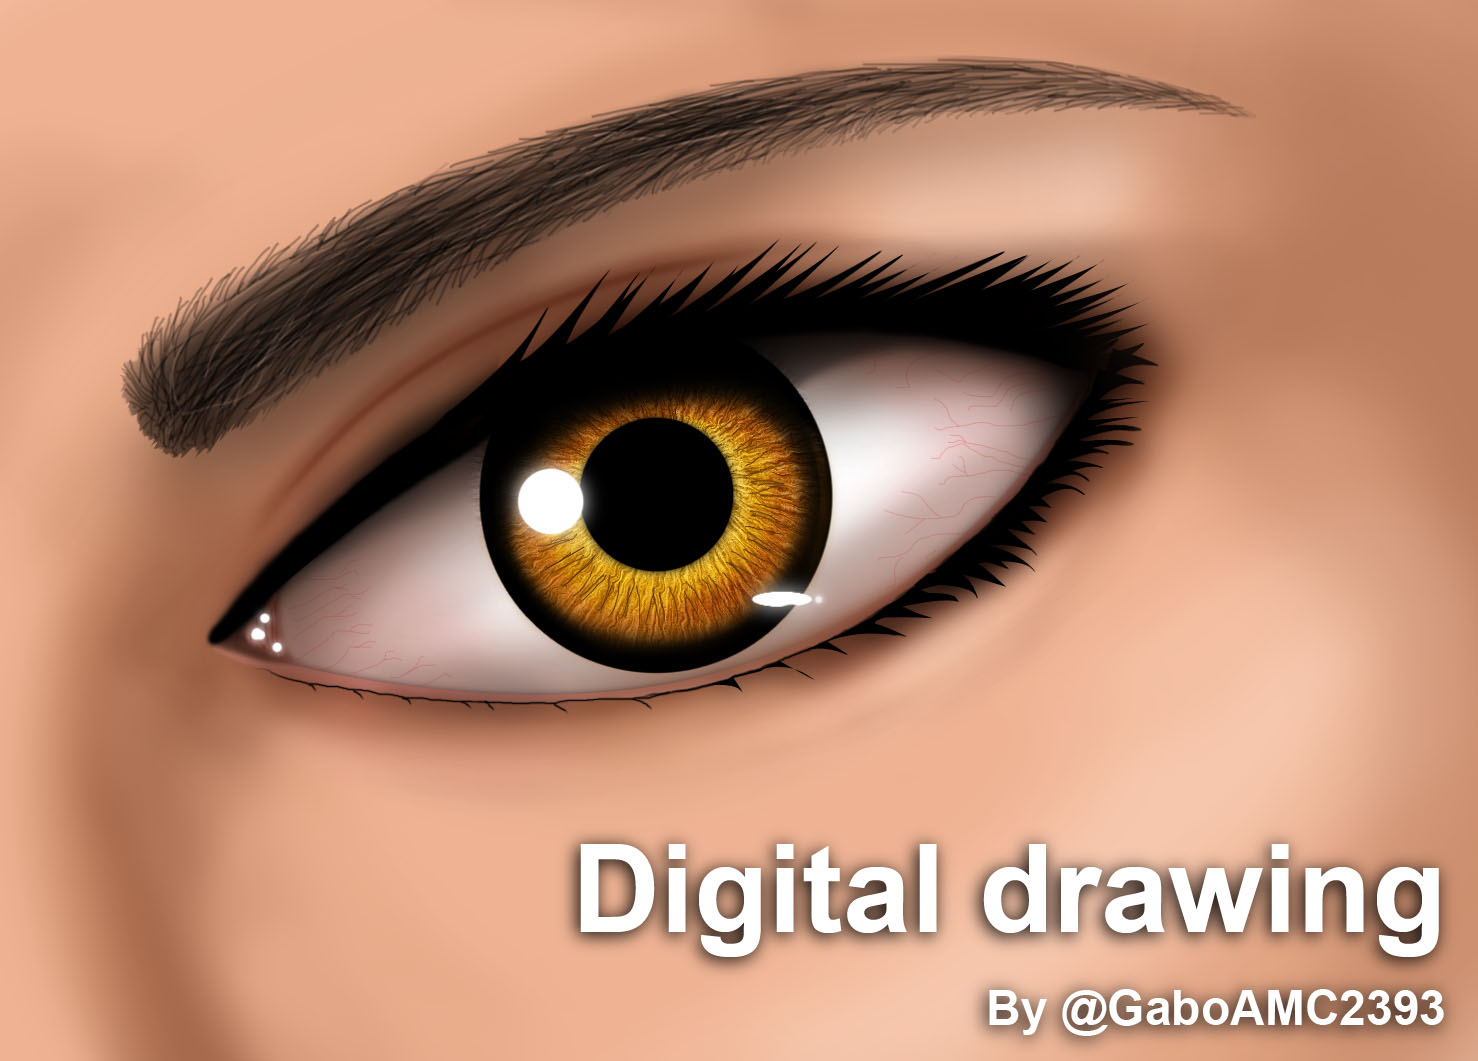
Finally, after adding some glitter to the eyes, something indispensable to give more life to the drawing, this is the final result.
Finalmente, tras agregar un poco de brillo a los ojos, algo indispensable para darle más vida al dibujo, este es el resultado final.

Well folks, that's it for now, what did you think? I loved it, in fact, it's one of the best drawings I've done for HIVE and I certainly enjoyed doing it a lot.
I hope you like it, you can leave your opinions below in the comments, as always I'll be happy to read them. With nothing more to add, I'll say goodbye then....
See you next time!
Bien amigos, esto ha sido todo por ahora. ¿Qué es ha parecido? A mi me ha encantado, de hecho, es uno de los mejores dibujos que he hecho para HIVE y ciertamente disfruté mucho haciéndolo.
Espero que les guste, pueden dejar sus opiniones abajo en los comentarios, como siempre estaré encantado de leerlos. Sin más que agregar, me despido entonces...¡Hasta la próxima!

Traducido con DeepL
My book collection # 2
Gabo Play: Rayman Adventures #1
My Palace
Song
Track: Always Moving Forward
Music by https://www.fiftysounds.com/

The Terminal

HiveDIY
▶️ 3Speak