Image edited in Gimp and Canva.

Luego de haber hecho un post sobre mi proceso creativo para crear un videolyric, mencione que si a alguien le interesaba un tutorial, lo haría... Así que, heyy, aquí esta.
Es muy complicado hacer un tutorial como este por escrito, y con gif. De hecho estuve considerando no subirlo, viendo los obstáculos que se me presentaban al explicar ciertas cosas.
Pero como explicaré lo más sencillo, y primordial, termine por decidirme y subirlo.
Ahora, sin más preámbulos, comencemos.
After I made a post about my creative process for creating a videolyric, I mentioned that if anyone was interested in a tutorial, I'd do it.... So, heyy, here it is.
It's very complicated to make a tutorial like this in writing, and with gif. In fact I was considering not uploading it, seeing the obstacles I was facing when explaining certain things.
But as I will explain the most simple and primordial, I ended up deciding to upload it.
Now, without further ado, let's get started.
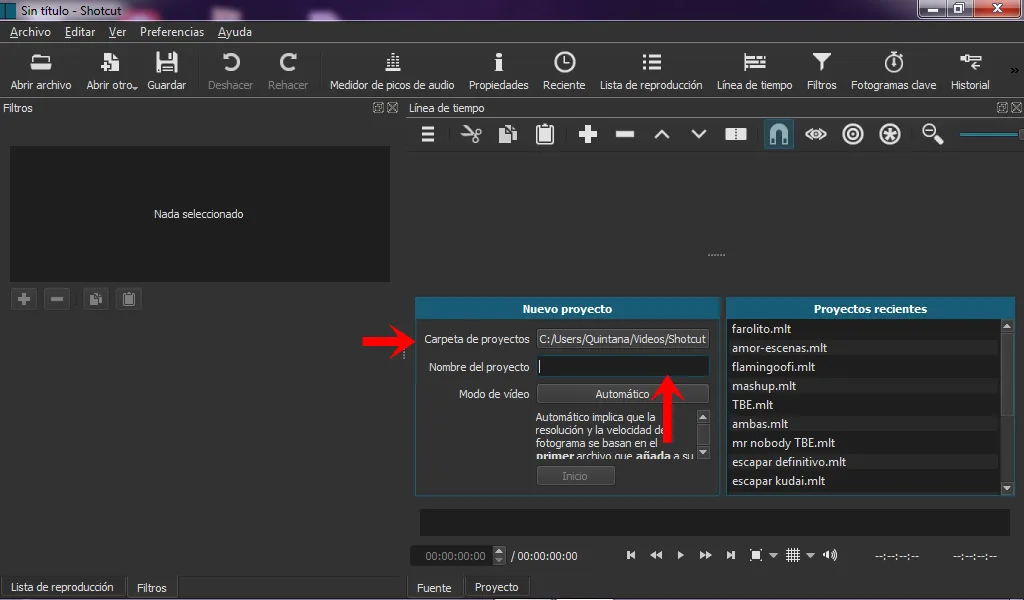
Primero que todo, el programa que yo uso es Shotcut, ya que es un programa gratis y que tiene requisitos bajos para la pc.
La imagen a utilizar debe tener las dimensiones 1920x1080. Si hay una que les gusta, pero no tiene estas dimensiones, solo deben cambiarle el tamaño. Paint tiene una opción para ello.
Al abrir el programa lo primero que tenemos es la cuadrilla donde se nos señala que coloquemos un nombre, para crear el proyecto.
First of all, the program I use is Shotcut, since it is a free program and has low requirements for the pc.
The image to use must have the dimensions 1920x1080. If there is one that you like, but does not have these dimensions, just resize it. Paint has an option for this.
When we open the program the first thing we have is the grid where we are told to put a name, to create the project.
All gifs and images are my own.
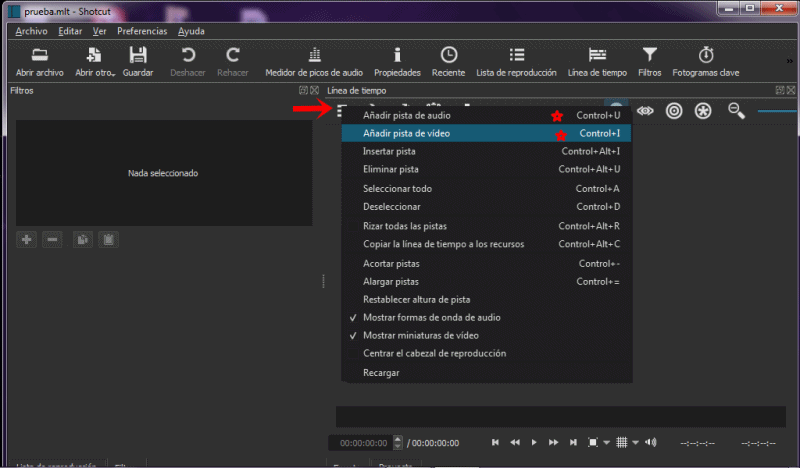
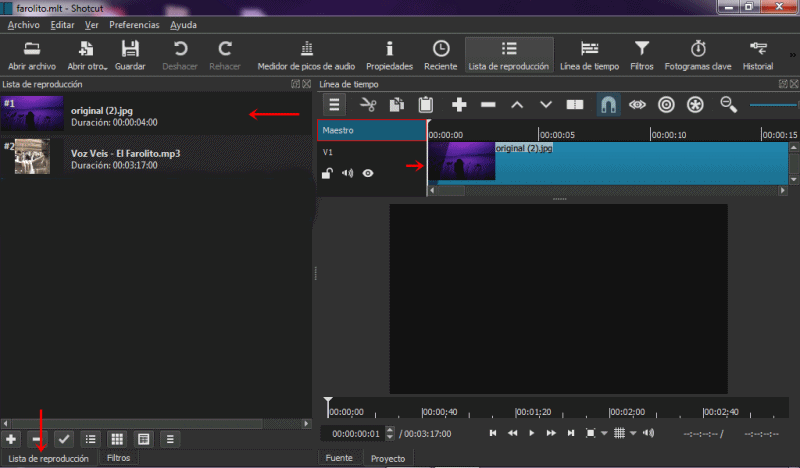
Luego, a primera vista, tenemos opciones en un panel superior, y dos casillas en el lateral izquierdo, en el que visualizamos "Lista de Reproducción" y "Filtros". Esos dos son los más importantes.
En el superior, que es la linea de tiempo, tenemos la opción de agregar pistas de 'audio' y 'vídeo', agregamos ambas. Y nos vamos a la opción del panel superior "abrir archivo" para traer al proyecto la canción y la fotografía. Estas a su vez las arrastramos hasta la lista de reproducción, desde donde se nos permite colocarlas en sus respectivas pistas.
La imagen a la pista de vídeo, y la canción a la de audio.
La imagen la extendemos durante toda la pista de vídeo, hasta el punto donde termina la canción.
Then, at first glance, we have options in a top panel, and two boxes on the left side, in which we visualize "Playlist" and "Filters". Those two are the most important.
In the upper one, which is the timeline, we have the option to add 'audio' and 'video' tracks, we add both. And we go to the option of the upper panel "open file" to bring the song and the photograph to the project. These in turn we drag them to the playlist, from where we are allowed to place them in their respective tracks.
The image to the video track, and the song to the audio track.
The picture we extend it for the entire video track, up to the point where the song ends.
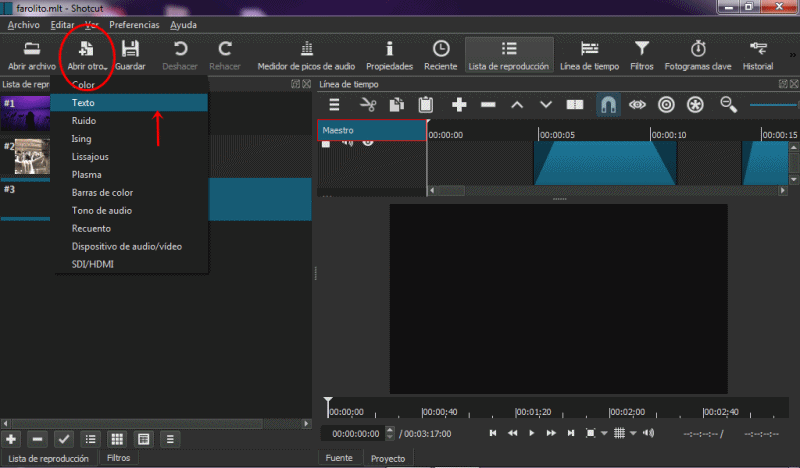
Para empezar a agregar la letra, en las opciones superiores seleccionamos 'Abrir otro' y elegimos 'Texto'. En la siguiente casilla ponemos la frase inicial, le damos aceptar, y al reflejarlo en la pantalla, configuramos los filtros y la fuente de la letra, en el panel lateral izquierdo 'Filtros'. Cuando lo terminamos, arrastramos ese texto hasta la lista de reproducción
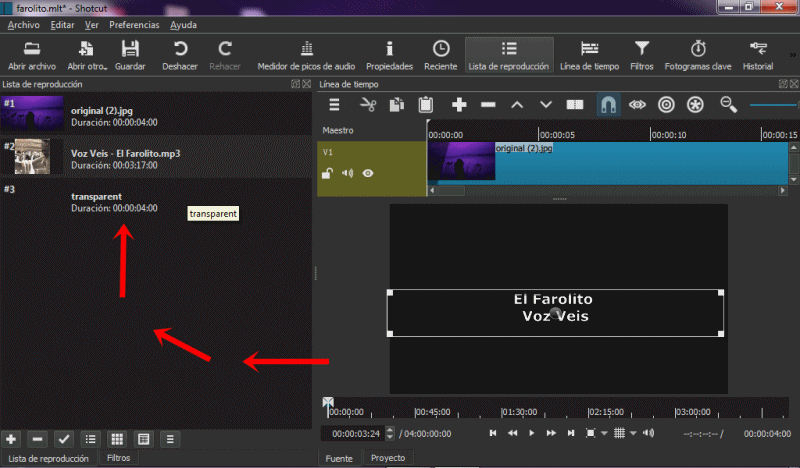
Agregamos otra pista de vídeo a la linea de tiempo, que es donde pondremos la letra. La letra antes arrastrada a la lista de reproducción, la colocamos en esta nueva pista, y la extendemos el tiempo que queramos que se vea.
Esa mismo pedazo de letra la podemos copiar y pegar durante toda la pista, cambiando el texto, por la letra correspondiente. Esto lo logramos con la herramienta copiar y pegar, que señalo en el gif con unas estrellas.
To start adding the font, in the top options select 'Open another' and choose 'Text'. In the next box we put the initial phrase, we give it accept, and when we reflect it on the screen, we configure the filters and the font of the letter, in the left side panel 'Filters'. When finished, drag the text to the playlist.
We add another video track to the timeline, which is where we will put the lyrics. The lyrics we dragged to the playlist before, we place them in this new track, and extend them as long as we want them to be seen.
That same piece of lyrics can be copied and pasted throughout the track, changing the text, for the corresponding lyrics. We achieve this with the copy and paste tool, which I point out in the gif with some stars.
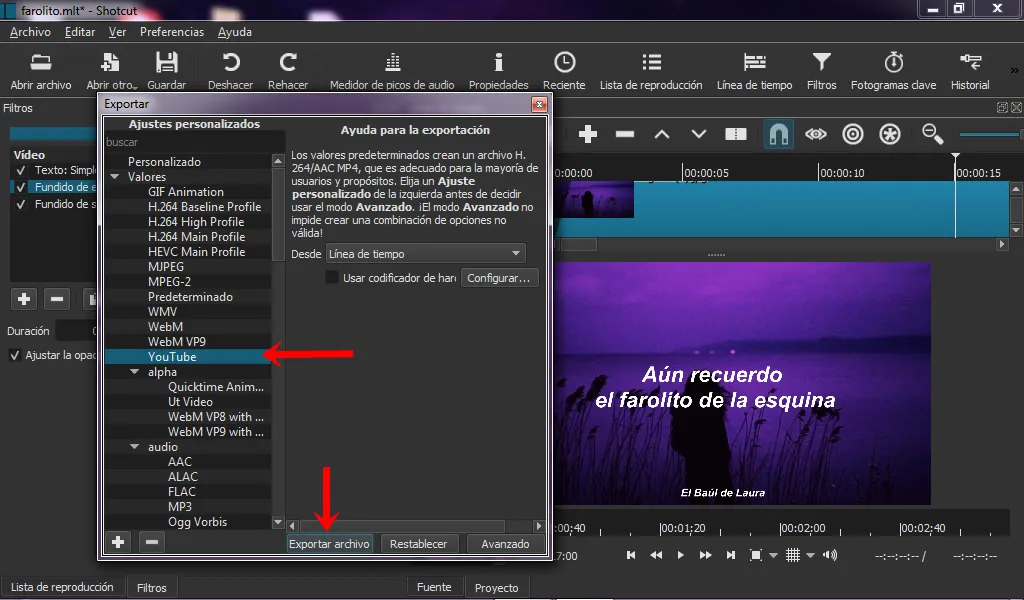
Luego de terminar todo ello, solo queda exportar el proyecto a formato mp4. Esto lo hacemos desde la casilla "Archivo" seleccionando "Exportar", a su vez, elegimos la opción 'Youtube' y 'Exportar archivo'.
Al terminar de cargar esta exportación, ya podemos abrir nuestro video.
After finishing all this, it only remains to export the project to mp4 format. We do this from the "File" box by selecting "Export", in turn, we choose the option 'Youtube' and 'Export file'.
When we finish loading this export, we can now open our video.
¡Eso fue todo! Espero les haya gustado, ¡saludos y se les quiere!
That was all! I hope you liked it, best regards and you are loved!
Traducción hecha en: DeepL
Imagenes editadas en Gimp y PhotoScape.
¡Se despide Laura QCh! / Laura QCh says goodbye!
Si quieres saber más de mi, aquí te dejo mis redes sociales.


