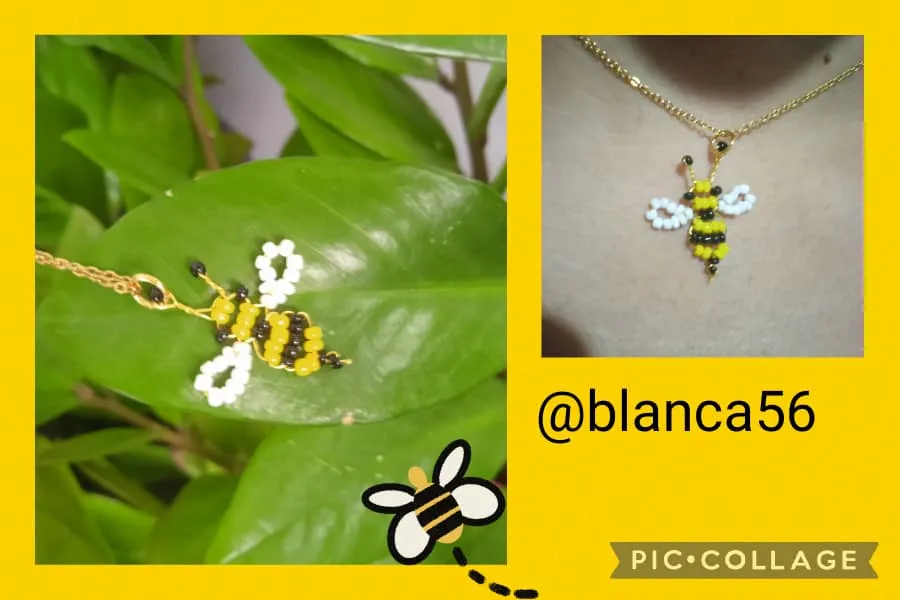
Hello friends of #Jewelry, I wish you a productive day, today I'm here to share with you a tutorial to make a cute charm in the shape of a little bee using the wire wrap and beads technique. Inspired by these little animals that are very useful for our ecosystem, for this work I used a pattern to speed up and specify each bead that I was introducing. It was an easy project, quick to make and very economical because of the material used. If you follow the step by step I will show you how to make a cute bee-shaped charm, so come with me.


Photos taken with my Xiaomi Redmi 9C. /Fotos tomadas con mi Xiaomi Redmi 9C.
Translated with / Traducido con: DeepL Translator.
Photo collage made with the PicCollage application./Collage de fotos hecha con la aplicación PicCollage.

Hola amigos y amigas de #Jewelry, les deseo un día productivo, hoy paso por acá para compartir con ustedes un tutorial para elaborar un lindo dije en forma de abejita usando la técnica de alambrismo y mostacillas. Inspirada en esos animalitos que son muy útiles para nuestro ecosistema, para dicho trabajo me apoyé en un patrón para así agilizar y precisar cada mostacilla que iba introduciendo. Fue un proyecto fácil, rápido de hacer además es muy económico por el empleo de material. Si siguen el paso a paso que les mostraré a continuación cómo elaborar un lindo dije en forma de abeja, así que vengan conmigo.
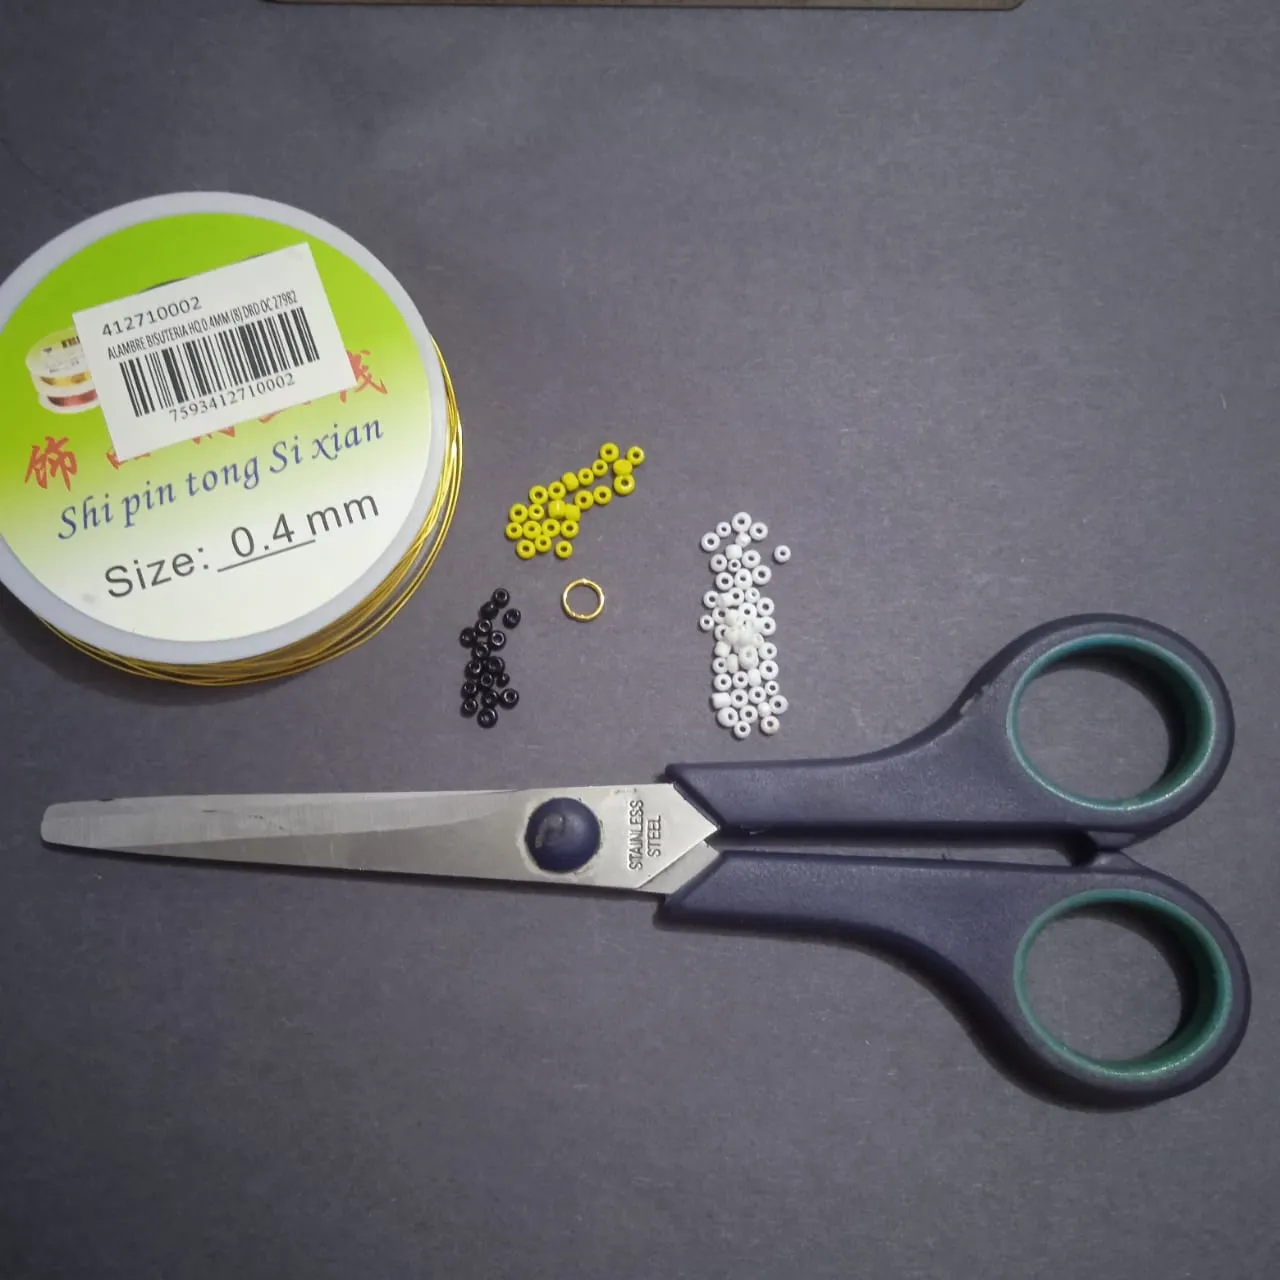
✨MATERIALS//MATERIALES✨
- White, black and yellow beads.
- Jewelry wire.
- Jewelry ring.
- Scissors or tweezers to cut.
- Mostacillas de color blanco, negro y amarillo.
- Alambre de bisutería.
- Aro de bisutería.
- Tijera o pinza para cortar.
✨STEPS//PASOS✨
- One of the advantages of following a pattern is that it facilitates the work and helps the visual coordination of the beads to be used to make the bee. So I share with you the pattern.
- Una de las ventajas de seguir un patrón es que facilita el trabajo y ayuda la coordinación visual de las mostacillas a utilizar para hacer la abeja. Así que comparto con ustedes el patrón.
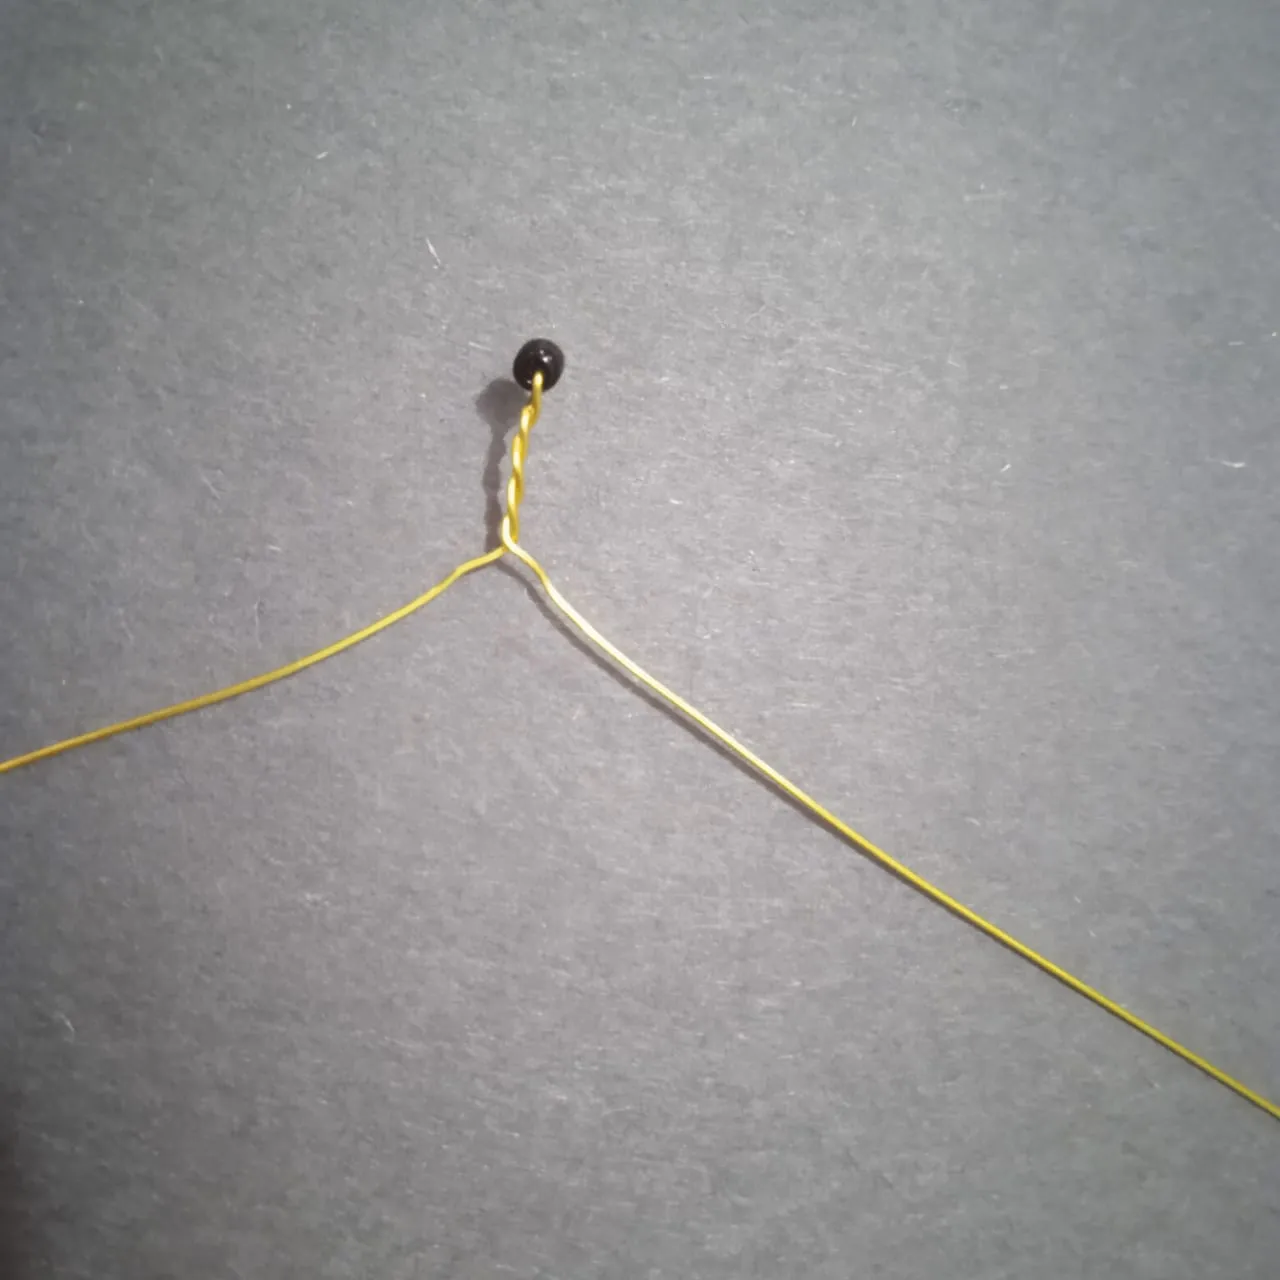
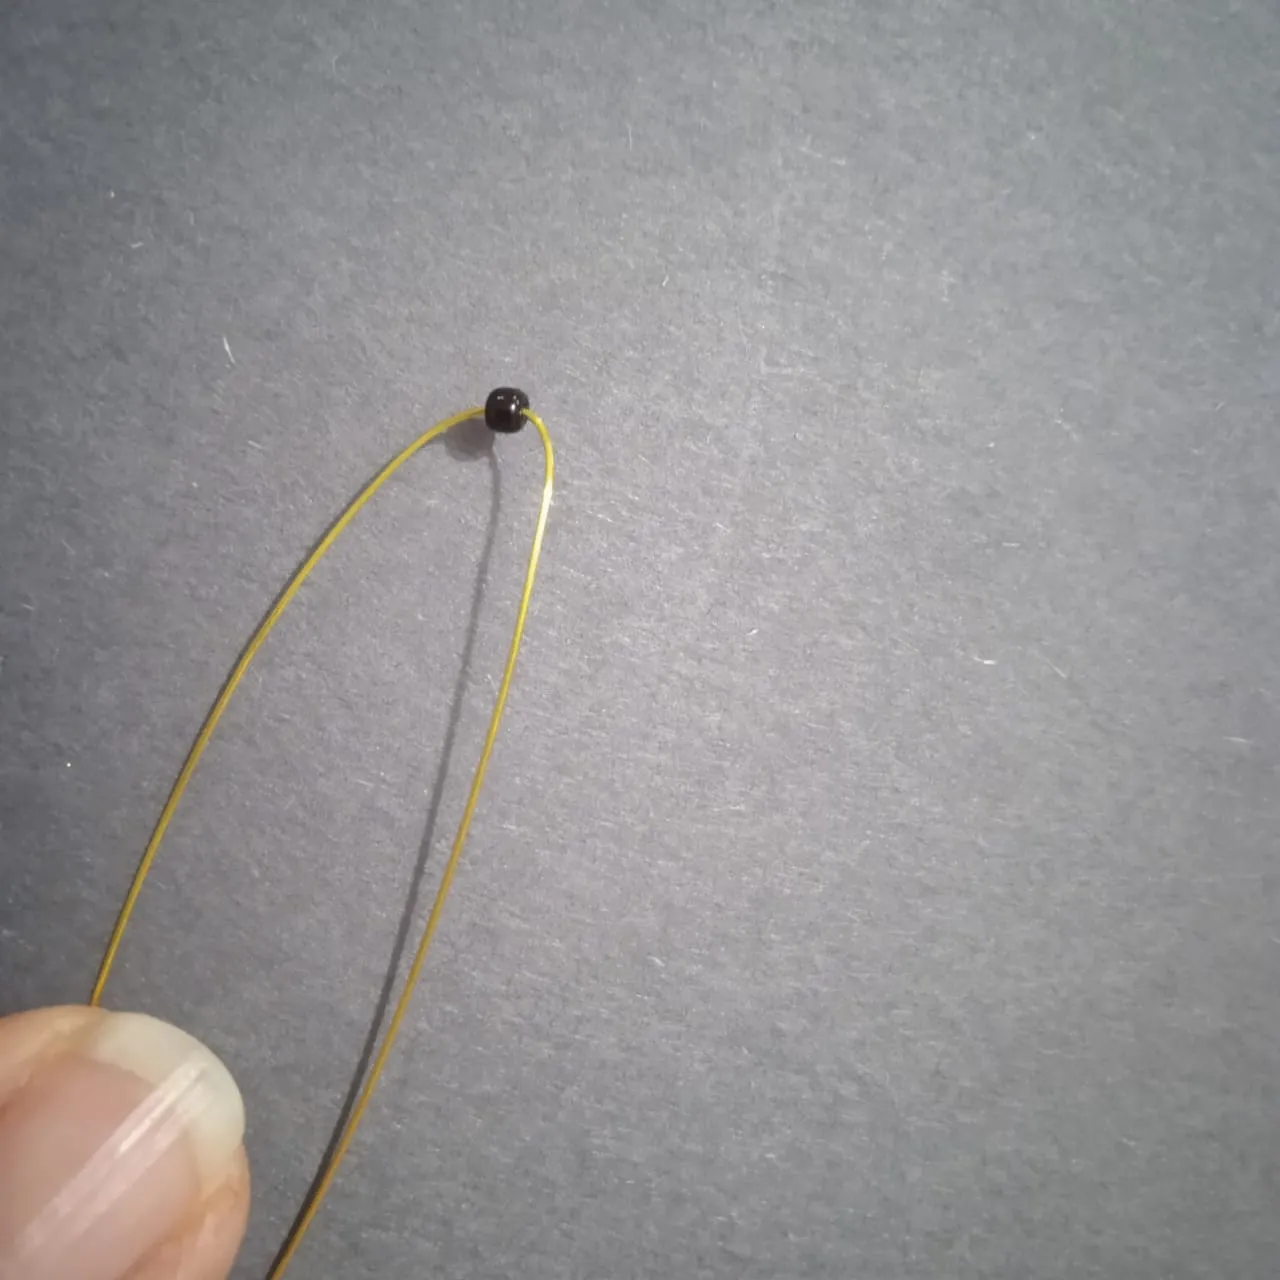
- After cutting the bijouterie wire we are going to use, insert 1 black bead, bring it to the middle, then twist it to form the first antenna.
- Después de cortar el alambre de bisutería que vamos a utilizar, introducir 1 mostacilla de color negro, llevarla hasta la mitad, luego entorchar, para formar la primera antenita.
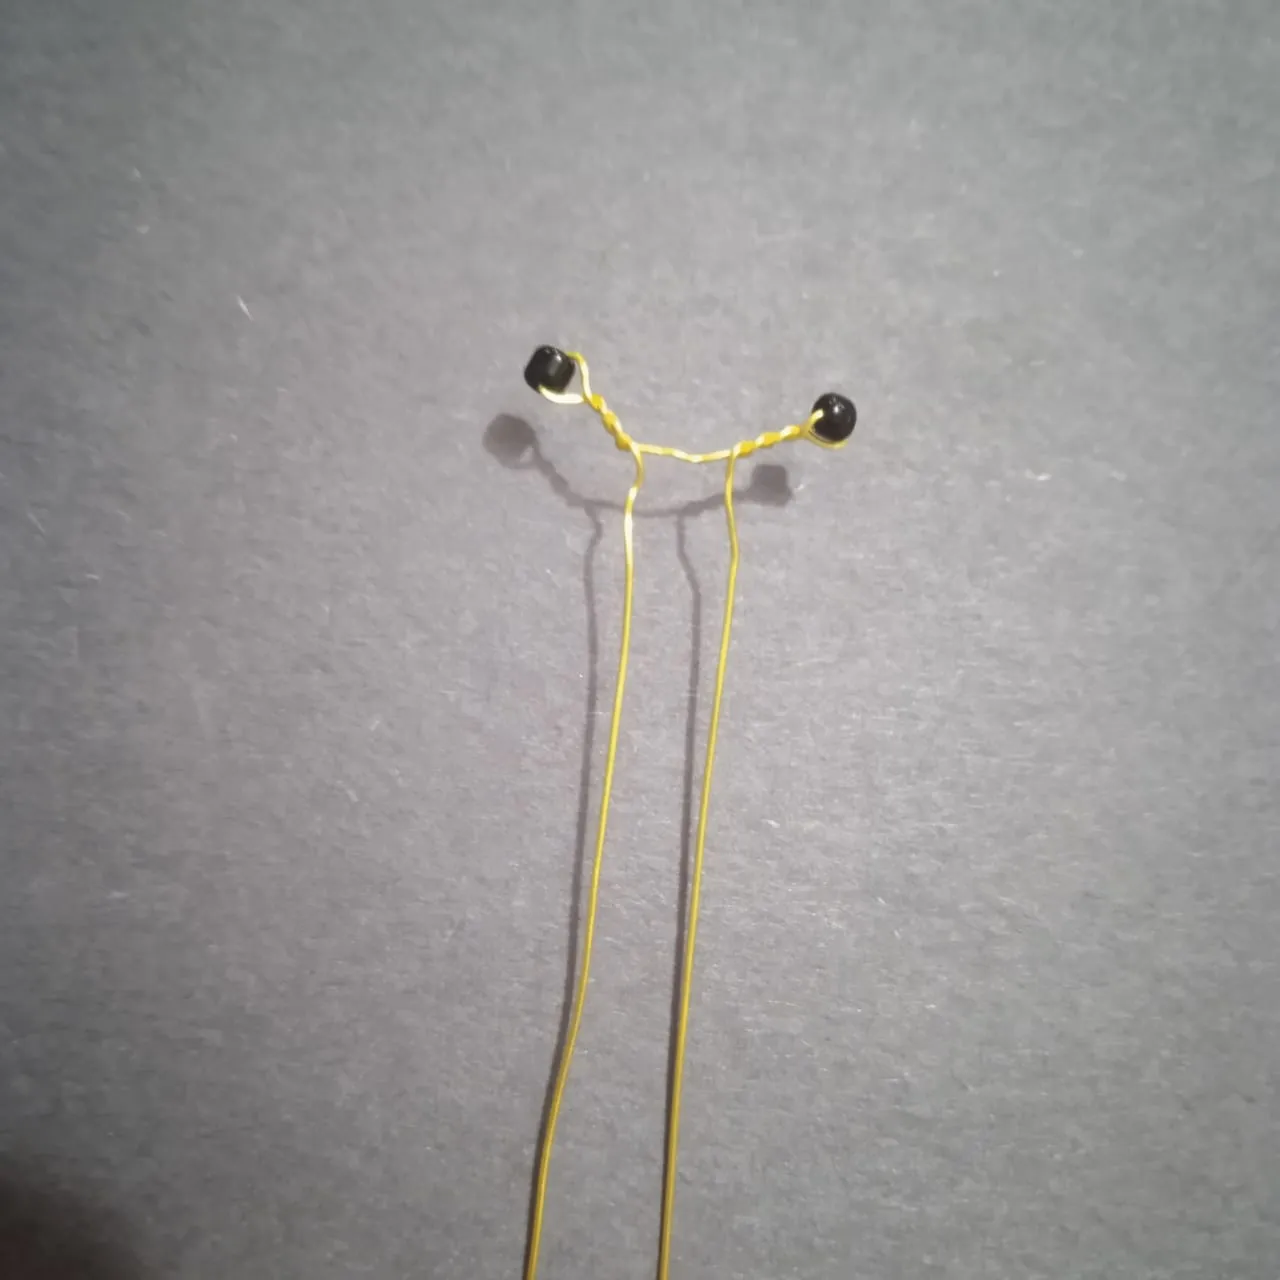
- Then with the wire on the right insert 1 black bead and twist to form the second antenna.
- Luego con el alambre de la derecha introducir 1 mostacilla negra y entorchar para formar la segunda antenita.
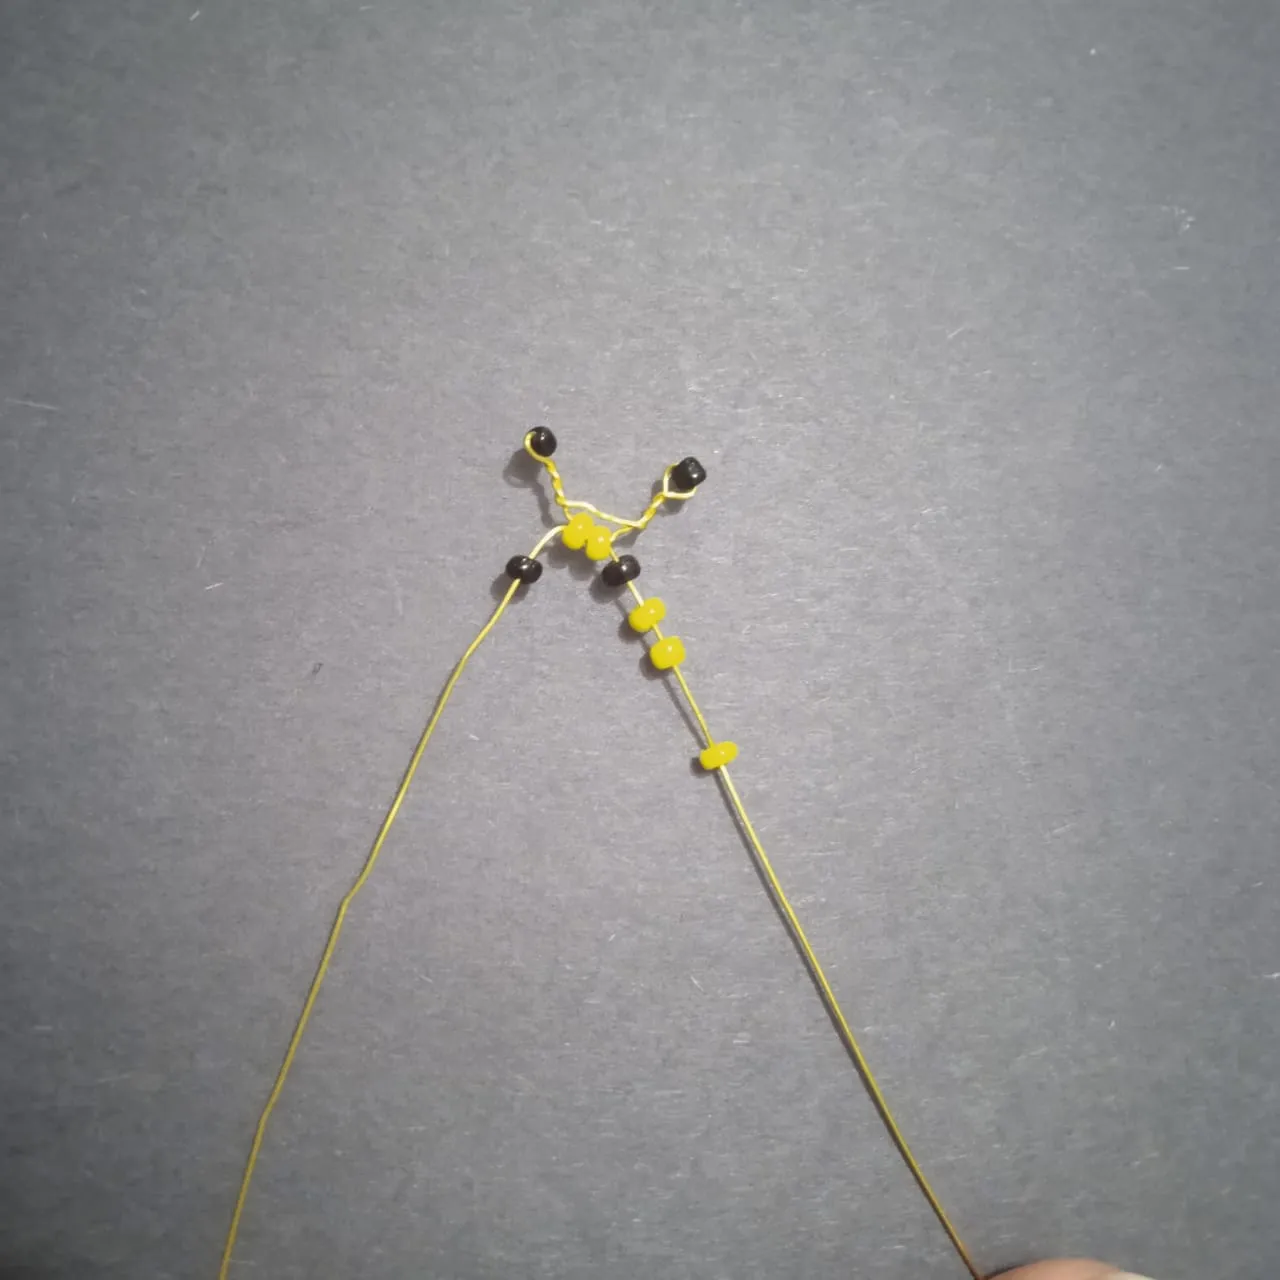
- Insert 2 yellow beads through the wire on the right side and cross them with the wire on the left side, from the back to the front, then pull both wires at the same time and bring them to the beginning of the bee's head.
- Introducir por el alambre del lado derecho 2 mostacillas de color amarillo y atravesar con el alambre del lado izquierdo, desde atrás hacia delante, luego tirar al mismo tiempo los dos alambres y llevar hasta el inicio de la cabeza de la abeja.
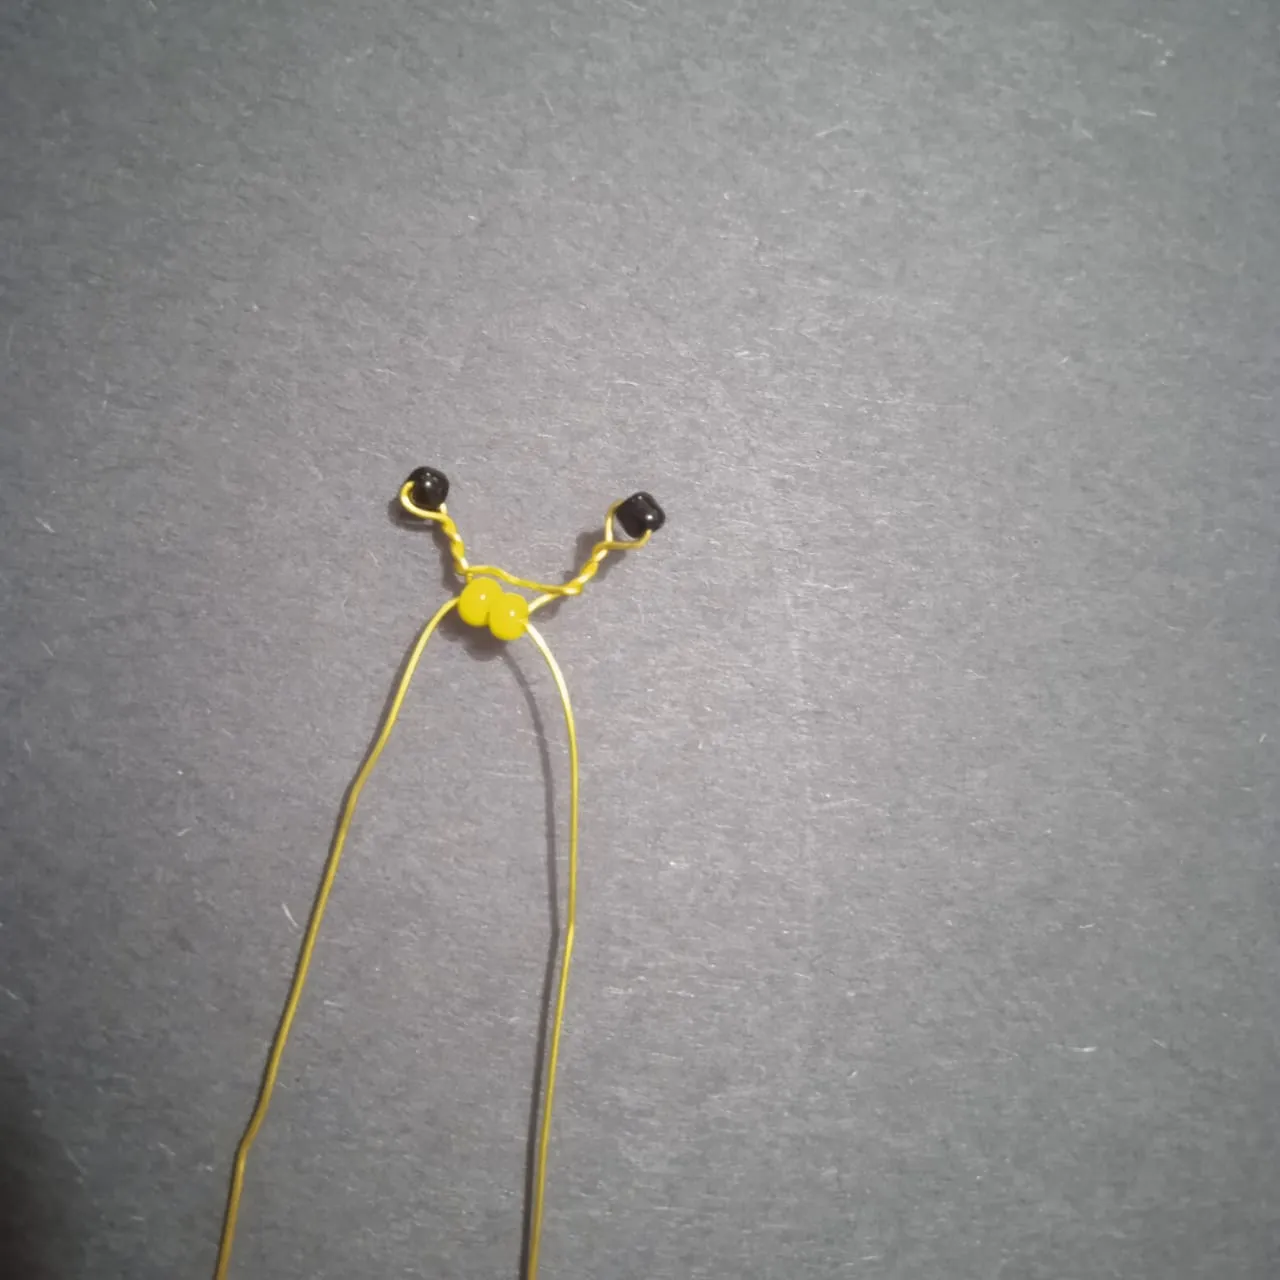
- Continue with 1 black and 3 yellow beads through the wire on the right and 1 black bead through the wire on the left, this must go through the beads on the right side from back to front to finish forming the head of the bee.
- Seguir con 1 mostacilla de color negro y 3 de color amarillo por el alambre de la derecha y 1 mostacilla de color negro por el alambre de la izquierda, éste debe atravesar las mostacillas del lado derecho desde atrás hacia delante para terminar de formar la cabeza de la abeja.
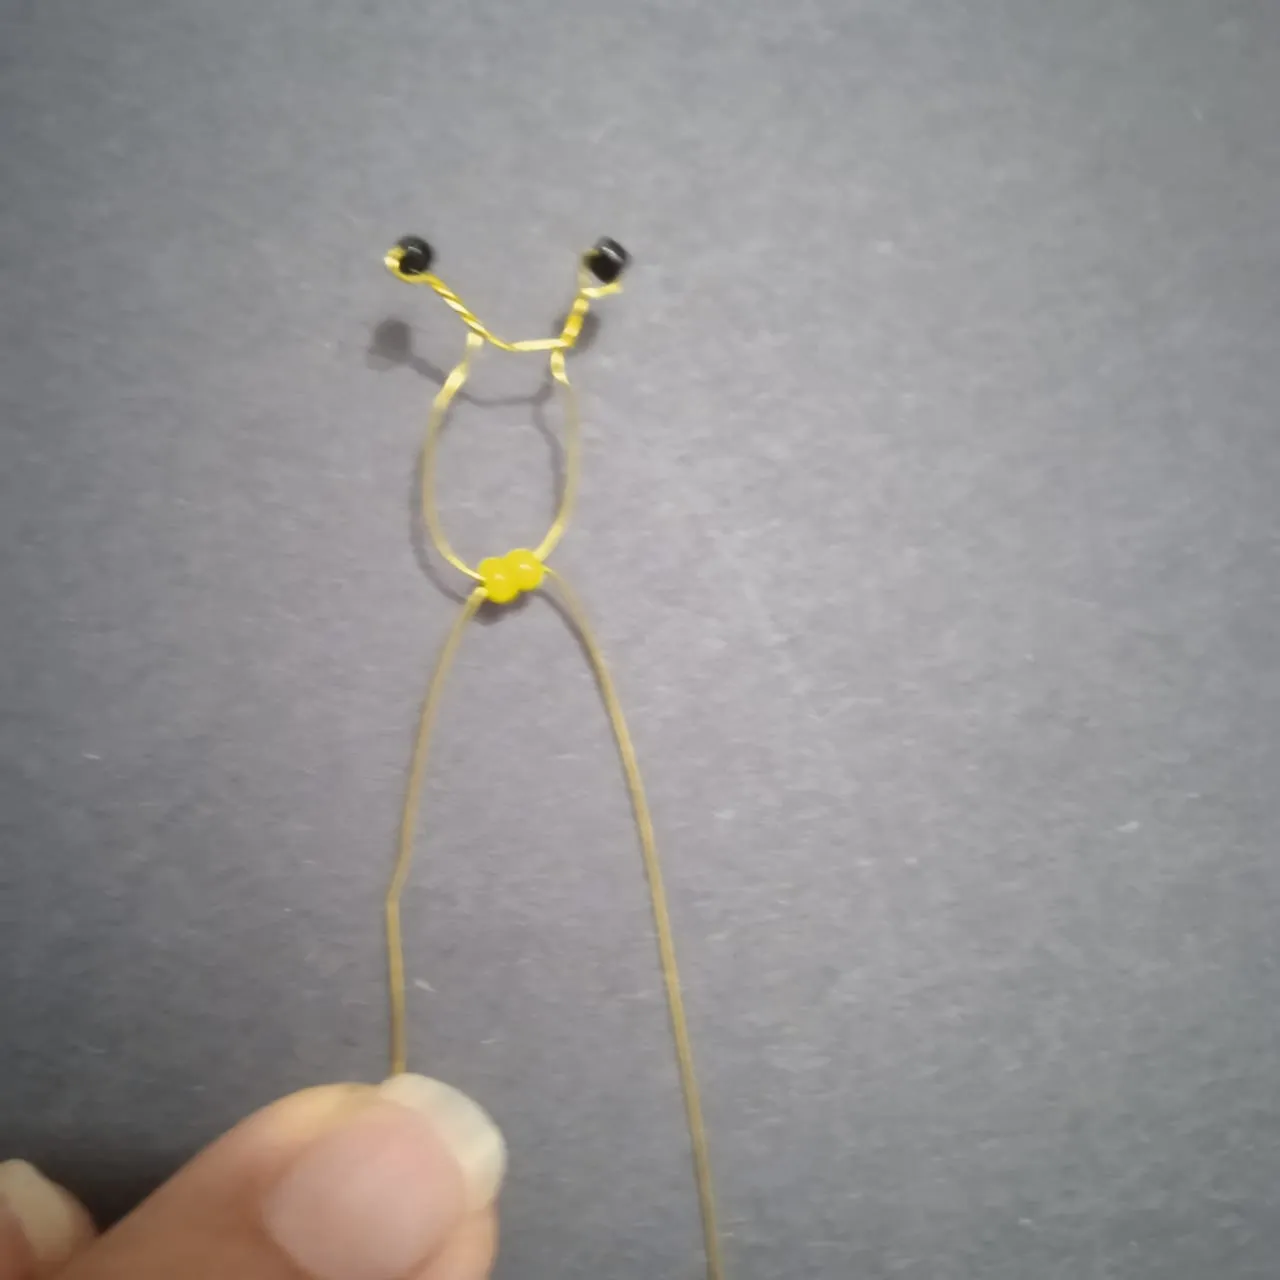
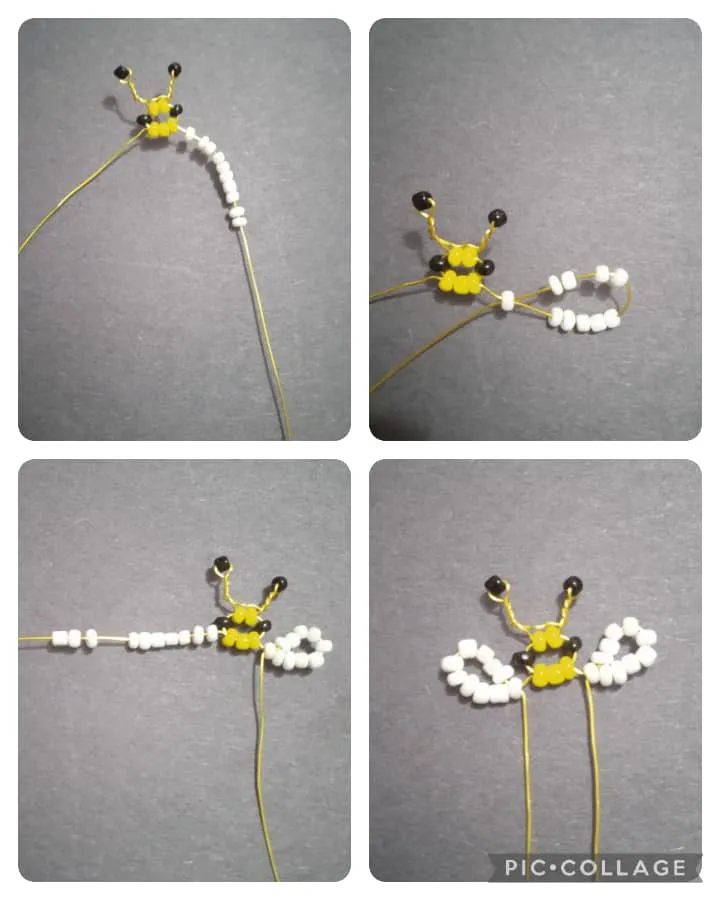
- Insert 10 white beads through the wire on the right, then insert the wire through the first bead, gently pull the wire to form the first wing. Continue inserting 10 white beads through the wire on the left, repeat the same procedure to form the second wing.
- Introducir por el alambre de la derecha 10 mostacillas de color blanco, luego introducir el alambre por la primera mostacilla, tirar con suavidad el alambre para formar la primera alita. Seguir introduciendo 10 mostacillas blancas por el alambre de la izquierda, repetir el mismo procedimiento, para formar la segunda alita.
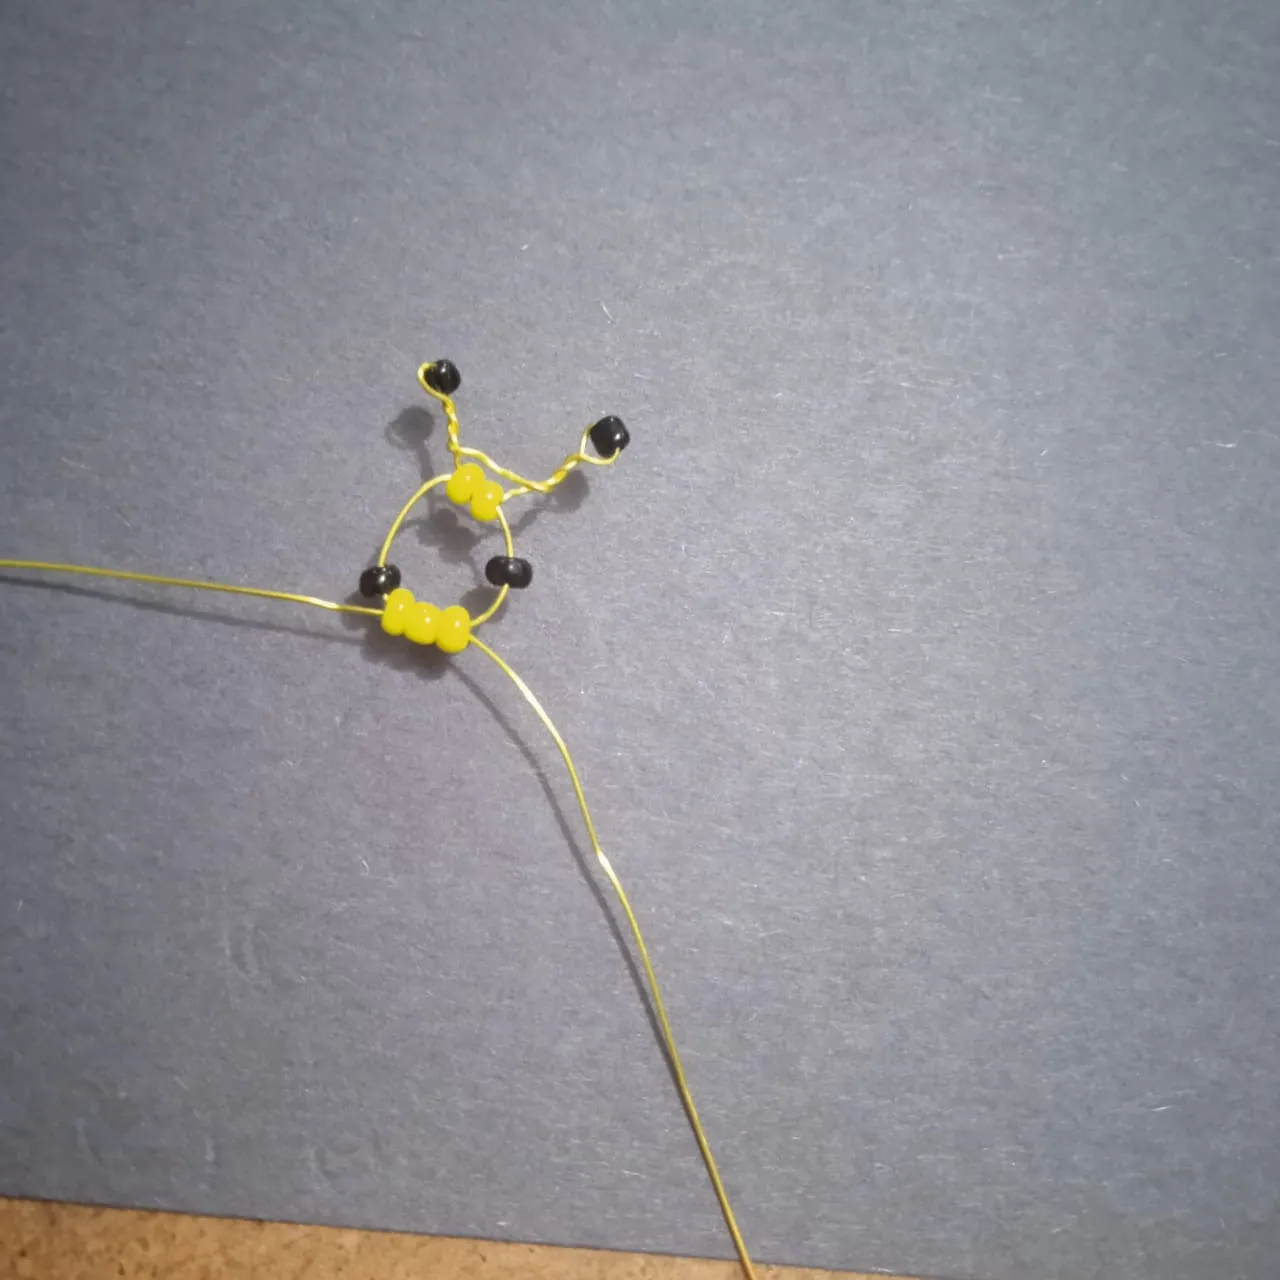
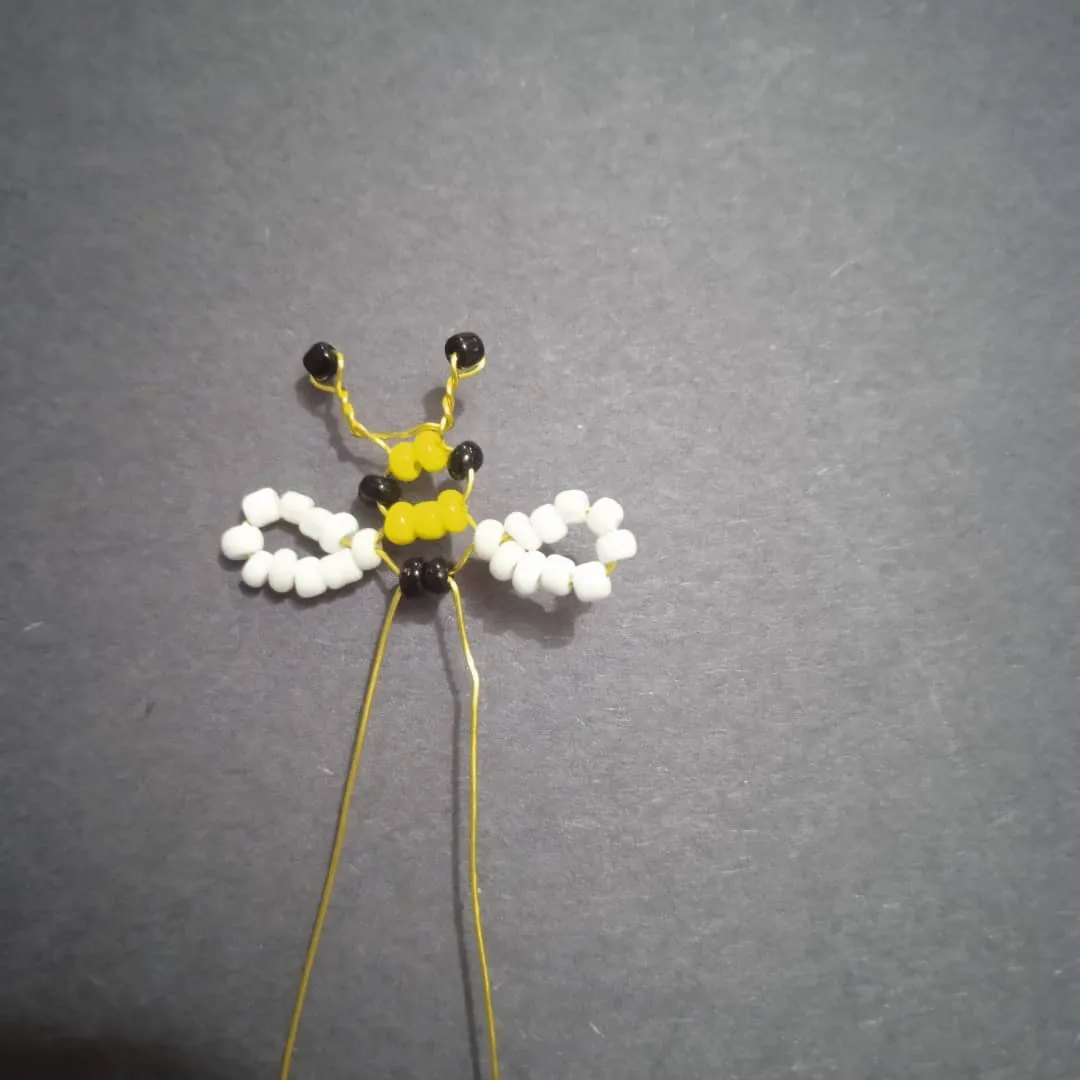
- Continue inserting 2 black beads through the wire on the right and cross them with the wire on the left, thus starting the body of the bee.
- Continuar introduciendo 2 mostacillas de color negro por el alambre de la derecha y atravesar con el alambre de la izquierda, así se da inicio del cuerpo de la abeja.
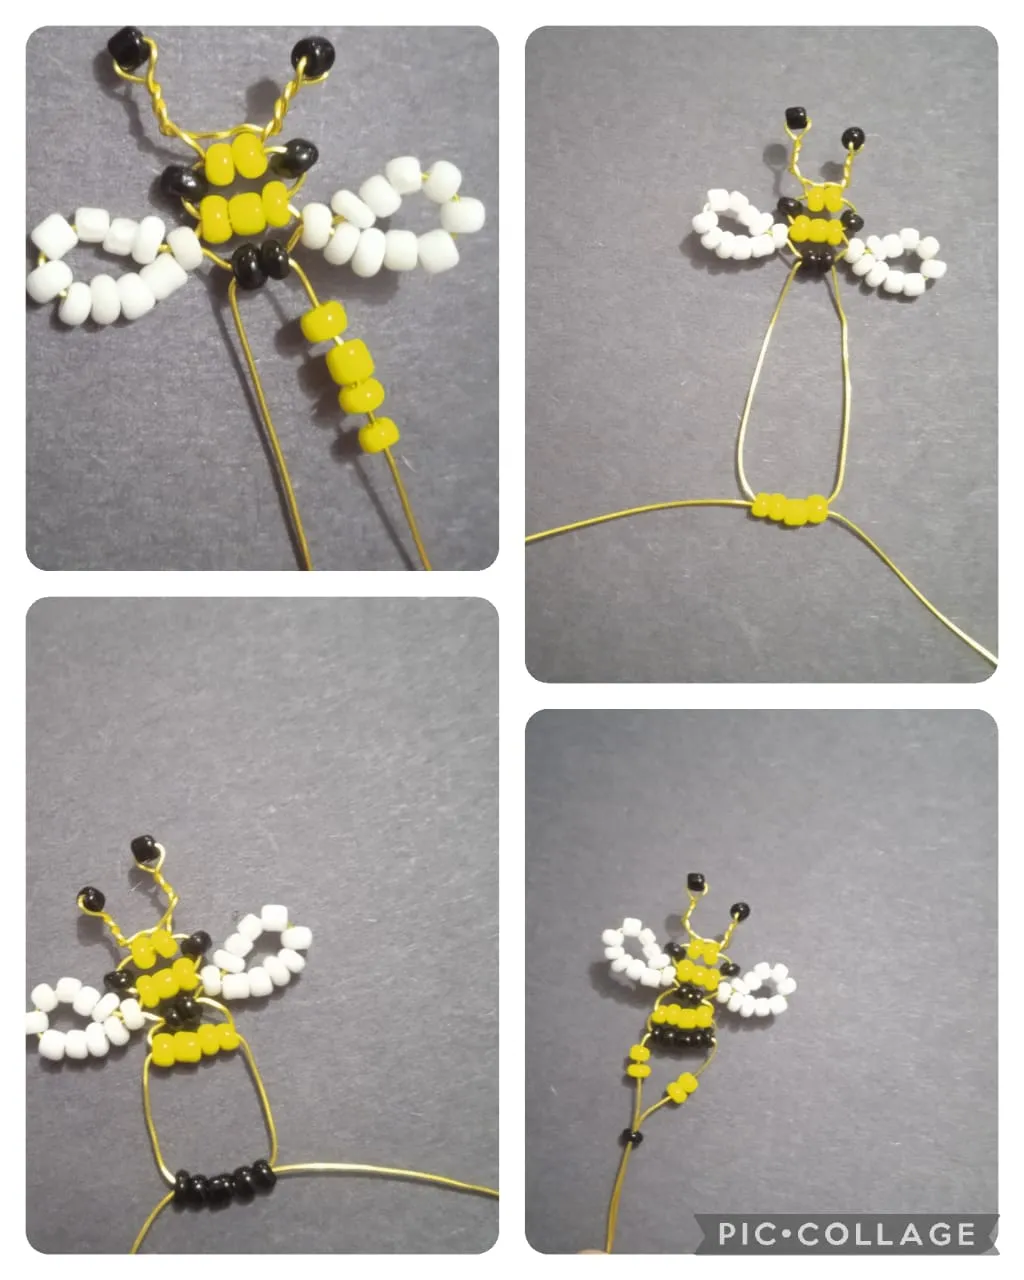
- Continue introducing through the wire on the right side 4 yellow beads and cross from the back to the front with the wire on the left side, pulling at the same time the wires until you reach the corresponding place. Now repeat the same procedure but now with 5 black beads. Separate again the wires in right and left and introduce 2 yellow beads on each side, join the wires to introduce 1 black bead, as shown in the picture.
- Continuar introduciendo por el alambre del lado derecho 4 mostacillas de color amarillo y atravesar desde atrás hacia delante con el alambre de la izquierda, tirar al mismo tiempo de los alambres hasta llevar al sitio correspondiente. Ahora repetir el mismo procedimiento pero ahora con 5 mostacillas de color negro. Separar nuevamente los alambre en derecho e izquierdo e introducir 2 mostacillas amarillas en cada lado, juntar los alambres para introducir 1 mostacilla de color negro, como está en la fotografía.
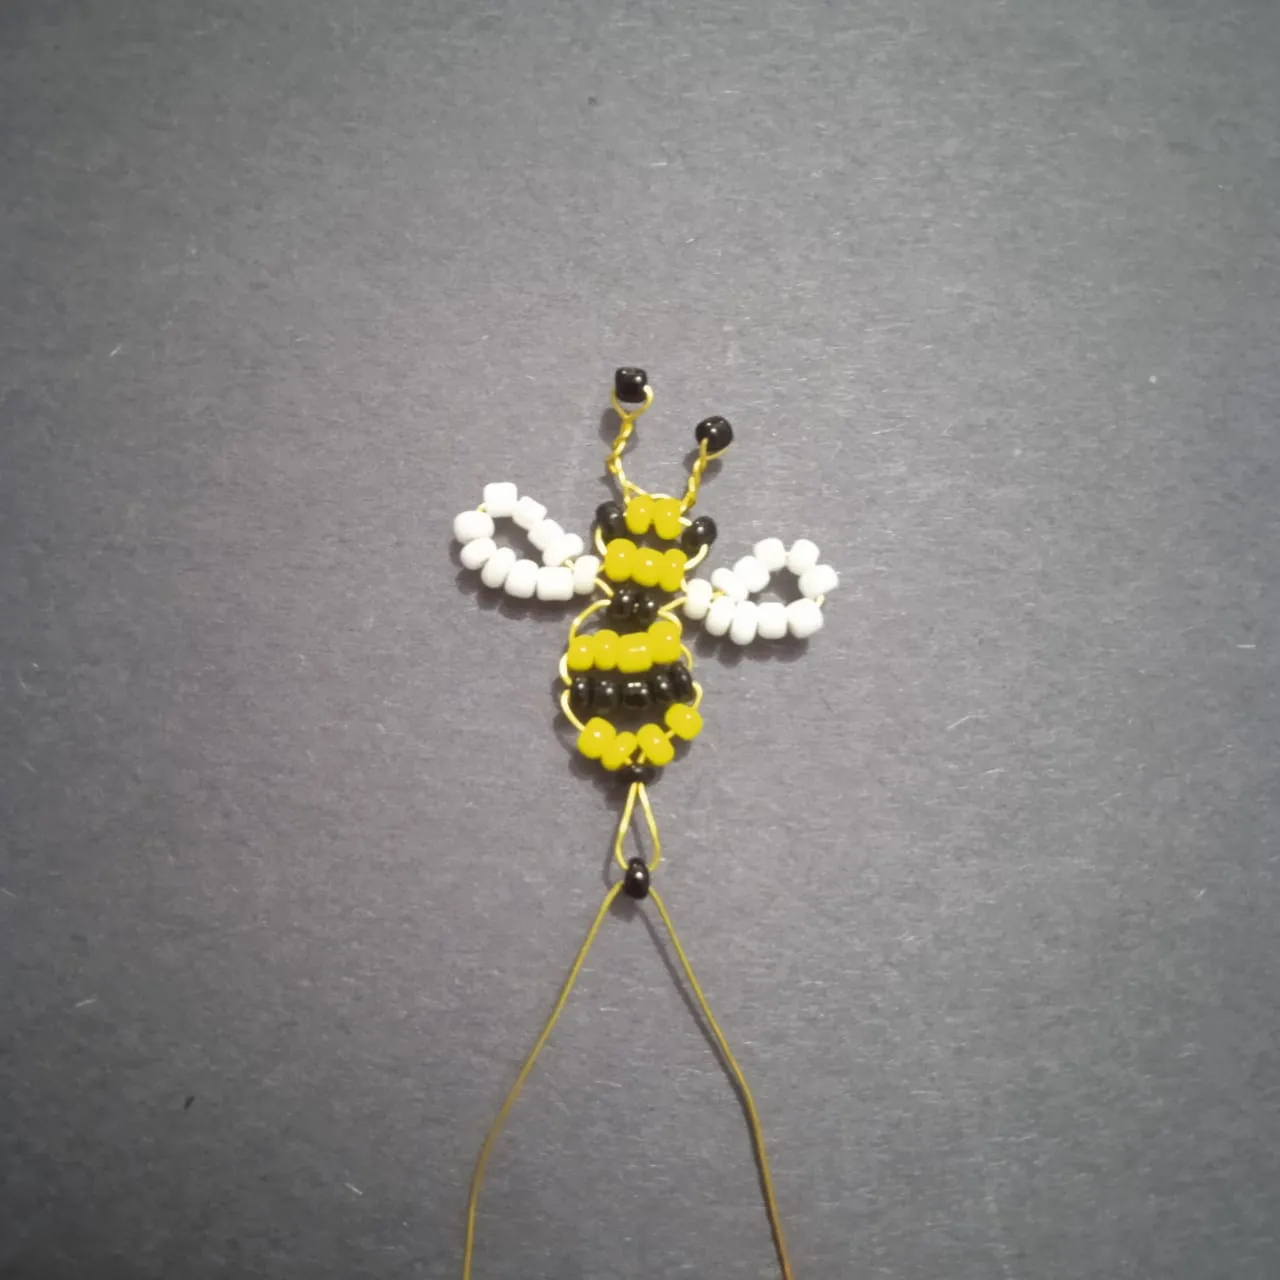
- Again separate the wires, introduce through the wire on the right 1 black bead and cross it with the wire on the left and bring it to the top, thus finishing the body of the bee.
- De nuevo separar los alambres, introducir por el alambre de la derecha 1 mostacilla de color negro y atravesar con el alambre de la izquierda y llevar hasta arriba, así finaliza el cuerpo de la abeja.
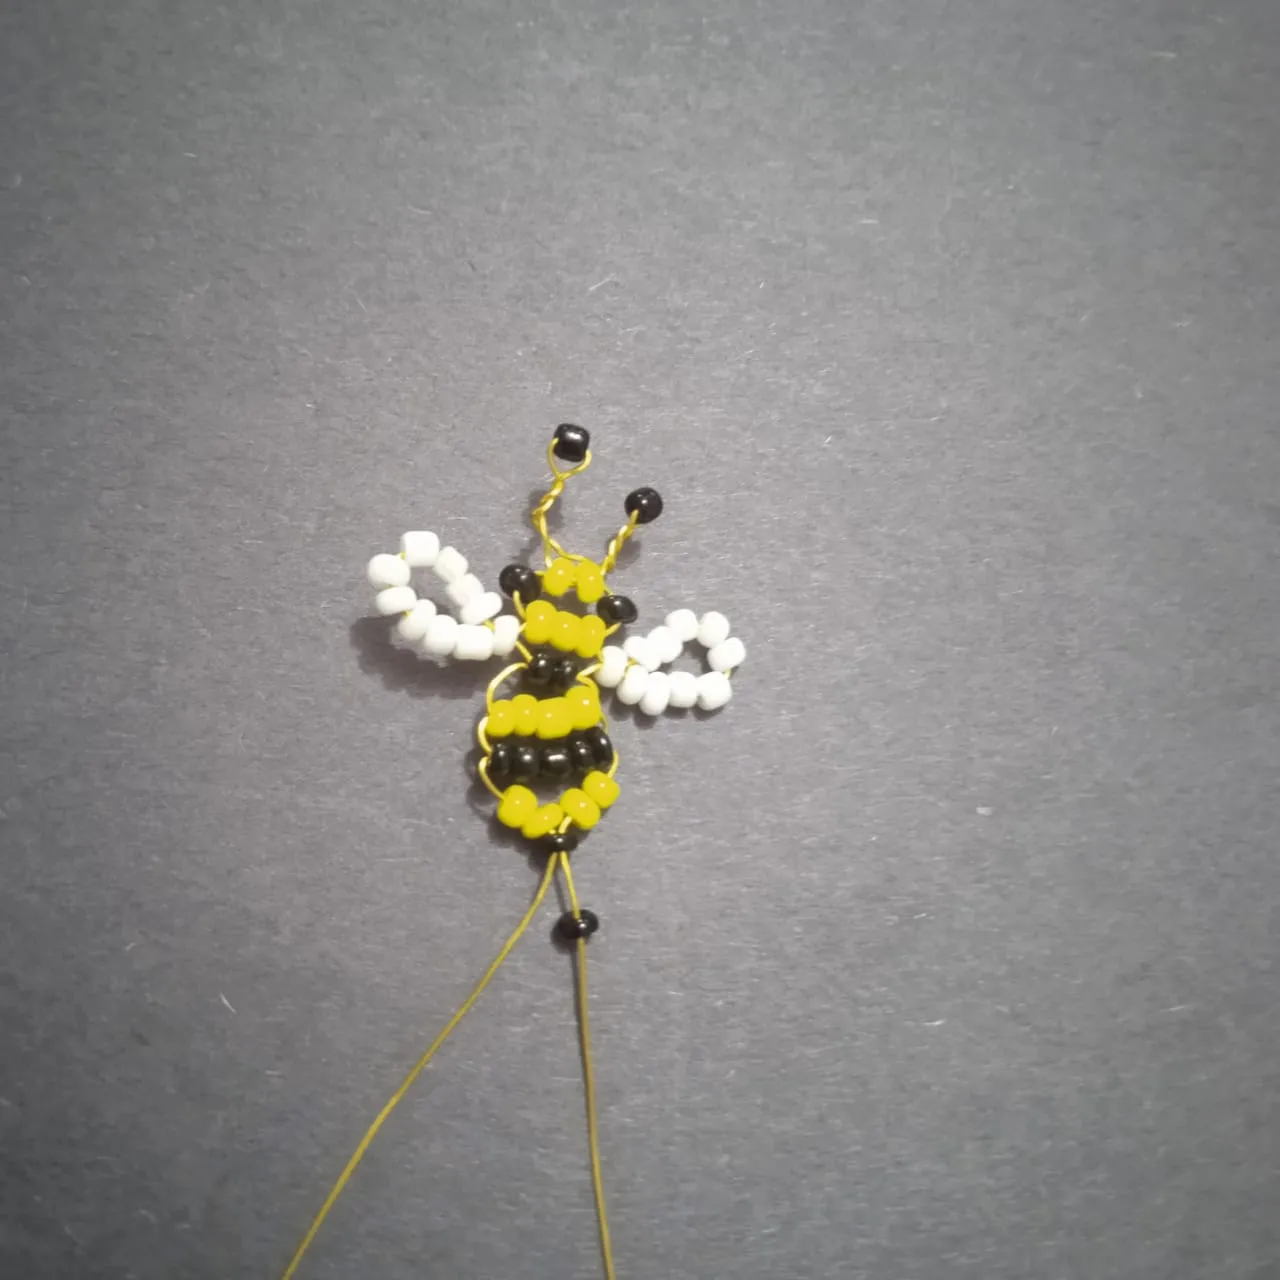
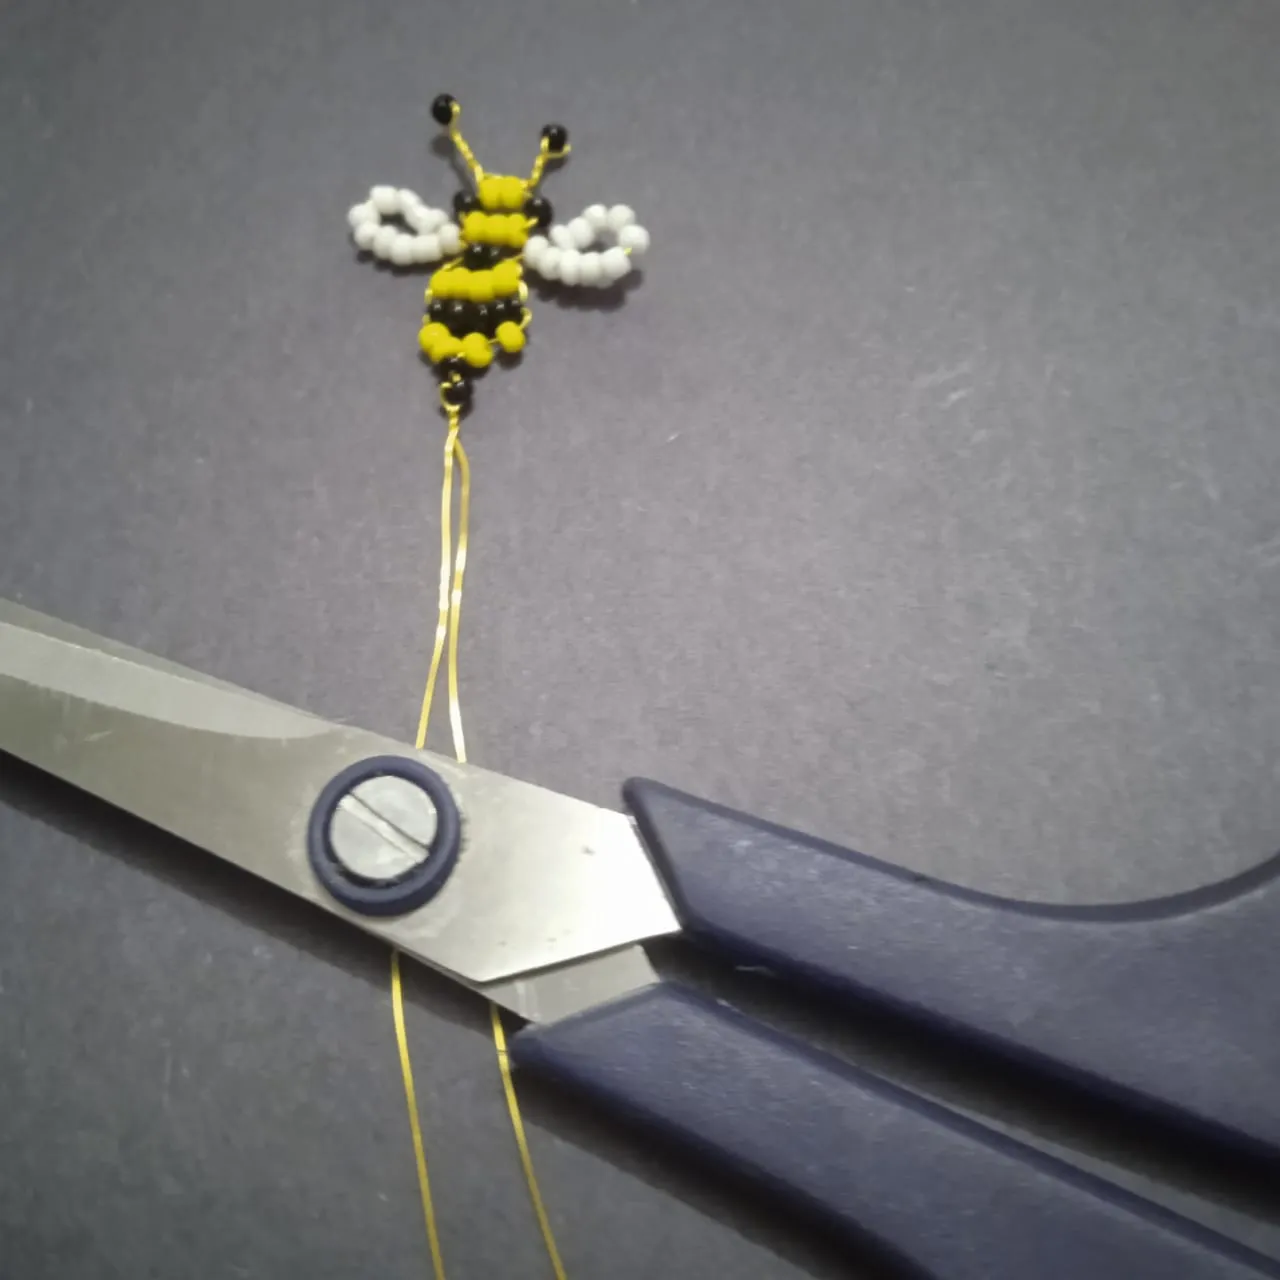
- The final wires are stranded and the excess material is cut off.
- Se entorchan los alambres finales y se corta el material sobrante.
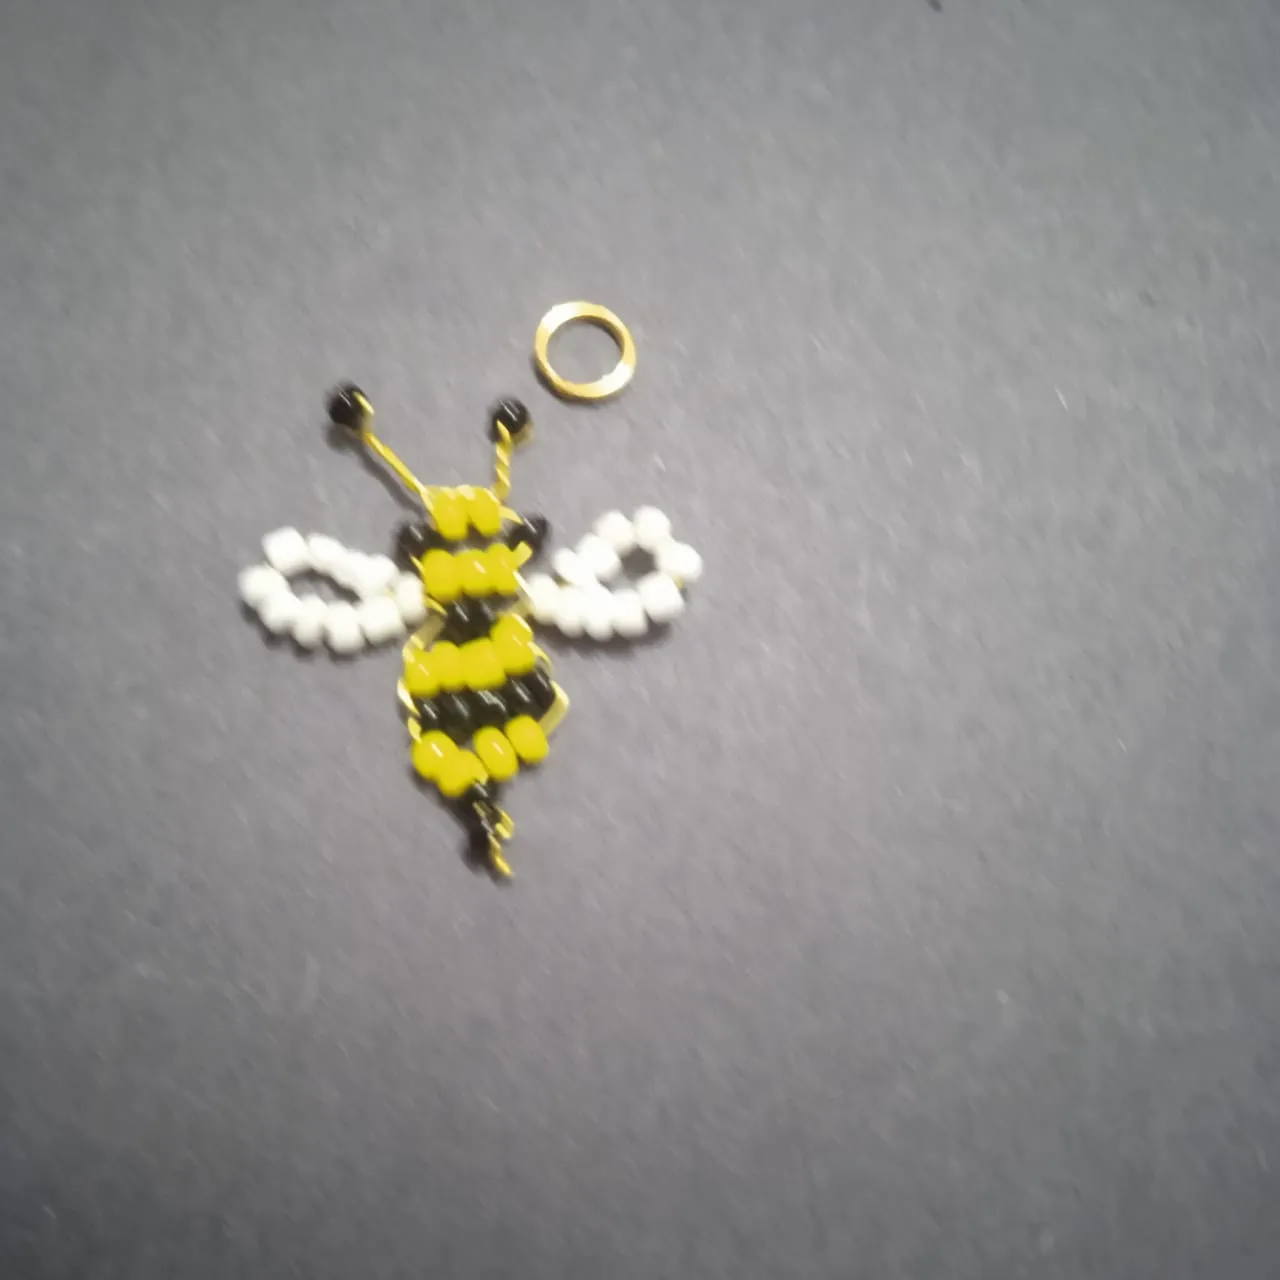
- Place the jewelry ring.
- Colocar el aro de bisutería.
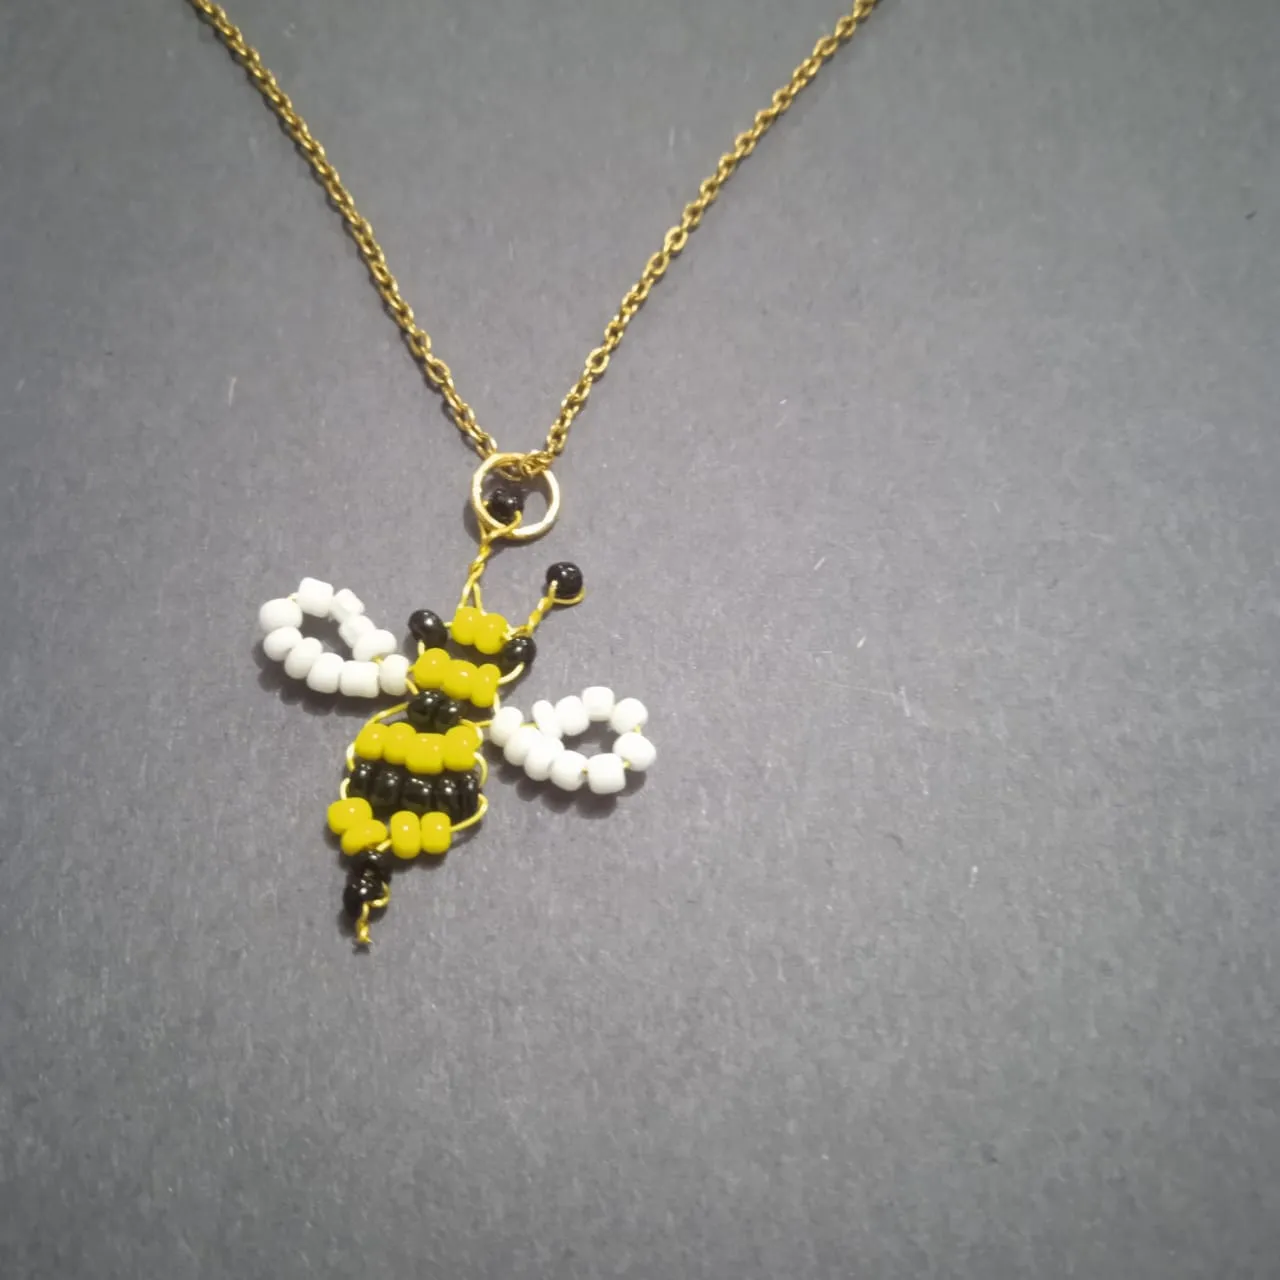
✨FINAL RESULT/ RESULTADO FINAL✨
- If you got to the final result of the project of a bee pendant 🐝made with beads and bijouterie wire, you can see that the project is easy to achieve. I say goodbye 🖐️ thanking you for your visit and comments.
- Si llegaron hasta el resultado final del proyecto de un dije en forma de abejita 🐝hecho con mostacillas y alambre de bisutería, se pueden dar cuenta que el proyecto es fácil de lograrlo. Me despido 🖐️ agradeciéndoles su visita y comentarios.