Hola, hola. ¿Cómo están hoy? Espero que bien 🥂 todos los días son buenos para comenzar de nuevo e iniciar mejores planes de vida 🙏 así que vamos a levantar el ánimo y a poner en marcha todos nuestros proyectos 🤞
El día de hoy quiero compartirles un diseño de zarcillos con el que he podido aprovechar algunas cuentas disponibles en mi caja de abalorios. Ya les había dicho que esta caja trajo muchas pelotitas de variadas formas, materiales y colores, sin embargo no hay la cantidad suficiente como para crear juegos completos muy elaborados. Lo mejor es que creando siempre encontramos solución e ideamos modelos para darles uso.

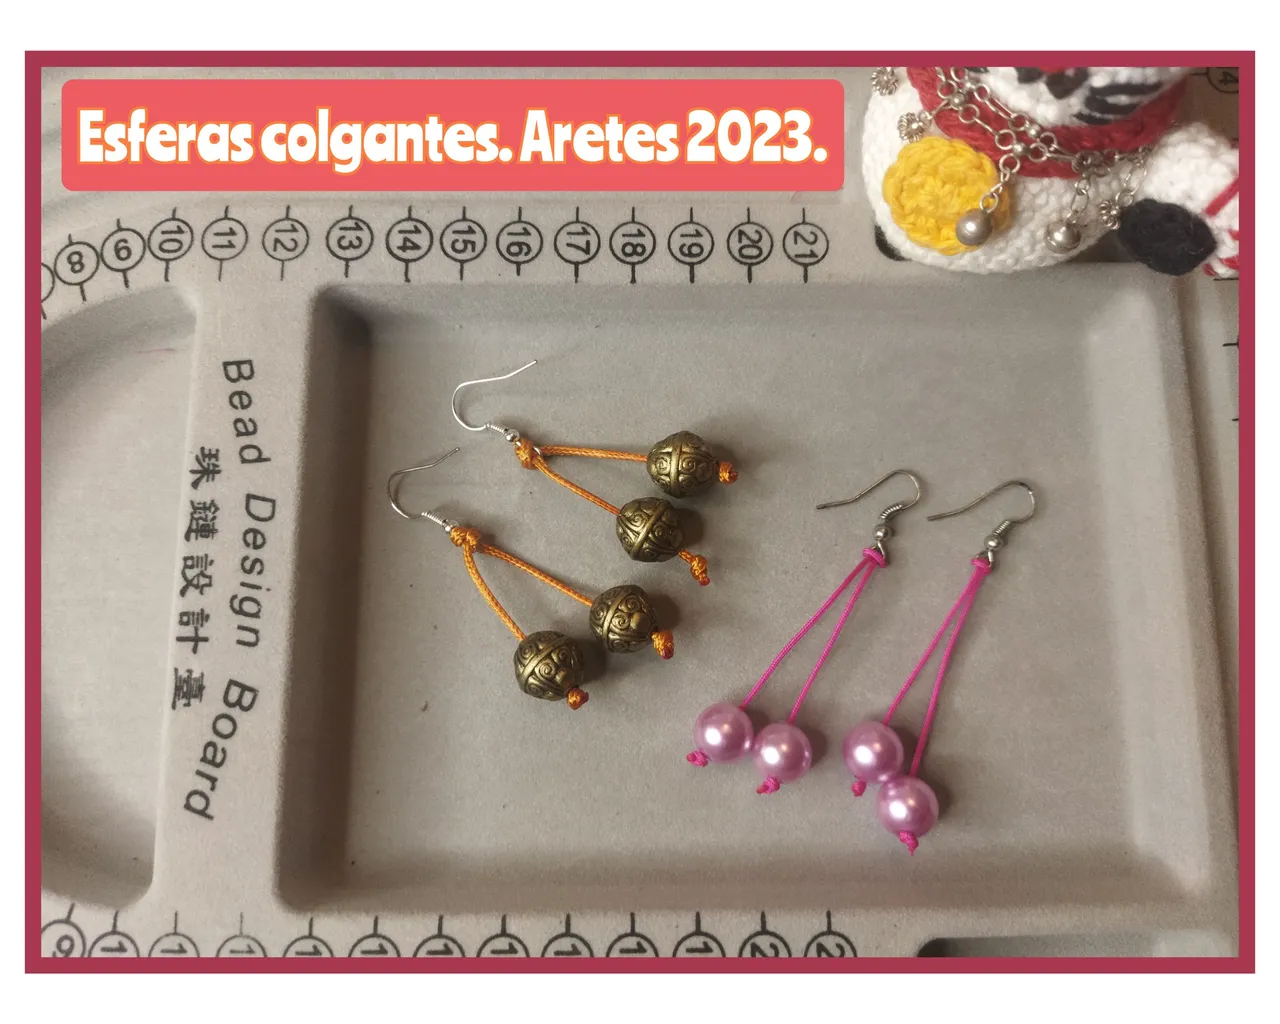
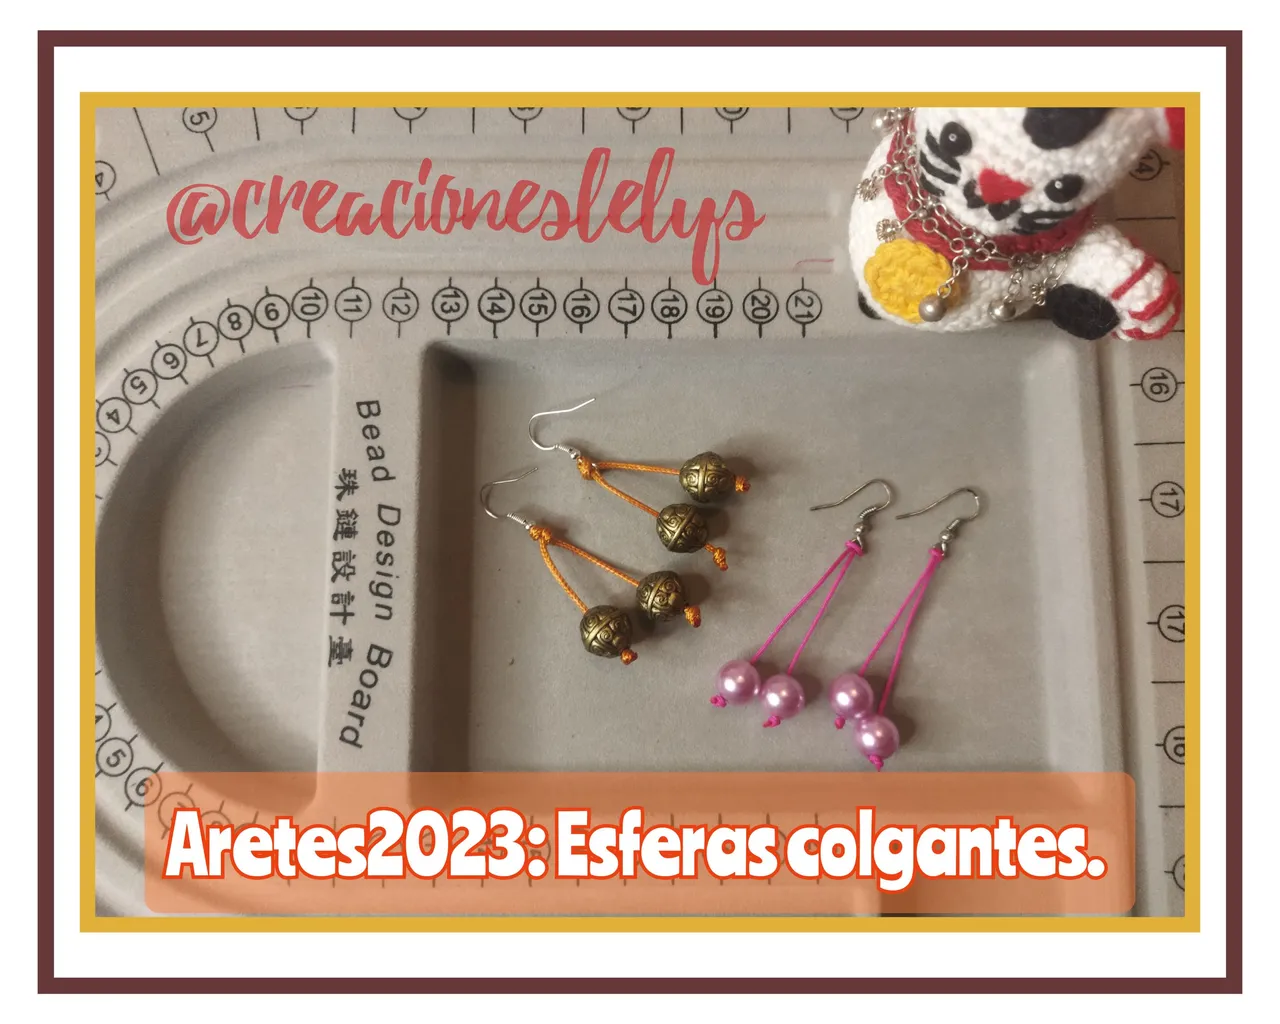
PAR DE BOLAS COLGANTES 🤍 UN NUEVO DISEÑO DE ARETES.
Tengo que confesarles que este proyecto me encantó porque se hacen súper fácil, todos podemos hacerlos en simples pasos, aprovechamos las bolas disponibles y lo mejor de todo es que podemos combinar al gusto o la necesidad 👋 Para hacer esta muestra usé los siguientes materiales.
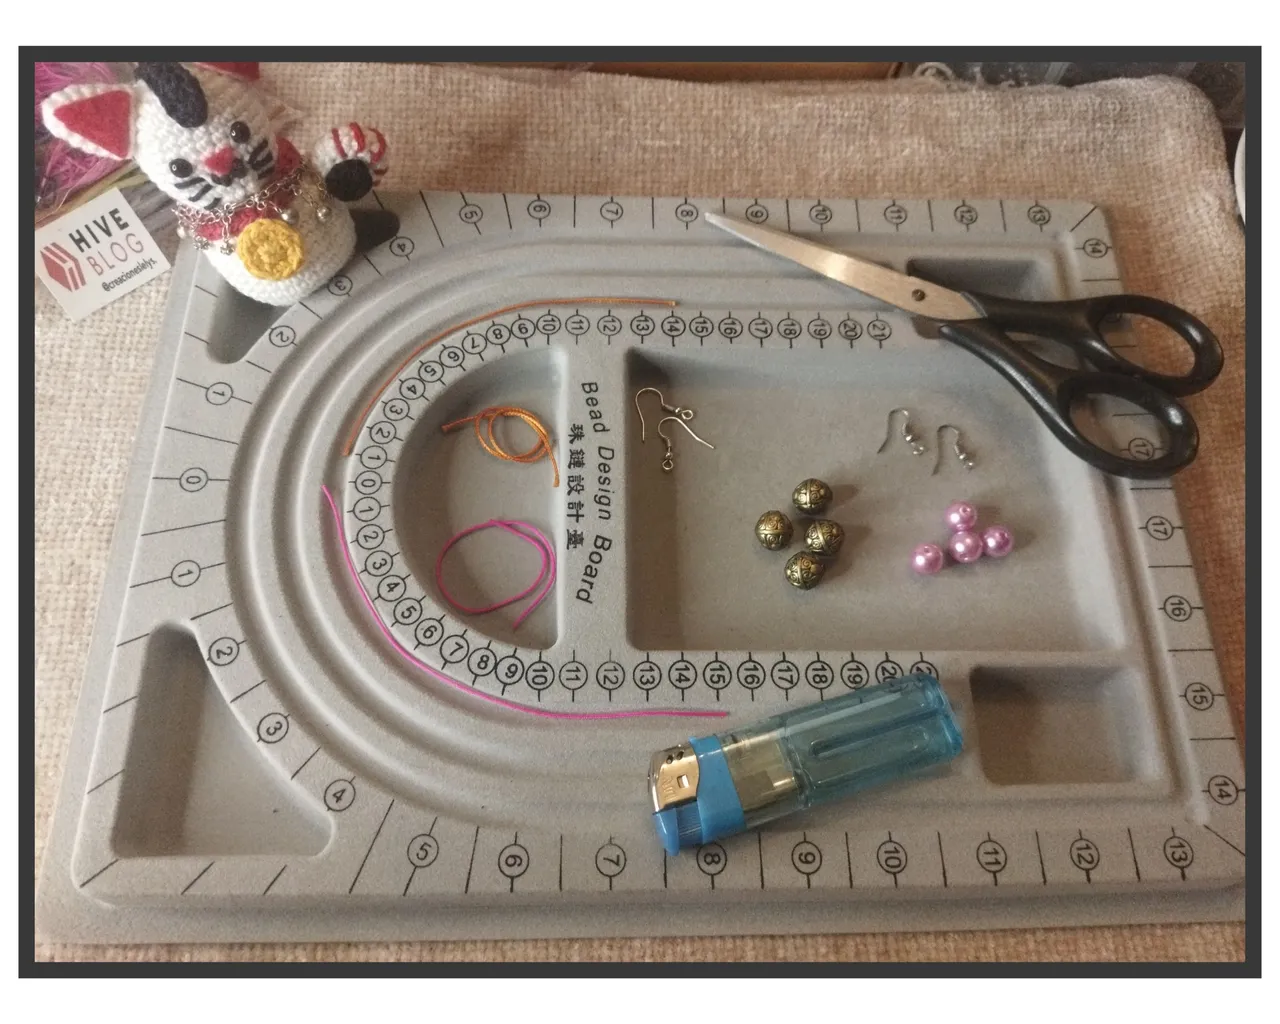
MATERIALES.
🔻 Abalorios, bolas, esferas o perlas que tengas disponibles. Deben tener orificios obviamente.
🔻 Hilo chino.
🔻 Tijeras.
🔻 Yesquero o encendedor.
🔻 Anzuelo o seguro pescador.
PROCEDIMIENTO.
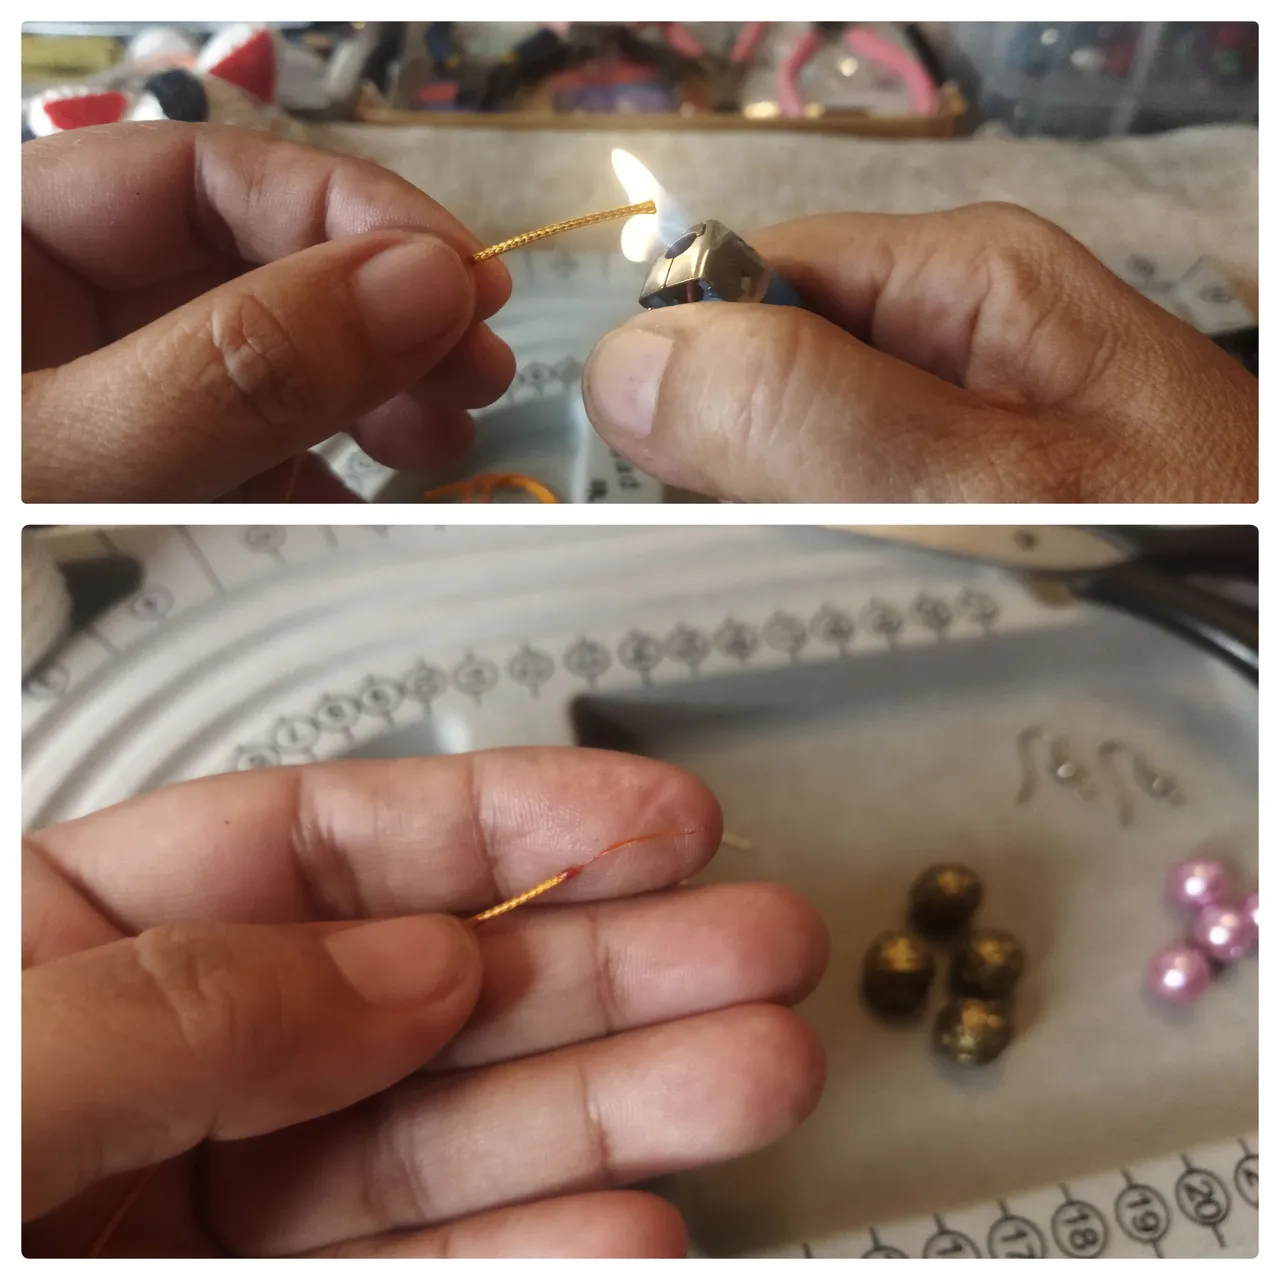
🔻 Lo primero que hacemos es afilar la punta del hilo chino para que pase fácilmente por el orificio de las bolas. Generalmente estas bolas tienen el orificio ancho, pero para mayor seguridad es mejor poner la punta más delgada. Esto se hace pasando la punta del hilo por la llama azul del yesquero, rapidito pasamos los dedos dando un giro o dos a esa punta calentada.
🔻 Decidimos el largo de nuestros aretes y procedemos a medir y cortar el hilo chino. Quedan muy lindos si combinamos los colores del hilo con las bolas elegidas. Al cortar el hilo hay que considerar que haremos nudos.
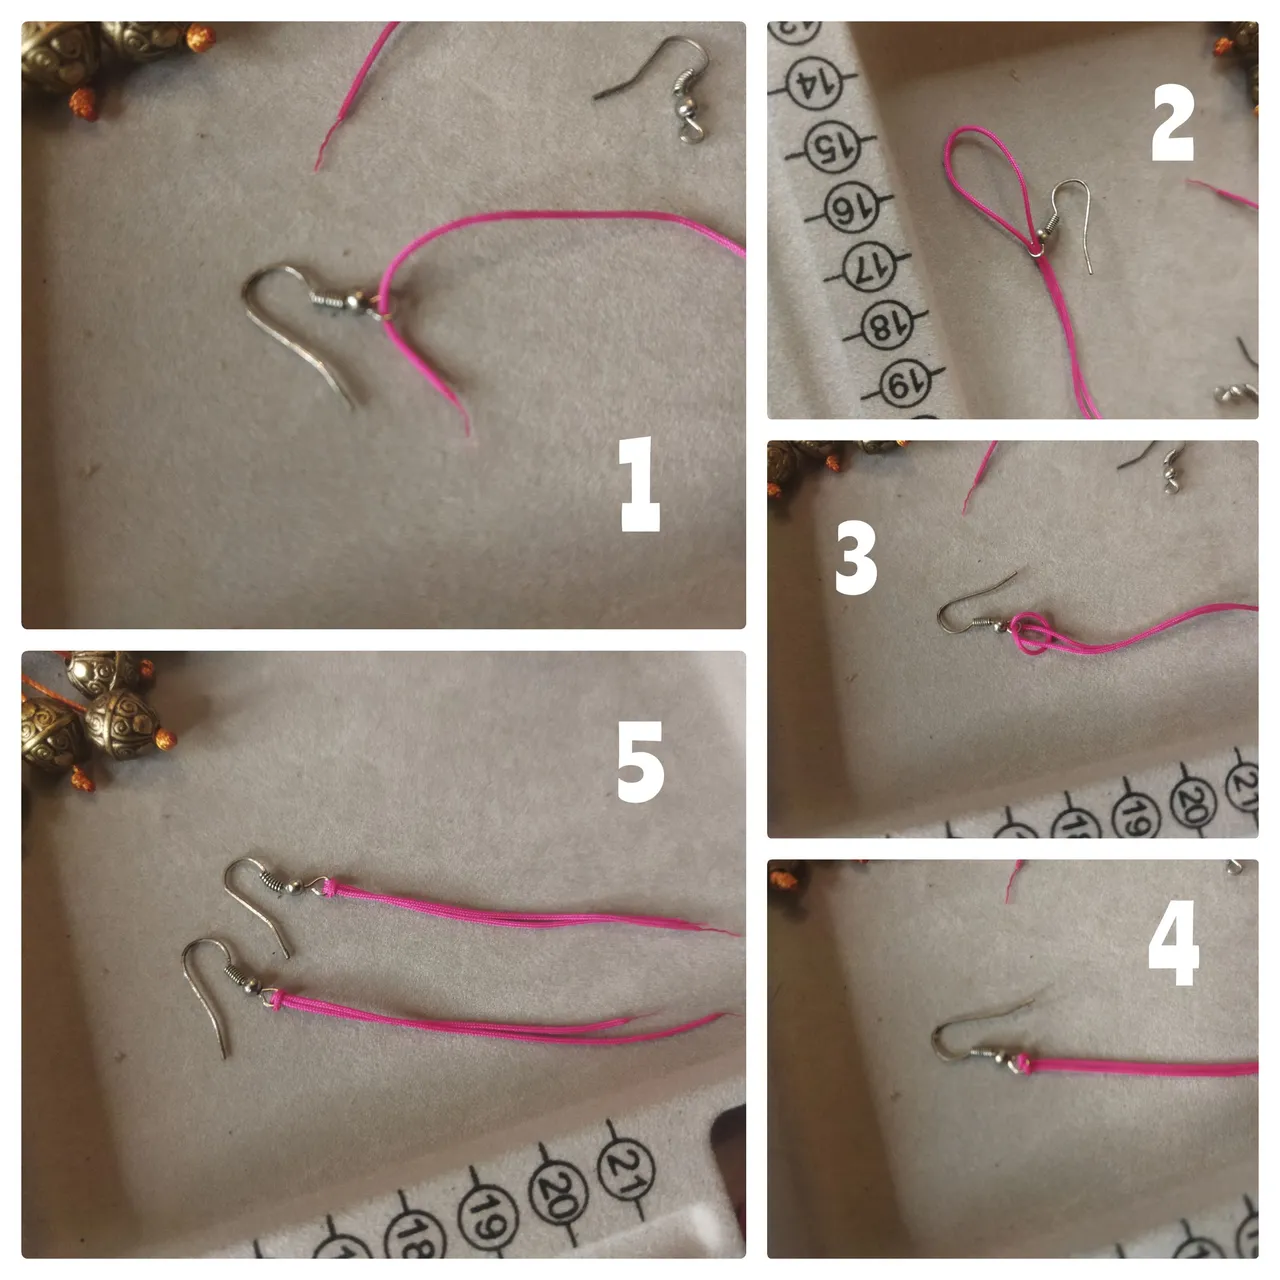
🔻 Este hilo que cortamos lo vamos a pasar por el aro del seguro pescador. Luego dejando una hebra más larga que la otra daremos dos vueltas por con la hebra larga por la hebra corta, después haremos un nudo para asegurar las hebras. Ver imagen.
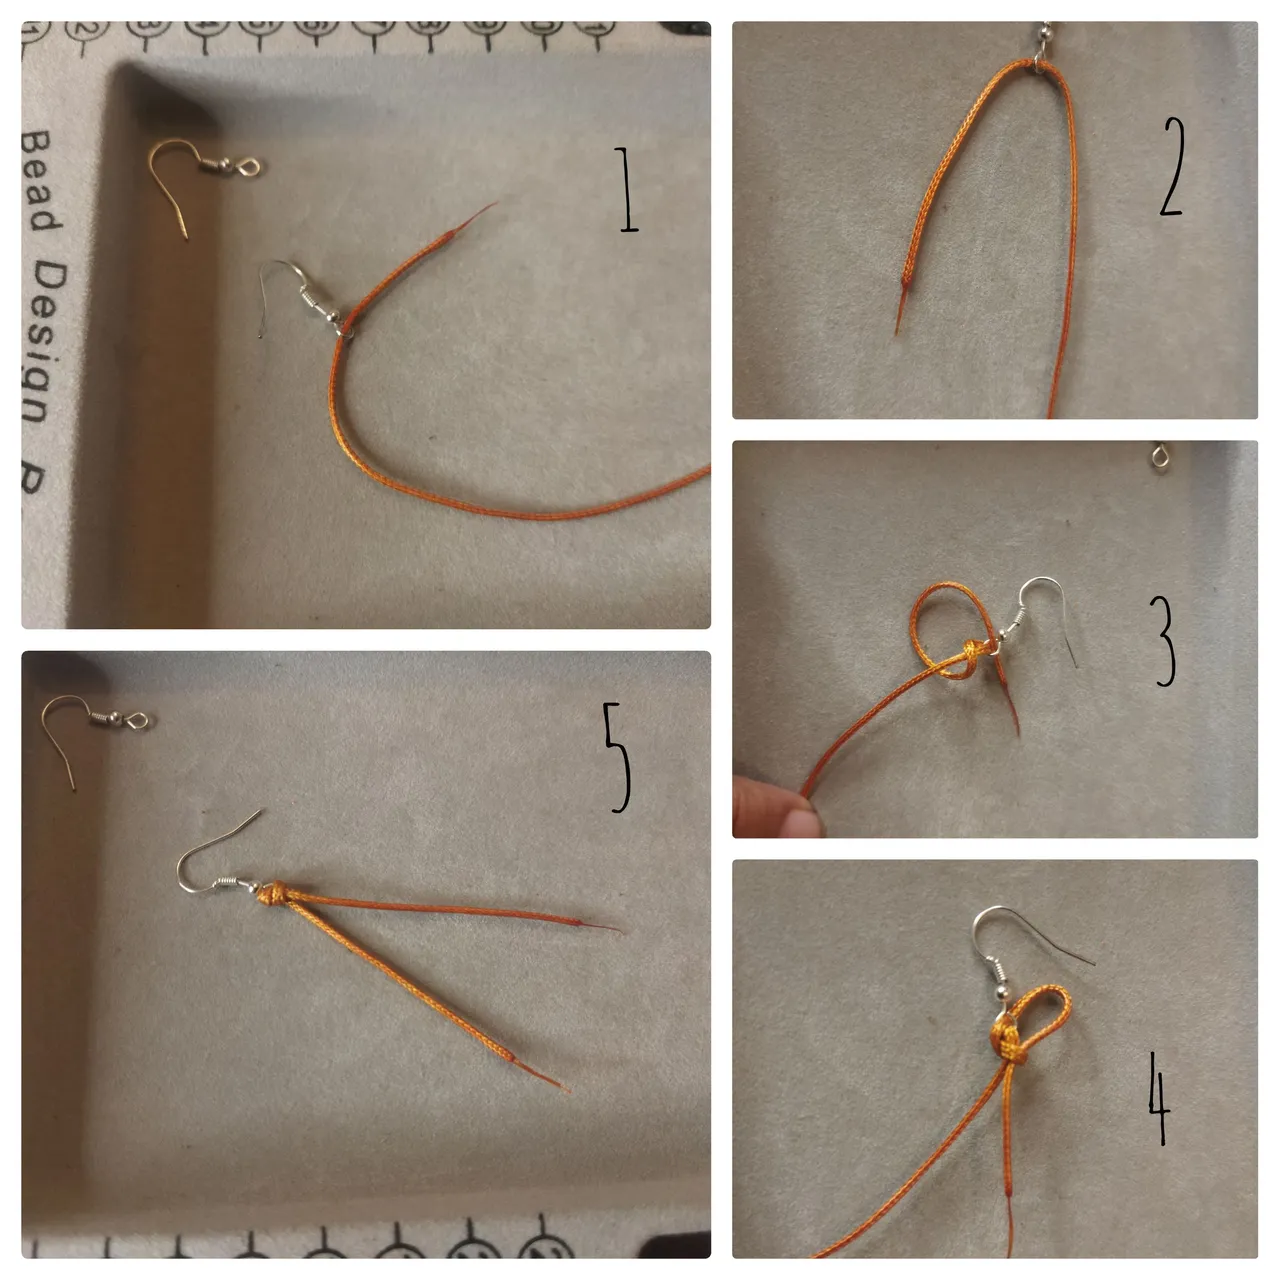
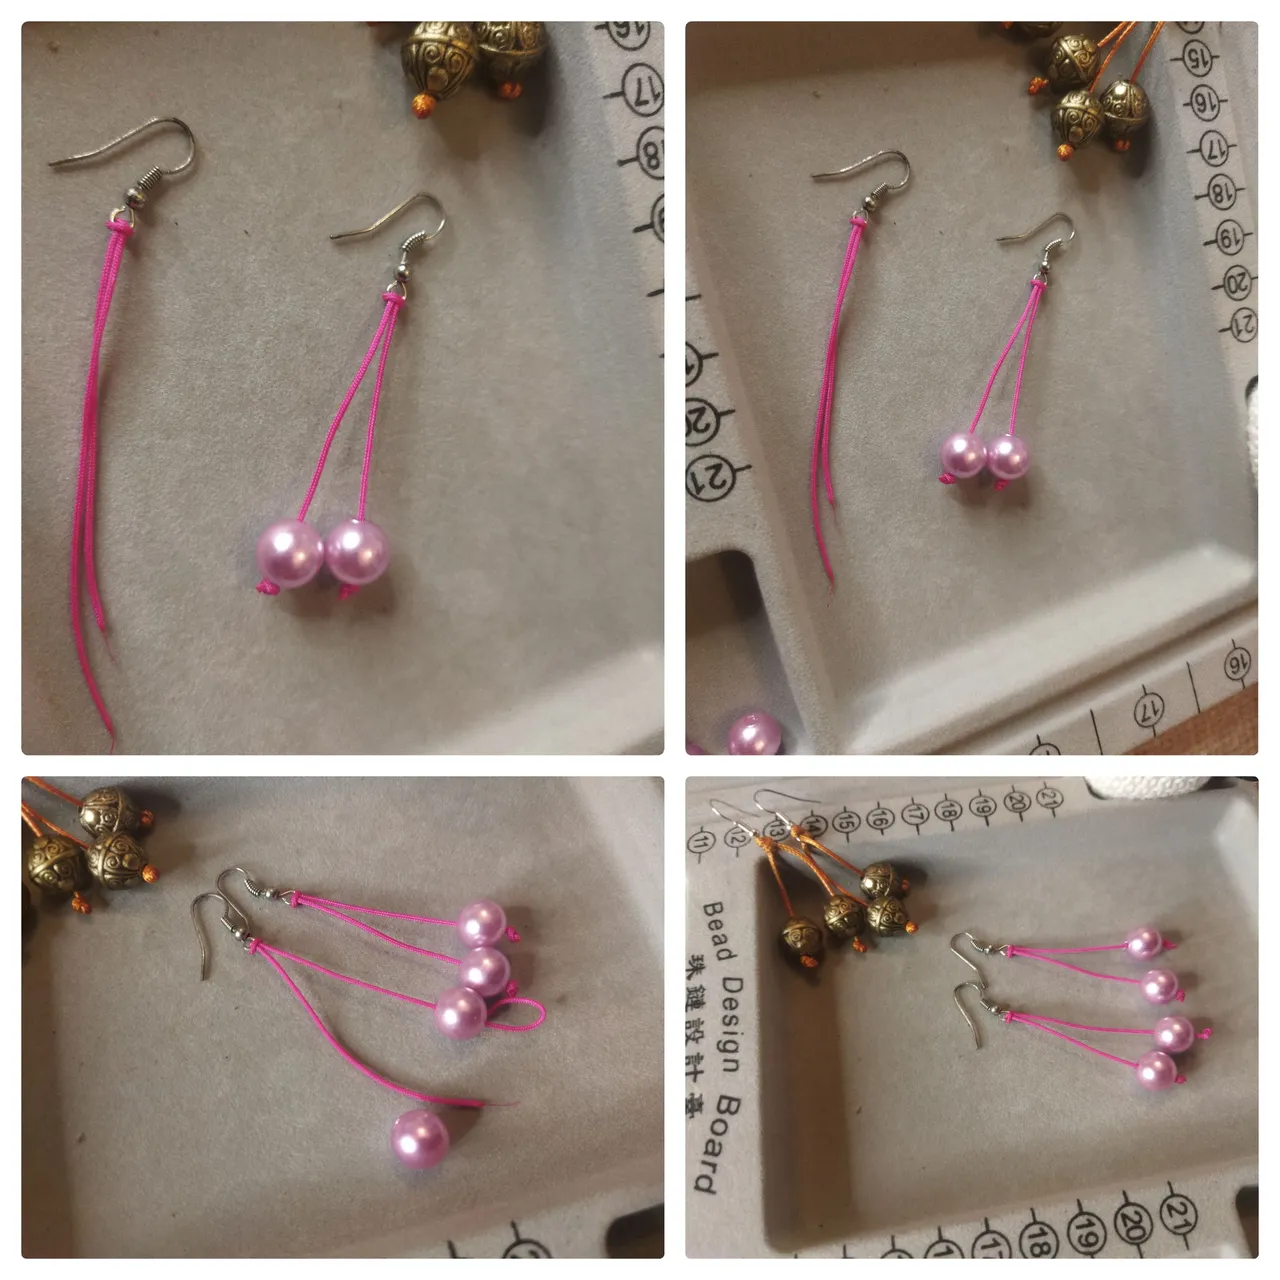
🔻 Al tener aseguradas las dos hebras metemos en cada una de ellas una bola. Procuramos que quede una más alta que la otra y hacemos doble nudo en cada punta del hilo. También podríamos dejarlas a la misma altura, pero chocarían unas con otras y produciría algún ruido muy cerca de tu oído.
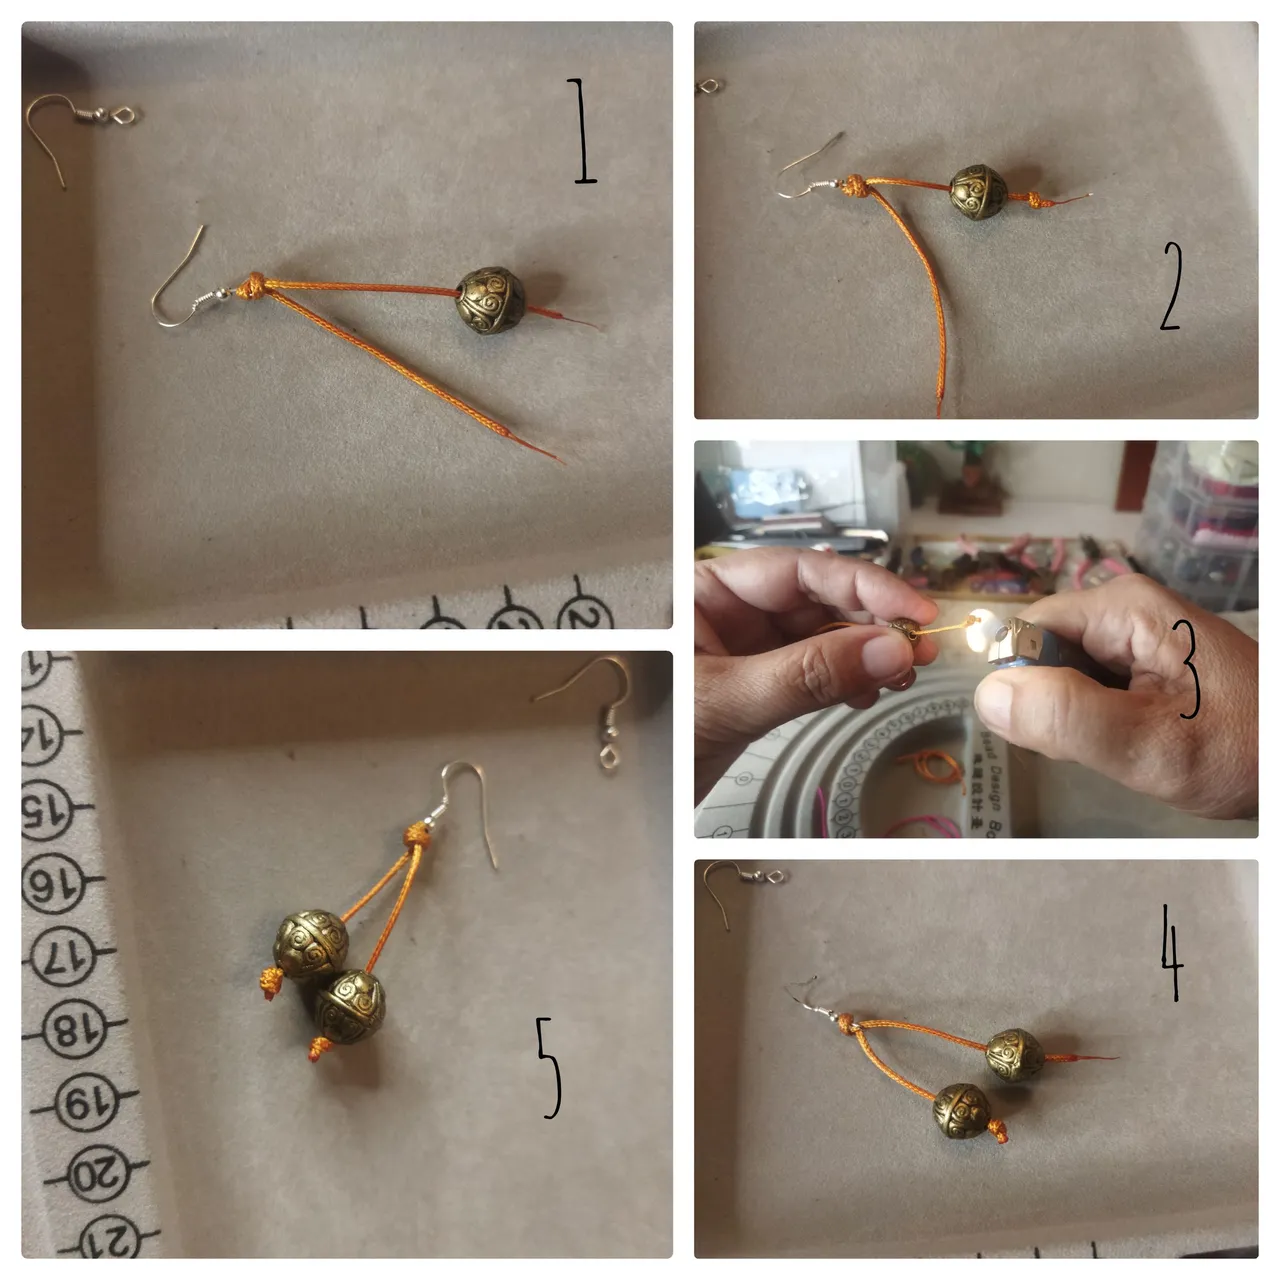
🔻 Después del nudo quemamos esa punta sobrante y ya habremos terminado. Como pueden ver son aretes muy lindos y se hacen rápido. Yo siempre pienso en accesorios que sean fáciles de hacer por dos razones: 1️⃣ Para que todos podamos hacerlos en casa y abaratar precios. 2️⃣ Hacer y vender.
RESULTADO.
🔻 En mi segundo modelo usé perlas plásticas 😊 se ven súper lindas. Lo que más me gusta de este modelo es que son livianos los aretes, ya saben que por mi problema de cervicalgia he dejado de usar accesorios pesados.
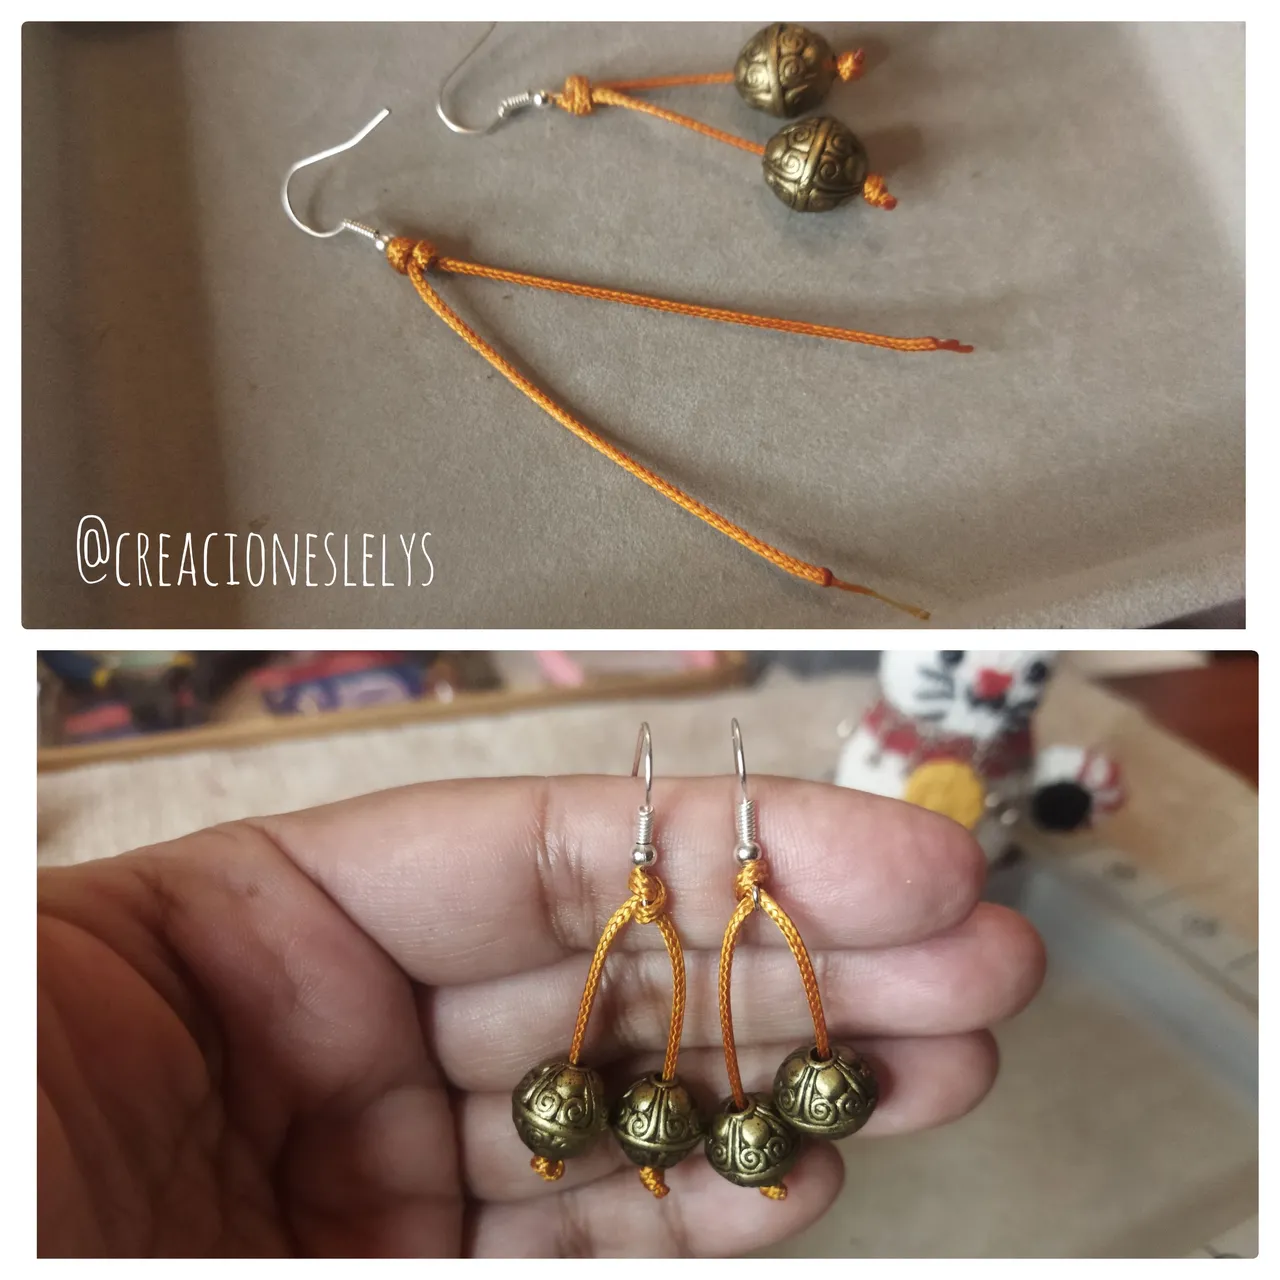
🔻 En estos aretes usé el hilo chino de un color similar al de las bolas, ya ven como resaltan las bolas y se ve espectacular 👏 al menos a mí me han gustado un montón. A mí mamá le gustó más el primer modelo, ya saben que ella aún no se quita el luto de forma definitiva y ese color le favorece más.
🔻 Otro detalle que me encanta es que se mueven mucho 😃 en aretes largos esos movimientos son el atractivo.
Espero que se atrevan a crear con los materiales que tengan a su disposición. Siempre es un placer compartir con ustedes mis creaciones. Deseo que este tutorial sea de utilidad para muchos.
Todas las fotos son de mi propiedad. Edité con Polish. Usé el traductor de Deepl. Hasta pronto. Gracias por seguir apoyando mi contenido. De verdad lo aprecio. Bendiciones 🙏
🔻🔻🔻🔻🔻🔻🔻🔻🔻🔻🔻🔻🔻🔻🔻
English.
Hello, hello, how are you today? I hope well 🥂 every day is good to start fresh and start better life plans 🙏 so let's get the mood up and get all our projects going 🤞.
Today I want to share with you a tendril design with which I was able to take advantage of some beads available in my bead box. I had already told you that this box brought a lot of beads of various shapes, materials and colors, however there are not enough to create very elaborate complete sets. The best thing is that by creating we always find a solution and come up with models to use them.
PAIR OF DANGLING BEADS 🤍 A NEW EARRINGS DESIGN.
I have to confess that I loved this project because they are made super easy, we can all make them in simple steps, we take advantage of the balls available and best of all is that we can combine to taste or need 👋 To make this sample I used the following materials.
MATERIALS.
🔻 Beads, balls, spheres or pearls that you have available. They must have holes in them obviously.
🔻 Chinese thread.
🔻 Scissors.
🔻 Tinder or lighter.
🔻 Fishhook or fisherman's safety catch.
PROCEDURE.
🔻 The first thing we do is to sharpen the tip of the Chinese thread so that it passes easily through the hole of the balls. Generally these balls have the wide hole, but for safety it is better to put the thinner tip. This is done by passing the tip of the thread through the blue flame of the tinder, quickly pass the fingers giving a twist or two to the heated tip.
🔻 We decide the length of our earrings and proceed to measure and cut the Chinese thread. They look very nice if we combine the colors of the thread with the chosen beads. When cutting the thread we have to consider that we will make knots.
🔻 This thread that we cut we are going to pass it through the ring of the fisherman insurance. Then leaving one strand longer than the other we will make two turns with the long strand through the short strand, then we will tie a knot to secure the strands. See picture.
🔻 Once the two strands are secured, we put a ball in each of them. We try to leave one higher than the other and we make a double knot in each end of the thread. We could also leave them at the same height, but they would collide with each other and produce some noise very close to your ear.
🔻 After the knot we burn that leftover tip and we are done. As you can see they are very cute earrings and they are quick to make. I always think of accessories that are easy to make for two reasons: 1️⃣ So we can all make them at home and lower prices. 2️⃣ To make and sell.
RESULT.
🔻 On my second model I used plastic beads 😊 they look super cute. What I like most about this model is that they are light earrings, you know that because of my cervicalgia problem I have stopped using heavy accessories.
🔻 In these earrings I used the Chinese thread of a similar color to the beads, you can see how the beads stand out and it looks spectacular 👏 at least I liked them a lot. My mom liked the first model better, you know she still doesn't take off her mourning for good and that color suits her more.
🔻 Another detail I love is that they move a lot 😃 in long earrings those movements are the appeal.
I hope you dare to create with the materials you have at your disposal. It is always a pleasure to share with you my creations. I hope this tutorial will be useful to many.
All photos are my property. I edited with Polish. I used Deepl translator. See you soon. Thank you for continuing to support my content. I really appreciate it. Blessings 🙏