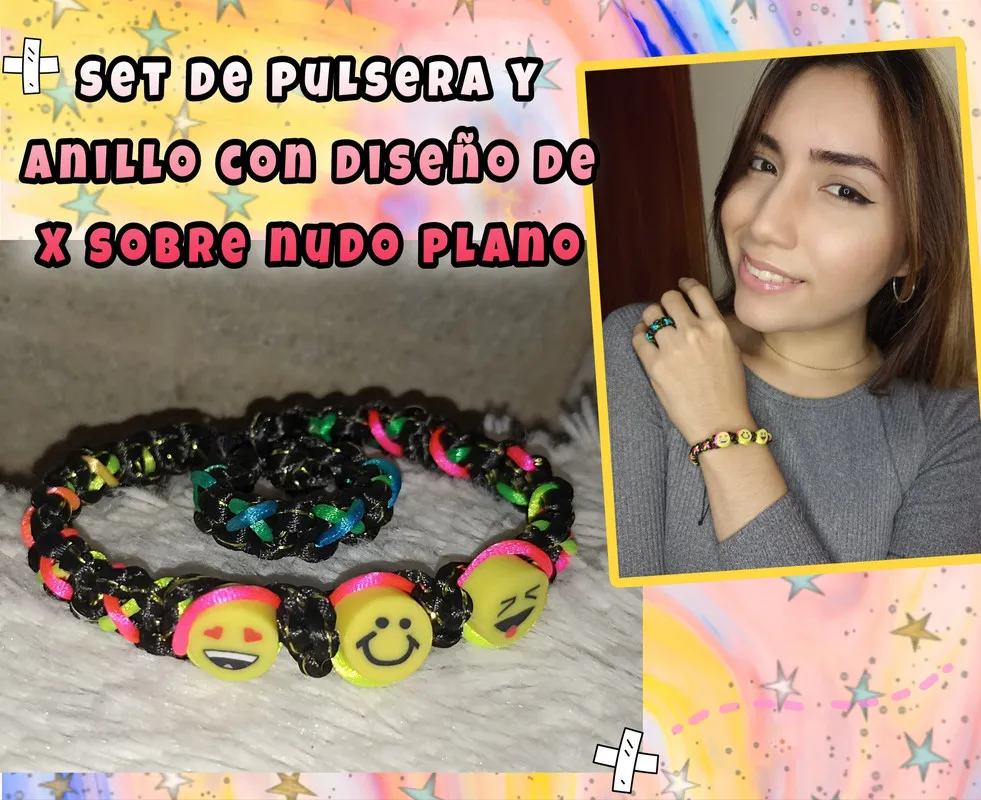


Hola amigos de Hive ❤️ hoy les quiero compartir un pequeño tutorial para realizar un lindo y divertido set de pulsera y anillo realizando la técnica básica de macramé de nudo plano agregándole un diseño súper fácil en forma de equis, un diseño que le va muy bien a unas piedras o dijes de emojis bastante divertidas y harán lucir muy llamativa nuestra pulsera. Si te gusta, te animo a que me acompañes y aprendas junto a mi a realizarlo, a tu gusto y los colores que prefieras, y ahora sí, sin más que agregar... Comencémos!!

Materiales:
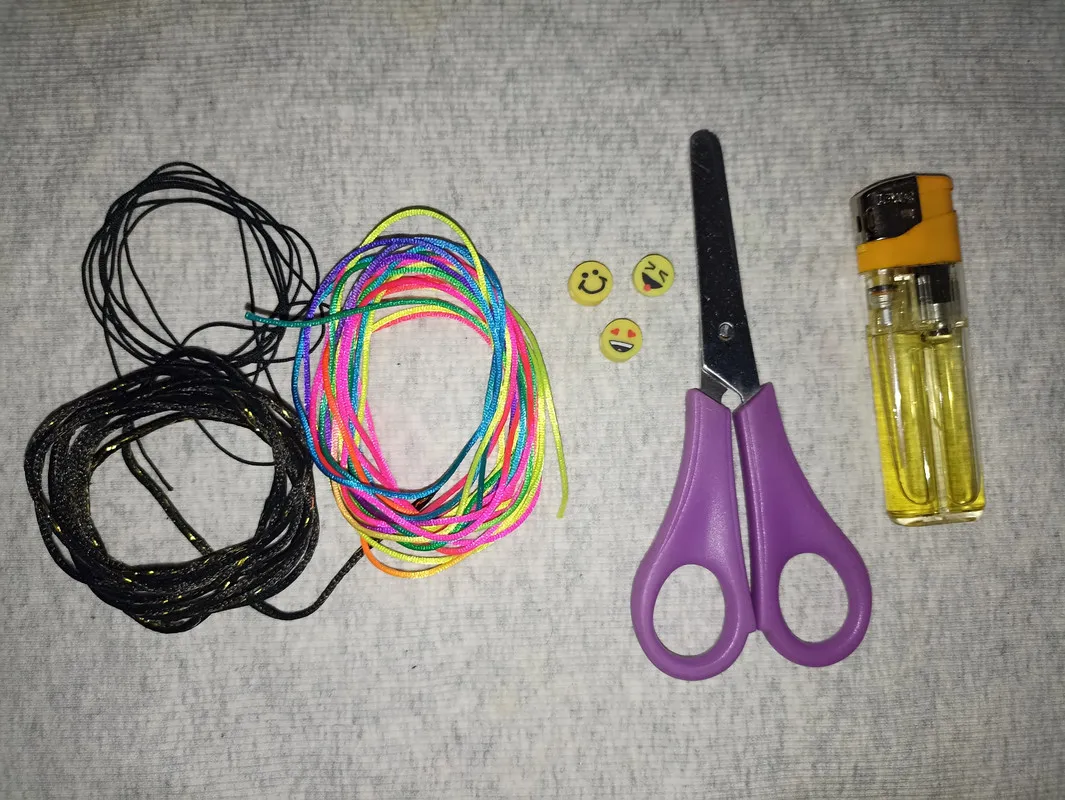
- Hilo chino (negro, matizado)
- Hilo cola de ratón (negro)
- Piedras/dije emoji
- Tijera
- Encendedor

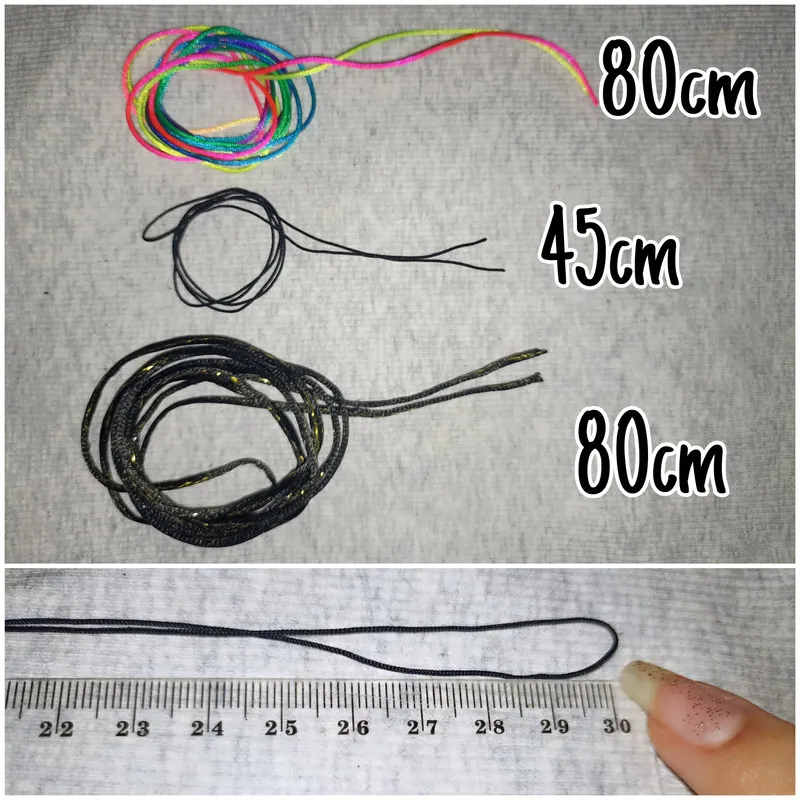
Para esta pulsera vamos a necesitar aproximadamente 80 cm de hilo cola de ratón y del hilo chino matizado, estos serán los hilos con los que tejeremos, y para el hilo central usaré 45 cm aproximadamente de hilo chino en color negro también. Estás medidas además las obtendremos colocando los hilos dobles como les muestro la segunda imagen. Con estas cantidades nos sobrará para realizar también el anillo a juego con el mismo diseño.
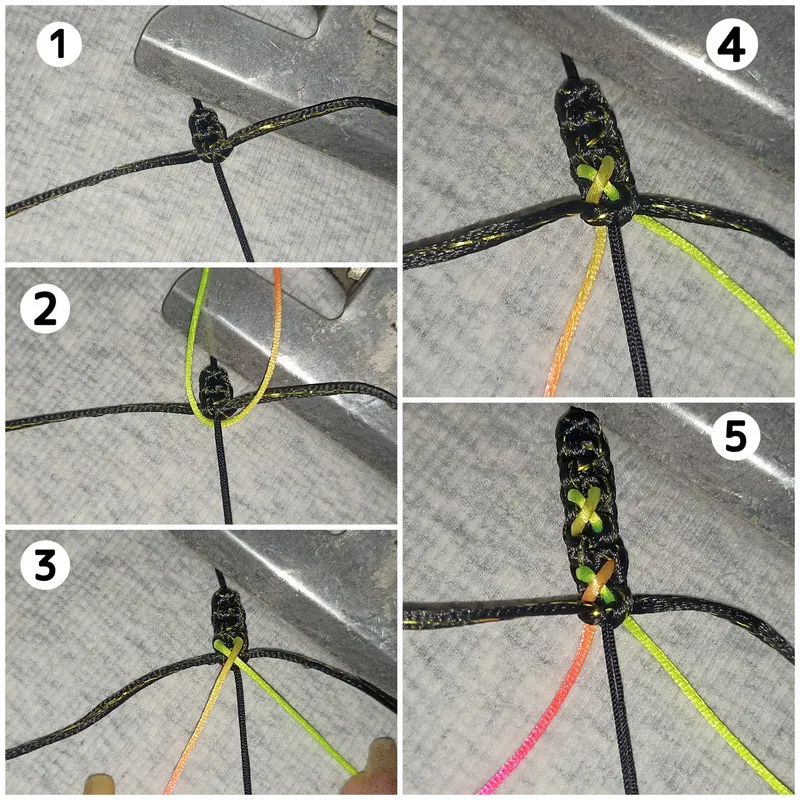
Cómo les expliqué al inicio, vamos a comenzar la pulsera dejando 7 a 8 cm de distancia y empezaremos a realizar 3 a 4 nudos planos, luego colocaremos en medio de hilo central nuestro hilo matizado como les muestro en la imagen n°2, realizamos otros 2 nudos planos y luego cruzamos el hilo formando una equis y sobre este volvemos hacer 2 nudos planos quedando sobre el tejido negro el diseño colorido que queremos formar. Hecho esto vamos a cruzar el hilo colorido por el revés de la pulsera y repetimos el mismo proceso dejando 2 nudos planos entre cada equis.
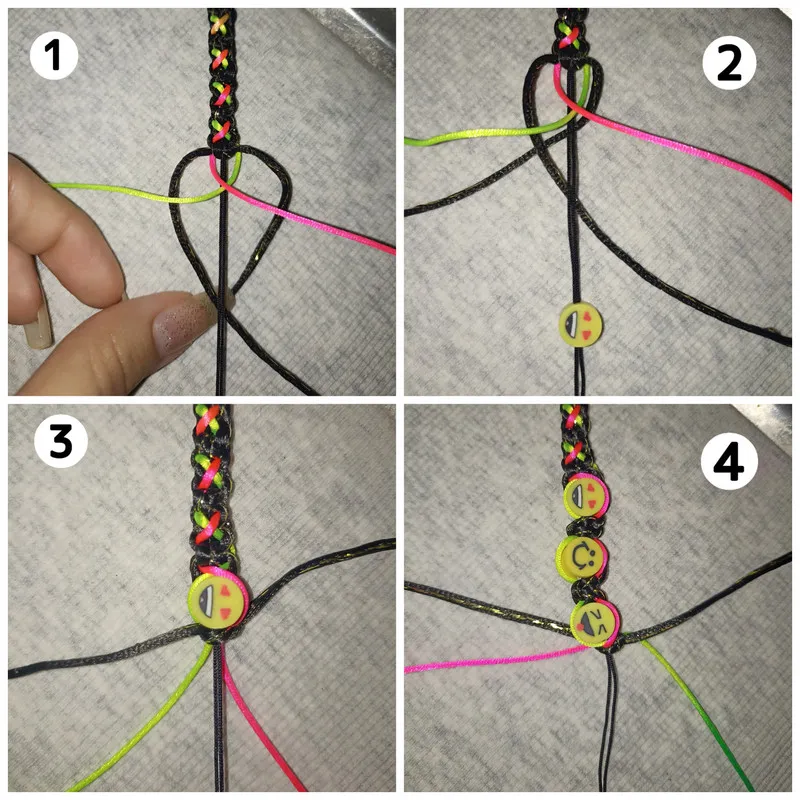
Si deseas puedes continuar este diseño o hacer lo que haré a continuación. Una vez haya tejido aproximadamente la mitad de la pulsera, voy a cruzar los hilos coloridos sobre el hilo central y los hilos negros los cruzaré por el revés, y después seguidamente introducire la piedra o dije de emoji. Luego con los mismos hilos de color negro haré un nudo plano para cerrar esta parte. Como yo tengo 3 piedras de emoji voy a repetir este proceso 3 veces y continúo normalmente con el diseño principal hasta obtener el largo deseado.
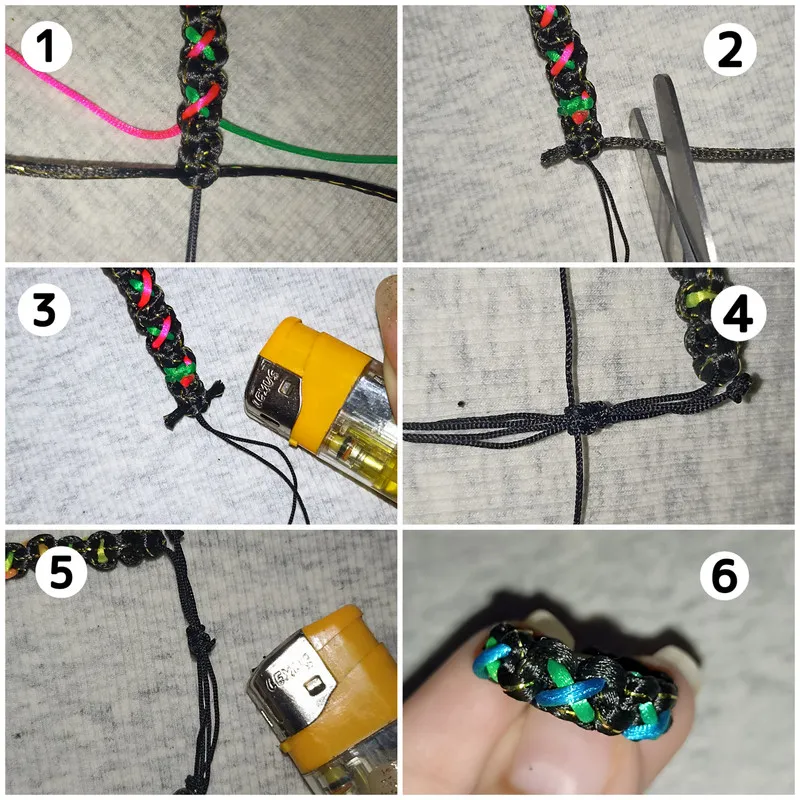
Ya casi para terminar voy a cortar todos los hilos sobrantes y quemaré las puntas tratando de esconderlas hacia la parte posterior o el revés de la pulsera. Para cerrarla haremos como siempre varios nudos planos o cualquier otro nudo como el franciscano o enroscado. Finalmente pasamos hacer el anillo repitiendo básicamente el mismo proceso haciendo prácticamente una mini pulsera, solo que al final al cerrarla, cortamos todos los hilos sobrantes.
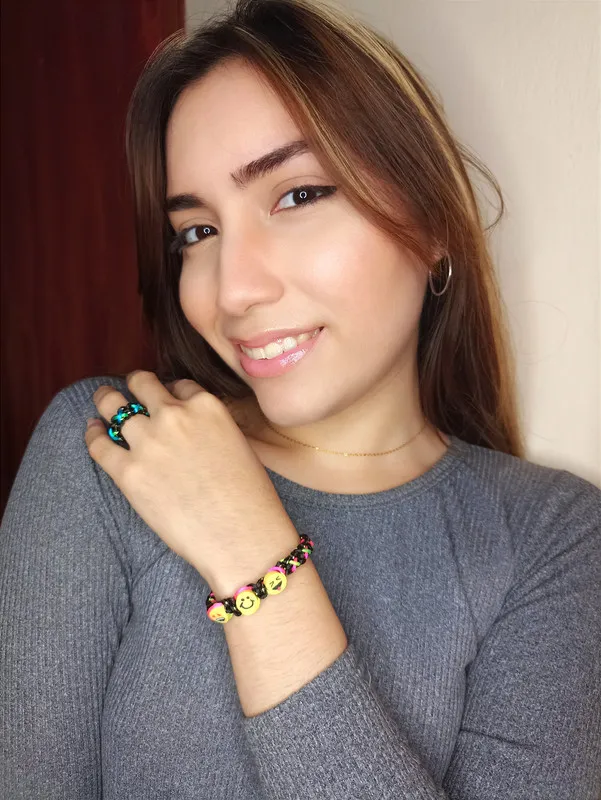
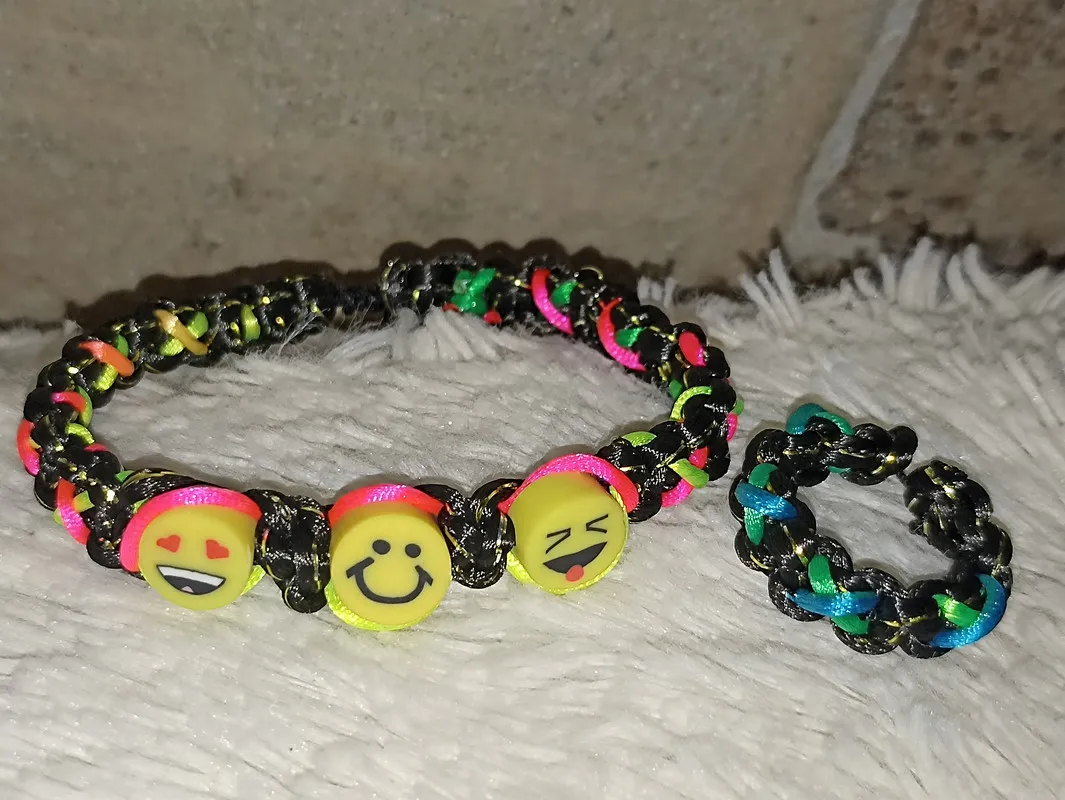
Y aquí les muestro el set terminado!!. Puedes seguir mi guía tutorial o puedes dejar volar tu imaginación y hacerlo combinando los colores, piedras, cristales y el diseño que quieras, hay miles para escoger y crear, la creatividad es tuya y por supuesto un toque secreto de amor para que el trabajo quede con el mejor acabado 🥰.!! si te gusto te animo a que lo intentes, me encantó mostrarles este pequeño tutorial de pulsera y anillo con un lindo diseño de equis y los divertidos emojis. Una idea más para tu uso personal, emprender o para regalar 😁...espero compartirles muy pronto nuevos trabajos, con mucho cariño me despido y será hasta la próxima !!💕


Hello friends of Hive ❤️ today I want to share with you a small tutorial to make a nice and fun set of bracelet and ring using the basic technique of flat knot macrame adding a super easy design in the shape of an X, a design that goes very well with some stones or emoji charms quite fun and will make our bracelet look very striking. If you like it, I encourage you to join me and learn with me to make it, to your liking and the colors you prefer, and now yes, without further ado .... Let's get started!
Materials:
- Chinese thread (black, shaded)
- Mouse tail thread (black)
- Stones/emoji saying
- Scissors
- Lighter
![]()
For this bracelet we are going to need approximately 80 cm of mouse tail thread and the shaded Chinese thread, these will be the threads with which we will weave, and for the central thread I will use approximately 45 cm of Chinese thread in black color also. These measures will also be obtained by placing the double threads as shown in the second image. With these quantities we will have enough to make the matching ring with the same design.
As I explained at the beginning, we are going to start the bracelet leaving 7 to 8 cm distance and we will begin to make 3 to 4 flat knots, then we will place in the middle of the central thread our colored thread as I show you in the image n°2, we make another 2 flat knots and then we cross the thread forming an X and on this we return to make 2 flat knots leaving on the black fabric the colored design that we want to form. Once this is done, we cross the colored thread on the back of the bracelet and repeat the same process leaving 2 flat knots between each cross.
If you wish you can continue this design or do what I will do next. Once I have woven approximately half of the bracelet, I will cross the colored threads over the central thread and the black threads I will cross them on the back side, and then I will introduce the emoji stone or charm. Then with the same black threads I will make a flat knot to close this part. As I have 3 emoji stones I will repeat this process 3 times and continue normally with the main design until I get the desired length.
Almost to finish I will cut all the excess threads and I will burn the ends trying to hide them towards the back or the back of the bracelet. To close it we will make as usual several flat knots or any other knot like the Franciscan or twisted. Finally we make the ring repeating basically the same process making practically a mini bracelet, only that at the end when closing it, we cut all the excess threads.
And here I show you the finished set!!!. You can follow my tutorial guide or you can let your imagination fly and do it combining colors, stones, crystals and the design you want, there are thousands to choose and create, creativity is yours and of course a secret touch of love so that the work is with the best finish 🥰.!!! if you like it I encourage you to try it, I loved to show you this little tutorial of bracelet and ring with a cute design of equis and the funny emojis. One more idea for your personal use, undertaking or to give as a gift 😁...I hope to share with you very soon new works, with much love I say goodbye and will be until next time !!!💕
Todo el contenido es de mi autoría y las imágenes son de mi propiedad
Cámara: Redmi note 10s
Uso un aro de luz LED como base para mi teléfono y tomarme las fotos
All content is my own and images are my property
Camera: Redmi note 10s
I use an LED light ring as a base for my phone to take pictures of myself

Edición y Separador|Editing and Separator
App PicMonkey - App Picsart - App Canva
Traductor|Translator
DeepL