¡Bienvenidos a mi blog!
Hola , queridos amigos relacionados con el arte de la joyería hecha a mano y forman parte de esta comunidad #jewelry, buenas noches, deseo que estén bien, hoy nuevamente con mis trabajos , algo que me apasiona, cada día tratando de hacer lo mejor posible , de aprender nuevas técnicas, para impartir mis conocimientos de una manera divertida.
El día de hoy quiero mostrar, como realizar una hermosa pulsera de mostacilla ,que está de moda con hilo elástico grueso y lo más emocionante es que en pocos minutos la realizamos, sin ningún tipo de dificultad, solo deseo de trabajar.
Esta pulsera es unisex, sirve para varones y hembras, como ya se acerca el dia del amor y la amistad, haré varias para regalarla ese día, pero tendré que hacer muchas, jajajaja , ya que tengo bastantes amigos.
¡Sin más nada ,manos a la obra!
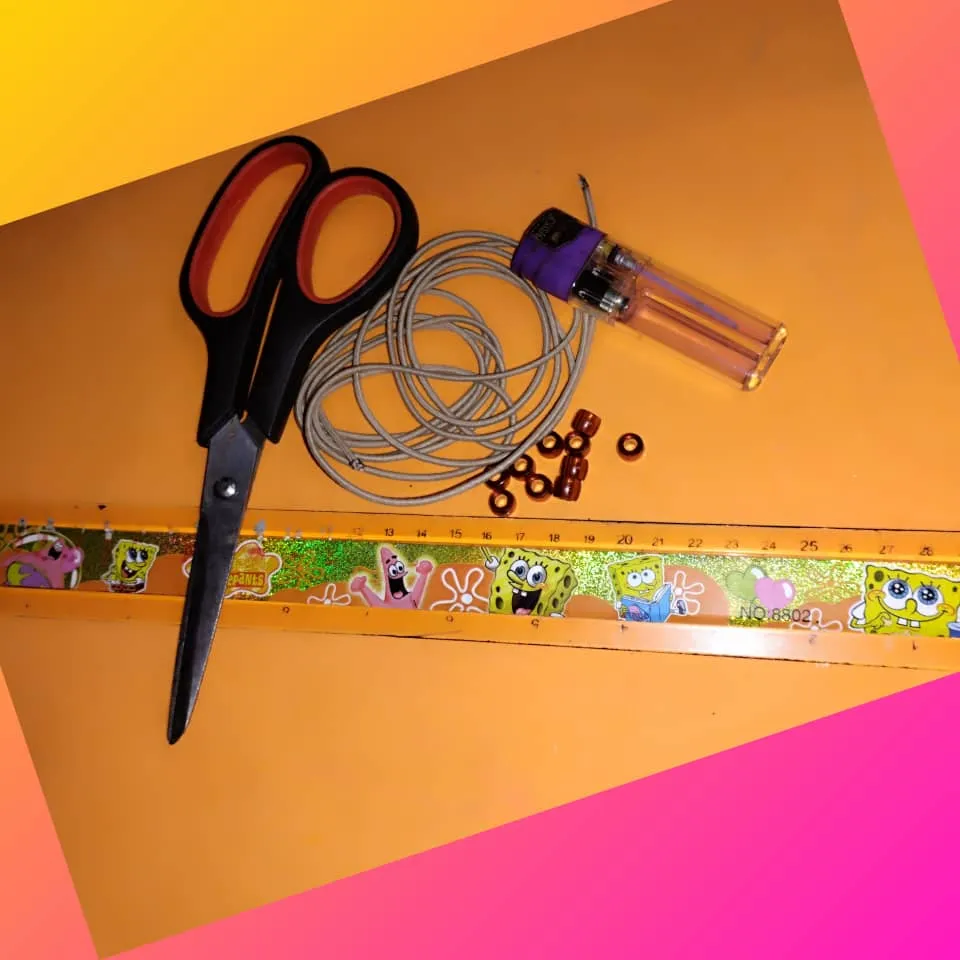
Materiales para la realización de la pulsera hecha con mostacillas e hilo elástico grueso:
- 2 metros de hilo elástico grueso , color beige.
- 27 cuentas de mostacillas grandes de color marrón.
- 1 yesquero.
- Regla.
- Tijera.
- Carpeta con gancho para sujetar.
Paso a paso para la elaboración de la pulsera con mostacillas e hilo elástico grueso:
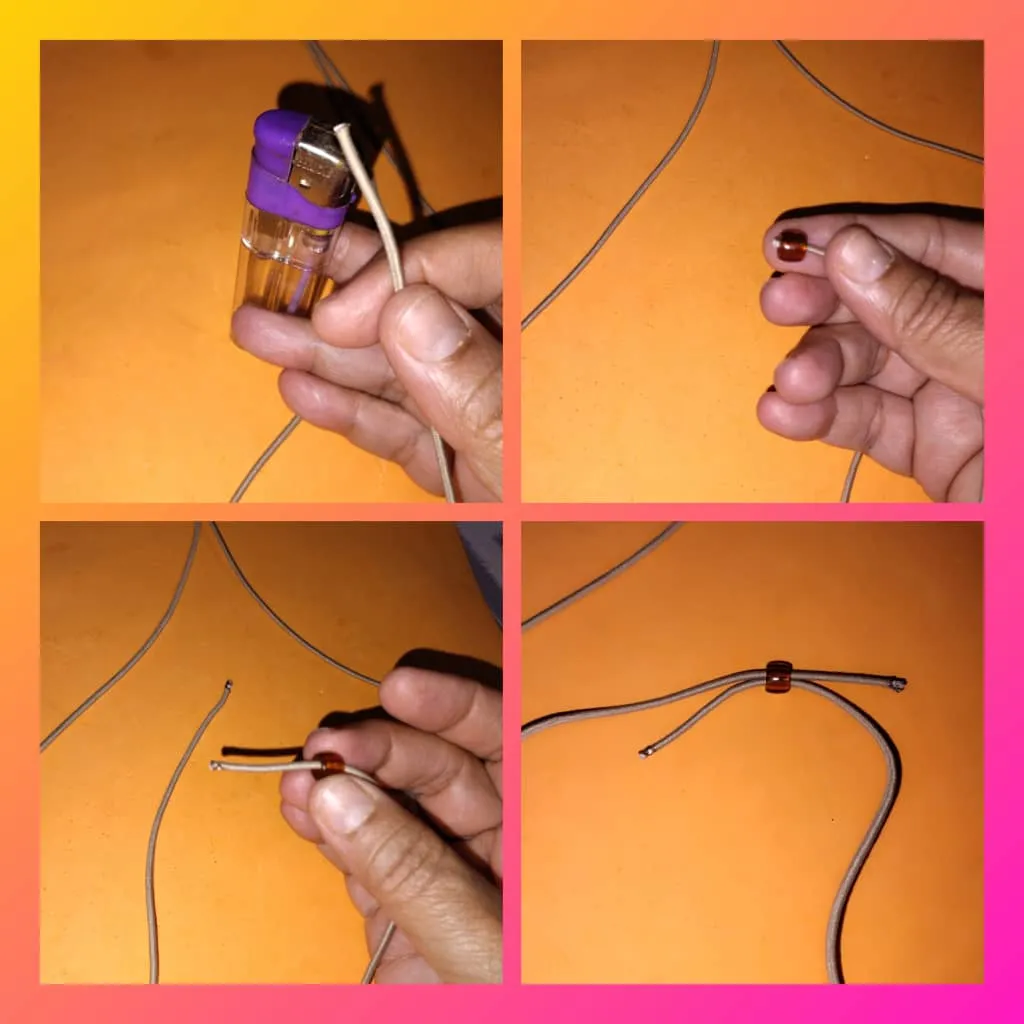
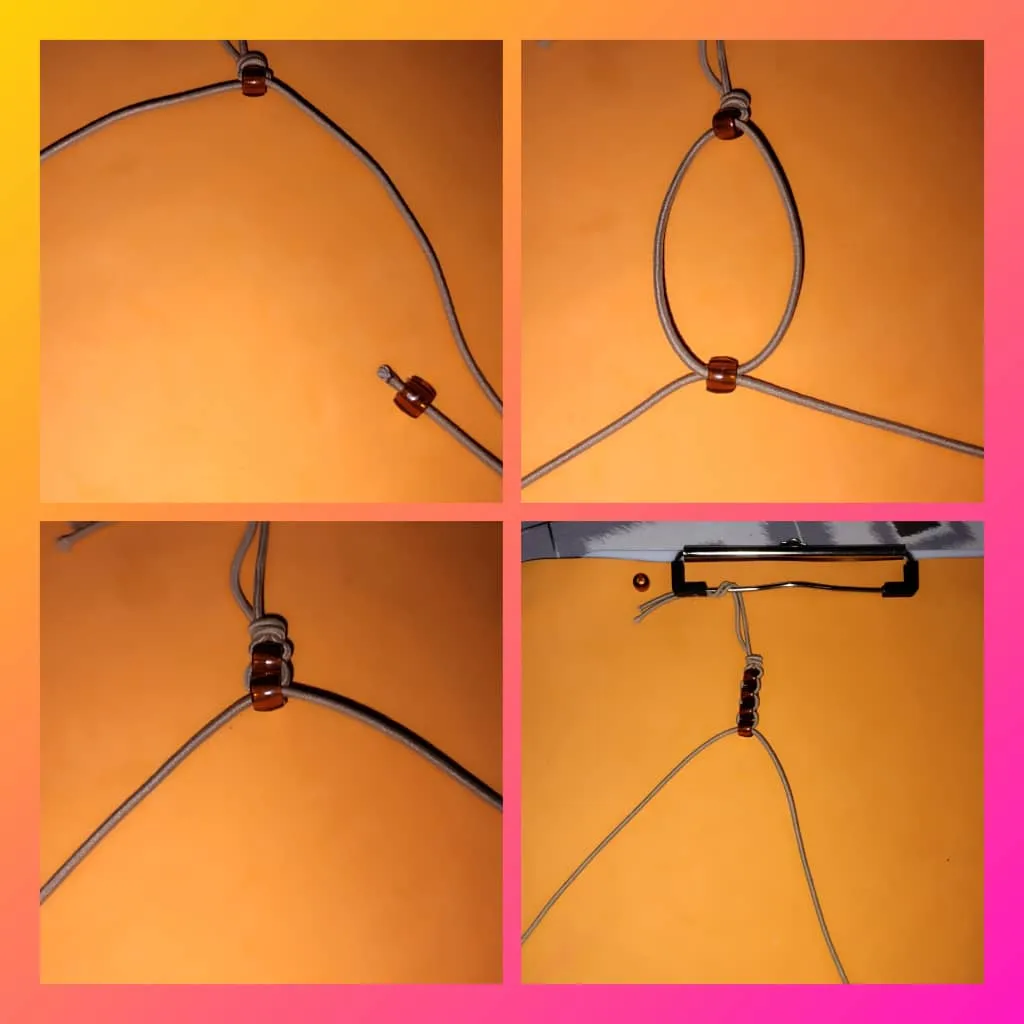
- Lo primero que haremos para la elaboración de la pulsera, es medir con la regla 70 centímetros de hilo elástico grueso,vamos a medir 2 pedazos de 70 centímetros, con la tijera recortamos.
- Tomamos las dos puntas , hacemos un nudo sencillo, dejando 9 centímetros desde la punta , no amarramos muy fuerte ya que después debe soltarse.

- Ahora , con un yesquero con mucho cuidado debe quemar las puntas.
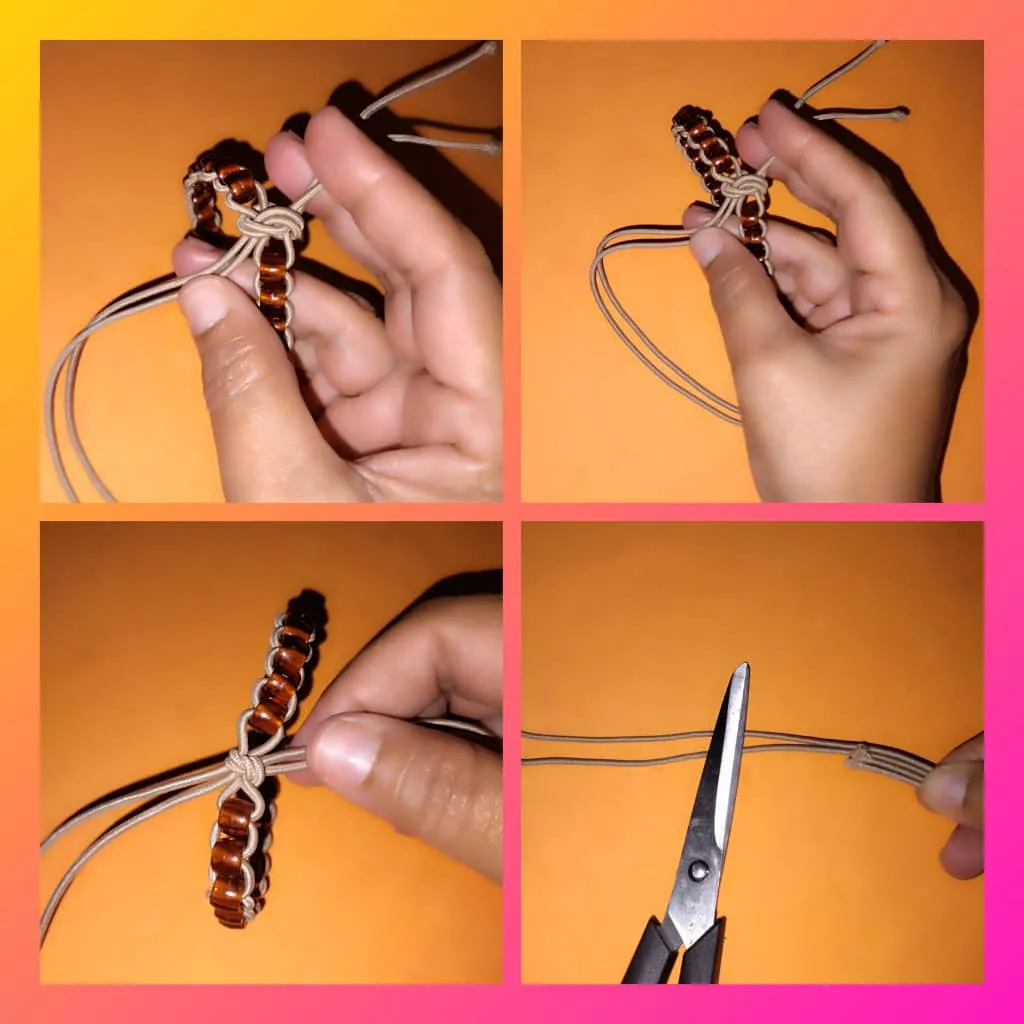
- Sujetamos de la carpeta los dos pedazos de hilo elástico color beige, comenzamos a meter del lado izquierdo, dentro del hilo elástico la primera mostacilla de color marrón, luego en la misma mostacilla pero del lado derecho en el mismo hueco introducimos el hilo .
- Continuando con la realización de la pulsera, halamos el hilo hasta pegarlo en donde está el nudo sencillo, tratamos de halarlo que quede apretado de ambos lados para que quede bonito.
- Así vamos metiendo todas las mostacillas, con el mismo procedimiento, metemos el hilo elástico comenzando siempre del lado izquierdo, luego metemos el derecho, halamos hasta llegar a donde está la última mostacilla.
- Hasta aquí llevamos 10 mostacillas listas, vean lo hermosa que está quedando.
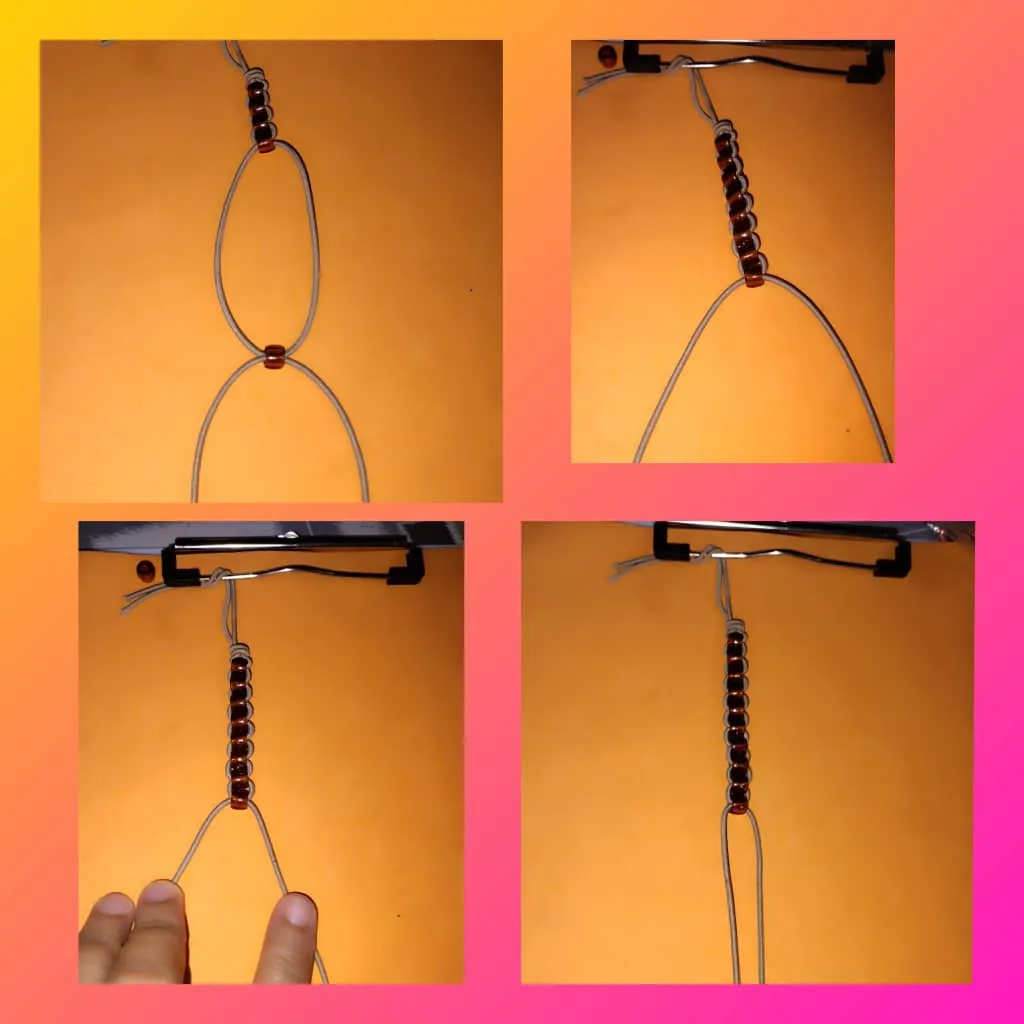
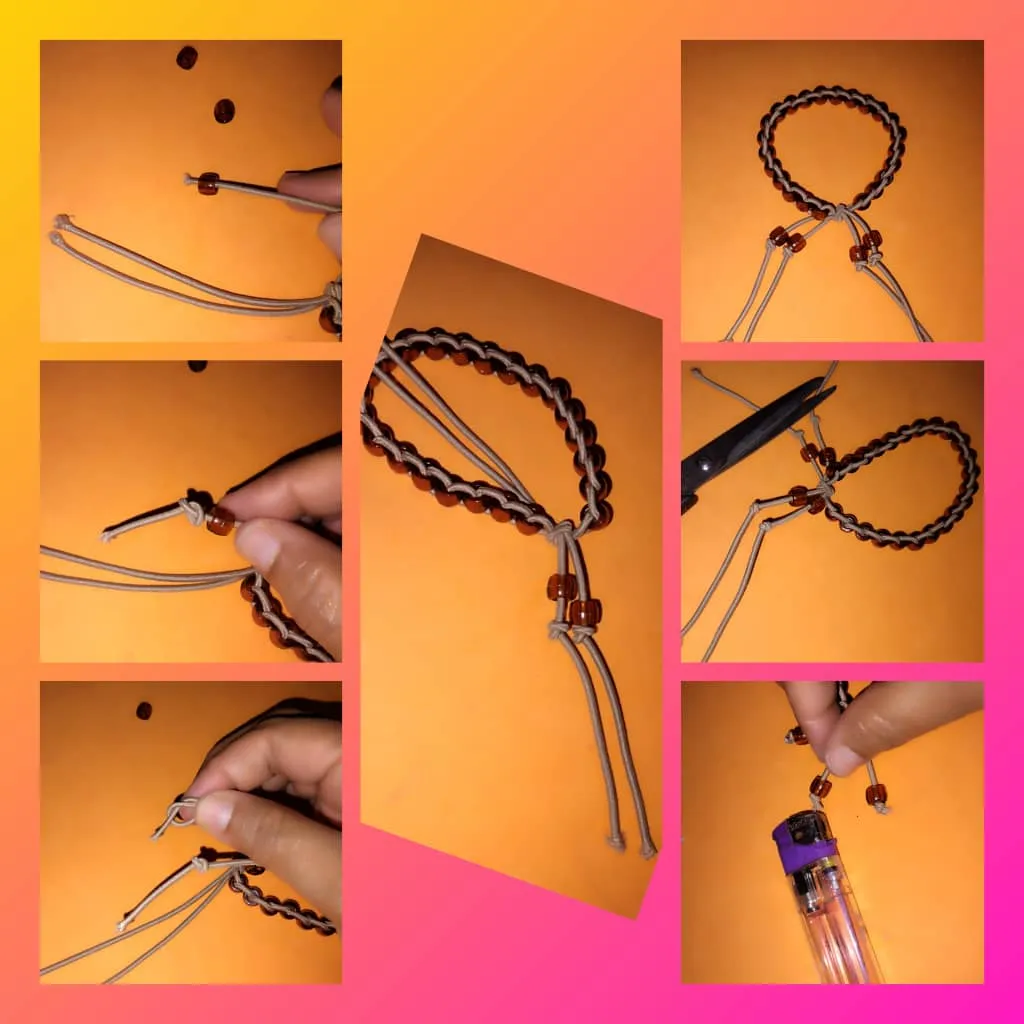
- El largo de la pulsera lo deciden ustedes, en mi caso coloqué 23 mostacillas, ya las coloqué , el siguiente paso
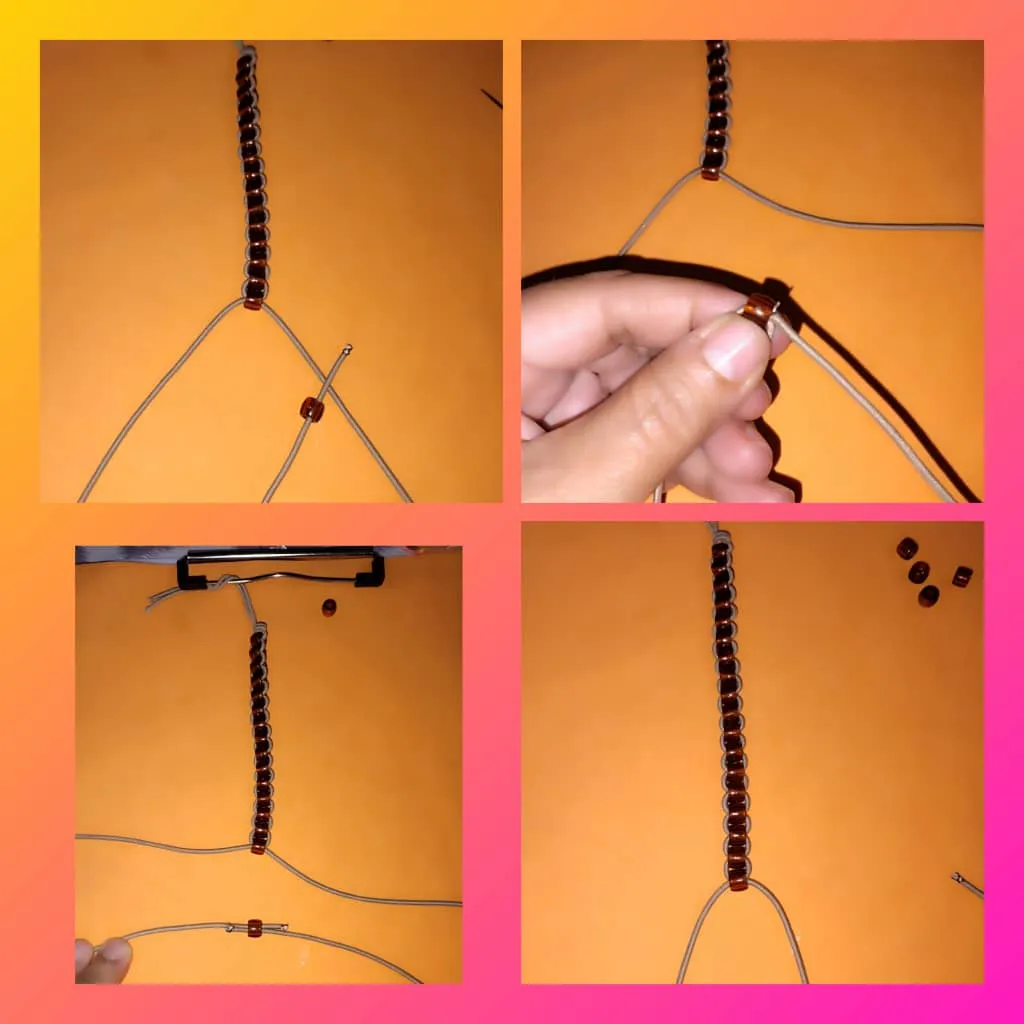
- Ya teniendo el largo de la pulsera procedemos a desatar el nudo que hicimos , cuando comenzamos a realizar la pulsera.
- Entonces tomamos las cuatros puntas de los hilos y amarramos , hacemos un nudo sencillo, dejamos 3 centímetros en cada punta y recortamos.
- Ahora colocamos una mostacilla en cada punta y al final hacemos un nudo sencillo.
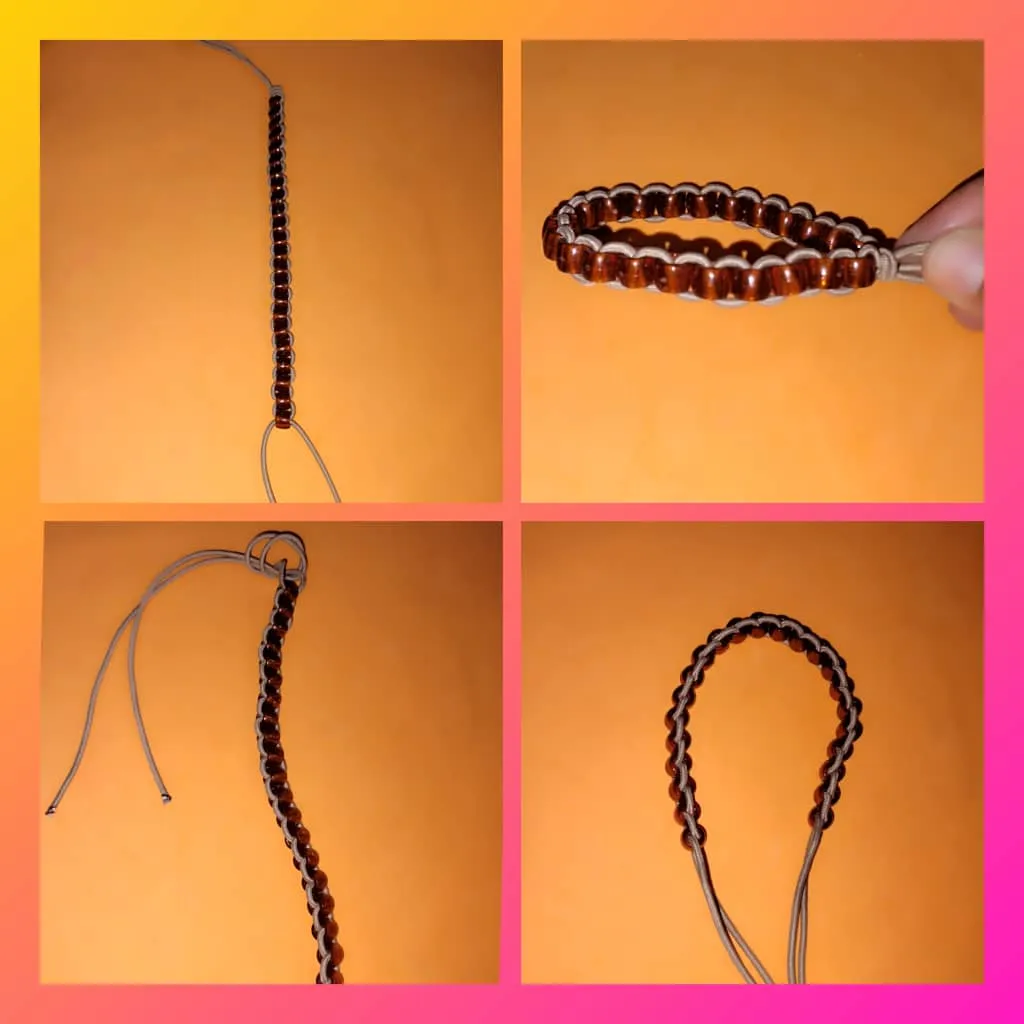
- Recortamos el excedente y la punta la quemamos con el yesquero con mucho cuidado.
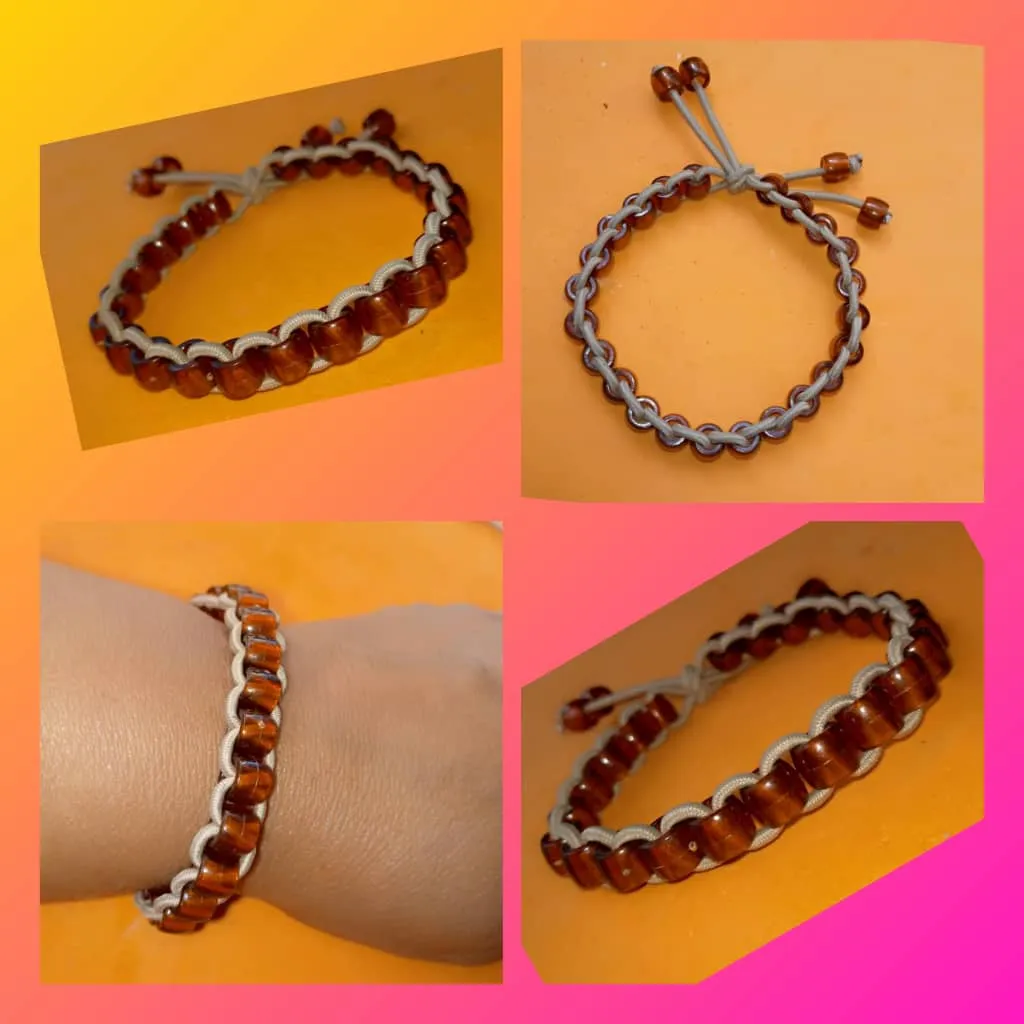
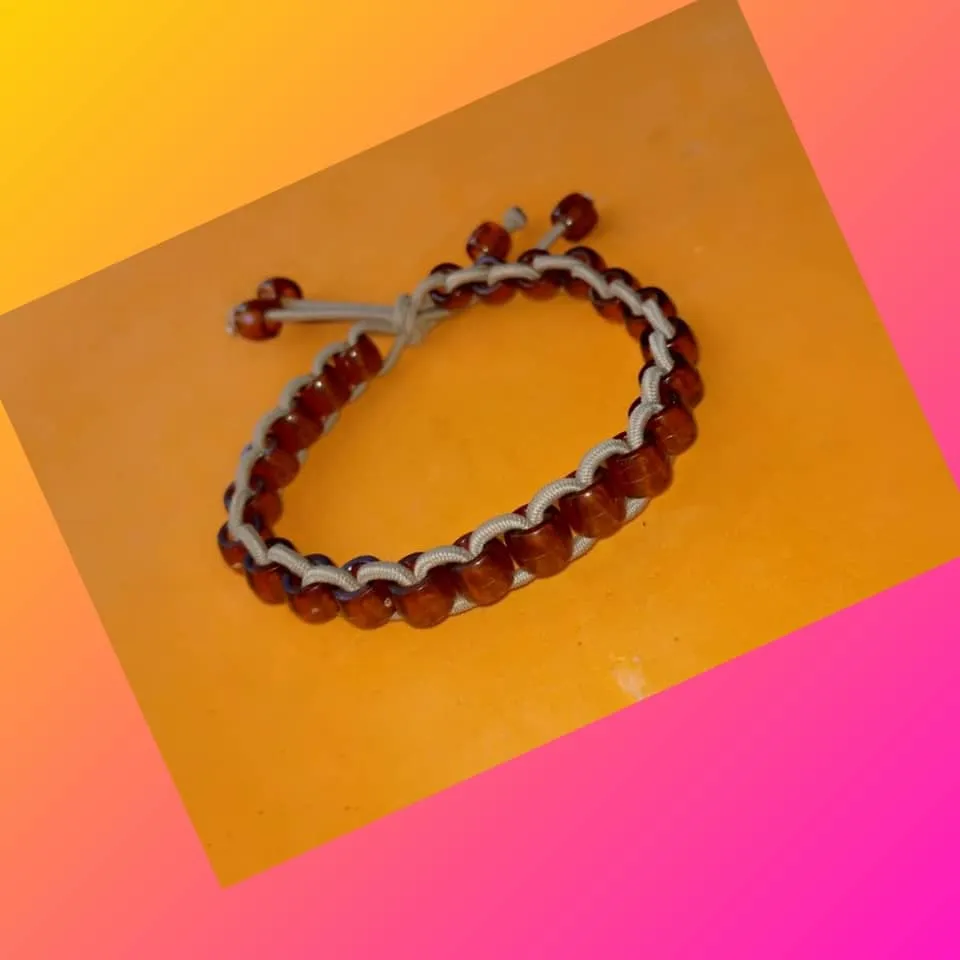
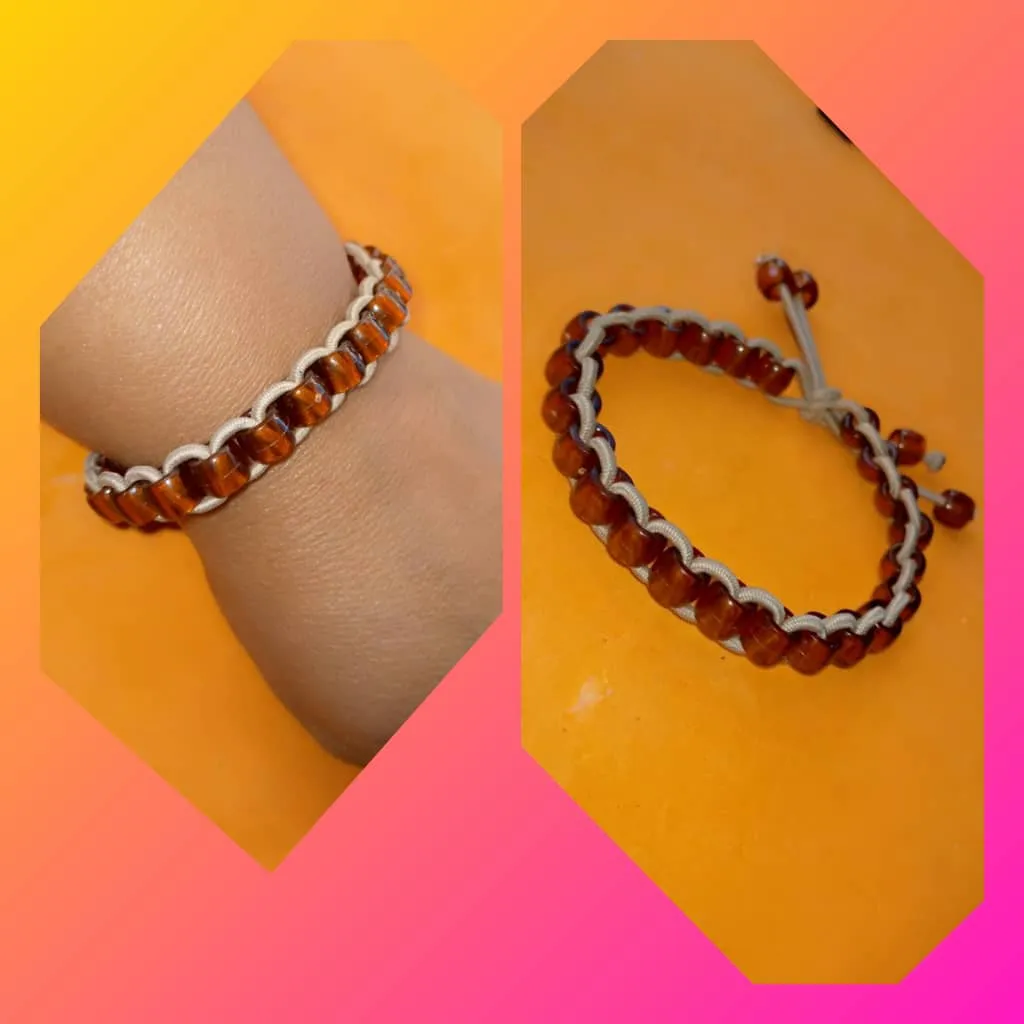
Resultado final de la hermosa pulsera hecha con mostacillas de color marrón e hilo elastico grueso de color beige.
Espero que les guste, hasta la próxima, muchas bendiciones.

Las fotos son mías , tomadas con telefono Infinix, editada con incollage y traducida con DEEPL.
ESPAÑOL
Welcome to my blog!
Hello , dear friends related to the art of handmade jewelry and are part of this community #jewelry, good evening, I wish you well, today again with my works , something that I am passionate about, every day trying to do my best , to learn new techniques, to impart my knowledge in a fun way.
Today I want to show you how to make a beautiful bracelet made with thick elastic thread and the most exciting thing is that in a few minutes we make it, without any difficulty, just desire to work.
This bracelet is unisex, it is suitable for males and females, as the day of love and friendship is approaching, I will make several to give away that day, but I will have to make many, hahahaha, because I have enough friends.
Without further ado, let's get to work!
Materials for the realization of the bracelet made with beads and thick elastic thread:
- 2 meters of thick elastic thread , beige color.
- 27 large beads of brown beads.
- 1 tinder.
- Ruler.
- Scissors.
- Folder with hook for fastening.
Step by step for the elaboration of the bracelet with beads and thick elastic thread:
- The first thing we will do for the elaboration of the bracelet, is to measure with the ruler 70 centimeters of thick elastic thread,we will measure 2 pieces of 70 centimeters, with the scissors we cut.
- We take the two ends, we make a simple knot, leaving 9 centimeters from the tip, we do not tie too tightly because later it should come loose.
- Now , with a tinder very carefully should burn the tips.
- We hold from the folder the two pieces of beige elastic thread, we begin to put on the left side, inside the elastic thread the first brown bead, then in the same bead but on the right side in the same hole we introduce the thread .
- Continuing with the making of the bracelet, we pull the thread until we stick it where the simple knot is, we try to pull it tight on both sides so that it looks nice.
- In this way we put all the beads, with the same procedure, we put the elastic thread always starting from the left side, then we put the right one, we pull until we get to where the last bead is.
- So far we have 10 beads ready, see how beautiful it is getting.
- The length of the bracelet is up to you, in my case I placed 23 beads, I already placed them, next step
- Already having the length of the bracelet we proceed to untie the knot we made , when we started to make the bracelet.
- Then we take the four ends of the threads and tie , we make a simple knot, leave 3 centimeters at each end and trim.
- Now we place a bead on each end and at the end we make a simple knot.
- We trim the excess and burn the tip with the tinder carefully.
Final result of the beautiful bracelet made with brown beads and thick beige elastic thread.
I hope you like it, until next time, many blessings.
The photos are mine, taken with Infinix phone, edited with incollage and translated with DEEPL.