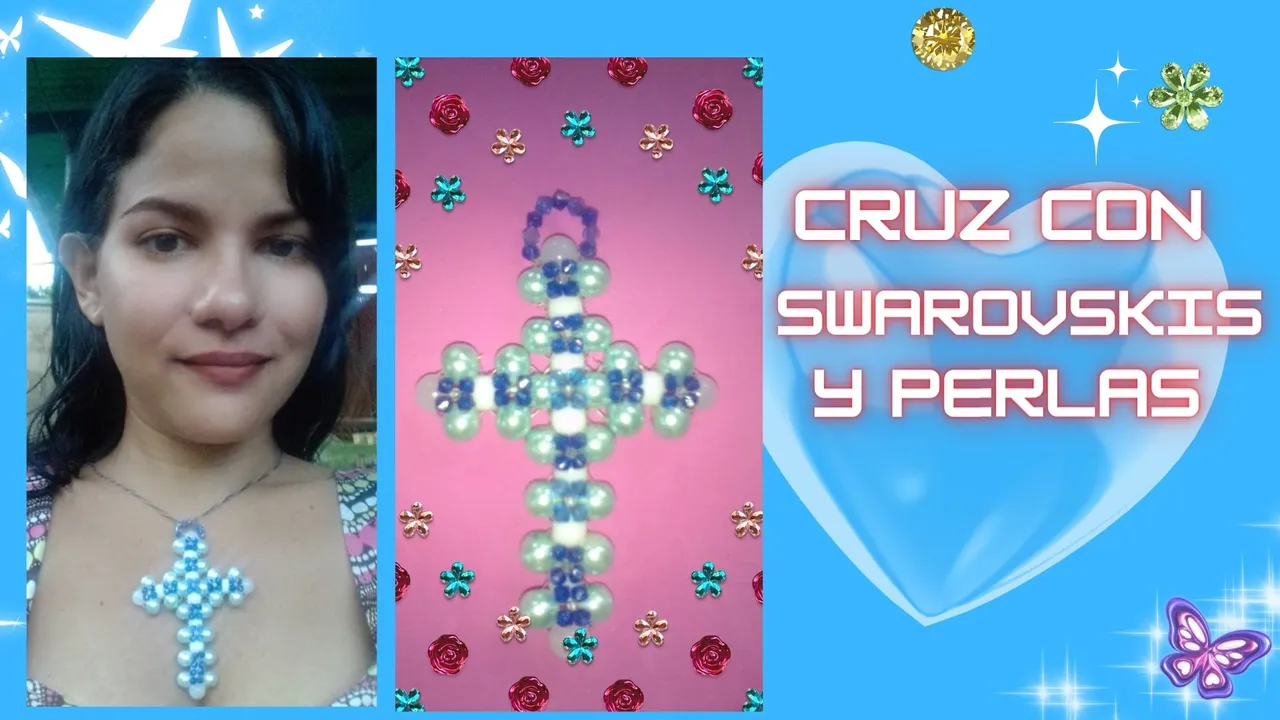
Hola nuevamente amigos de la comunidad de Jewelry, en esta oportunidad les hice un tutorial para hacer un dije (es un poco grande porque las perlas son grandes) , es sencillo de hacer y lo hice rápido, necesitas perlas y swarovskis , si tienen varios colores mejor porque resalta mas el patrón que se va formando.
Hello again friends of the Jewelry community, this time I made a tutorial to make a pendant (it is a little big because the pearls are large), it is easy to do it quickly, you need pearls and swarovskis, if you have several colors better because it highlights more the pattern that is forming.
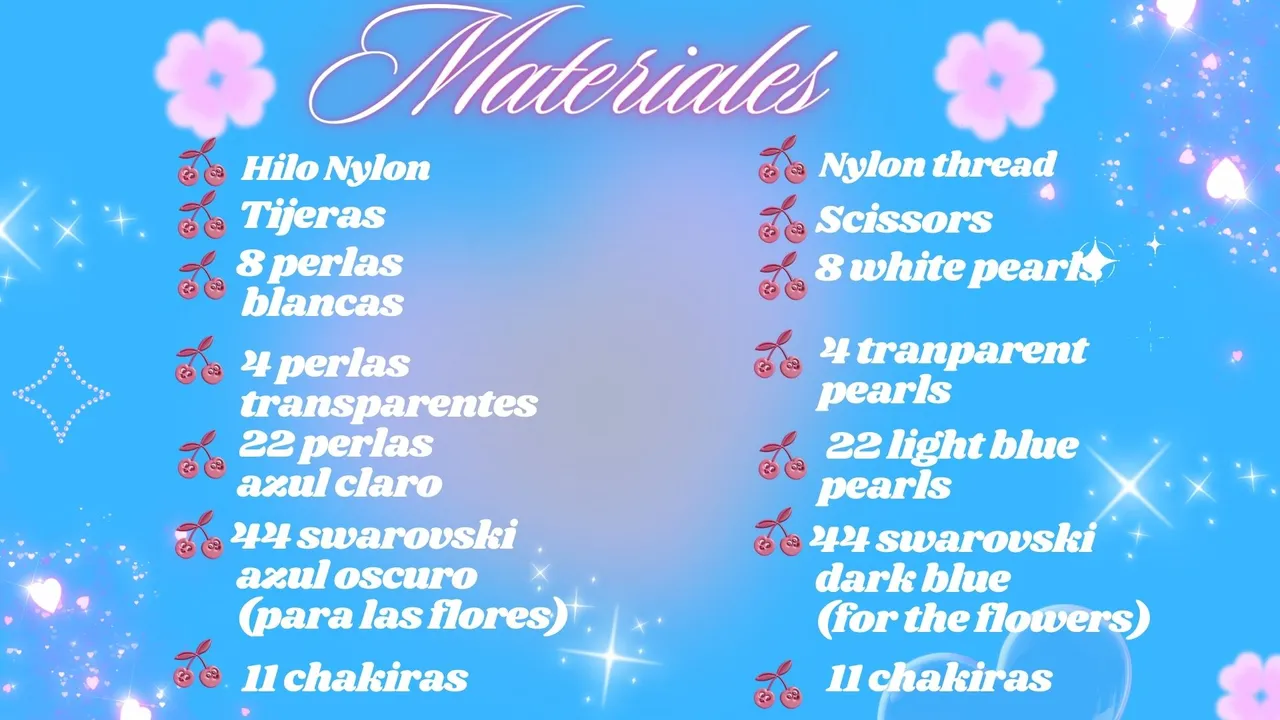
Materiales | Materials
Procedimiento | Procedure
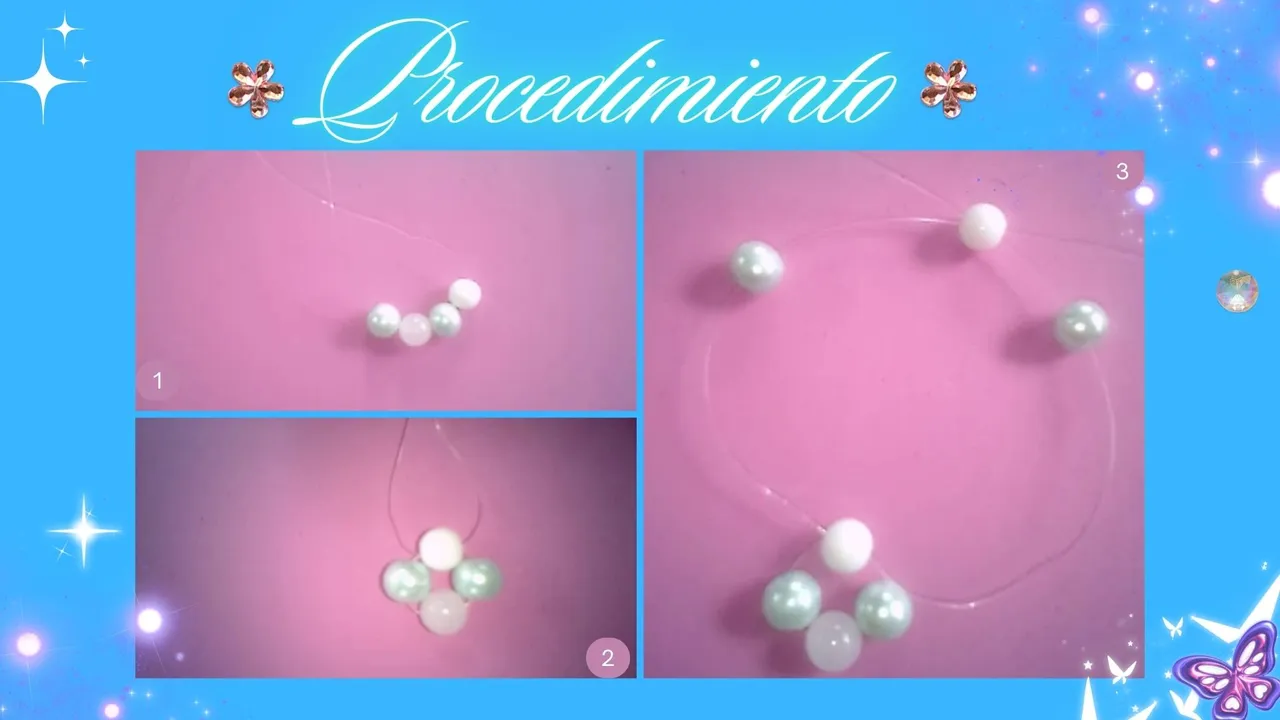
Paso 1 | Step 1
Colocamos cuatro perlas , una azul, otra transparente, otra azul y una blanca, luego pasamos los dos hilos por la perla blanca, luego ingresamos una perla azul de un lado , la otra perla azul del otro lado y la blanca va a pasar por los dos hilos.
We place four beads, one blue, one transparent, one blue and one white, then we pass the two threads through the white bead, then we enter a blue bead on one side, the other blue bead on the other side and the white bead will pass through the two threads.
Paso 2 | Step 2
Este proceso anterior se repite hasta que aparece la fila de perlas azules como en la imagen 6.
This process is repeated until the row of blue beads appears as in image 6.
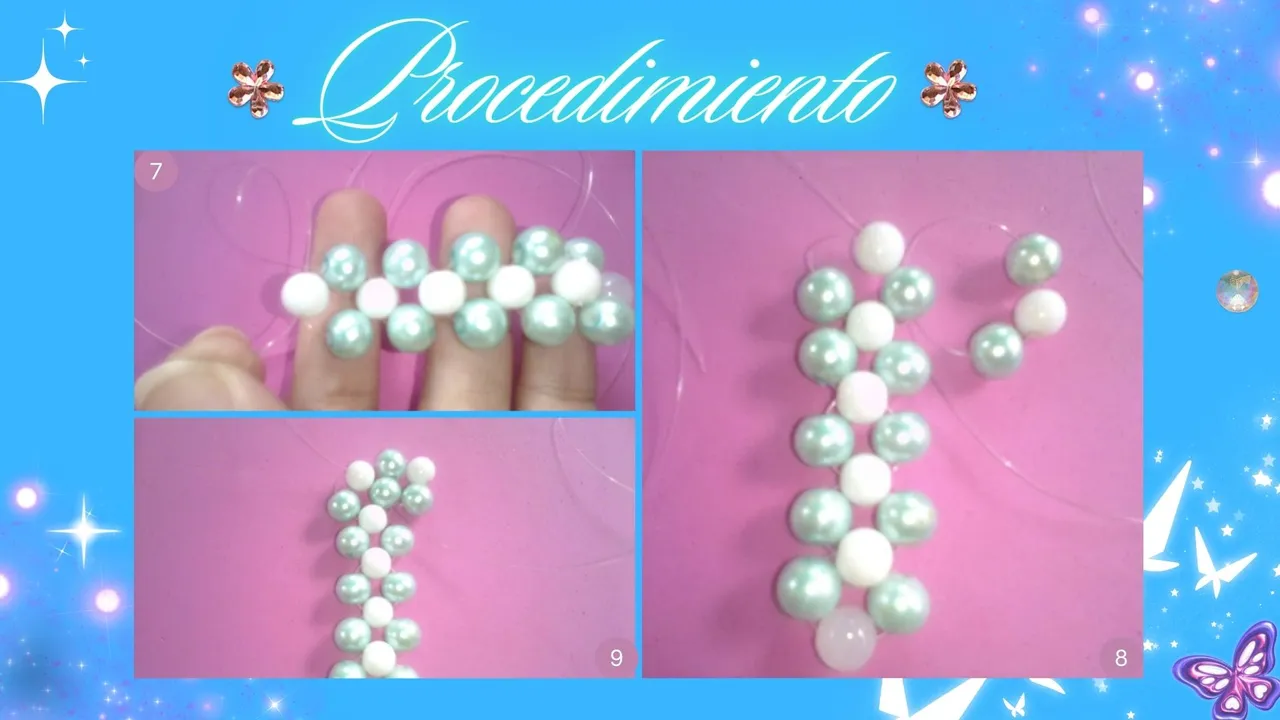
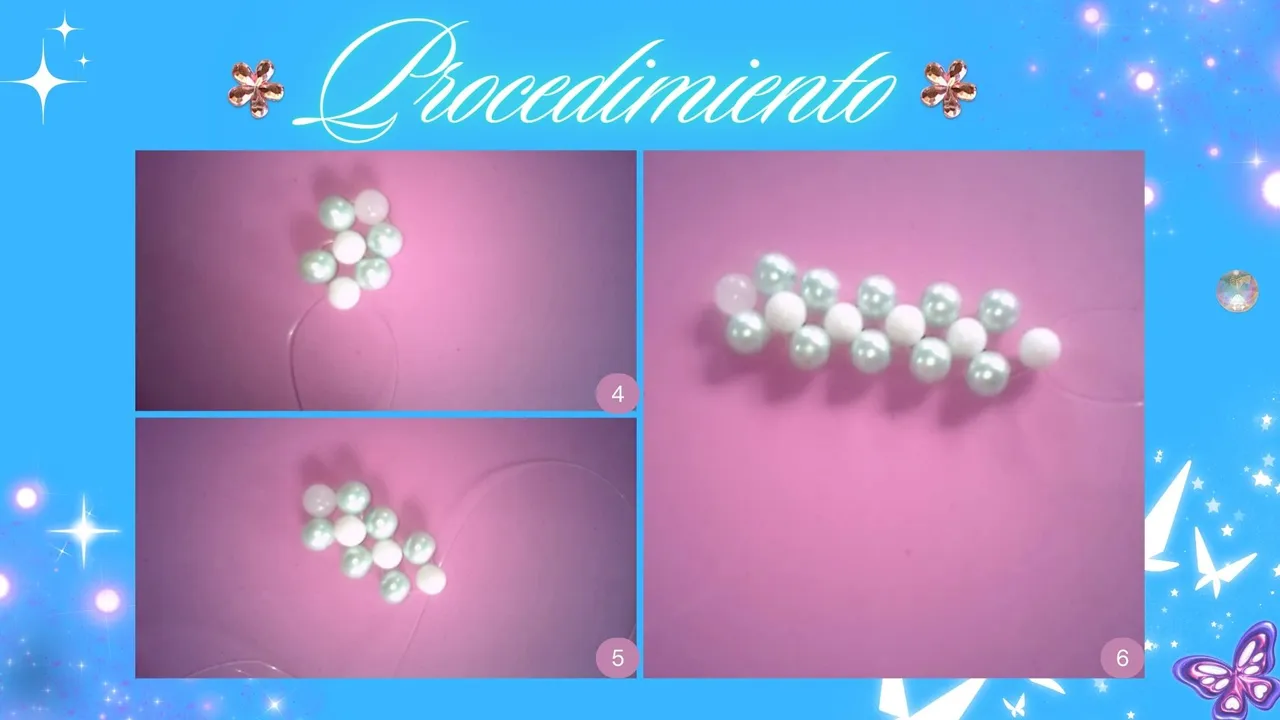
Paso 3 | Step 3
Ahora, el hilo nylon que quedó en la última perla blanca se pasa por la perla azul de al lado y se ingresan tres perlas mas, para hacer el brazo de la cruz. Luego este hilo se jala un poco.
Now, the nylon thread left on the last white bead is passed through the blue bead next to it and three more beads are inserted to make the arm of the cross.
Then this thread gets pulled a bit.
Paso 4 | Step 4
Luego viene una perla azul, otra transparente y otra azul , se le da la vuelta y se ingresa el hilo por la perla blanca y se jala un poco hasta que queda como en la imagen 12.
Then comes a blue bead, another transparent bead and another blue bead, turn it over and insert the thread through the white bead and pull it a little until it looks like in image 12.
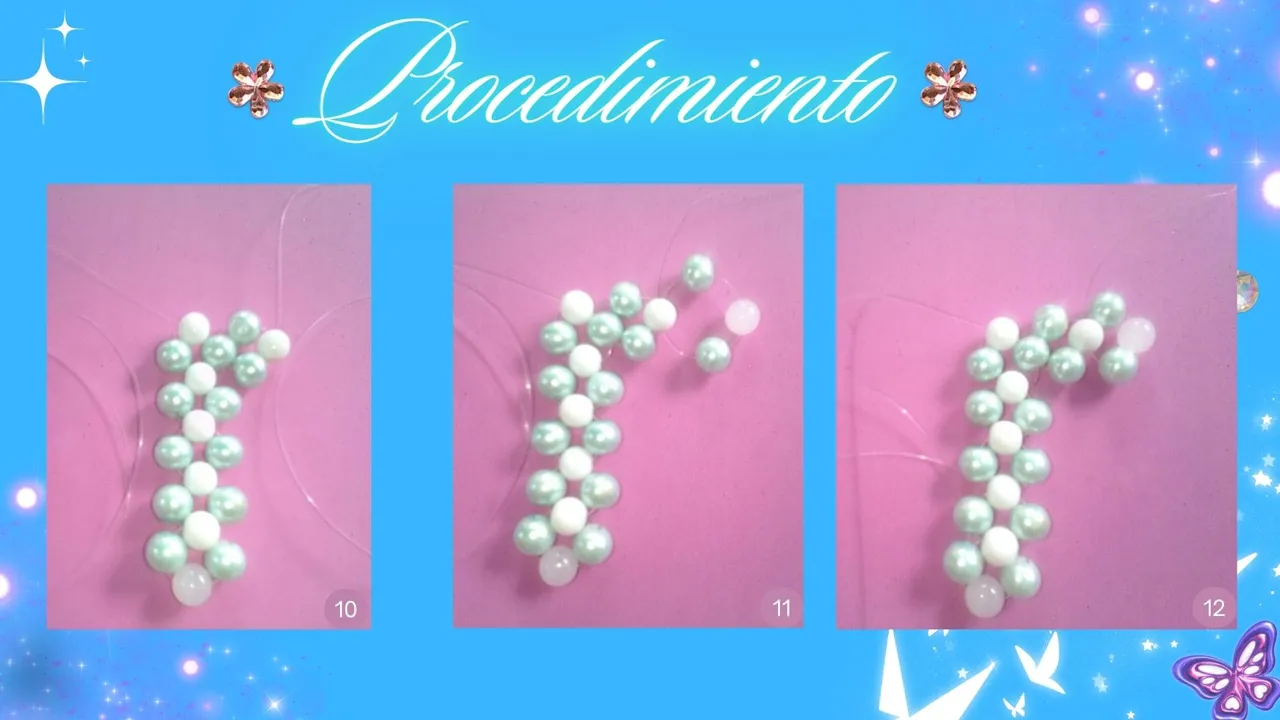
Paso 5 | Step 5
Luego volteamos la cruz para tener mas facilidad de manipular ya que soy derecha, entonces el hilo de la izquierda queda saliendo por la perla blanca, hacia arriba como se ve en la imagen 13, el hilo de la derecha queda por la perla blanca y se baja por la perl azul hacia la derecho y el hilo se ve hacia abajo como se ve en la imagen 15.
Then we turn the cross over to make it easier to manipulate since I am right, then the thread on the left is coming out through the white bead, upwards as seen in the image 13, the thread on the right is through the white bead and down through the blue bead to the right and the thread is downwards as seen in the image 15.
Paso 6 | Step 6
Luego usamos el hilo de izquierda solamente, igual como hicimos en el brazo anterior que hicimos, agregamos una perla azul, una blanca y otra azul , le damos la vuelta al hilo y la pasamos por la perla azul como se ve en la imagen 16. Luego jalamos el hilo y agregamos una azul otra transparente y otra azul, como se ve en la imagen 18.
Then we use the left hand yarn only as we did in the previous arm we made, we add a blue bead, a white bead and a blue bead, we turn the yarn over and pass it through the blue bead as shown in picture 16. Then we pull the thread and add a blue one, a transparent one and a blue one, as shown in image 18.
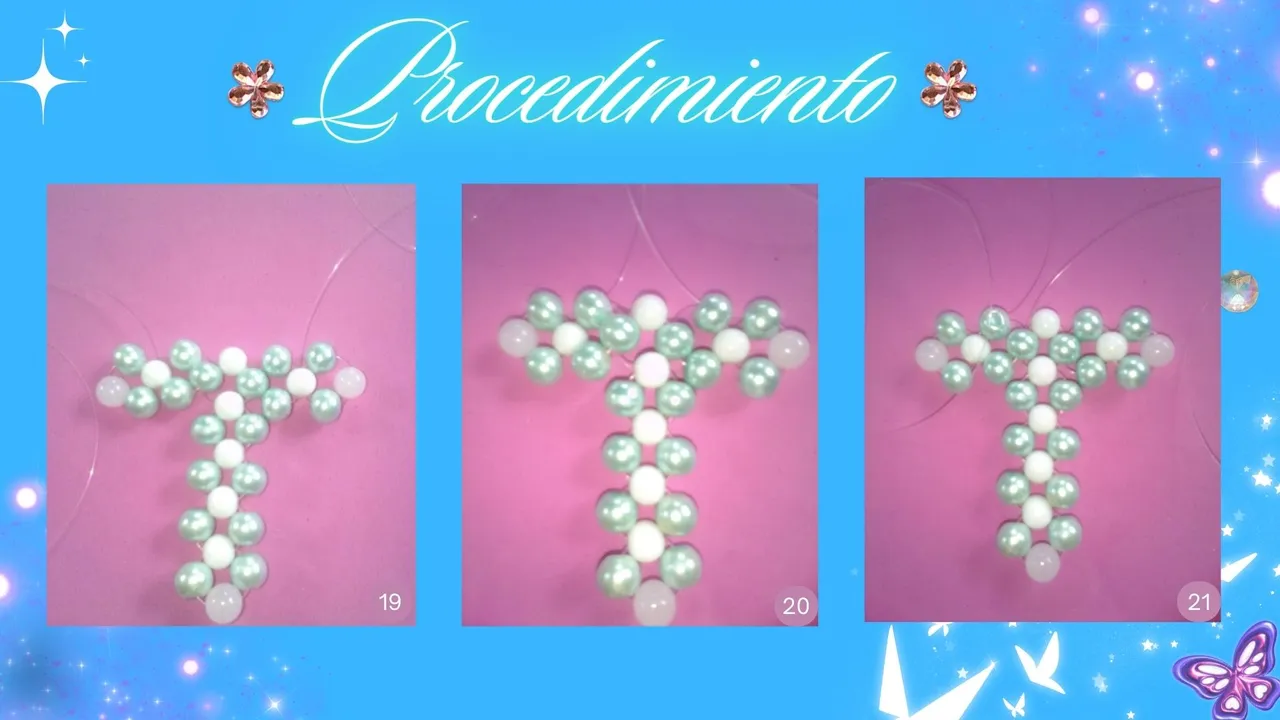
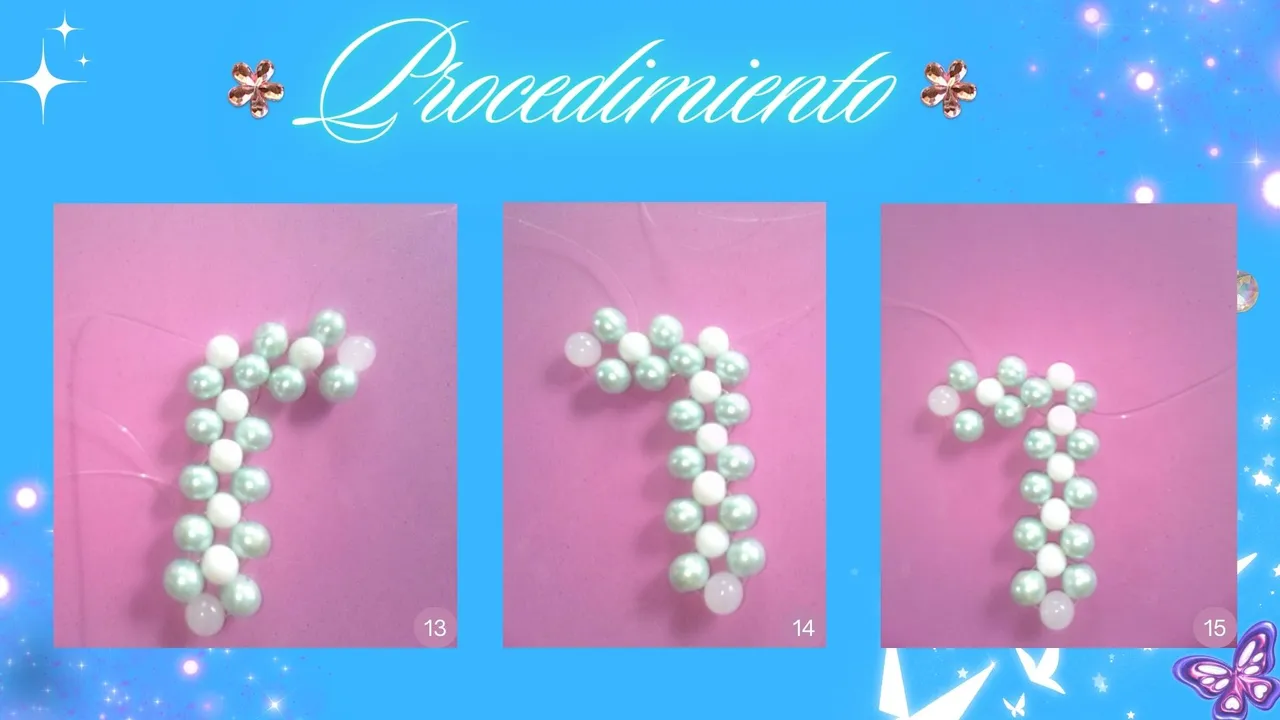
Paso 7 | Step 7
Luego vamos pasando los hilos de nylon que quedaron hacia arriba en las perlas blancas, los llevaremos los dos a que coincidan con la perla blanca en el centro de la cruz. Esto se puede ver mejor en la imagen 23. Luego agregamos una perla azul de cada lado por cada hilo y la blanca se pasa por los dos hilos.
Then we pass the remaining nylon threads upwards on the white beads, we will bring them both to match the white bead in the center of the cross. This can be seen better in picture 23. Then we add a blue bead on each side for each thread and the white bead is passed through both threads.
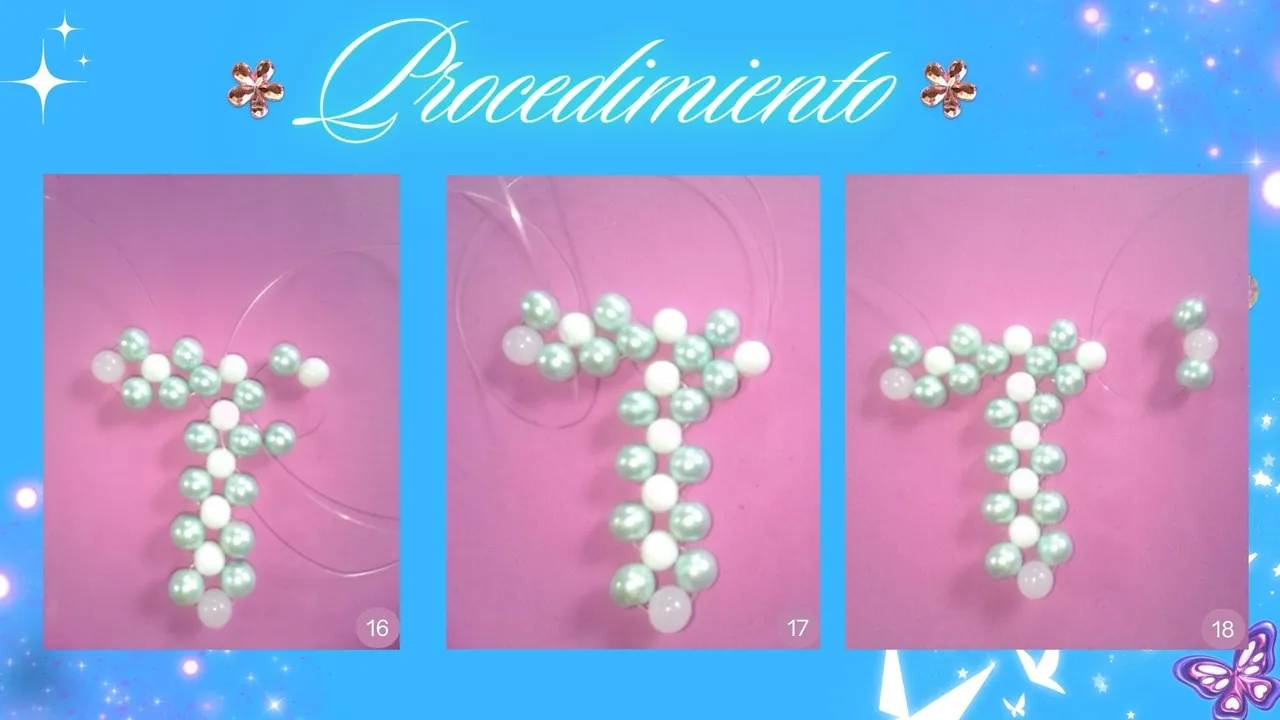
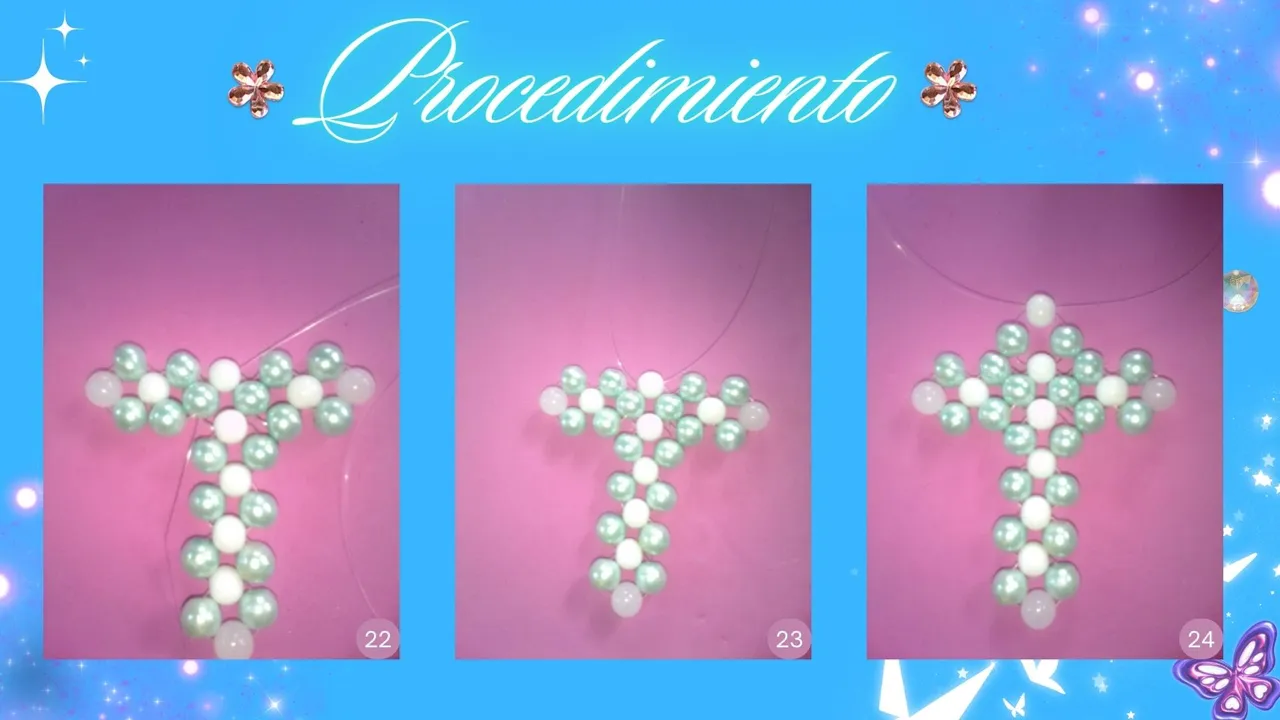
Paso 8 | Step 8
Luego de finalizada la parte de arriba, hacemos nudos, un nudo de cada lado, ver imagen 26. Luego con otro hilo nylon nuevo lo colocamos en partes iguales a cada la lado de la perla transparente de abajo como se ve en la imagen 27 y agregamos un swarovski por cada lado. Ver imagen 27.
After finishing the top part we tie a knot on each side, see image 26. Then with another new nylon thread we place it in equal parts on each side of the bottom transparent pearl as shown in image 27 and add a swarovski on each side. See image 27.
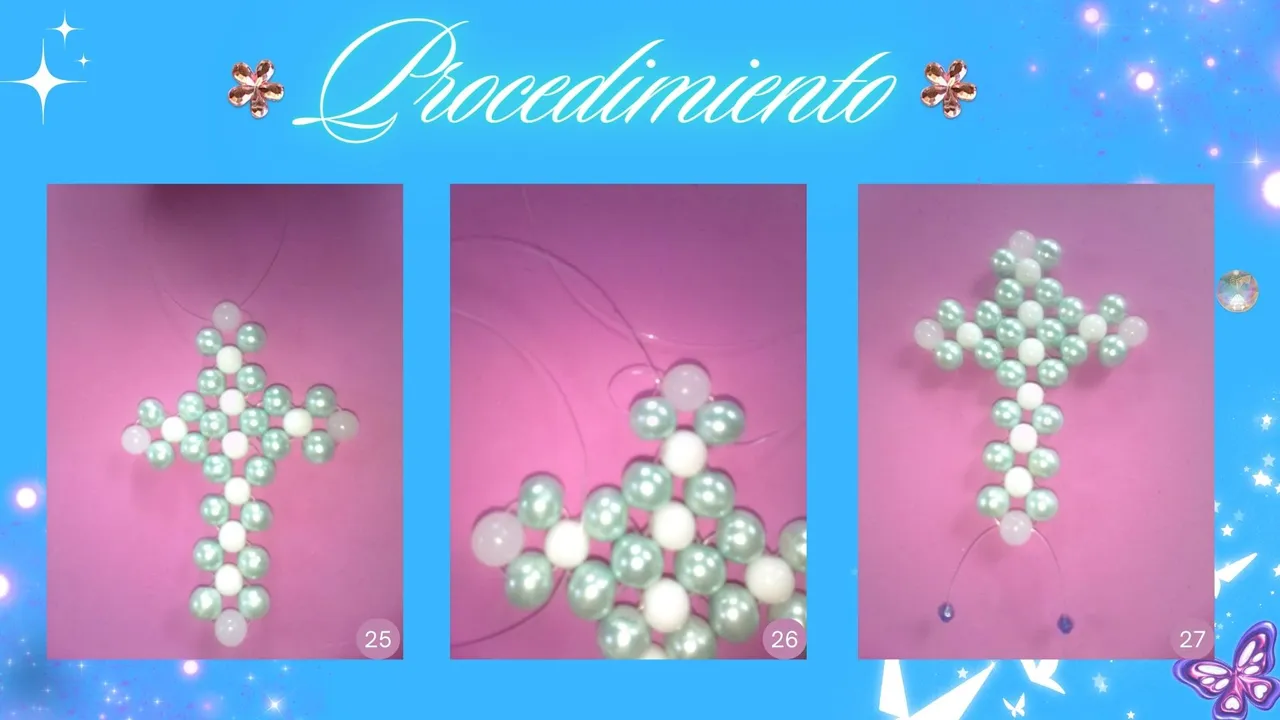
Paso 9 | Step 9
Luego pasamos una chakira pequeña por los dos hilos y luego pasamos los dos hilos por la perla blanca como se ve en la imagen 28. Y vemos que se arma una flor con el swarovski Luego volvemos a repetir el procedimiento como lo hicimos anteriormente.
Then we pass a small chakira through the two threads and then we pass the two threads through the white pearl as shown in image 28. Then we repeat the procedure as we did before.
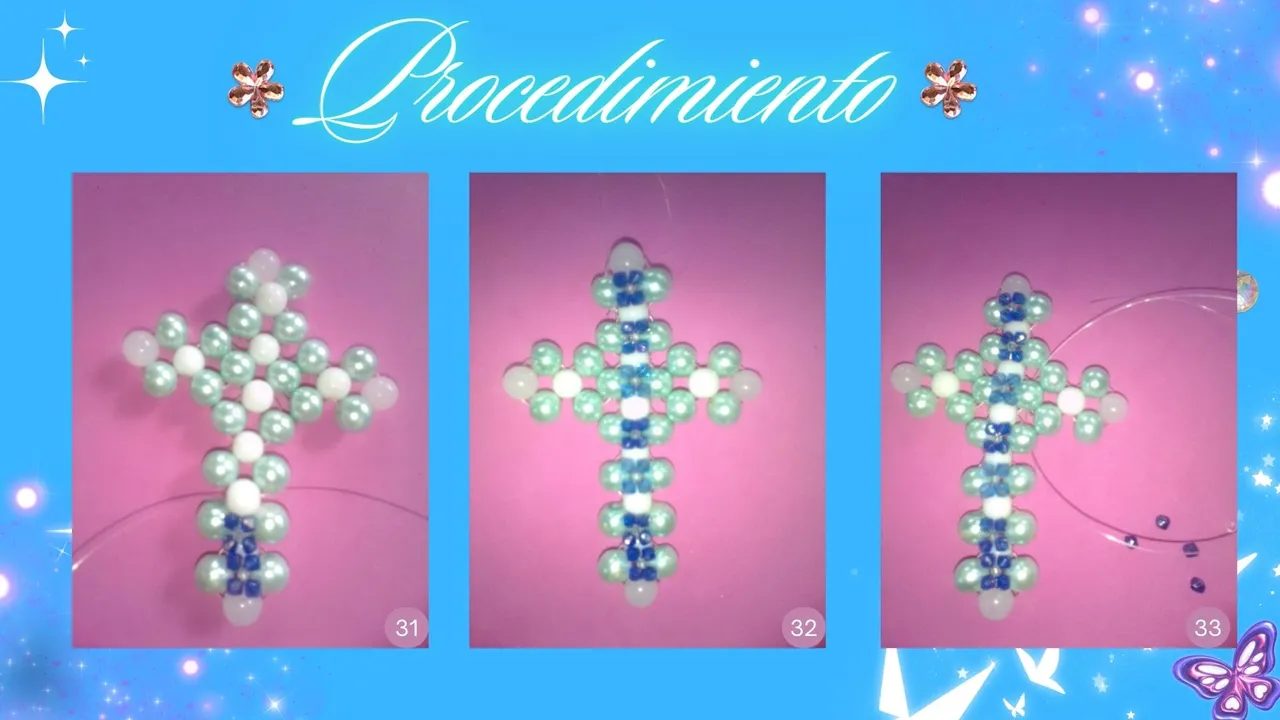
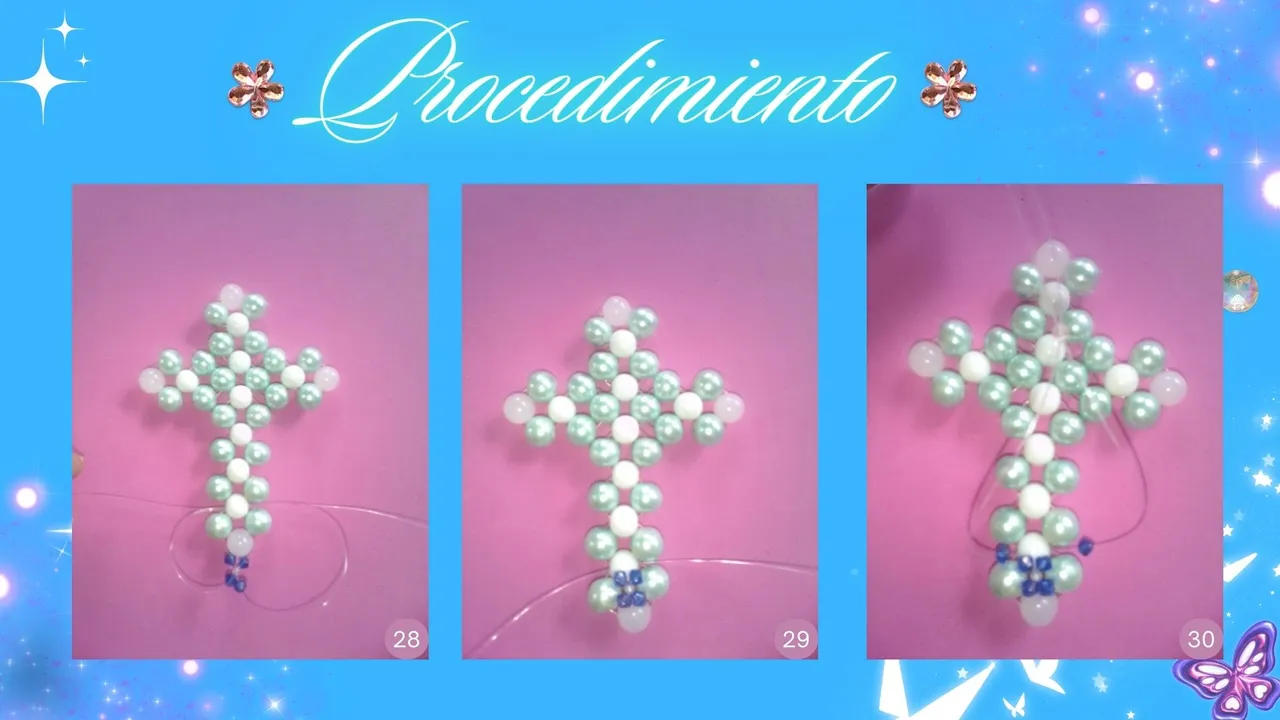
Paso 10 | Step 10
Luego podemos ver como se van completando una fila de las flores de swarovski en la imagen 32. Luego tomamos otro hilo de nylon nuevo y lo colocamos en la perla azul que está en el centro del lazo derecho de la cruz como podemos ver en la imagen 33 y hacemos el mismo procedimiento que acabamos de hacer para formar la flor de swarovski.
Then we can see how a row of swarovski flowers are completed in image 32. Then we take another new nylon thread and we place it in the blue pearl in the center of the right loop of the cross as we can see in image 33 and we do the same procedure that we just did to form the swarovski flower.
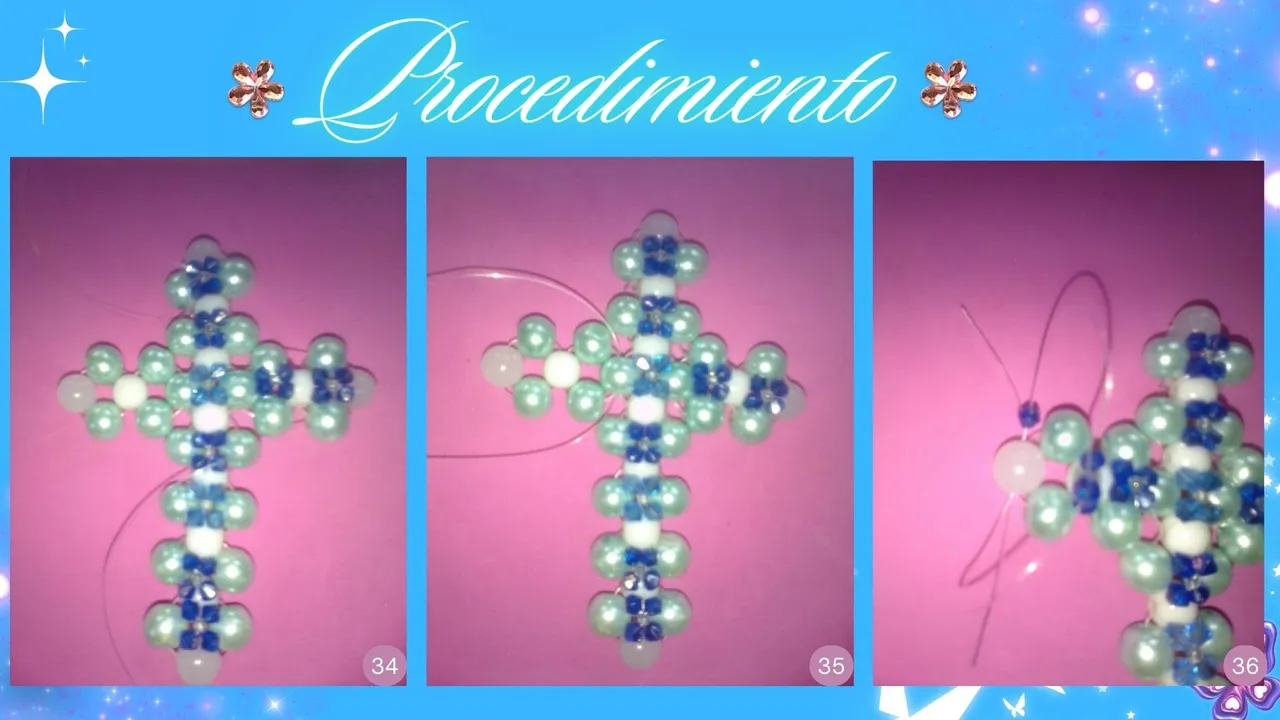
Paso 11 | Step 11
Luego hacemos los nudos a cada lado y cortamos, luego usamos un nuevo hilo de nylon como en la imagen 35 y repetimos el mismo proceso para hacer la flor de swarovski.
Then we make the knots on each side and cut, then use a new nylon thread as in image 35 and repeat the same process to make the swarovski flower.
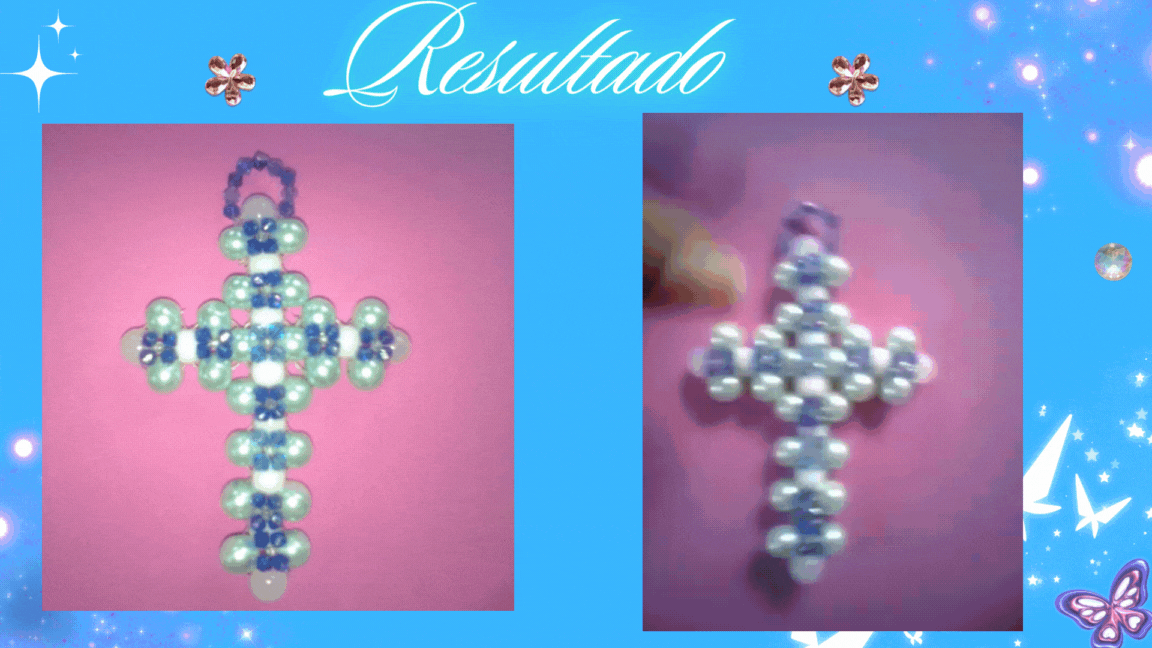
Resultado | Result
Y asi es como queda, si usan alambre pueden usarlo de llavero , yo no lo usaría de llavero ya que es muy delicado y lo usaré como un dije. Espero les guste , a mi me gusto mucho.
And this is how it looks like, if you use wire you can use it as a keychain, I would not use it as a keychain because it is very delicate and I will use it as a pendant. I hope you like it, I liked it a lot.
Gracias por leer !!!
Thanks for reading!!!

Créditos | Credits
Utilicé Canva para editar imágenes y personalicé un poco una plantilla de Canva.
I used Canva to edit images and customize a Canva template a bit.
Utilicé deepl.com para la traducción
I used deepl.com to traduction.
Todas las imagenes del paso a paso son mías, tomadas con mi telefono Yezz Liv1.
All the step by step images are mine, taken with my Yezz Liv1 phone.
 |
 |