English
Design on Canva.com
For the realization of this bracelet we are going to use the following.
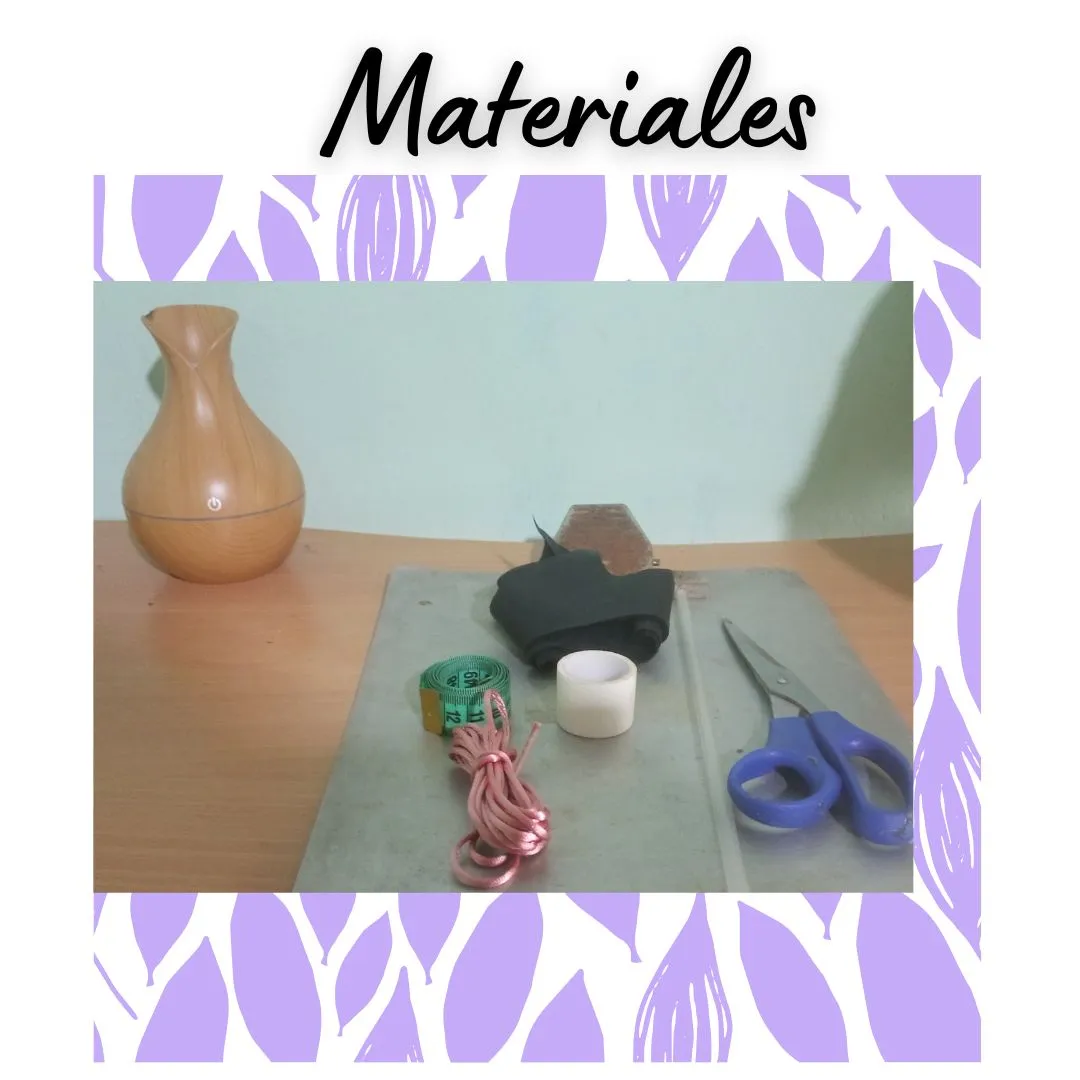
A small white pearlite
Silicon
Tinder
Chain
5 meters of mouse tail
Tirro
Hook binder
Step by step
We take the thread and cut it in four parts, we arrange the thread side by side and with a little bit of tyro we seal the top part so that it does not move, then we fix the thread on the hook of the folder, the first and fourth thread we separate it from the two threads in the middle, the threads in the middle we fix them together to the folder at the bottom with tyro so that it does not move.
Then we would have the first thread and the fourth thread loose, to make the first knotting we start with the fourth loose thread that is on the right and that thread we pass it under the first thread on the left that is fixed, then the other thread that is on the left is going to pass under the thread on the left fixed and then the thread goes up and goes under it and then the threads are pulled to make the knotting.
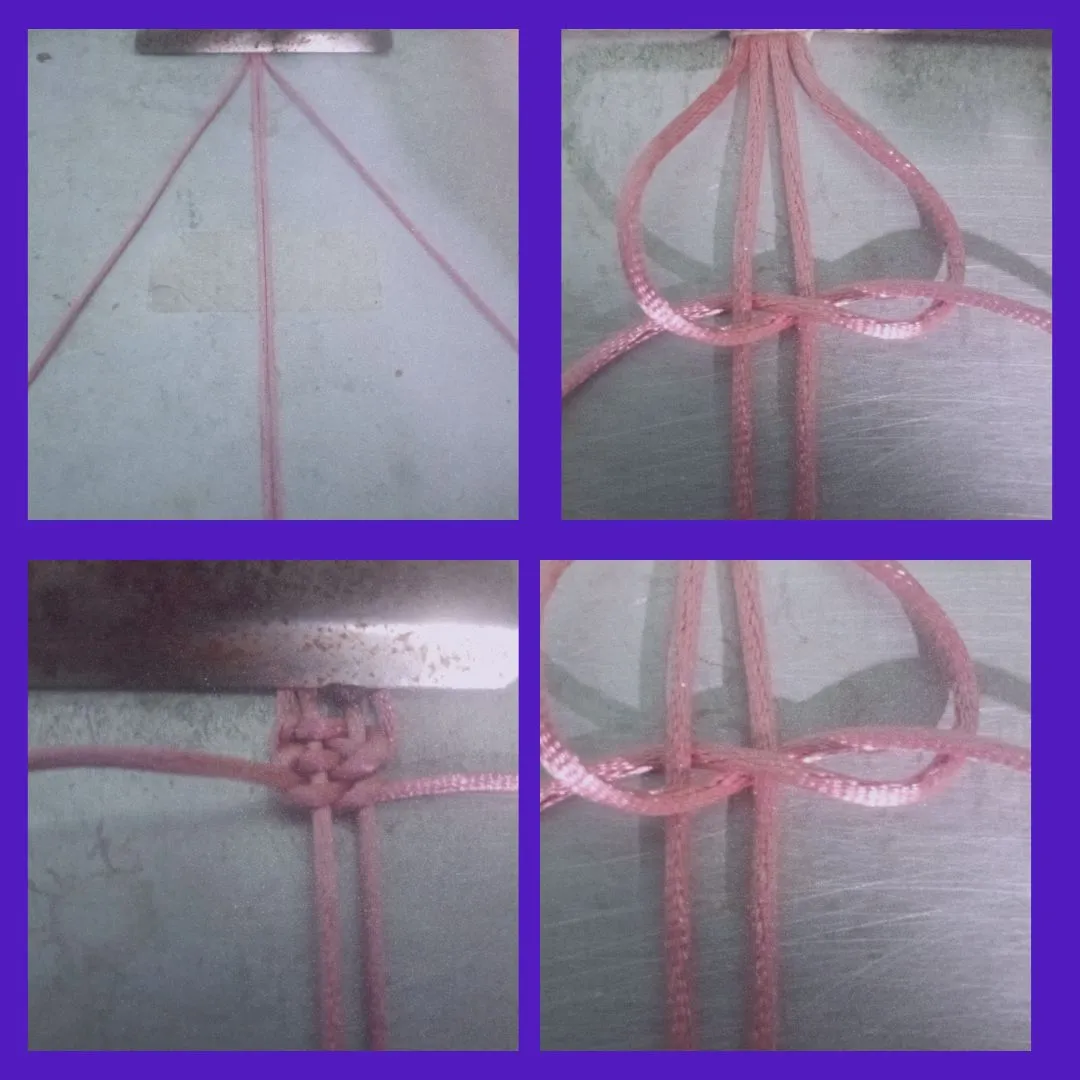
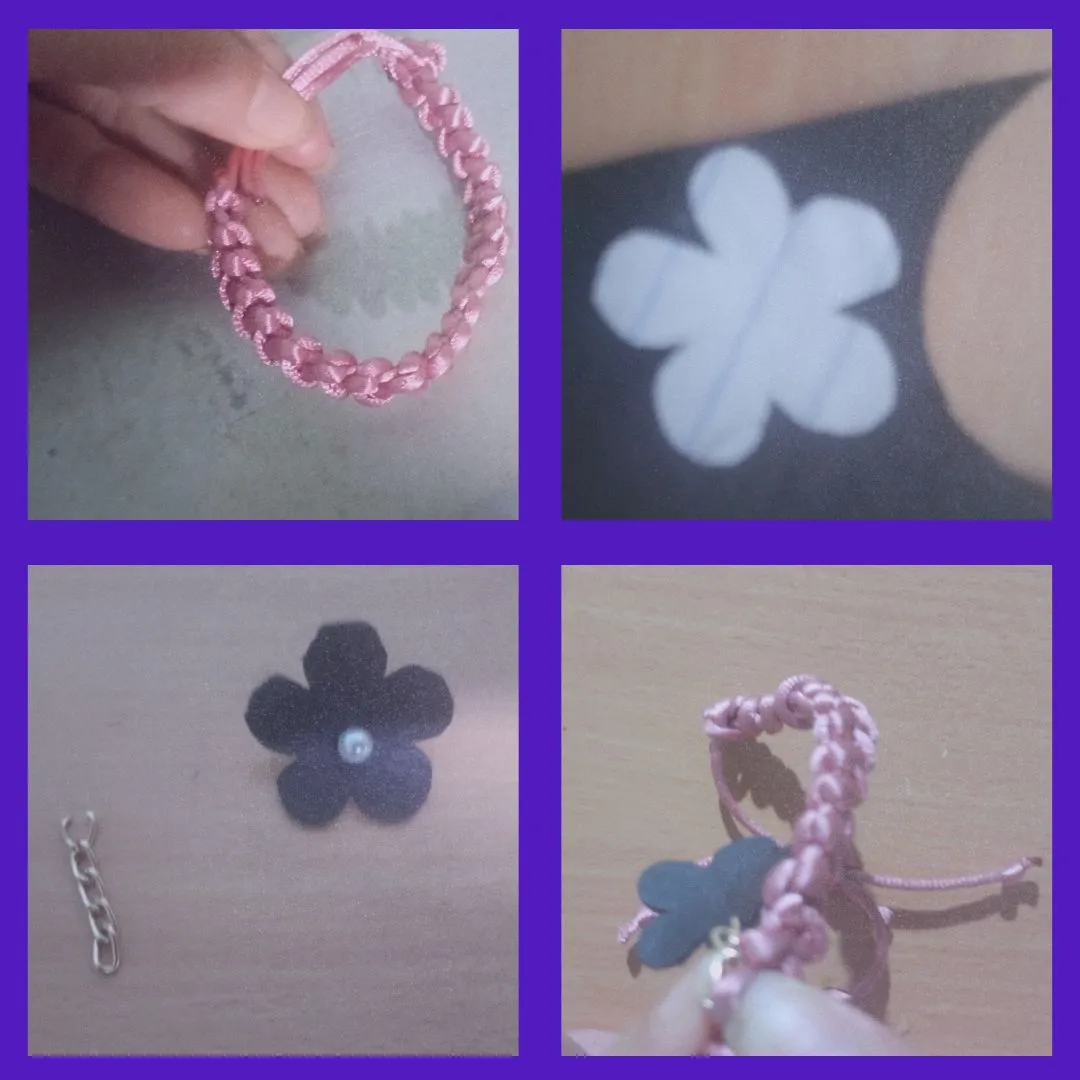
As you started on the right, now you have to do the same procedure, but taking the first thread from the left that is passed under the thread fixed on the right, then the last thread from the right is passed to the thread fixed on the left and then placed from below to the knot, then close with both threads so that the knot comes out, this operation is done according to the size of the wrist, I made a total of 35 knotted interspersed, first right and then left to complete the set. cut two of the threads at each end and fix it with fire so that it sticks to the whole, leaving only two threads that will be knotted at the tip each one and will be passed through fire so that it does not fray.
The bracelet is taken and placed in a cylindrical shape, a 10cm piece of mouse tail thread is taken and knotted three times between the threads, this will keep the bracelet closed as a brooch and also allow the flow to open space or close the bracelet according to the size of the person's wrist.

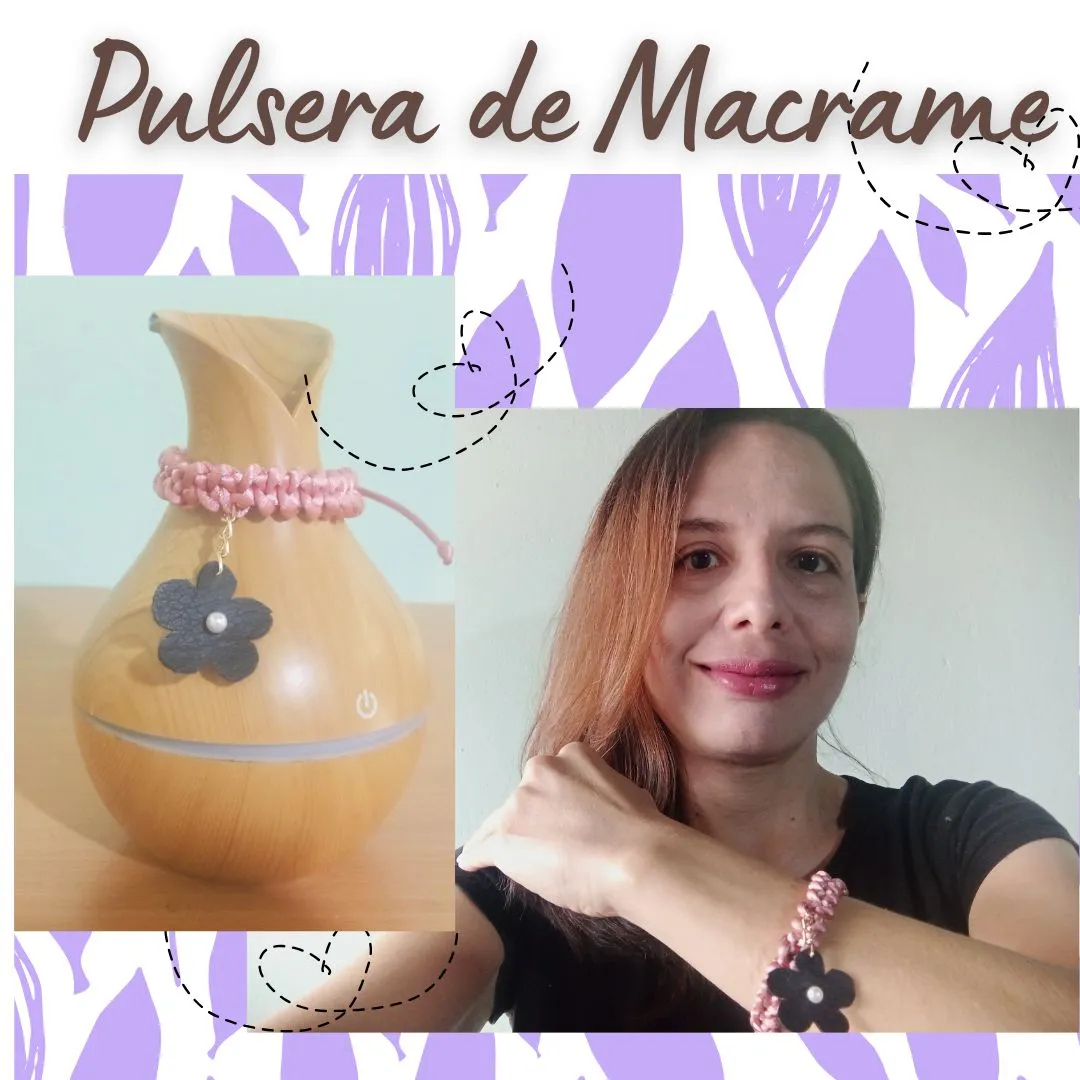
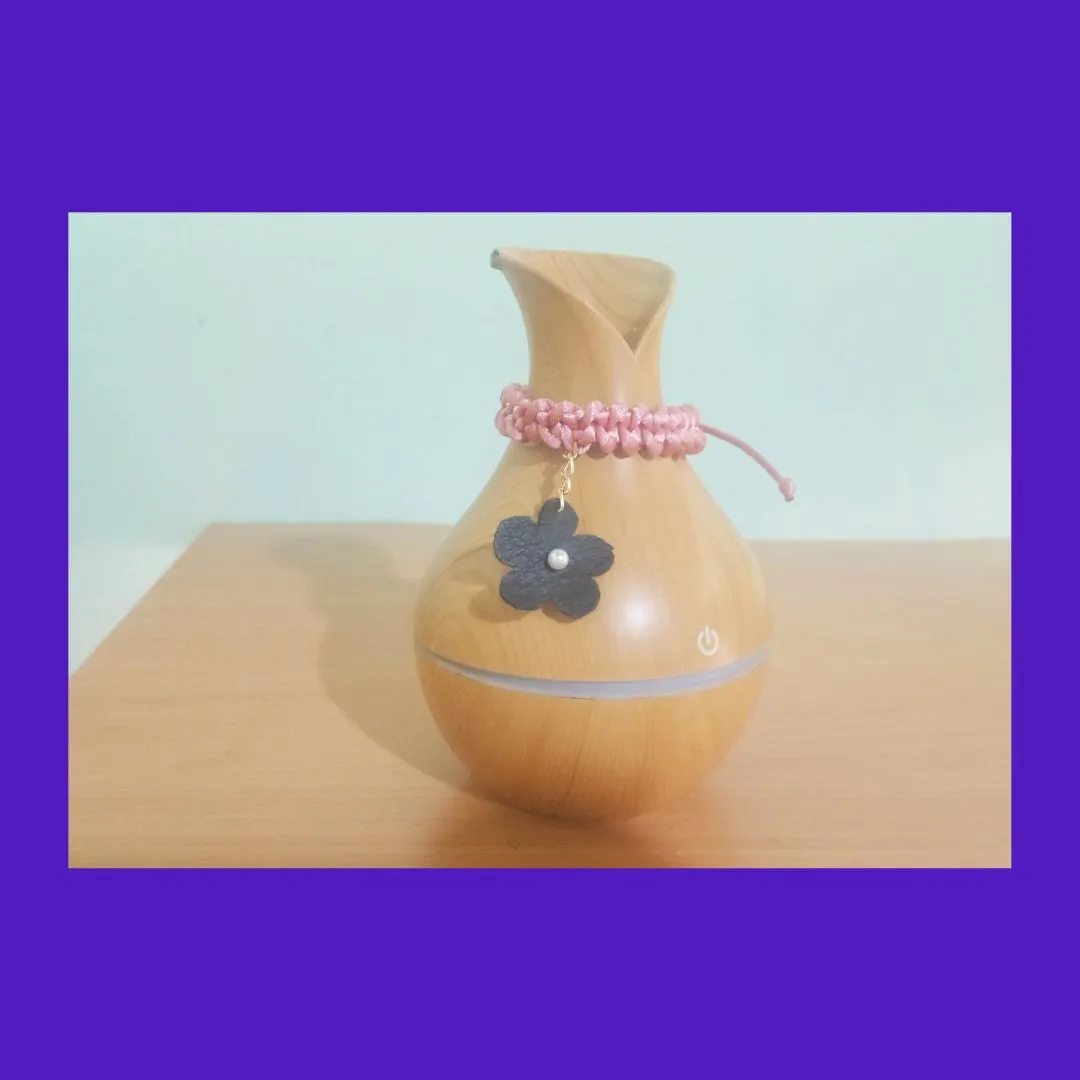
Once the bracelet is finished, the ornaments are placed, in this case I made it with leather, the pattern of a flower is placed and the lines are marked, then it is cut and with silicone the pearlite is fixed in the middle of the flower, in the upper part the chain is placed and it is fixed to the bracelet and thus the macramé bracelet is ready.
Well, this is all for me, friends. I'll see you next time to continue showing you more techniques for making beautiful accessories. If you have any comments or suggestions, I'm here to help. Greetings and Blessings to all.

Spanish
Diseño en Canva.com
Siempre me han gustado las pulseras de macramé, creo que esta es una técnica muy bonita y que ejercita la parte motriz y mental de los que deciden sumergirse en este arte. Por mi parte tuve la valentía estos días de aprender a realizar esta técnica y aunque ha sido un reto, ha valido la pena porque estoy explorando un nuevo hobbie, aunque debo decir que he tenido que ejercitar mi mente en cada anudada, en varias oportunidades me preguntaba: ¿había hecho la izquierda o la derecha? ¿Cuántos nudos llevo? ¿dónde es que iba el hilo? ¿Abajo o arriba? Desbaratar y repetir una y otra vez el mismo procedimiento ha sido un dolor de cuello, pero el tiempo invertido valió la pena porque pude consolidar mi primer proyecto de pulsera y lo mejor es que aprendí a realizarlo rápido después de mi intento número, se me fue la cuenta, en fin, aquí les presento el paso a paso de esta especial pulsera para mí.
Para la realización de esta pulsera vamos a ocupar lo siguiente
Cuerina de color negro
Una perlita blanca pequeña
Silicon
Yesquero
Cadenita
5 metros de Cola de ratón
Tirro
Carpeta de gancho
Paso a paso
Agarramos el hilo y recortamos en cuatro partes, ordenamos el hilo uno al lado del otro y con un poquito de tirro sellamos la parte de arriba para que no se mueva, posteriormente fijamos el hilo en el gancho de la carpeta, el primer y cuarto hilo lo separamos de los dos hilos del medio, a los hilos del medio lo fijamos juntos a la carpeta en la parte de abajo con tirro para que no se nos mueva.
Entonces tendríamos el primer hilo y el cuarto hilo sueltos, para hacer el primer anudado empezamos por el cuarto hilo suelto que está a la derecha y ese hilo lo pasamos por debajo del primer hilo de la izquierda que está fijado, luego el otro hilo que está a la izquierda va a pasar por debajo del hilo de la izquierda fijado y luego se sube el hilo y se mete por debajo y luego se jalan los hilos para hacer el anudado.
Como se comenzó por la derecha, ahora le corresponde hacer el mismo procedimiento, pero tomando el primer hilo de la izquierda que se pasa por debajo del hilo fijado que está a la derecha, luego el ultimo hilo de la derecha se pasa al hilo fijado de la izquierda y luego se coloca desde abajo al nudo, luego se cierra con ambos hilos para que salga el nudo, esta operación se realiza según el tamaño de la muñeca, yo realice en total 35 anudados intercalados, primero derecha y luego izquierda hasta completar la el conjunto. se recortan dos de los hilos de cada extremo y se fija con fuego para que se pegue al conjunto, quedando solo dos hilos que se anudaran en la punta cada uno y se pasara por fuego para que no se deshilache.
Se toma la pulsera y se coloca en forma cilíndrica, se toma un pedacito de 10cm de hilo de cola de ratón y se anuda por tres veces entre los hilos, este será el que mantendrá la pulsera cerrada como un brochecito y además permitirá el flujo para abrir espacio o cerrar la pulsera según el tamaño de la muñeca de la persona.
Culminada la pulsera se le colocan los adornos, en este caso lo realice con cuerina, se coloca el patrón de una flor y se marcan las líneas, luego se recorta y con silicón se fija la perlita en el medio de la flor, en la parte de arriba se coloca la cadenita y se fija de la pulsera y así nos queda lista la pulsera de macramé.
Bueno amigos esto es todo por mi parte, nos vemos en una próxima oportunidad para seguirles mostrando más técnicas para la realización de bellos accesorios, si tienen algún comentario o sugerencia estoy a la orden, Saludos y Bendiciones a todos.
Fotos propias sacadas con un teléfono celular Redmi 10
Diseños en canva.com
Traduccion en Deepl.com