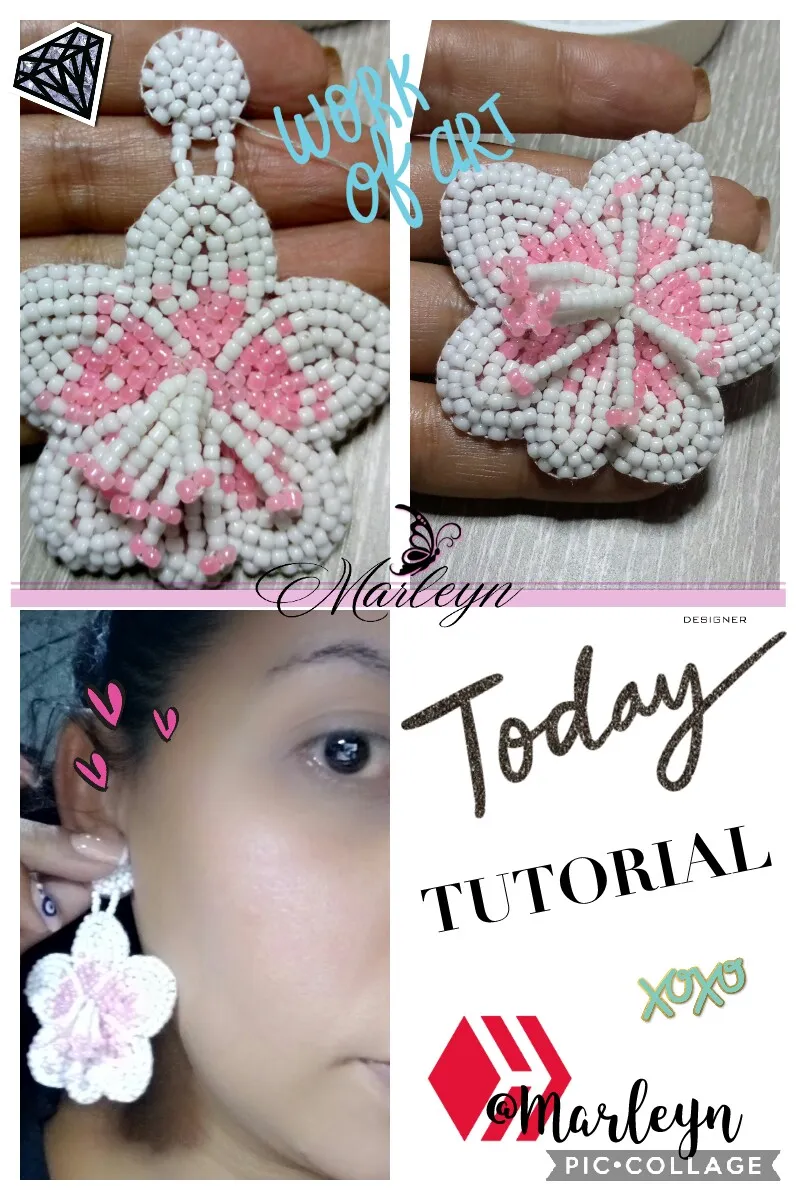
Happy and blessed new day first of all I hope you are well, shining, with happy spirit and above all with health, energy surrounded by family and love. I have proposed to learn how to make embroidered tendrils in beads, I have a lot to learn and I will be delighted to explain what I have learned, and I have compiled a lot of information about embroidery in rhinestones, although I lack technique, I think that the most important thing is practice and of this way to improve and improve our pieces. First of all I am an apprentice and any advice will always be well received! I am a believer that we never stop learning every day, those who know me know that needles and I don't, hahahaha I always hurt myself, I break the needle, well I tell you! I'm a little clumsy when it comes to needles, despite that I think that with practice I'll show myself that it can be done. Let's start:
Cuando lo termines realiza un amarre por atras,corta el hilo sobrante, colocamos un poco de silicón liquido en la parte de atrás y lo vamos a pegar en el cuero o tela gruesa que tengas, es preferible que sea el tono mas parecido posible! Antes de pegar la pieza al cuero traspasa el cuero con la base del zarcillo; yo me equivoqué en una de las tantas veces que lo hice y no le coloque la base del zarcillo mas abajo lo veras en otras fotos. Siempre como humanos es normal y equivocarnos así que bueno solo reí y lo volvi a hacer una vez mas desde el principio incluso la tercera vez q lo hice me quedo mas bonito en comparación del primero que me quedo algo torcido, bueno continuando, luego de pegar las piezas insertamos nuevamente hilo en la agujas y ahora la insertamos en el cuero desde adentro hacia afuera para esconder el nudo y comenzamos a cocer poco a poco agregando entre cada puntada una mostacilla.
When you finish it, make a tie at the back, cut the excess thread, put a little liquid silicone on the back and stick it to the leather or thick fabric you have, that is It is preferable that it be the most similar tone possible! Before gluing the piece to the leather, go through the leather with the base of the tendril; I was wrong in one of the many times that I did it and I did not place the base of the tendril further down, you will see it in other photos. As humans, it is always normal and making mistakes, so well, I just laughed and did it again from the beginning, even the third time I did it, it turned out prettier compared to the first one, which left me a little crooked, well continuing, after hitting the pieces we insert thread into the needles again and now we insert it into the leather from the inside out to hide the knot and we begin to cook little by little adding a seed bead between each stitch.

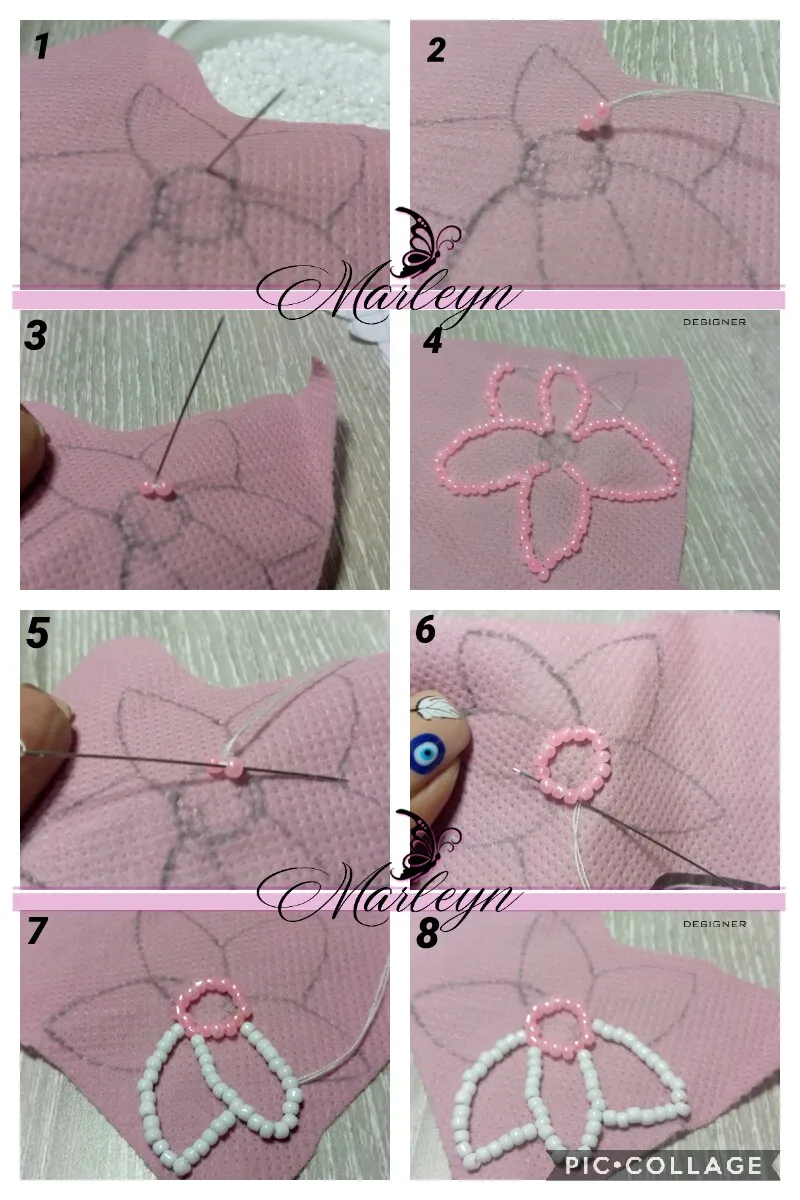
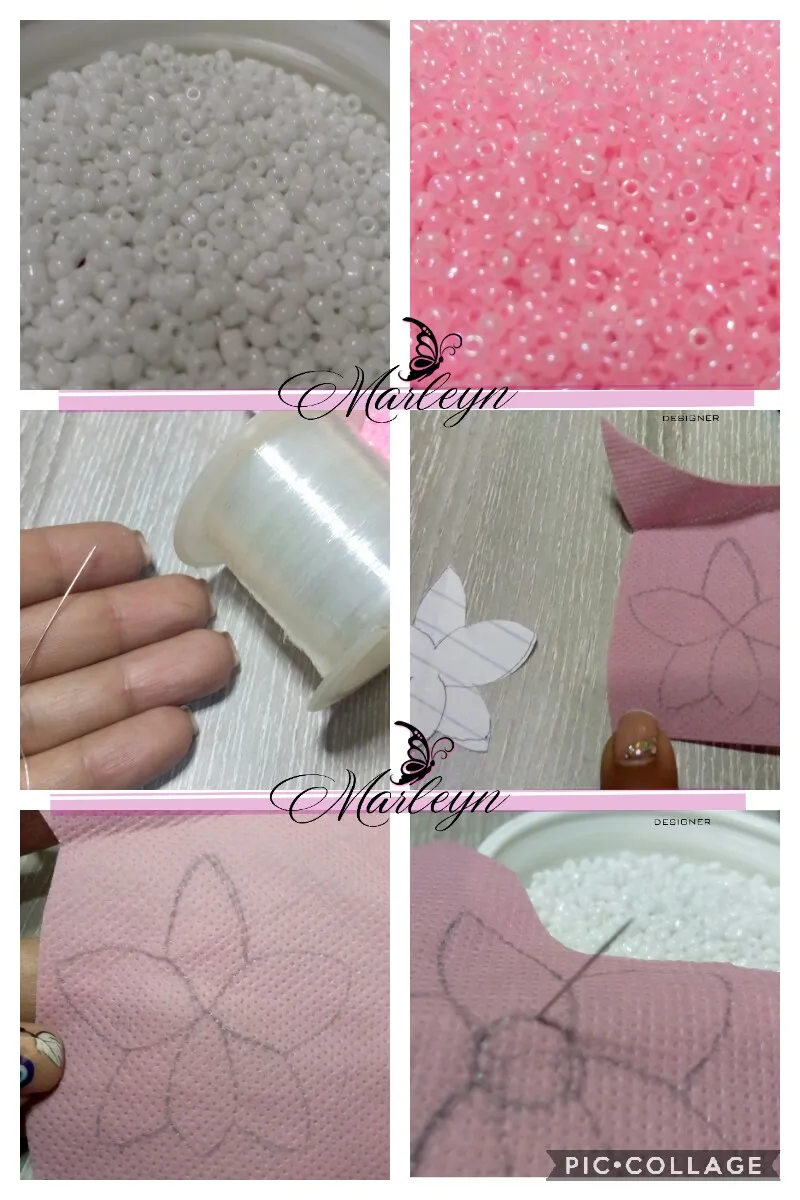
Dejemos a un lado la pieza anterior para realizar la parte de abajo de nuestra pieza, el paso a paso es muy parecido a la pieza anterior, esta vez vamos a seguir las lineas del patrón yo comencé por las hojas de la orquídea introduciendo mostacillas de 2 en 2 y me devolvía con la aguja por la segunda mostacilla, así sucesivamente hasta completar toda la pieza esta la hice con mostacilla rosada el resultado no fue de mi gusto, así que lo intente nuevamente reiteradas veces hasta que me gusto como estaba quedando!Como te comenté en un párrafo anterior se requiere práctica, quizás para algunos es súper fácil al principio y para otras personas como yo no tanto, todo esta en tu perseverancia, tu paciencia y tus ganas de aprender.
Let's put aside the previous piece to make the bottom part of our piece, the step by step is very similar to the previous piece, this time we are going to follow the lines of the pattern I started through the leaves of the orchid introducing beads 2 by 2 and I returned with the needle through the second bead, so on until I completed the entire piece I made this with pink bead the result was not to my liking, so I tried again several times times until I liked how it was turning out! As I mentioned in a previous paragraph, practice is required, perhaps for some it is super easy at first and for other people like me not so much, everything is in your perseverance, your patience and your desire to learn .
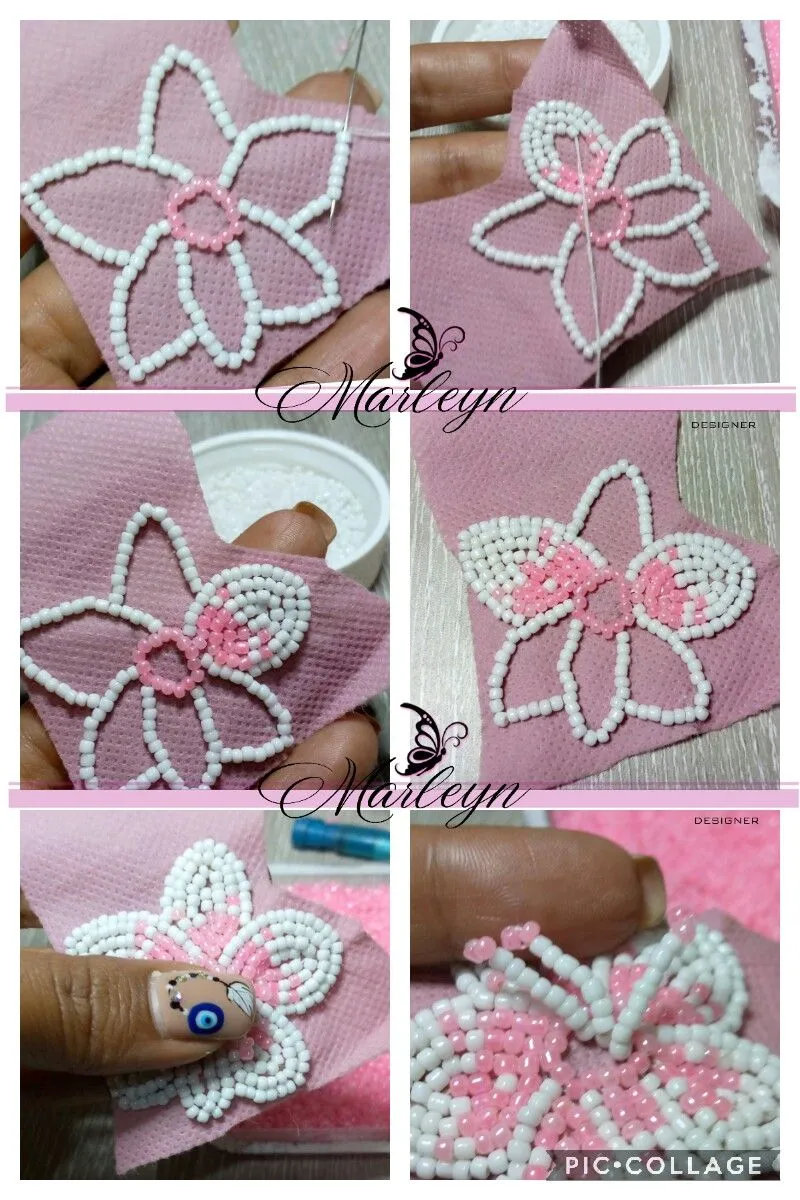
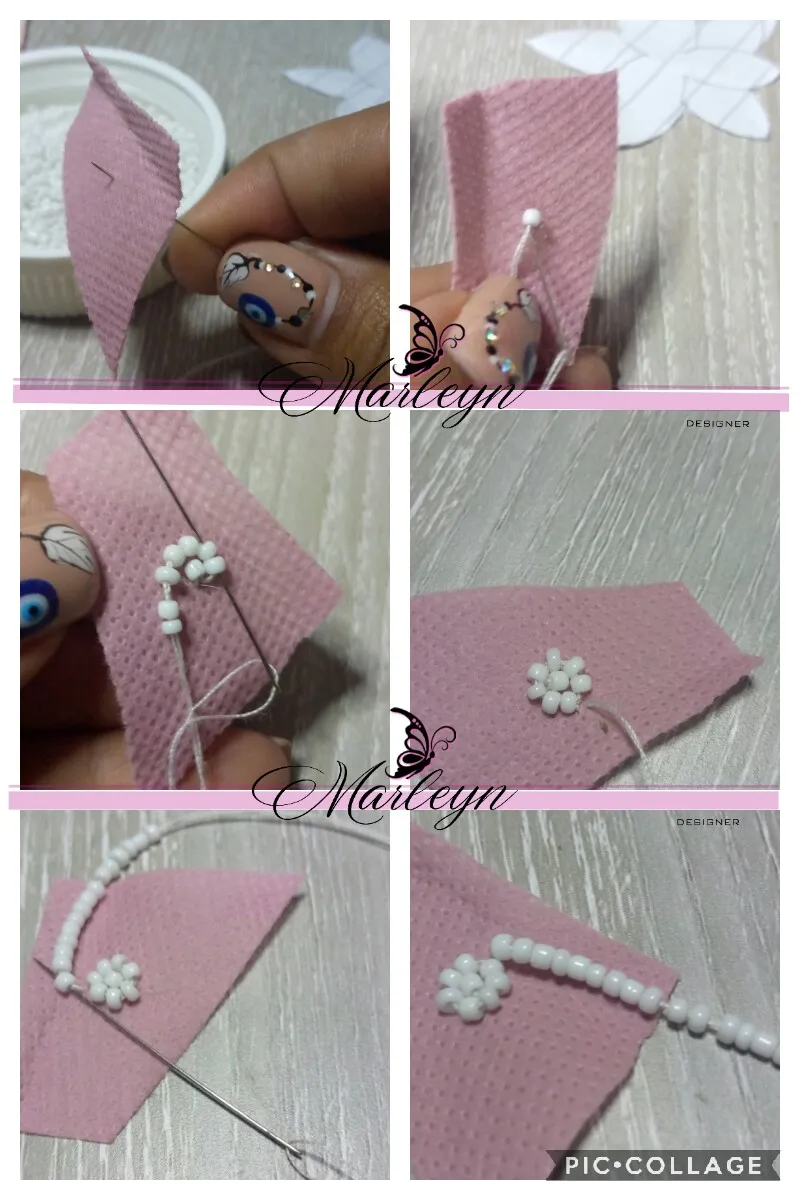
Cuando termines de bordar toda la orilla de nuestra orquídea, vamos a pasar la aguja con el hilo unas dos veces por toda la pieza como te muestro en la primera imagen, luego vamos a bordar adentro de la flor, sin apresurarte poco a poco, yo jugue con los colores quería que tuviera como una especie de degradado pero no lo conseguí aunque el resultado me gusto bastante, como estoy aprendiendo esto es mas ensayo y error. recuerda ir realizando un amarre por atrás de vez en cuando por que puede suceder que se rompa el hilo, o se te enrede y de esta manera no pierdes todo el trabajo realizado anteriormente. Eso lo entendí como la tercera vez que bordaba la orquídea (Risas)
When you finish embroidering the entire edge of our orchid, we are going to pass the needle with the thread twice through the entire piece as I show you in the first image, then we are going to embroider inside the flower, without rushing little by little, I played with the colors I wanted it to have a kind of gradient but I didn't get it although I quite liked the result, as I'm learning this is more trial and error. remember to make a tie from behind from time to time because it can happen that the thread breaks, or it gets tangled up and in this way you do not lose all the work done previously. I understood that as the third time I embroidered the orchid (Laughter)
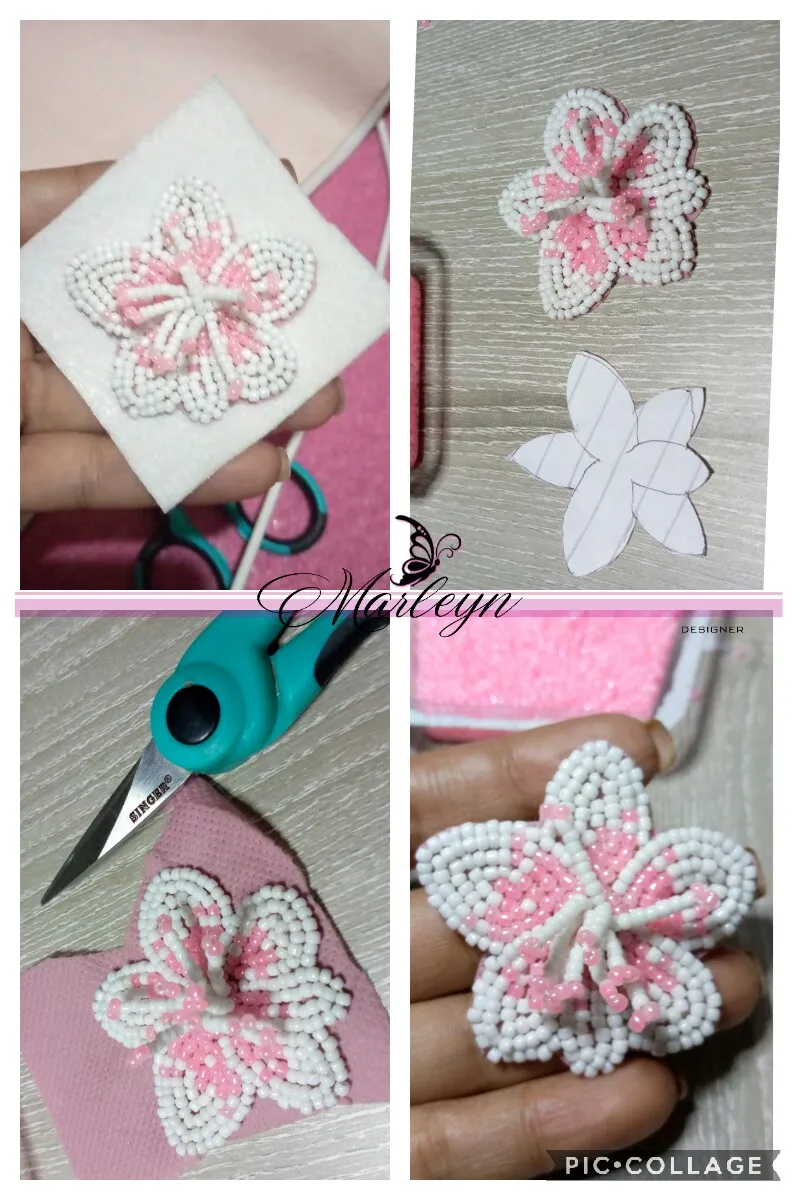
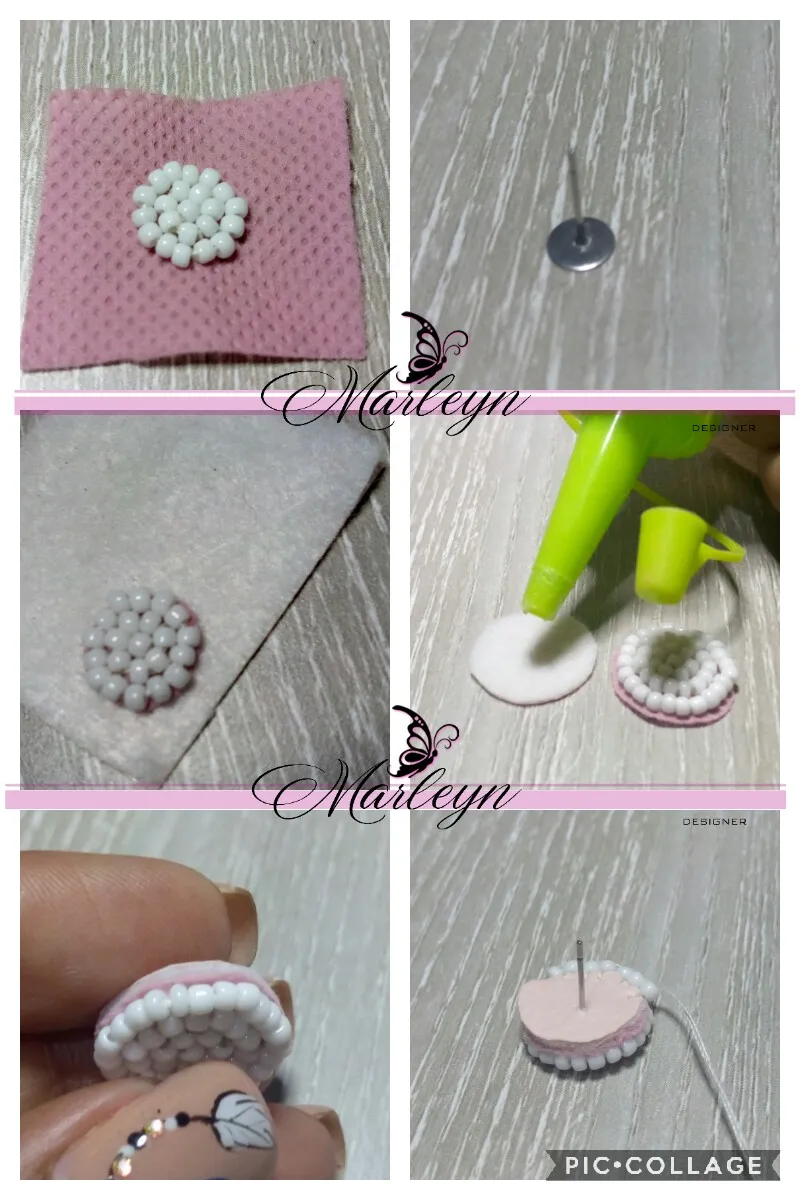
En este punto que hemos terminado de bordar la flor por adentro vamos a cortar la tela sobrante debes ser muy cuidadoso para no cortar los hilos, luego colocamos silicon liquido preferiblemente evitando las orillas y lo pegaremos en nuestro cuero o tela gruesa, puede dejarlo secar un poco y recorta la tela sobrante sin perder la forma de tu pieza.
At this point that we have finished embroidering the flower on the inside we are going to cut the excess fabric you must be very careful not to cut the threads, then we place liquid silicone preferably avoiding the edges and we will glue it on our leather or thick fabric, you can let it dry a bit and trim the excess fabric without losing the shape of your piece.
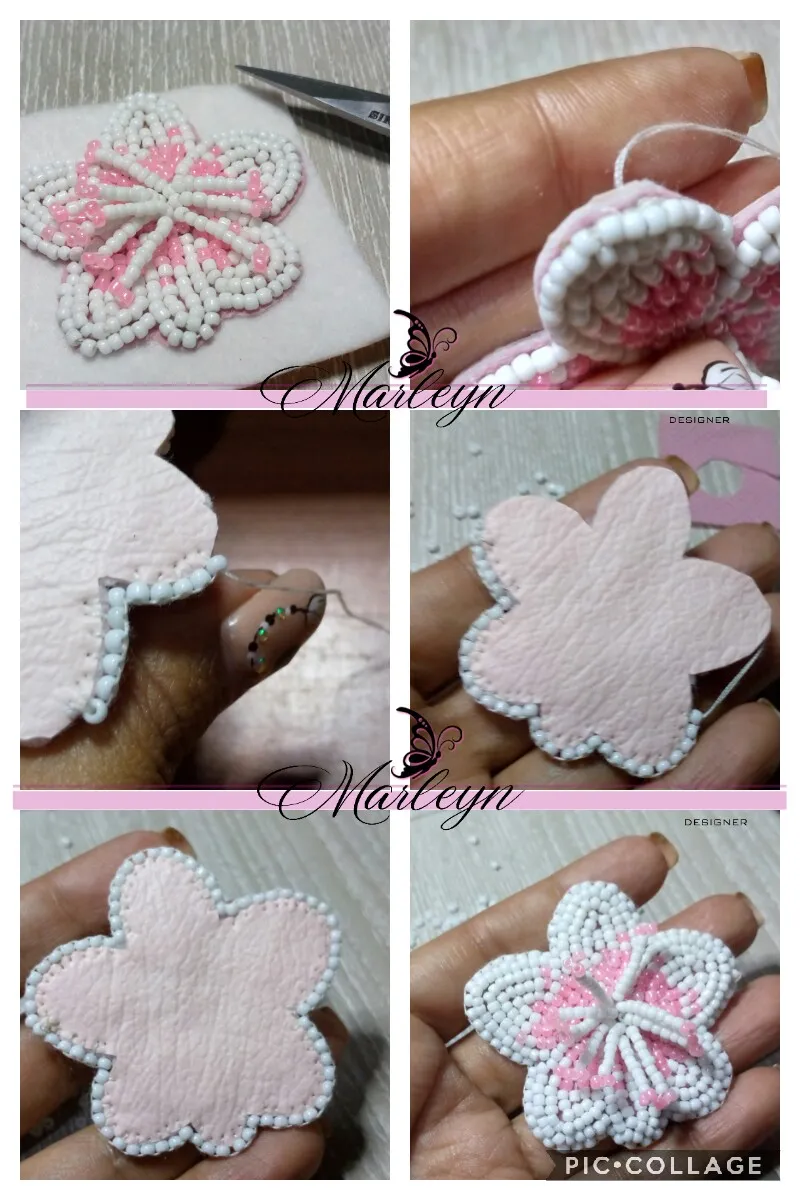
Luego de cortar el cuero sobrante de tu pieza con cuidado de no perder la forma ni cortar demás , vamos a insertar el hilo en la aguja e introducir la aguja por la parte de atrás del cuero hacia afuera para esconder el nudo del hilo, luego comenzamos a coser toda la orilla agregando una mostacilla entre cada puntada hasta completar toda la orilla.
After cutting the remaining leather of your piece being careful not to lose its shape or cut others, we are going to insert the thread into the needle and insert the needle through the back of the leather towards outside to hide the knot of the thread, then we begin to sew the entire edge adding a seed bead between each stitch until we complete the entire edge.
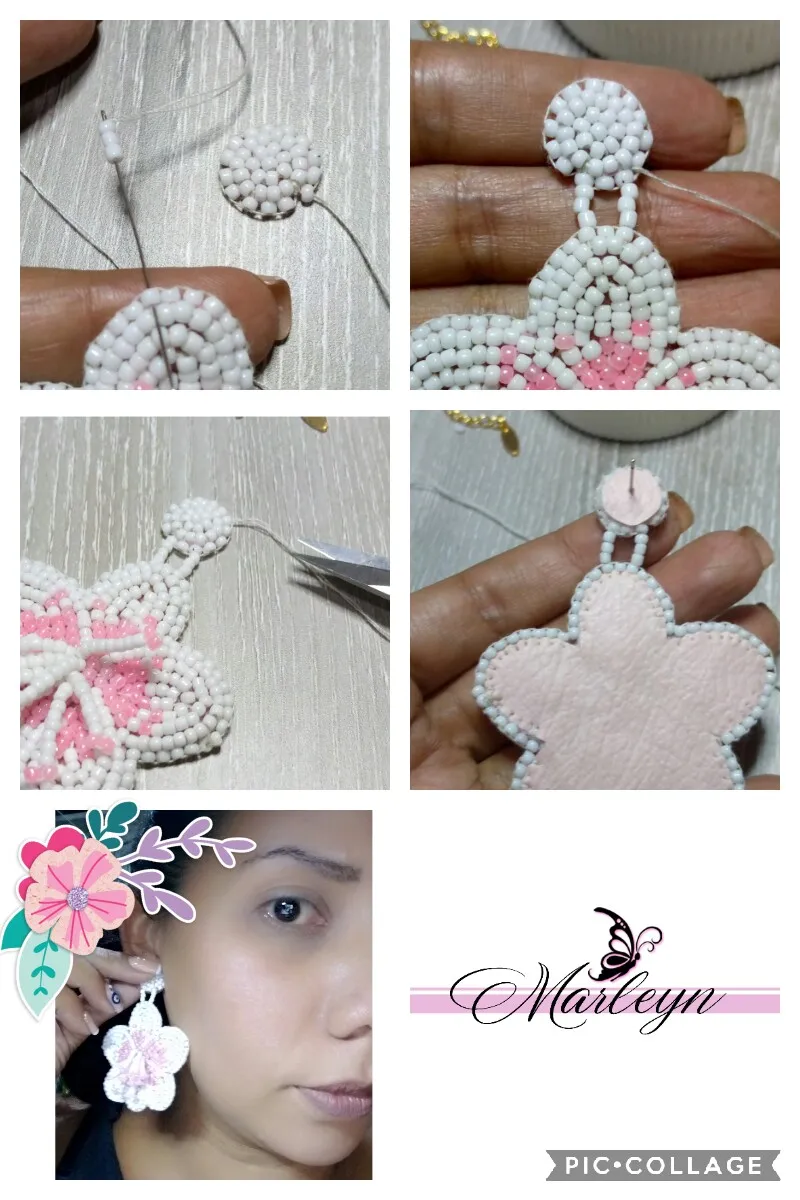
Cuando termines de bordar la orilla realiza un amarre pero no cortes el hilo, vamos a pasarlo entre las mostacillas hasta llegar a la que deseas sea la parte superior de tu pieza, agrega 3 mostacillas y entra por la pieza que forma la parte de arriba de nuestro zarcillo, saca la aguja nuevamente dejando una mostacilla de por medio, agrega 3 mostacillas nuevamente, ahora entra por una mostacilla de la parte de abajo, pasa la aguja entre varias mostacillas y realiza un nudo escondido, corta el hilo sobrante y de esta manera terminamos nuestra pieza, realmente es fácil solo debemos practicar para mejorar nuestra técnica PASO A PASO!
When you finish embroidering the edge, make a tie but do not cut the thread, we are going to pass it between the beads until we reach the one you want to be the upper part of your piece, add 3 beads and enter through the piece that forms the top of our tendril, take the needle out again leaving a bead in between, add 3 beads again, now enter through a bead from the bottom, pass the needle between several beads and make a knot hidden, cut the excess thread and in this way we finish our piece, it really is easy we just have to practice to improve our technique STEP BY STEP!
Si tienes una duda escríbeme un comentario, estaré feliz de ayudarte con cualquier detalle, Espero que mis diseños les gusten tanto como a mí me gusta, aprendan con placer ...!

Nunca olvides que el Poder es Querer y si quieres Puedes...
Eres Luz eres Energía, TU PUEDES ... Que el universo infinito Conspire para que todo siempre sea mejor ... Se les quiere ...
Venezuela FE
Somos Seres Abundantes! Qué las energías del universo vibren en sintonía con las de cada uno de nosotros en armonía! Cuidemos nuestras palabras, acciones y pensamientos!
If you have a question, write me a comment, I will be happy to help you with any details, I hope you like my designs as much as I like, learn with pleasure ...!
Never forget that Power is Wanting and if you want you can ...
You are Light, you are Energy, YOU CAN ... May the infinite universe Conspire so that everything is always better ... They are loved ...
Venezuela FAITH
We are Abundant Beings! May the energies of the universe vibrate in tune with those of each of us in harmony! Let's take care of our words, actions and thoughts!
Mi trabajo es mi pasión y cuando tu trabajo es tu pasión nada es imposible / My work is my passion and when your work is your passion nothing is impossible

¡Gracias por detenerte a leer! y apoyarme!!!
Todas las fotografías son de mi propiedad.
Fotos capturadas con mi Tecno Spark
Separador de texto realizado Separadores de texto para blog.
Nos vemos en mi próxima publicación.
¡Ten un feliz día!
Thanks for stopping to read! and support me!!!
All photographs are my property.
Photos captured with my Tecno Spark
Text separator made Text separators for blog.
See you in my next post.
Have a happy day!