
Bienvenidos || Welcome
La práctica hace al maestro y en efecto concuerdo totalmente con dicha frase, creo que para nadie es un secreto que me gusta trabajar con mostacillas y poco a poco eh ido aprendiendo la técnica y eso me llena de sastifaccion total, unos de mis último trabajo fue unos hermosos zarcillos de flecos con técnica de ladrillo y el acabado de dichos zarcillos para nada me discuto ya que eran los primeros que realizaba y puesto que los hice con mostacillas corrientes y no las que llaman Shakira, quedaron bastante bien, sin embargo hay forma de trabajar estas mostacillas corrientes y lograr un mejor acabado en el trabajo así que en esta ocasión estaré realizando unos zarcillos de flecos pero con mejora en la técnica de ladrillo y un diseño distinto a los anteriores zarcillos realizados, los cuales son una belleza les dejo el link por si no los vieron.
Practice makes perfect and indeed I totally agree with that phrase, I think it is no secret that I like to work with beads and little by little I have been learning the technique and that fills me with total sastifaccion, one of my last work was a beautiful fringed tendrils with brick technique and the finish of these tendrils for nothing I argue because they were the first I made and since I did them with ordinary beads and not those called Shakira, they turned out quite well, however there is a way to work these ordinary beads and achieve a better finish on the work so this time I will be making some fringed tendrils but with an improvement in the brick technique and a different design to the previous tendrils made which are a beauty I leave you the link in case you didn't see them.

☀️ Proyecto del día de hoy. || Today's project. ☀️
Sin más preámbulo acompañenme al paso a paso para realizar estos hermosos zarcillos, para ello vamos a necesitar los siguientes materiales:
Without further ado, please follow me step by step to make these beautiful tendrils, for this we will need the following materials:
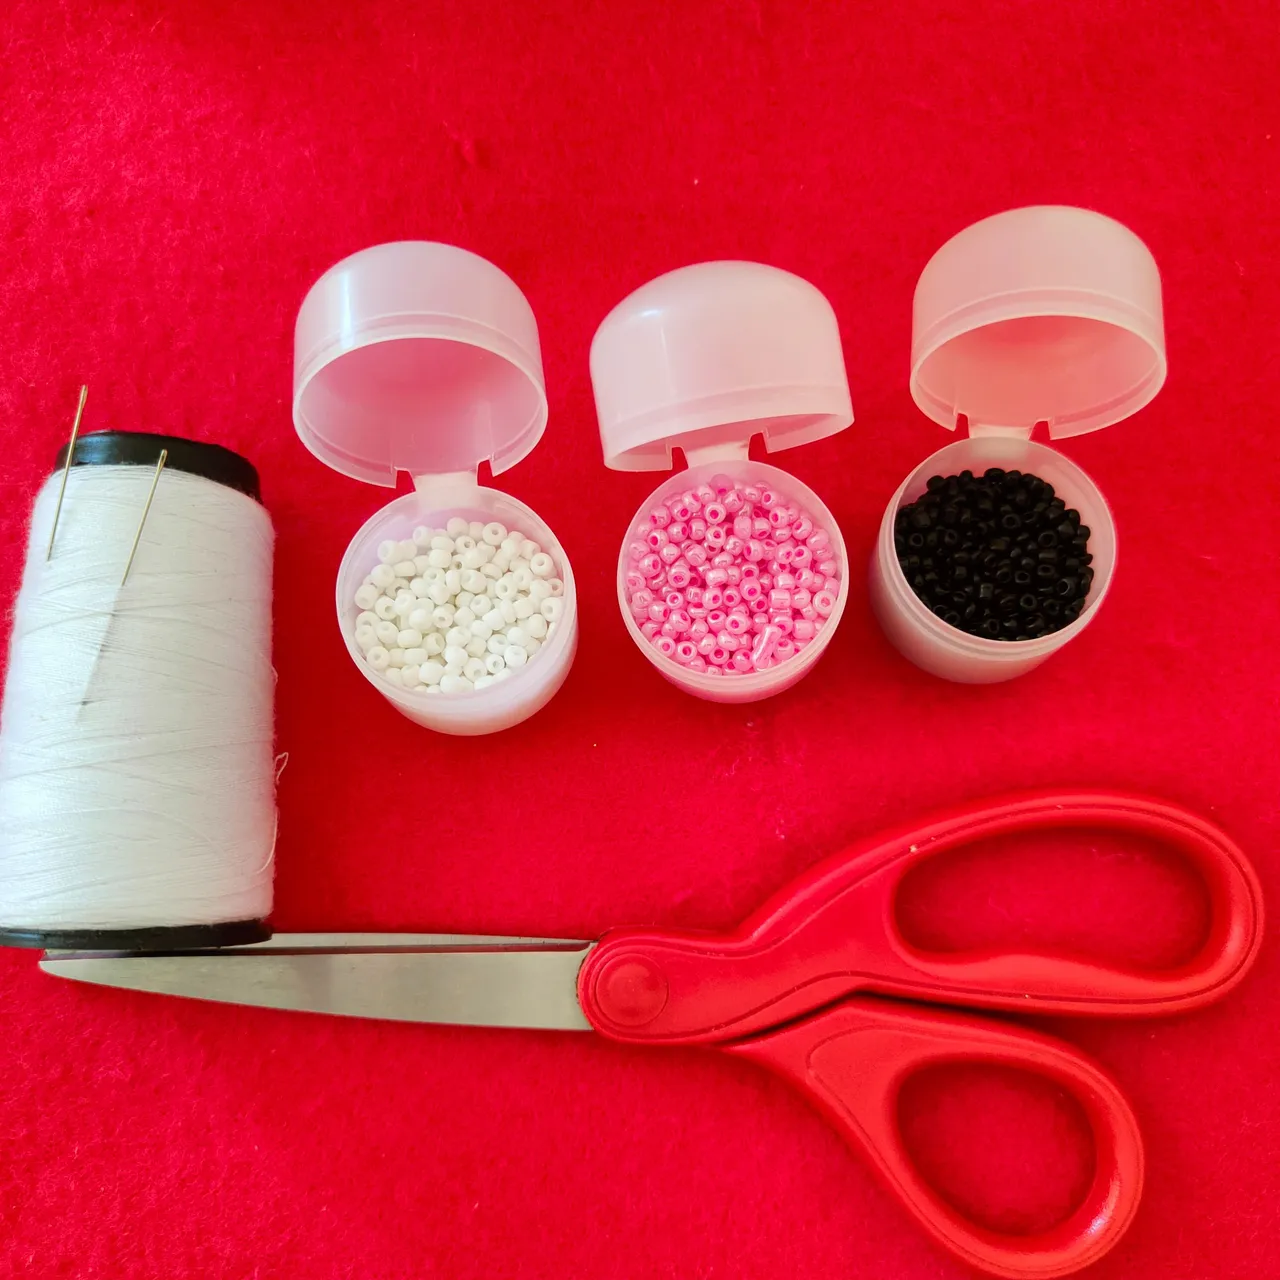
Materiales || Materials
🩷 Mostacillas rosadas.
🩷 Mostacilla blancas.
🩷 Mostacillas negras.
🩷 Hilo nailon.
🩷 Aguja.
🩷 Tijera.
🩷 2 Anzuelos de bisutería.
🩷 Pink mustard.
🩷 White mustard.
🩷 Black beads.
🩷 Nylon thread.
🩷 Needle.
🩷 Scissors.
🩷 2 costume jewelry hooks.
Pasos ||Steps
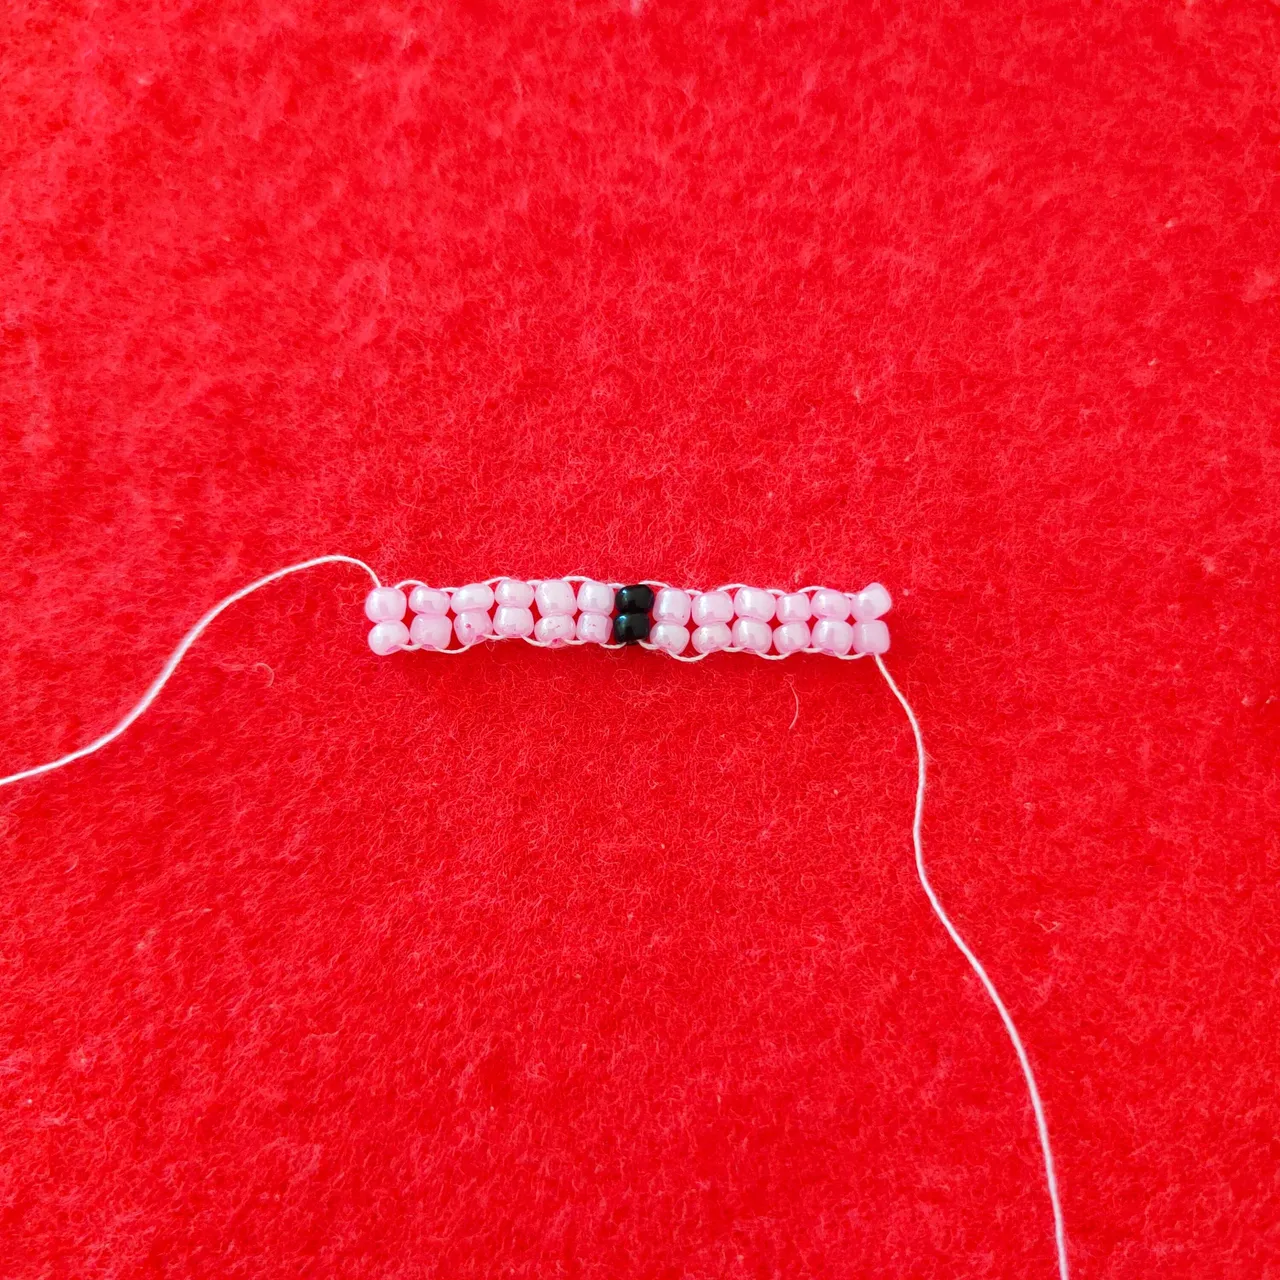
🩷 Paso 1.| iniciaremos midiendo 2 metros de hilo y lo vamos ensartar en la aguja, seguidamente vamos a utilizar 4 mostacillas de color rosado, la cual vamos a posicionar en toda la mita del hilo, seguidamente vamos a introducir la aguja a través de las mostacillas en el mismo sentido que entró la aguja para crear un círculo.
🩷 Step 1.| we will start by measuring 2 meters of thread and we will string it on the needle, then we will use 4 pink beads, which we will position on the whole half of the thread, then we will introduce the needle through the beads in the same direction that the needle entered to create a circle.
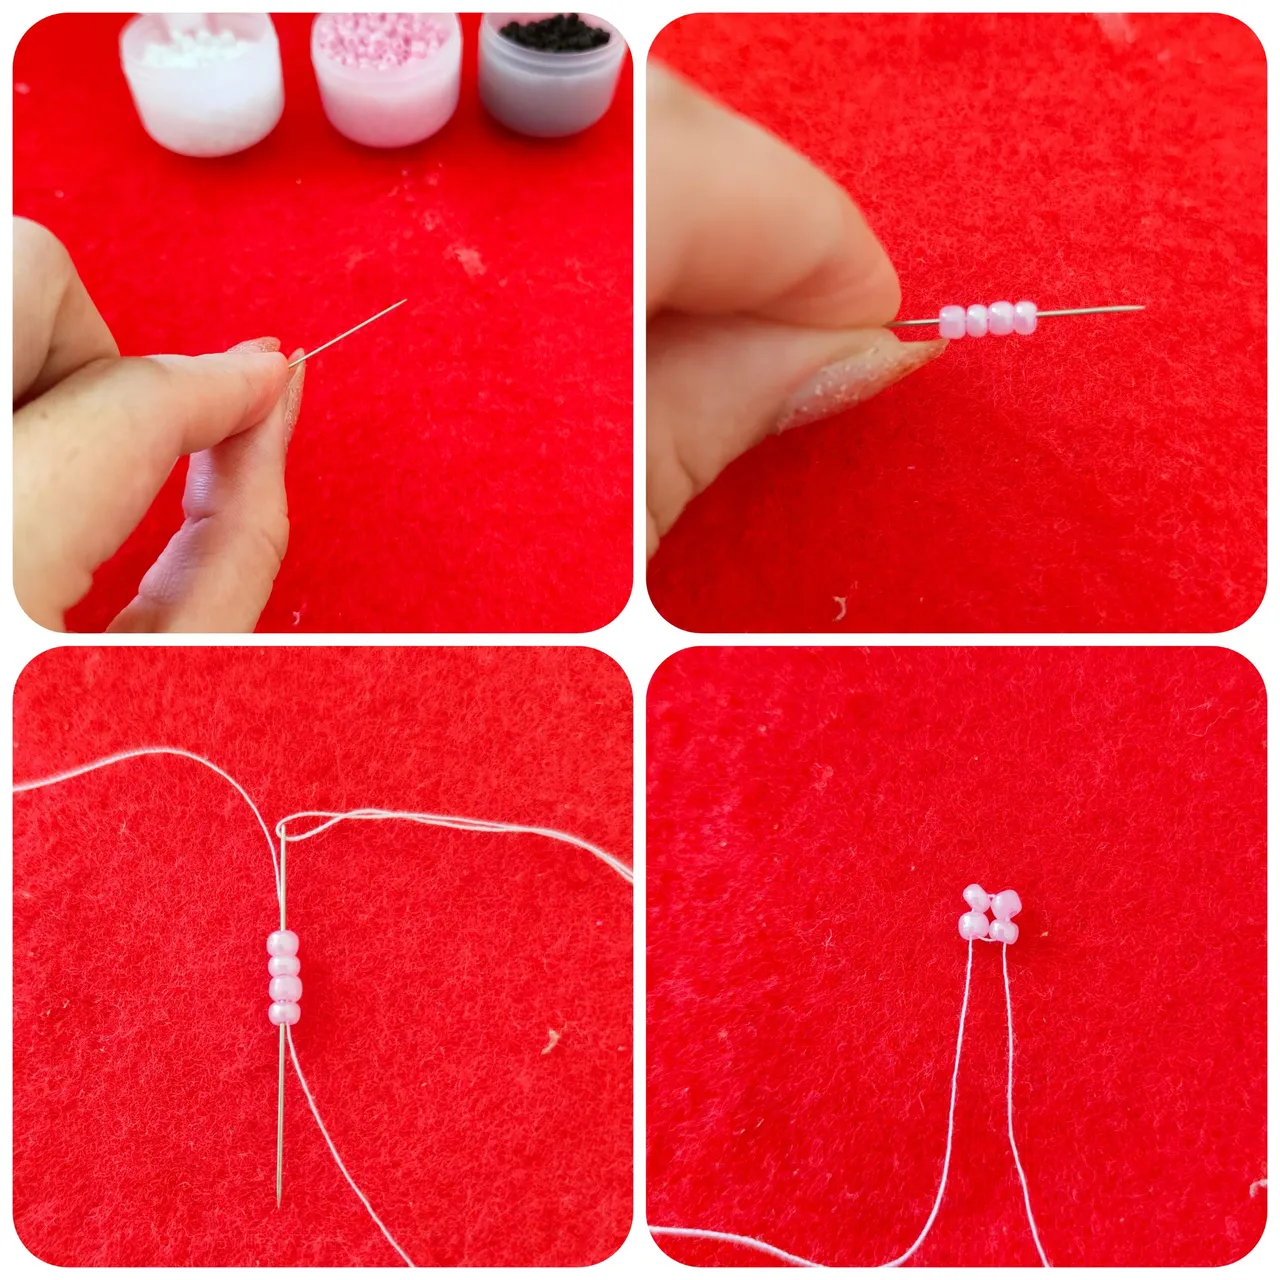
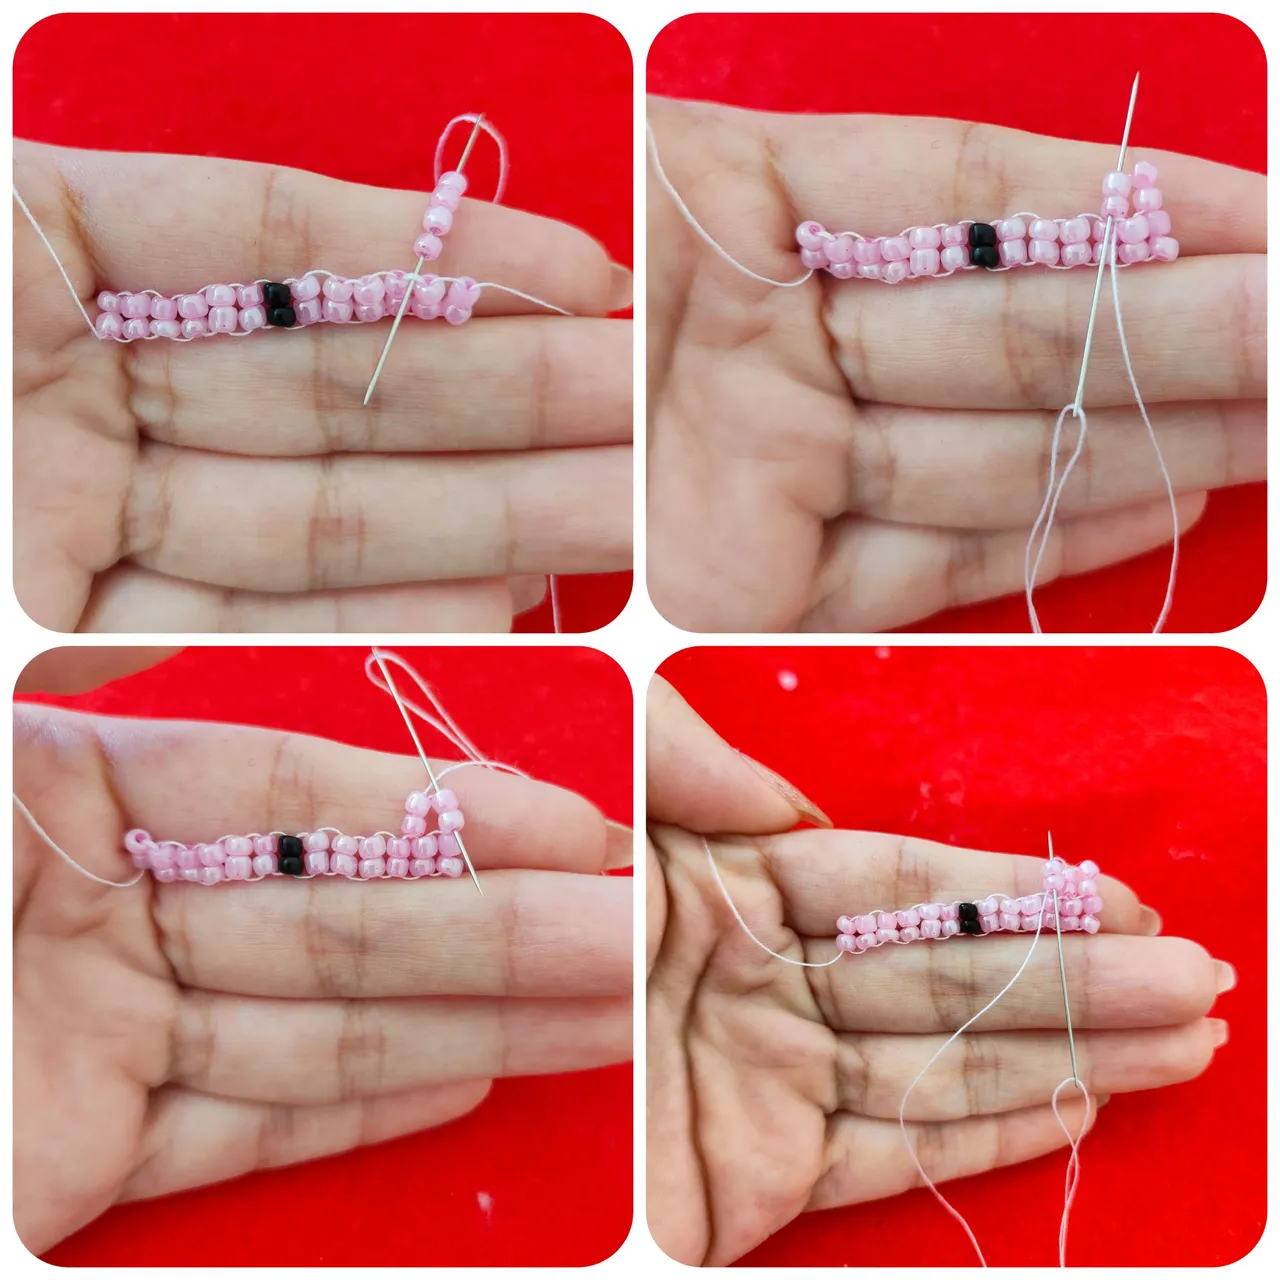
🩷 Paso 2.| para crear nuestro primer eslabon, partiremos de estas 4 mostacillas, agregaremos 2 mostacillas y pasaremos la aguja en el sentido que pasó la última vez, en este caso la aguja está en dirección hacia abajo y la volveremos a pasar por estás 2 mostacillas en esa misma dirección, una vez que hay 3 hileras pasamos la aguja hacia arriba en las últimas 2 mostacillas, este es el proceso básico para crear los eslabones, es el paso que vamos estar repitiendo continuamente.
🩷 Step 2.| to create our first link, we will start from these 4 beads, add 2 beads and pass the needle in the direction it passed the last time, in this case the needle is in the downward direction and we will pass it again through these 2 beads in that same direction, once there are 3 rows we pass the needle upwards in the last 2 beads, this is the basic process to create the links, it is the step that we will be repeating continuously.
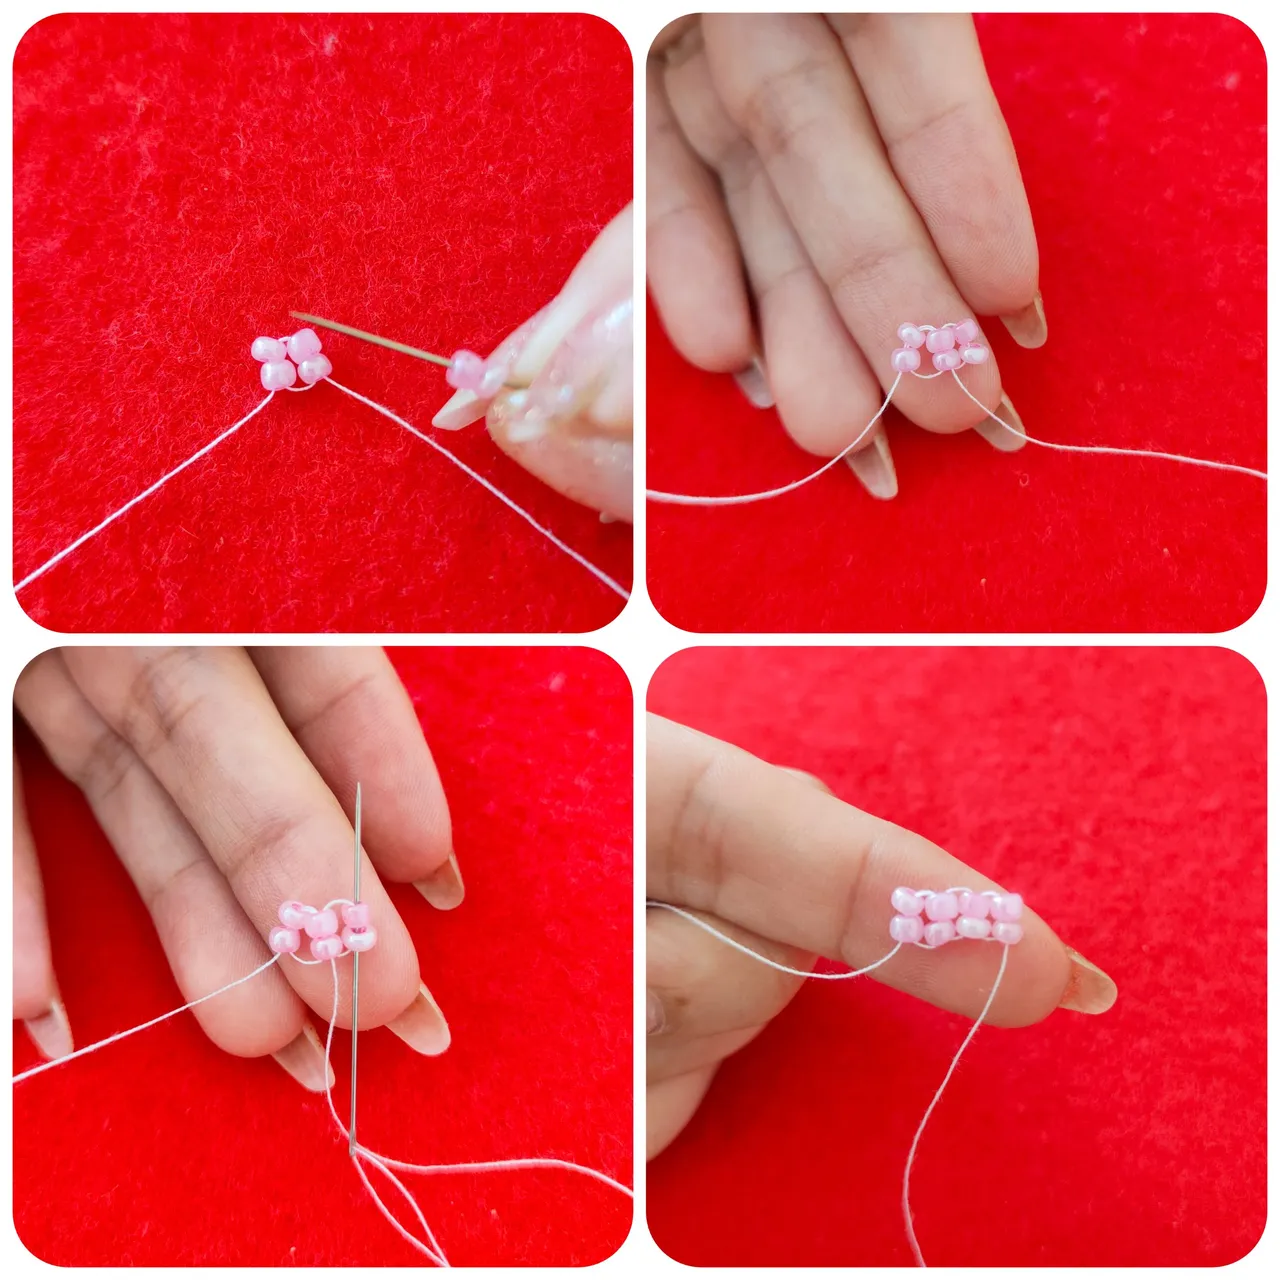
🩷 Paso 3.| Nuestro primer eslabon va quedar 3 hileras rodadas, 1 negra y 3 rosadas mas.
🩷 Step 3.| Our first link is going to be 3 rows rolled, 1 black and 3 more pink.
🩷 Paso 4.| Al tener nuestro primer eslabon, vamos a tomar 4 mostacillas rosadas en este caso y en segundo espacio hacia la izquierda vamos a introducir nuestra aguja, ajustamos las mostacillas, y ahora vamos a subir con aguja por estas 2 mostacillas y ensartamos hora la aguja con direccion hacia abajo en las 2 mostacillas que están en la orilla y volvemos a ensartar la aguja hacia arriba en las mostacillas que están hacia el lado izquierdo, de este modo vamos ajustar las mostacillas cada vez que iniciemos un nuevo eslabon y no importa si las mostacillas no son la que llaman Shakira, con esta técnica van ajustar bastante bien, y crear un efecto ladrillo bastante prolijo.
🩷 Step 4. | When we have our first link, we are going to take 4 pink beads in this case and in the second space to the left we are going to introduce our needle, adjust the beads, and now we are going to go up with the needle through these 2 beads and thread the needle downwards in the 2 beads that are on the edge and thread the needle upwards in the beads that are on the left side, in this way we will adjust the beads every time we start a new link and it does not matter if the beads are not the one called Shakira, with this technique they will fit quite well, and create a pretty neat brick effect.
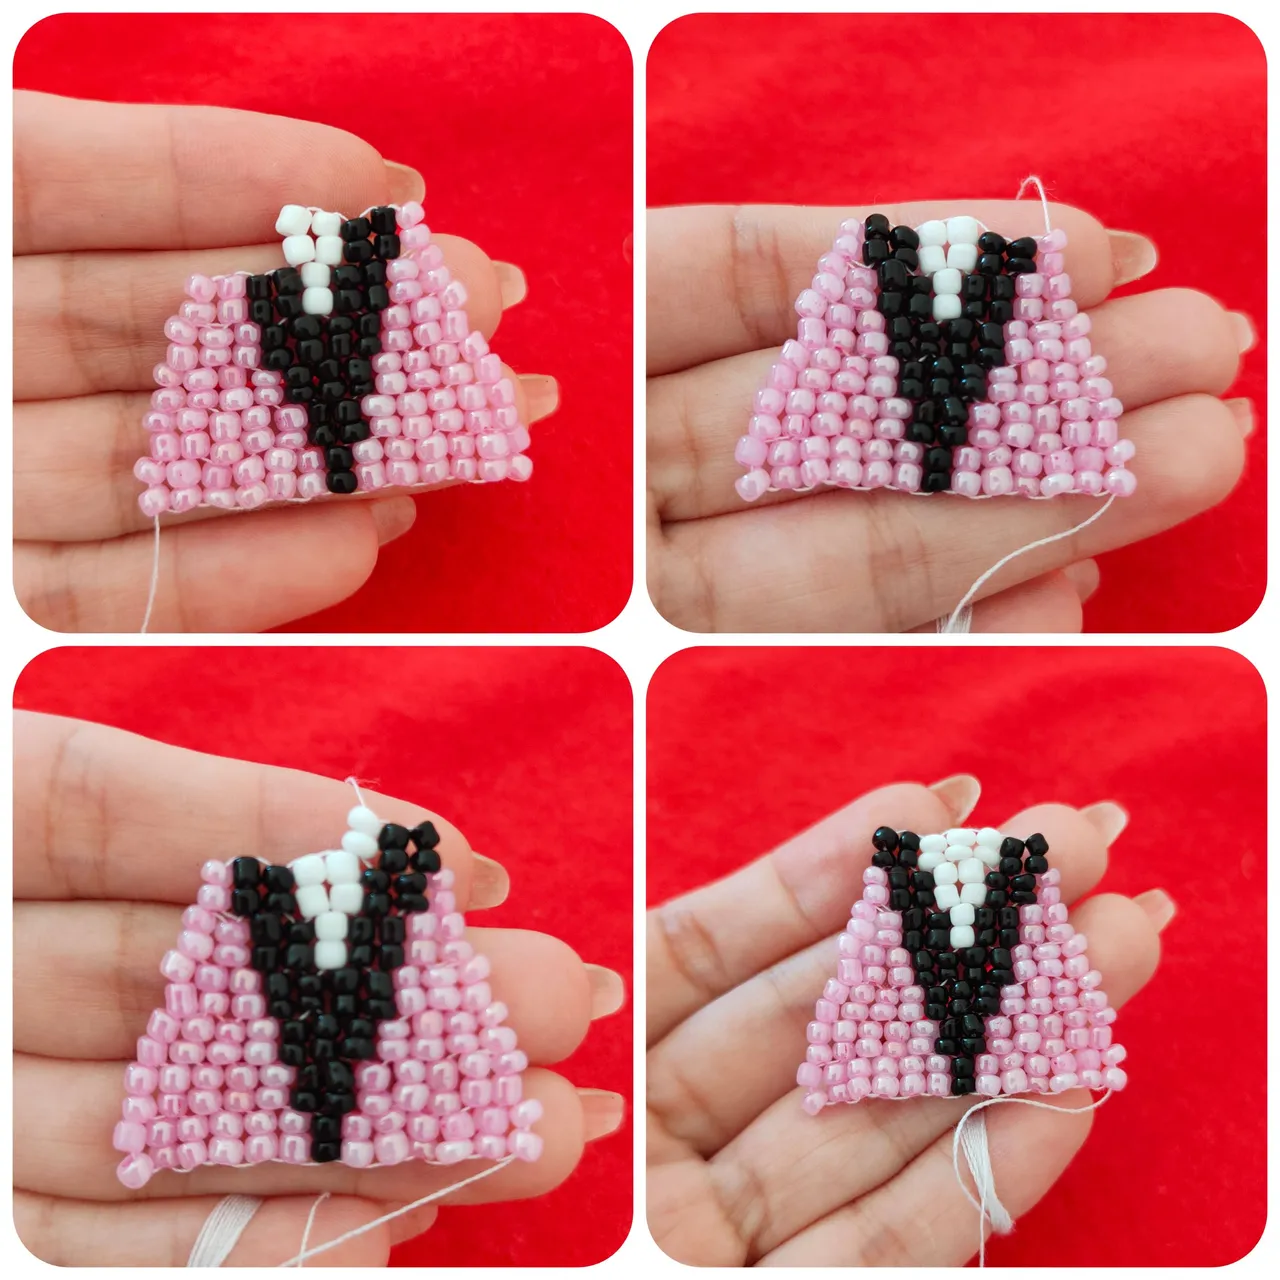
🩷 Paso 5.| El segundo eslabon va estar constituido por 5 hilera rosadas,2 negras y 5 rosadas mas, el tercer eslabon estará constituido por 4 hileras rosadas, 3 negras y 4 rosadas mas, para guiarse mejor es importante tener cuentas la simetría ya que en cada costados siempre habrá similar hileras de acuerdo a los colores de las mostacillas.
🩷 Step 5. | The second link will be made up of 5 pink, 2 black and 5 pink rows, the third link will be made up of 4 pink, 3 black and 4 pink rows, to better guide you it is important to take into account the symmetry since on each side there will always be similar rows according to the colors of the beads.
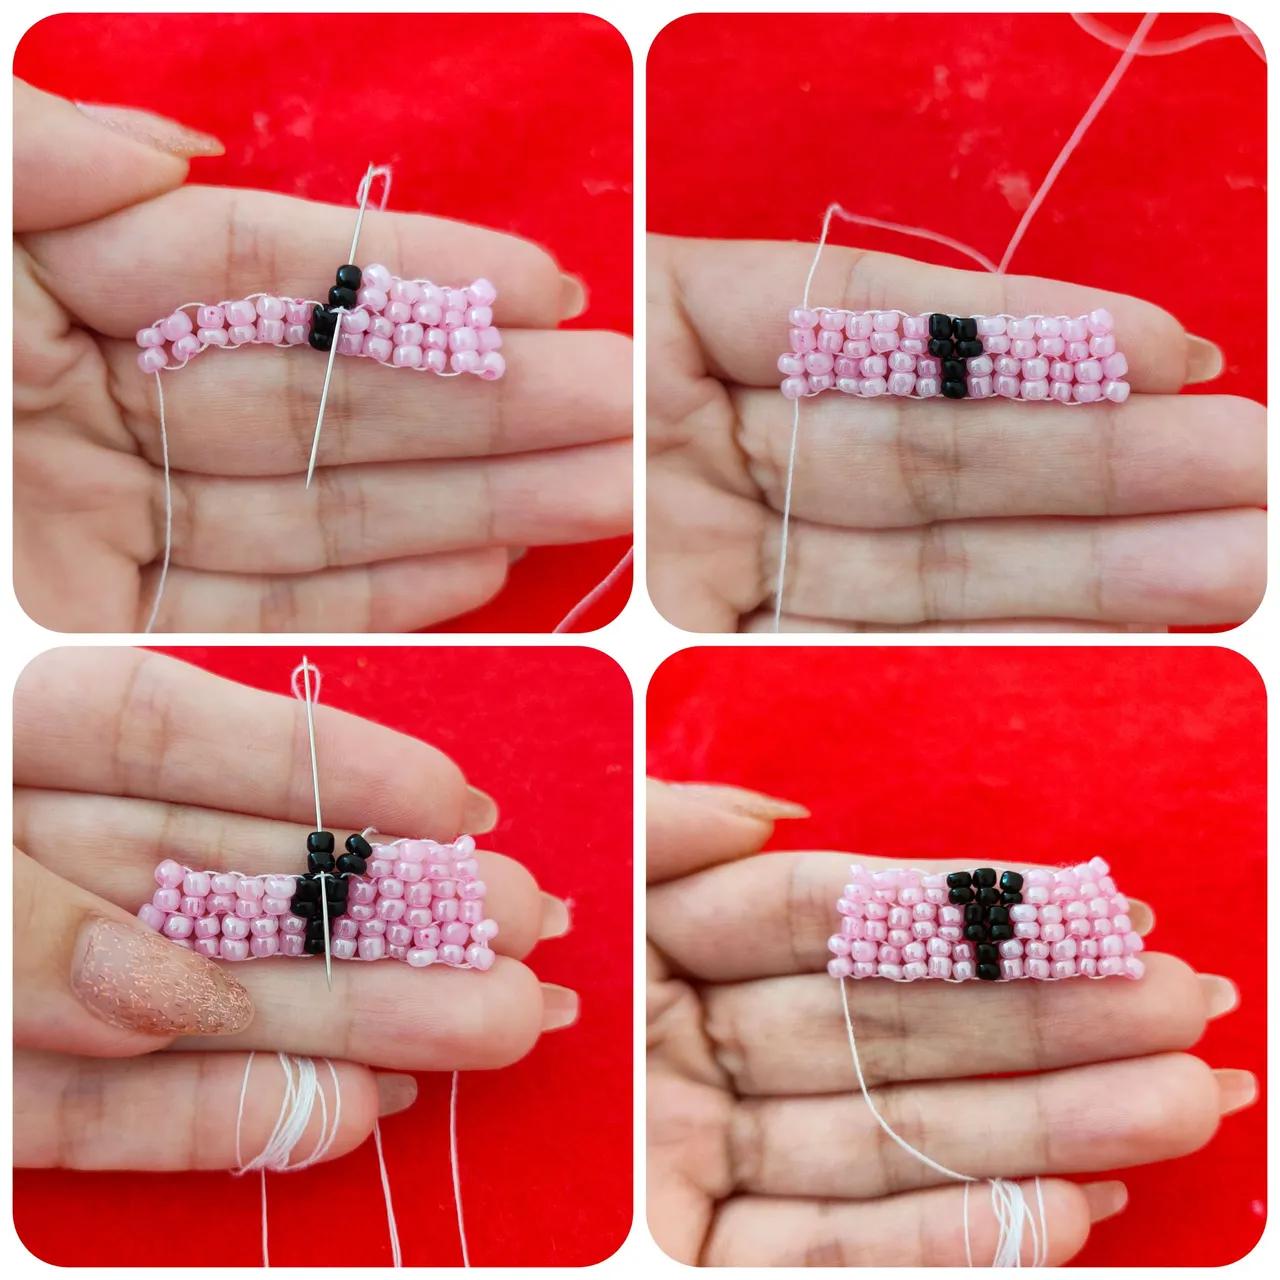
🩷 Paso 6.| el cuarto eslabon serán 3 hileras rodadas, 4 negras y 3 rosadas más, el quinto eslabon serán 2 hileras rosadas, 2 negras y 1 blanca, seguida de 2 negras y 2 rosadas.
🩷 Step 6.| the fourth link will be 3 rows rolled, 4 black and 3 more pink, the fifth link will be 2 rows pink, 2 black and 1 white, followed by 2 black and 2 pink.
🩷 Paso 7.| a medida que vamos realizando cada eslabón vamos observando cómo va reduciendo la medida nuestra pieza del zarcillo y esto es gracias a que cada vez que terminamos un eslabon al iniciar el siguiente hacemos nuestro ajuste con esas primeras 4 mostacillas, nuestro sexto eslabon va estar constituido por 1 hilera rosada, 2 negras, 2 blancas, 2 negras y 1 rosada, es hermoso como va tomando forma y ver su firme ajuste, el séptimo eslabon va estar constituido por 2 hileras negras, 3 blancas y 2 negras, a partir de este eslabon no usaremos más mostacillas rosadas, claro eso sí ustedes deciden hacerla en este mismo tono, recordemos que los colores quedan a elección y gusto de cada uno. 🙂🥰
🩷 Step 7. | As we are making each link we are observing how our tendril piece is reducing in size and this is because each time we finish a link to start the next we make our adjustment with those first 4 beads, our sixth link will be made up of 1 pink row, 2 black, 2 white, 2 black and 1 pink, it is beautiful how it takes shape and see its firm adjustment, 2 black and 1 pink, it is beautiful how it is taking shape and see its firm adjustment, the seventh link will be constituted by 2 black rows, 3 white and 2 black, from this link we will not use more pink beads, of course if you decide to make it in this same tone, remember that the colors are left to choice and taste of each one. 🙂🥰
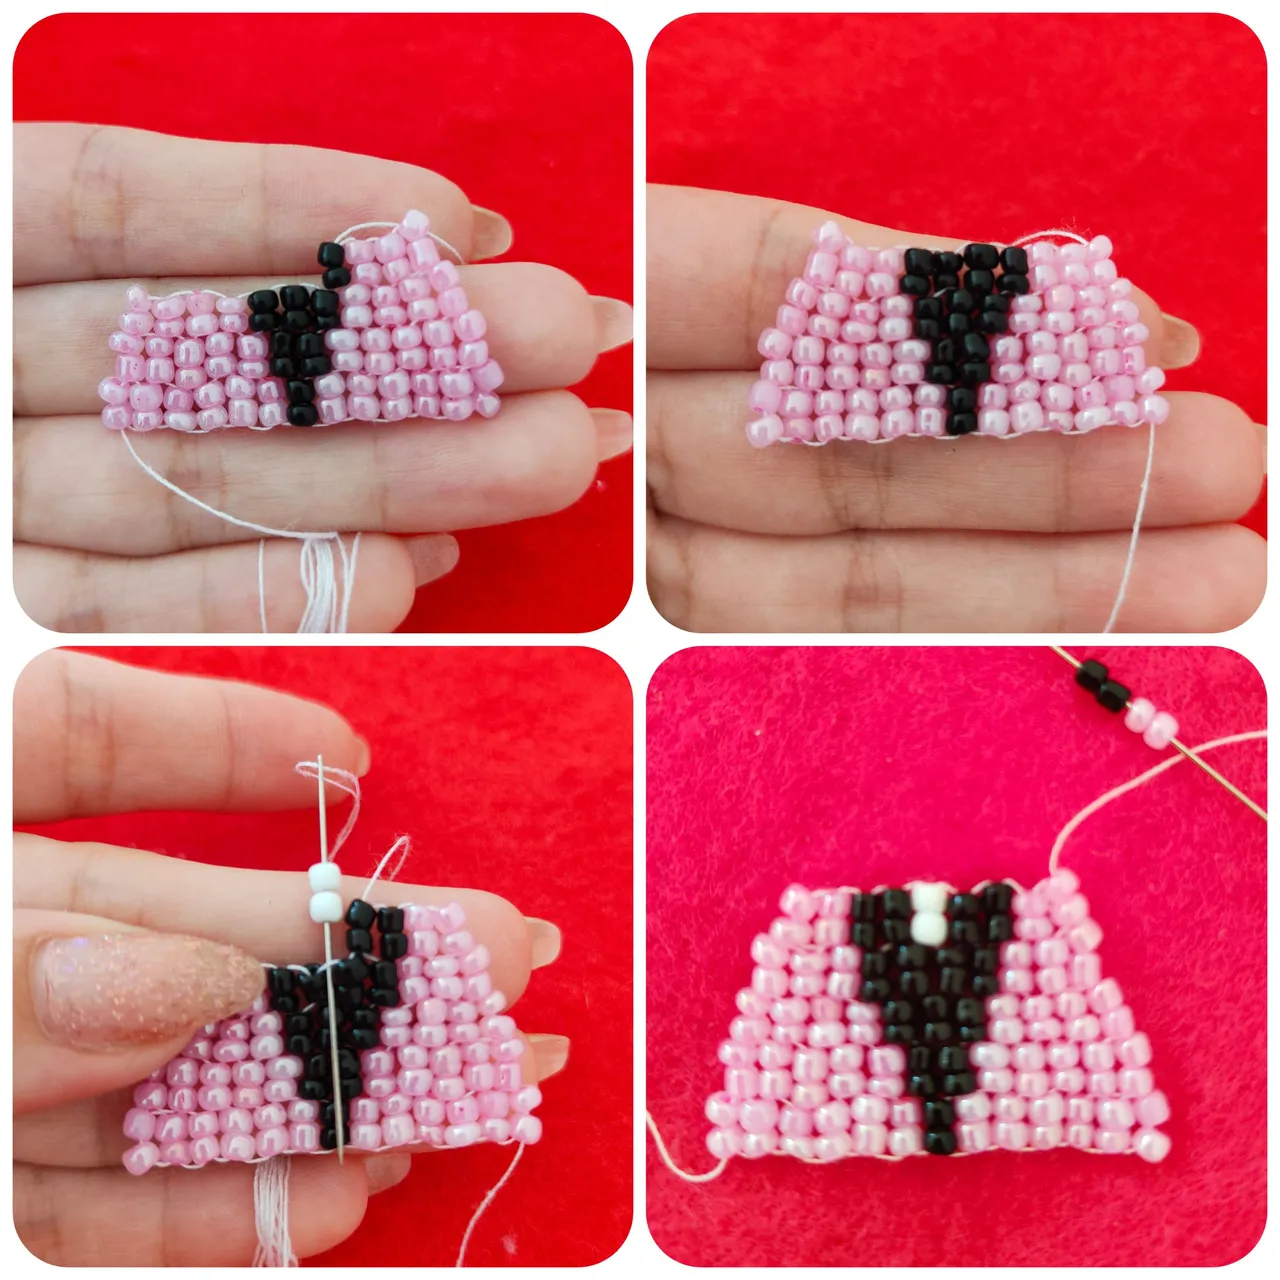
🩷 Paso 8.| para el octavo eslabon vamos a iniciar con 2 mostacillas negra y 2 blancas, el mismo estará constituido por 1 hilera negra, 4 blancas y 1 negra, el noveno eslabon será 5 hileras blancas.
🩷 Step 8.| for the eighth link we are going to start with 2 black and 2 white beads, it will consist of 1 black, 4 white and 1 black row, the ninth link will be 5 white rows.
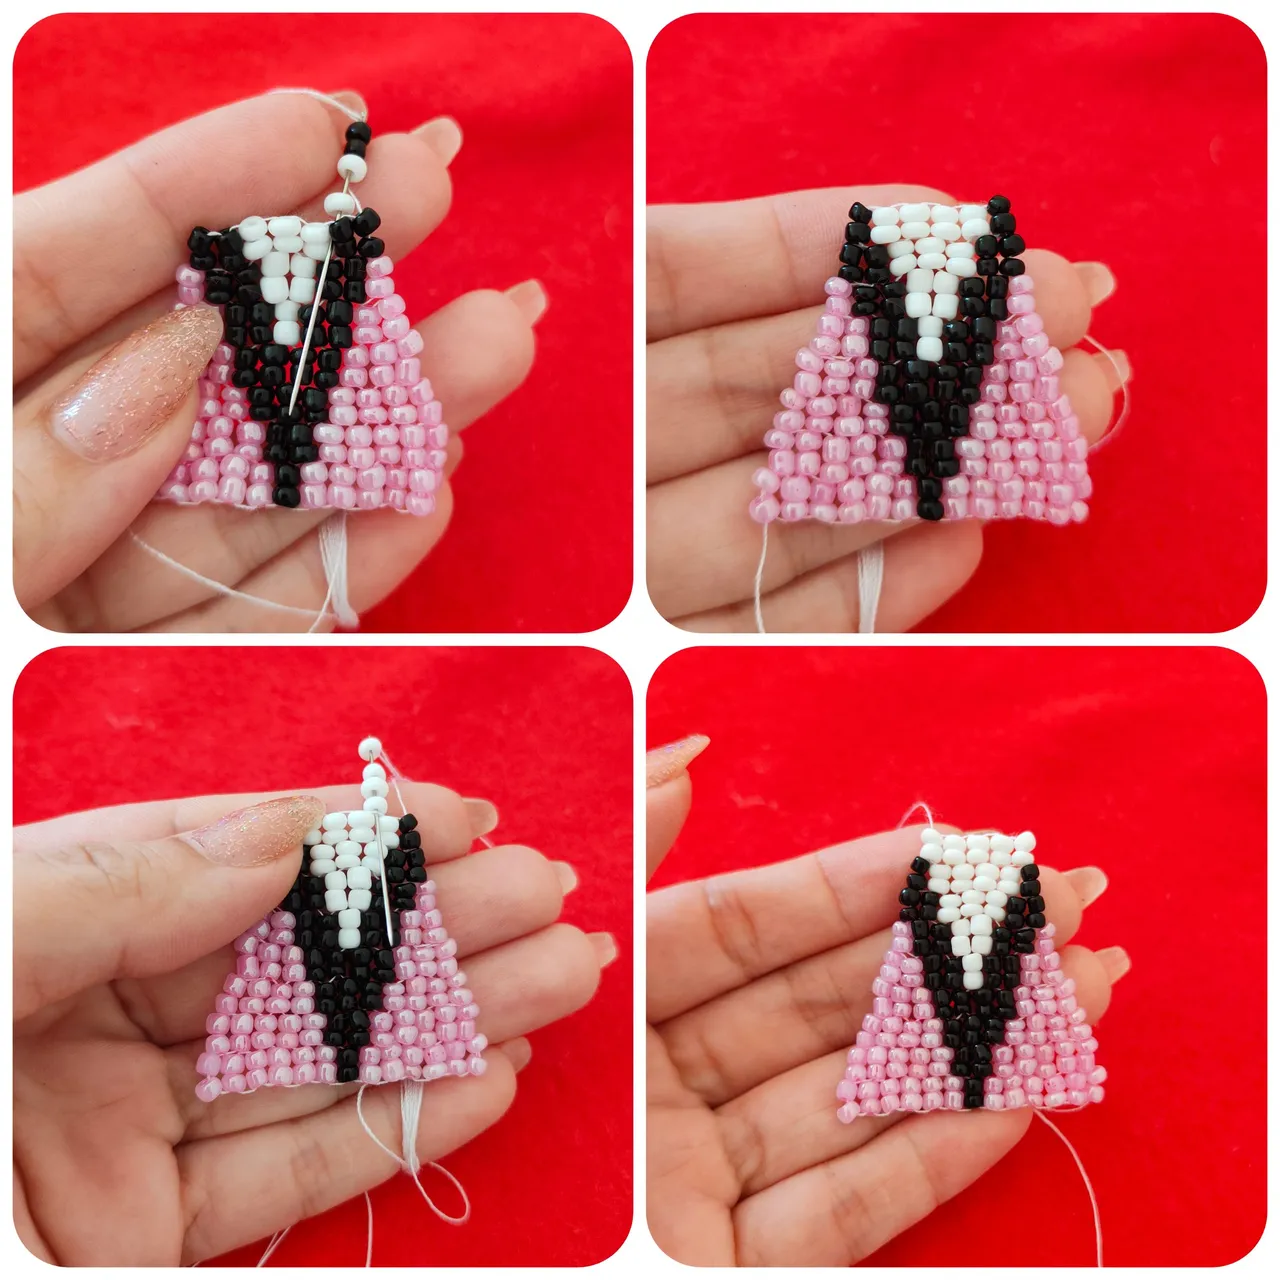
🩷 Paso 9.| Para la décima hilera serán 4 hileras blancas, y para la décima primer, 3 hileras blanca ya falta poco para culminar la parte superior de nuestro zarcillos, va quedando hermoso en este punto ya mi cara de felicidad era inevitable pues estaba quedando como quería.
🩷 Step 9.| For the tenth row there will be 4 white rows, and for the tenth row, 3 white rows, we are almost ready to finish the upper part of our tendrils, it is getting beautiful at this point and my face of happiness was inevitable because it was getting the way I wanted.
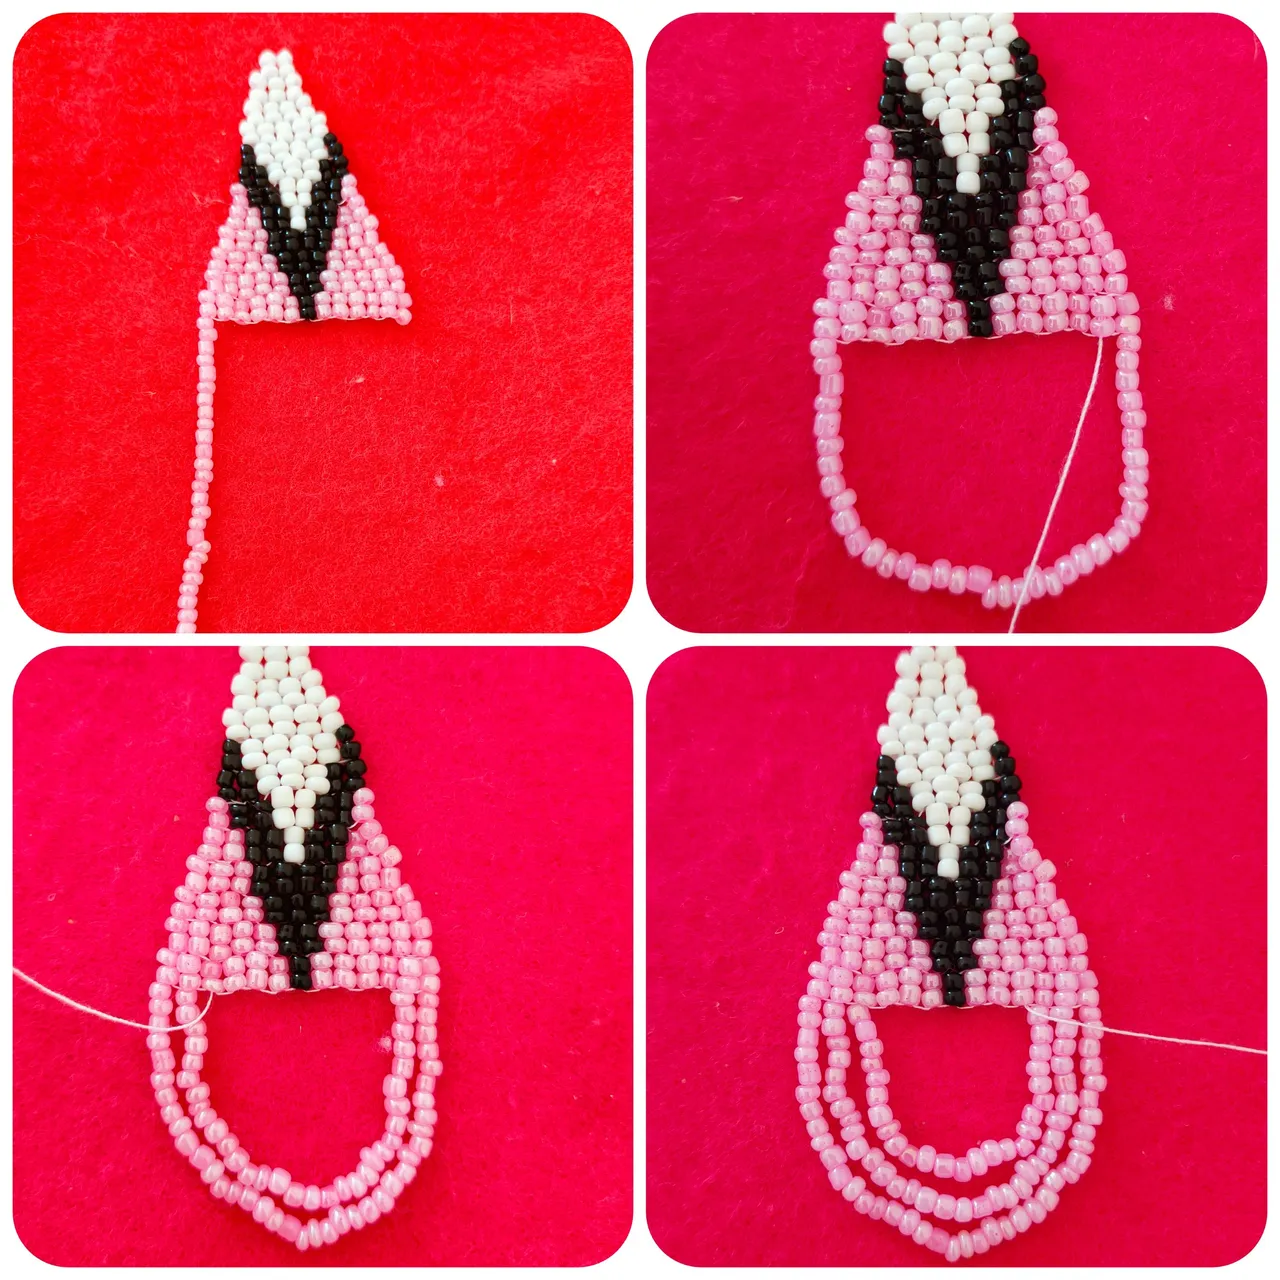
🩷 Paso 10.| nuestro último eslabon será de 2 hileras blanca en este punto habremos culminado la parte superior del zarcillo, ahora vamos a bajar con la aguja en uno de sus costados y vamos a realizar 2 nudos para concluir esta fase del zarcillo, cortamos el excedente de hilo que sobre, en la parte inferior del zarcillo está la otra mita del hilo que aún no se ha utilizado, en el vamos ensartar la aguja para comenzar a elaborar la parte inferior del zarcillo.
🩷 Step 10.| our last link will be 2 white rows at this point we will have completed the upper part of the tendril, now we will go down with the needle on one of its sides and we will make 2 knots to conclude this phase of the tendril, we cut the excess thread that remains, at the bottom of the tendril is the other half of the thread that has not yet been used, in it we will thread the needle to begin to develop the lower part of the tendril.
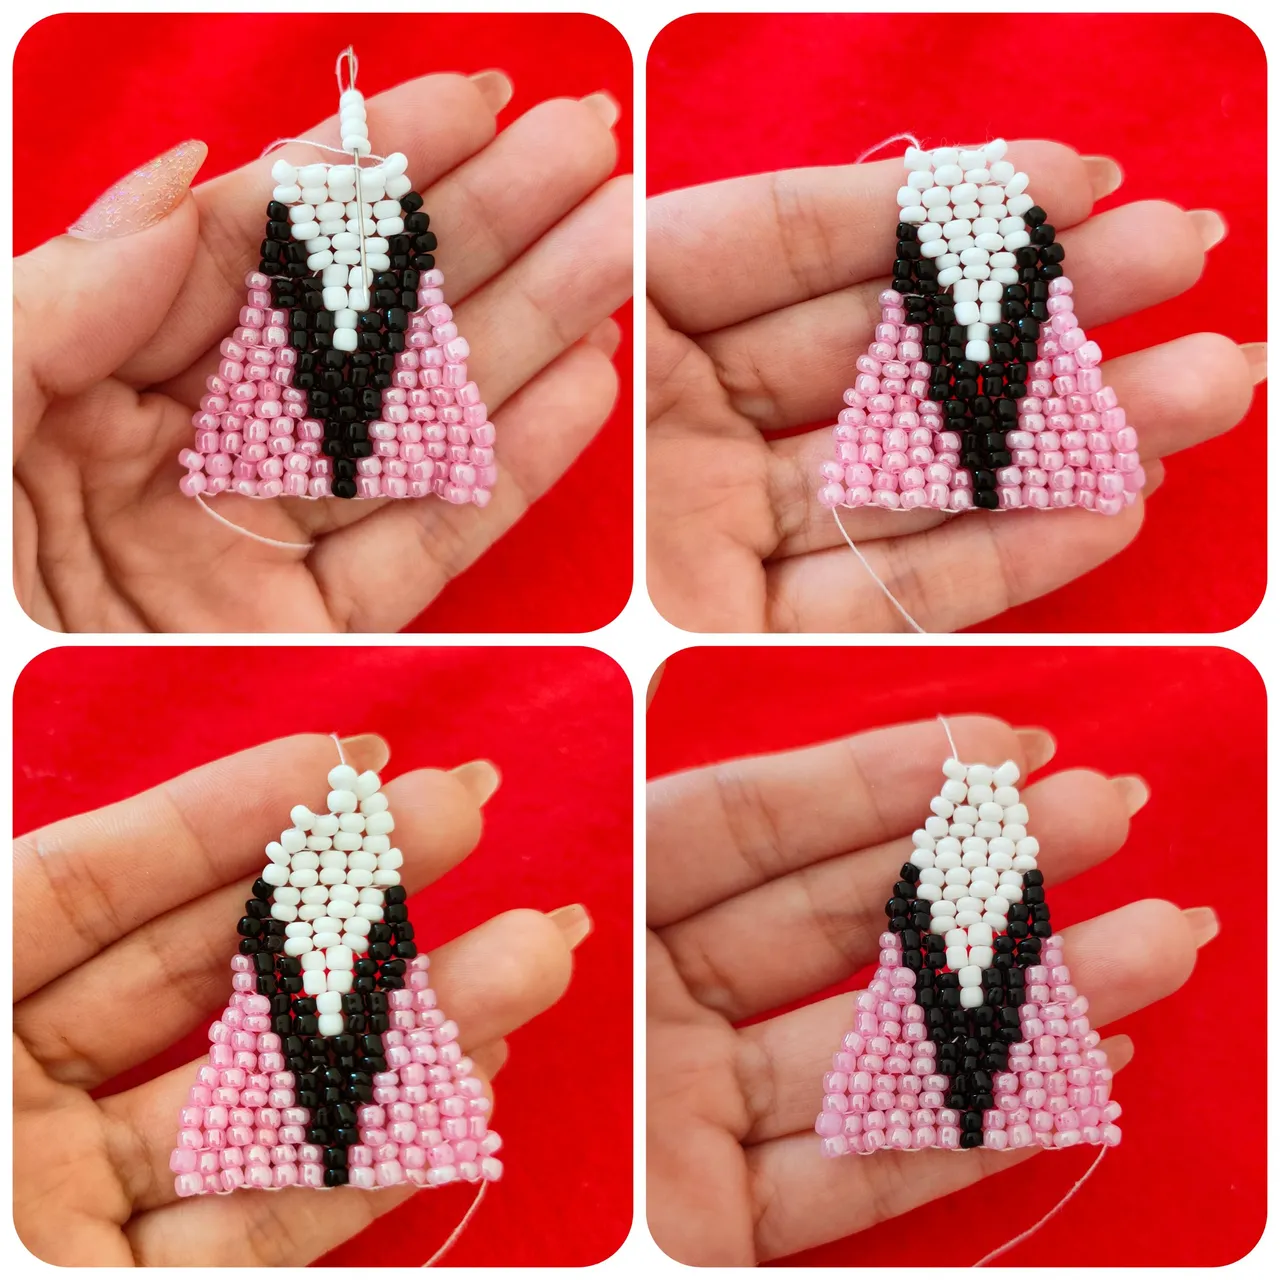
🩷 Paso 11.| vamos a introducir en el hilo 36 mostacillas rosadas y vamos a llevar nuestra aguja al otro extremos del zarcillo, subimos con la aguja por las 2 mostacillas en ese extremo, ajustamos y ensartamos la aguja por la otras 2 mostacillas a la izquierda de este modo vamos a dar paso a lo que sera la segunda hilera de mostacillas de la parte inferior está estará compuesta por 28, repetimos el proceso y ahora agregamos, 25 mostacillas.
🩷 Step 11.| we are going to introduce in the thread 36 pink beads and we are going to take our needle to the other end of the tendril, we go up with the needle by the 2 beads at that end, we adjust and thread the needle by the other 2 beads to the left in this way we are going to give way to what will be the second row of beads of the lower part is composed of 28, we repeat the process and now we add, 25 beads.
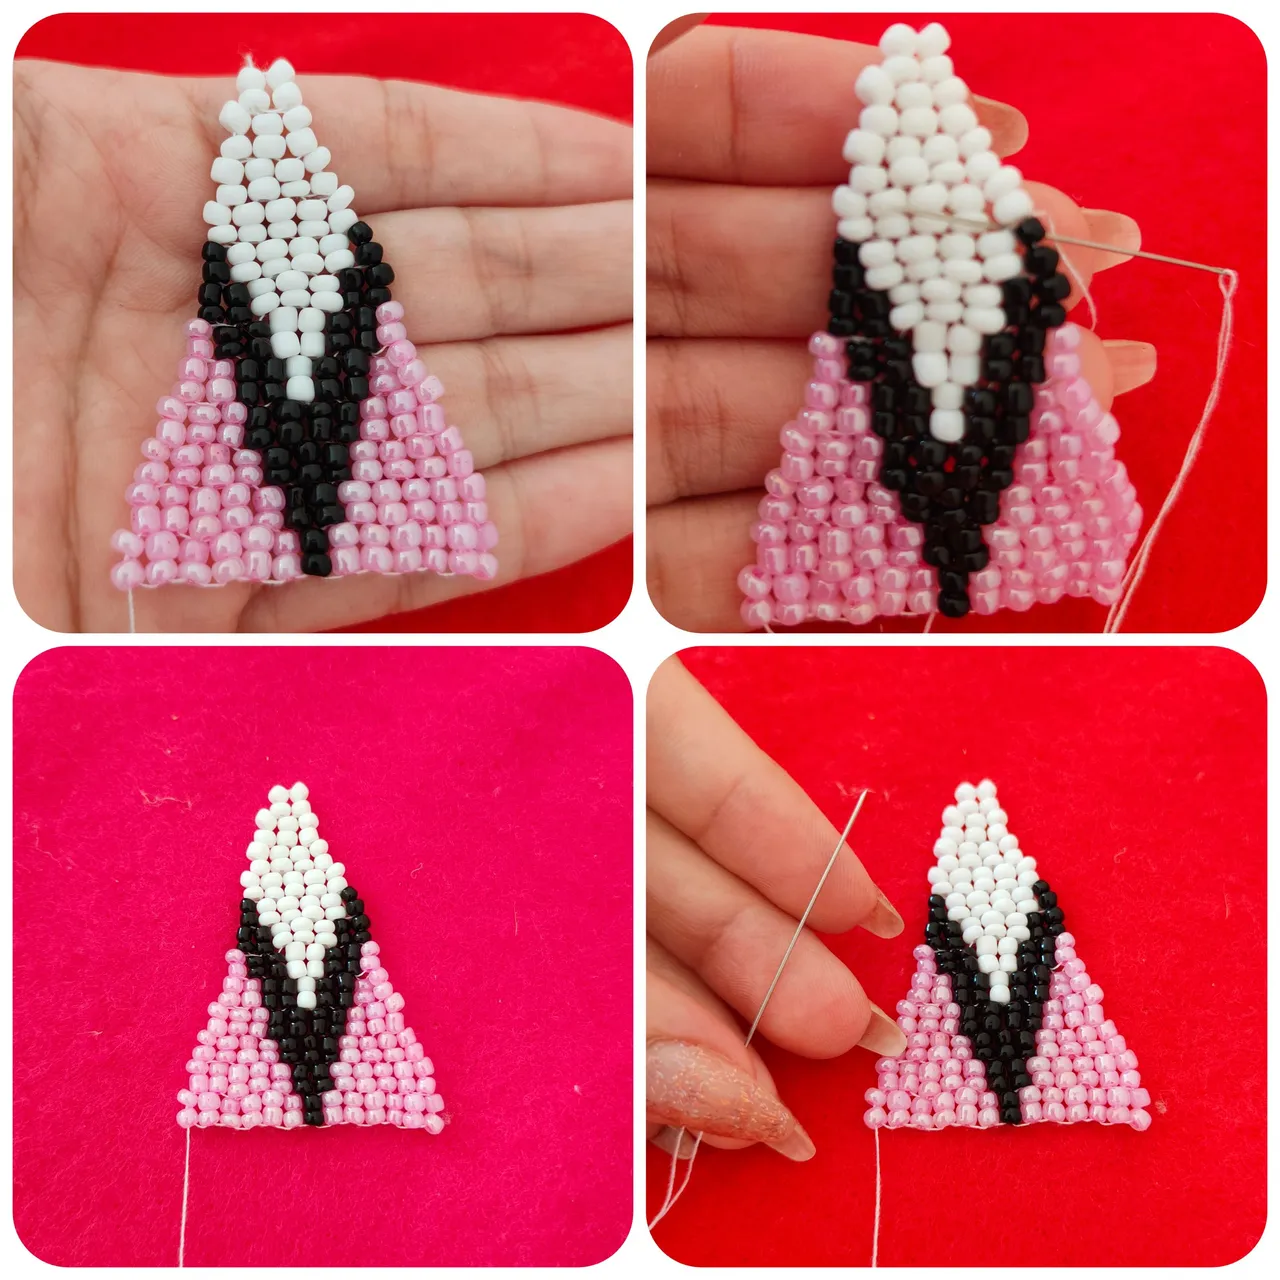
🩷 Paso 12.| La cuarta hilera llevará 20 mostacillas, la quinta 18 y la sexta 15 y para la séptima 3 mostacillas, pasamos nuestra aguja al centro del zarcillo y procedemos ahí a realizar 2 nuedo para finiquitar la parte inferior del zarcillo, por último pero no menos importante, colocamos en anzuelo en la parte superior del zarcillo.
🩷 Step 12.| The fourth row will have 20 beads, the fifth row 18 and the sixth row 15 and for the seventh row 3 beads, we pass our needle to the center of the tendril and proceed there to make 2 knots to finish the lower part of the tendril, last but not least, we place the hook in the upper part of the tendril.
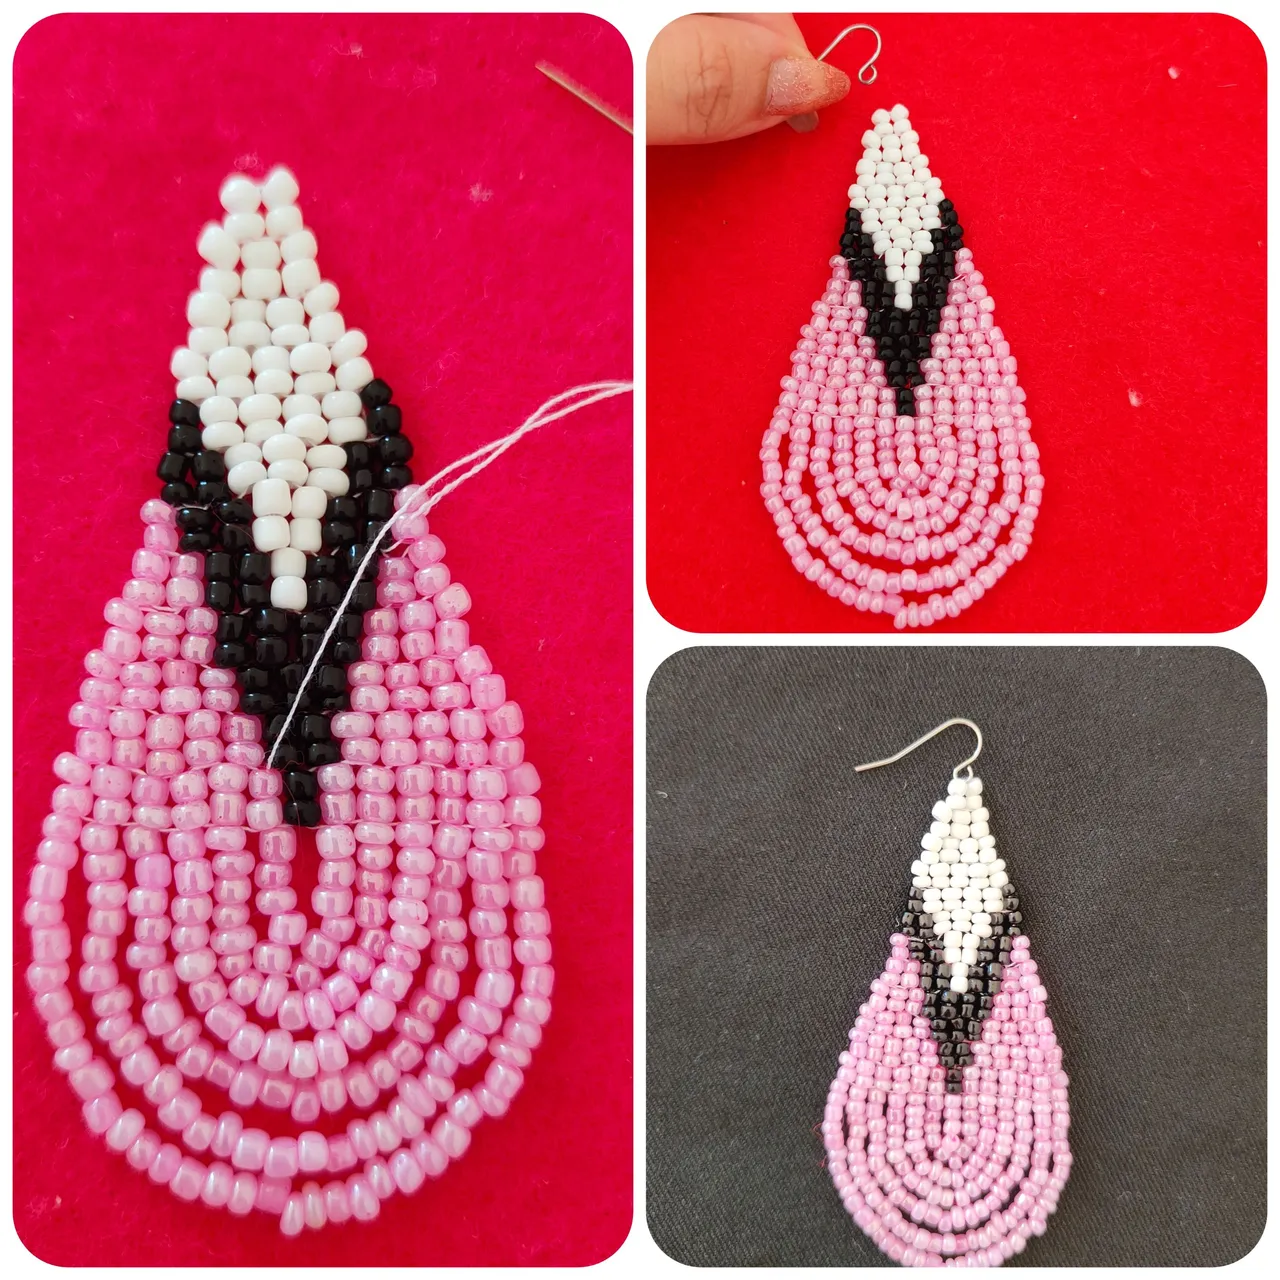
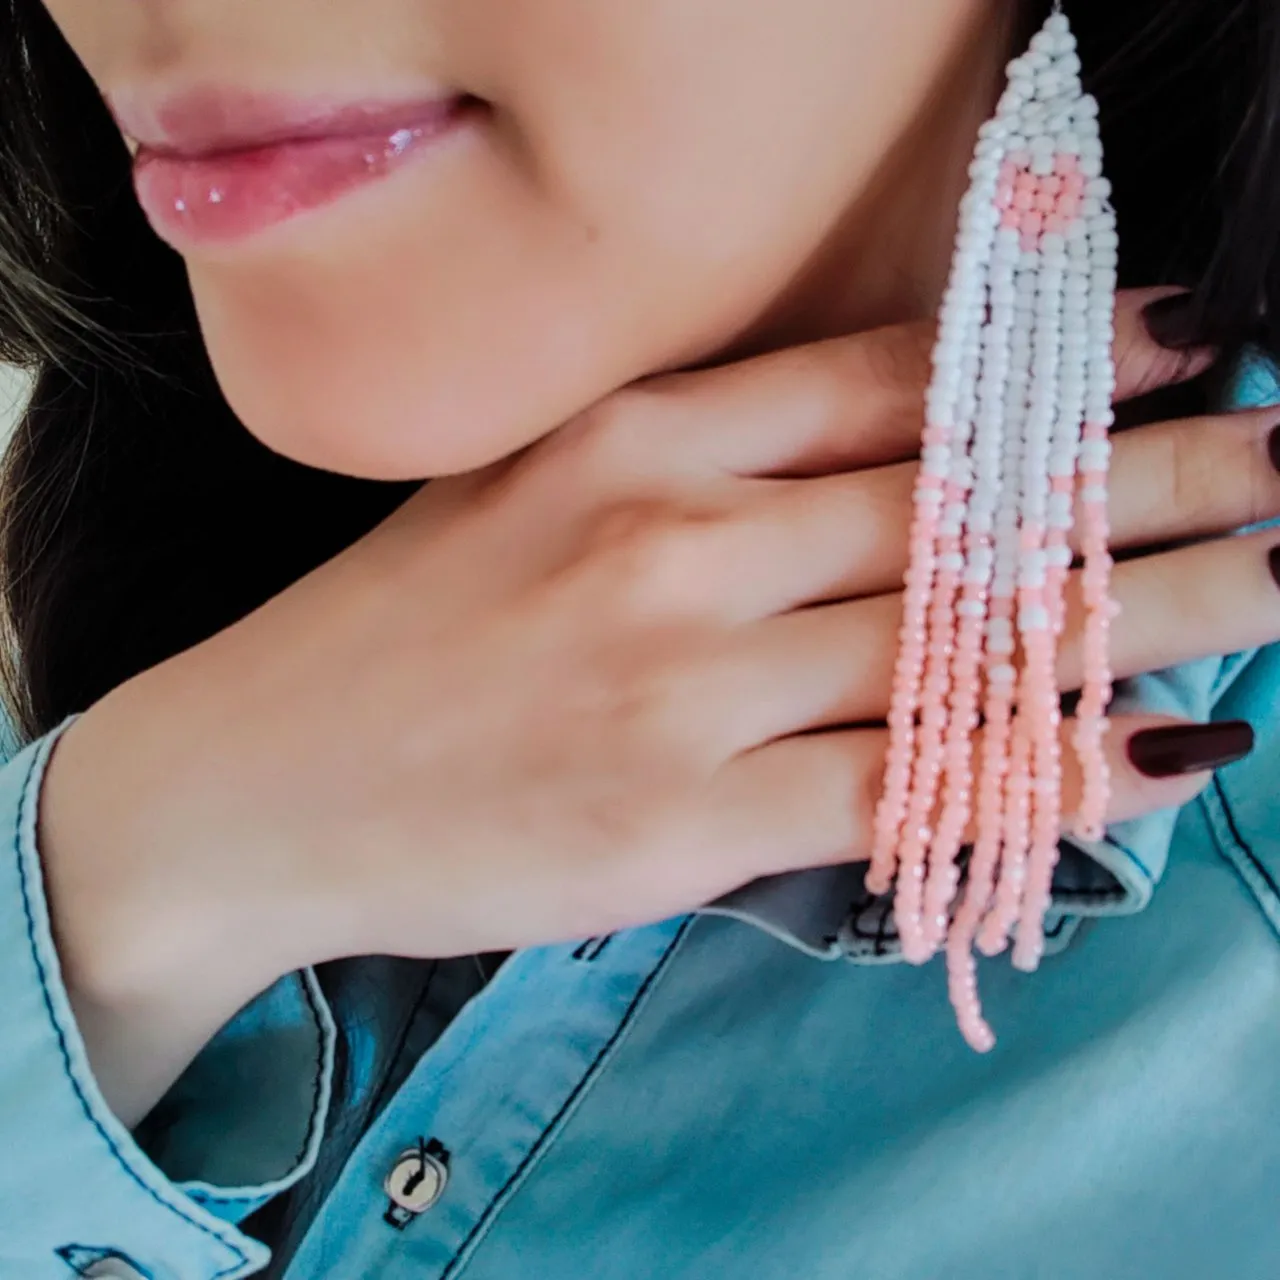
De esta manera habremos culminado nuestro zarcillos de flecos con técnica de ladrillo, es un trabajo que requiere paciencia y práctica pero vale todo el esfuerzo pues su resultado es hermoso.
This way we will have finished our fringed tendrils with brick technique, it is a work that requires patience and practice but it is worth all the effort because the result is beautiful.
Resultado || Result
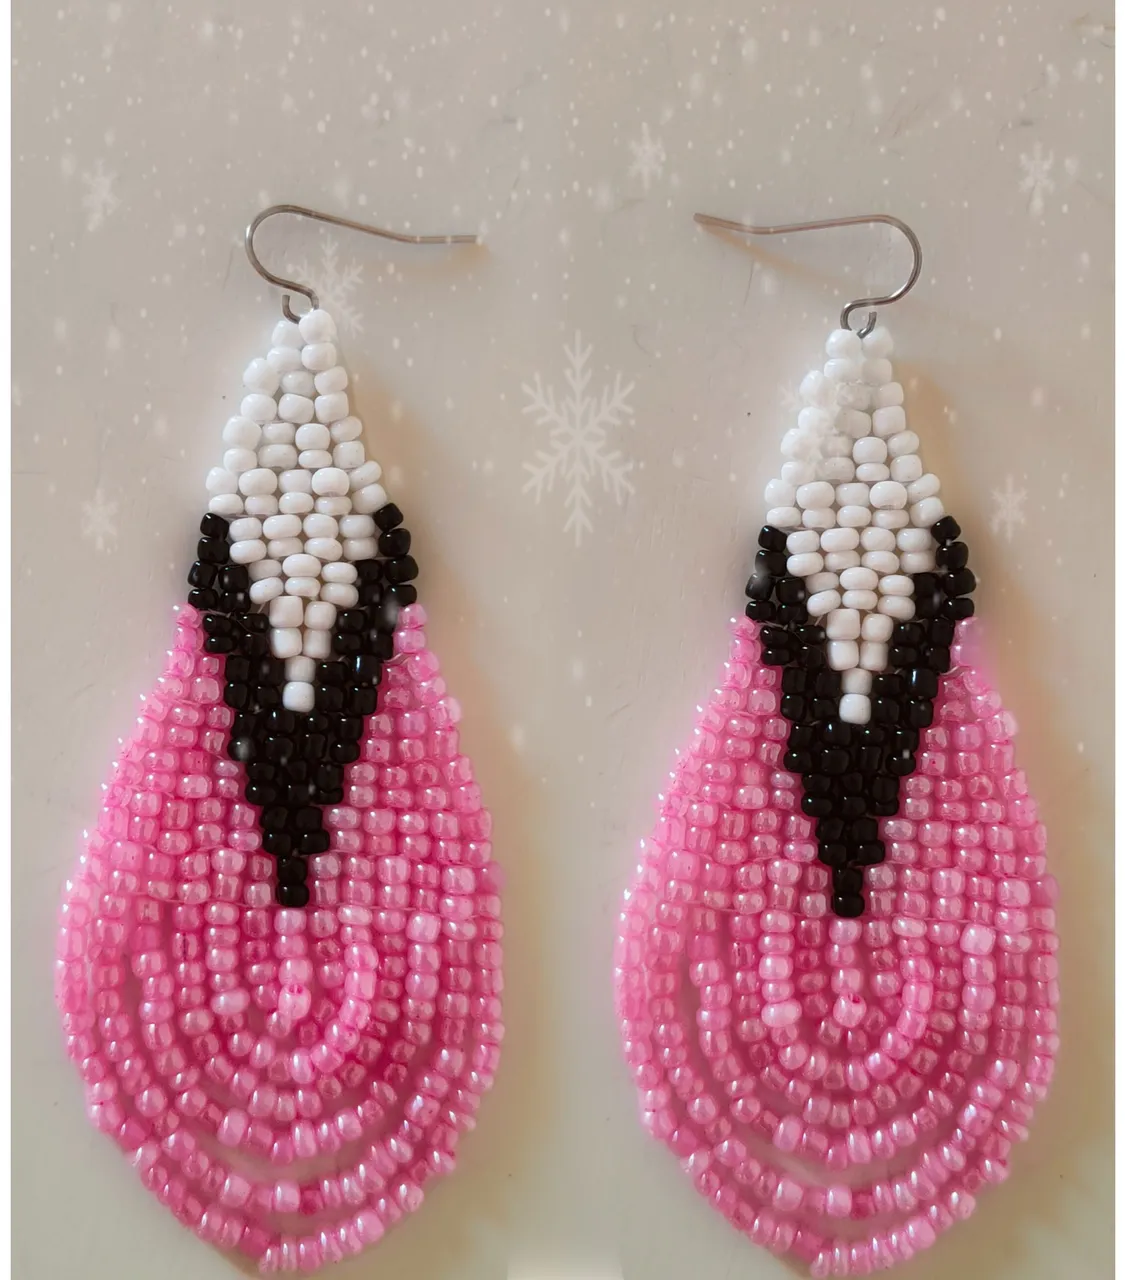
Espero el resultado fuese de su agrado y la técnica lo más explicita posible, ante cualquier duda pueden escribirme en la sección de comentarios que con mucho gusto les responderé, gracias por llegar hasta aquí, por su tiempo, atención, y apoyo esperando que tengan un gran día se despide su amiga hasta un próximo post.
I hope the result was to your liking and the technique as explicit as possible, if you have any questions you can write me in the comments section that I will gladly answer them, thank you for coming here, for your time, attention, and support hoping you have a great day your friend says goodbye until a next post.
La creatividad no tiene límite. || There is no limit to creativity. ✨💎🎉🌷


🎥Imágenes y vídeo creados con: |Images and video created with: Youcut video| Giphy | Canva |
🇪🇸 Traducido con DeepL