Saluditos para todas mis Artistas Creativos de las Manualidades y la Joyería, esperando que se encuentren de maravilla rodeados de esos pequeños seres que nos llenan de alegría con sus risas, y travesuras. Y cada tercer domingo del mes de julio le hacemos un reconocimiento y celebramos el Día del Niño; en Venezuela este Día es muy especial se realizan eventos como festivales, concursos actividades recreativas, etc., las familias se reúnen para mostrarle a los pequeños la importancia de como debe protegerse la infancia y recordarle lo especial que deben ser los niños. Que todos tienen derecho a la educación, a la salud, la protección contra la explotación y el abuso, que tienen derecho a jugar y divertirse.
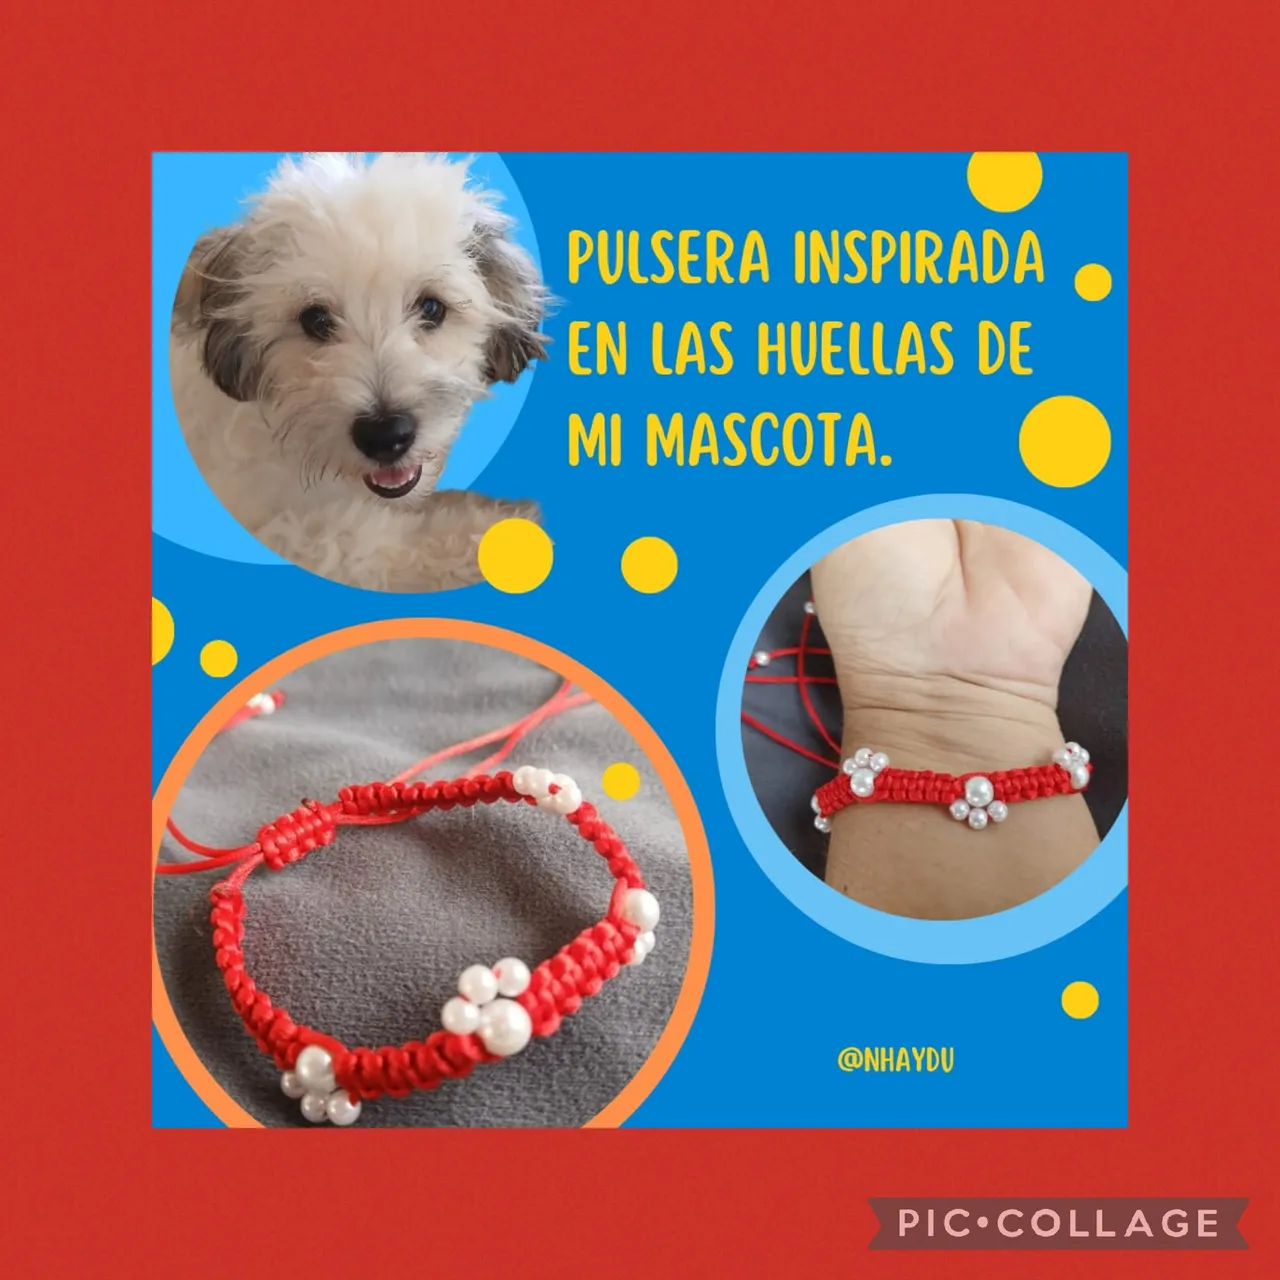
En casa siempre celebramos en grande se reúnen toda la familia y cada uno hace su aporte ( los que menos aportan traen sus dos o tres niños 🤣🤣🤣) pero lo pasamos genial, en esta oportunidad mi nieta también trajo su mascota, ya me había pedido que le hiciera unos detallitos para obsequiar a sus primos que también tienen sus mascotas, le hice llaveritos con figuras de perros, gatos, loros, etc., y para Ella, una linda y delicada pulsera inspirada en las huellitas de su mascota.
Está la realicé con un cordón rojo satinado del llamado cola de rata y unas perlitas blancas, use el nudo plano de la técnica macramé y los invito a seguir leyendo para que vean cómo la hice.
Greetings to all my Creative Artists of Crafts and Jewelry, hoping you are having a wonderful time surrounded by these little beings who fill us with joy with their laughter and mischief. And every third Sunday in July, we recognize them and celebrate Children's Day. In Venezuela, this day is very special. Events such as festivals, contests, recreational activities, etc. are held. Families gather to show their children the importance of protecting childhood and remind them how special children are. They believe that everyone has the right to education, health care, protection from exploitation and abuse, and the right to play and have fun. At home, we always celebrate big. The whole family gets together, and everyone contributes (those who contribute the least often bring their two or three children 🤣🤣🤣), but we had a great time. This time, my granddaughter also brought her pet. She had already asked me to make some little gifts for her cousins, who also have pets. I made keychains with figures of dogs, cats, parrots, etc., and for her, a cute and delicate bracelet inspired by her pet's paw prints.
I made it with a red satin cord called rat's tail and some white pearls. I used the flat knot of the macramé technique. I invite you to continue reading to see how I made it.
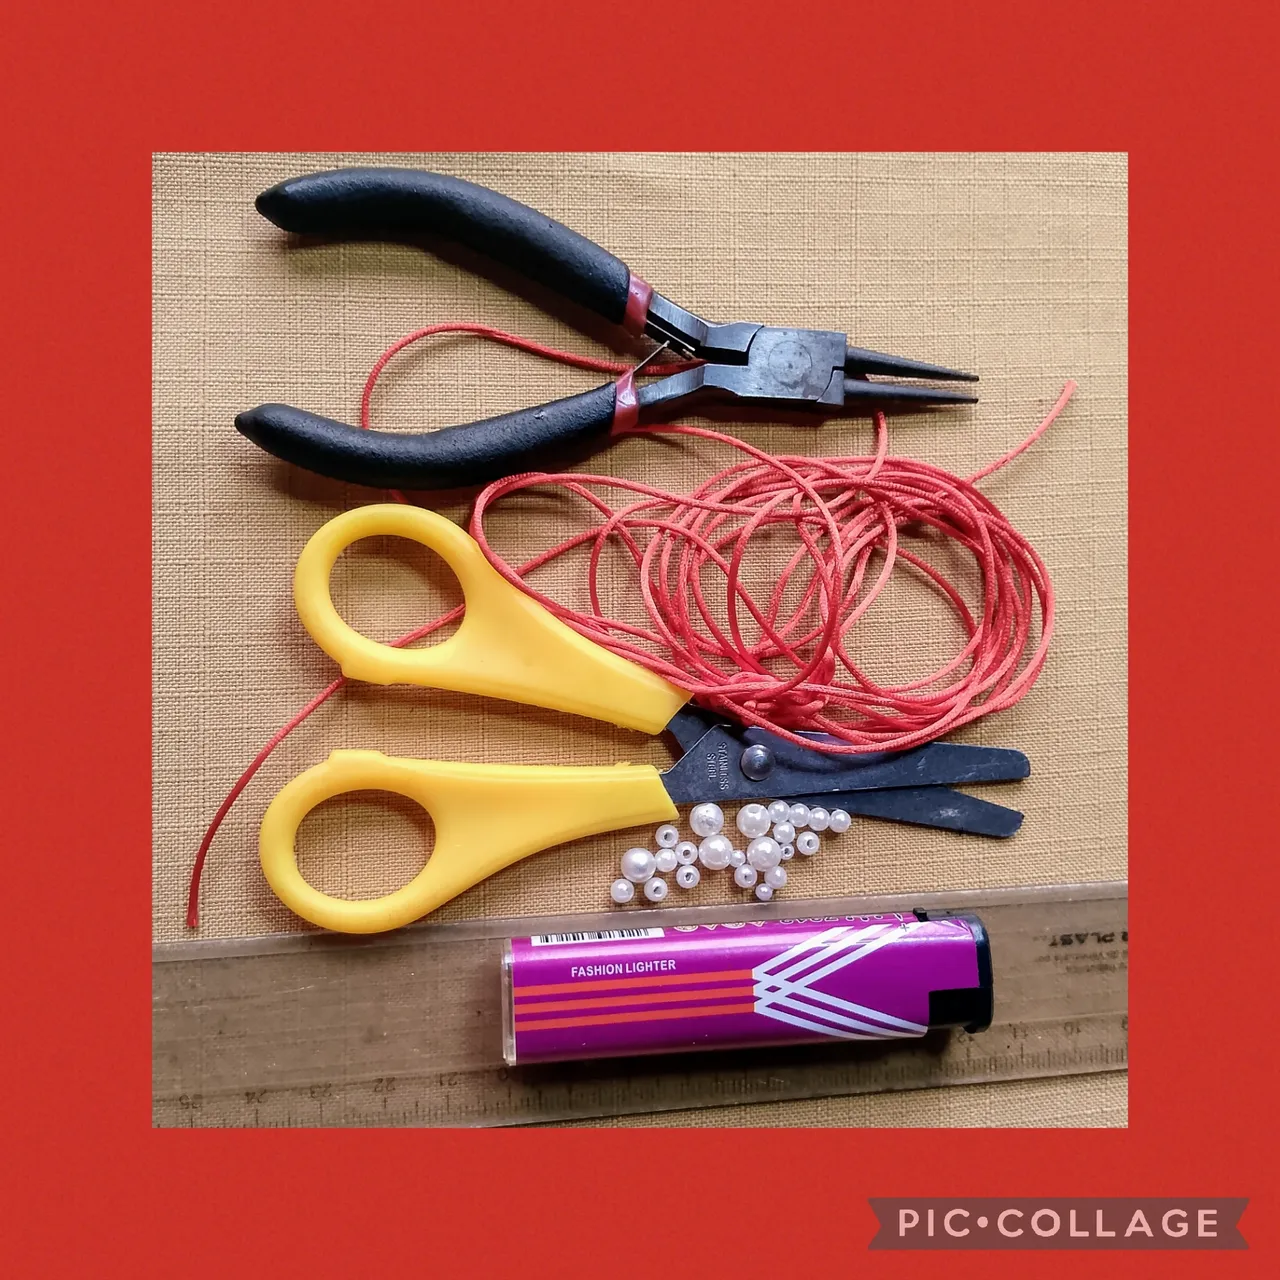
MATERIALES USADOS EN SU ELABORACIÓN:
✓ Dos metros cuarenta centímetros de
cola de rata, color rojo satinado.
✓ Seis perlas número seis.
✓ Catorce perlas número dos.
✓ Un encendedor.
✓ Tijeras.
✓ Centímetro.
✓ Una pinza.
MATERIALS USED IN ITS PREPARATION:
✓ Two meters and forty centimeters of red satin rattail.
✓ Six number six pearls.
✓ Fourteen number two pearls.
✓ A lighter.
✓ Scissors.
✓ Centimeter.
✓ A pair of tweezers.
CON ESTOS SENCILLOS Y POCOS PASOS REALICÉ ESTÁ BONITA Y DELICADA PULSERA:
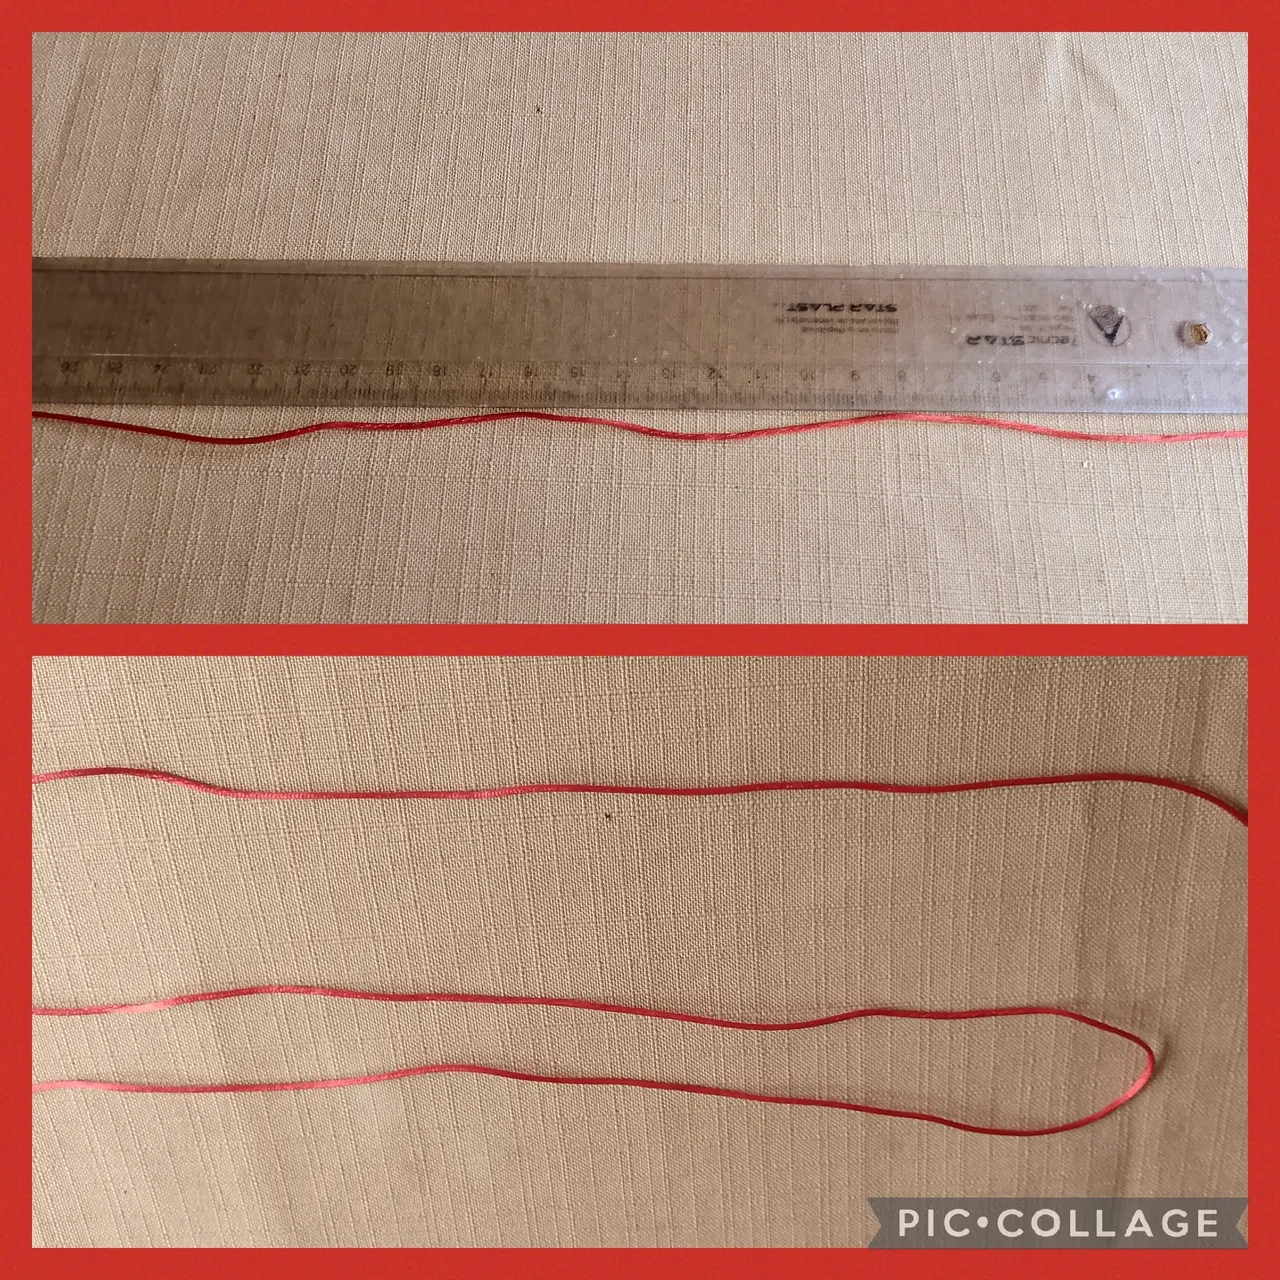
PRIMER PASO:
Voy a comenzar con este delicado proyecto, ocupando la regla y las tijeras para medir y cortar del cordón cola de rata de color rojo satinado dos medidas de cuarenta y cinco centímetros cada una, otra de ciento veinte y una última de veinte centímetros para el cierre así:
WITH THESE SIMPLE AND FEW STEPS I MADE THIS BEAUTIFUL AND DELICATE BRACELET:
FIRST STEP:
I'm going to start this delicate project by using the ruler and scissors to measure and cut two 45-centimeter lengths of satin red rattail cord, another 120-centimeter length, and a final 20-centimeter length for the clasp, like this:
SEGUNDO PASO:
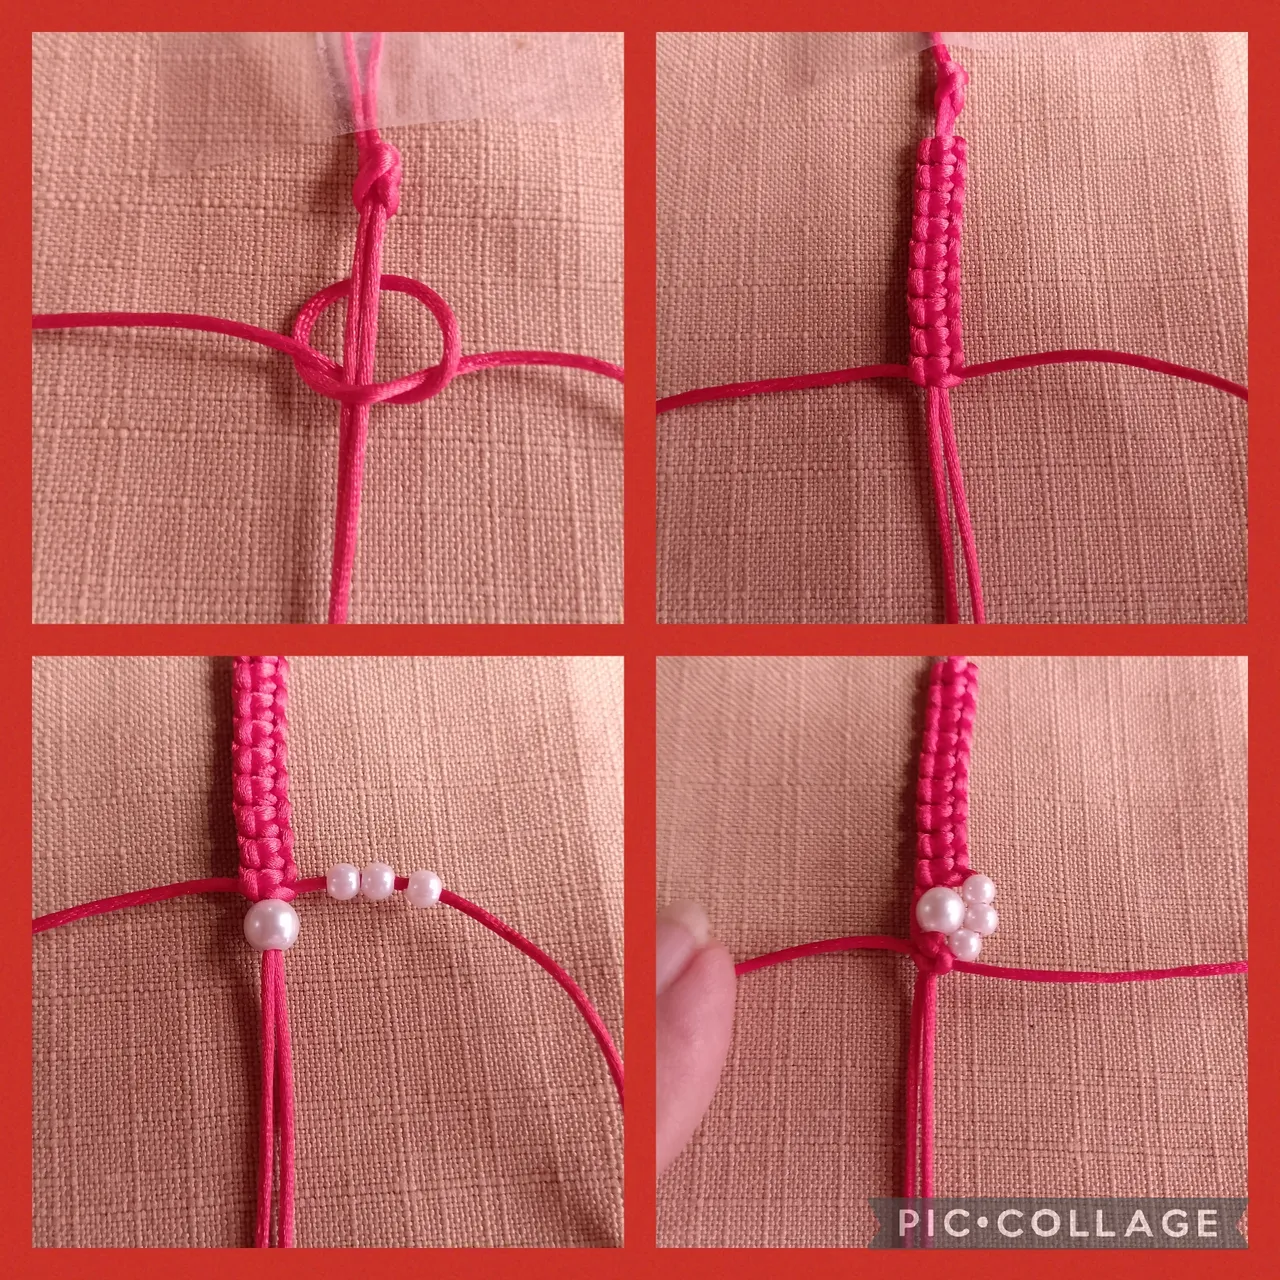
En este paso tomo los dos cordones de cuarenta y cinco centímetros, uso la regla y mido doce centímetros y en esa longitud los fijo con un tiro a mi mesa de trabajo, ahora tomo el cordón cola de rata rojo satinado de un metro cuarenta lo doblo a la mitad uniendo las puntas y lo coloco debajo de los hilos centrales verificando que sean iguales para tejer nudo plano que es el nudo con que realizaré mi pulsera.
El nudo plano ya lo he realizado en otras ocasiones es muy sencillo y facil de realizar los invito a leer mis publicaciones anteriores dónde detallo su proceso. Una vez colocado los cordones tejo seis centímetros como muestra la imagen. Ahora junto las puntas y las quemo usando el encendedor para formar una sola punta, dónde inserto una perla número seis y la subo hasta el último nudo, ahora uso de nuevo el encendedor para afilar la punta del cordón del lado derecho y ahí inserto tres perlas número cuatro que subo hasta la perla número seis y realizo un nudo plano para formar el diseño de una garra.
STEP TWO:
In this step, I take the two 45-centimeter cords, use the ruler, and measure 12 centimeters. At that length, I secure them with a string to my work table. Now, I take the 1.40-meter satin red rattail cord, fold it in half, joining the ends, and place it under the center threads, making sure they are equal, to weave a flat knot, which is the knot I will use to make my bracelet.
I've already made the flat knot before; it's very simple and easy to do. I invite you to read my previous posts where I detail the process. Once the cords are in place, I weave six centimeters as shown in the image. Now I join the tips and burn them using the lighter to form a single point, where I insert a number six pearl and bring it up to the last knot, now I use the lighter again to sharpen the tip of the cord on the right side and there I insert three number four pearls that I bring up to the number six pearl and make a flat knot to form the design of a claw.
TERCER PASO:
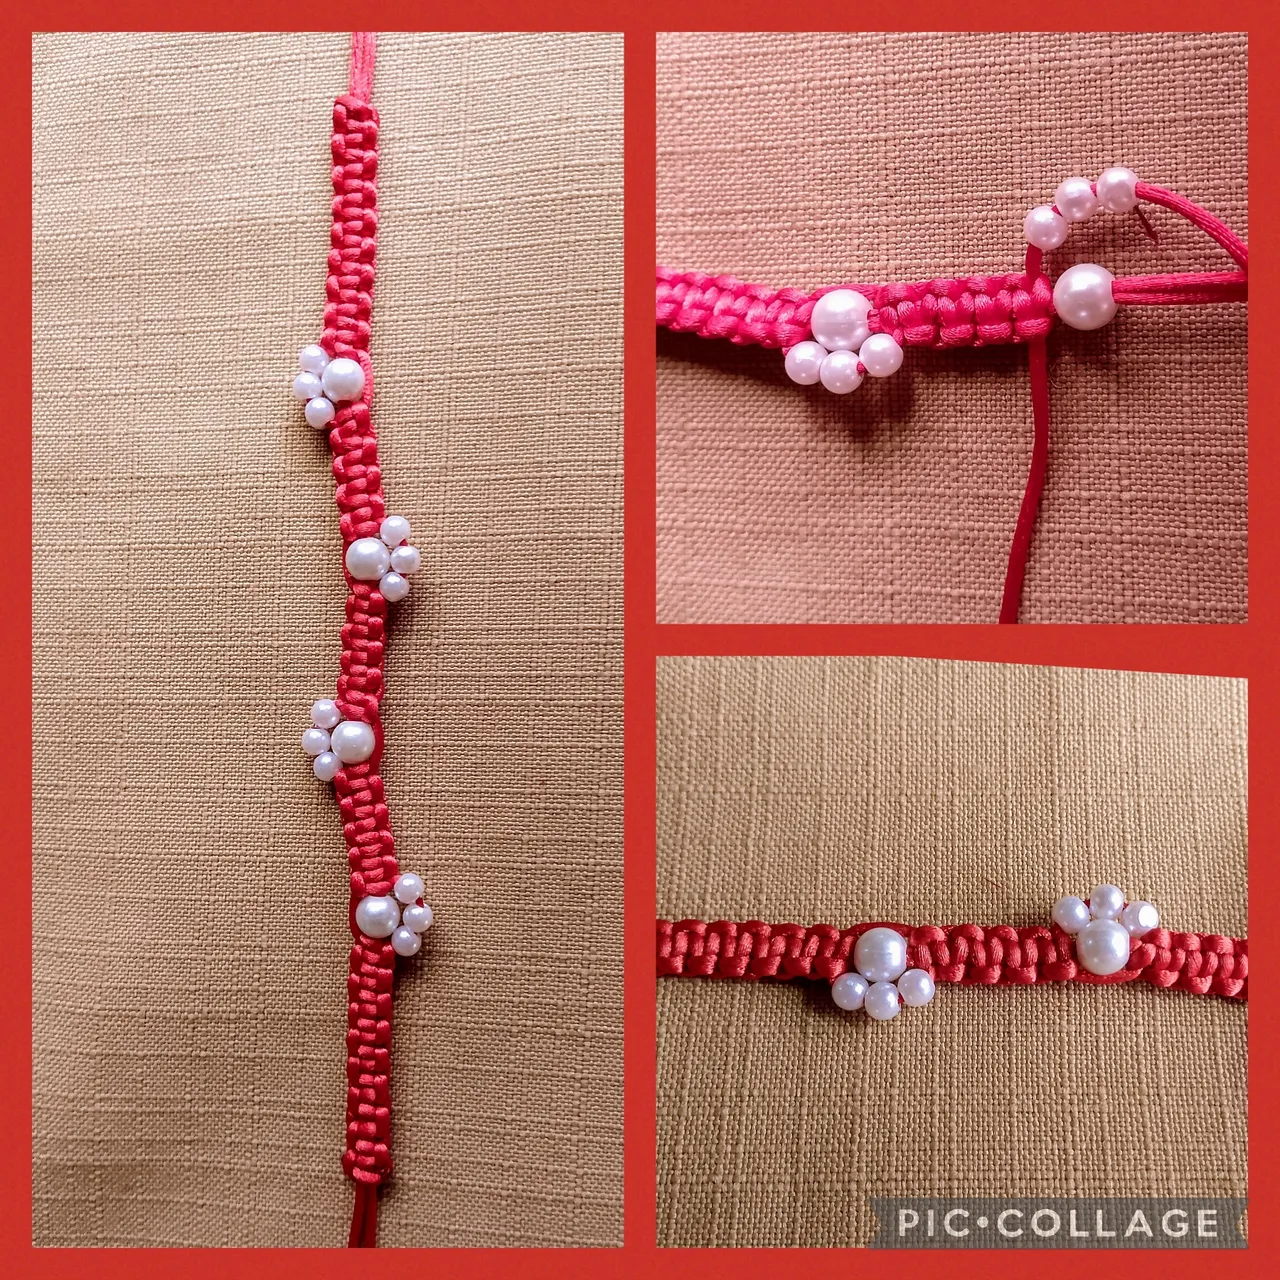
Ahora elaboro centímetro y medio de nudo plano para hacer distancia entre garras. Paso a elaborar otra garra pero está la elaboro del lado izquierdo, como muestra el diseño, realizo el mismo procedimiento para elaborar la tercera garra pero está vez del hago del lado derecho y para la cuarta garra la hago del lado izquierdo así como muestro, después de elaborar esta última garra tejo seis centímetros de nudo plano como al principio, y así va quedando.
STEP THREE:
Now I make a centimeter and a half flat knot to create the distance between the legs. I move on to another leg, but I make it on the left side, as shown in the design. I follow the same procedure for the third leg, but this time I make it on the right side. For the fourth leg, I make it on the left side, as shown. After making this last leg, I knit a six-centimeter flat knot, just like at the beginning, and so it looks.
CUARTO PASO:
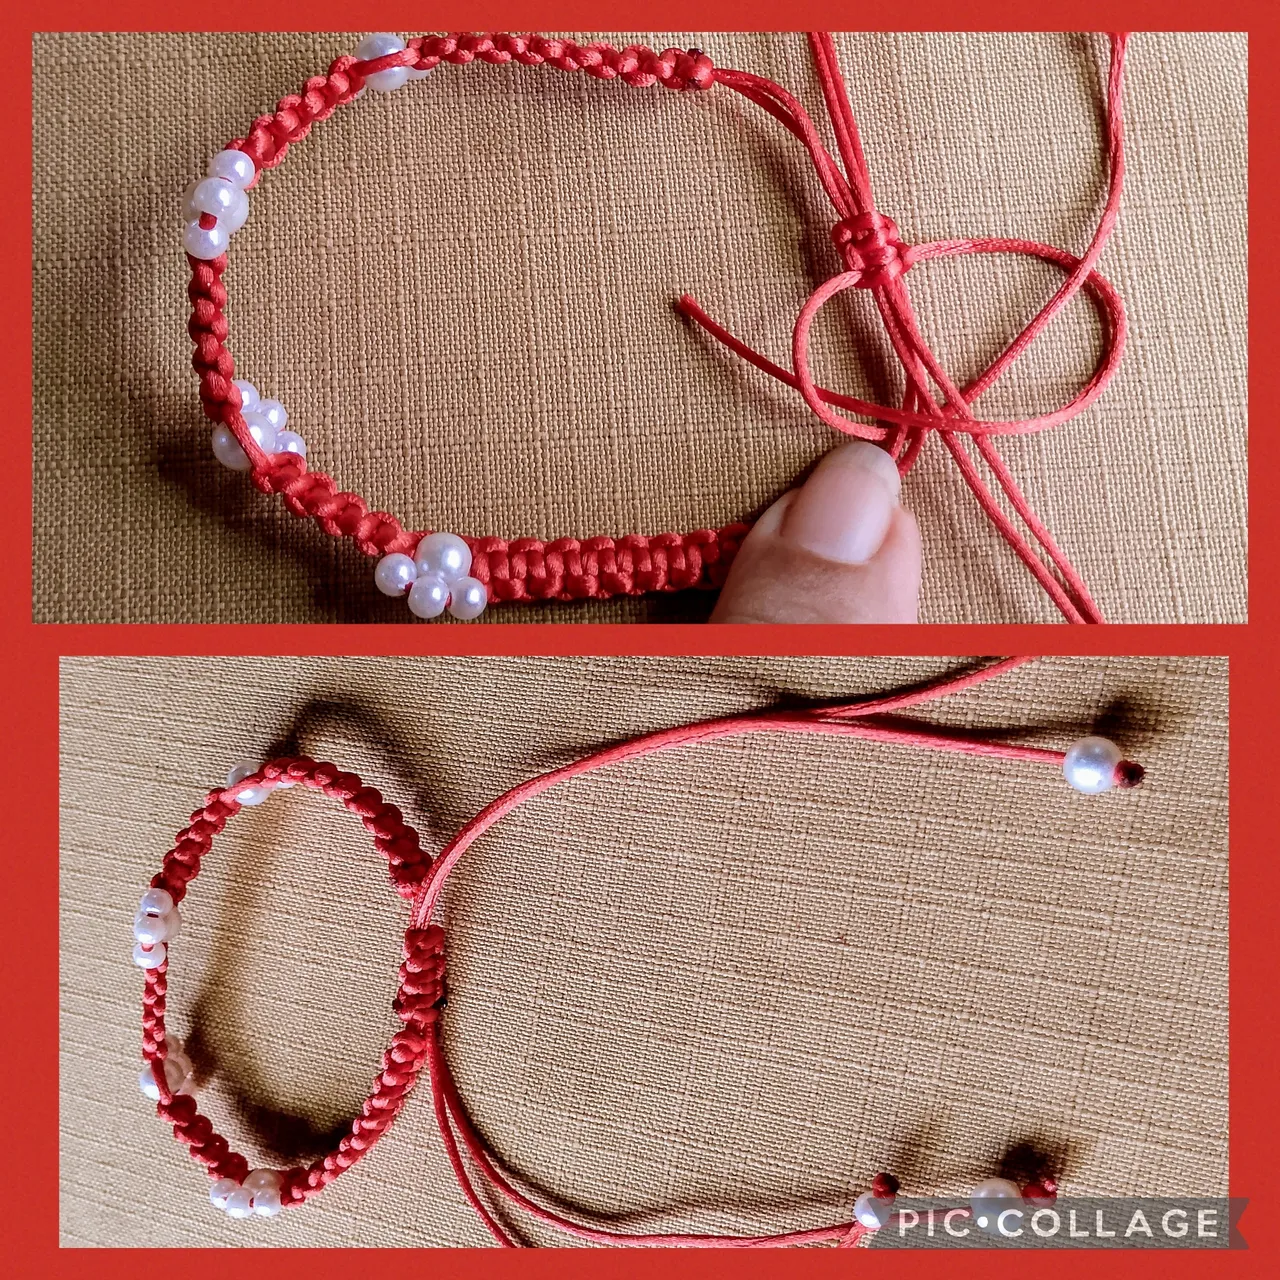
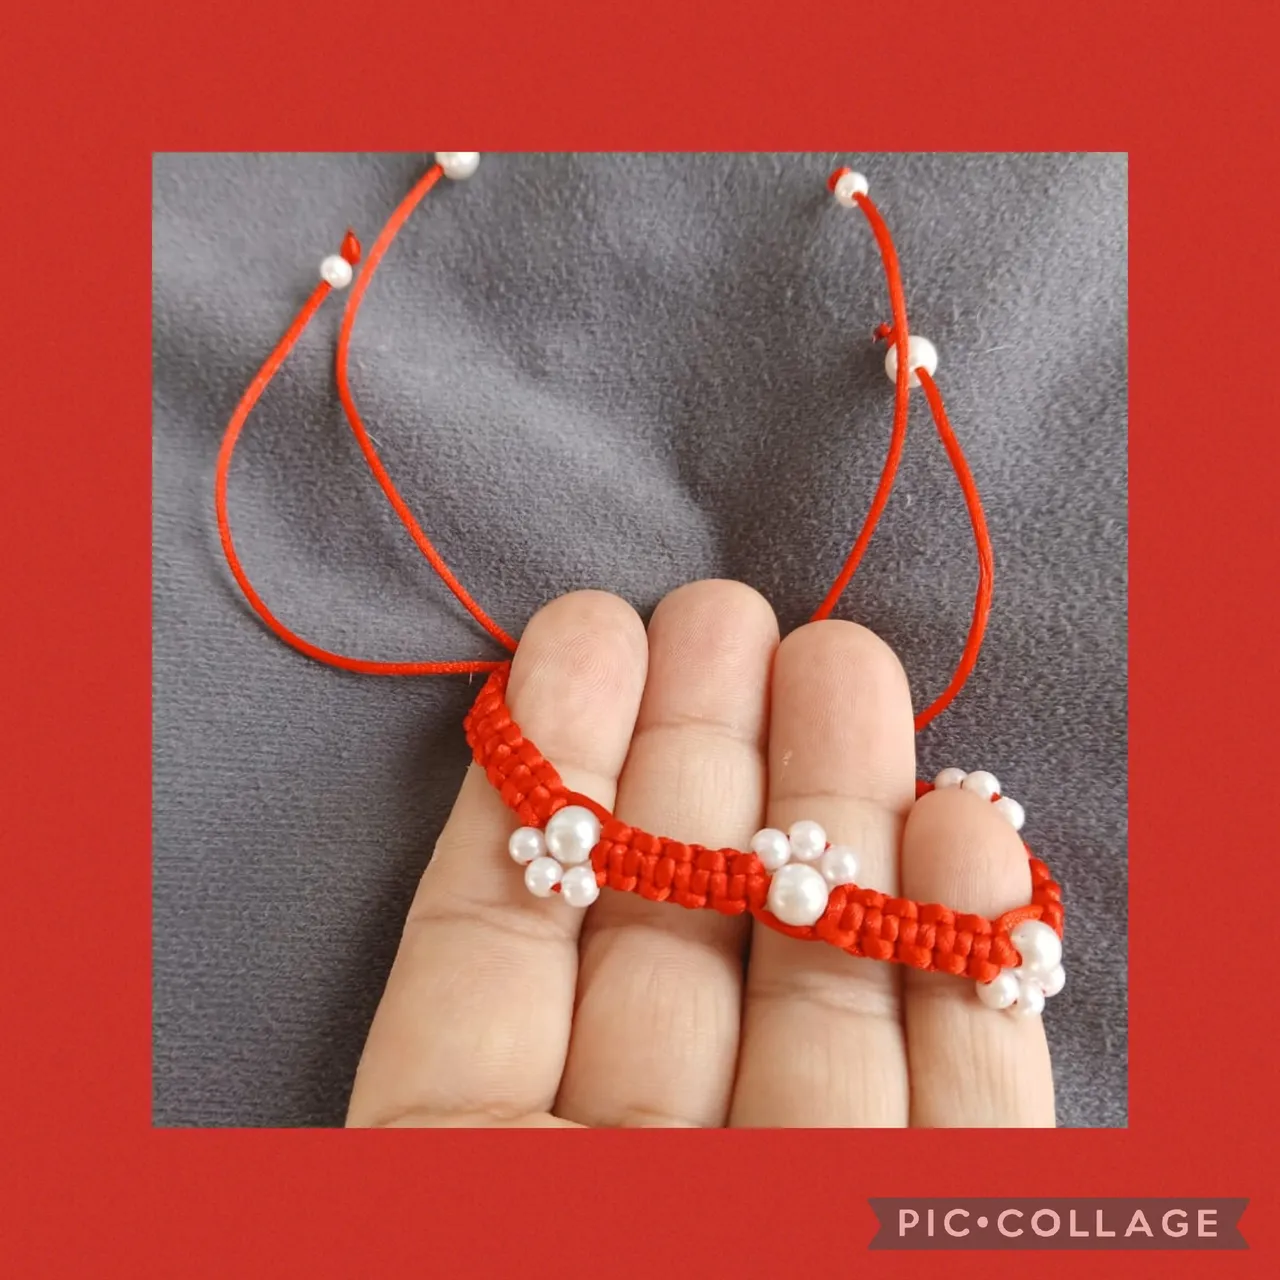
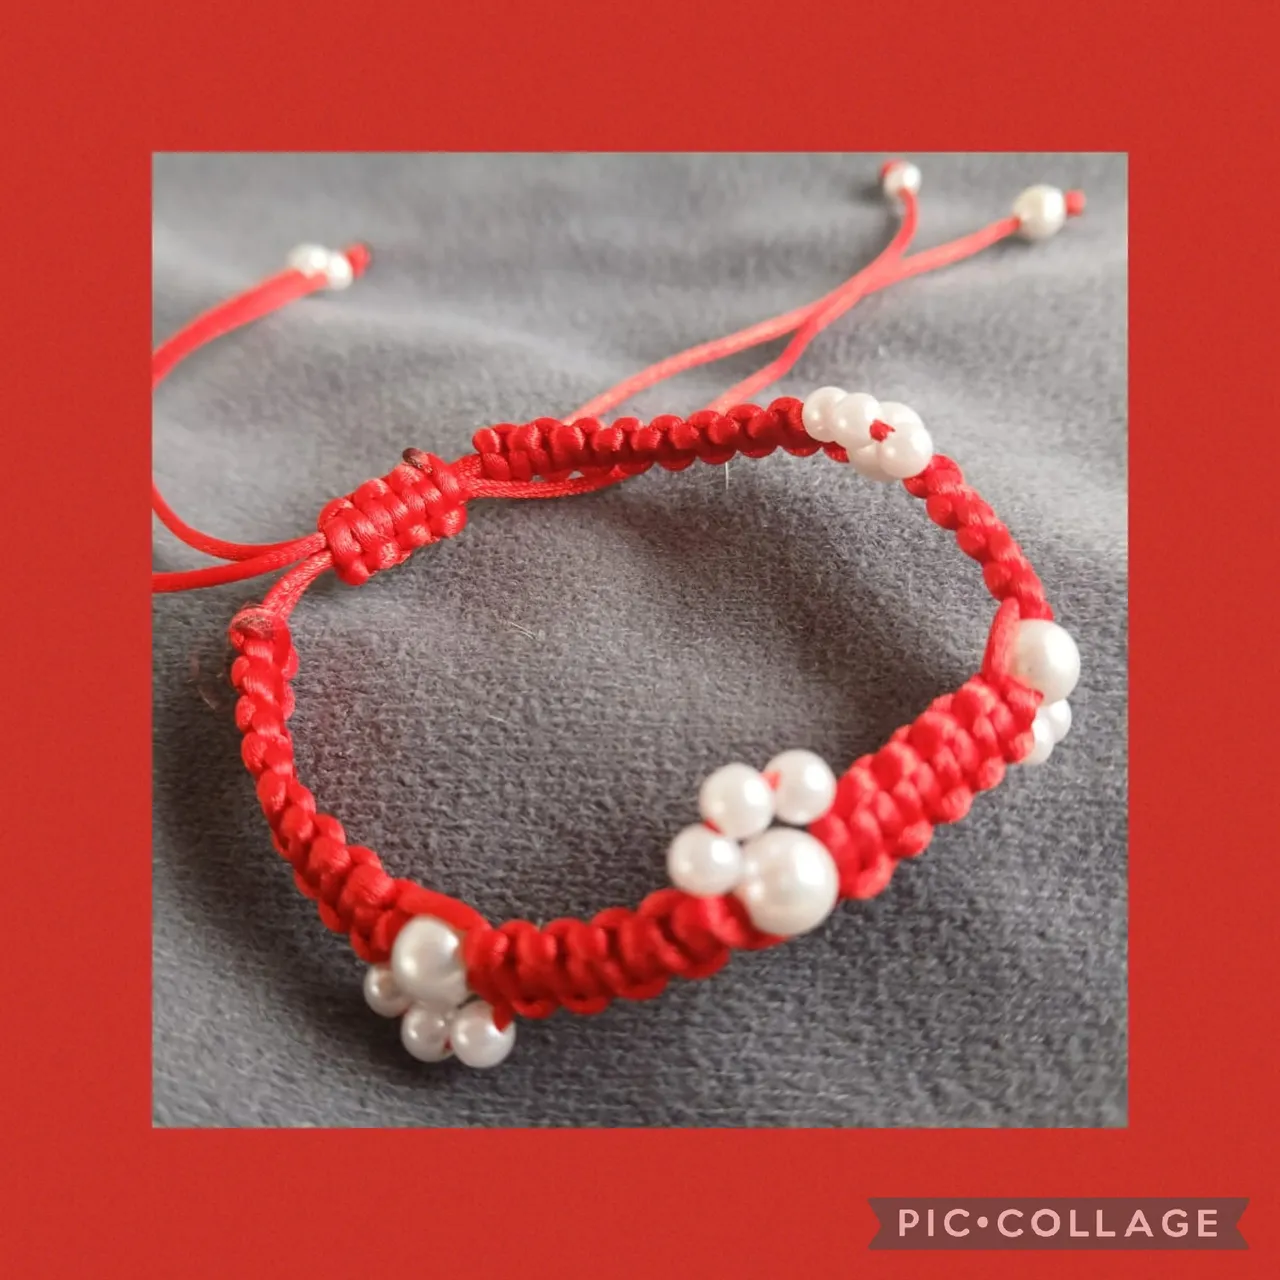
Ya estoy finalizando la pulsera y voy a realizar el cierre, corto los cordones excedentes y sello con el encendedor, tomo el cordón de veinte centímetros y hago cinco nudos planos así como muestro, ahora en los cordones del cierre coloco una perlita número seis y una perlita cuatro de cada lado hago un nudo simple y sello con el encendedor para este resultado.
STEP FOUR:
I'm now finishing the bracelet and I'm going to make the clasp. I cut the excess cords and seal them with the lighter. I take the twenty-centimeter cord and make five flat knots as shown. Now, on the clasp cords, I place a number six bead and a number four bead on each side. I make a simple knot and seal them with the lighter for this result.
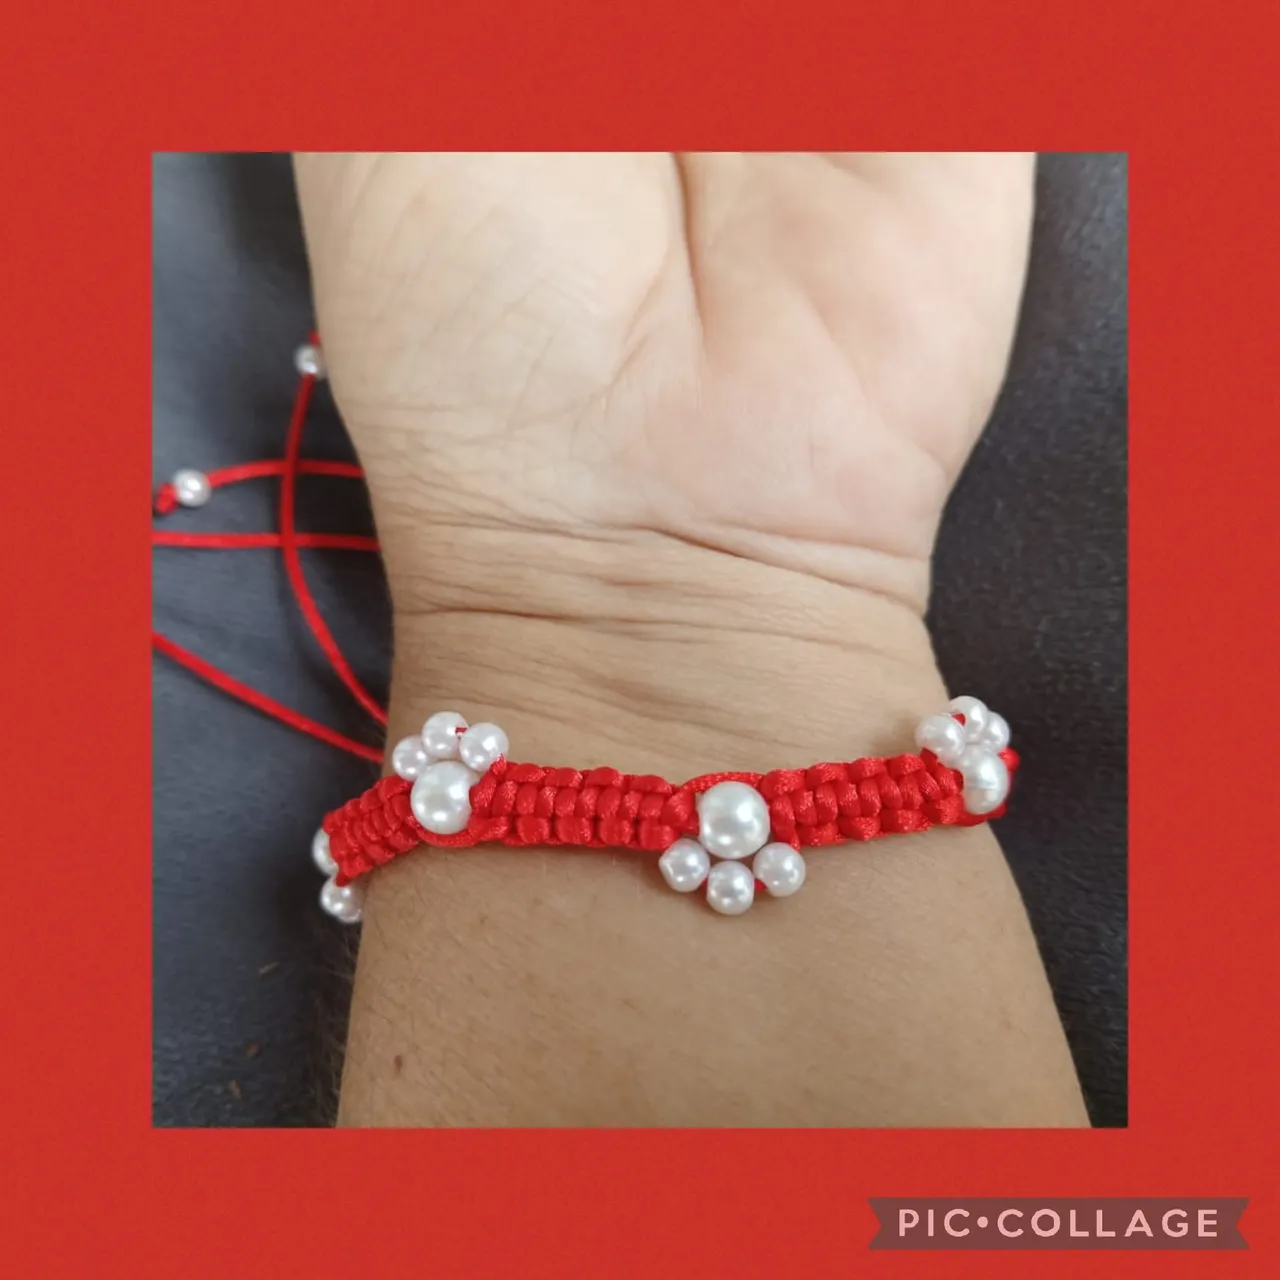
Artistas Creativos de las Manualidades y la Joyería este es el resultado final de mi manualidad, una bonita y delicada pulsera que elaboré para complacer a mi nieta, de verdad me encantó el diseño me pareció diferente y ella estuvo complacida, espero que a ustedes también les agrade este proyecto y le pongan su toque personal, pueden realizar también un collar para su mascota por ejemplo.
Espero hayan pasado un excelente Día del niño y que tengan un feliz inicio de semana, gracias a todos los que leen, ven mis publicaciones y me apoyan con sus valiosos comentarios , nos vemos en la próxima manualidad, bye bye.
Creative Artists of Crafts and Jewelry, this is the final result of my craft: a beautiful and delicate bracelet I made to please my granddaughter. I really loved the design; it seemed different to me, and she was pleased. I hope you also like this project and add your own personal touch. You can also make a collar for your pet, for example.
I hope you had a wonderful Children's Day and that you have a happy start to the week. Thank you to everyone who reads and views my posts and supports me with your valuable comments. See you for the next craft project. Bye bye.
Las imágenes y redacción de este tutorial son de mi exclusiva propiedad, las fotos fueron tomadas con mi teléfono celular Tecno Spark Go 20 y las edite con una aplicación gratis del mismo.
Para traducir texto use Google traductor.
The images and writing in this tutorial are my exclusive property. The photos were taken with my Tecno Spark Go 20 cell phone and edited with a free app.
Use Google Translate to translate the text.