Greetings dear friends craft lovers, welcome to my post once again, I'm Nitsu and today I'm going to share with you the process of creating this 3D painting, my idea came when I saw this product on an internet page, I really loved it and when I checked the price it seemed absolutely crazy, so after thinking about it for a while I decided that I would do it on my own and although it was not exactly the same I'm glad that it has its own style.
Saludos queridos amigos amantes de las manualidades, bienvenidos a mi post una vez más, soy Nitsu y hoy voy a compartirles el proceso de creación de este cuadro en 3D, mi idea surgió al ver este producto en una página de internet, realmente me había encantado y cuando revise el precio me pareció una absoluta locura, así que tras pensarlo un rato decidí que lo haría por mi propia cuenta y aunque no quedo exactamente igual estoy contento de que tenga su propio estilo.
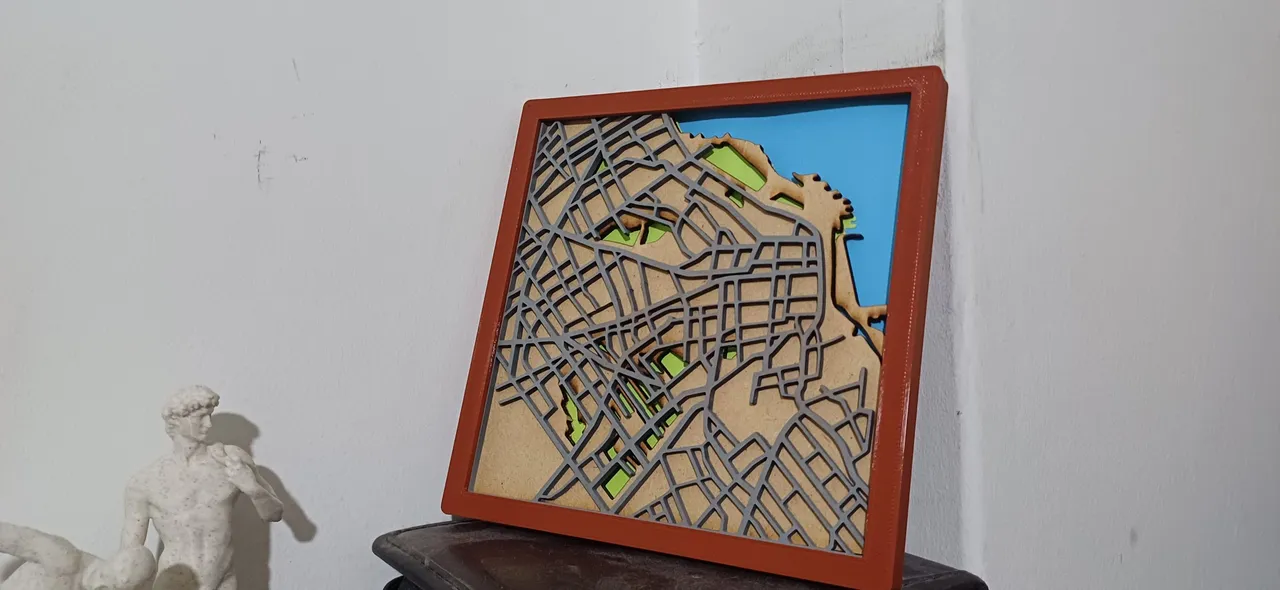
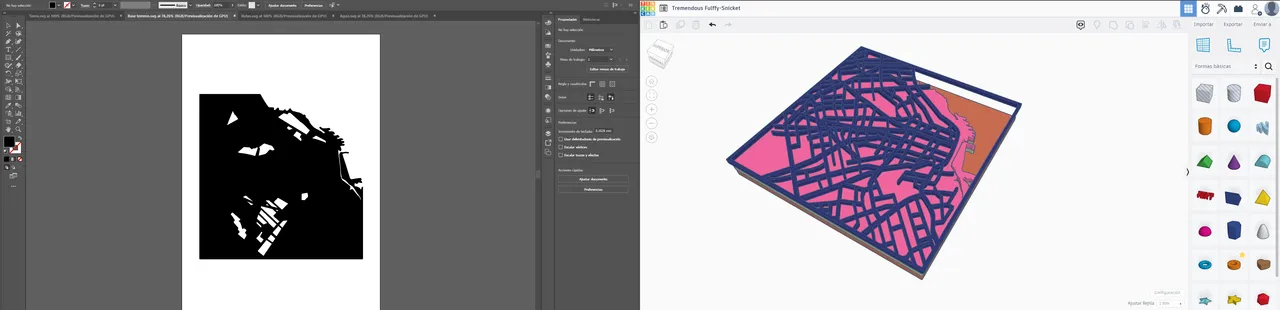
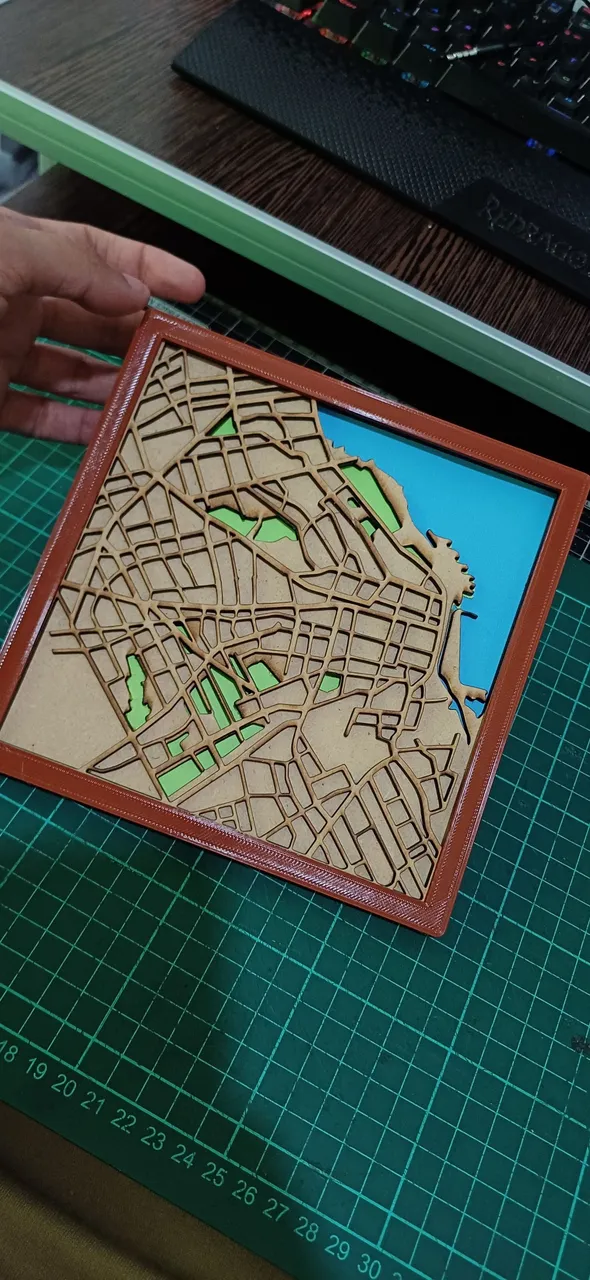
This painting with map is inspired by the map of the Autonomous City of Buenos Aires (CABA) seen from above, it took longer than I had considered at first and I found it a little frustrating but once I achieved the final result I was very happy with the result.
Este cuadro con mapa está inspirado en el mapa de la Ciudad Autónoma de Buenos Aires (CABA) visto desde arriba, tarde más de lo que había considerado en un principio y me resulto un poco frustrante pero una vez logre el resultado final me quede muy contento con el resultado.
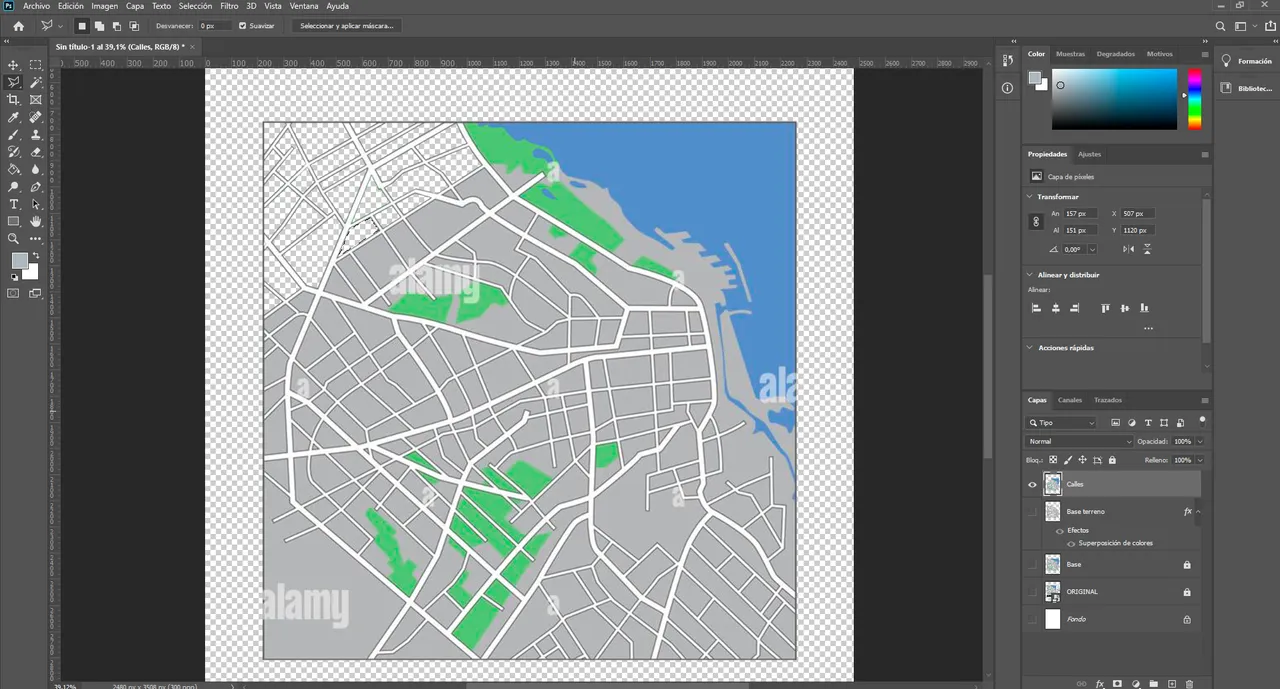
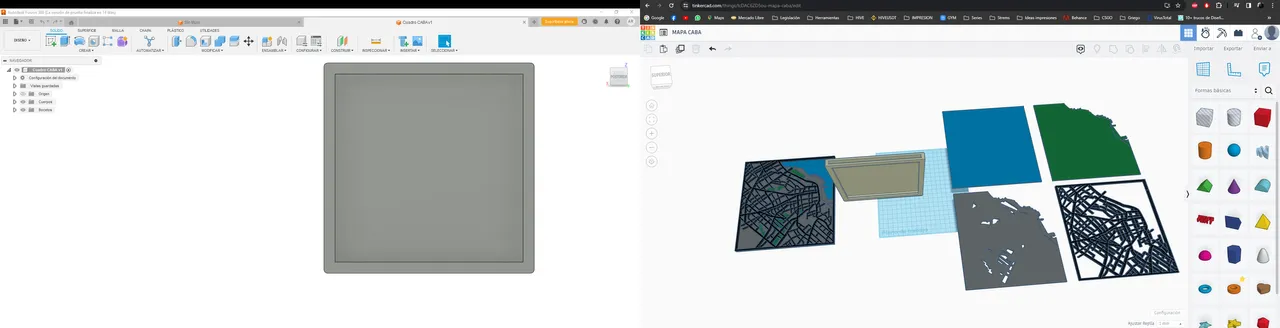
To start I needed a base image, a map of CABA and after some time I found one that convinced me to start with my work, I downloaded it and in Photoshop I started to edit the layers. For this I generated several different layers, the first one was going to be the original image but hidden this way I would have the original reference image in case of any doubt, the second layer would be the blue square base that would represent the water, followed by the third green layer that would be the squares and parks of the city, in fourth place, would be what I would call the terrain of buildings that would be all the gray areas and finally the main avenues and highways that run through the capital.
Para comenzar necesitaba una imagen base, un mapa de CABA y tras estar bastante tiempo encontré uno que me convencía para empezar con mi trabajo, lo descargué y en Photoshop comencé a editar las capas. Para esto genere varias capas diferentes, la primera iba a ser la imagen original pero oculta de esta manera tendría la imagen de referencia original ante cualquier duda, la segunda capa seria la base cuadrada azul que representaría el agua, seguida de la tercera capa verde que serían las plazas y parques de la ciudad, en cuarto lugar, estaría lo que llamaría el terreno de edificios que serían todas las zonas grises y por ultimo las avenidas y autopistas principales que recorren la capital.
All the editing of the images took me several hours and since it was so tiring or boring I did it little by little so as not to get exhausted. Once I finished I proceeded to export the images in PNG and then vectorize them with Illustrator. For this I use the intelligent vectorization that allows me to do this task in a much faster way, although sometimes it is not very accurate and I have to be careful to edit those sections that are not as you want.
Toda la edición de las imágenes me llevo varias horas y al ser tan agotador o aburrido lo fui haciendo de a poco para no extenuarme. Una vez lo finalice procedí a exportar las imágenes en PNG para posteriormente vectorizarlas con Illustrator. Para ello utilizo el vectorizado inteligente que me permite hacer esta tarea de forma mucho más rápida, aunque a veces no es muy exacta y toca estar atento para editar esas secciones que no quedan como uno desea.
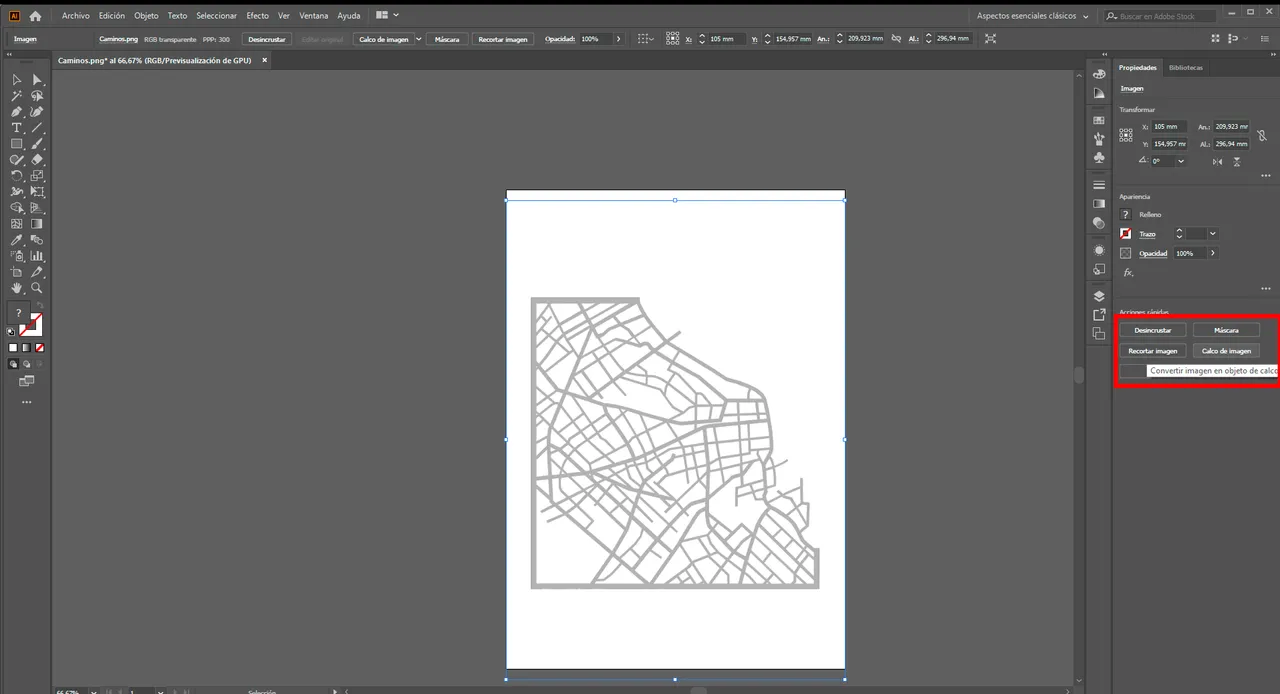
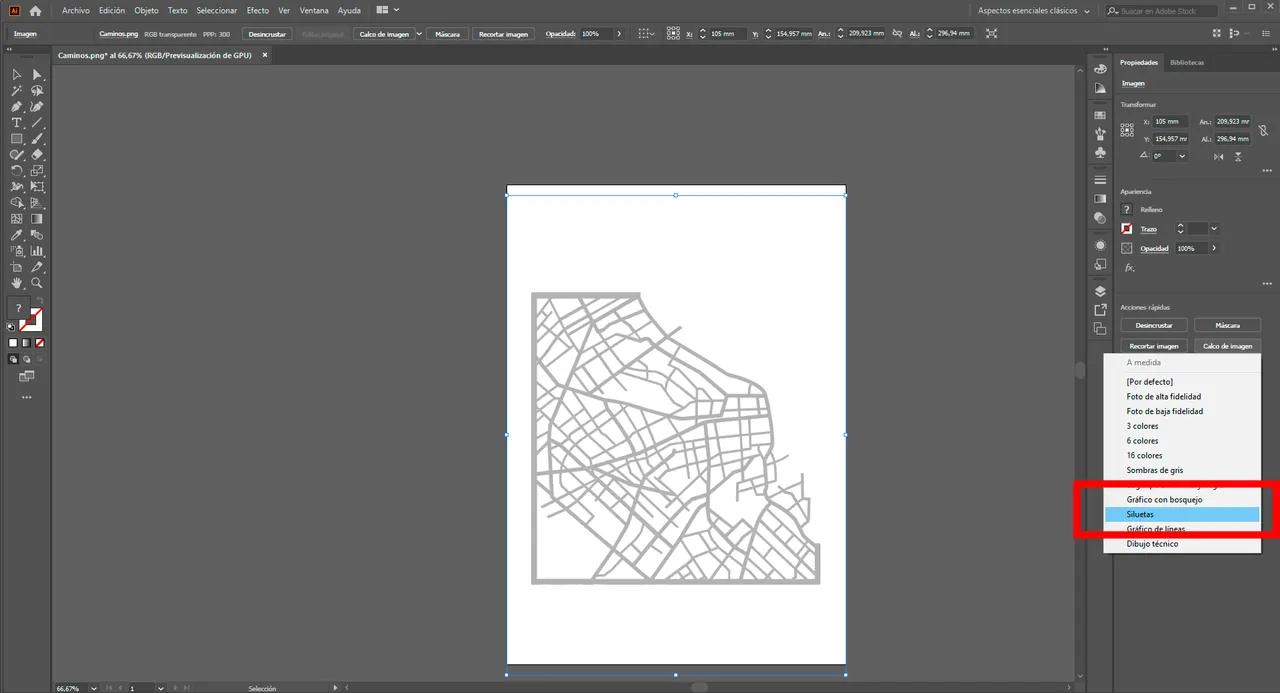
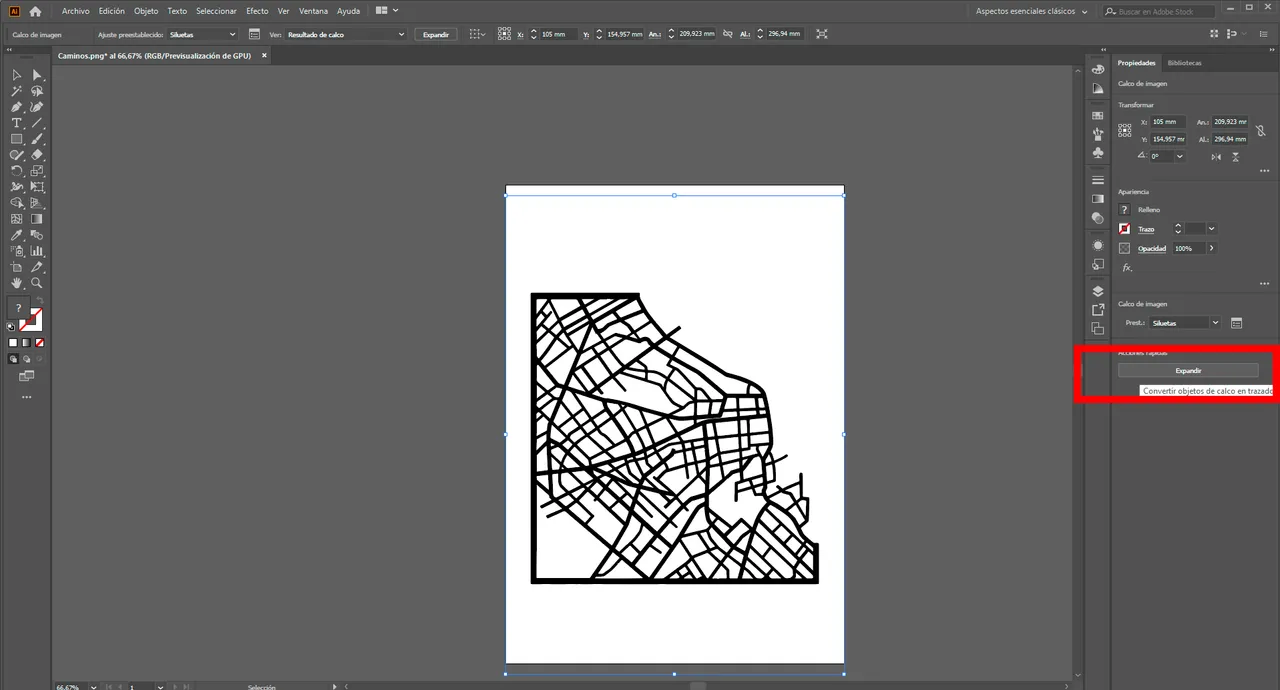
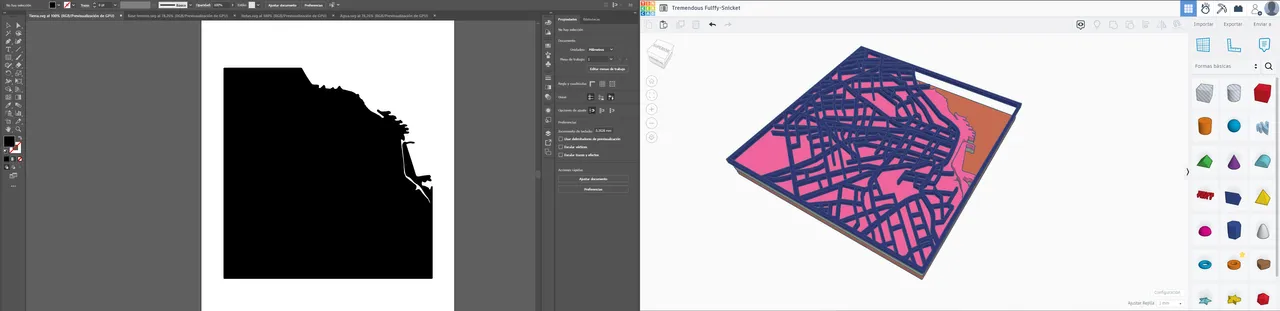
To vectorize we open the image in the program, go to the right bar and click on image tracing, a tab will open and there we will select silhouettes, this way we will have a black image only of the silhouette of our image, we click and finally we click on expand to have our vectorized file. To these images I exported them as SVG to be able to place them in my laser cutting program Light Burn.
Para vectorizar abrimos la imagen en el programa, vamos a la barra de la derecha y apretamos sobre calco de imagen, se abrirá una pestaña y allí seleccionaremos siluetas, de esta forma nos quedará una imagen en negro solo de la silueta de nuestra imagen, apretamos y por último hacemos click sobre expandir para tener nuestro archivo vectorizado. A estas imágenes las exporte cono SVG para poder colocarlas en mi programa de corte laser Light Burn.

Also try to open in Fusion (a 3D modeling program that I'm learning to use) the SVG files, you can modify and extrude them without further complication, but in this case I didn't need the STL files to print these parts so I just mention it in case anyone is interested or may find it useful.
También probe abrir en Fusion (Un programa de modelado 3D que estoy aprendiendo a usar) los archivos SVG, se pueden modificar y extruir sin mayor complicación, pero en este caso no necesitaba los archivos STL para imprimir de estas piezas así que solo lo menciono por si a alguno le interesa o le puede resultar de utilidad.
 |  |
|---|
Continuing with the project now I had to cut 4 pieces with my laser cutter, on one side, the light blue square that would represent the water, on the other the piece that would represent the parks and all the green land. These two were cut in green and light blue cardboard paper, first to avoid having to cut MDF and having to paint it and secondly because in this way these pieces would occupy less space in the picture and they do not need depth to understand each other well.
Continuando con el proyecto ahora tenía que cortar 4 piezas con mi cortadora laser, por un lado, el cuadrado celeste que representaría el agua, por otro la pieza que representaría los parques y todo el terreno verde. Estas dos fueron cortadas en papel de cartulina verde y celeste, primero para evitar tener que cortar MDF y tener que pintarlo y segundo porque de esta forma estas piezas ocuparían menos ligar en el cuadro sumado a que no necesitan profundidad para entenderse bien.

|
|
|---|
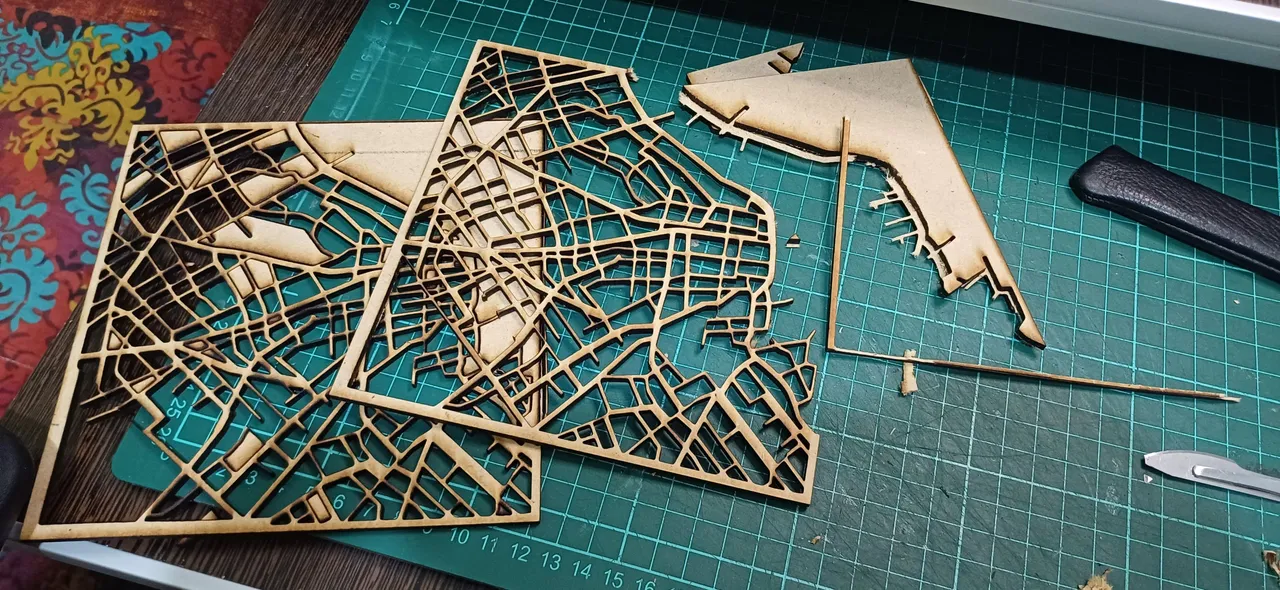
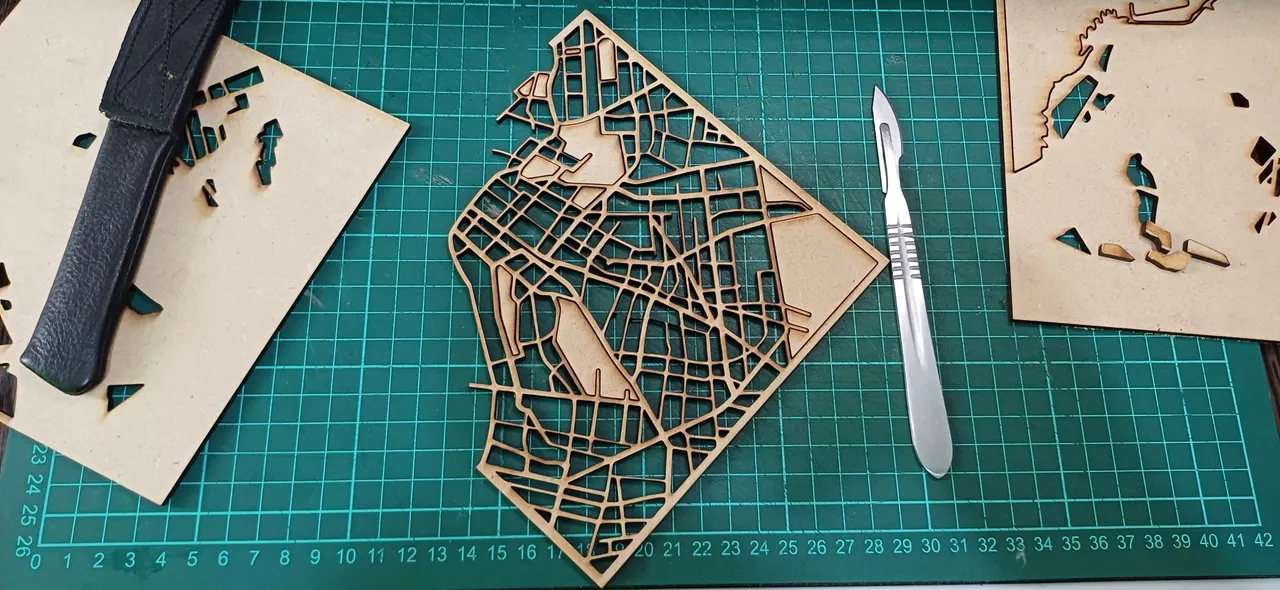
Then I cut the last two pieces in 3mm MDF, first the terrain of buildings that took about 1 hour to be ready and finally cut the streets and avenues, this file took a little over 2 hours and was the most frustrating to do because if the laser of my machine is not on a completely flat surface, the focus of the cut is lost and does not end up looking good. Something comparable to losing focus when you want to burn with a magnifying glass. So after about 4 attempts I finally got the result that was useful to me.
Posteriormente corte las últimas dos piezas en MDF de 3mm, primero el terreno de edificios que tardo aproximadamente 1 hora en estar listo y por último corte las calles y avenidas, este archivo tardo un poco más de 2 horas y fue el más frustrante de hacer ya que si el láser de mi maquina no está en una superficie completamente plana, se pierde el foco del corte y no termina por quedar bien. Algo comparable a perder el foco cuando uno quiere quemar con una lupa. Así que tras unos 4 intentos al fin obtuve el resultado que me era de utilidad.

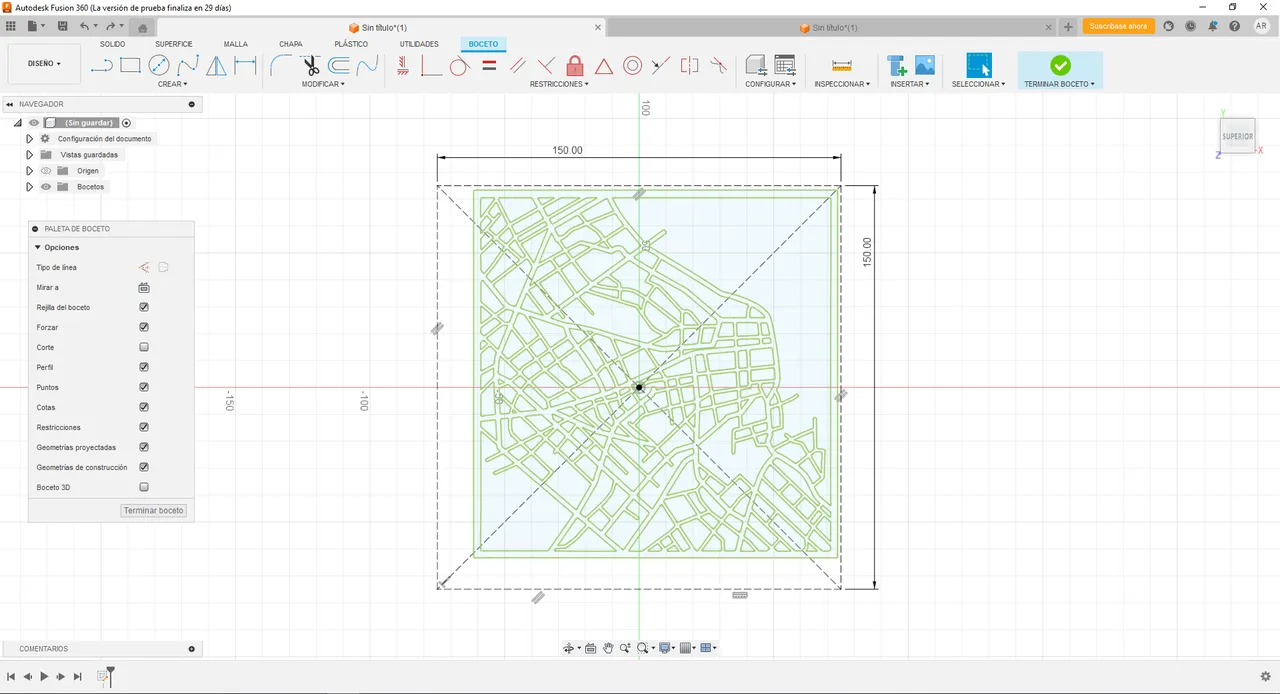
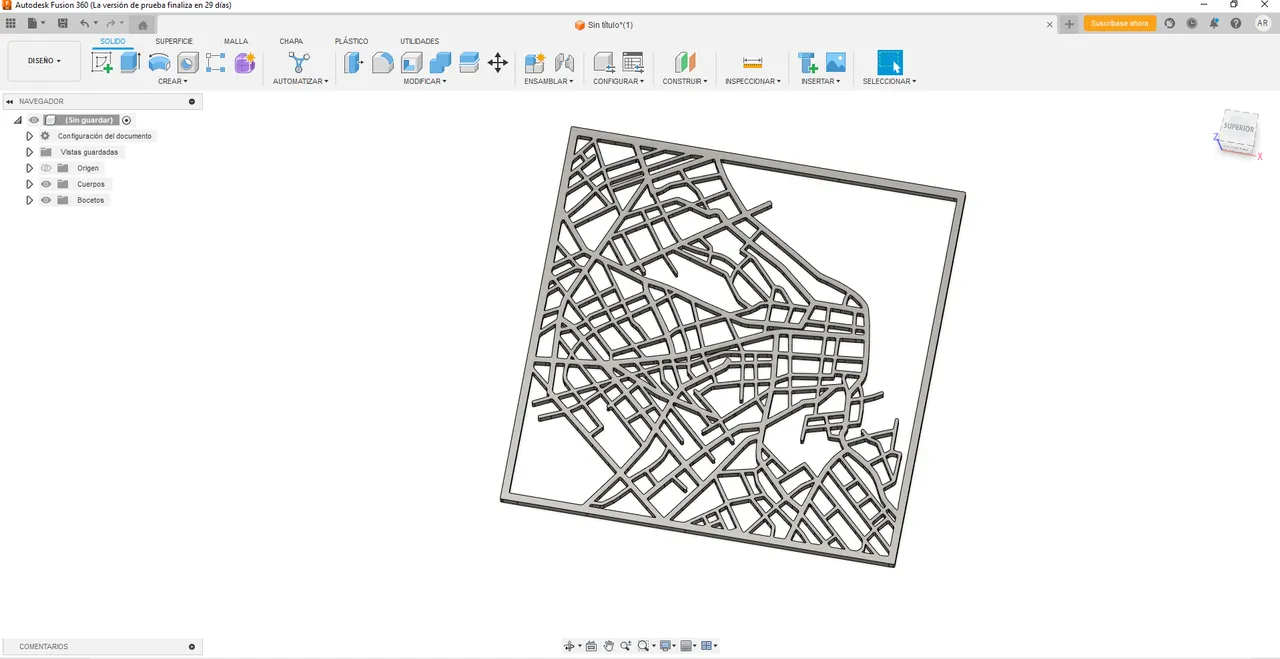
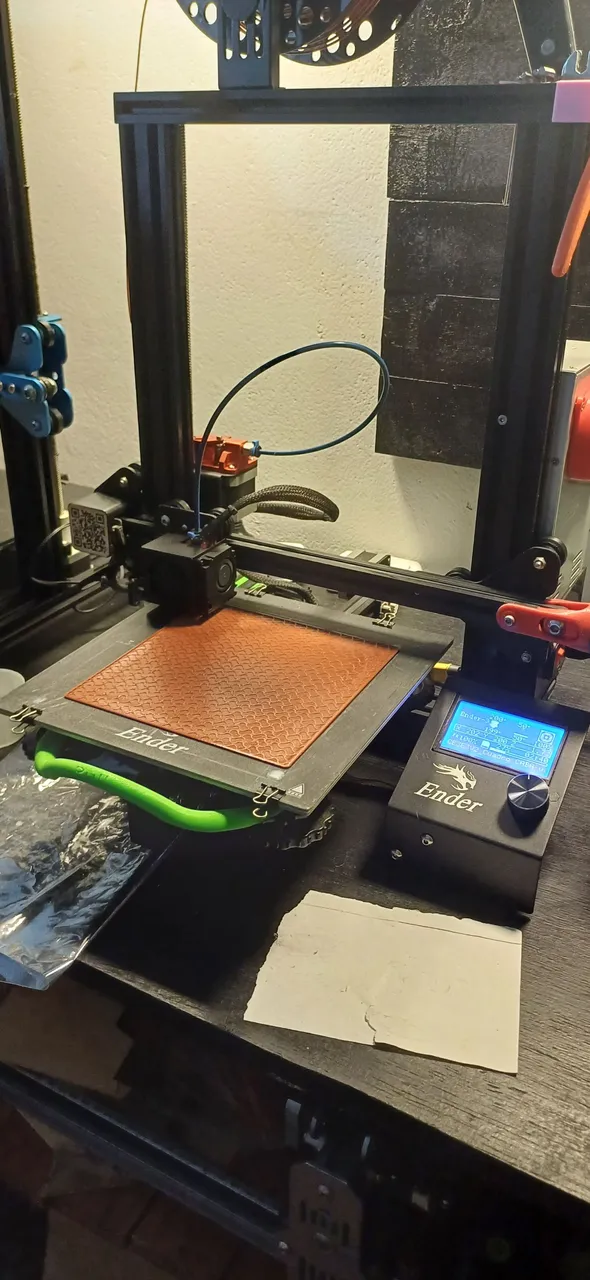
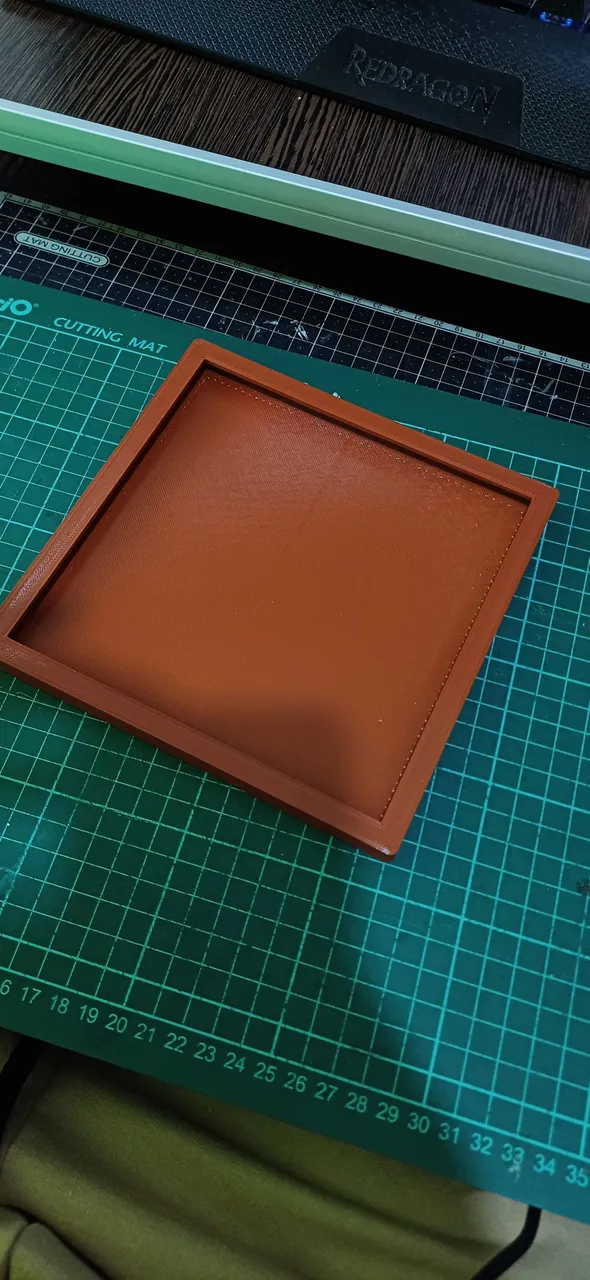
Now all that was left was the final piece to unify everything, the frame containing all the pieces. In the original model the person seems to use a laser cut wooden frame, but I decided to use 3D printing so to continue practicing with the new program I am using I opened FUSION, took my caliper, ruler and began to take measurements. As you can see in the image I made a square that would allow me to have a frame of about 5mm, on its upper side I would place each of the layers of the frame so I also had to take into account the total width that these added up and the tolerance to fit easily. I made two small tests until I found the exact measurement and then I had to print the whole piece, which took about 8 hours of printing.
Ahora solo quedaba la pieza final para unificar todo, el marco que contenga todas las piezas. En el modelo original la persona parece que utiliza un marco de madera cortado en laser, pero yo proferí usar impresión 3D así que para seguir practicando con el programa nuevo que estoy usando abrí FUSION, tomé mi calibre, regla y comencé a tomar medidas. Como verán en la imagen hice un cuadrado que me permitiera tener un marco de unos 5mm, por su costado superior iría colocando cada una de las capas del cuadro así que también tuve que tener en cuenta el ancho total que estas sumaban y la tolerancia para que entren fácilmente. Hice dos pruebas pequeñas hasta encontrar la medida exacta y me mande a imprimir la pieza completa que tardo unas 8 horas de impresión.
|
|
|
|---|
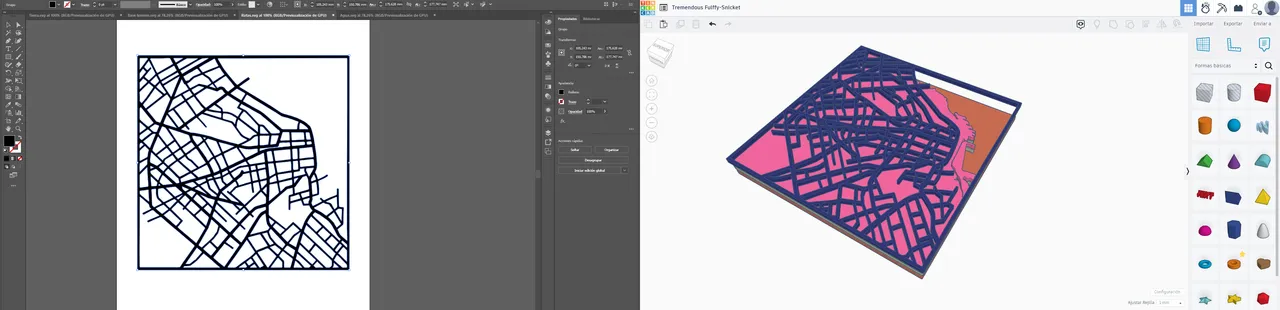
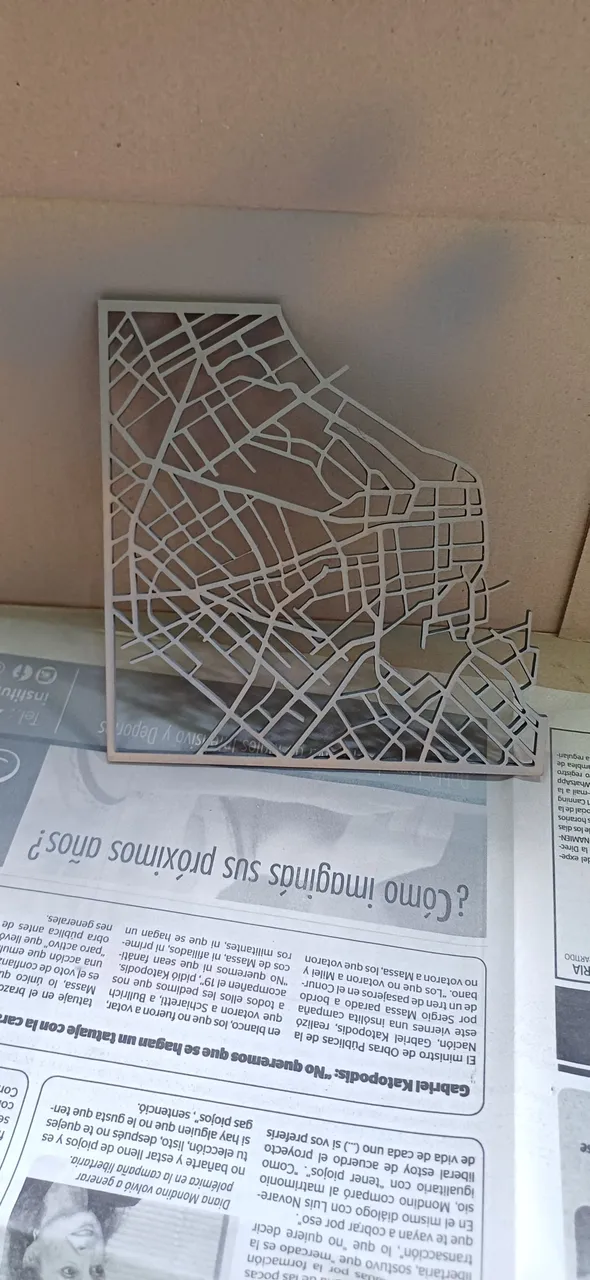
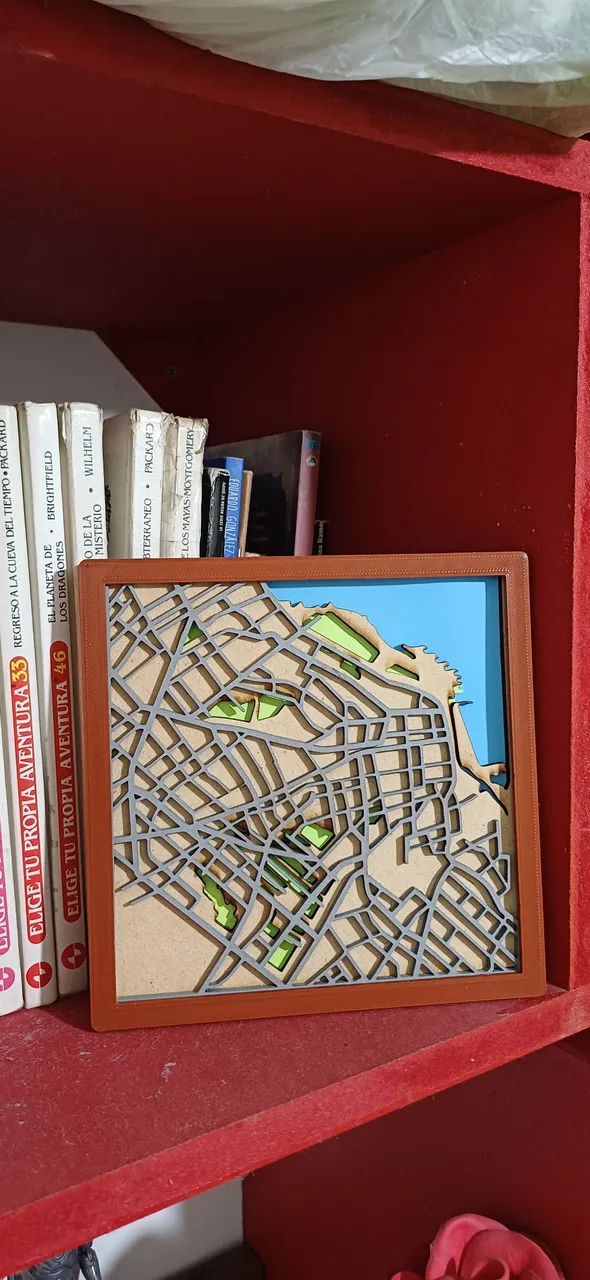
Once I had it ready, I had to remove the supports and carefully place each one of the layers trying to avoid bending the colored cardboard and READY! I already had my own version of the painting that I had seen on the internet, it took me more time, more effort, but I did it from scratch and that is priceless. What do you think? Can you think of a map of another city that might be interesting? I would love to read your opinions and ideas in the comments.
Una vez la tuve lista toco retirar los soportes e ir colocando cuidadosamente cada una de las capas intentando evitar que se doblen las cartulinas de colores ¡Y LISTO! Ya tenía mi propia versión del cuadro que había visto por internet, me llevo más tiempo, más esfuerzo, pero lo hice desde cero y eso no tiene precio ¿Qué les ha parecido? ¿Se les ocurre algún mapa de otra ciudad que puede ser interesante? Me encantaría leer sus opiniones e ideas en los comentarios.

|

|
|---|

My 3D printing works @nit_3dprinting
Mis trabajos de impresión 3D @nit_3dprinting
Translated by DeepL
Traducido con DeepL
All images are my own
Todas las imágenes son de mi autoría
My last post "Ares the God of War on your Desktop" [ENG-ESP]
Mi último post "Ares the God of War on your Desktop" [ENG-ESP]