ENGLISH CONTENT
Hello to all the members of this community and craft lovers! A while ago I showed you the creation process of a couple of plushies, including some Aziraphale and Crowley plushies, as a birthday gift for my sister, who is a fan of the Good Omens series. To give her the gift, I thought that using a gift bag would be too simple, so I thought of also making some special boxes for each couple of plushies. I will dedicate a post to each box, since, for those who don't know me, I usually go into a lot of detail about my creative process and I wouldn't like it to be too heavy to read or end up making a very long post, not to mention that I first focused on one box, before moving on to the next 😙
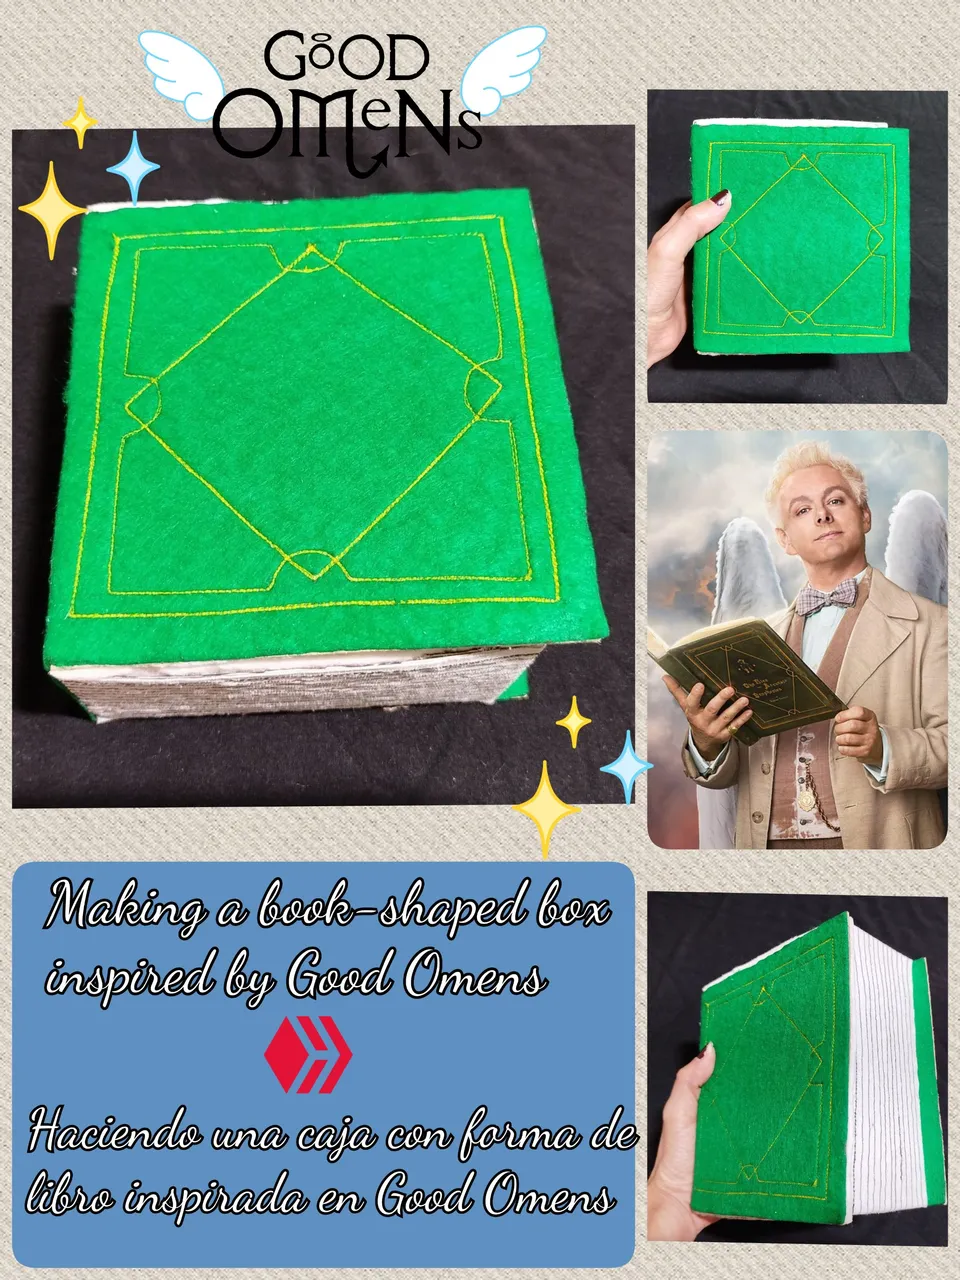
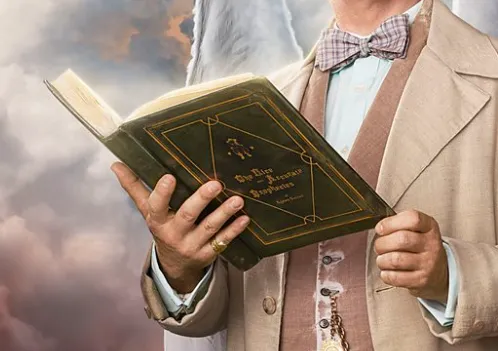
Okay. Ruling out the idea of placing the plushies inside a gift bag, as I mentioned, I thought the best option was to make a box, since it would also serve as a storage space for the plushies 😌 But I also didn't want it to be a simple box with a bow; I wanted it to also be representative of the pair of plushies inside. Since I had watched the series once with my sister, I remembered that Aziraphale, one of the characters, loves books and even has a bookcase full of them. So, I thought making the box as a sort of "hollow book" was ideal. After looking for some reference images of boxes with this shape and also from the same series, I found the book I would use as a reference, which is olive green.
 |  |
|---|
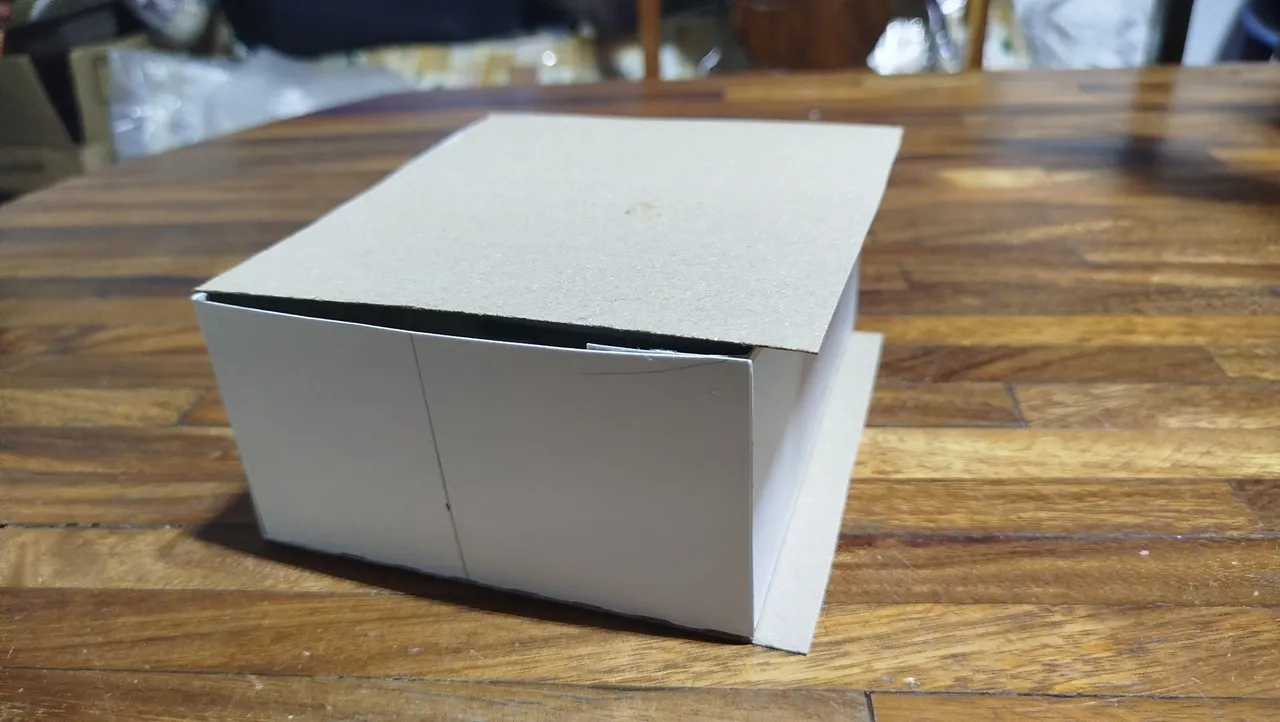
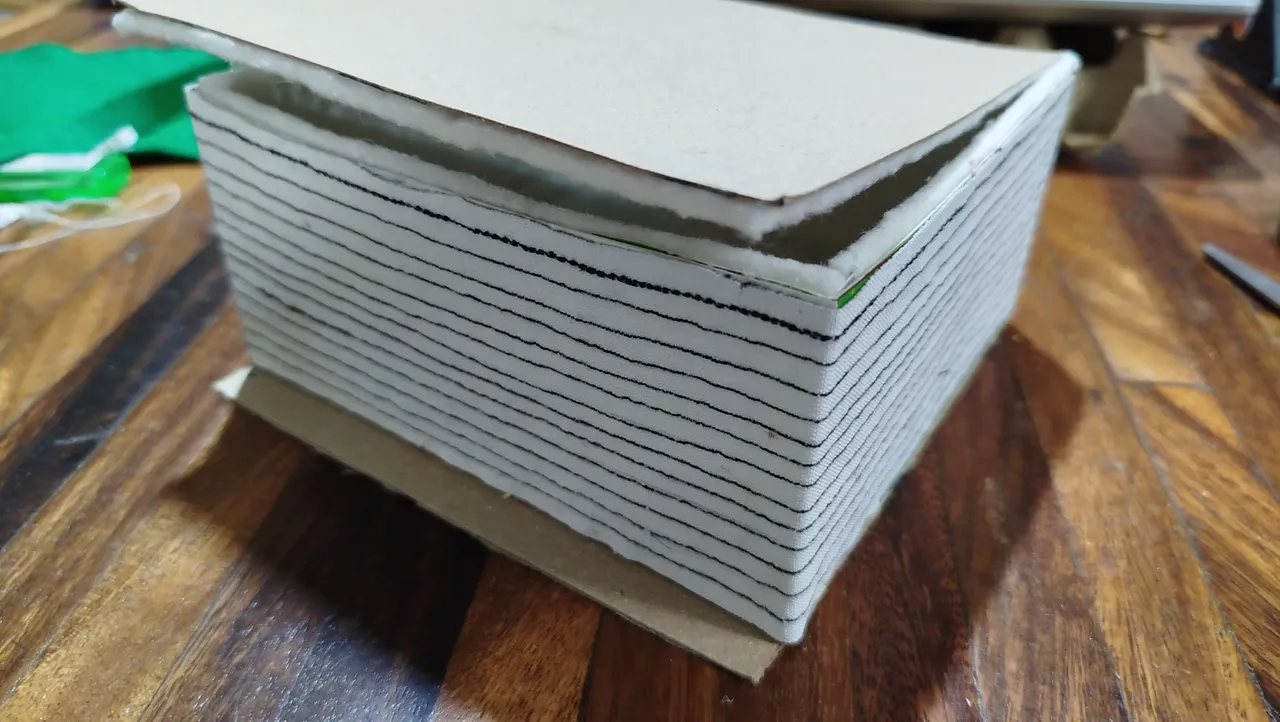
I'm no expert at making boxes, but I'm confident in my crafting skills 😉 I selected the box measurements based on the size of the stuffed animals, since I wanted them both to lie together. I used cardstock I'd gotten from cereal boxes I'd saved. I love using recycled materials, and cardstock can be obtained from various items. I made some ties to be able to assemble the box, but I didn't worry about it since I planned to cover it, which would give it the strength it needed. To glue the box together, I used liquid silicone. The detail that would give it the book shape are basically the leftover tabs from the top and bottom covers, and to open it, I used some pieces of cardstock on the inside as hinges. I didn't take any internal photos because I was so focused that I forgot to 😆
 | 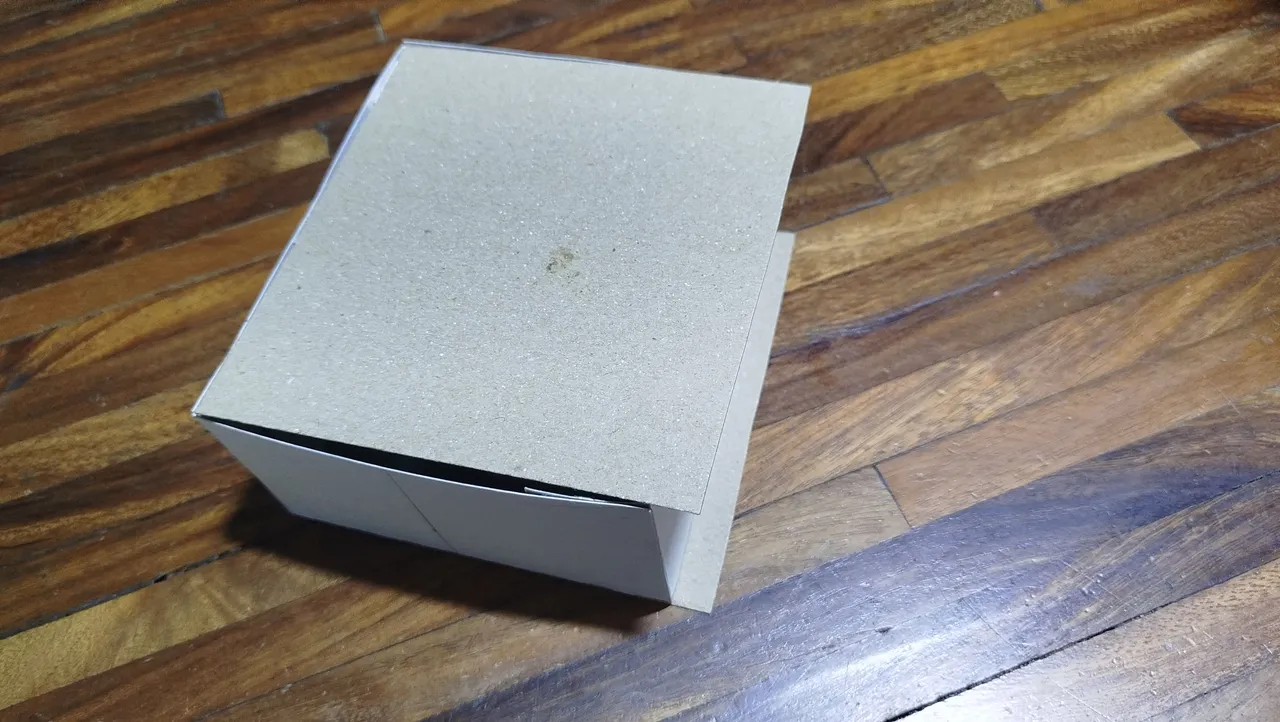 |
|---|
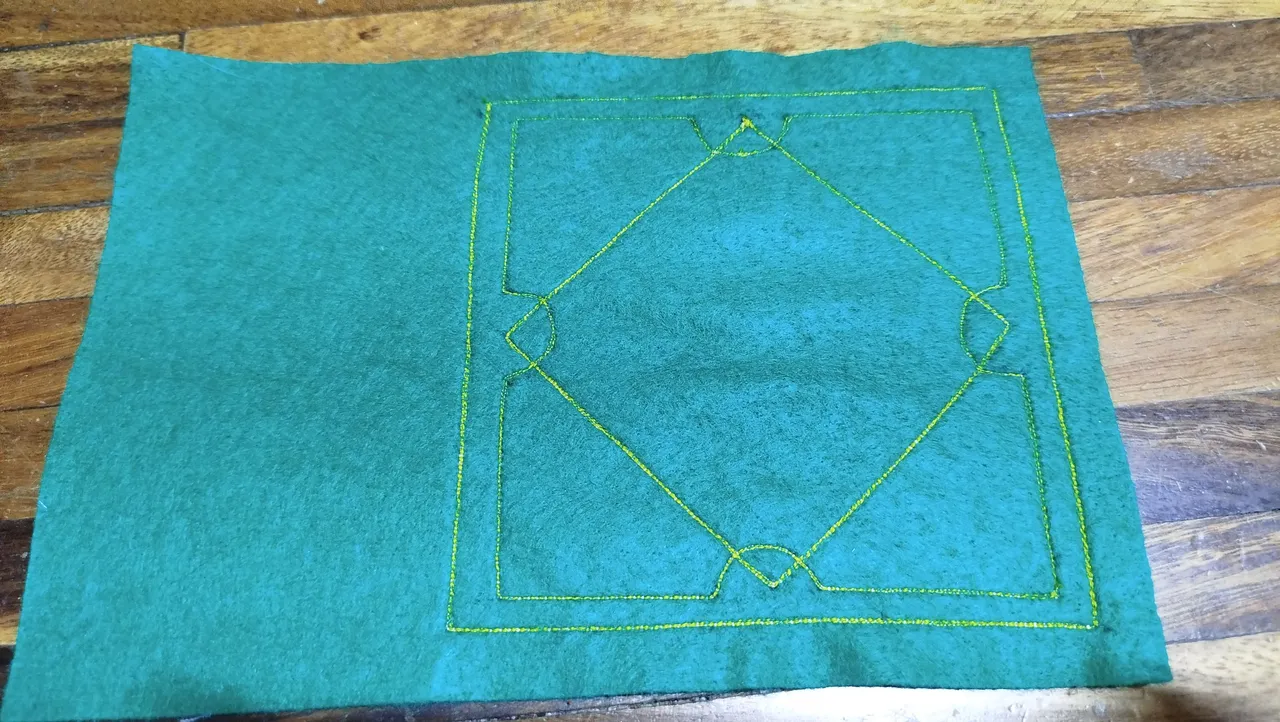
With the base of the box ready, it was time for my favorite part... the decoration! To do this, I used a piece of green felt (the size of a letter-sized sheet of paper), which I would use for the book cover, as well as a strip of white fabric, designed to make what would be the pages of the book. Likewise, after cutting the felt I would need, I cut some separate strips, which would be the inner tab of the book. It's worth mentioning that I didn't find the shade of green I was looking for, but that detail didn't discourage me, since all the bookstores I went to at the time had felt in every color except green, so finding any shade was a feat for me (I need to buy green fabric, because I only have small scraps 🙃).
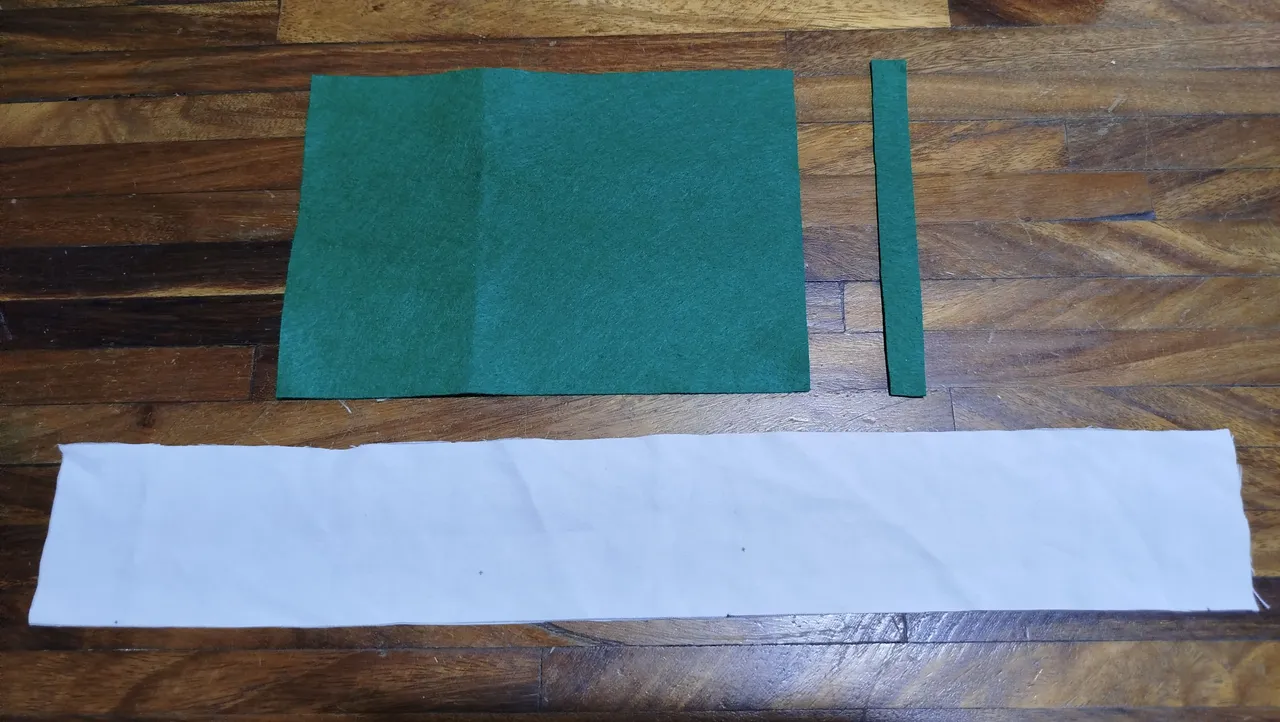
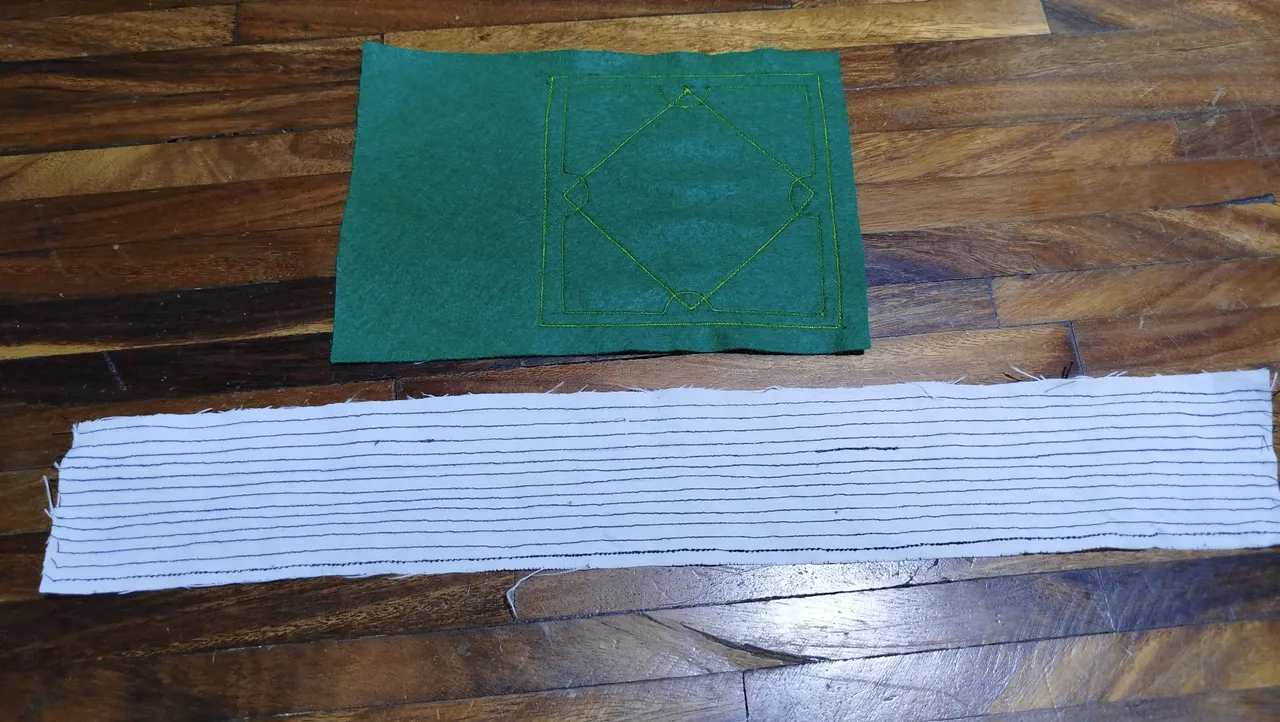
Anyway, I needed a guide to help me draw the book cover and divide the pages. I used a pencil and a marker, trying to make it visible enough for when I used the machine. One option for these details would have been fabric paint, but since I didn't have any, I decided to use my ally: the sewing machine. My machine has several decorative stitches, which I like to use for embroidery projects, so I couldn't pass up the opportunity to see what I could do using the thread.
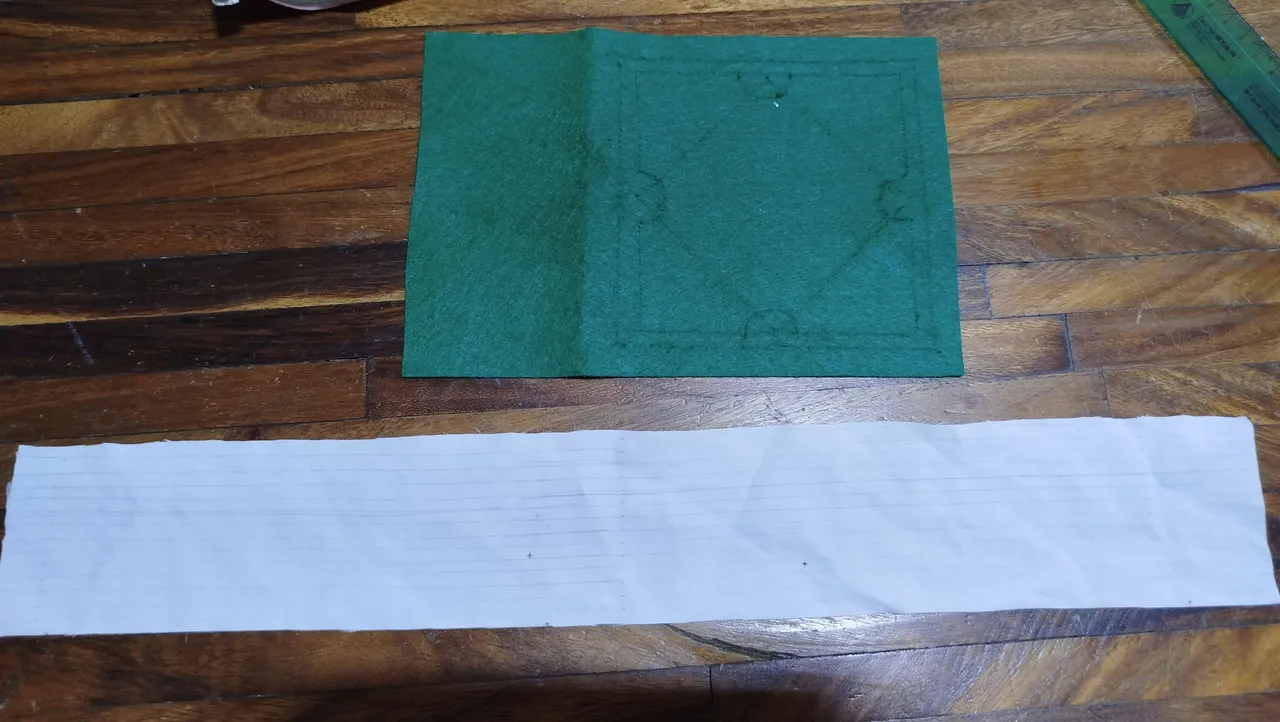
I wasn't entirely happy with the stitching on the leaves, but I was happy with the book cover. I'd never used my felt sewing machine before, so I didn't know how it would perform, but the result was pretty decent, in my opinion. I would have liked to have used gold thread or a similar shade, but at least the yellow thread stood out enough to make the simplified design stand out.
 |  |
|---|
The next step was to glue all of this to the box using liquid silicone. I also lined the inside of the box to give it strength and appeal. I used white felt to highlight the pages of the book.
 |  |
|---|
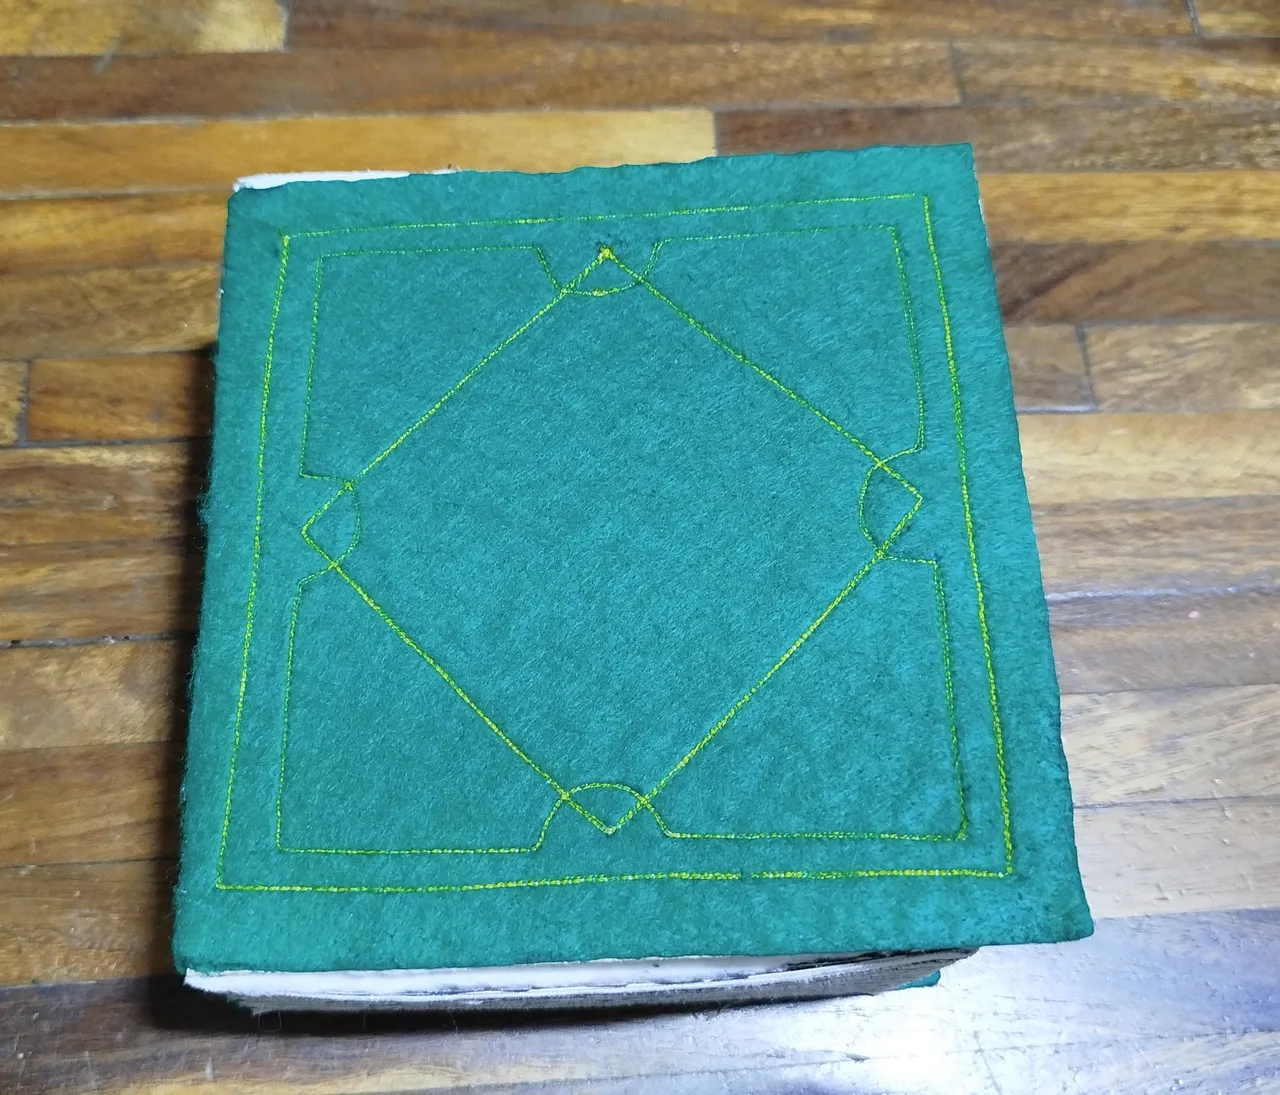
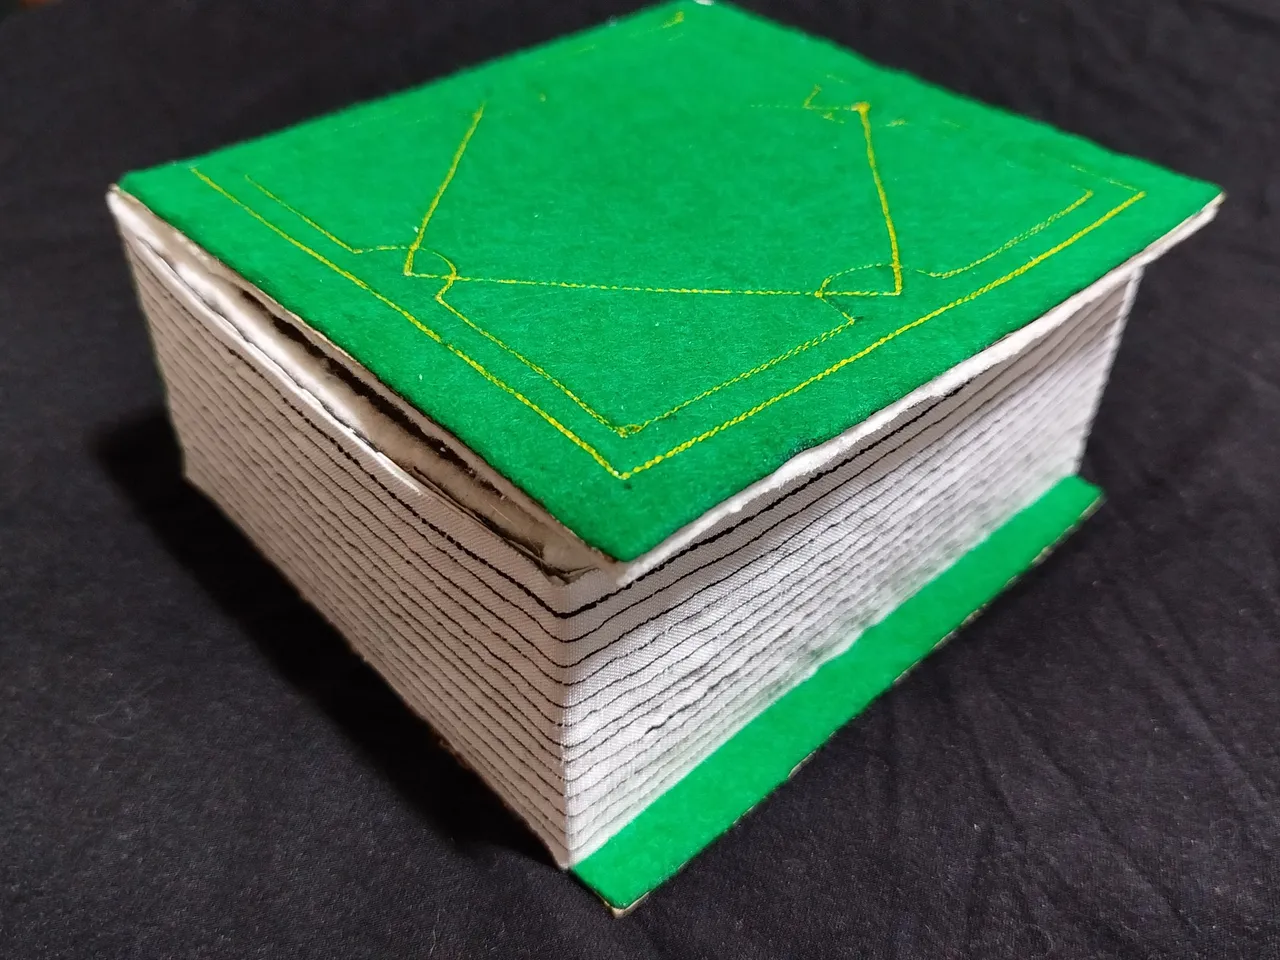
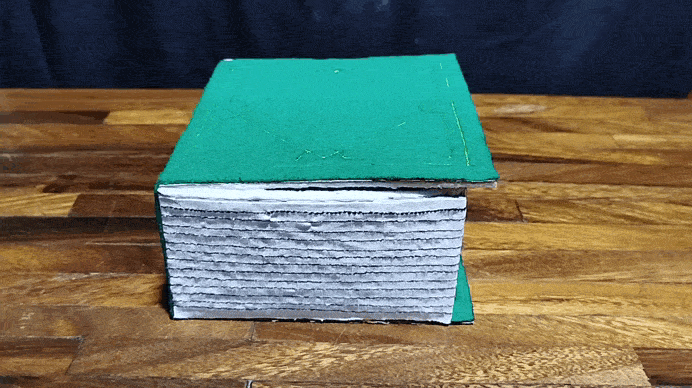
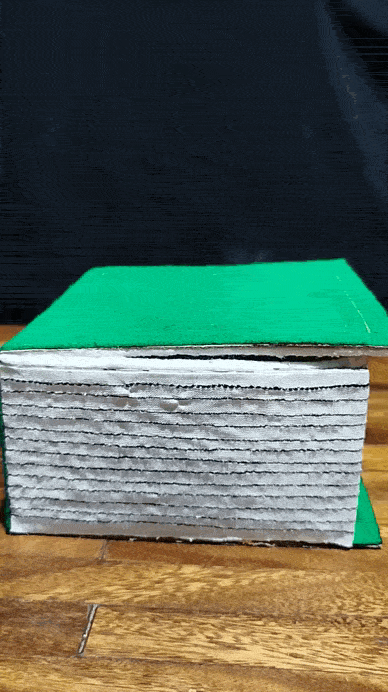
And so, the book-shaped box was finished 😊 I must confess that I loved the result, especially because green is my favorite color 💚 Next, I will show you more detailed photos of the box:
 | 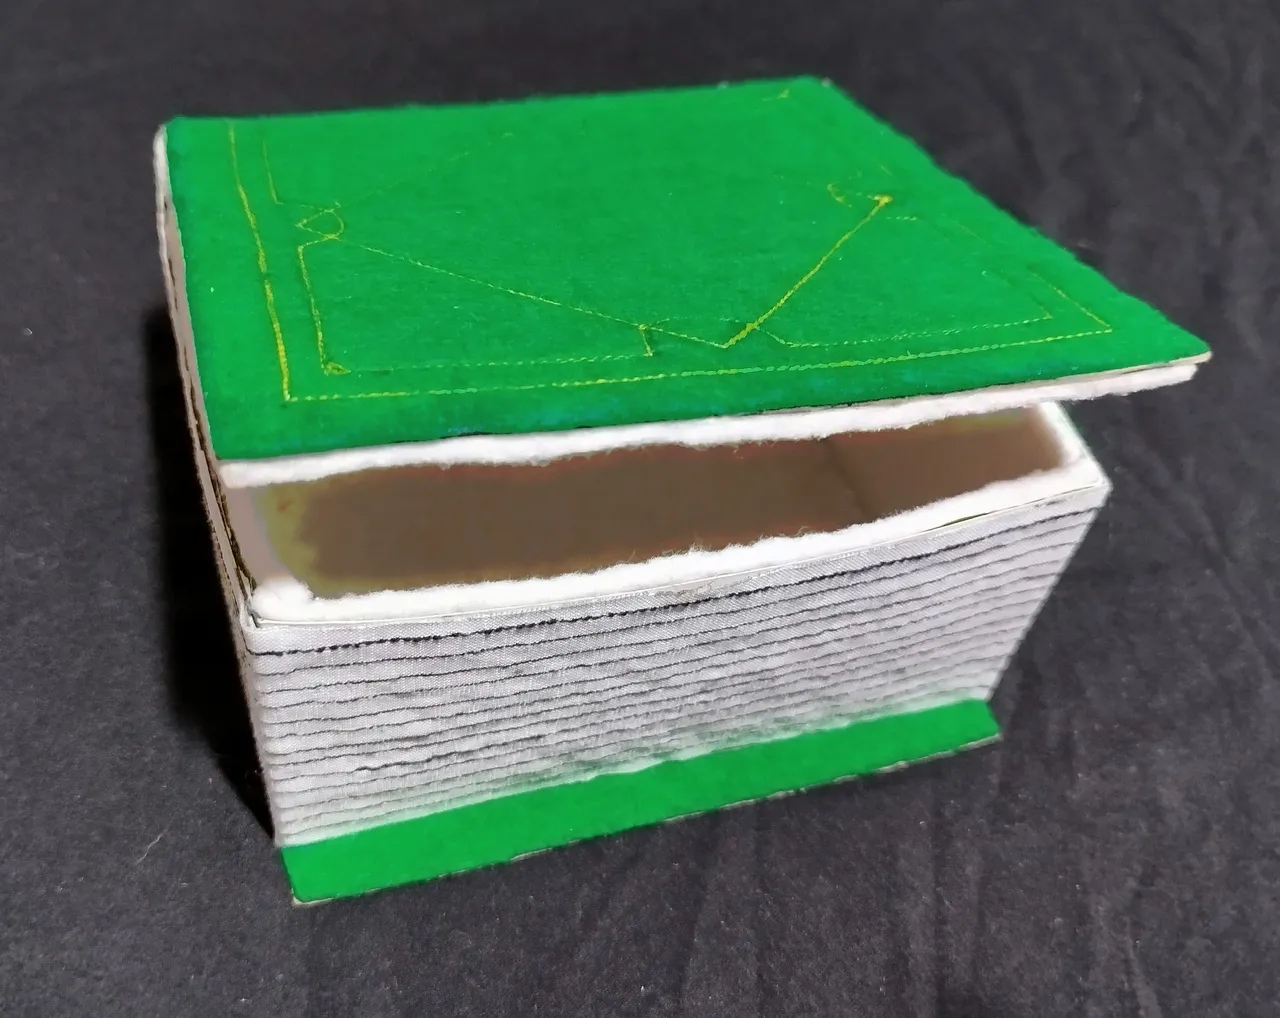 | 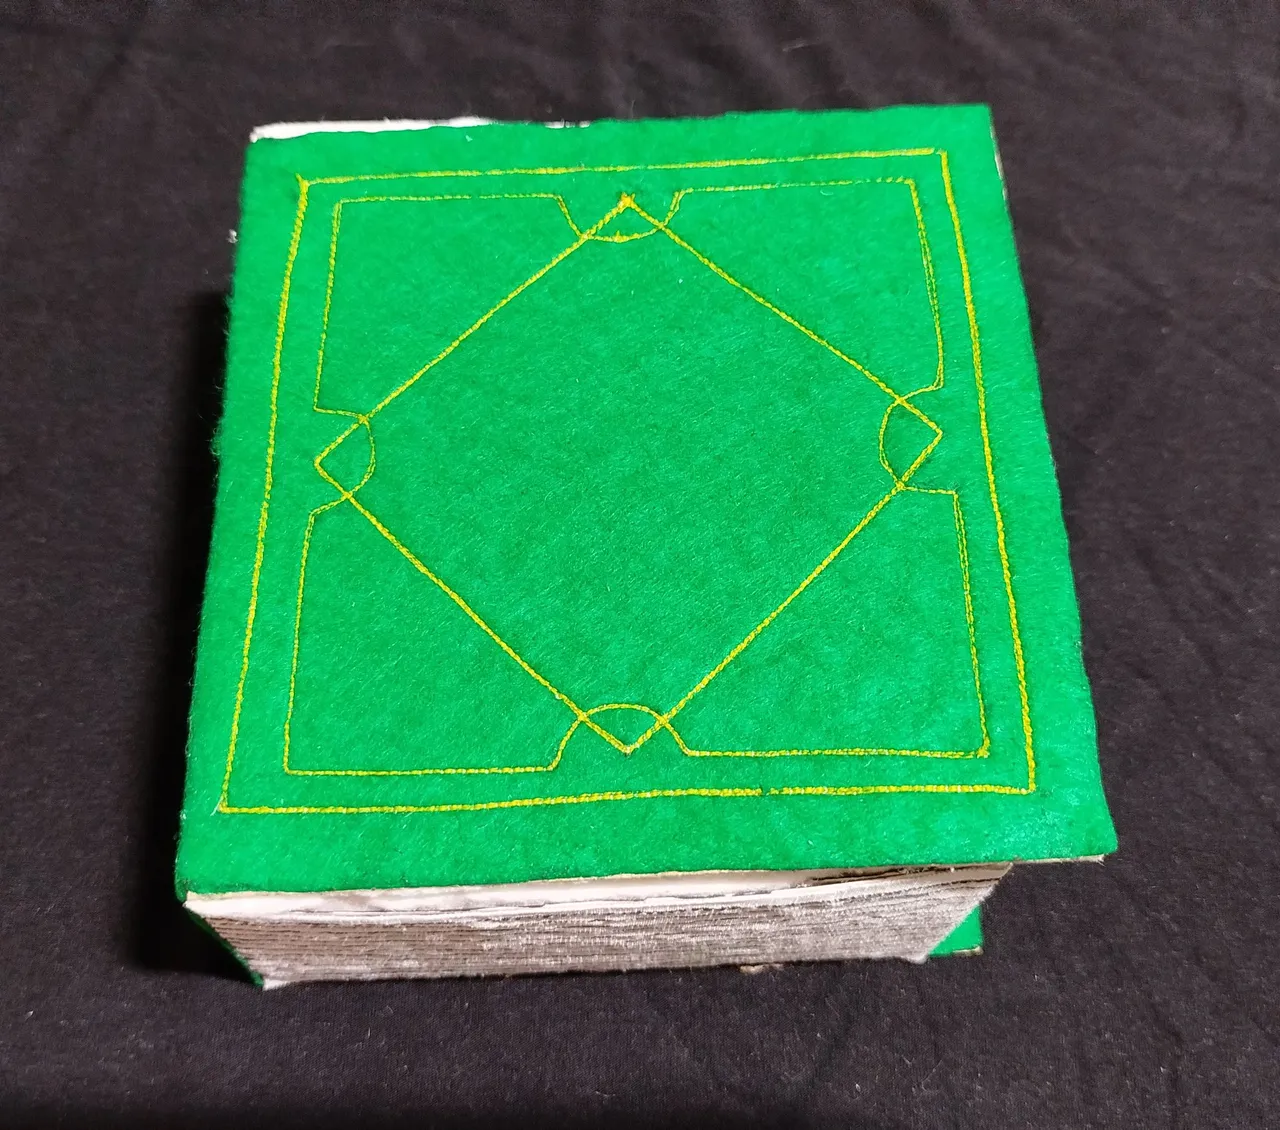 |
|---|
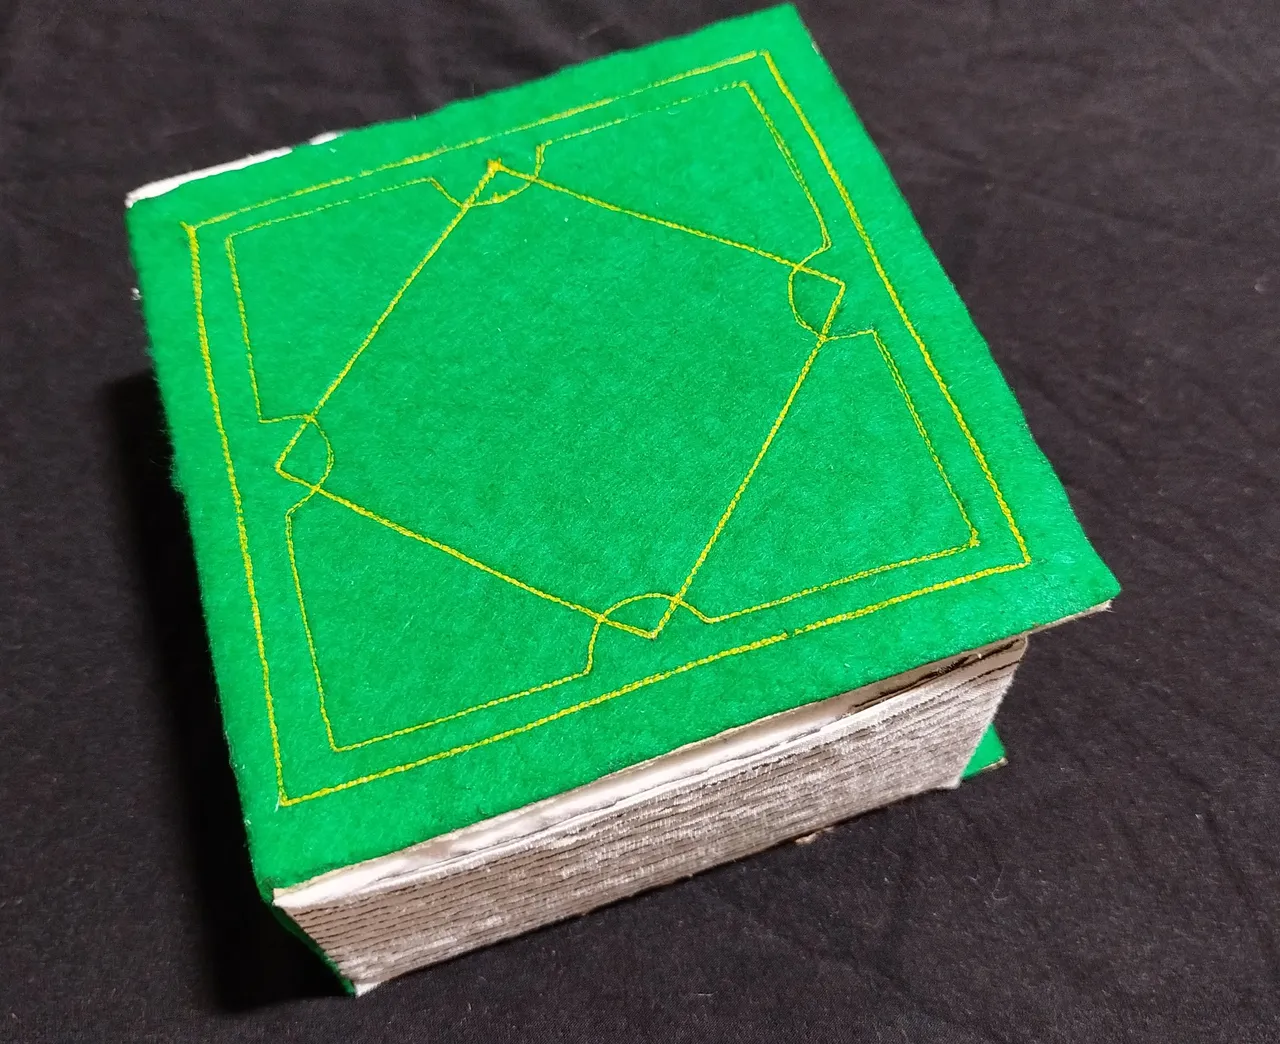 | 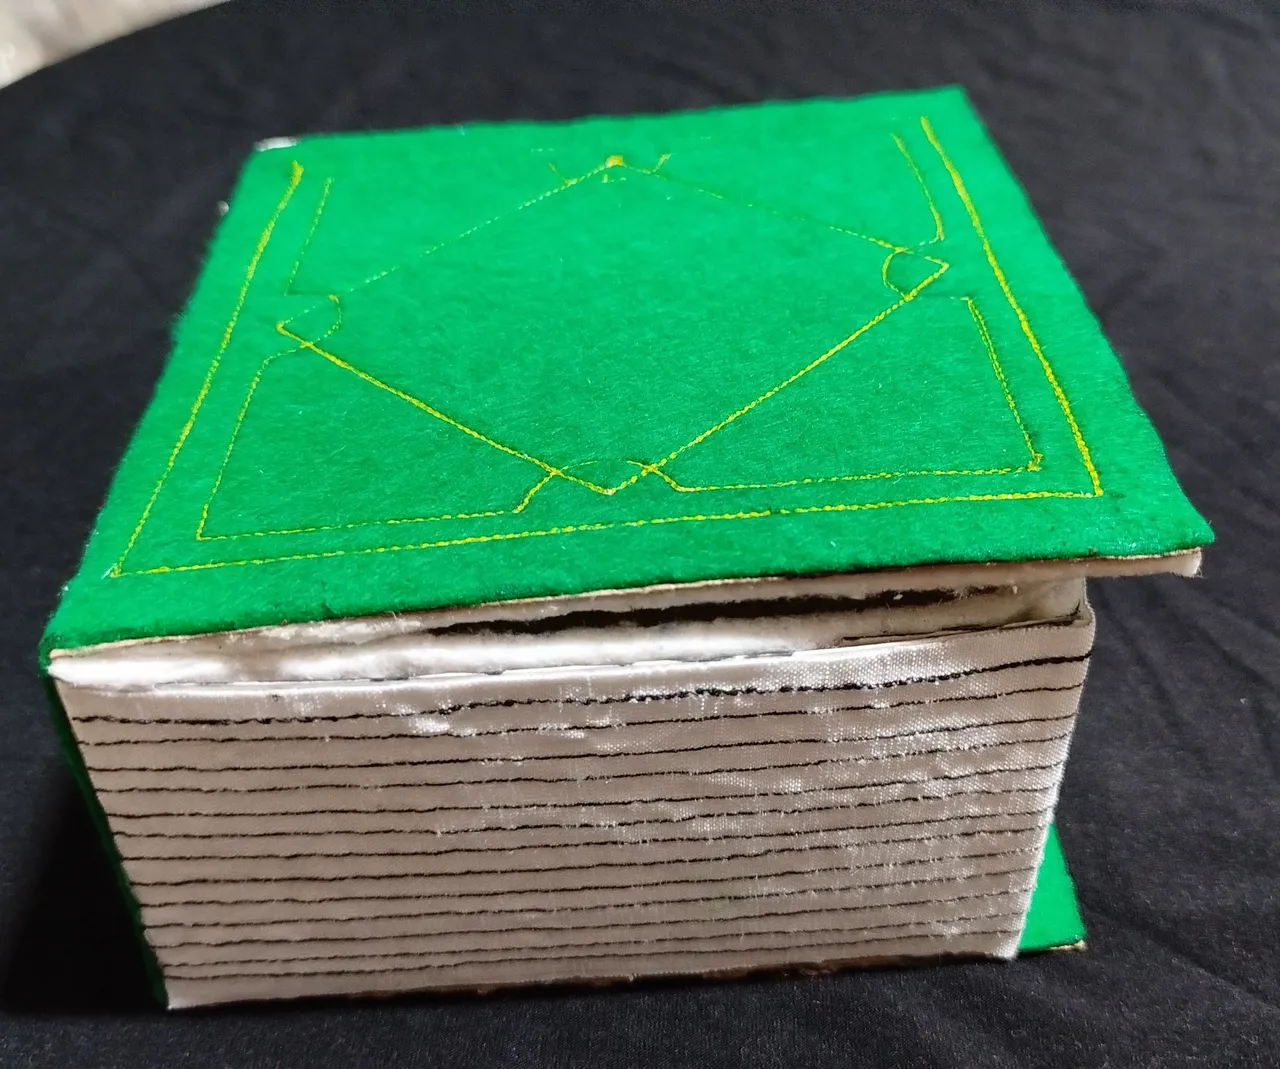 |
|---|
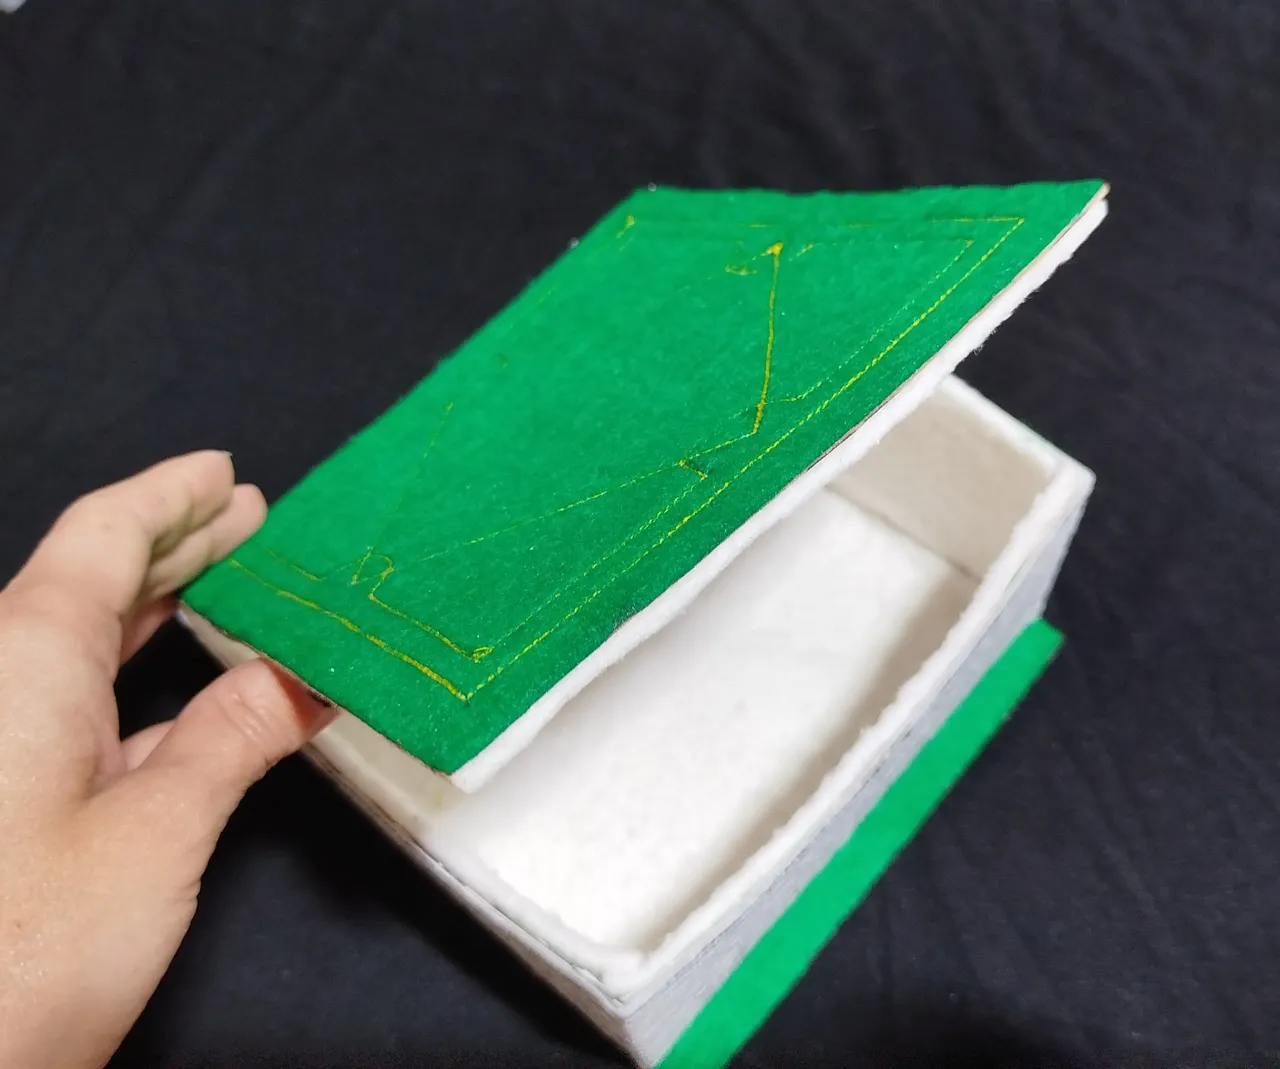 | 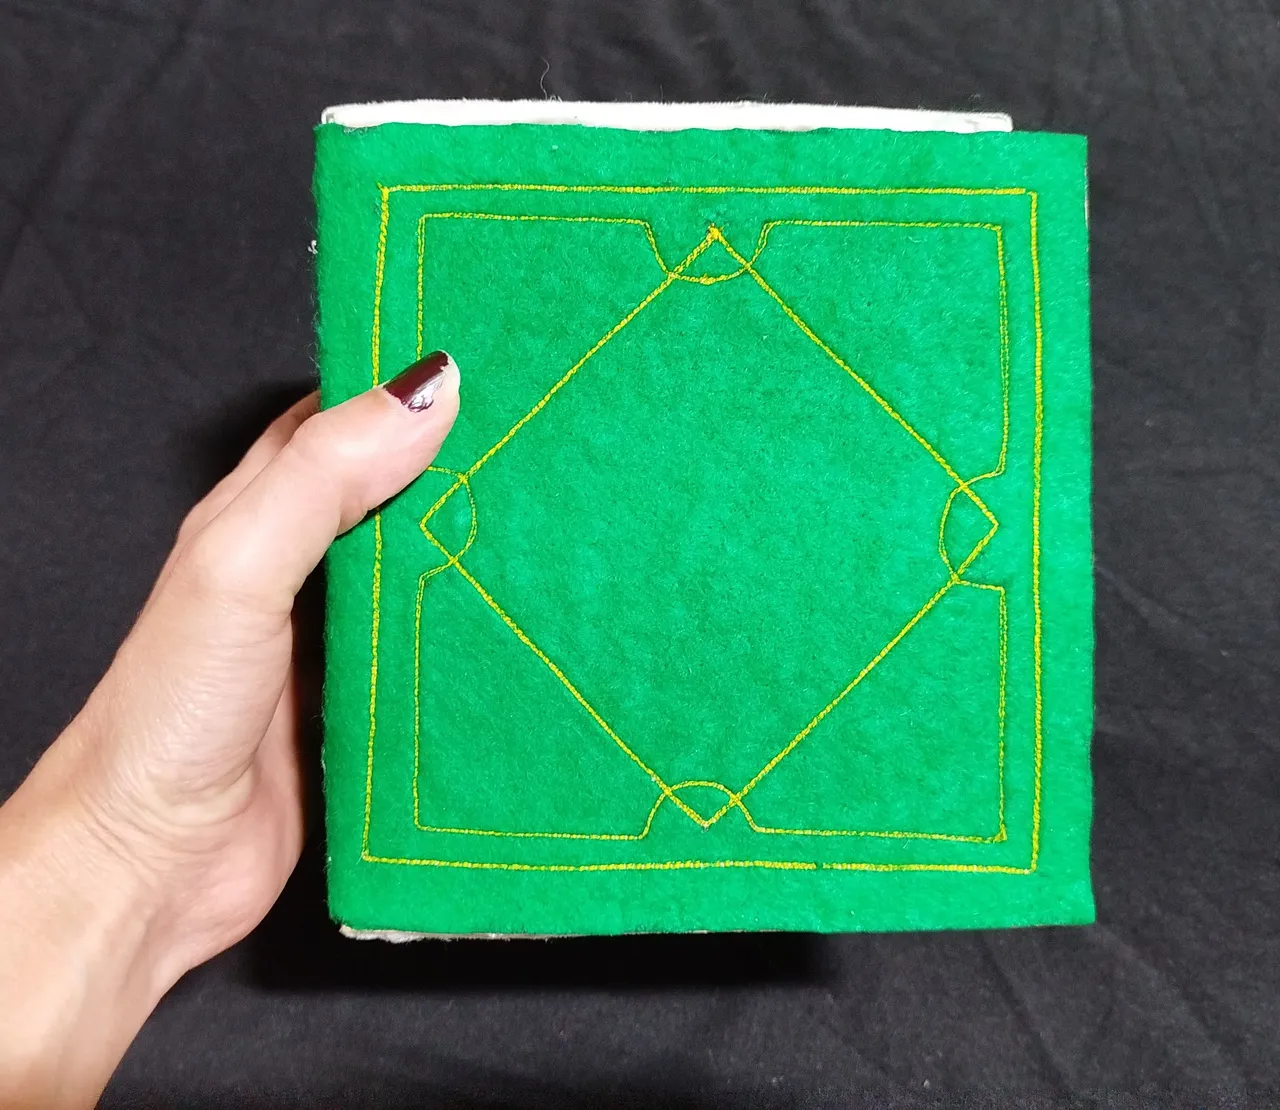 | 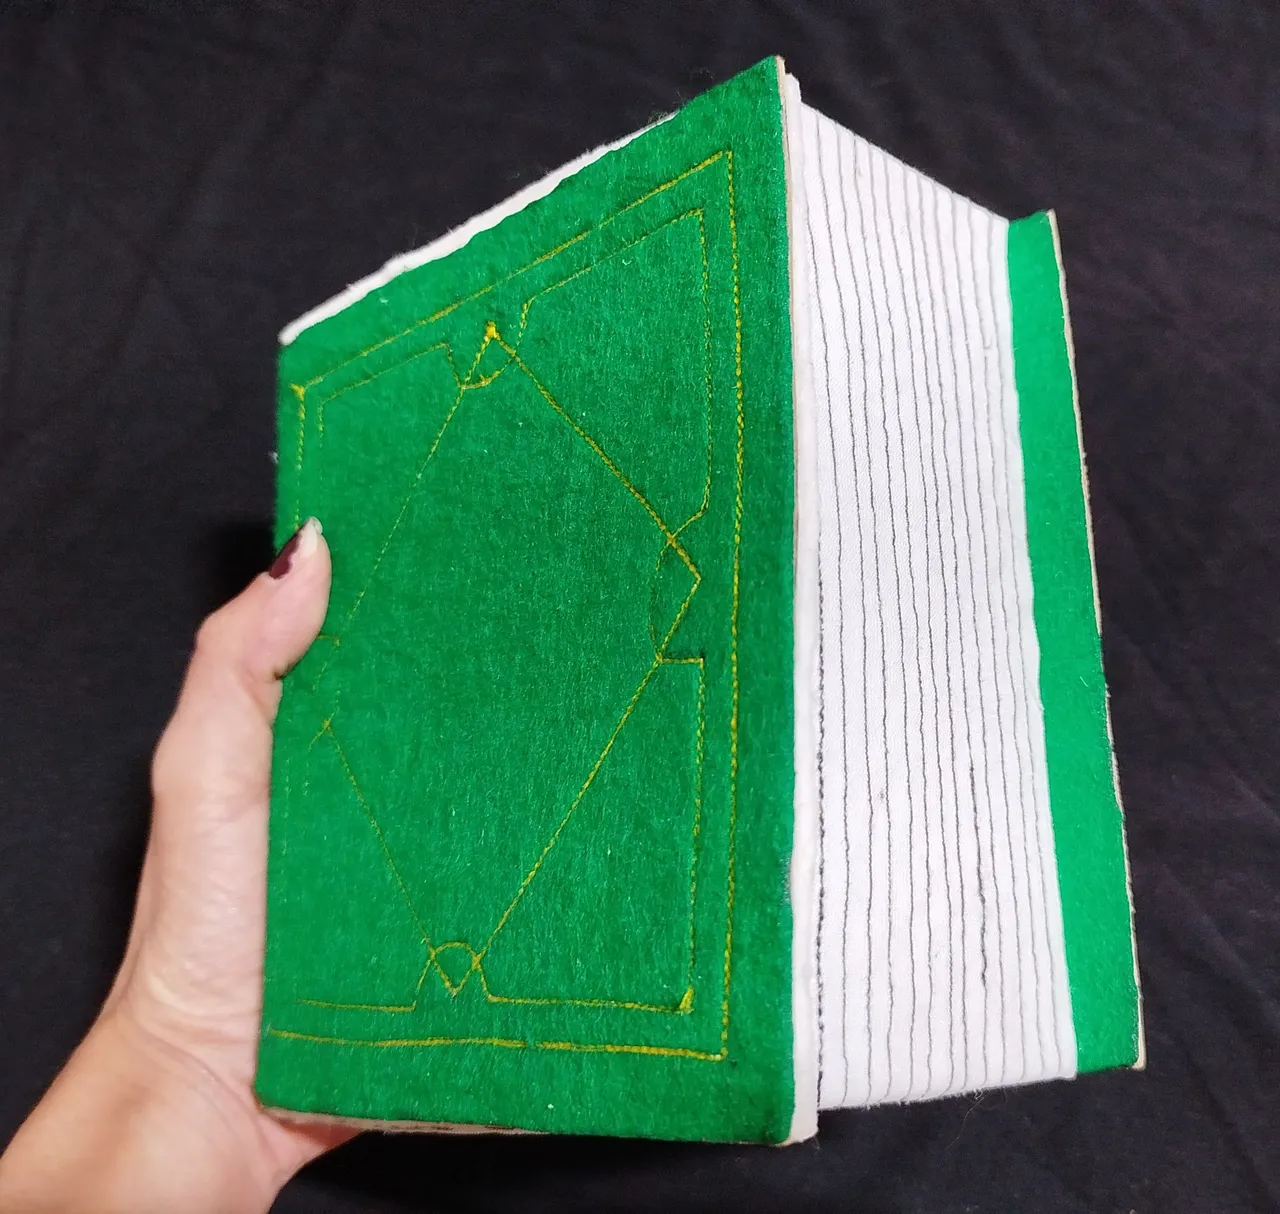 |
|---|
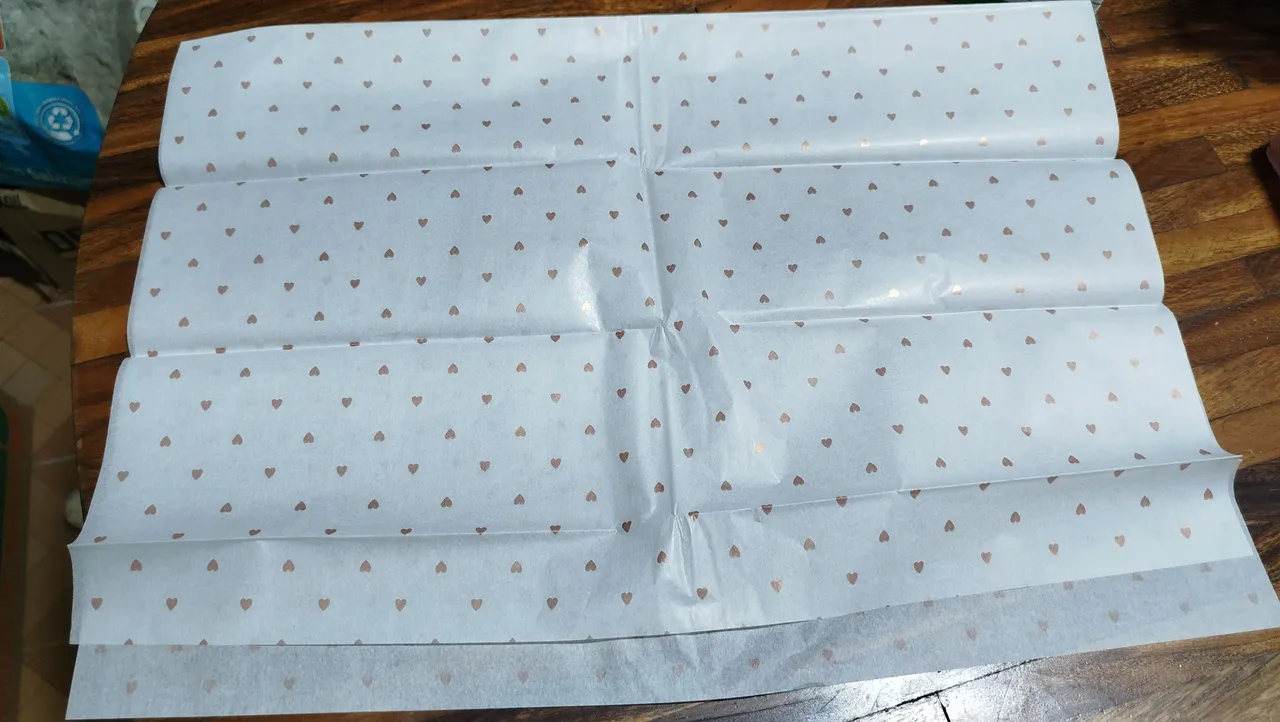
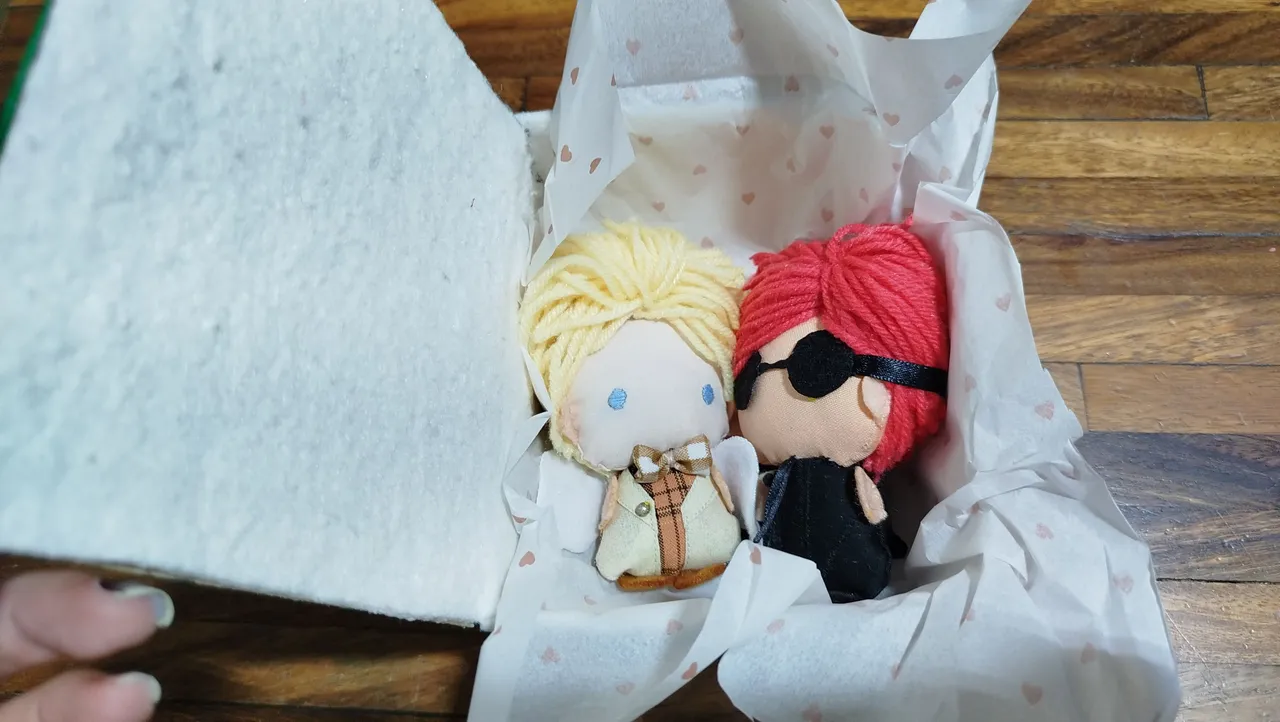
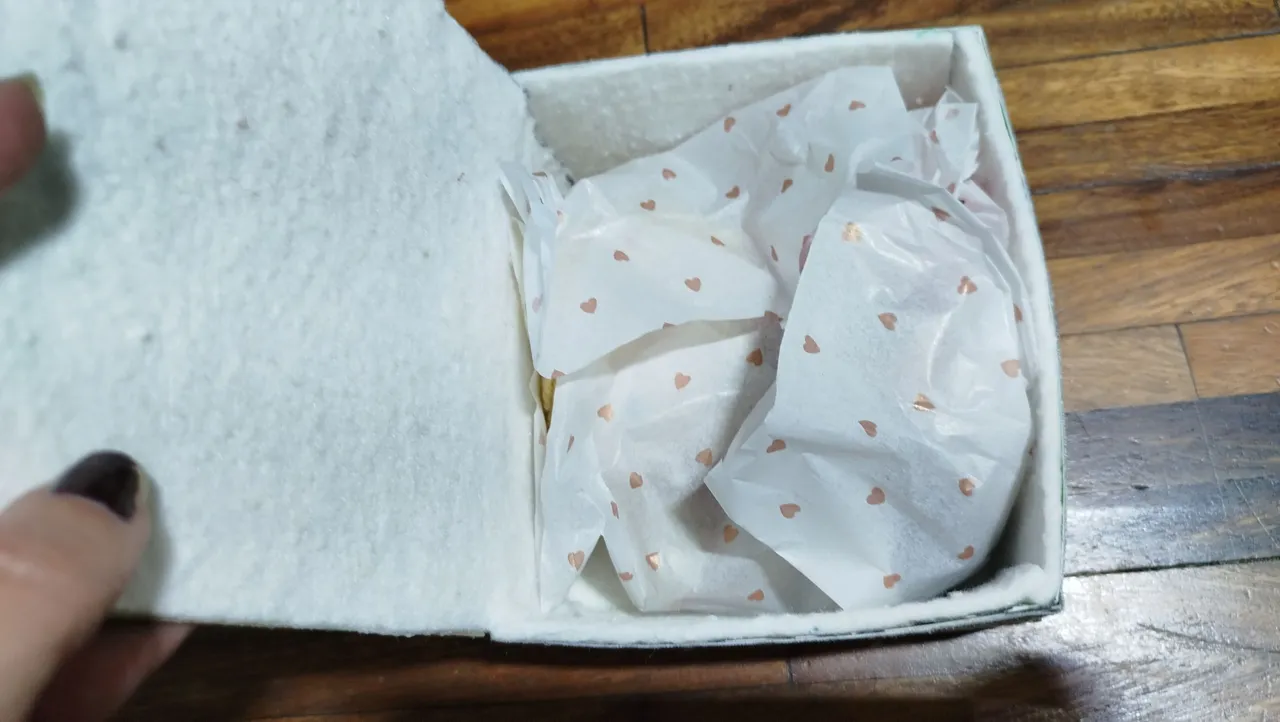
But it doesn't end there 👀 Since I didn't want to just place the stuffed animals inside the box, I thought I'd use some tissue paper to increase the wow factor once the lid was lifted 😌 I hadn't bought this type of paper in years, so I was surprised not only by how affordable it was ($1), but also by the fact that there were several with beautiful prints. I chose the heart design because I thought it was quite cute and perfect for a couple 😇
 |  |  |
|---|
I think this type of box can be used to store accessories or small items that you don't want to lose. Also, if you have a box at home, you can decorate it to make it look more striking or to your liking ✨
 |  |
|---|
Thank you very much for visiting my post. I hope you found it interesting.
💚 Until next time! 💚

CONTENIDO EN ESPAÑOL
¡Hola a todos los integrantes de ésta comunidad y amantes de las manualidades! Hace un tiempo les mostré el proceso de creación de una pareja de peluches, entre ellos unos peluches de Aziraphale y Crowley, como regalo de cumpleaños para mi hermana, quién es fanática de la serie Good Omens. Para entregarle el obsequio, pensé que usar una bolsa de regalo sería demasiado simple, así que pensé en realizar también, unas cajas especiales para cada pareja de peluche. Dedicaré un post para cada caja, ya que, para el que no me conozca, suelo detallar mucho sobre mi proceso creativo y no me gustaría que fuese algo muy pesado de leer o terminar haciendo un post muy largo, sin mencionar que primero me enfoqué en una caja, antes de pasar a la siguiente 😙
Muy bien. Descartando la idea de colocar los peluches dentro de una bolsa de regalo, como mencioné pensé que la mejor opción era hacer una caja, ya que también serviría para mantener los peluches guardados 😌 Pero tampoco deseaba que fuese una caja sencilla con un lazo, sino que también fuese representativa a la pareja de peluches en su interior. Como había visto la serie una vez junto a mi hermana, recordé que Aziraphale, uno de los personajes, ama los libros y hasta tiene una librería llena de ellos. Así que pensé que realizar la caja como una especie de "libro hueco", era lo ideal. Luego de buscar algunas imágenes de referencia de cajas con esta forma y también de la misma serie, encontré el libro que usaría como referencia, el cual es de color verde olivo.
| |
|---|
No soy experta haciendo cajas, pero confío en mis habilidades para hacer manualidades 😉 las medidas de la caja las seleccioné de acuerdo al tamaño de los peluches, ya que quería que ambos quedaran acostados juntos. Utilicé cartulina que saqué de cajas de cereal que guardé. Me encanta usar materiales reciclados y la cartulina puede obtenerse de diversos artículos. Hice algunos empates para poder armar la caja, pero no me preocupé por ello, ya que tenía pensado forrarla y eso, le daría la resistencia que necesitaba. Para pegar la caja, utilicé silicón líquido. El detalle que le daría la forma de libro, básicamente son las pestañas sobrantes de las tapas superior e inferior y para abrir la misma, utilicé unos trocitos de cartulina en la parte interna a modo de bisagras. No le tomé fotos internamente porque me concentré tanto que me olvidé de ello 😆
| |
|---|
Al ya tener lista la base de la caja como tal, tocaba mi parte favorita... ¡La decoración! Para ello, utilicé un pedazo de fieltro de color verde (del tamaño de una hoja carta), el cual usaría para la cubierta del libro, así como una tira de tela blanca, pensada para realizar lo que vendrían siendo las hojas del mismo. Así mismo, luego de cortar el fieltro que necesitaría, corté unas tiras aparte, que serían la pestaña interna del libro. Cabe mencionar que no encontré el tono de verde que estaba buscando, pero ese detalle no me desanimó, ya que en todas las librerías a las que fui en ese momento, había fieltro de todos los colores, menos verde, así que hallar cualquier tonalidad fue un logro para mí (necesito comprar tela verde, porque no tengo más que retazos pequeños 🙃).
En fin, necesitaba una guía que me sirviera para poder realizar el dibujo de la tapa del libro, así como la división de las hojas. Utilicé entonces un lápiz y un marcador, tratando de que se viera lo suficiente para cuando fuese a utilizar la máquina. Una opción para hacer estos detalles, hubiera sido la pintura de tela, pero como no tenía, decidí usar mi aliado: La máquina de coser. Mi máquina tiene varias puntadas de decoración, las cuales me gusta utilizar para proyectos de bordado, así que no podía dejar pasar la oportunidad de ver qué podría llegar a hacer utilizando el hilo 😉
La costura de las hojas, no me gustó como quedó del todo, pero sí la de la tapa del libro. Nunca había usado mi máquina para coser fieltro, así que no sabía cómo se comportaría, pero el resultado fue bastante decente, a mi parecer. Me hubiese gustado poder utilizar un hilo dorado o una tonalidad parecida, pero al menos el hilo amarillo resaltó lo suficiente para que el diseño simplificado, se notase.
| |
|---|
Lo siguiente, fue pegar todo esto a la caja utilizando el silicón líquido. También aproveché de forrar la caja en la parte interna, para darle firmeza y vistosidad. Utilicé fieltro color blanco para hacer mención a las hojas del libro.
| |
|---|
Y de esta forma, la caja con forma de libro, estuvo terminada 😊 Debo confesar que amé el resultado, sobre todo porque el verde es mi color favorito 💚 A continuación, les mostraré fotografías más detalladas de la caja:
| | |
|---|
| |
|---|
| | |
|---|
Pero esto no acaba aquí 👀 Como no deseaba simplemente colocar los peluches en el interior de la caja, pensé en utilizar un poco de papel de seda para aumentar el factor sorpresa una vez que la tapa fuese levantada 😌 Tenía años sin comprar éste tipo de papel, así que me sorprendió no solamente lo económico que es (1$), sino también que habían varios con hermosos estampados. Seleccioné el diseño de corazones porque me pareció bastante lindo e ideal para la pareja 😇
| | |
|---|
Pienso que éste tipo de caja pueden usarse para guardar accesorios o cosas pequeñas que no deseemos que se extravíen. Así como también, si tienen una caja en casa, pueden decorarla para que luzca de forma mucho más llamativa o de su gusto ✨
| |
|---|
Muchas gracias por haber visitado mi publicación. Espero que les haya parecido interesante.
💚 ¡Hasta una próxima oportunidad! 💚