ENGLISH CONTENT
Hello to all the members of this community and craft lovers! For those who don't know, I'm a huge fan of crafts, and I even had a period in my life where I wanted to make everything I saw, saving reference images, tutorials, and even buying magazines. Nowadays, it's not like much has changed, haha. I still save everything I'd like to make, but I calm down and only venture into making things I can actually use, or if I want to give them as a gift.
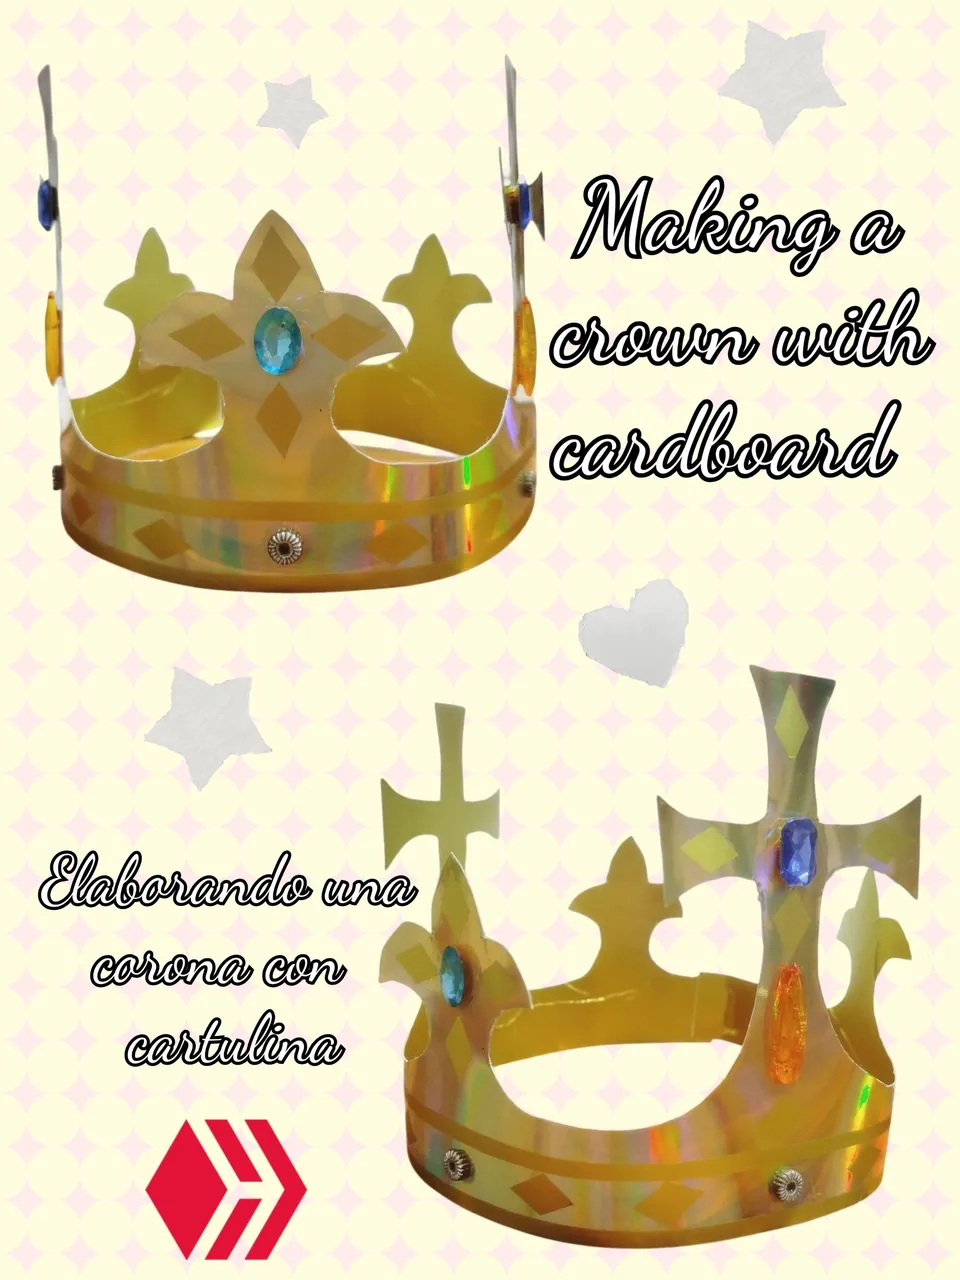
But, as for the craft I'm here to show you today, it's a commission my brother @babarois asked me to make for him. He's a musician and is currently working on a medieval-style music project, so he needed a crown for a video he's planning to record. I think the tutorial could be useful if you need a crown for a costume or to take pictures with an original outfit 👑
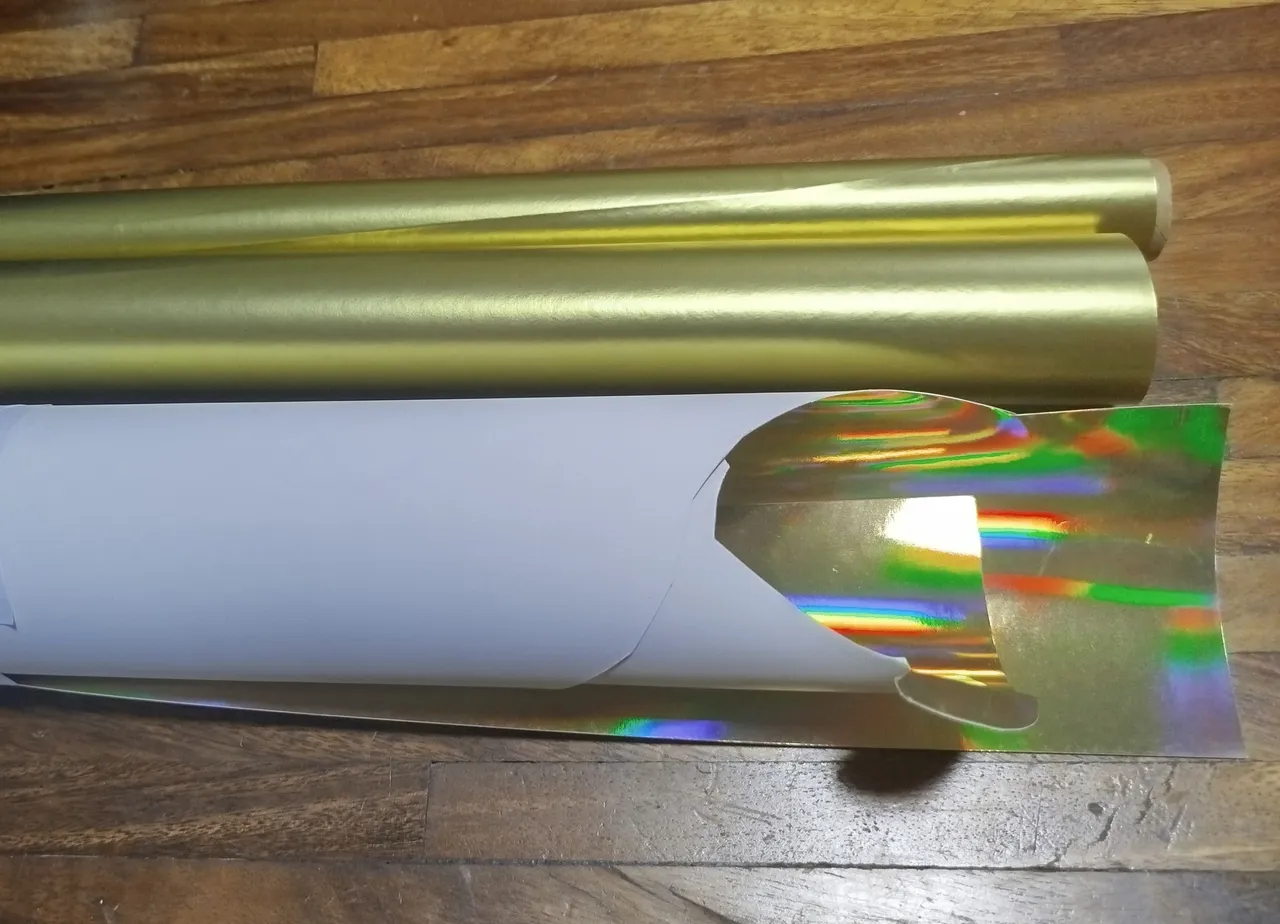
The truth is, I had no idea how I would make it haha but what I like about my brother is that he trusts my skills and is not very demanding 😆 The only thing I asked him was to get me the materials, since I didn't have any cardstock. The next day, he found some beautiful double-sided gold cardstock at the market, with an iridescent shine. I loved it! I had some gold metallic adhesive paper, so with that, I could make the base of the crown.
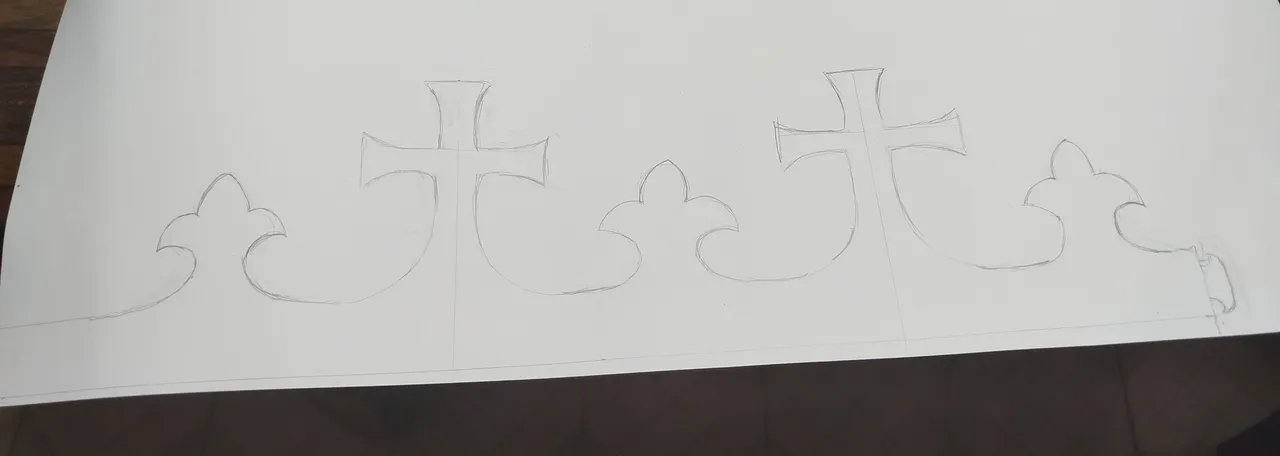
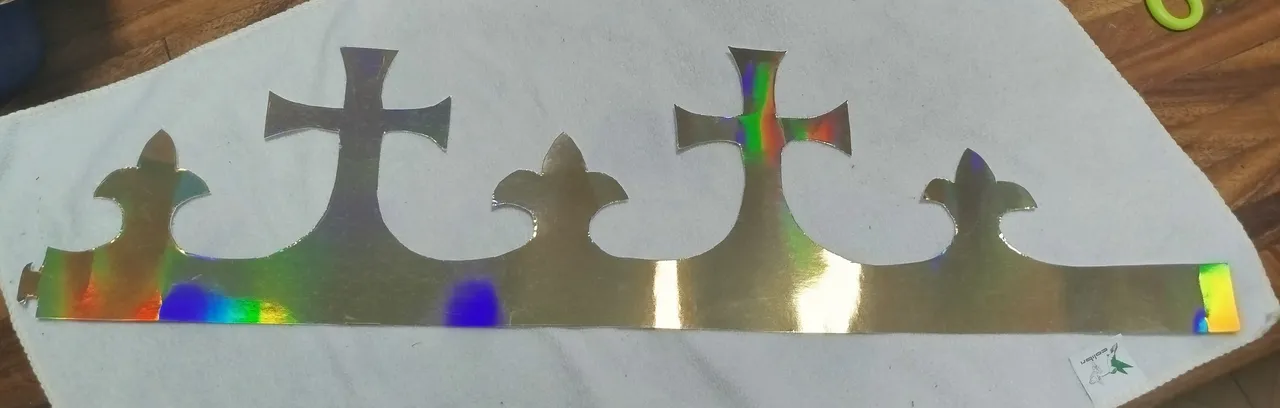
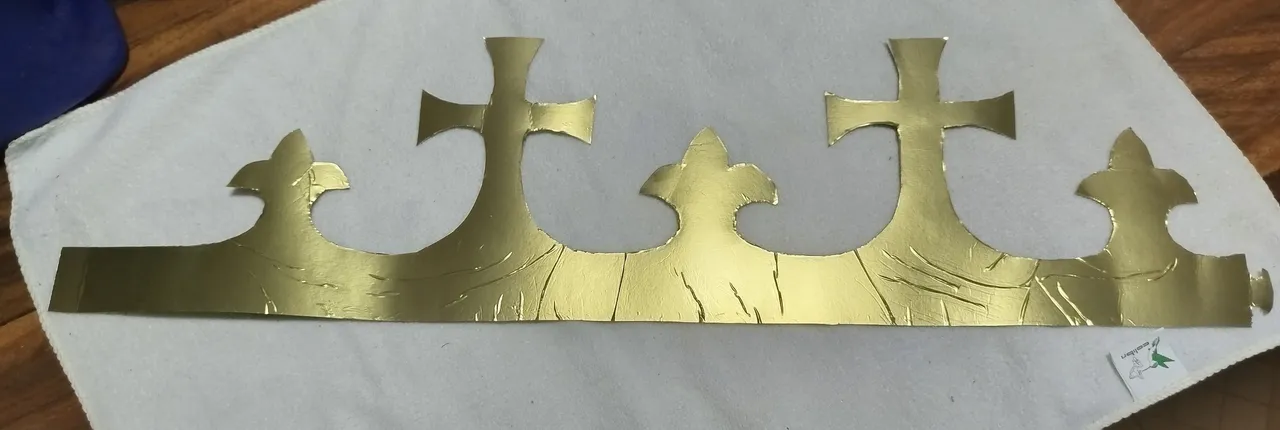
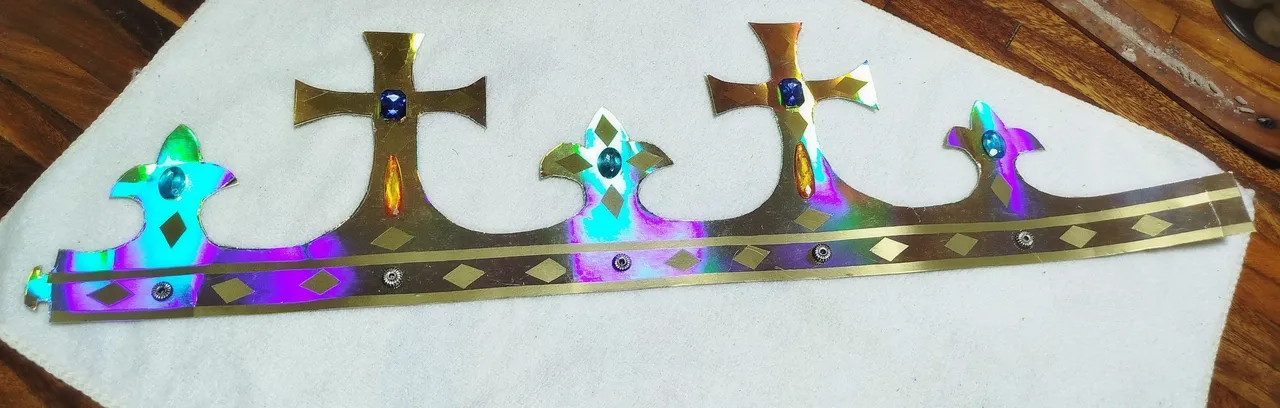
My brother had sent me a lot of reference images, so I asked him to choose just one, taking some details from the ones he liked. As a pattern, I used a cardboard crown I got from Burger King during one of my trips (it was a good idea to save that crown). I traced the crown design onto the double-sided cardboard and added the details my brother wanted, sizing it to fit his head. Cutting the cardboard was a process... it's somewhat delicate, so the edges didn't turn out very well 😅 although, well, it's just temporary while my brother can get better materials for something more elaborate.
 |  |
|---|
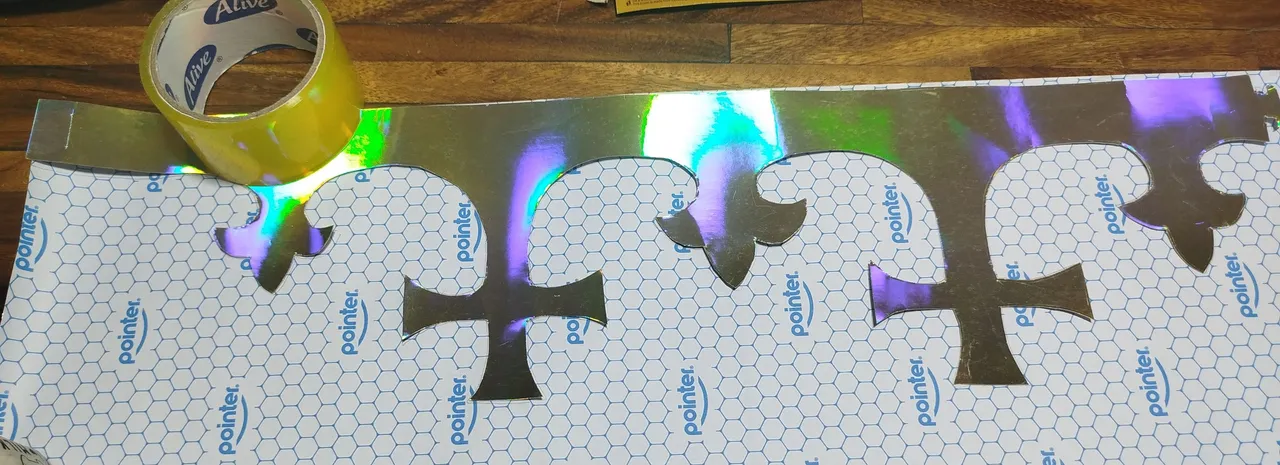
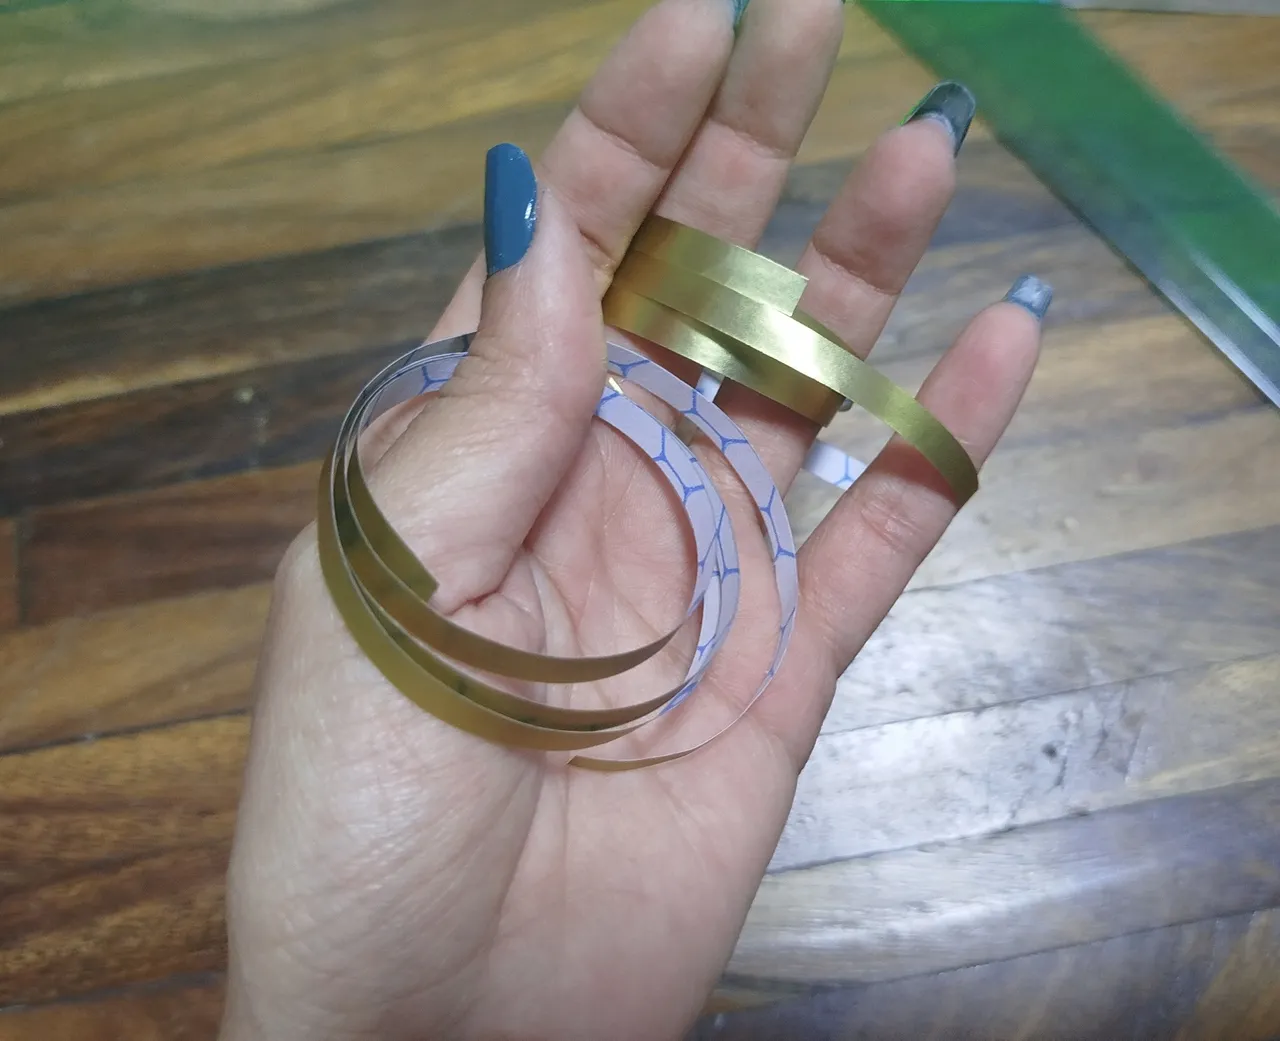
Once I had the base of the wreath, I thought it would be ideal to line the inside with metallic adhesive paper, so it wouldn't look white (if I had had gold paint, I would have painted it). That way, I traced the wreath design onto the adhesive paper and cut it out.
 |  |
|---|
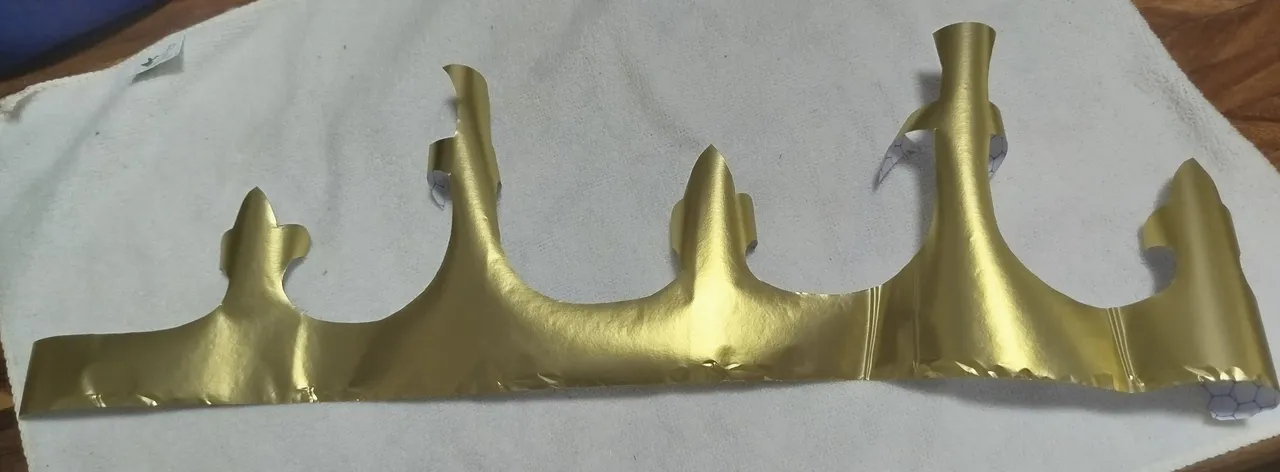
It's worth mentioning that this paper is beautiful... but it's very delicate. I bought it because the roll was super cheap when I saw it at the stationery store back then, but it tears really easily, not to mention that it only adheres perfectly to paper or cardstock surfaces. Gluing it was a tedious process because it inevitably creased 😣 Since it was internal, it wasn't a problem, but I would have liked it to look better. But hey, I was already familiar with that paper, haha. It's good to use on small pieces and in shapes that aren't irregular.
 |  |
|---|
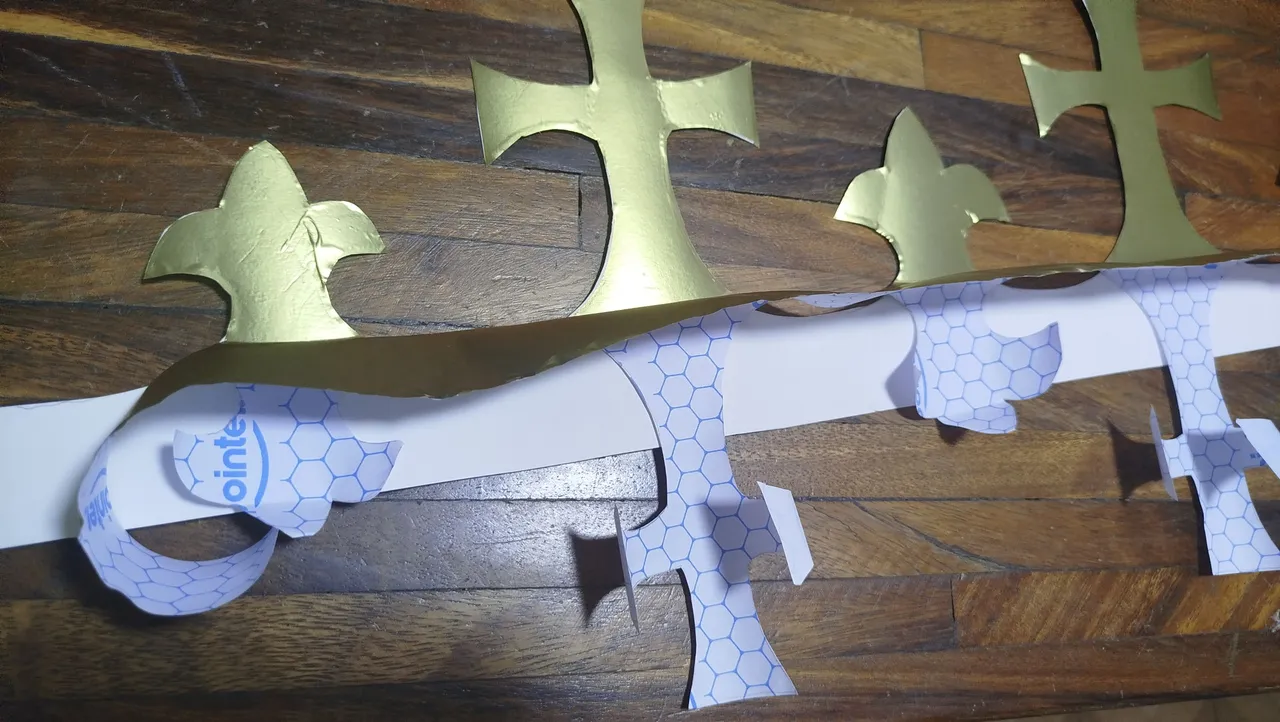
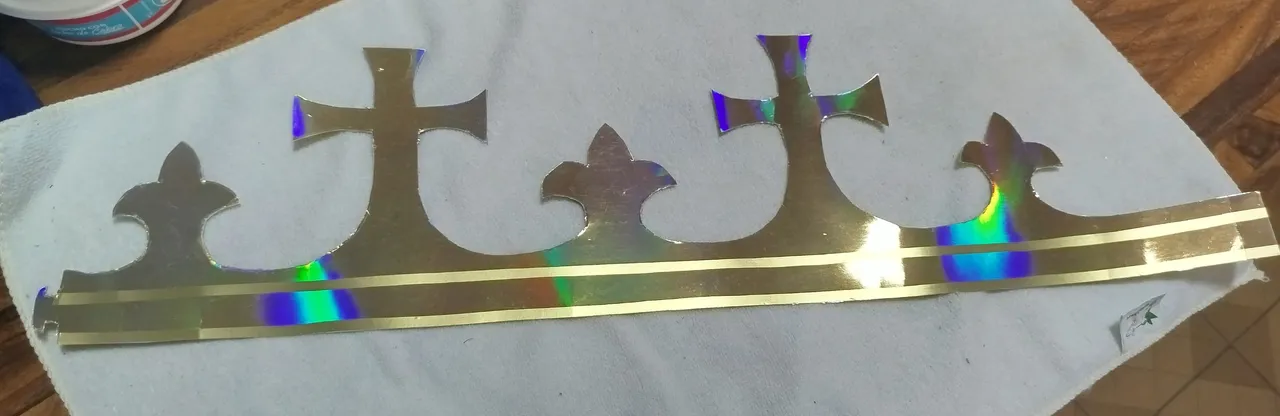
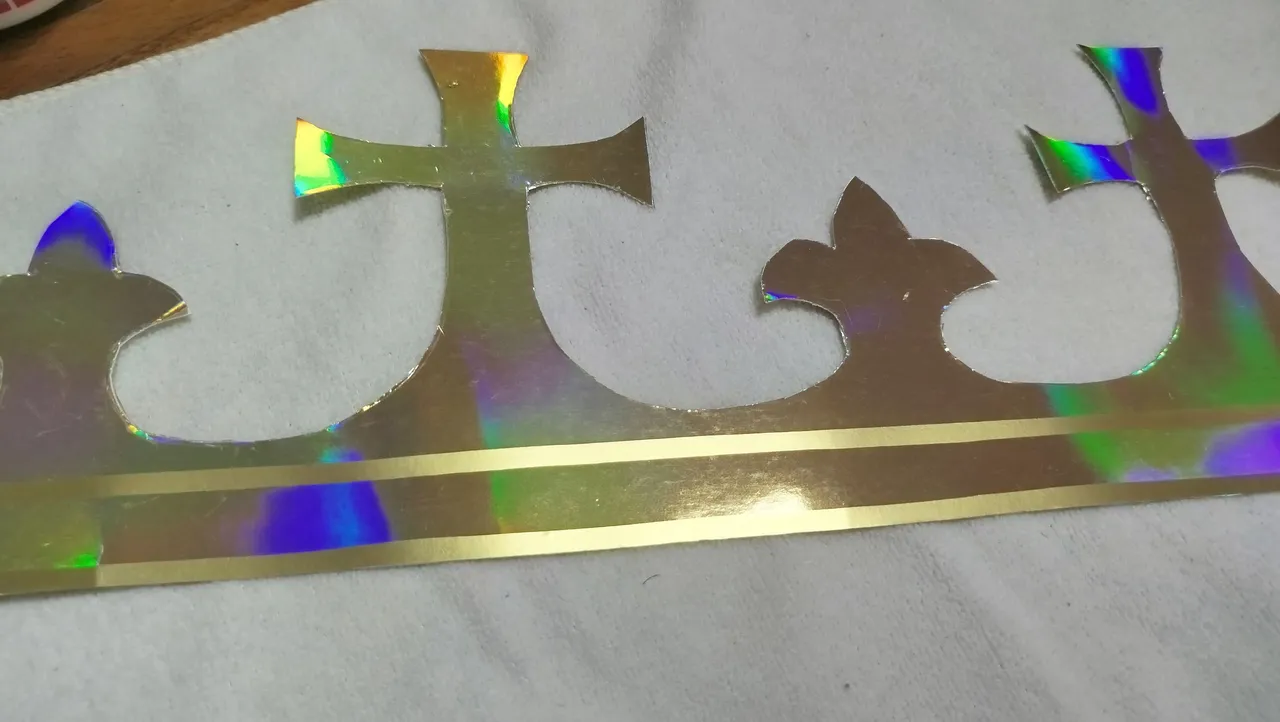
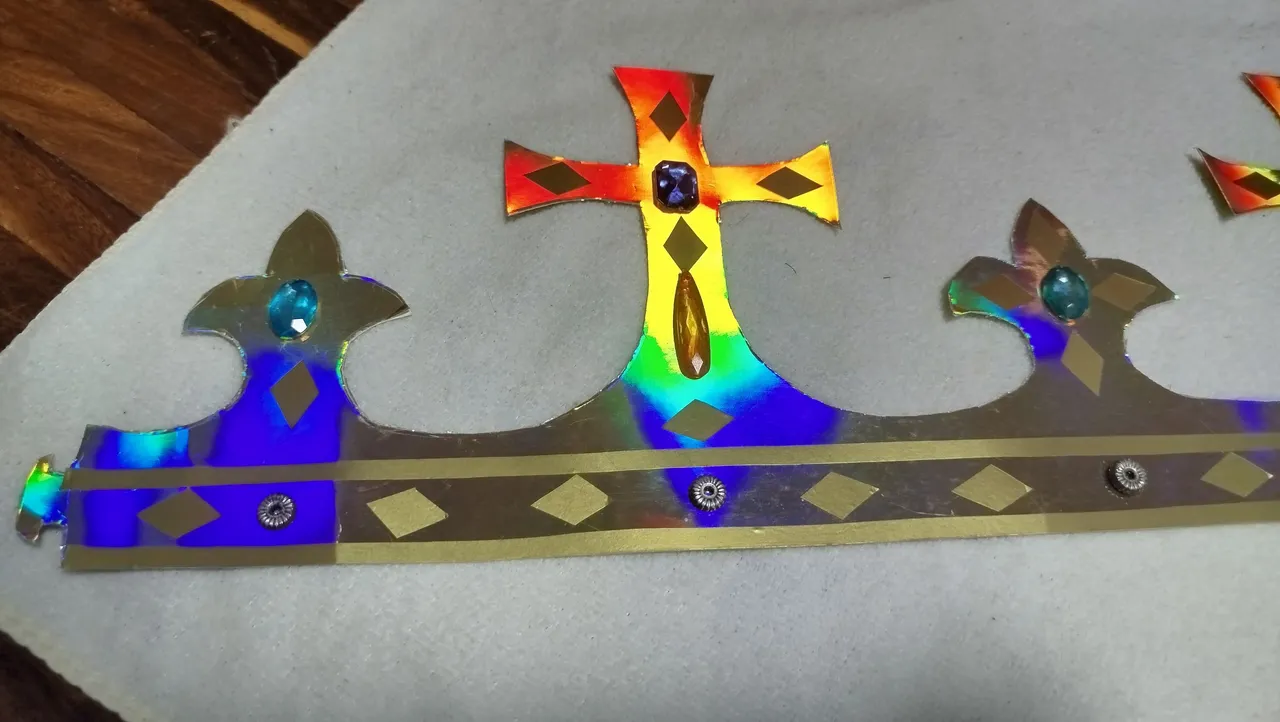
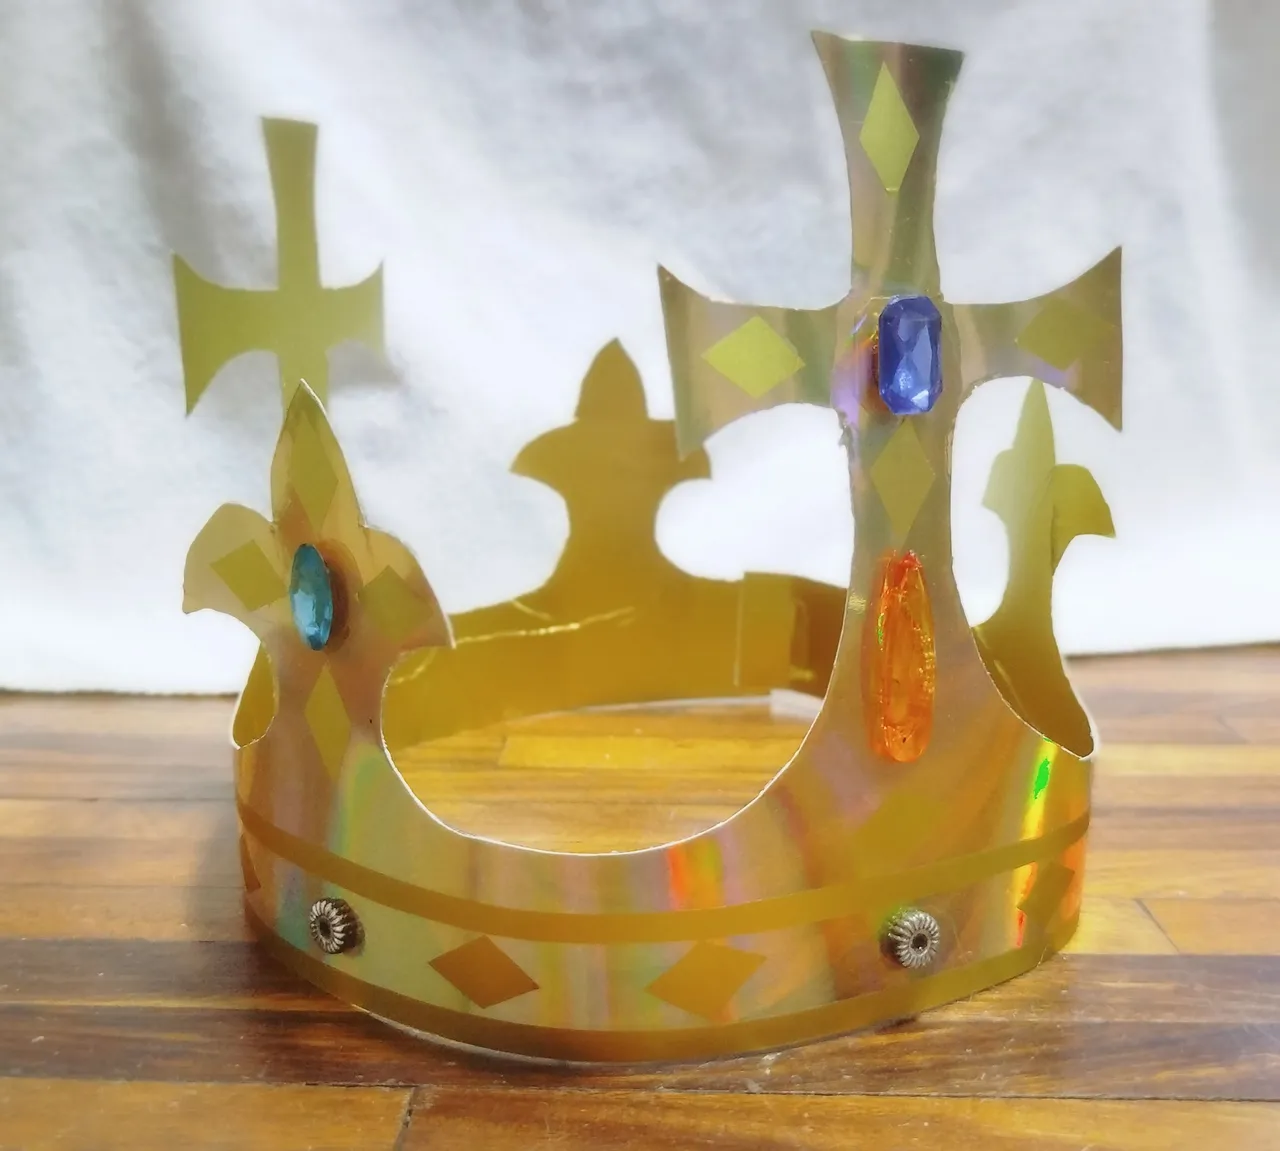
Just seeing it like that made my brother excited 😙 So I looked for a way to decorate it. I thought of adding some details with adhesive paper on the front of the crown. This time, I had no problem applying the adhesive, since it was a straight shape. In contrast to the two gold colors, it looked pretty good, in my opinion.
 |  |  |
|---|
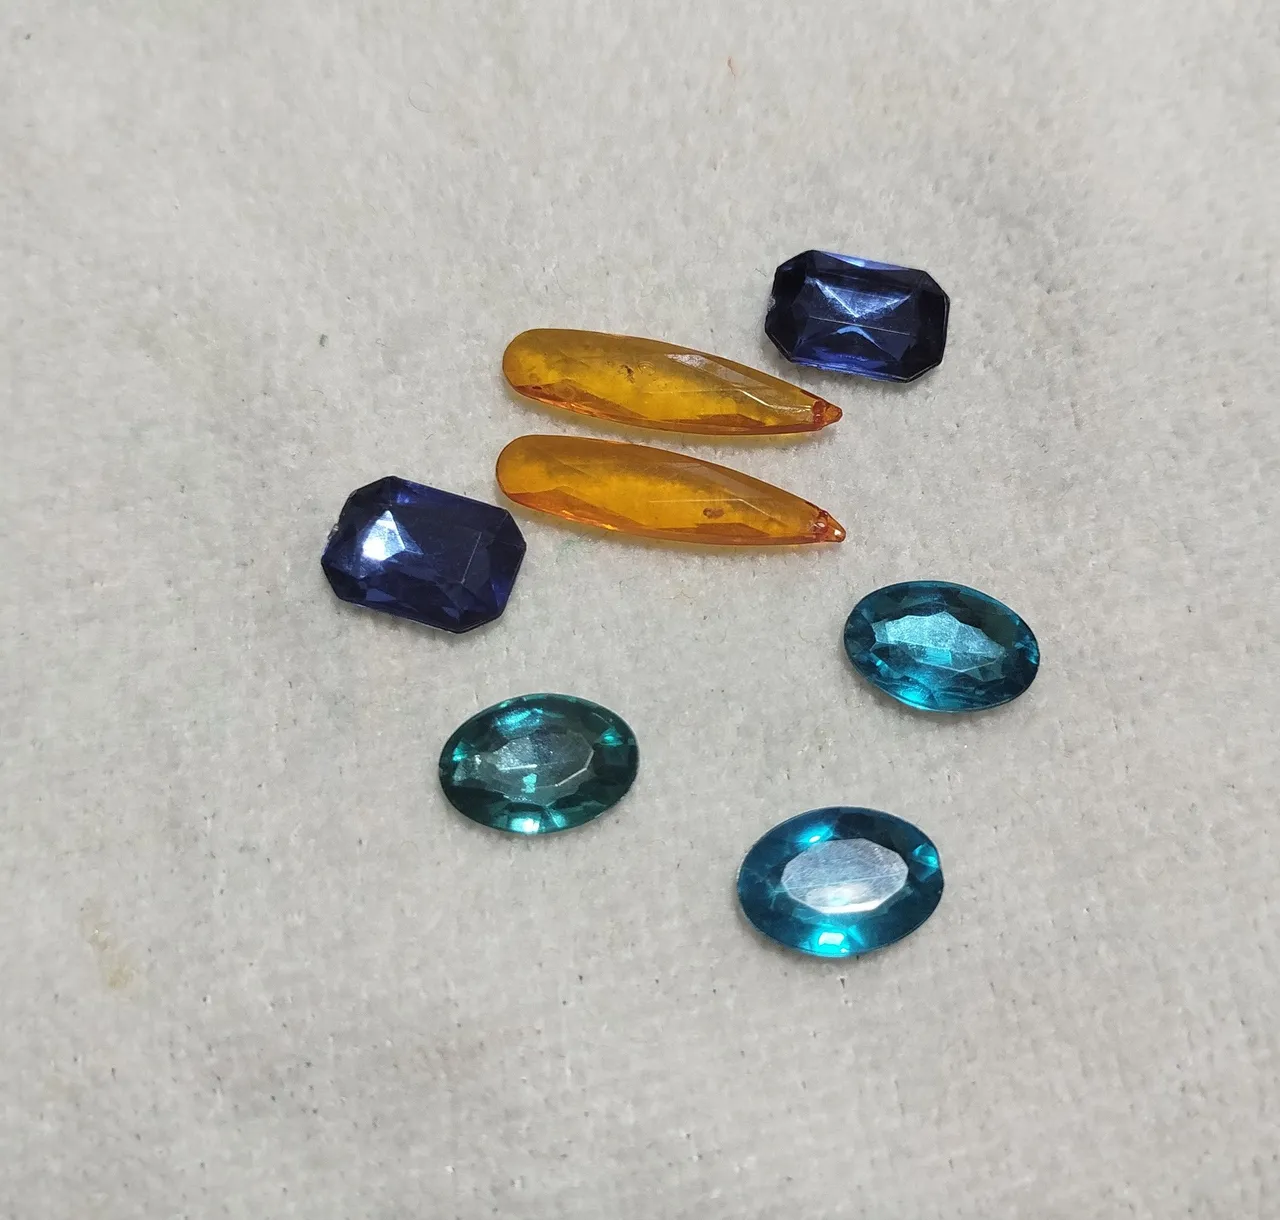
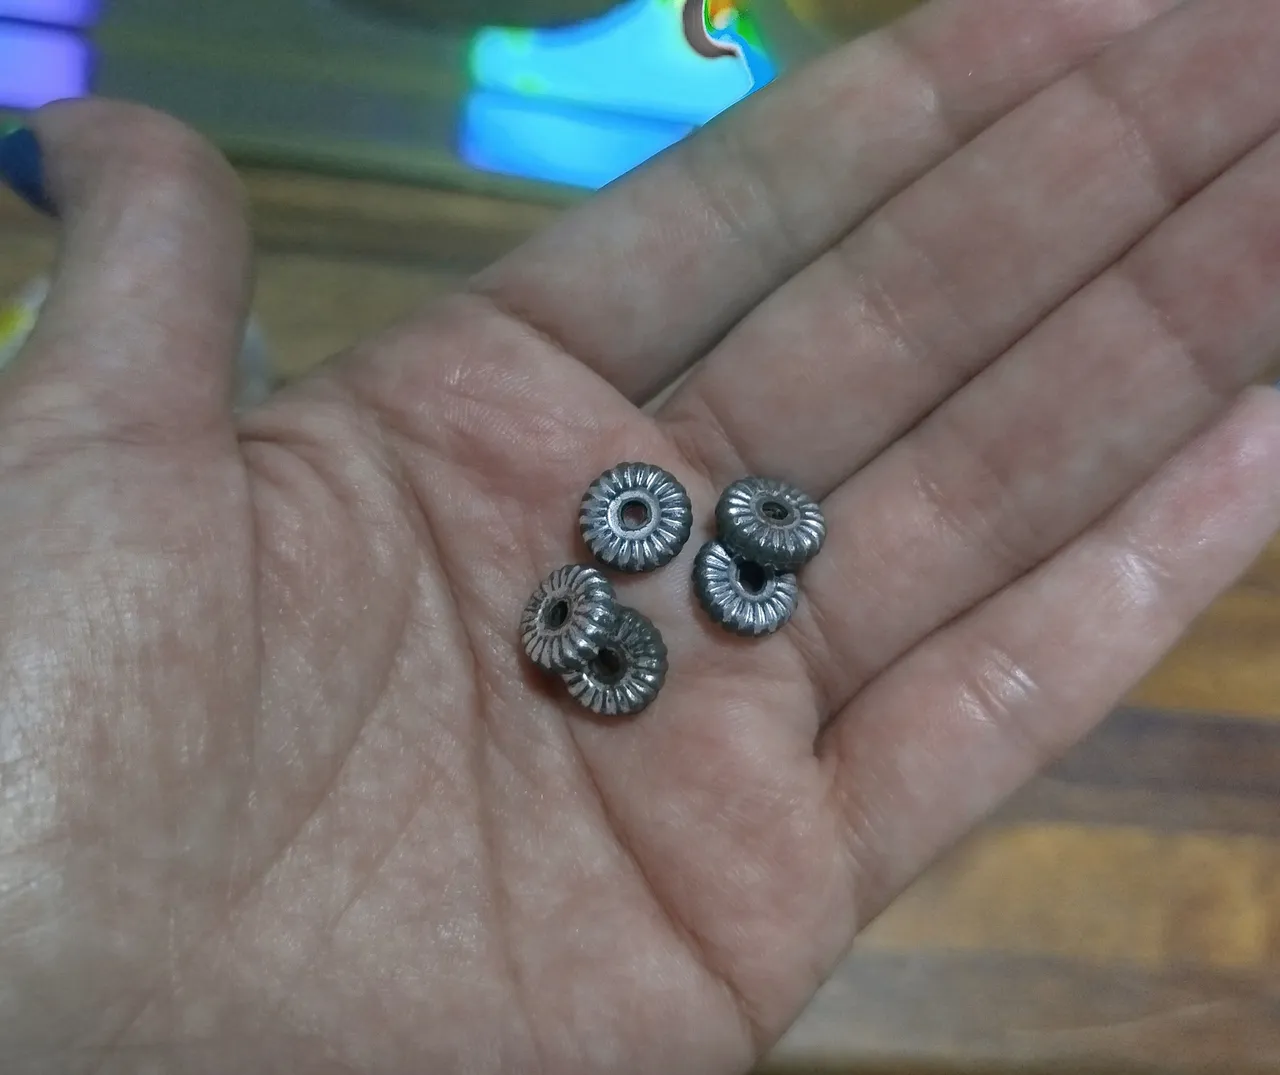
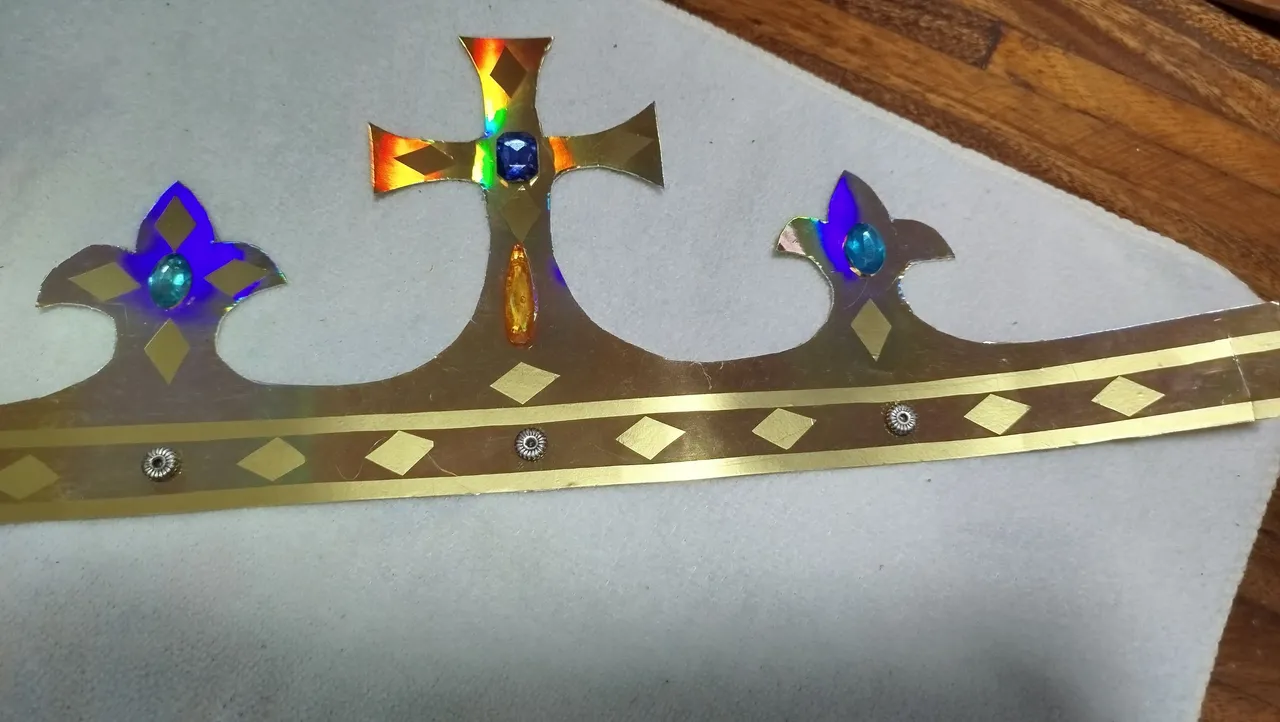
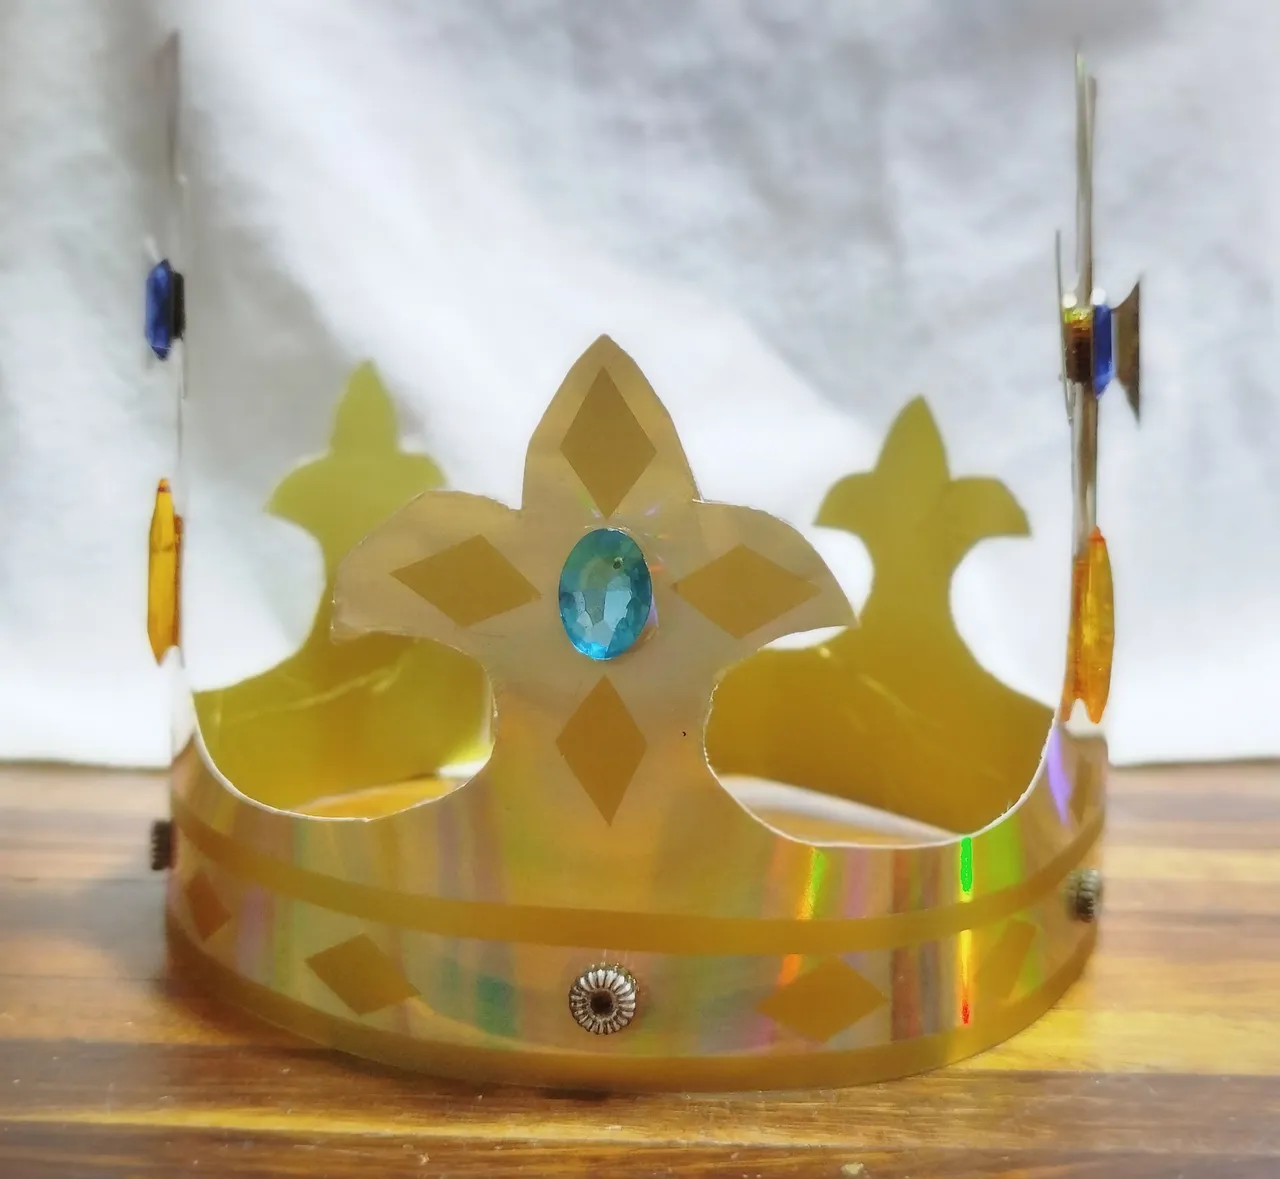
The next thing I did was search through my craft supplies for something I could use to decorate the crown. I had some plastic stones and some beads that I think were costume jewelry, which seemed perfect. To glue them on, I used liquid silicone.
 |  |  |
|---|
 |  |
|---|
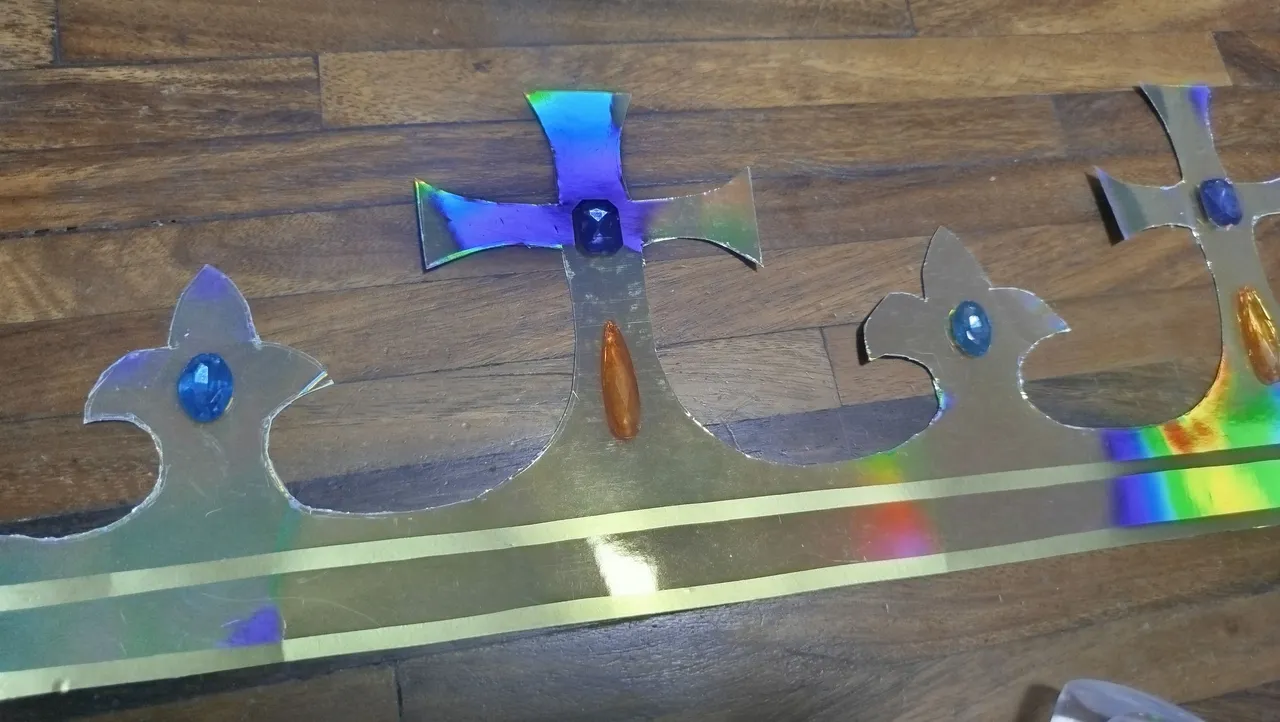
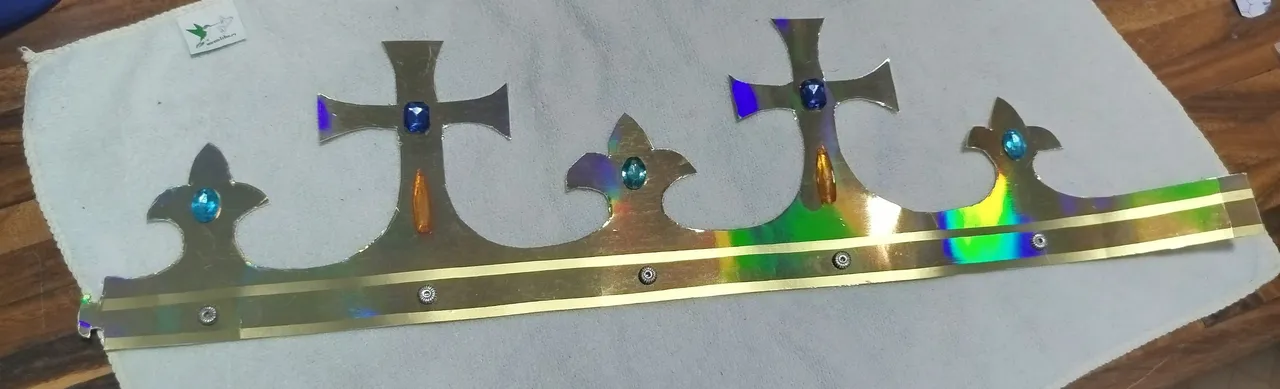
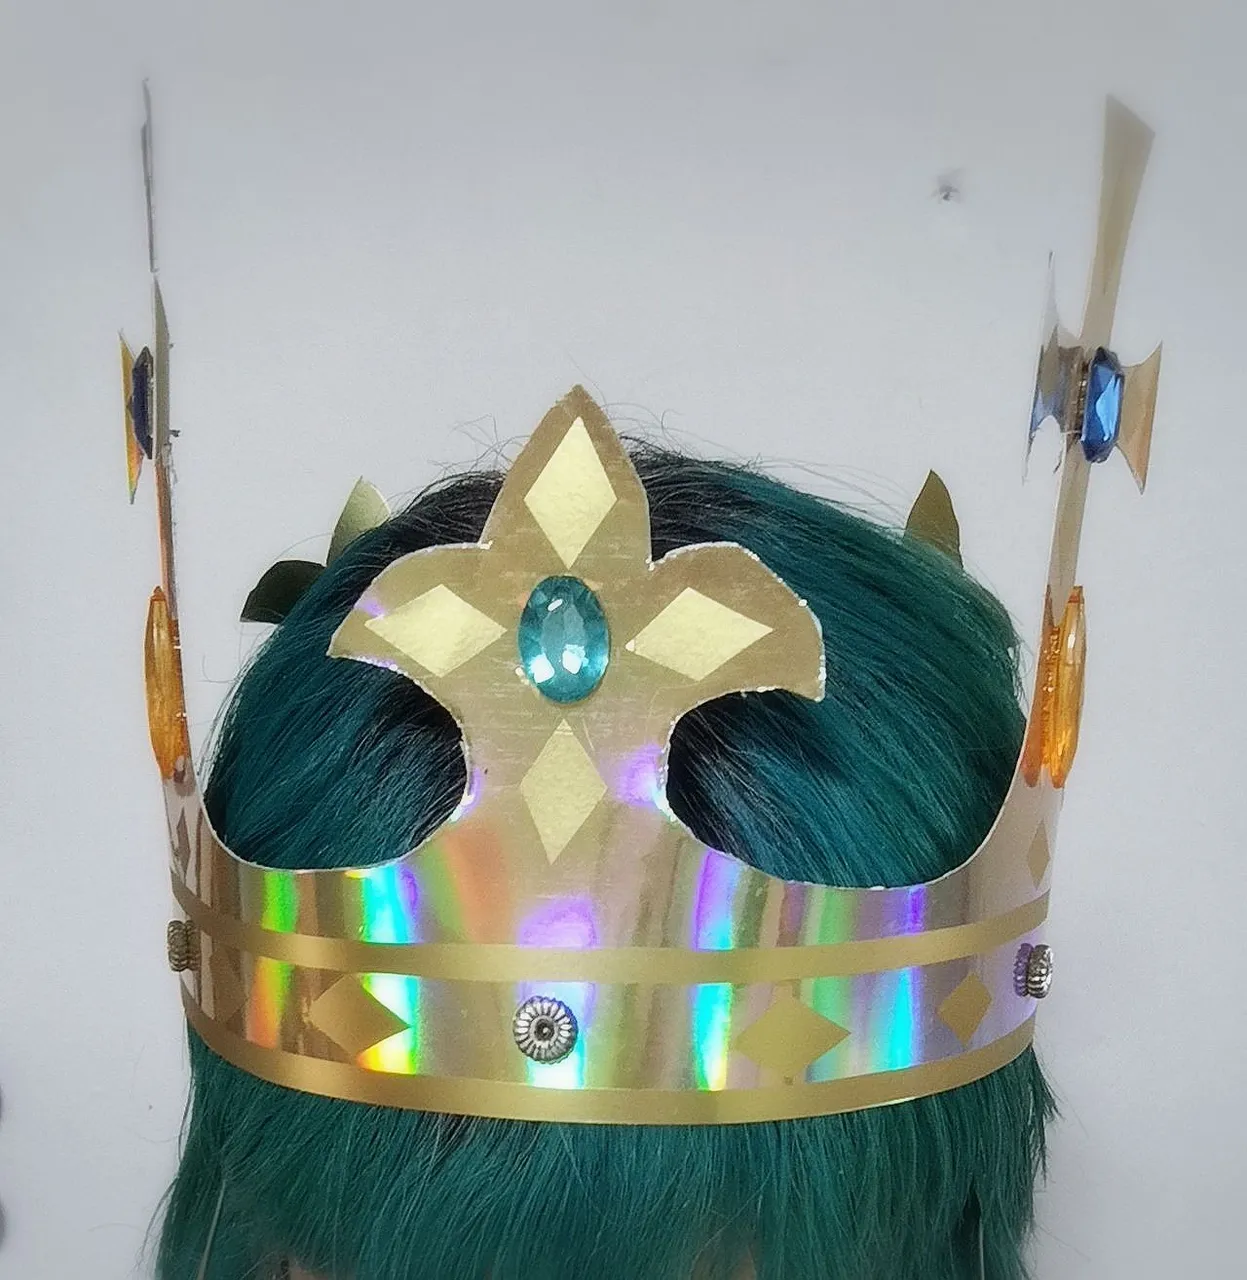
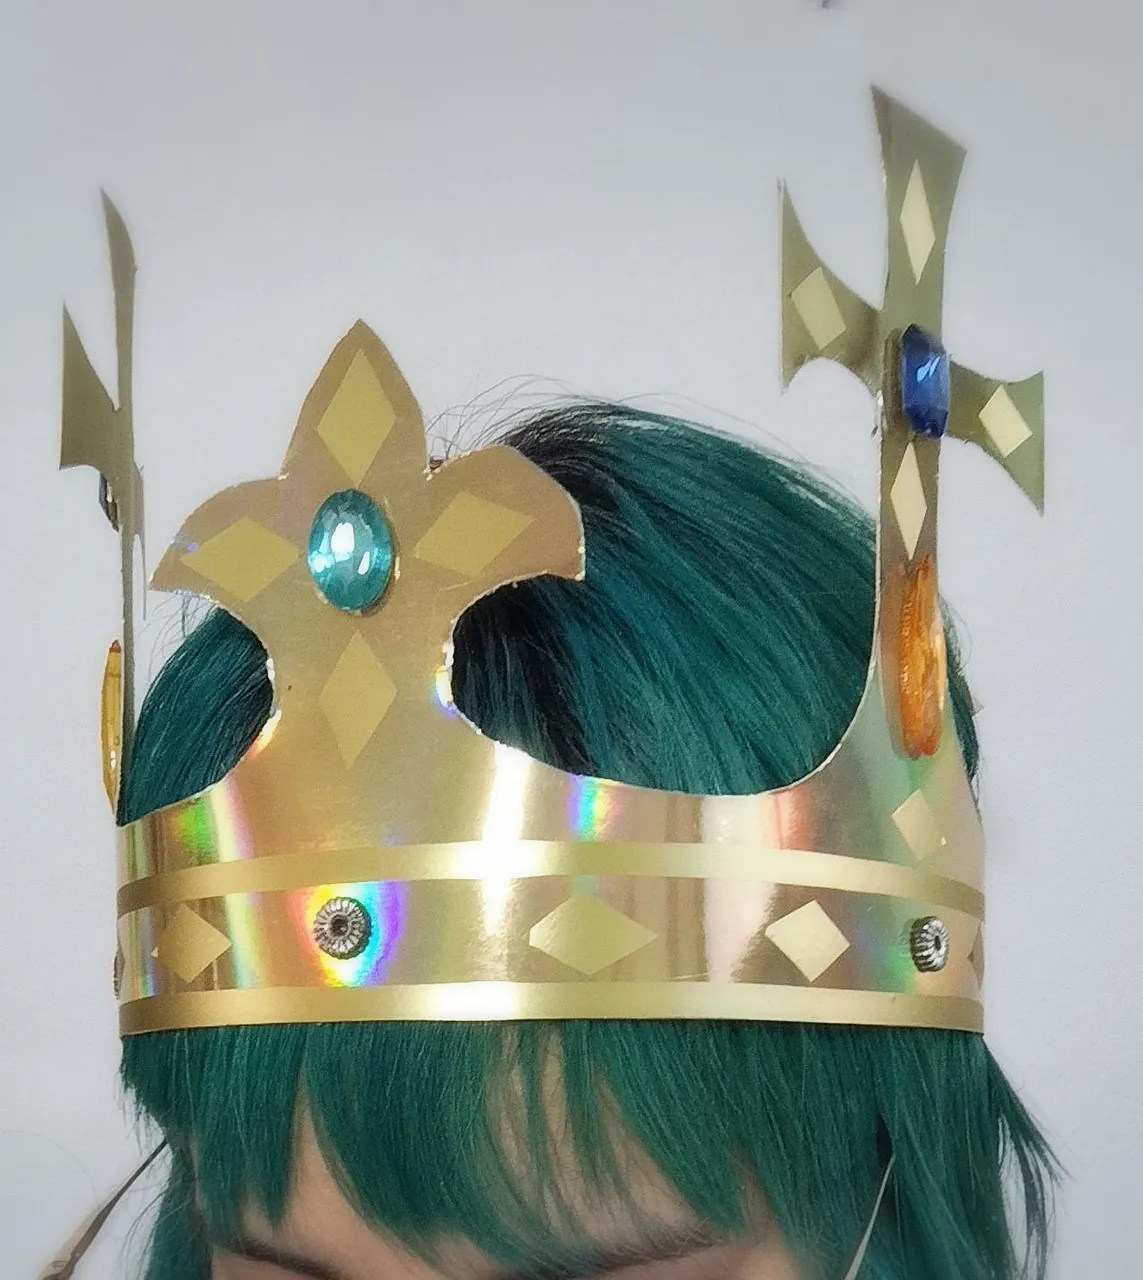
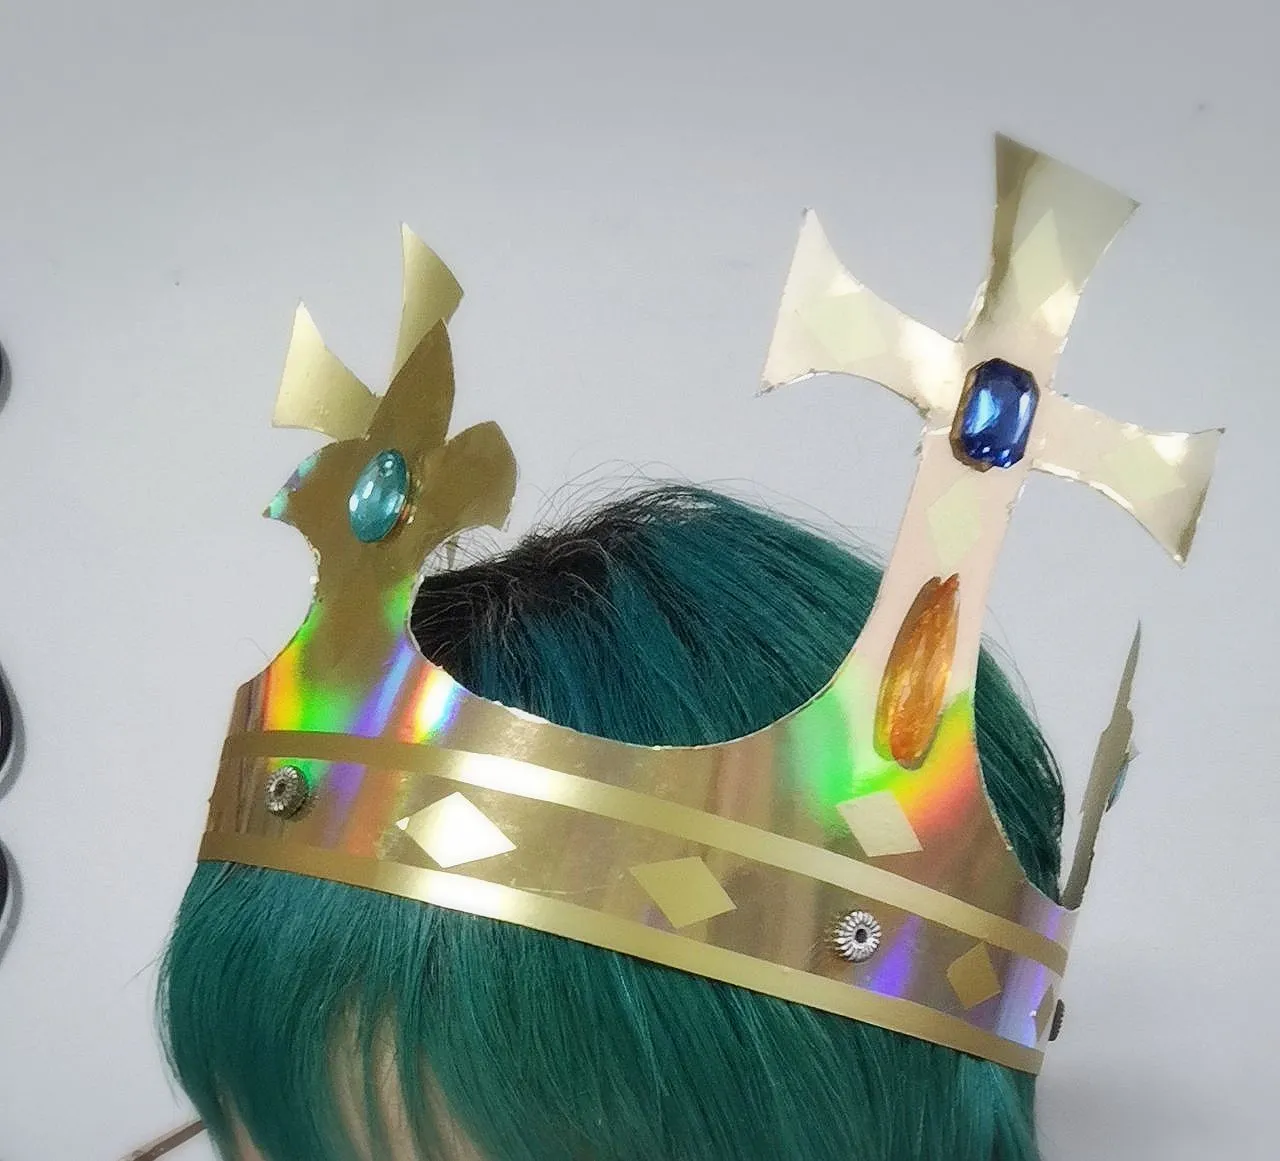
Finally, I added a few more details using the metallic adhesive paper and finally, the crown was ready ✨
 |  |  |
|---|
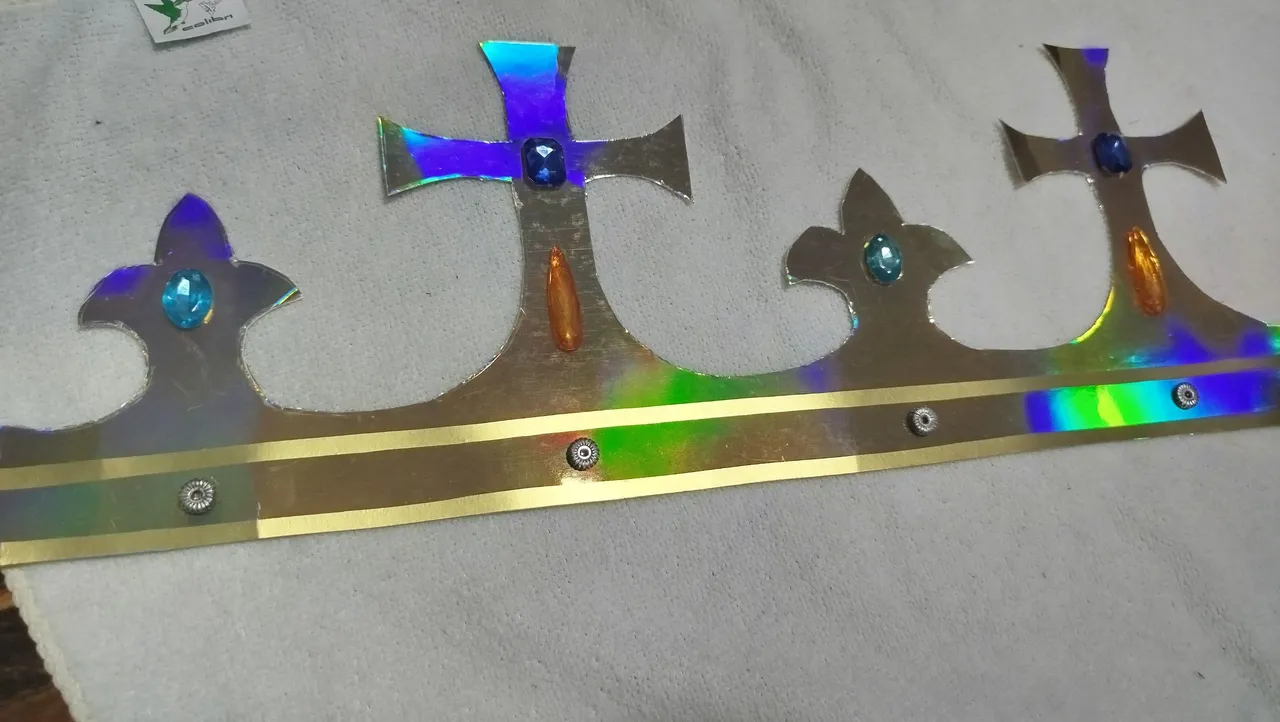
It's worth mentioning that my brother loved the final result, and that made me feel satisfied. I would have liked to have done something more elaborate, but I'm glad it turned out so well despite everything. If I had had some gold embroidery thread, I would have added it to all the edges of the crown. I think it would have looked great, but I haven't bought that kind of thread in years.
 |  |
|---|
It was interesting working with that gold cardstock, although I did find it's a delicate material, preferably cut with sharp scissors. I'm also happy that I was able to find a good use for the adhesive paper I bought. I still have a little bit left, so I hope to put it to good use next time.
 |  |  |
|---|
✨ Thank you so much for checking out my post. I hope you found it interesting ✨
💚 See you next time! 💚

CONTENIDO EN ESPAÑOL
¡Hola a todos los integrantes de esta comunidad y amante de las manualidades! Para el que no sepa, me fascinan mucho las manualidades e inclusive, tuve una etapa de mi vida en la que deseaba hacer todo lo que veía, guardando imágenes de referencia, tutoriales y hasta comprando revistas. En la actualidad, no es que haya cambiado mucho jaja continúo guardando todo lo que me gustaría hacer, pero me calmo y sólo me aventuro a realizar lo que realmente le vea un uso real o en el caso de que desee hacer un regalo.
Pero, en cuanto a la manualidad que vengo a mostrarles el día de hoy, se trata de un encargo que me pidió que le realizase mi hermano @babarois. Él es un músico y actualmente anda realizando un proyecto de música al estilo medieval, así que necesitaba una corona para un video que tiene pensado grabar. Pienso que el tutorial podrías servirle por si necesitan una corona para algún disfraz o para tomarse fotografías con un outfit original 👑
La verdad, no tenía ni idea de cómo la haría jaja pero lo que me gusta de mi hermano, es que confía en mis habilidades y no es muy exigente 😆 Lo único que le pedí, fue que me consiguiera los materiales, ya que no tenía cartulina. Al día siguiente, consiguió en el mercado una hermosa cartulina doble faz dorada, con un brillo tornasolado ¡Me encantó! Yo tenía un papel adhesivo metalizado de color dorado, así que con eso, podría elaborar la base de la corona.
Mi hermano me había pasado muchas imágenes de referencia, así que le pedí que escogiera solo una, tomando algunos detalles de las que le habían gustado. Como patrón, utilicé una corona de cartulina que me regalaron en Burger King durante uno de mis viajes (fue una buena idea guardar esa corona). Marqué el dibujo de la corona en la cartulina doble faz y le realicé los detalles que quería mi hermano, haciéndolo del tamaño adecuado al contorno de su cabeza. Cortar la cartulina fue un proceso... es algo delicada, de modo que los bordes no quedaron muy bien 😅 aunque bueno, se trata de algo provisional mientras mi hermano puede conseguir mejores materiales para algo más elaborado.
| |
|---|
Una vez que tuve la base de la corona, pensé que lo ideal era forrar la parte interna con el papel adhesivo metalizado, para que no se viera de color blanco (He haber tenido pintura dorada, la hubiese pintado). De esa forma, marqué el dibujo de la corona en el papel adhesivo y lo recorté.
| |
|---|
Cabe mencionar que éste papel es hermoso... pero es muy delicado. Lo compré porque el rollo estaba a un precio súper económico cuando lo vi en la papelería en ese tiempo, pero se rompe con muchísima facilidad, sin mencionar que sólo se adhiere perfectamente en superficies de papel o cartulina. Pegarlo fue un proceso tedioso, porque inevitablemente se hicieron pliegues 😣 Como era algo interno, no había problema, pero me hubiese gustado que quedase mejor. Pero bueno, yo ya conocía ese papel jaja es bueno pasa usarlo en piezas pequeñas y con formas que no sean irregulares.
| |
|---|
Ya sólo con verla así, mi hermano estaba emocionado 😙 Así que busqué la forma de decorarla. Se me ocurrió hacerle unos detalles con el papel adhesivo en la parte delantera de la corona. Esta vez, no tuve ningún inconveniente a la hora de pegar el adhesivo, ya que se trataba de una figura recta. En contraste de ambos dorados, quedaba bastante bien, a mi parecer.
| | |
|---|
Lo siguiente que hice, fue buscar entre mis materiales de manualidades, algo que pudiera servirme para decorar la corona. Tenía algunas piedras de plástico y algunas cuentas que creo que son de bisutería, que me parecieron perfectas. Para pegarlas, utilicé silicón líquido.
| | |
|---|
| |
|---|
Para finalizar, le hice unos detalles más utilizando el papel adhesivo metalizado y finalmente, la corona estuvo lista ✨
| | |
|---|
Cabe mencionar que a mi hermano le encantó el resultado final y eso, me hizo sentir satisfecha. Me hubiera gustado hacer algo más elaborado, pero me alegra que haya quedado tan bien a pesar de todo. Si hubiese tenido algo de bordador dorado, le hubiera colocado en todos los bordes de la corona. Pienso que hubiera quedado genial, pero hace años que no compro de ese tipo de bordador.
| |
|---|
Fue interesante trabajar con esa cartulina dorada, aunque si verifiqué que se trata de un material delicado, que de preferencia, hay que cortar con una tijera con buen filo. Estoy contenta también de haberle podido hallar un buen uso al papel adhesivo que compré. Aún me queda un trocito, así que espero utilizarlo de buena forma la próxima vez.
| | |
|---|
✨ Muchas gracias por haber visitado mi publicación. Espero que les haya parecido interesante ✨
💚 ¡Hasta una próxima oportunidad! 💚