✦ Welcome creative traveler! All materials and tools used in this tutorial are named throughout the post. Enjoy! ✦

🇪🇸 ~ ¡Hola a todos!, espero que se encuentren muy bien 🧡 👏 Yo he tenido unas semanas bastante ocupadas, sin embargo he sido capaz de guardar el registro de algunos proyectos que hice; y a pesar de que la celebración sucedió hace bastantes días, hoy quiero participar en esta comunidad con este tutorial con temática de Halloween 🤗 🎃 💕
🇺🇸 ~ Hello everyone, I hope you're all feeling great 🧡 👏 I've had a pretty busy few weeks, however I've been able to keep track of some projects I did; and even though the celebration happened quite a few days ago, today I want to participate in this community with this Halloween themed tutorial 🤗 🎃 💕
 |  |  |
|---|
En Venezuela festejar Halloween entre los niños es algo bastante nuevo (las fiestas para adultos son tema aparte), siendo un país con alta influencia religiosa (católica, cristiana o evangélica, entre muchas otras de principios bastante similares) los padres procuran activamente que los niños no se involucren en las dinámicas comunitarias que se organizan para que los pequeños de la casa puedan salir a pedir "dulce o truco".
Sin embargo este año, al menos en la zona donde vivo actualmente, eso se ha flexibilizado un poco y al tratarse de residencias privadas, y ante todo garantizando la seguridad de los niños, algunos vecinos nos organizamos para que el 31 de Octubre en las casas que quisiéramos participar, tuviéramos dulces para que todos los niños llenaran sus cestas.
Ah, ¿pero donde consigues cestas con tema de Halloween en un país que no lo celebra formalmente?. Algunas tiendas especializadas venden alternativas de calabazas plástico (bastante pequeñas), pero la realidad es que no hay mucho de donde escoger, y por eso decidí elaborar yo misma una serie de canastas con tema de Halloween, ¡esta es la primera parte! 💅 ✨
In Venezuela celebrating Halloween among children is something quite new (parties for adults are a separate issue), being a country with a high religious influence (Catholic, Christian or Evangelical, among many others with similar principles) parents actively try to keep children from getting involved in the community dynamics that are organized so that the little ones of the house can go out trick-or-treating.
However this year, at least in the area where I currently live, that has become a little more flexible and since these are private residences, and above all guaranteeing the safety of the children, some of us neighbors organized so that on October 31 in the houses that we wanted to participate, we would have candy for all the children to fill their baskets.
Ah, but where do you get Halloween-themed baskets in a country that doesn't formally celebrate Halloween? Some specialty stores sell plastic pumpkin alternatives (quite small), but the reality is that there's not much to choose from, and so I decided to make a series of Halloween themed baskets myself, this is part one! 💅 ✨
• 𝕊𝕋𝔼ℙ 𝔹𝕐 𝕊𝕋𝔼ℙ 𝕋𝕌𝕋𝕆ℝ𝕀𝔸𝕃 •
« PUMPKIN-SHAPED PIÑATA BASKETS FOR HALLOWEEN »

✦ I recommend using recycled cardboard from cereal boxes, pasta boxes and cake mix boxes. It is a cardboard easy to handle with school scissors, but strong enough ✦
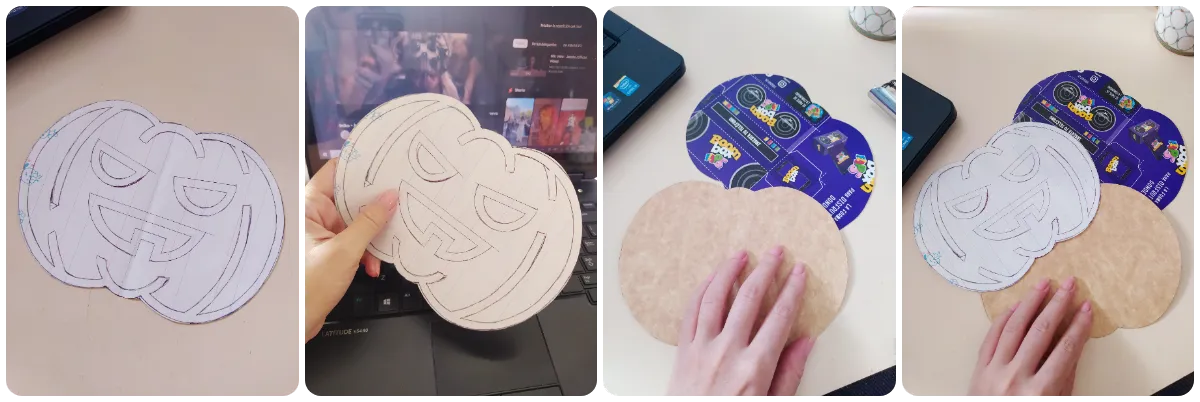
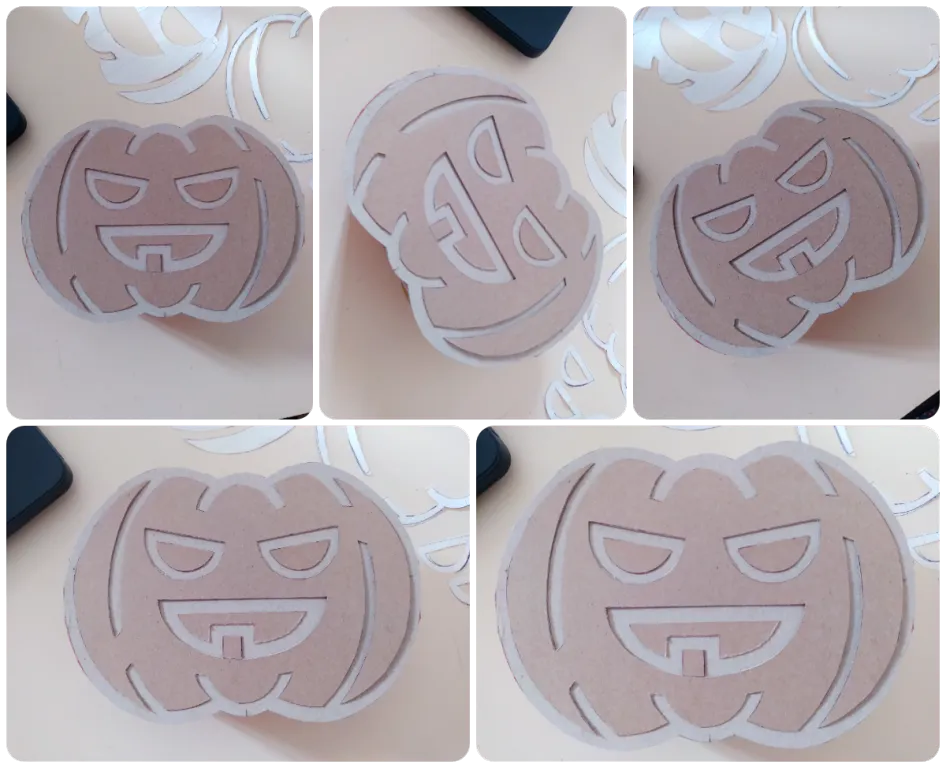
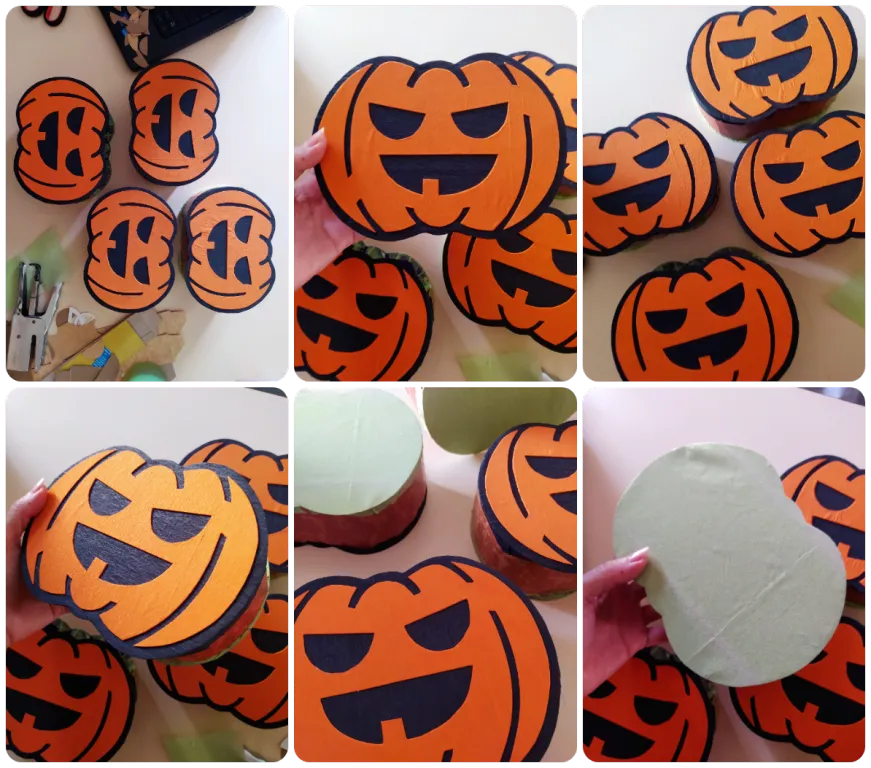
🔸 Para iniciar, necesitaras una imagen guía en caso prefieras una imagen predeterminada, antes que diseñar tu mismo el modelo de la calabaza. Yo utilise este bonito diseño de FlatIcon, lo replique en una hoja de papel corriente, y luego transferí la silueta a una pieza de carton reciclado.
🔹 To start, you will need a guide image in case you prefer a default image, rather than designing the pumpkin model yourself. I used this nice design from FlatIcon, replicated it on a sheet of plain paper, and then transferred the silhouette to a piece of recycled cardboard.

✦ You will replicate only the main face of the pumpkin and the inside of the eyes and mouth, because the first piece will be lined with black crepe paper to simulate the lines of the drawing ✦
🔸 El segundo paso es dividir todas las partes del patron de papel, y replicar cada una por separado en nuevas piezas de cartón, preferiblemente del mismo tono o color. Es importante recortar con cuidado para que los bordes sean lo mas limpios posible. Tomate tu tiempo 💖
🔹 The second step is to divide all the parts of the paper pattern, and replicate each one separately on new pieces of cardboard, preferably of the same tone or color. It is important to cut carefully so that the edges are as clean as possible. Take your time 💖
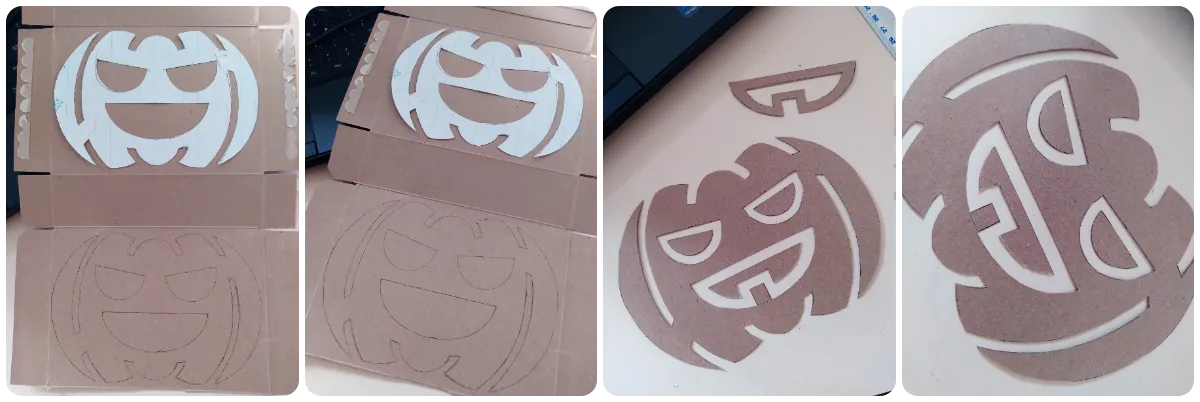
✦ It seems difficult but it is not, if you notice that the material is a little mistreated by twisting it with the scissors to reach the smallest details, place the piece of cardboard on a firm and smooth surface, and rub the handle of the scissors on the corrugated parts, this will smooth them ✦
🔸 Repetirás este proceso tantas veces como cantidad de cestas quieras elaborar. Seran 2 siluetas completas para el cuerpo de la canasta, 1 cara, 2 fondos de ojo y 1 interior de boca por cada unidad.
🔹 Repeat this process as many times as the number of baskets you want to make. There will be 2 complete silhouettes for the body of the basket, 1 face, 2 eye bottoms and 1 inside of mouth for each unit.
✦ The length of the cardboard strip of the basket body is entirely up to you, if you want it to be halfway up the figure, that's fine, if you want it a little higher, that's fine too! ✦
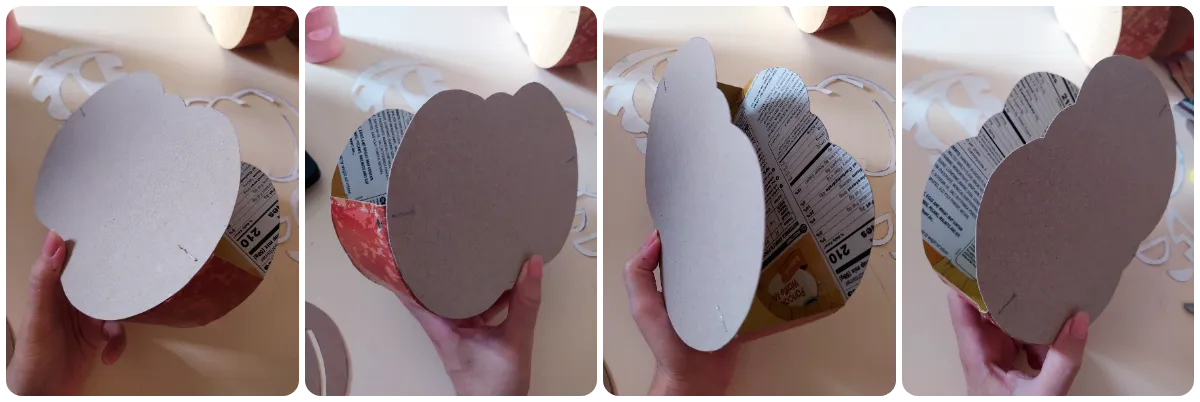
🔸 Para formar el cuerpo de la cesta, recortaras una tira de cartulina o el mismo carton de reciclaje, que mida de 8 a 10 centímetros de ancho. Recuerda dejar un extra de 2 centímetros que serán las pestañas que recortaras en sus laterales para pegar ambas caras de la calabaza.
🔹 To form the body of the basket, you will cut a strip of cardboard or the same recycled cardboard, measuring 8 to 10 centimeters wide Remember to leave an extra 2 centimeters that will be the tabs that you will cut on the sides to glue both sides of the pumpkin.
✦ Be careful that the outer side of the baskets is the clean part of the cardboard; leave the part with printing or images on the inside because those figures can be seen through the paper with which we will line the beautiful part of the baskets, and that takes away a lot of beauty to the result. That is why they should be as shown in the pictures ✦
🔸 Recomiendo dejar reposar las canastas al menos 30 o 40 minutos para que el pegamento escolar seque un poco, pero si puedes esperar al menos 1 hora seria excelente antes de seguir trabajando.
🔹 I recommend letting the baskets rest for at least 30 to 40 minutes for the school glue to dry a bit, but if you can wait at least 1 hour that would be excellent before continuing to work.
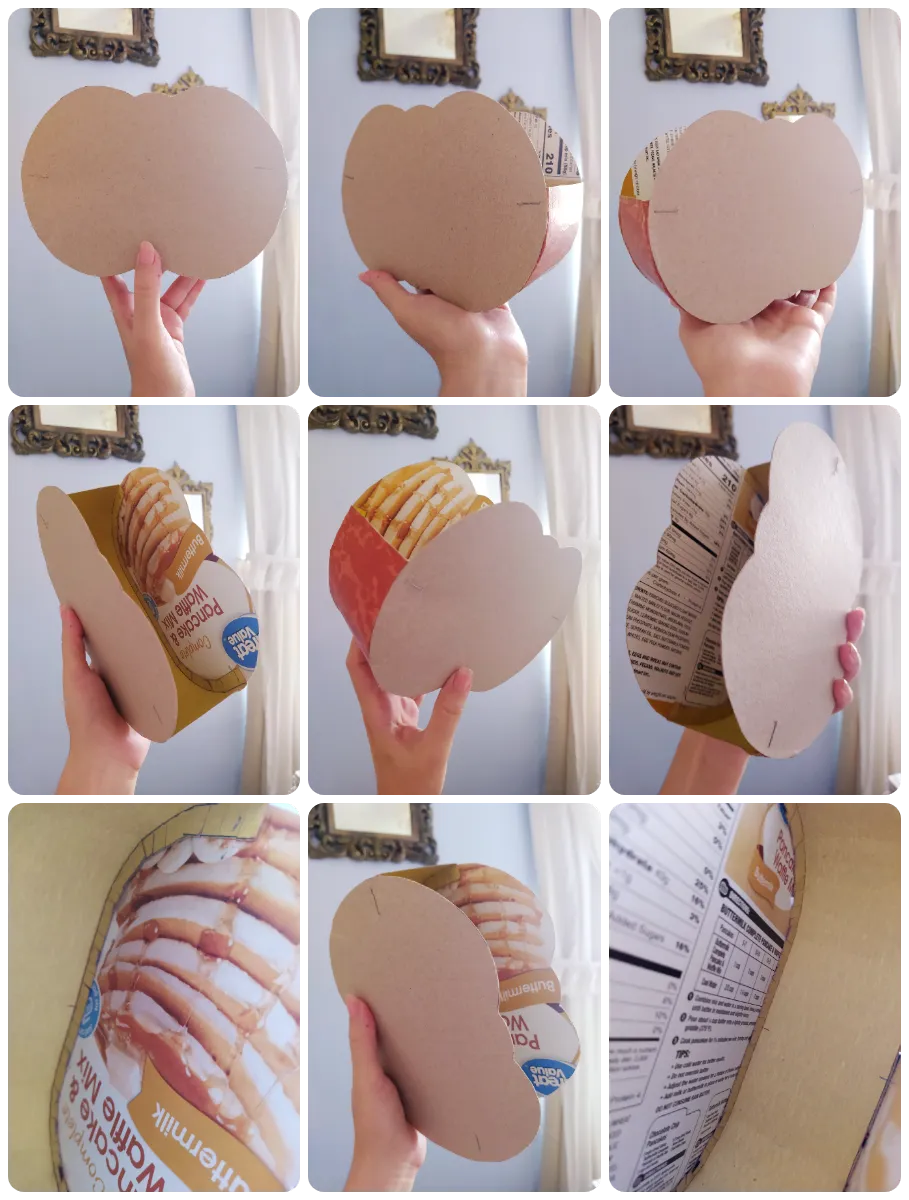
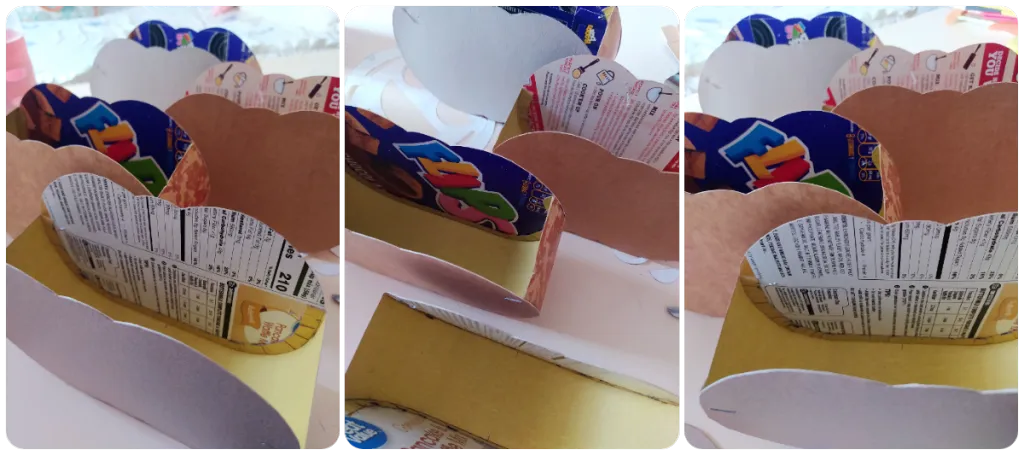
✦ Here you can see the internal flanges that were used to join the sides of the basket on the inside ✦
🔸 Transcurrido ese tiempo, notarás que el resultado se siente bastante sólido y resistente. ¿Por qué no utilizar silicon frío o silicona caliente?, al ser una silueta bastante simple, el pegamento escolar o de madera en poca cantidad es suficiente, en cambio, el silicon frío al secar se retrae y corres el riesgo de desfigurar la canasta, y el silicon caliente puede agregar grosor o irregularidades en sus bordes.
🔹 After that time, you will notice that the result feels quite solid and resistant. Why not use cold silicone or hot silicone? Since the silhouette is quite simple, school glue or wood glue in small quantities is enough, on the other hand, cold silicone dries and retracts and you run the risk of disfiguring the basket, and hot silicone can add thickness or irregularities in its edges.
✦ If you notice any mistakes, take the paper patterns and retrace with pencil on the figures you have ready, do not discard them, first check if you can correct them ✦
🔸 En esta etapa, debes comprobar que todas las piezas de carton del rostro coincidan correctamente.
🔹 At this stage, you should check that all the cardboard pieces of the face match correctly.
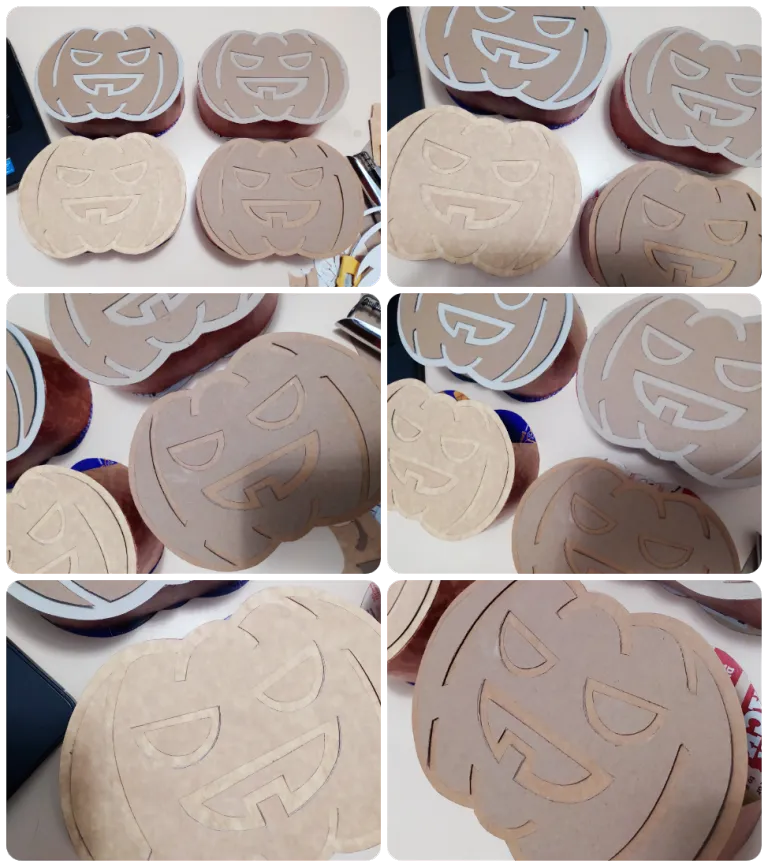
✦ Here you can see the difference between the different types of cardboard used, the contrast is quite nice! ✦
🔸 Repite este paso con todas las canastas, tomate tu tiempo y con paciencia comprueba que todas se ven bonitas y que sus piezas encajan correctamente.
🔹 Repeat this step with all the baskets, take your time and patiently check that they all look nice and that their pieces fit correctly.
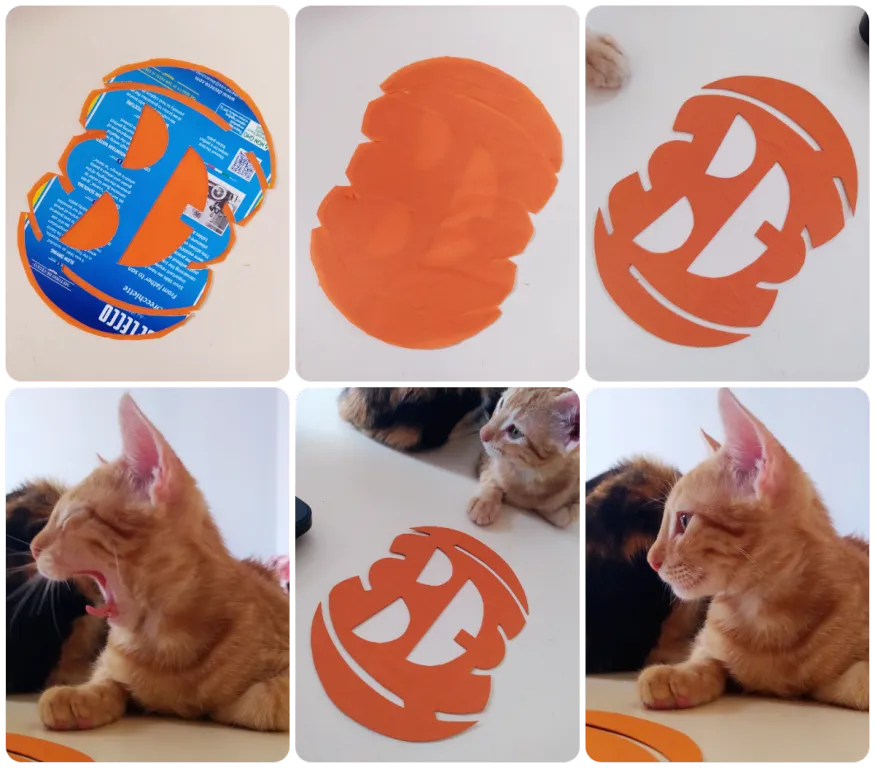
✦ The kittens were very interested in the baskets, they accompanied me during the whole process hahaha, they were very observant ✦
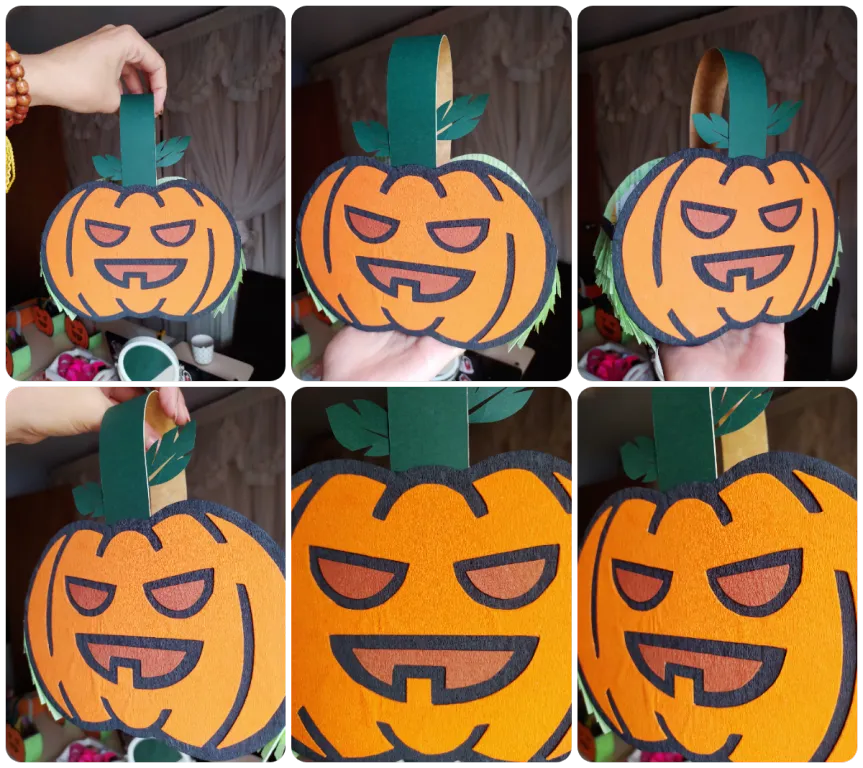
🔸 La primera pieza que debes trabajar el cuerpo de la canasta, forra con papel crepe o papel seda la parte frontal con color negro o marron oscuro, y el reverso o la cara que queda de espalda, fórrala con papel crepe o papel seda color verde. Luego, debes forrar la pieza de carton de la cara con color anaranjado brillante. Fíjate en el método explicado en las imágenes.
🔹 The first piece that you should work on is the body of the basket, line the front side with black or dark brown crepe paper or tissue paper, and the back side or the side that is on the back, line it with green crepe paper or tissue paper. Then, **you must line the cardboard piece of the face with bright orange color.
✦ It is important to add enough glue all around the edge of each figure, otherwise, it will be poorly glued and will lift ✦
🔸 ¡Pegar la parte frontal del rostro es super satisfactorio!, mira que resultado tan bonito 💕 el efecto es bastante llamativo y diferente, y el fondo de color obscuro hace la función de líneas del dibujo, es muy gracioso. Tambien se puede apreciar el reverso ya forrado del papel color verde.
🔹 Pasting the front part of the face is super satisfying! Look what a nice result 💕 the effect is quite striking and different, and the dark background makes the lines of the drawing, it's very funny. You can also see the back side already lined with green paper.
✦ If you do not want to use colored cardboard, you can use some paint, but it is important not to leave that area raw ✦
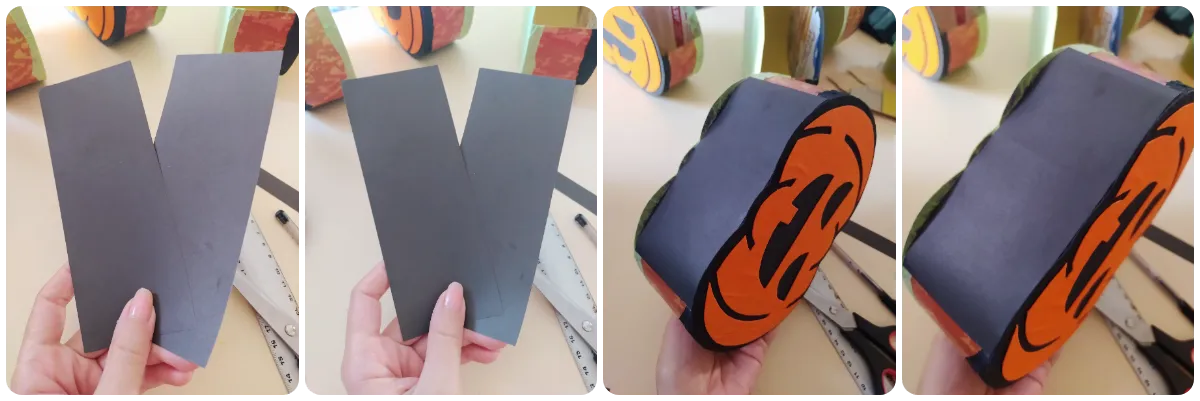
🔸 Para el fondo de cada canasta, vamos a forrar su parte inferior con una tira de cartulina de color negro o verde obscuro, le dará una terminación mas bonita cuando comiences a pegar el papelillo de los laterales.
🔹 For the bottom of each basket, we are going to line the bottom with a strip of black or dark green cardboard, it will give it a nicer finish when you start gluing the paper on the sides.

✦ The width of the paper is 3 to 3.5 cm, and the cuts must measure more than 2 cm ✦
🔸 Para forrar los laterales de las cestas, recomiendo utilizar papelillo cortado como el que se utiliza para forrar piñatas, le dará un efecto festivo a cada canasta, un detalle muy feliz y adecuado porque es un item destinado a niños. Color verde manzana o un verde claro estará bien, evita el verde oscuro.
🔹 To line the sides of the baskets, I recommend using cut paper like the one used to line piñatas, it will give a festive effect to each basket, a very happy and appropriate detail because it is an item intended for children. Apple green or a light green will be fine, avoid dark green.
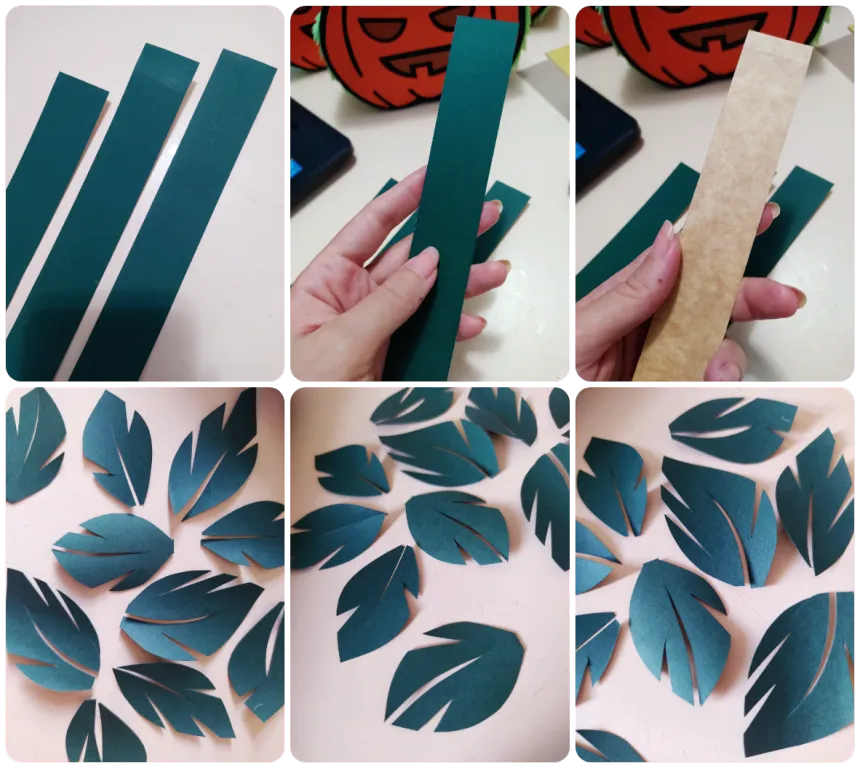
✦ With the leftover cardboard, I made some freehand leaves to decorate the base of each grip ✦
🔸 Para el aza de la canasta, necesitaras recortar una tira de cartulina de 3 cm de ancho x 22-24 cm de largo, y para el lado que tiene letras o estampado, lo forraras con más cartulina color verde oscuro o negro.
🔹 For the top of the basket, you will need to cut out a strip of cardboard 3 cm wide x 22-24 cm long, and for the side that has letters or print, you will line it with more dark green or black cardboard.
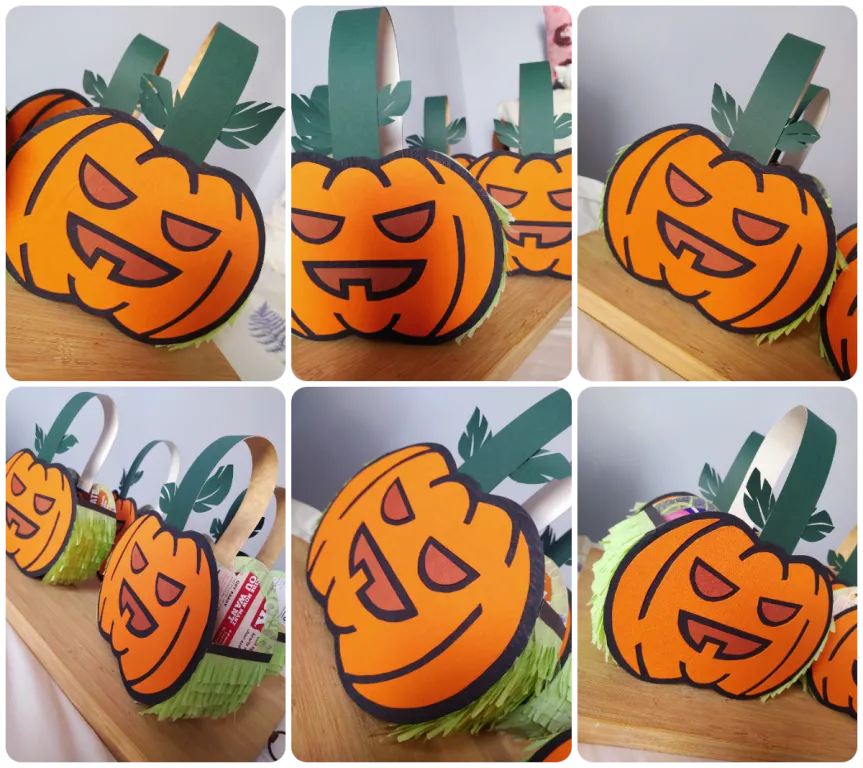
« ℝ𝔼𝕊𝕌𝕃𝕋𝔸𝔻𝕆 𝔽𝕀ℕ𝔸𝕃 »
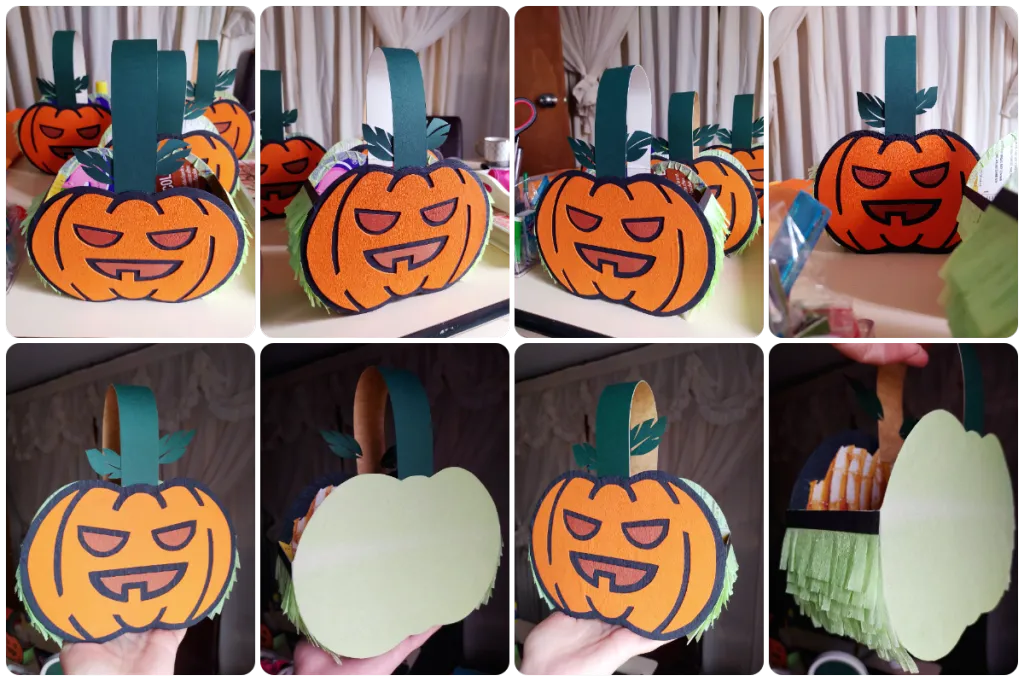
✦ The handle of each basket is glued approximately 2 to 2.5 cm on the inside of each side ✦
✦ These baskets can hold 500 to 800 grams of candy ✦
✦ The inside can be lined with colored paper for a cleaner finish. I did it but I forgot to take those pictures in time before delivering the baskets ✦
Este proyecto me tomo aproximadamente día y medio para ser completado, tuve varias distracciones (estoy cuidando un total de 5 gatitos y requieren bastante tiempo al día, espero conseguirles un buen hogar, pero hasta que no aparezcan familias que me inspiren 100% seguridad, no me arriesgare a darlos a personas potencialmente irresponsables o malintencionadas) y admito que estoy algo oxidada porque no me siento tan ágil, quizá sean los meses sin poder sentarme a craftear como me gustaría, que me están pasando factura 😔 pero el resultado es bastante aceptable y eso me animó a crear nuevos modelos (lo veras todo en un siguiente post!).
This project took me approximately a day and a half to complete, I had several distractions (I'm taking care of a total of 5 kittens and they require quite a lot of time a day, I hope to get them a good home, but until families that inspire me 100% security appear, I won't risk giving them to potentially irresponsible or malicious people) and I admit I'm a bit rusty because I don't feel so agile, maybe it's the months without being able to sit down to craft as I would like, that are taking their toll on me 😔 but the result is quite acceptable and that encouraged me to create new models (you'll see it all in a next post!).
 |  |  |
|---|---|---|
 |  |  |

Y esta fue la primera parte de mi proyecto temático para Halloween 2023, unas canastas con forma de calabacita para acompañar la actividad de "dulce o truco" de los niños de mi comunidad.
Felizmente puedo adelantar que muchos participaron, no todos, hubo padres especialmente religiosos que le prohibieron la salida para jugar a sus niños ese día, pero definitivamente los que sí pudieron salir a disfrutar de la actividad, fueron muchos más que el año pasado. Todos estaban euforicos porque sus canastas fueron llenadas varias veces de dulces, la actividad fue un éxito, igual que mis canastas uwu)/ 🎃 🍬 👌
Ésta técnica también sirve para otras ocasiones, por ejemplo pueden ser recreadas con figuras de Navidad o San Valentín; espero te hayas divertido en este recorrido, y prometo una segunda parte mucho más colorida. ¡Feliz fin de semana a todos! 🦋 🌸
And this was the first part of my Halloween 2023 themed project, some pumpkin-shaped baskets to accompany the trick-or-treating activity for the children in my community.
I can happily say that many participated, not all, there were especially religious parents who prohibited their children from going out to play that day, but definitely those who were able to go out and enjoy the activity were many more than last year. Everyone was euphoric because their baskets were filled several times with candy, the activity was a success, just like my baskets uwu)/ 🎃 🍬 👌
This technique also works for other occasions, for example they can be recreated with Christmas or Valentine figures; I hope you had fun on this tour, and I promise a much more colorful second part. Happy weekend to all! 🦋 🌸


🍓 All texts and images by @Tesmoforia ✦ Translation: Deepl ✨
🚨 ¡Please do not take, edit or republish my material without my permission! 🚨
💌 ¿Do you wish to contact me? Mino.Cosplay@Gmail.com 💌
🌙 Banner, signature and separators by Keili Lares