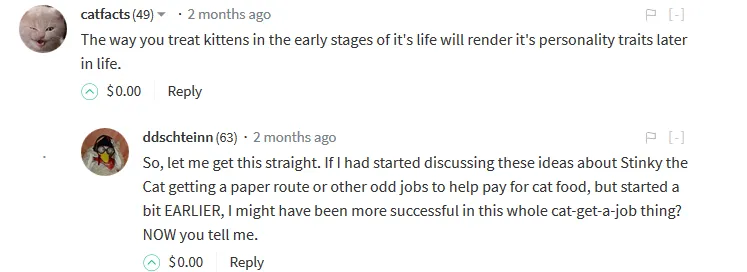
Nilson The Cabbaa'ge ~ Sporting A New Purple 'Rug'
Decor For The Center Of The Table
I have decided to take this challenge in a slightly different direction, concentrating on a Table Decor theme, with the added advantage of complete edibility at the end of the whole process. I realize I may get drummed out of the Iron Chef Challenge, but since I can't cook worth a hoot anyway, it may not really matter in the large scheme of worldly things.
I just wanted to add a bit of my own 'flair' to this idea of creating a foodstuff with a special theme. I'm really stretching my 'culinary wings' here, since I've only done this type of challenge once before. And that was for @woman-onthe-wing, with my rendition of [The Fine Art Of Cereal Mixing]. So, without further ado, whatever that means, I give you, Nilson, the Centerpiece Cabbaa'ge O' Lantern (pronounced Că-bŏ-ŏj ).
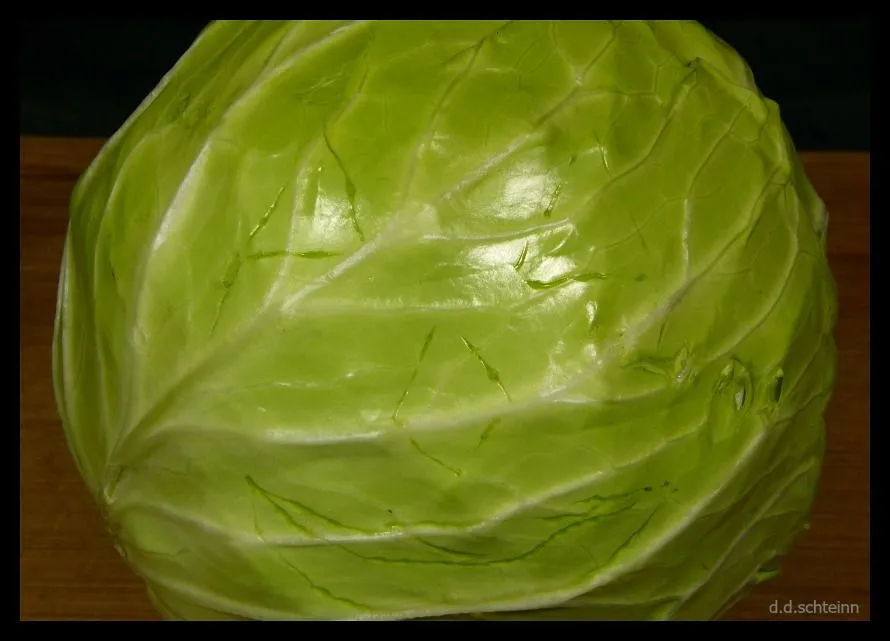
It All Starts With A Cabbage
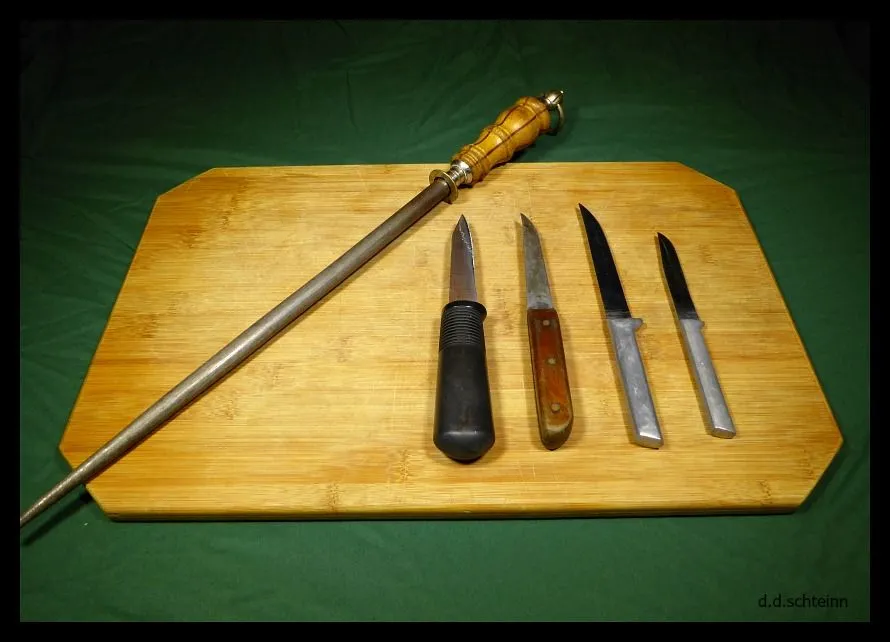
I picked a green, standard cabbage for this entry. These seem to be rather hearty vegetables, with a good, solid 'base' as a sculpting medium. Since I've never actually carved a cabbage before, I decided the stiff, very round green ones might hold together better than some of the other fancy, less hearty varieties.
I don't know all the official cabbage names, and the guy I asked in the produce department about carving characteristics was of NO help. But after looking around and squeezing quite a few different cabbages in the grocery store today, I realized some just might not hold up very well to the carving knife. Let's face it, having your dinner come apart, well before the final prep-curtain drops, just won't do. Hence, the good old, Standard Green Cabbage for this project.
A Design Like No Other
To date, my only vegetable carving experience has been the standard pumpkin for Halloween. And a cabbage has proven to be a veggie of a different mother. Firstly, the official, approved procedure for carving an October pumpkin involves removing the top, or final 'lid' first, followed by scooping out the 'gook' from the inside (preferably with a large, sharp ice-cream spoon).
This step is followed by carving the outer layer or rind, once the pumpkin is fully hollowed out. No problem. We've all done a ton of these holiday projects since we were seven years old. And it usually works pretty well.
It's All Bass-Ackwards Here
Enter your everyday carving cabbage. The standard, run-of-the-mill garden cabbage is exactly the opposite, when compared to a pumpkin carve. You cannot start with the 'hollowing' procedure, then carve the outer layer last. Due to the multiple-layering dynamics of the entire cabbage, you must carve the surface design, in this case a face, BEFORE you clear the insides. A complete, carving 360. And an artistic challenge as well.
Also, a pumpkin has a hard, outer rind, that is relatively easy to cut with a sharp knife. Preferably a serrated, sawing-type knife. The cabbage has a gazillion layers of...cabbage...compared to the pumpkin rind. I couldn't say with any certainty how MANY layers a cabbage has, and Google didn't seem to know either.
Suffice it to say, there are more layers here than in a pumpkin, and this makes the carving process MUCH more tedious. If I had to summarize what I discovered here in the cutting process: "Always stay in vertical line, with your horizontal surficial design". A true necessity, all the way through to the final slice.
The Kitchen Operatory Is Ready
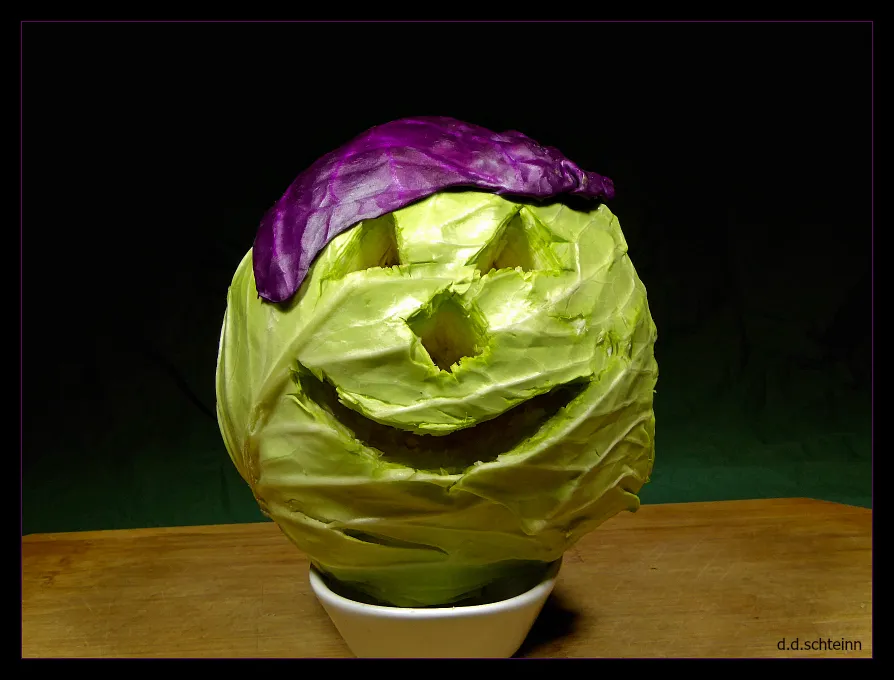
The Tools Of The Trade
I started out with a whole series of carving knives, since I'm trodding into very new kitchen territory here. As you can see above, there are many options in knife design. I started with the thick blade, wide-handled 'shortie', but soon graduated to the smallest silver knife shown above. The 'pen-knife thin-blade'
The kerf of the blade ended up being VERY important. Sawing through the many cellulose layers of this vegetable is not possible. You have to fine-cut each layer separately with a sharp blade, and with laser-like precision. The thin blade on 'old silver' there was just the ticket.
NOTE: Keeping the knife razor sharp is very important. Hence, the sharpening rod. (Quality German steel)
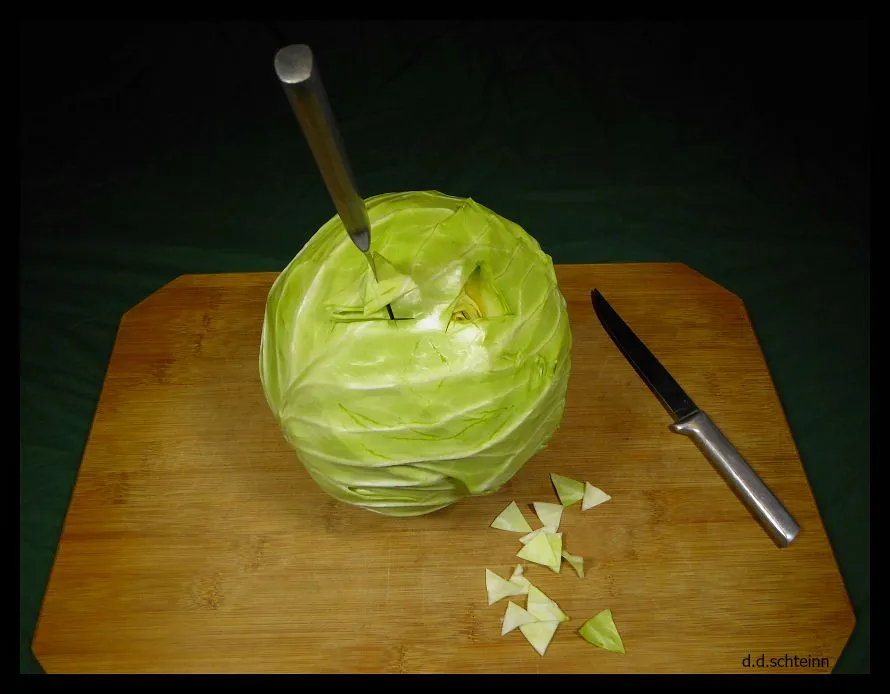
Let's Get This Started
A Nice, Standard Green Cabbage "Blank"
The head above was quite supple, solid, and just begging to become a nice table centerpiece.
The Final Design ~ Mapped Out On The Surface
Plan Your Work, Work Your Plan
I stenciled my final design specs onto the cabbage with a No. 2 pencil. I decided against a Sharpie type marker, as the ink would probably soak into the outer layers, and make large, black blotches on the final art piece. Plus, I want to eat Nilson, when I'm all done. I don't think black Sharpie residue is all that good for you.
The First Cut Is The Scariest ~ And The Hardest
Look- It Comes Out In Perfect Little Triangles
Though quite nervous in the beginning, particularly with that first cut, I was quite impressed with the eventual action of this procedure. It was much easier than I expected. As one cuts down into the layers, they lift right out like little triangles of paper, one after the other. This part was quite easy, once I got the hang of it.
Authors Note: There is great potential here for development of a new tool for this art work. I'd call it the Multi-Layer Cabbage-Lifting Fork. I envision a skinny, straight-tined fork, with little 90° bends at the end. Perfect for lifting the individual layers out of the cabbage like a miniature Otis elevator. This would be ideal for anyone searching for an investment opportunity, or better yet, a Crowd Sourcing project.
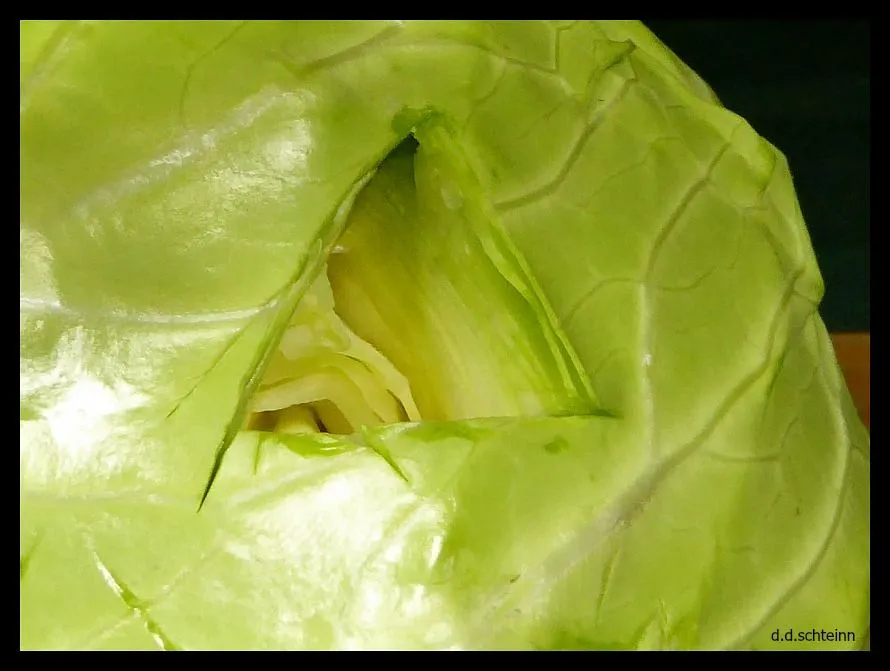
The Dainty Eye Cut ~ "Easy Does It"
You can plainly see the multiple layers of the cabbage 'innards', as you cut down through towards the center. It is really important to keep the knife vertical as you slice down through the layers. It is also very easy to over-cut the corners, which ruins the fine design you have planned out on the surface. One of these cutting faux pas' can be seen in the lower left corner of Nilson's eye.
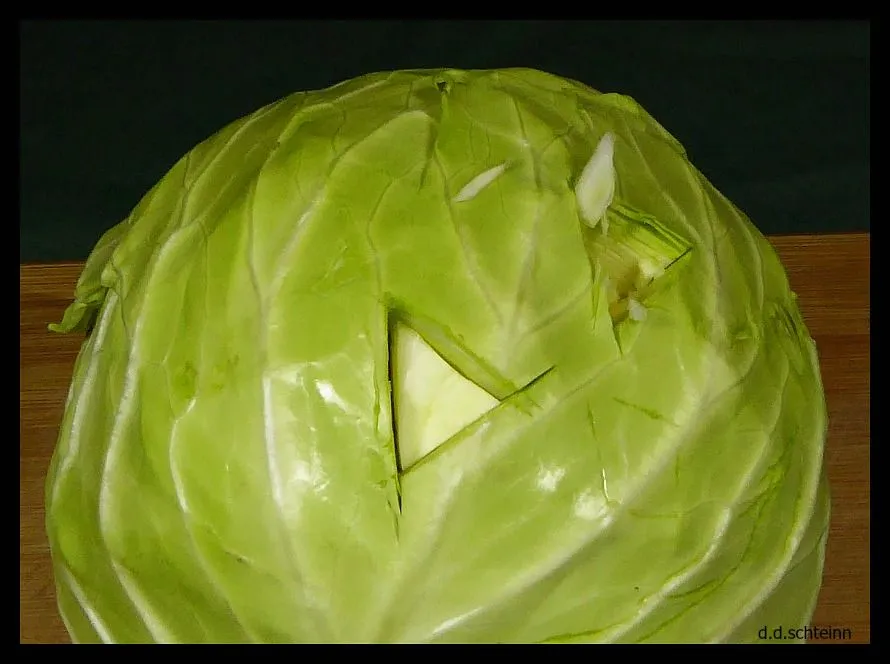
More Perfect Cabbage Layering
The nice, well-cut surface of each layer is seen in the left eye in the photo above. These lift right out as you go down. Who knew it would be this easy. NOTE: You can still make out the planning outline of the nose and mouth in this view. They are still quite visible, even though we've been messing around with the cabbage for quite a while now.
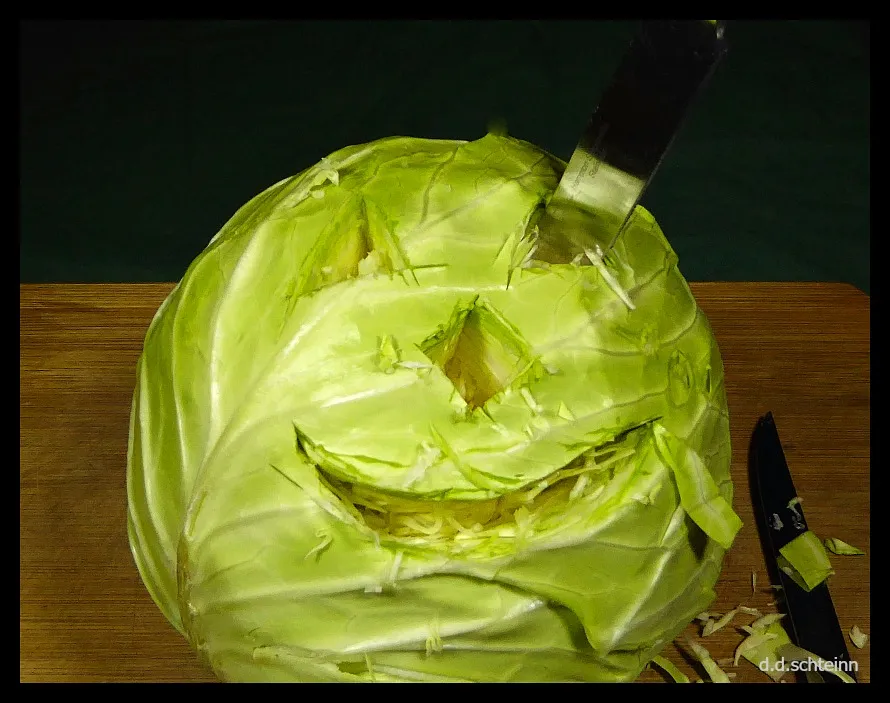
Good Golly ~ The Deeper You Go, The Messier It Gets
I soon cut the nose and mouth, and discovered a few new things about this process. As you go deeper and deeper into the cabbage, the cutting gets harder and harder. Staying 'in line' with the original design gets more and more difficult, as you have to cut each new layer as you proceed down through the globe. Not impossible by any means, but it's easy to over-cut the design.
Unfortunately, Nilson is starting to look more like a funky Freddy-Kruger chop-'em-up character in a bad B-movie, than a fun, "invite the guests in for brunch", cartoon Jack O' Lantern character of a centerpiece. Particularly with the knife jabbed into his right eye-socket like some sort of cruciferous zombie. I guess this part IS temporary. How does that chef's kitchen saying go?..."Thank goodness no-one's in the kitchen, when the prep goes down".
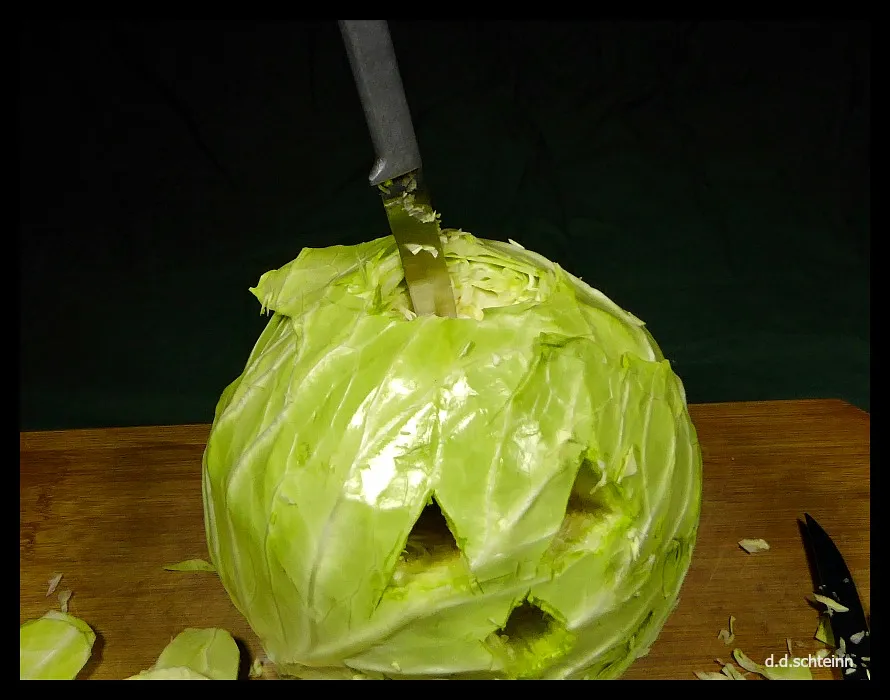
Ooh, That's Gotta Hurt!!
Gutting the center of the cabbage was quite stressful. I had no idea if Nilson would fall to pieces once I started the cranial boring part, or if he would even stay more of less 'in the round'. Surprisingly, the layers all held fast, once I started the top-down mining process.
The hardest part in this step is staying perfectly vertical with your slices, as well as efficiently scooping out the cut pieces in the center of the ball. It is not possible to FULLY hollow out the cabbage, like a pumpkin, as it would no-doubt collapse in upon itself. Not UN-like when the old 49'ers hit a horizontal shale deposit in a coal mine, almost guaranteeing a major cave-in disaster. There's no way to shore up the inside of a cabbage as you go, so less hollowing of the sphere is the only answer to this pesky conundrum.
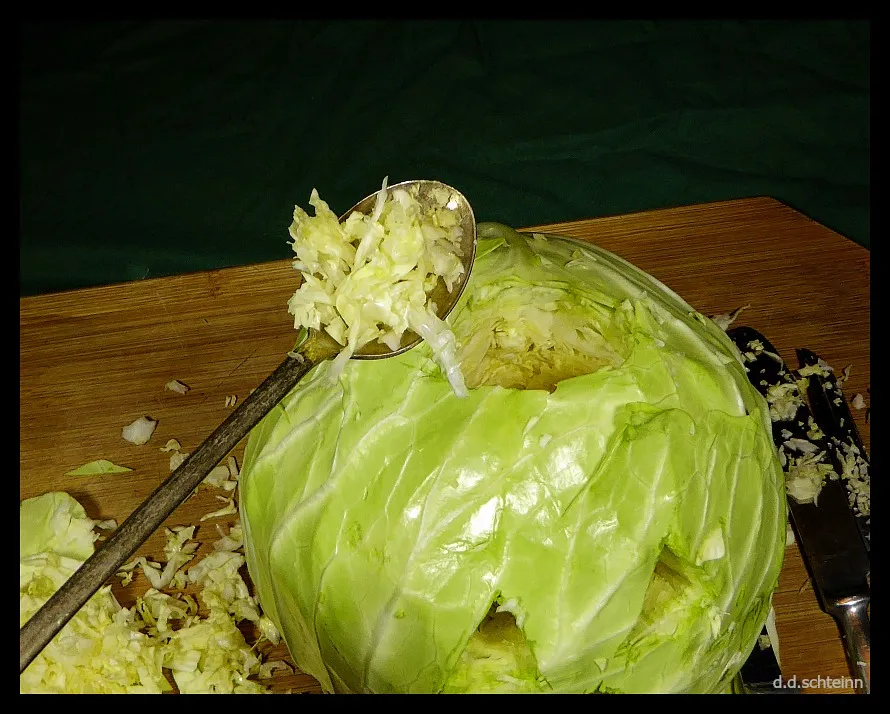
Spooning Out The Green-Matter
If At First You Don't Succeed ~ Get A Longer Spoon
As the excavation continued and went deeper and deeper into the cabbage, it became harder and harder to get the cut pieces out. I even tried holding the cabbage ball upside down, and shaking it 'til the cows came home. All to no avail.
Using a knife to retract the 'bits' only cut deeper into areas where it was not intended, and I almost compromised my truly fine pumpkin-face design doing this activity.
The answer? A long handled iced-tea spoon. The scoop end is small enough to get inside the ball, yet large enough to efficiently scoop out the innards. The round-nosed handle also works well as an eyeball/nose/mouth cleaning device, to poke the cut layers back through towards the center of the cabbage for efficient scoop-age.
A Bit Of Organized Mayhem
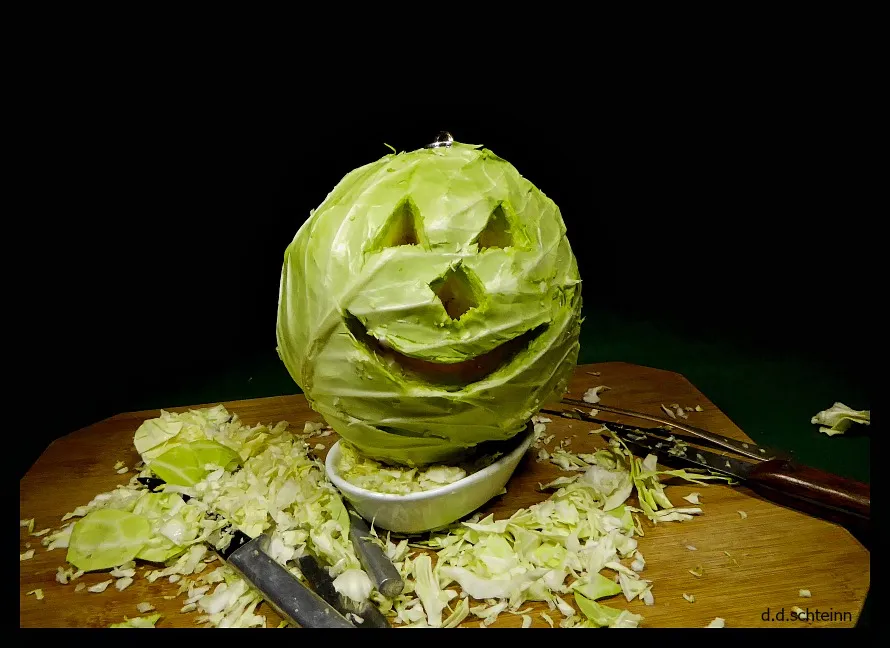
Our kitchen DIY project is almost complete. All the cabbage frass I pulled out is still useful as a vegetable addition for a stir fry, soup, or anything else a cabbage might be good for. We just need to round up the innards, clean off the board, and we're all set for the next step. Oh, and find something that will work as a top or lid.
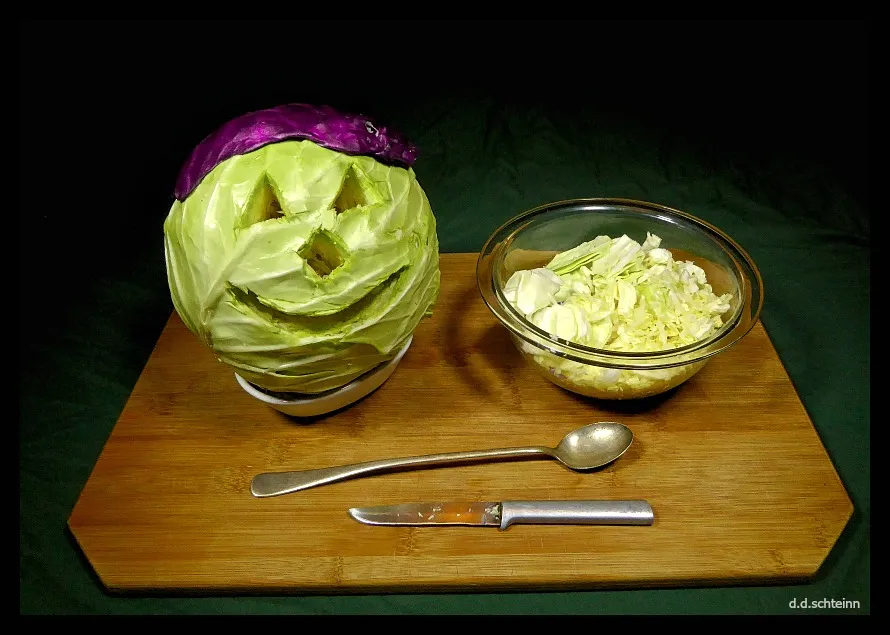
Much Better
The area is cleaned up, the cabbage pieces corralled and put into a bowl for the kitchen, and we're ready to light up our new, ultra-fine centerpiece. And just what IS that incredibly stylish topper on our new centerpiece?
If The Shoe Don't Fit, Get Another Shoe. If There IS No Shoe, Find Something Else
One of the problems with this whole Cabbaa'ge O' Lantern project is that there is not really a lid for our little friend, once we're finished. Let's face it, a regular pumpkin does not sport this problem. As soon as you cut the top off a pumpkin in the first steps, you have your final lid.
But by the very physiologic nature of a cabbage, there IS no lid for our final centerpiece. All you have is many many small shards of leftover cabbage, in a very large, UN-consolidated pile. What to do? I was stymied at first.
A really great solution to this problem surfaced as I was digging around in the refrigerator for a writing snack. Rummaging about in my vegetable bags, the idea soon hit me like a myopic seagull flying through a storm drainage pipe. Purple cabbage. The leaves are large, and curved, since they ARE on a cabbage, which makes the outer layer leaf perfect as a lid.
Not only is the leaf the right shape to fit on our spheroidal centerpiece, but it is a nifty and different color as well. Bright purple. Once I slapped it on as a lid, it reminded me of a stylish toup on our good friend Nilson. (Yes, I know on a human being the word is Toupee. But on a highfalutin, carved up vegetable, the 'ay ' is silent. It's a vegetable-garnish-design thing. You can read all about it under Stylish Garden-Green Canapés in The Joyé Of Cooking)

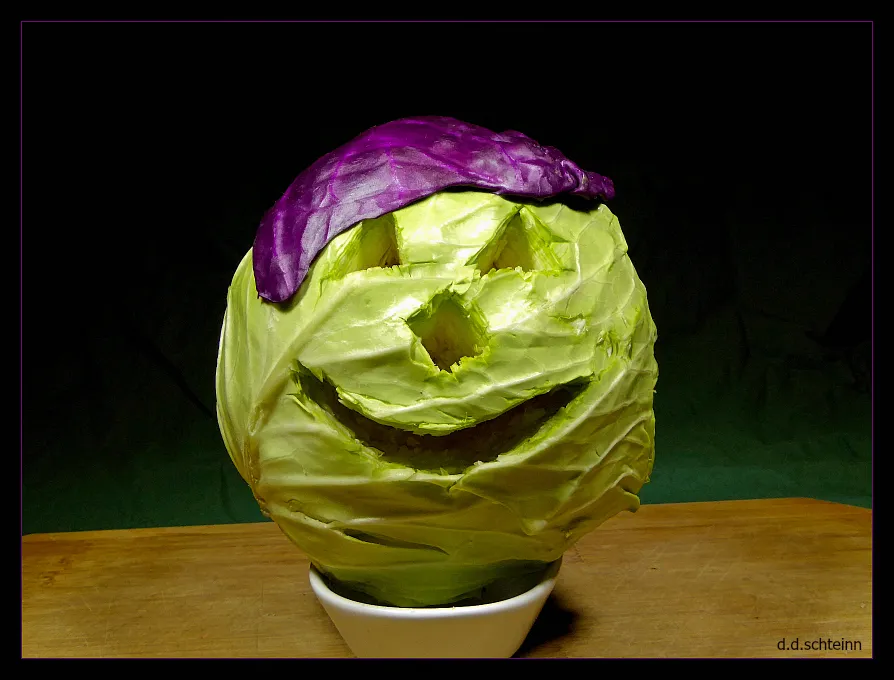
Nilson Finally Gets Lit
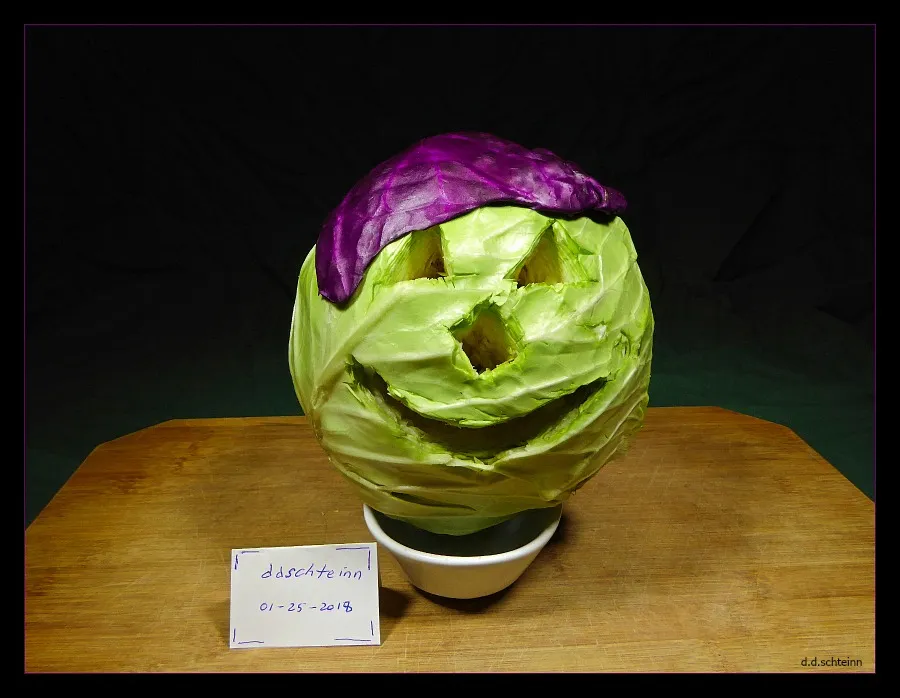
Proof Of Ownership ~ Nilson The Cabbaa'ge O' Lantern ~ Waiting For The Dinner Guests To Arrive
~ Finto ~
Poste Script: I realize this is not quite what folks had in mind for this challenge. But I got really excited when I found out this is a challenge I could actually perform. And though I realize this whole thing is not supposed to be about table centerpieces, I think it is still OK, as all table place-settings need a nice centerpiece in the middle to 'set things off ' just right. So, that is my final thought about this.
Also, I hear people talking about a Michelin Series Star Rating of 3.0... as being the best rating for a restaurant or other eating establishment. Just think of this post as more of a Dunlop 1.2 rating.

Poste Script 2.0: This craft project was designed, pre-tested and approved by the head cooks within the Home Economics Department of the Schteinn School of the Sophisticated Sciences
Thanks for stopping in and viewing the intricate process of carving a nice cabbage centerpiece. If you have any thoughts about carving procedures, Crusiferid's as a table decoration, purple toup's on a vegetable, better ways to light up a cabbage, or anything else this post reminds you of, please feel free to comment away in the spaces below. I'd love to hear from you.
Please UPVOTE, COMMENT and FOLLOW if you enjoy my works.
And go to @ddschteinn -- There's a whole lot more...
Posted: 01/26/2018 @ 01:49

Excerpts From Late-Night Conversations With A Mechanical Cat
Fact Number 27