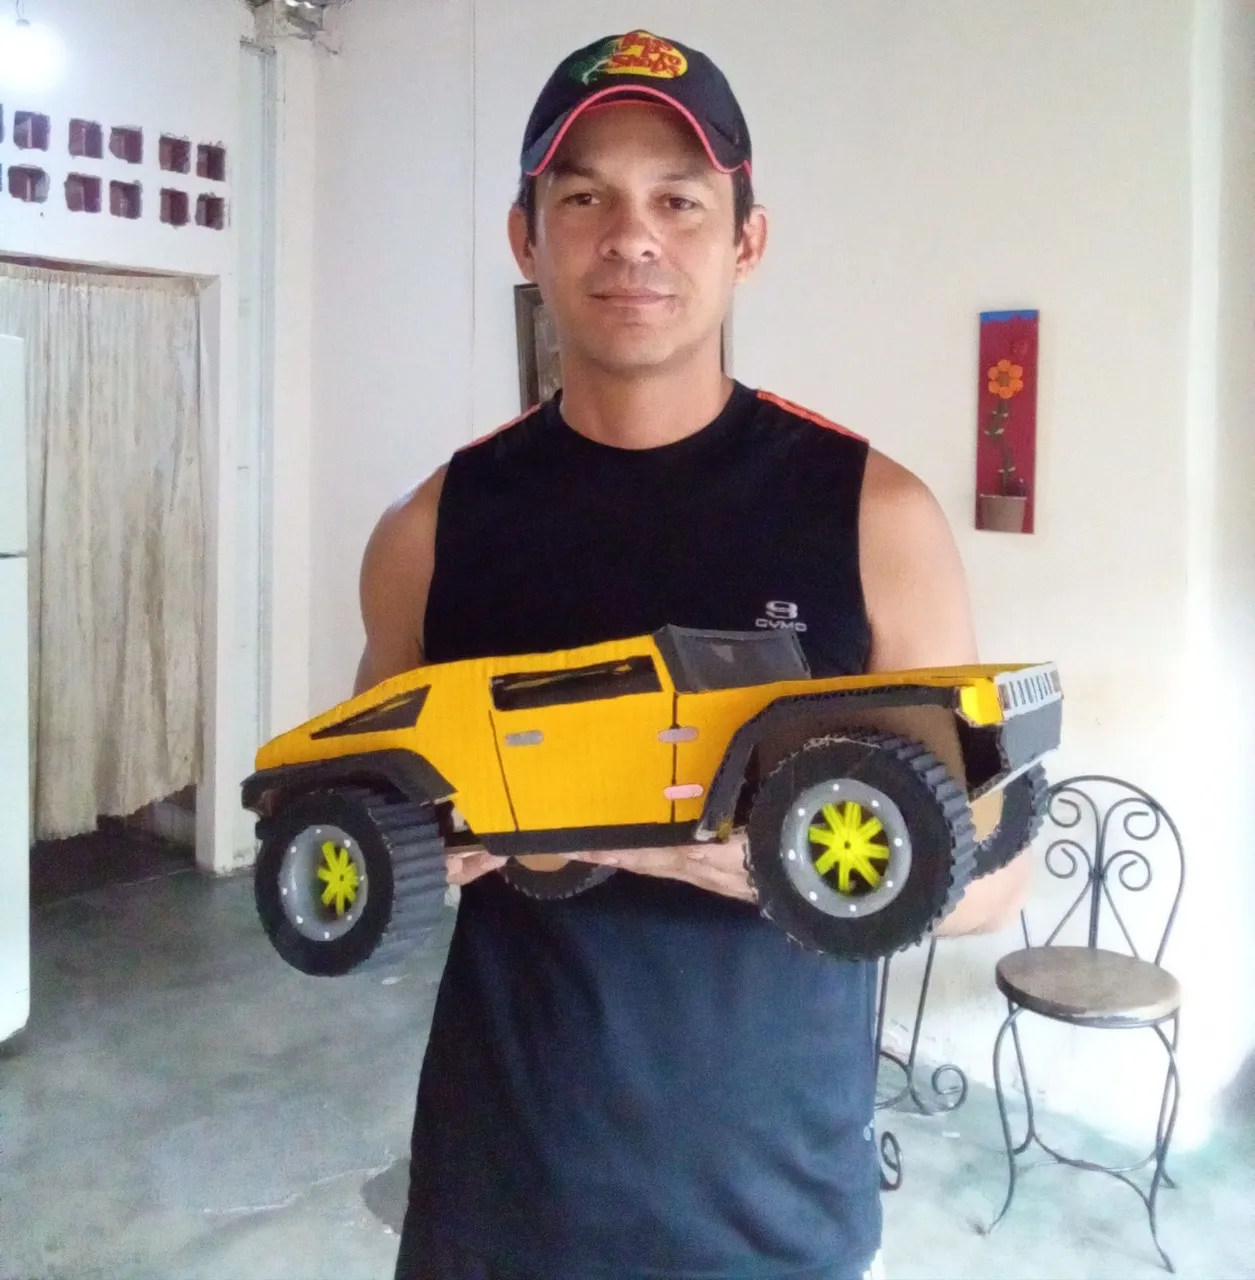
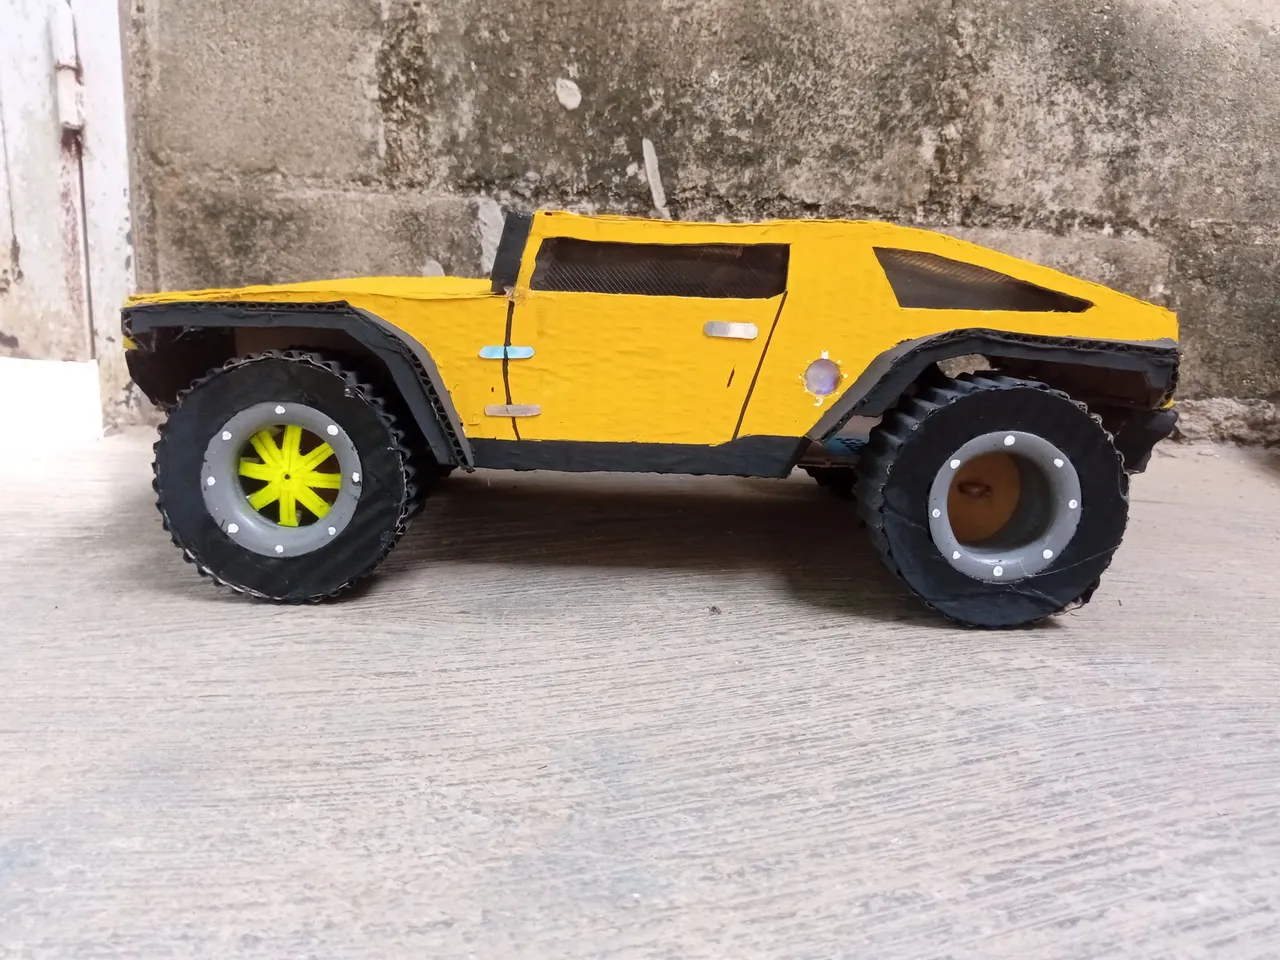
Hummer H4 made with reusable cardboard
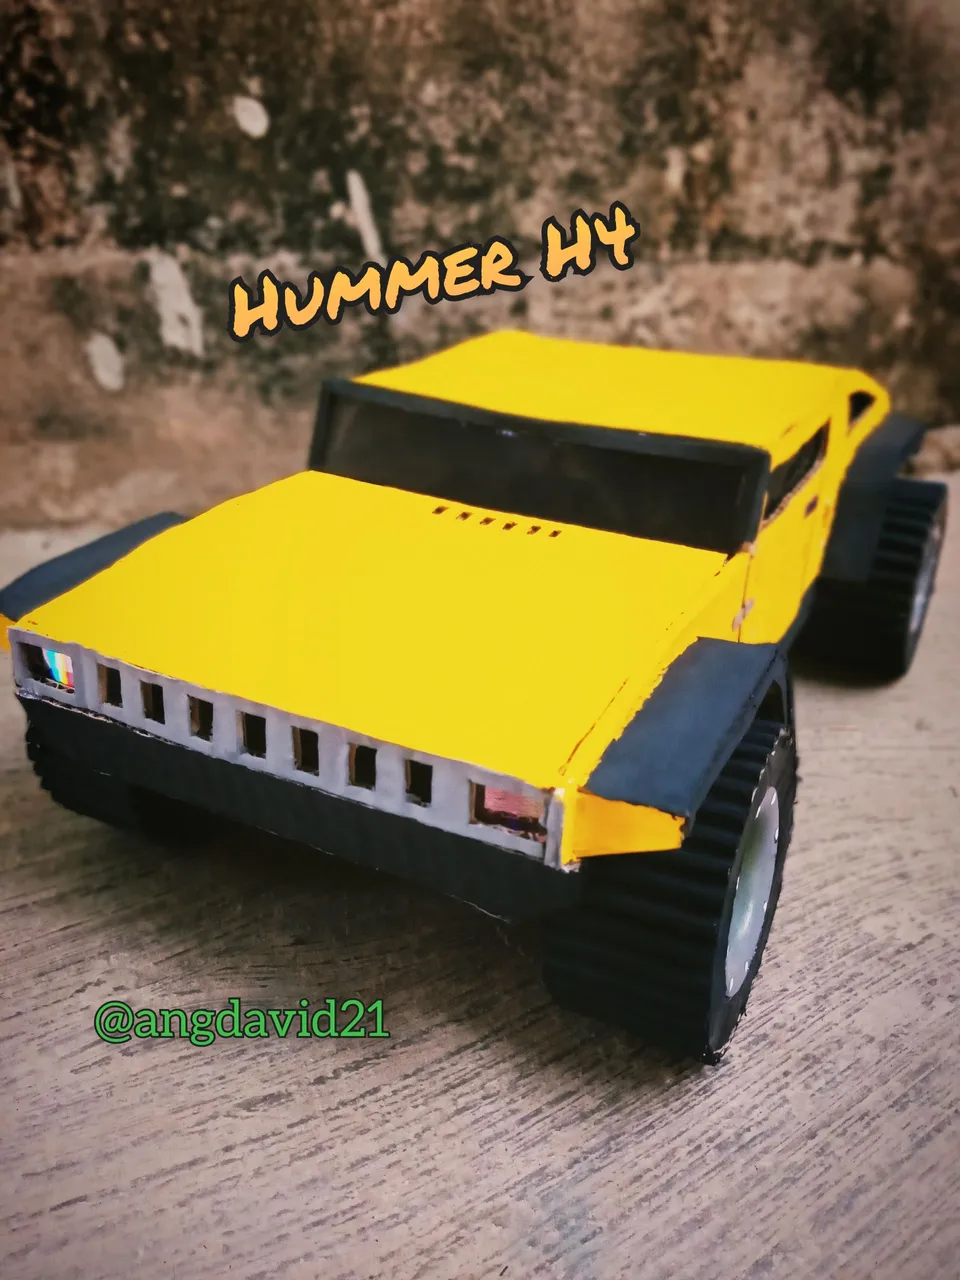
Hello, how are you, my #diy friends, nice to greet you again, I had been away for a few days because I had a bit of work, but here I am again to bring you the works or crafts that I like to do, it is a wonderful modesty car apart 😁😄, but I really liked this work that I did and today I want to share it with you I hope you like this tutorial post, and are encouraged to build a cart of these, to Then I show you the step by step.
Hola que tal mis amigos de #diy un gusto de nuevo en saludarles, tenía algunos días ausente se debe a que eh tenído un poco de trabajo, pero aquí estoy de nuevo para traerles las obras o manualidades que me gusta realizar, se trata de un maravilloso carro modestia aparte😁😄, pero si me gustó mucho este trabajo que hice y hoy quiero compartirlo con uds espero les guste este post tutorial, y se animen a contruir un carrito de estos, a continuación les muestro el paso a paso.

| Cardboard scraps |
| scalpel |
| rule |
| Cold painting |
| Silicon in bar |
| Brushes |
| Paper Adhesive Tape |
| 2 inch PVC pipe |
| Trozos de cartón |
| Bisturí |
| Regla |
| Pintura al frío |
| Silicon en barra |
| Pinceles |
| Cinta adhesiva de papel |
| Tubo de PVC de 2 pulgadas |
For this step the first thing we will do is design or draw our first parts on a sheet of paper and then I stick it to the cardboard, this method is easier for me since the cuts can come out more accurate, of course the pulse plays an important role 😄. The measurements for these pieces are: the sides of the car are 46 CM long and 12 CM high. In width it will measure 19 CM. These will be the first measurements of our pieces.
Para este paso lo primero que haremos es diseñar o dibujar nuestras primeras partes en una hoja de papel y luego la pego al cartón, este método se me hace más fácil ya que los cortes pueden salir más precisos, claro el pulso juega un papel importante 😄. La medidas para estas piezas son: los laterales del carro 46 CM de largo y de alto 12 CM. De ancho medirá 19 CM. Estás serán las primeras medidas de nuestras piezas.
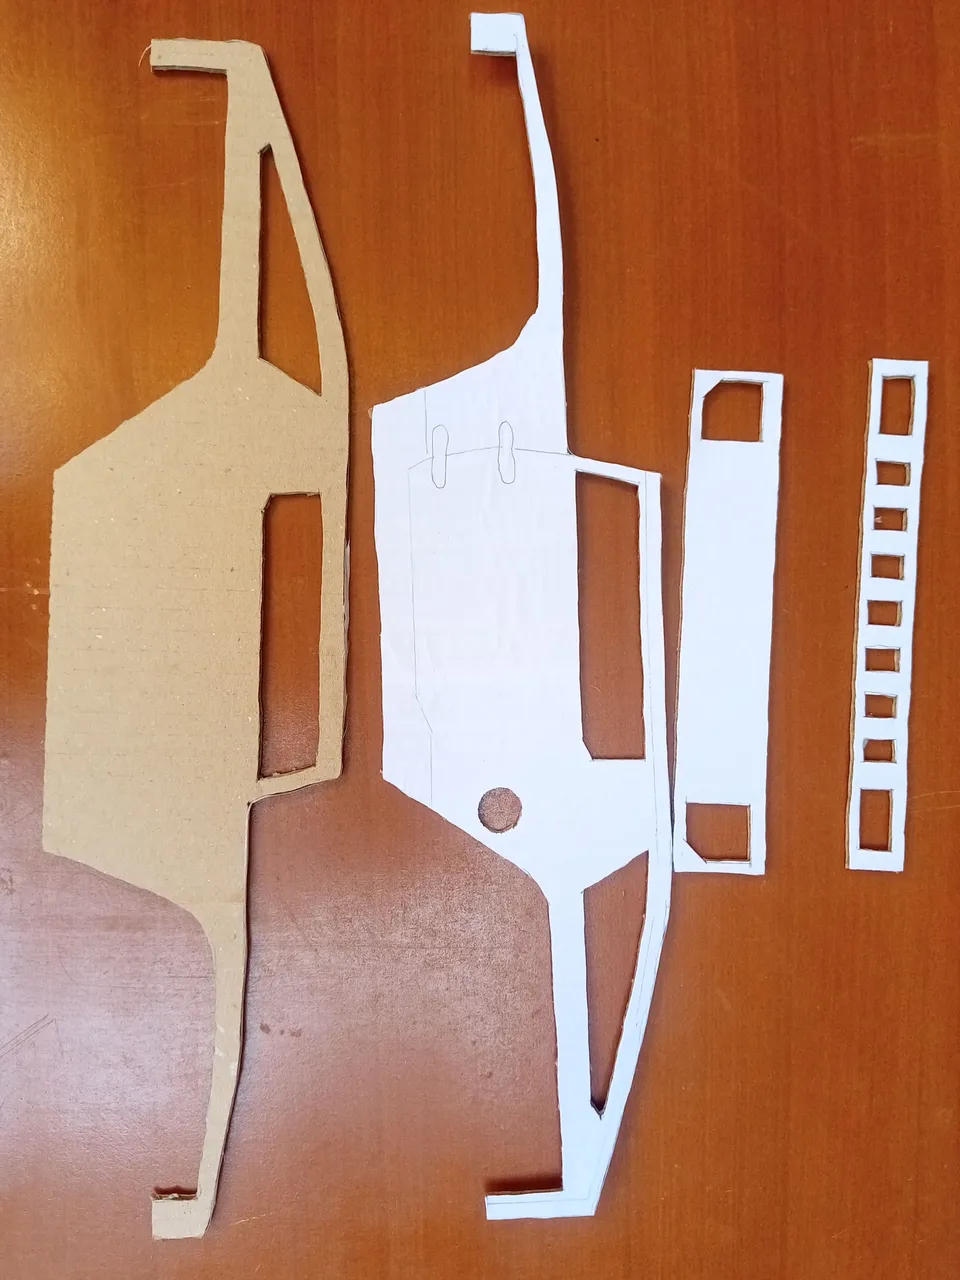
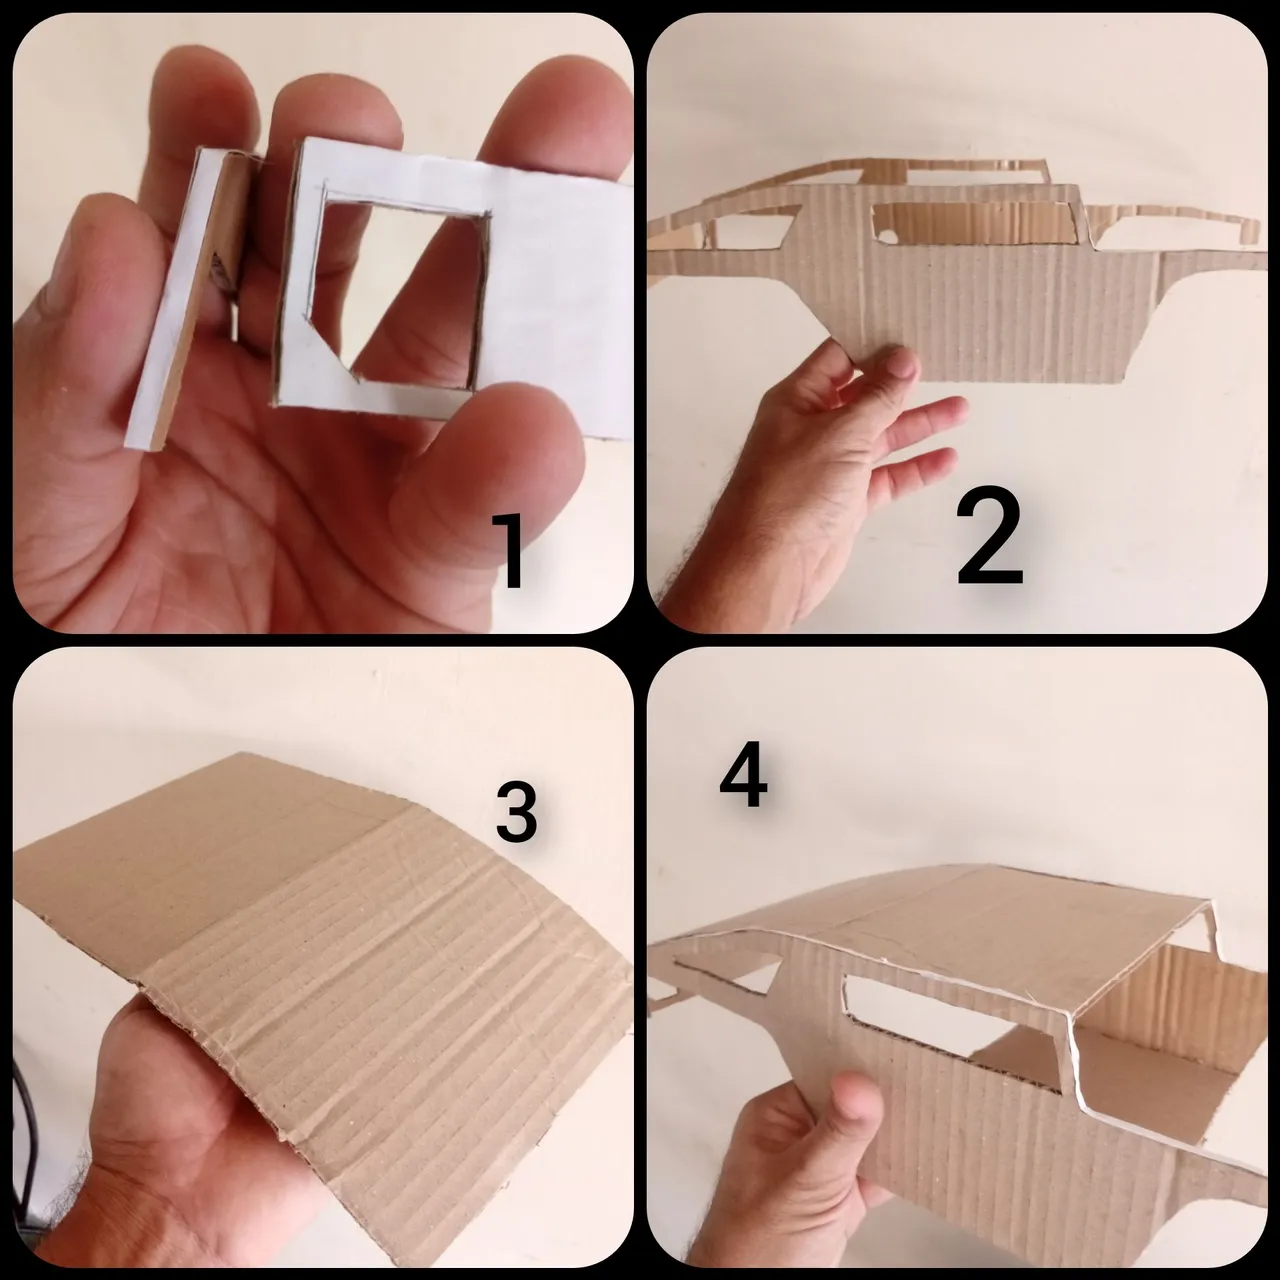
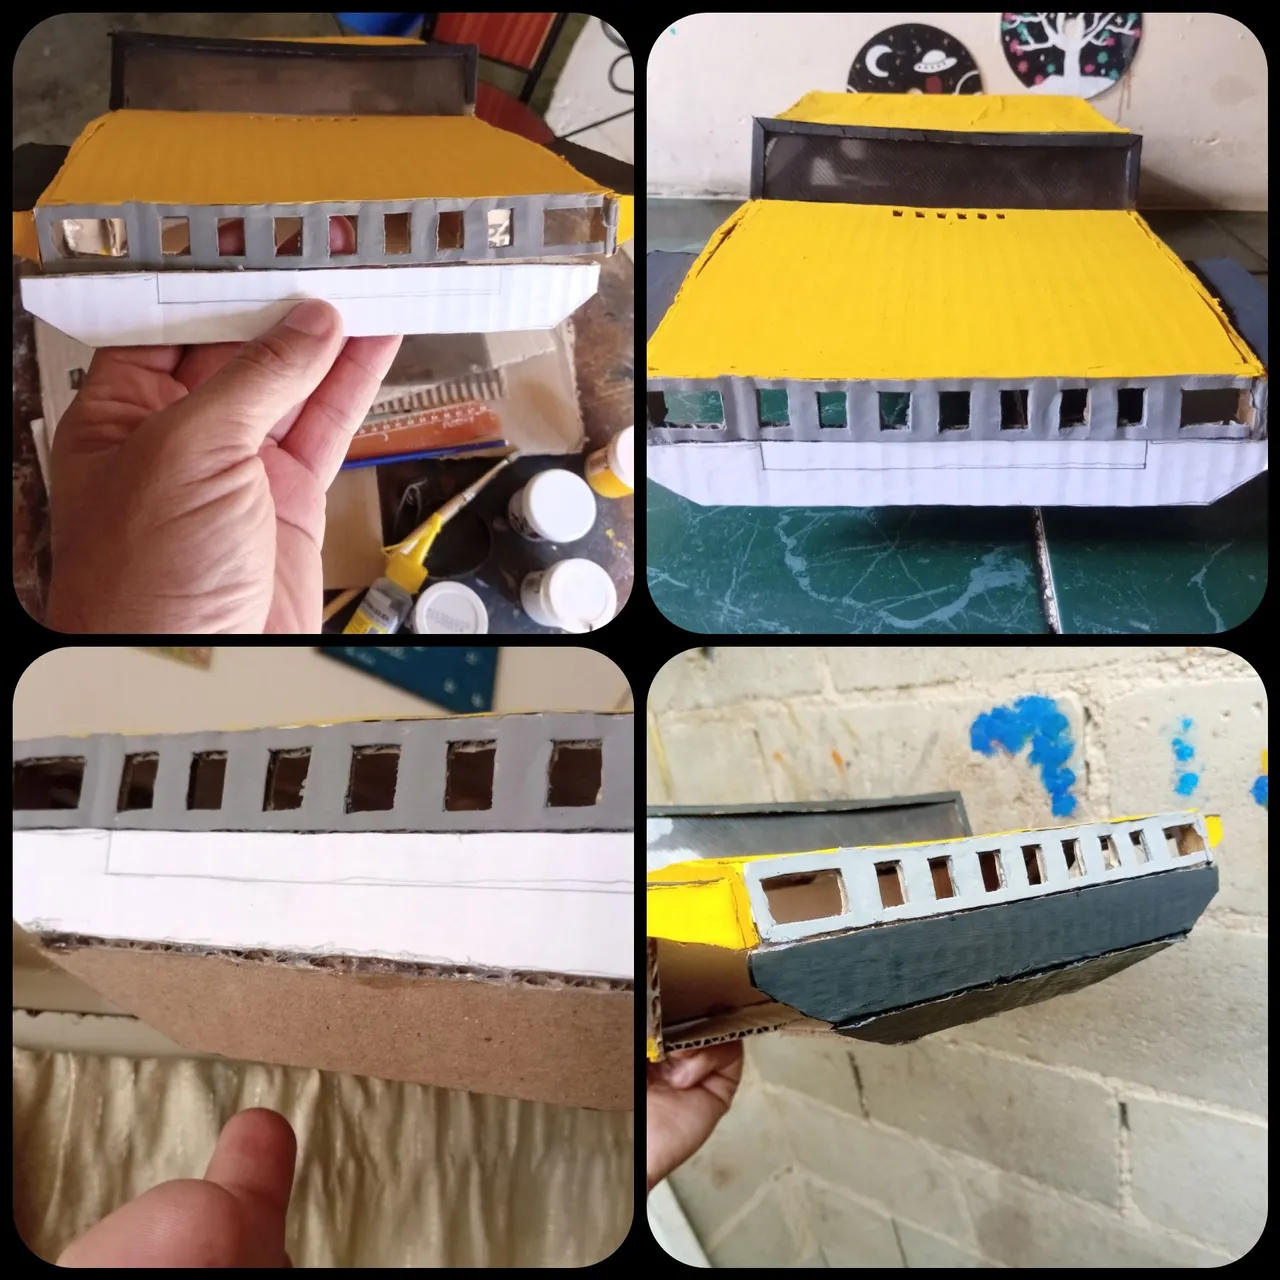
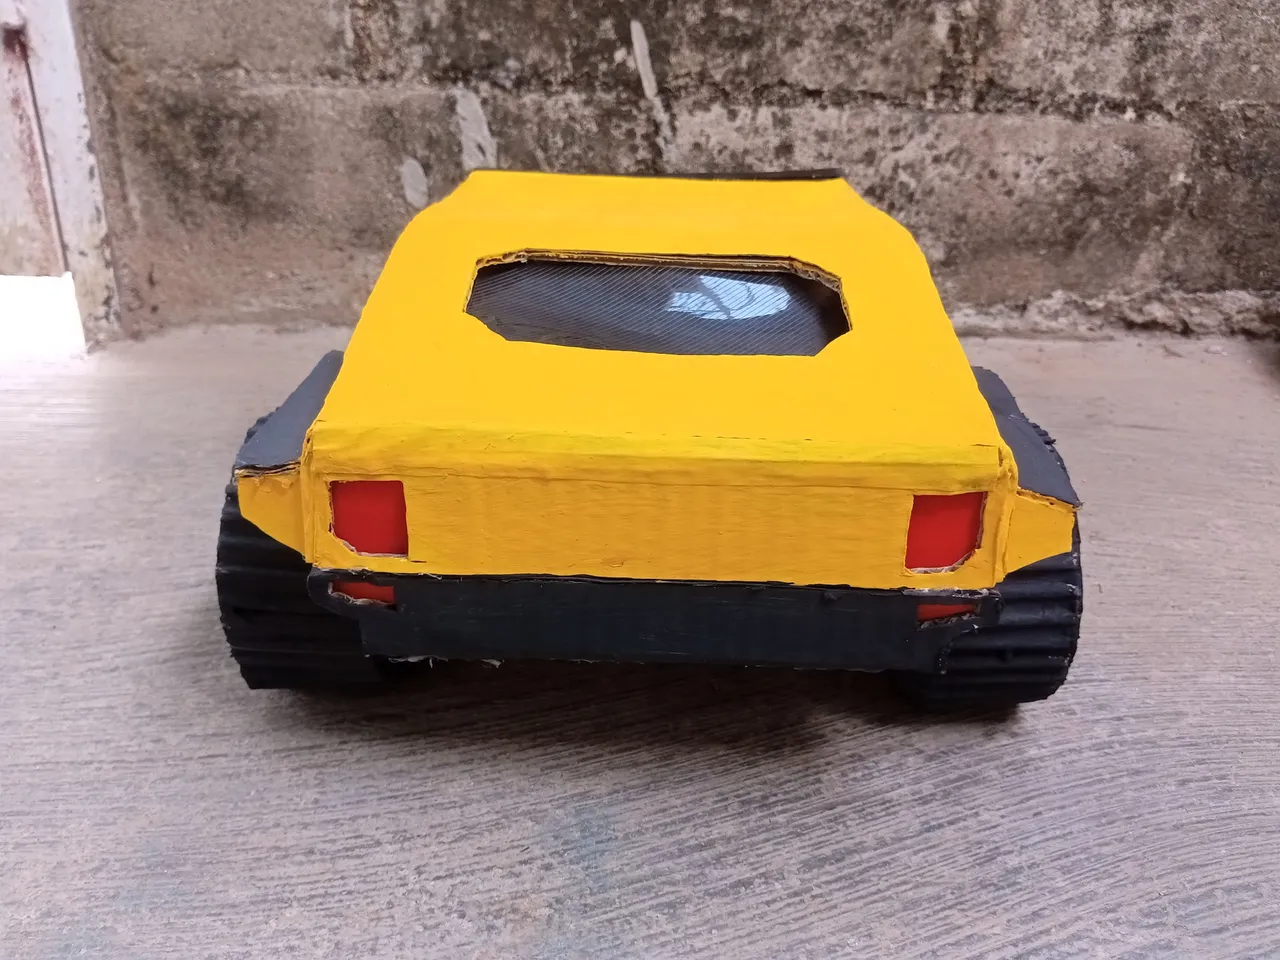
In this next step we will paste the first parts, in this case they would be the sides and the front, rear and roof, the roof will measure 16 CM wide by 28 long, in In my case, I would say that they are the most important parts, since from here we start to get the other measures and the "perfection" so to speak of our car.
En este siguiente paso pegaremos las primeras partes, en este caso serían las laterales y las parte delantera, trasera y techo, el techo tendrá una medida de 16 CM de ancho por 28 de largo, en mi caso diría que son las partes más importantes, ya que de aquí partimos para sacar las demás medidas y la "perfección" por decirlo así de nuestro carro.
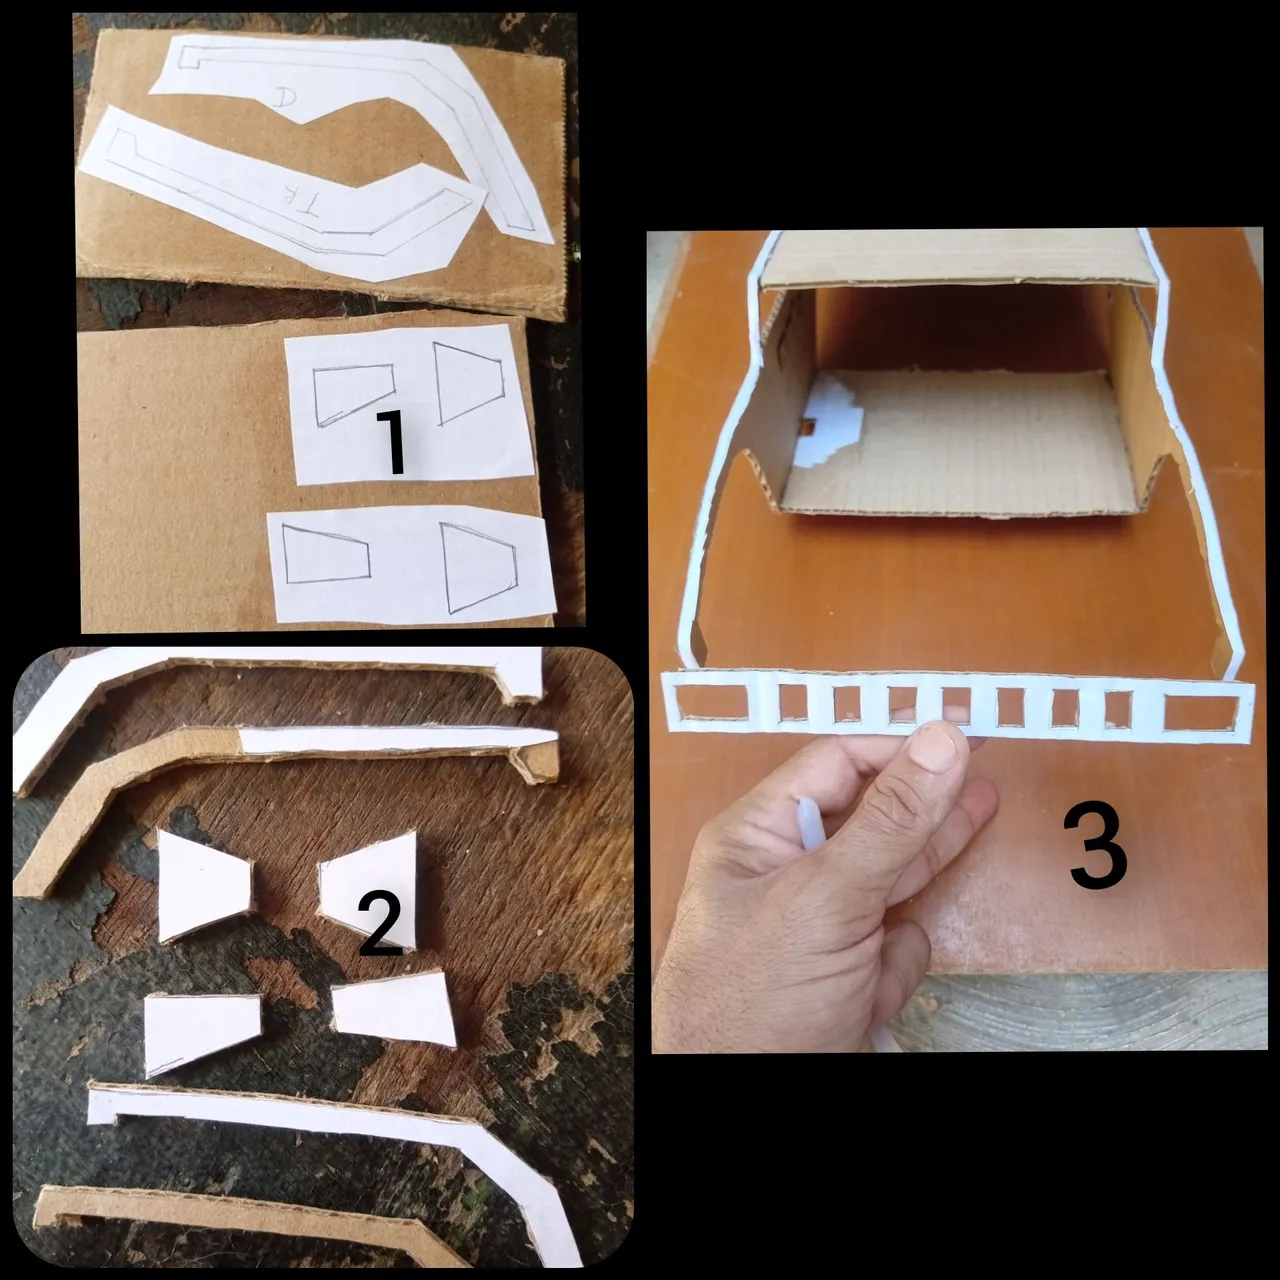
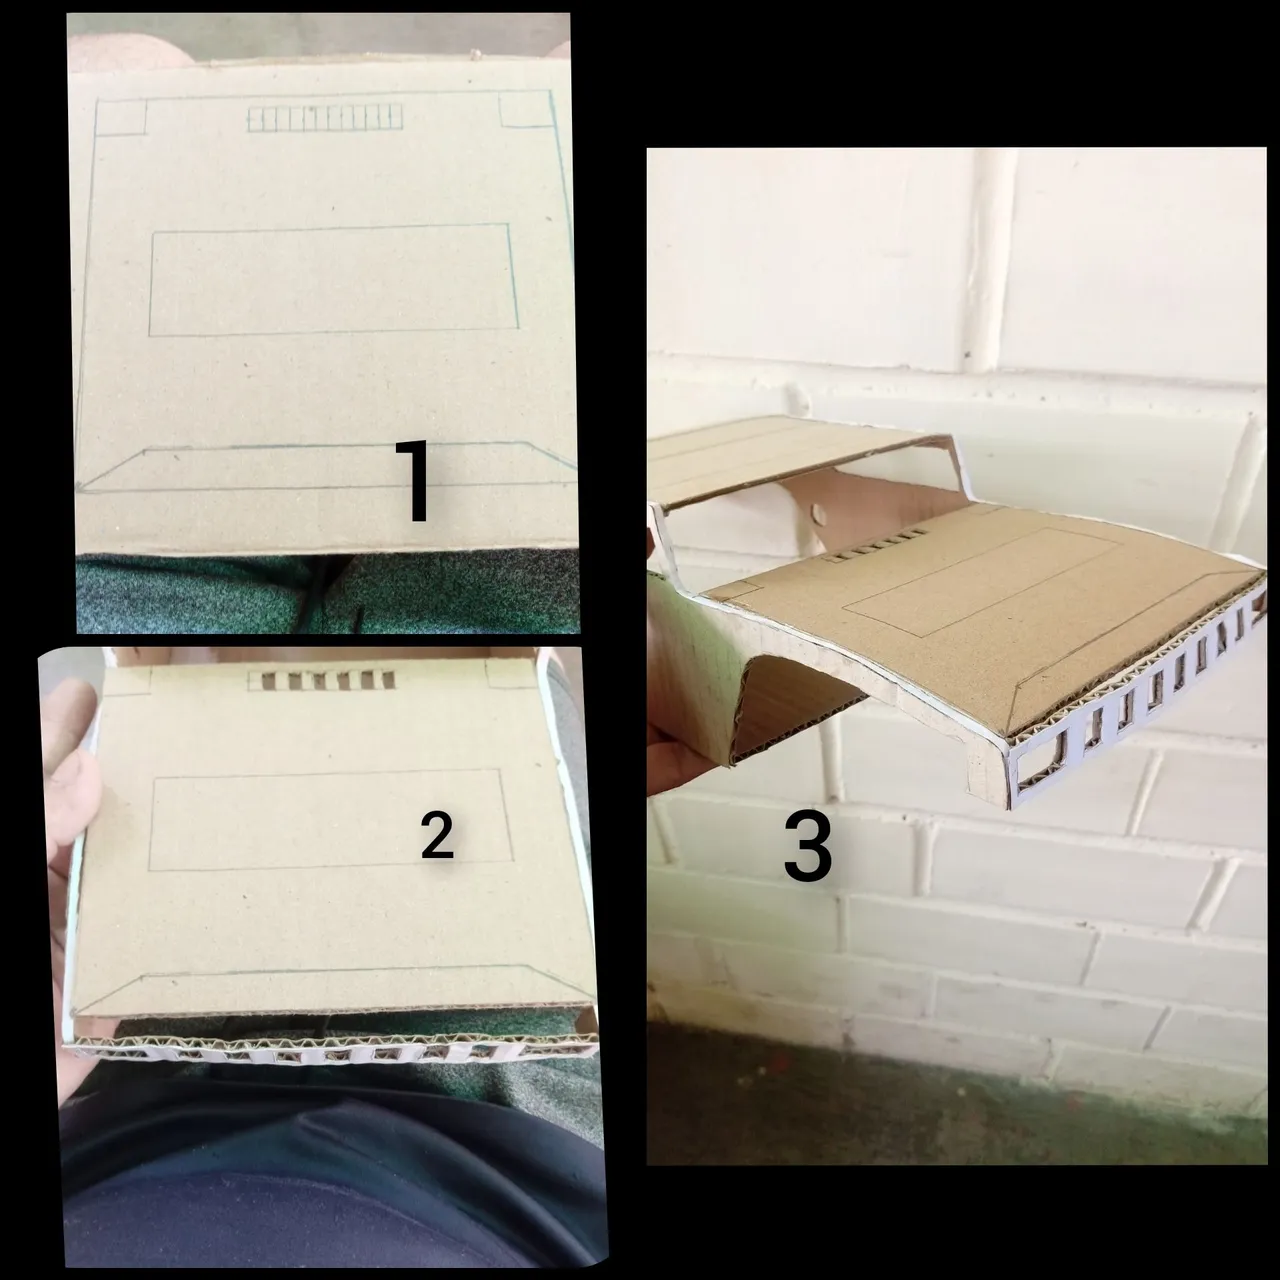
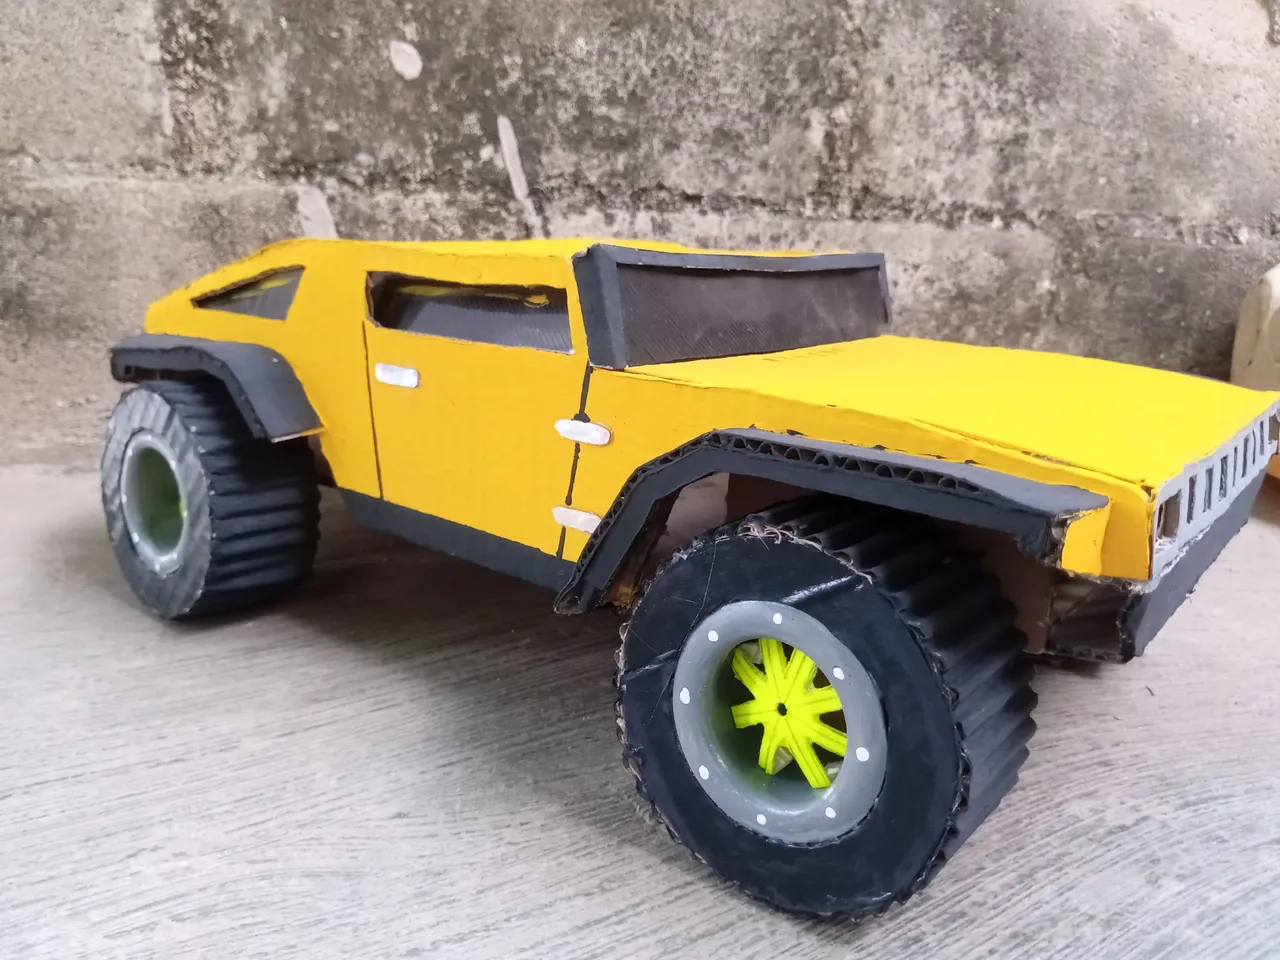
It's time to make the fenders, they will go in parts, first we draw what will be the lateral part and then place a piece of cardboard to measure that will go on top.
Llegó la hora de realizar los guarda fangos, estos irán por partes, primero dibujamos los que será la parte lateral para luego colocar un trozo de cartón a la medida que irá en la parte superior.
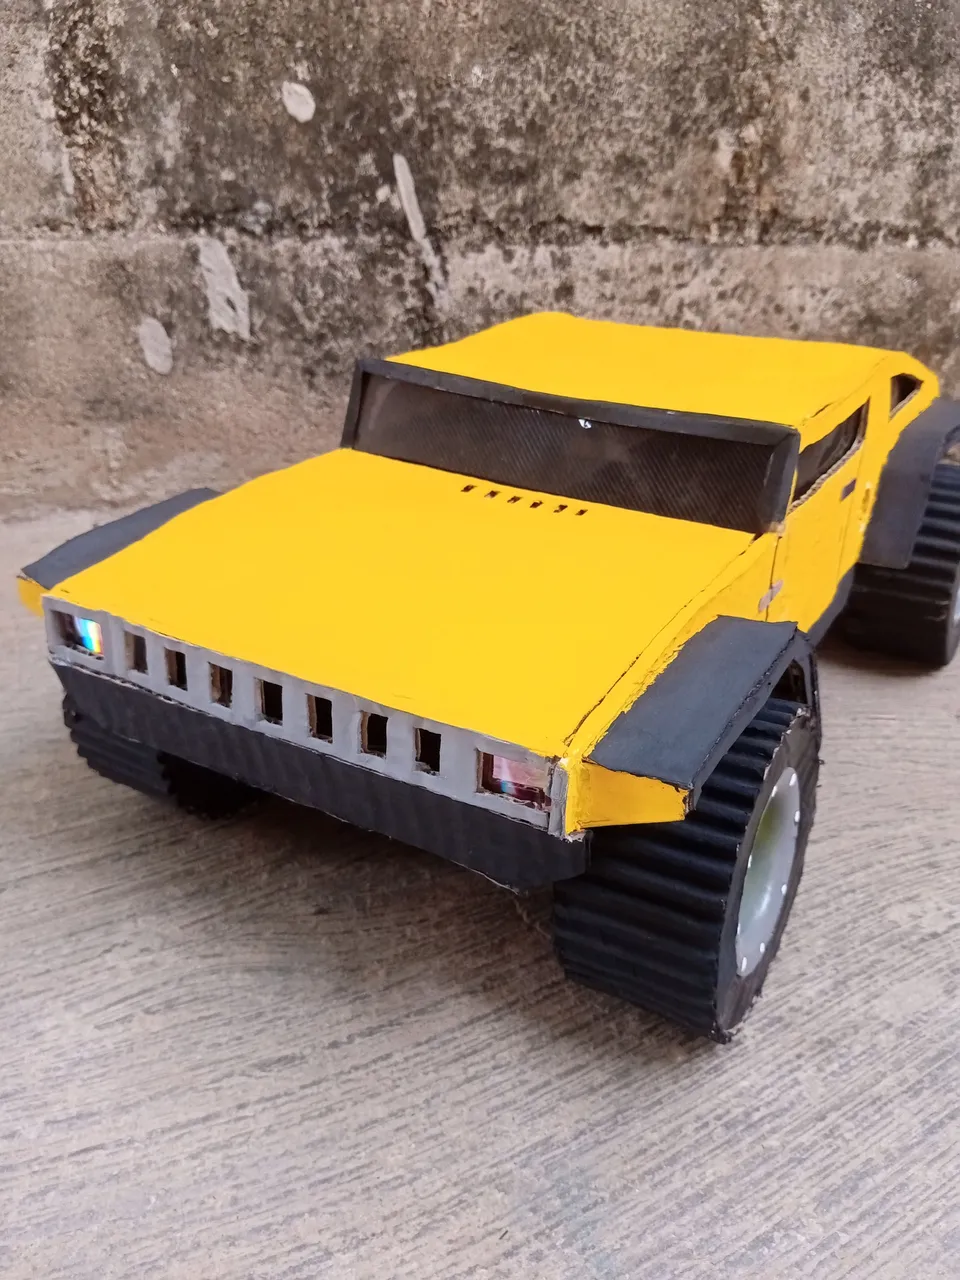
Little by little our car is taking shape, so it's not time to make the hood, it will measure 16 CM wide by 15 CM long. As they are assembling, they will notice some difference in measurements, more than everything in the roof and hood, but don't worry, that is the structure of the car, in the upper part it is slightly smaller than its normal width.
Poco a poco nuestro carro está tomando forma, así que no toca realizar el capo, este tendrá unas medidas de 16 CM de ancho por 15 CM de largo. A medida que van armando notarán alguna diferencia de medidas más que todo en el techo y capo, pero tranquilos así es la estructura del carro, en la parte superior va ligeramente más pequeño que su ancho normal.
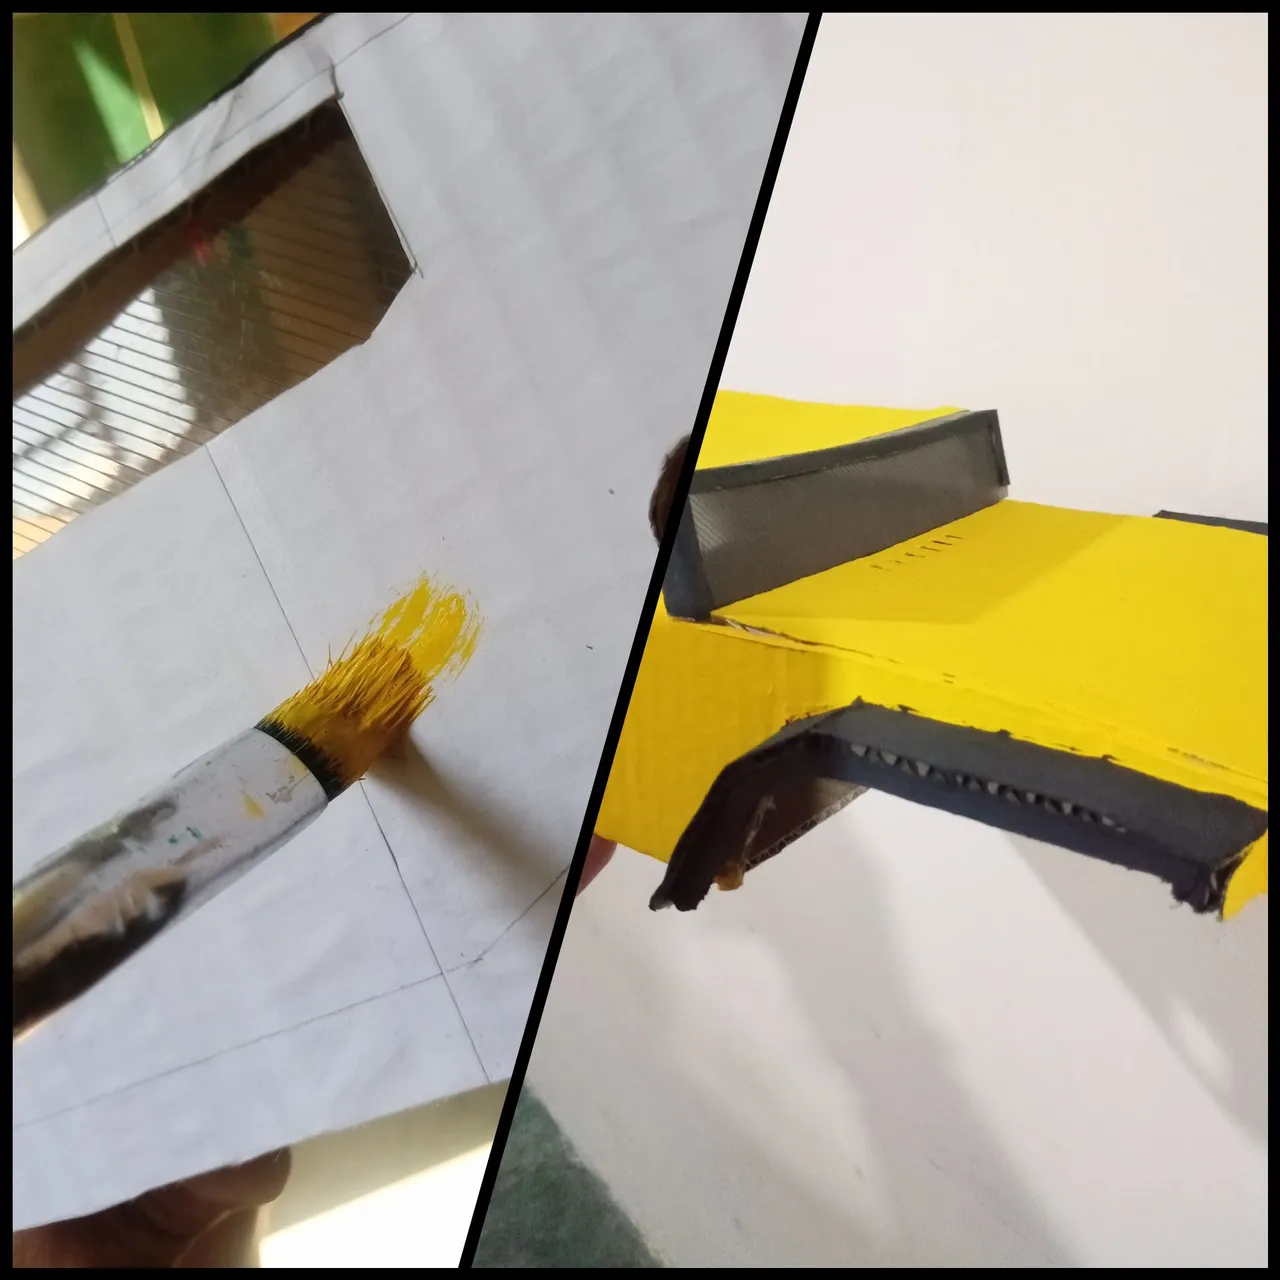
Since our car already looks like a car 😁 it's time to start giving them a few coats of paint, in my case I used yellow, black and some gray details this car took 5 coats of paint since cardboard absorbs a lot of paint.
Ya que nuestro carro ya parece un carro 😁 es hora de comenzar a darles unas capas de pintura, en mi caso use amarillo, negro y algunos detalles en gris este carro se llevó 5 manos de pintura ya que el cartón absorbe mucha pintura.
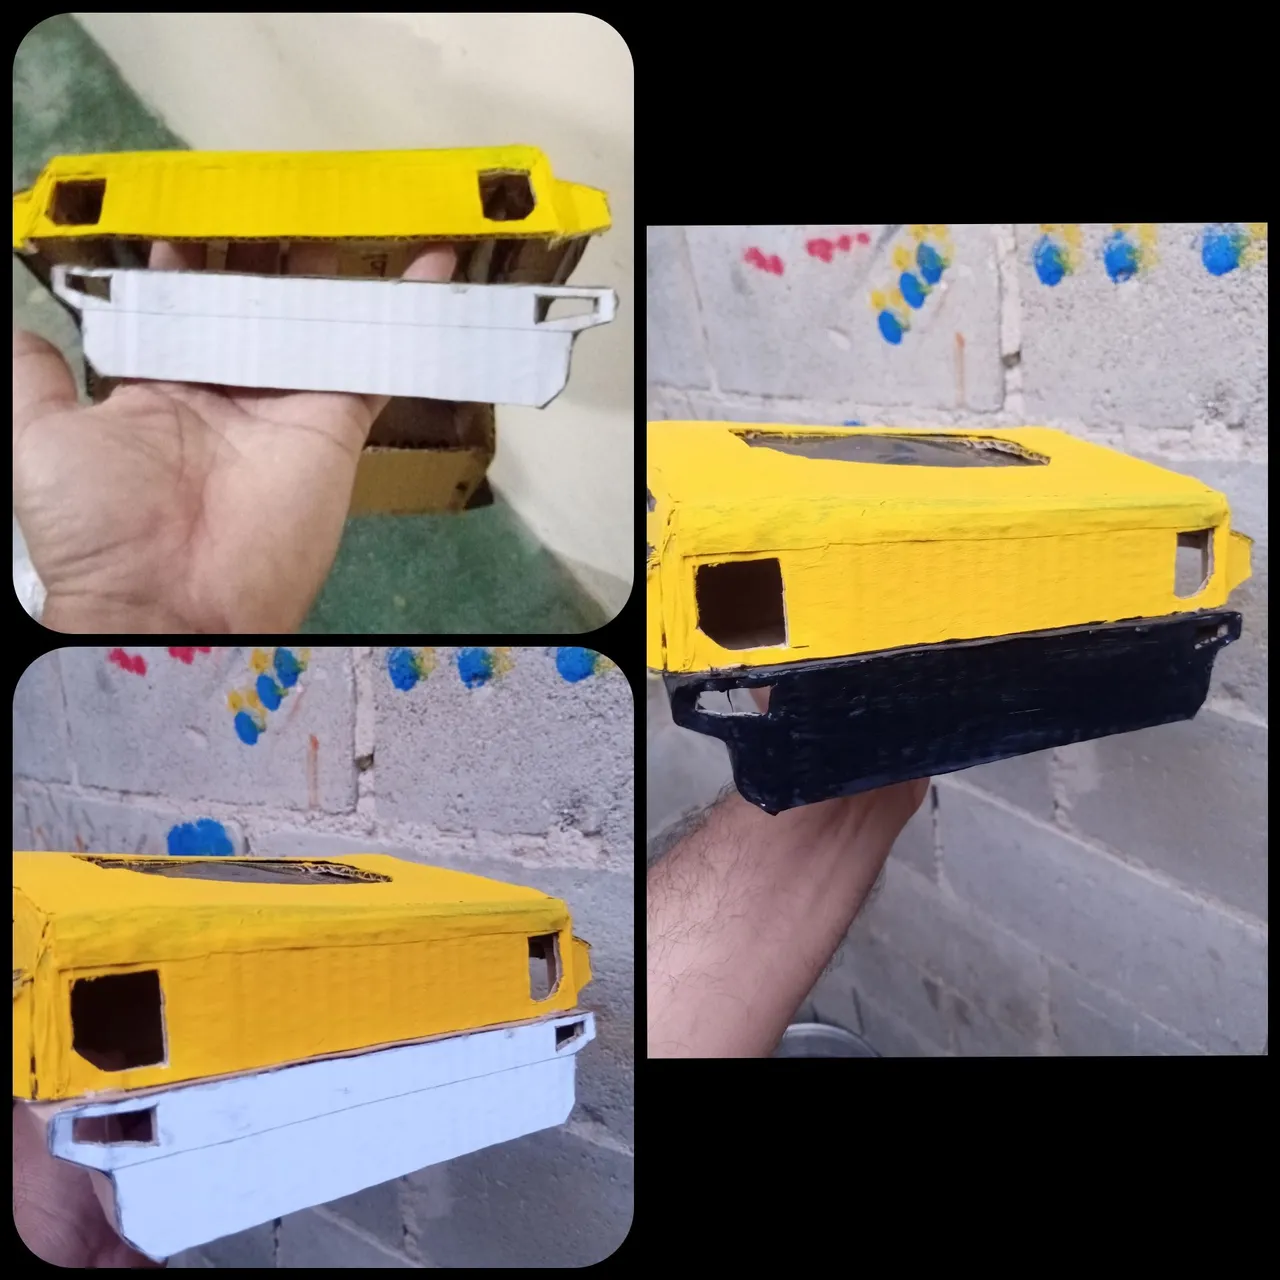
Already painted several times we make what will be the bumpers, in this case they will be the front and rear I am going to measure, just measure the width of the car and make it to then glue and give it some hands black paint
Ya pintado varias veces realizamos lo que será los parachoques, en este caso serán el delantero y trasero estoy irán a la medida, solo medir lo ancho de carro y fabricar para luego pegar y darle unas manos de pintura color negro
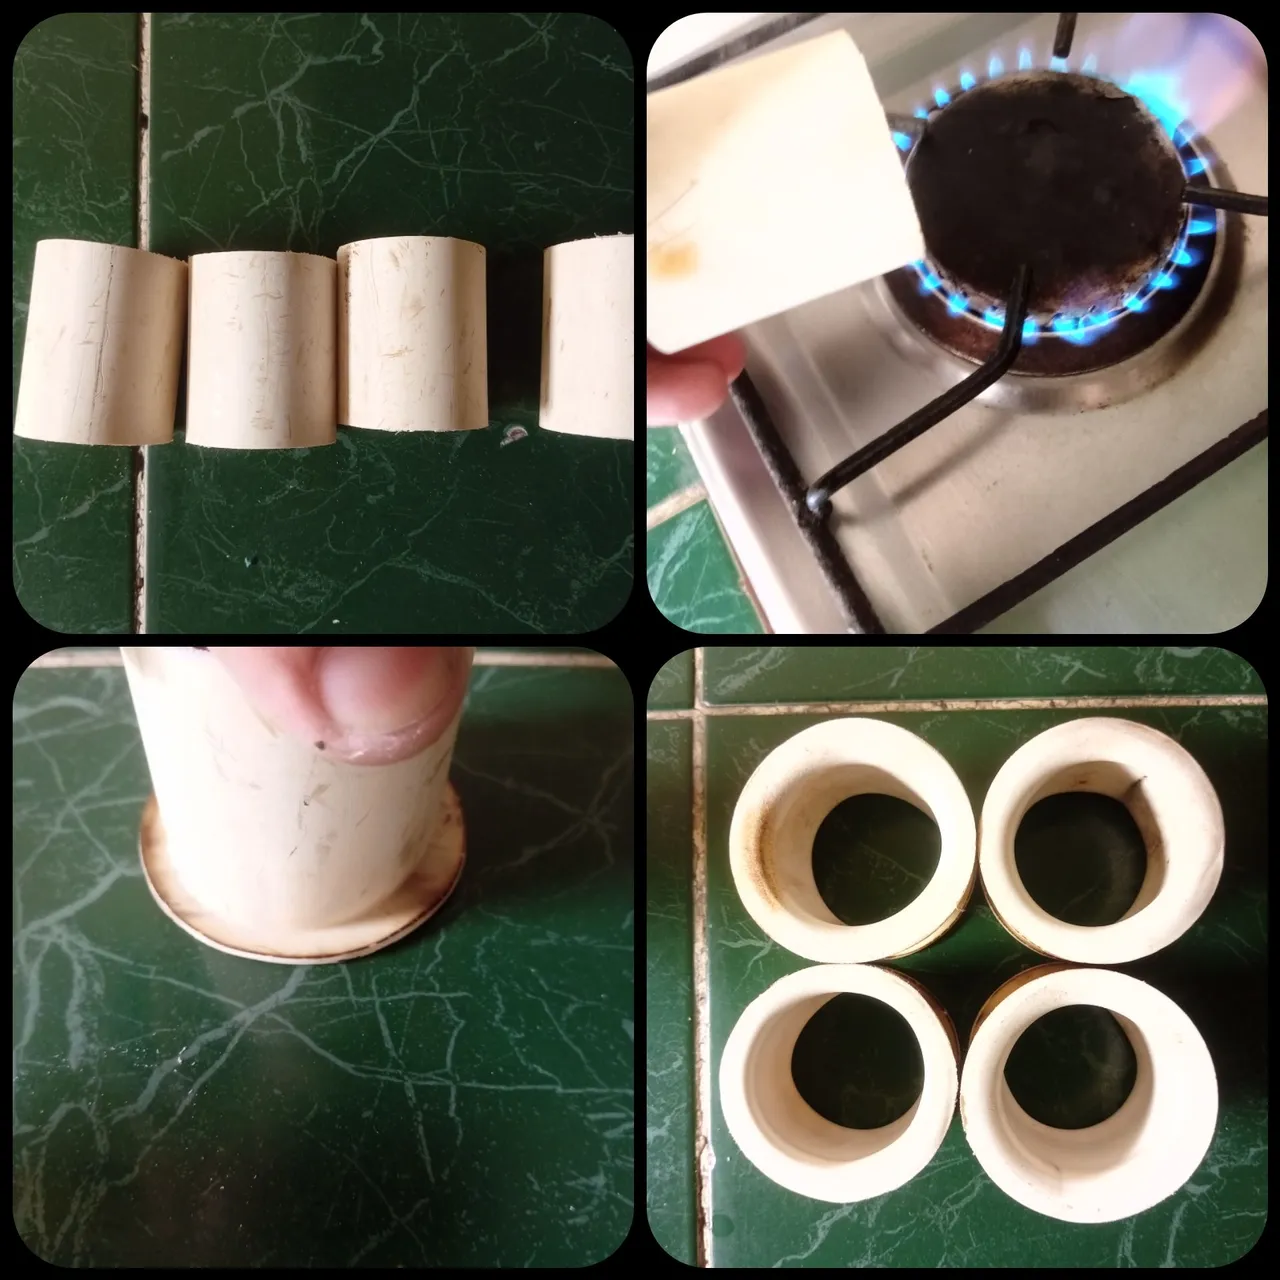
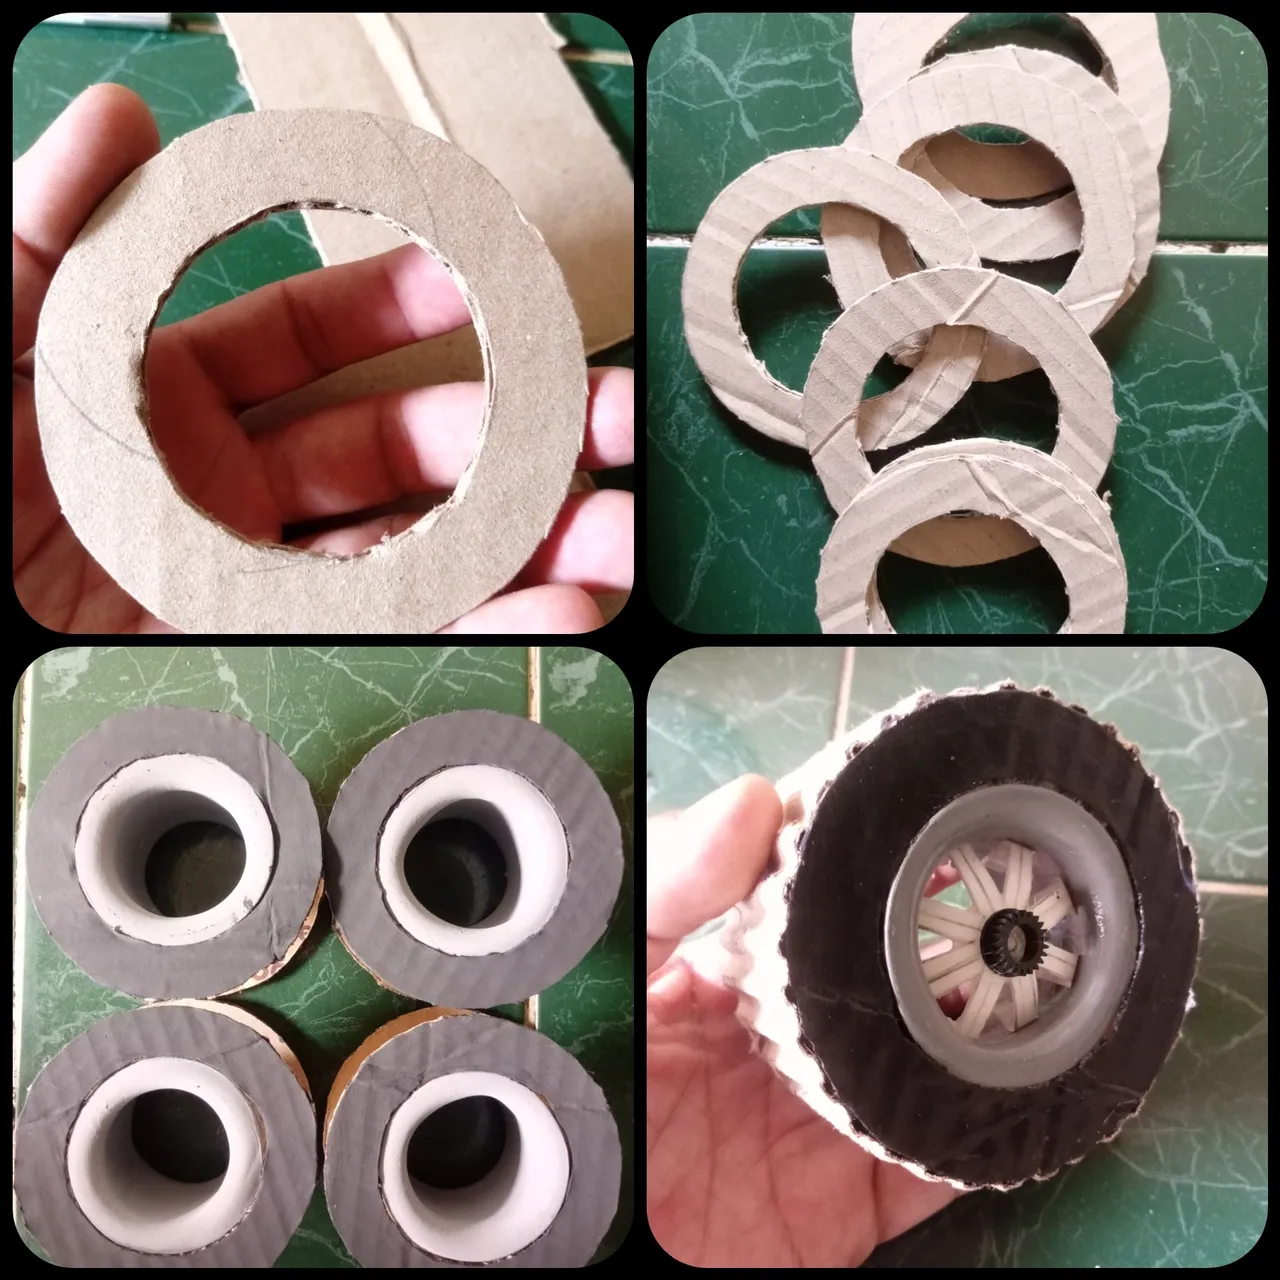
After doing all of the above, it's time to make the wheels. To do this, use 4 pieces of 2-inch PVC pipe, these measure 6 CM. Then I pass them through fire to soften and thus be able to make them as a tab type, here in Venezuela we call it Rin, immediately afterwards we make 8 rings of 8 CM in diameter by 1½ CM high, these will go on the tab that we make in the PVC tubes to these we call it rubber here in Venezuela. And the wheels would stay this way as shown in the following images.
Luego de realizar todo lo anterior, es hora de realizar las ruedas, para ello utilice 4 trozos de tubo PVC de 2 pulgadas estos miden 6 CM. Luego los pase por fuego para ablandar y así poder realizar como tipo pestaña, aquí en Venezuela le llamamos Rin, acto seguido realizamos 8 aros de 8 CM de diámetro por 1½ CM de alto estos irán en la pestaña que realizamos en los tubos PVC a estos le decimos caucho aqui en Venezuela. Y las ruedas nos quedaría de esta manera como se muestra en las siguientes imágenes.
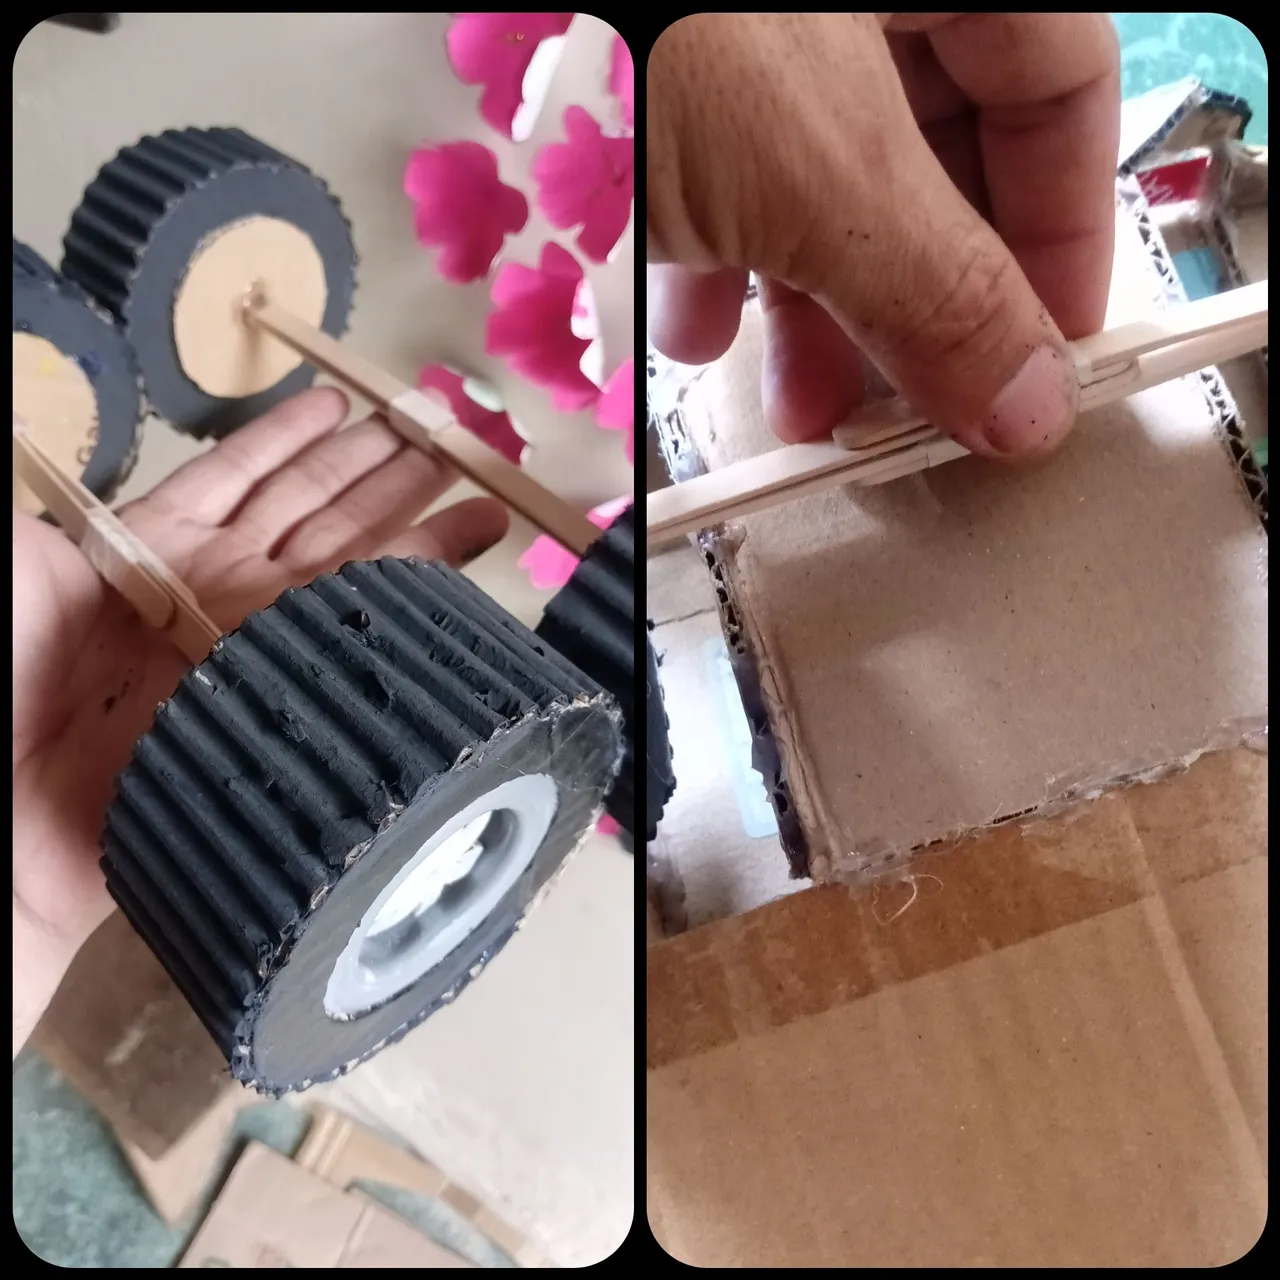
List the wheels, take 4 wooden pallets and make what will be the axis of the wheels, they will not turn since it will be a decorative car along with the ones I already have 😁. They will go this way as it will be shown in the image
Lista las ruedas, tome 4 paletas de madera y realice lo que será el eje de las ruedas, estás no van a girar ya que será un carro de adorno junto con los que ya tengo 😁. Irán de esta manera como se mostrará en la imagen
Well my friends, I made this cardboard car like this, I hope you like it and thank you very much in advance for visiting my post. See you soon with more wonderful crafts, God bless you greatly 🙏
Imágenes editadas en photocolage de Android
This post is translated by android app Google translate
All photos were taken by my Alcatel 1v Smartphone
