💚✨🎄Hello HIVEDIY community!! Welcome | ¡Hola comunidad de HIVEDIY! Bienvenido/a💚✨🎄
¿Cómo se encuentran?❄️💗 ¡Yo espero que muy bien!❄️💗 En este tutorial, les enseño a realizar estos dos lazos grandes para que eleven un poco su ropa en nochebuena, es un accesorio realmente bonito que realice con la intensión de ponerme el 24 de diciembre para la cena de navidad que se realizará con mi familia este año. Sin más nada que decir, aquí los materiales:
How are you feeling?❄️💗 I hope you're doing great!❄️💗 In this tutorial, I show you how to make these two large bows to elevate your outfit a little on Christmas Eve, it's a really nice accessory that I made with the intention of wearing on December 24 for Christmas dinner with my family this year. Without further ado, here are the materials:
•💚✨🎄Materiales a utilizar💚✨🎄•
•💚✨🎄Materiales a utilizar💚✨🎄•
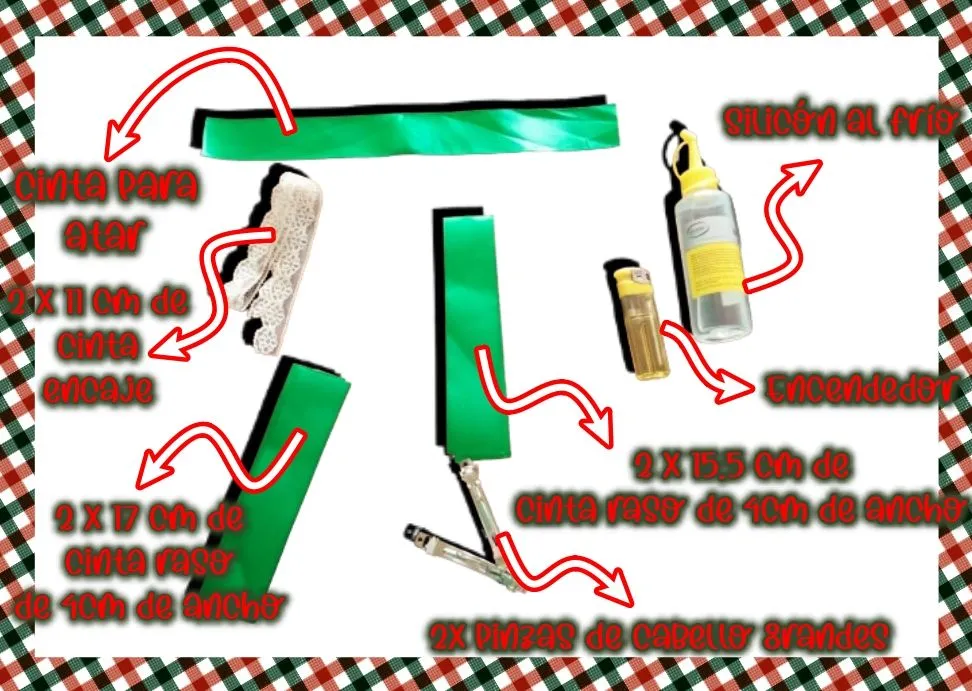
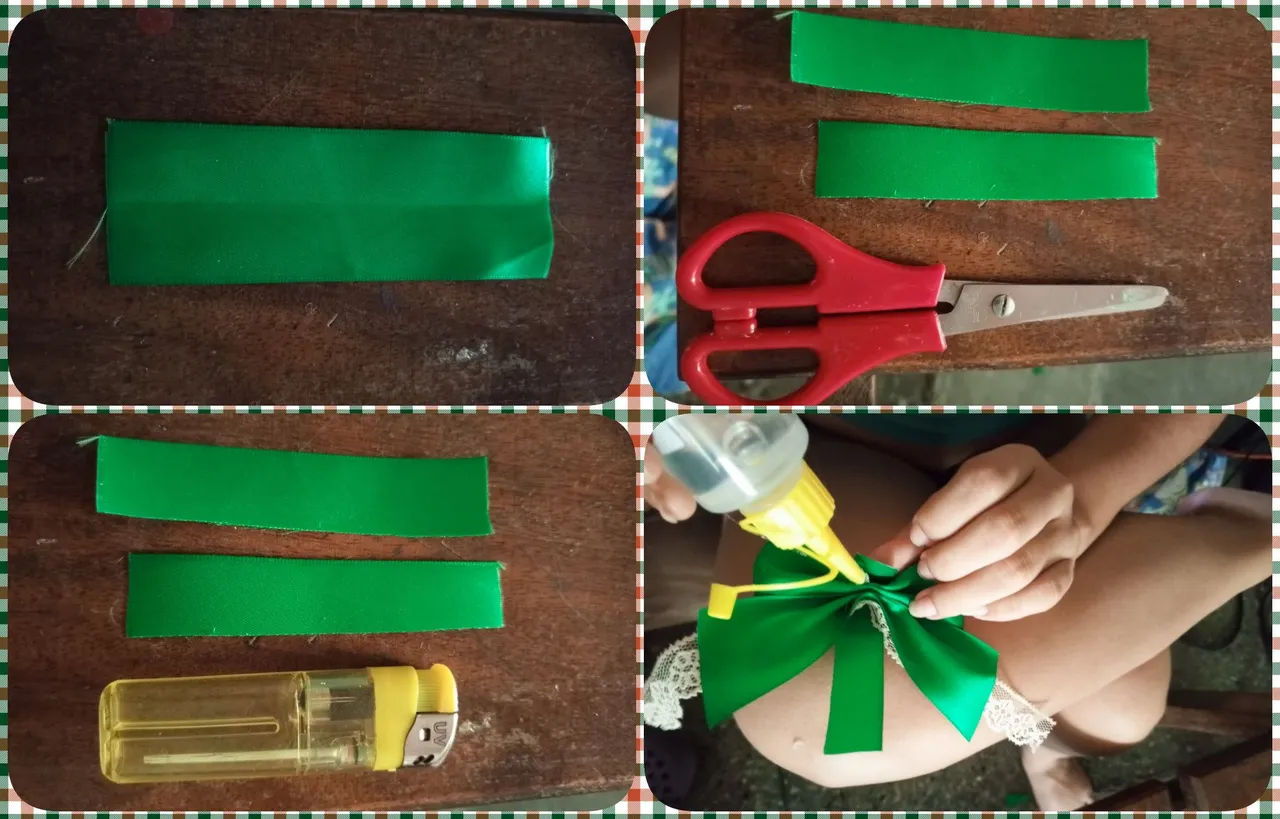
| - 2 strips of 17 cm satin ribbon | - 2 tiras de cinta raso de 17 cm | |
|---|---|---|
| - 2 strips of satin ribbon 15.5 cm | - 2 tiras de cinta raso 15.5 cm | |
| - 2 strips of 11 cm lace ribbon | - 2 tiras de cinta de encaje de 11 cm | |
| - Scissor | - Tijera | |
| - Silicon | - Silicón | |
| - 2 large hair clips | - 2 Pinzas grandes de cabello | |
| - Lighter | - Encendedor | |
| - A strip of satin ribbon for tying the bows | - Una tira de cinta raso para atar los lazos |

•💚✨🎄STEP BY STEP💚✨🎄•
•💚✨🎄STEP BY STEP💚✨🎄• Tomaremos las cintas de 17 cm y la doblaremos por la mitad cosa que cuando en el centro de la misma veamos una rayita la cual trazaremos con silicón y pegaremos los dos extremos en esta raya de silicón para que queden justamente en el medio. En la imagen se puede apreciar mejor y repetimos el mismo paso con la otra tira.
En este paso cogeremos las dos tiras pegadas y las presionaremos en el medio, en el espacio que queda le aplicaremos un punto de silicón y presionaremos con nuestros dedos hasta que se seque, luego que esté seco y pegado las dos hendiduras que quedaron con dos huequitos tanto arriba como abajo le vamos a aplicar pega para posteriormente presionarlas con nuestros dedos y pegarlas. Esto es para realizar el moño del lazo. Y como recalque posteriormente se debe de repetir lo mismo con la otra forma
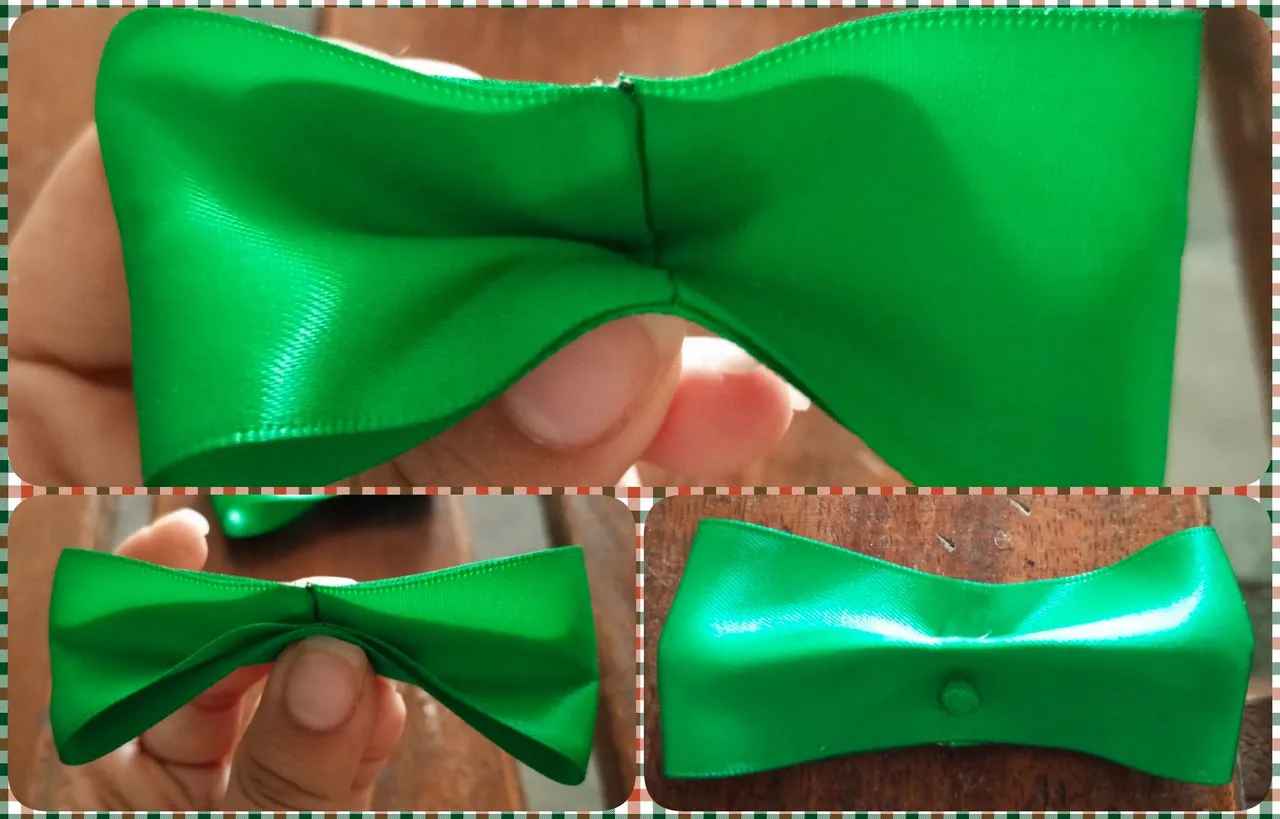
Para hacer los lazos se van a tomar las tiras de 15.5 cm y realizaremos lo mismo que en el paso anterior, es decir, tomaremos el medio de lo que será el lazo, le aplicamos el silicón y mantenemos pegados con nuestros dedos. Después, las hendiduras que quedan las volvemos a pegas. Se puede observar mejor en las imágenes.
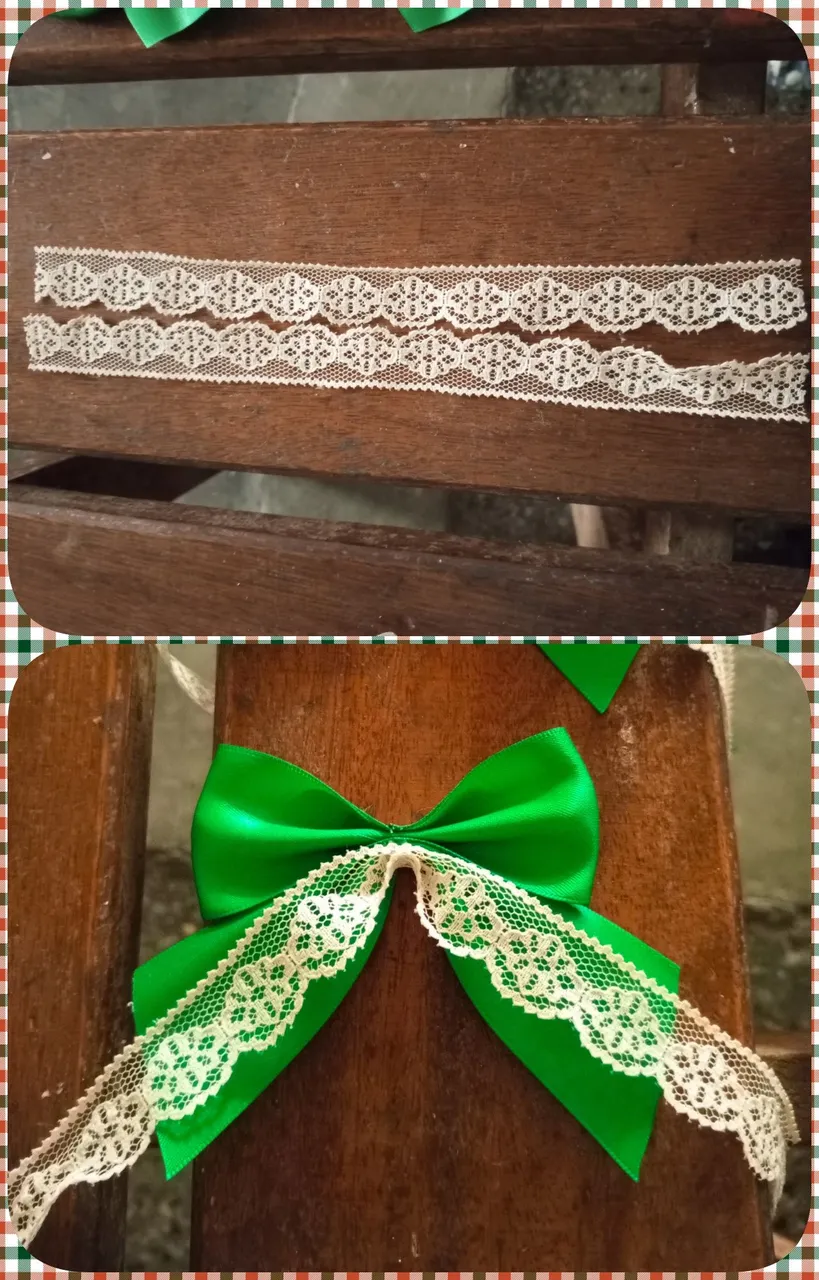
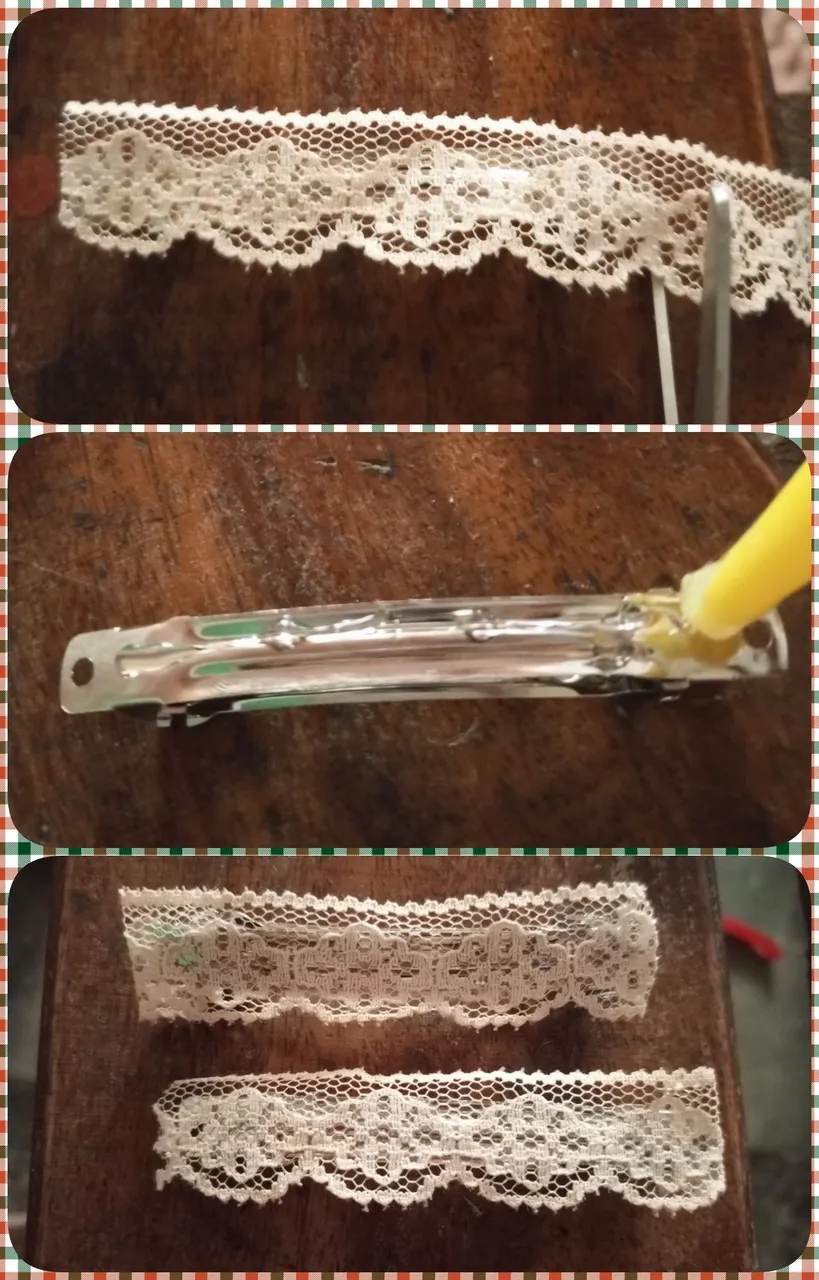
Ahora bien, en este paso agarraremos las partes pegadas (tanto los moños como los lazos) y vamos a darle forma a nuestros moños de lazo. Tomaremos el moño y lo curvearemos para pegar los lazos de abajo de este. Cortaremos el final en de los lazos en forma de / juntándolas, cosa que queden iguales y cogeremos la cinta de encaje, la pegaremos en el medio y la posicionaremos donde van los lazos, para que estos no se muevan lo que hice fue pegarlos al final de donde terminan los lazos verdes. Si les sobra algo de encaje forren las pinzas con la misma.
Y, por último, para hacer el centro del moño para que todo se vea más bonito, cortaremos un trozo de cinta raso como de unos 10cm, la doblamos por la mitad, quemamos sus esquinas y envolvemos la parte del en medio del moño con esta, cosa que quede bien y no desprolija. Los pegamos a las pinzas y ¡listo! Finalizamos así, estos hermosos moños.
We will take the 17 cm strips and fold it in half so that when in the center of it we see a small line which we will trace with silicone and glue the two ends in this line of silicone so that they are right in the middle. In the image you can see it better and repeat the same step with the other strip.
In this step we will take the two glued strips and press them in the middle, in the remaining space we will apply a dot of silicone and press with our fingers until it dries, after it is dry and glued the two slits that were left with two holes both above and below we will apply glue and then press them with our fingers and glue them. This is to make the bow of the bow. And as I emphasized later we must repeat the same thing with the other form.
To make the bows we are going to take the 15.5 cm strips and we will do the same as in the previous step, that is to say, we will take the middle of what will be the bow, we apply the silicone and we keep glued with our fingers. Afterwards, we glue the remaining indentations again. You can see it better in the images.
Now, in this step we will take the glued parts (both the bows and the loops) and we are going to shape our bow bows. We will take the bow and curve it to glue the loops underneath it. We will cut the end of the bows in the shape of a / joining them together, so that they are equal and we will take the lace ribbon, we will glue it in the middle and we will position it where the bows go, so that they do not move, what I did was to glue them at the end of where the green bows end. If you have some lace left over, line the clips with it.
And finally, to make the center of the bow so that everything looks nicer, cut a piece of satin ribbon about 10cm, fold it in half, burn the corners and wrap the middle part of the bow with it, so that it looks nice and not messy. We glue them to the clips and that's it! We finish this way, these beautiful bows.
•🎄✨💚IMAGES OF STEP 1&2💚✨🎄•
•🎄✨💚IMAGES OF STEP 1&2💚✨🎄• 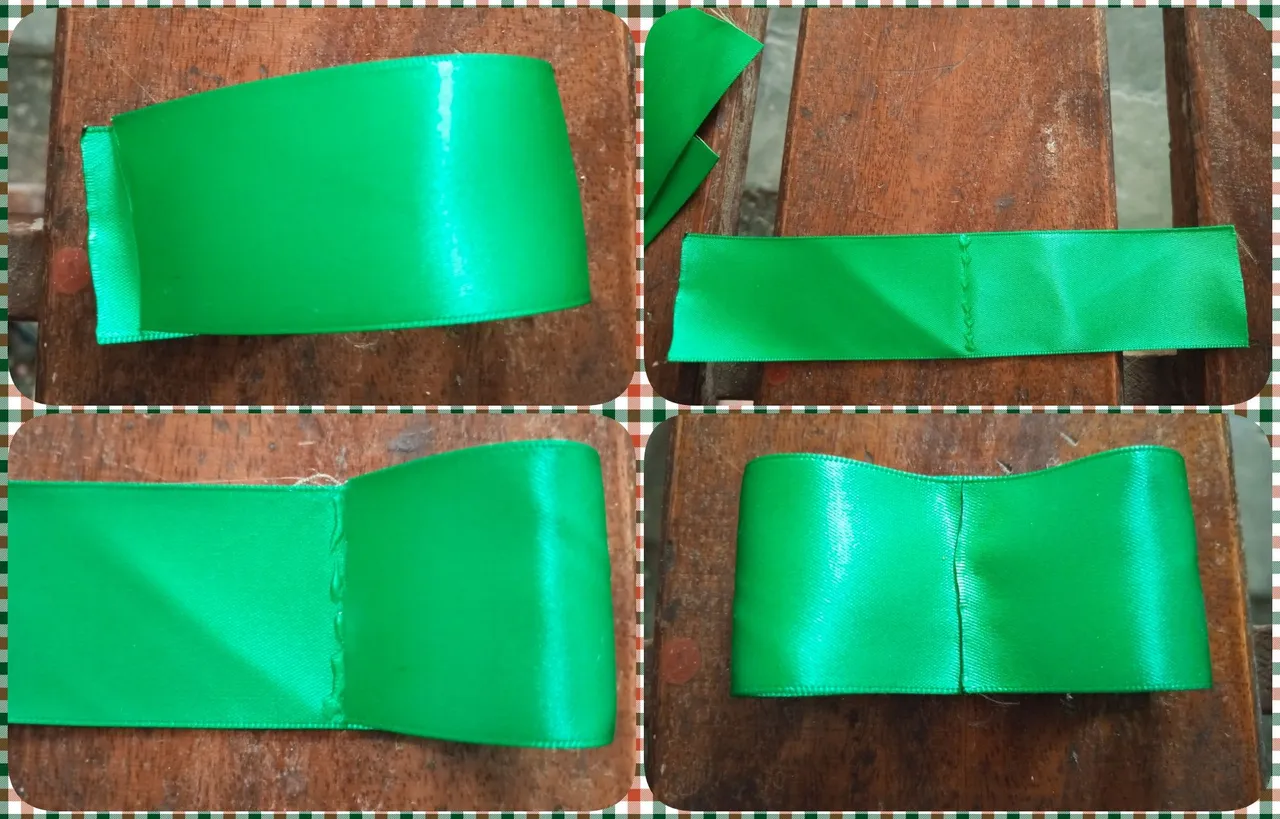
•🎄✨💚IMAGES OF STEP 3, 4 & 5💚✨🎄•
•🎄✨💚IMAGES OF STEP 3, 4 & 5💚✨🎄• 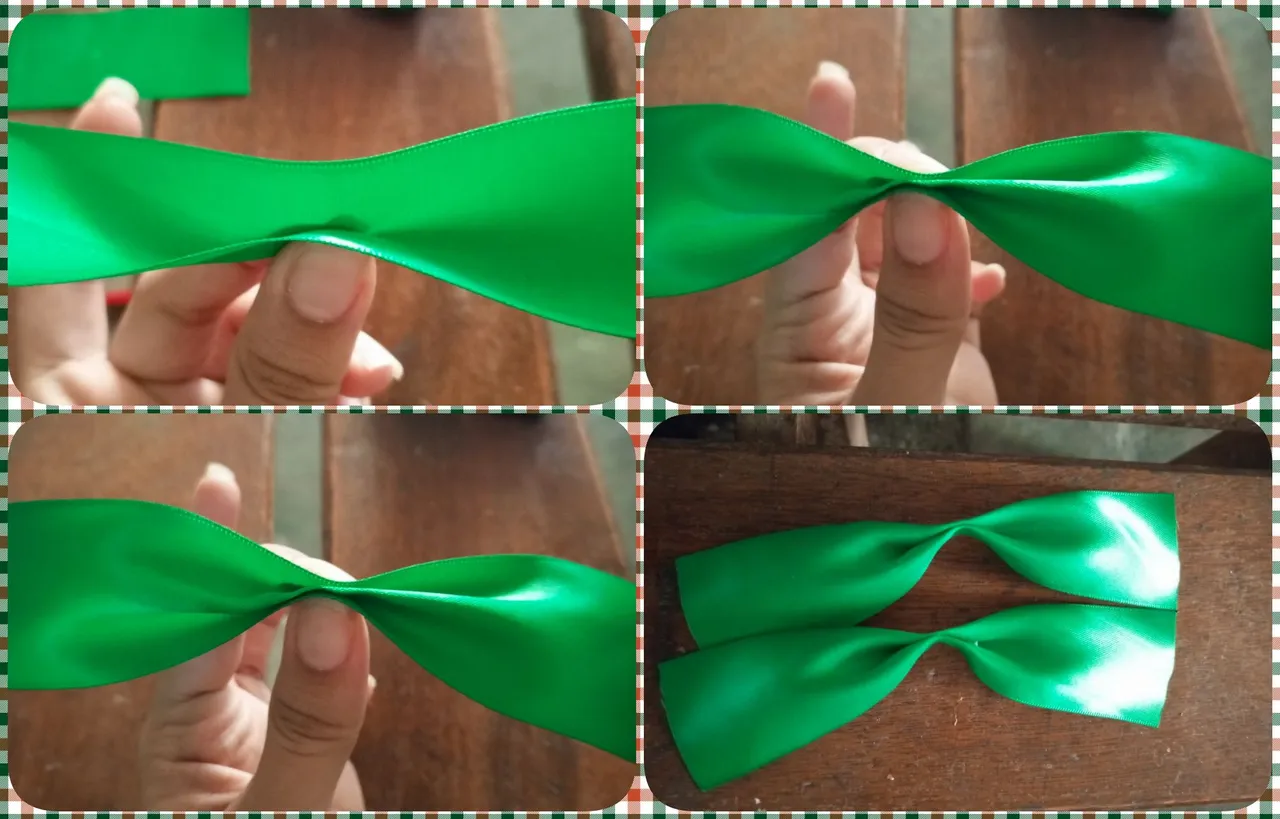

•🎄✨💚RESULT💚✨🎄•
•🎄✨💚RESULT💚✨🎄•


💞Thank you so much for making it this far! I hope you liked my post, I'll see you next time!💞
💞¡Muchas gracias por llegar hasta aquí! Espero que te halla gustado mi post. ¡Nos vemos en una próxima oportunidad!💞

📲 Todas las fotografías fueron tomadas con un teléfono Tecno Spark 10 pro
📷 TODAS LAS FOTOS SON DE MI PROPIEDAD