¡Bienvenido a mi blog!
Muy buenos días amigos de esta linda comunidad #hivediy, espero que esten bien, Dios les bendiga y les de mucha salud. Que estos días navideños sea propicio para reunirnos con nuestros familiares, dejar el rencor , el odio o alguna diferencia , comencemos el nuevo año perdonando y amándonos los unos con los otros , eso nos ayuda a tener paz en nuestro corazón.
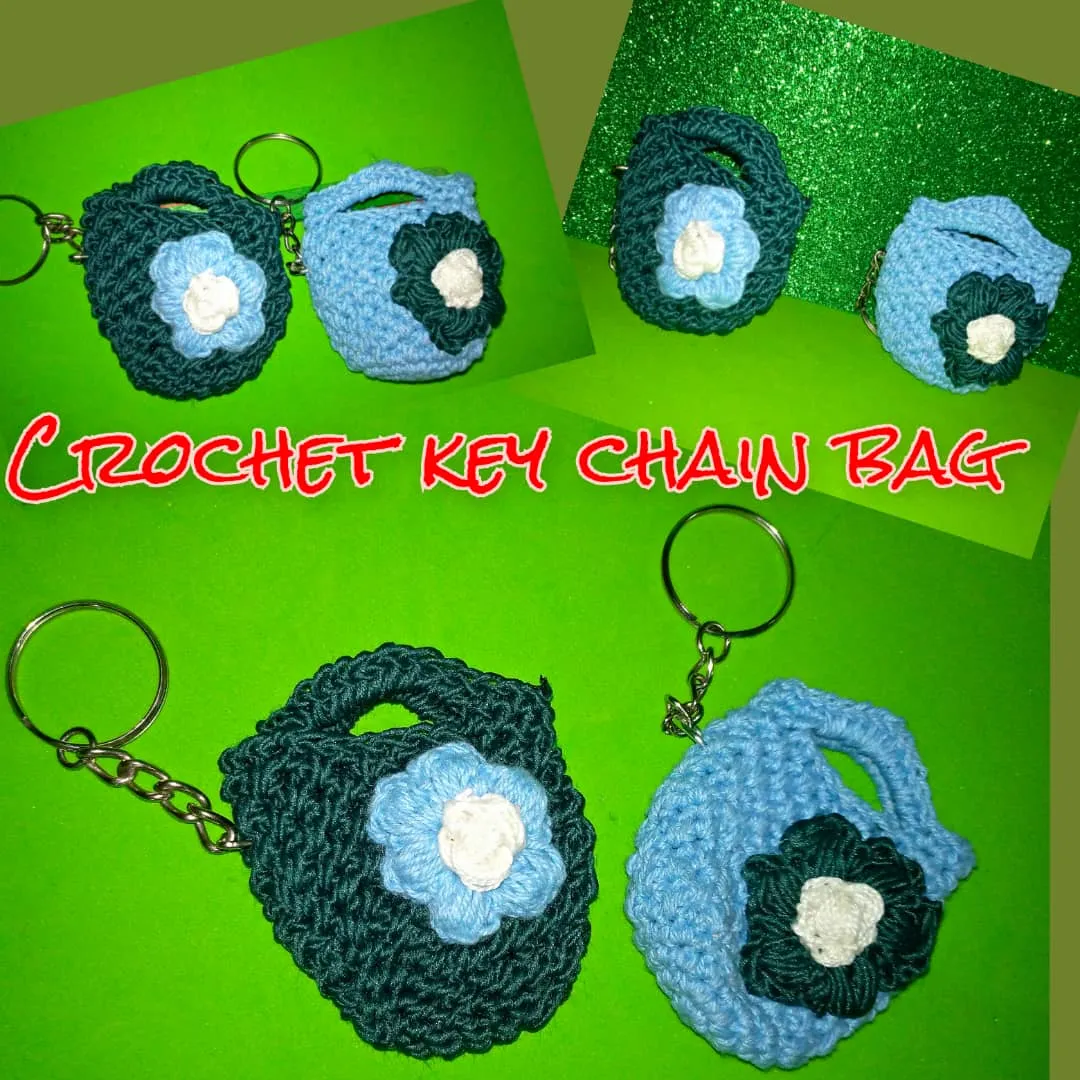
Hoy quiero mostrarle por medio de un tutorial , como realizar un lindo llavero en forma de bolsito a crochet, mu fácil de hacer , solo tienes que tener ganas de trabajar y lo lograrás.
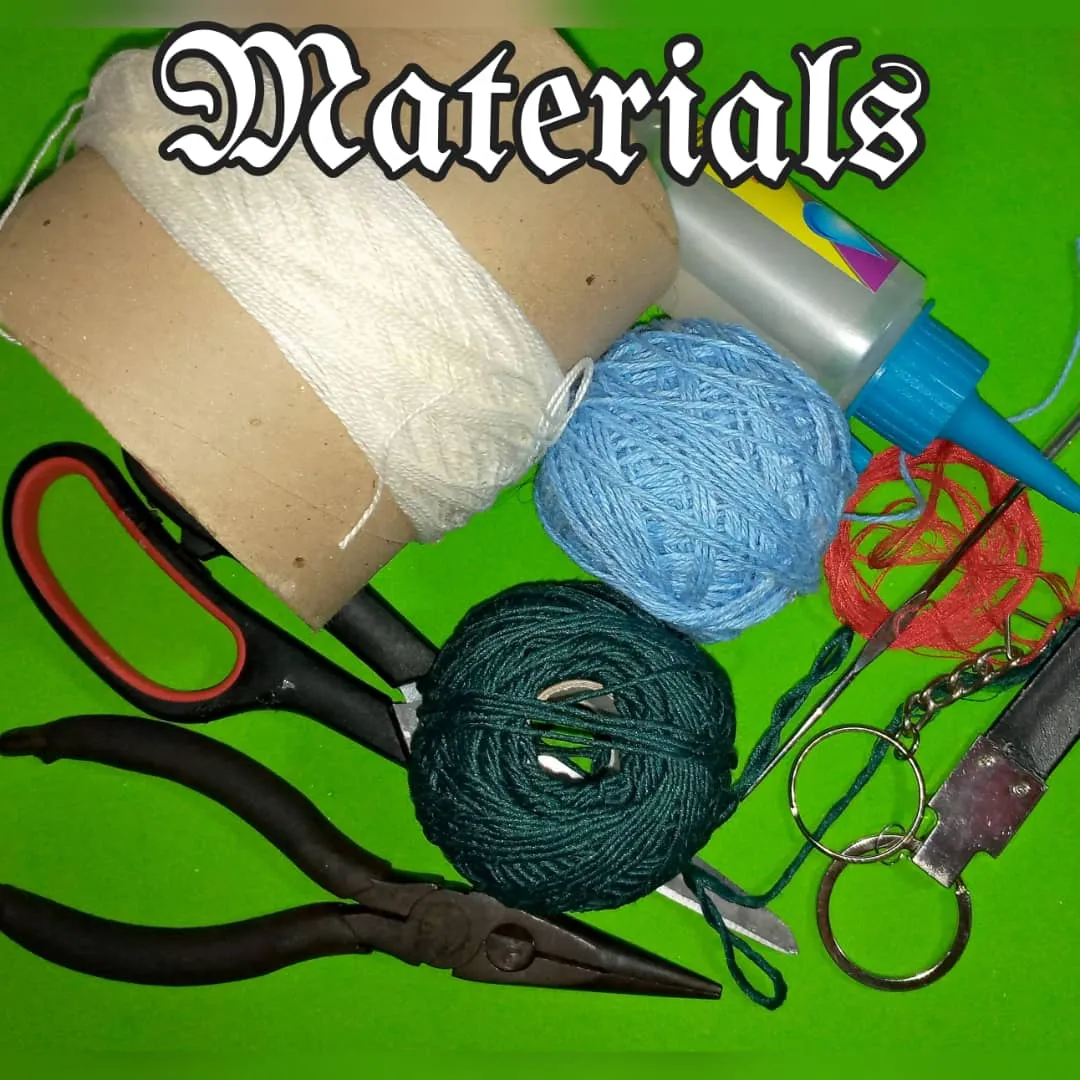
Los materiales para la realización del bolso llavero a crochet son los siguientes:
- Hilo de tejer blanco, azul y verde
- Aguja o ganchillo.
- Silicona líquida.
- Pinza.
- Tijeras.
- 2 llaveros
Aquí le mostraré el paso a paso para la realizacion del bolsito llavero a crochet:
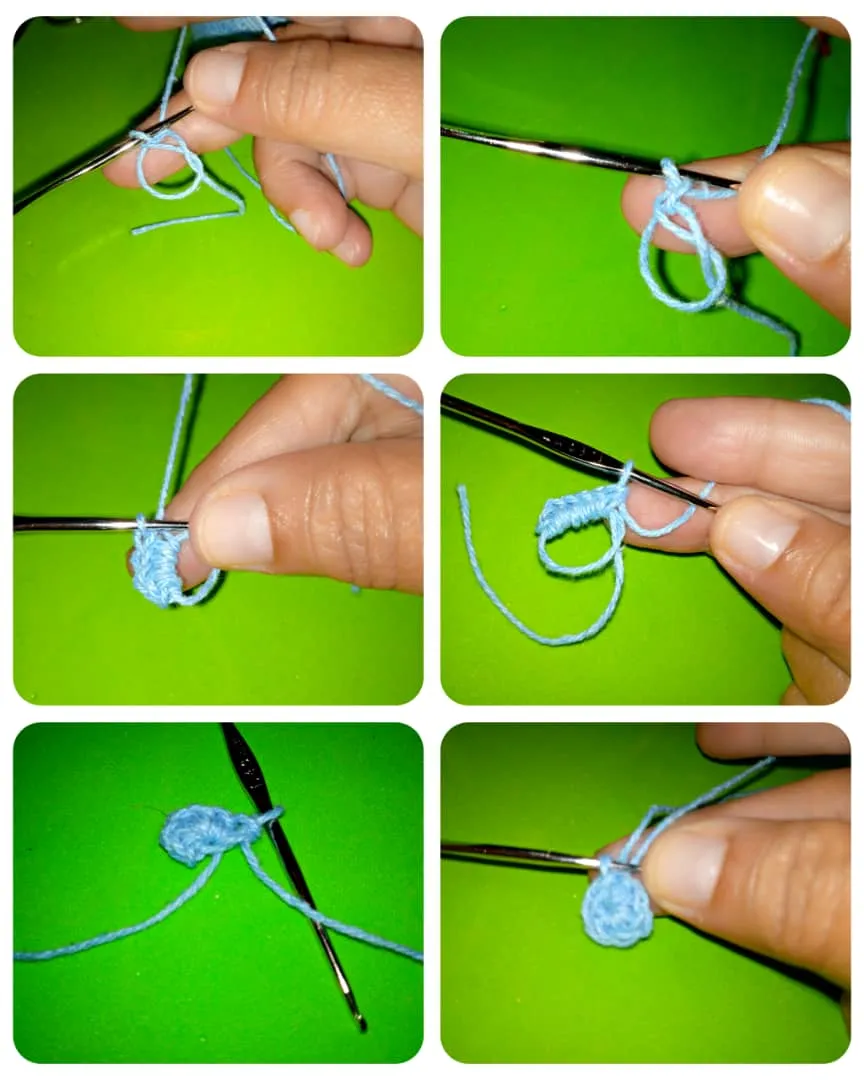
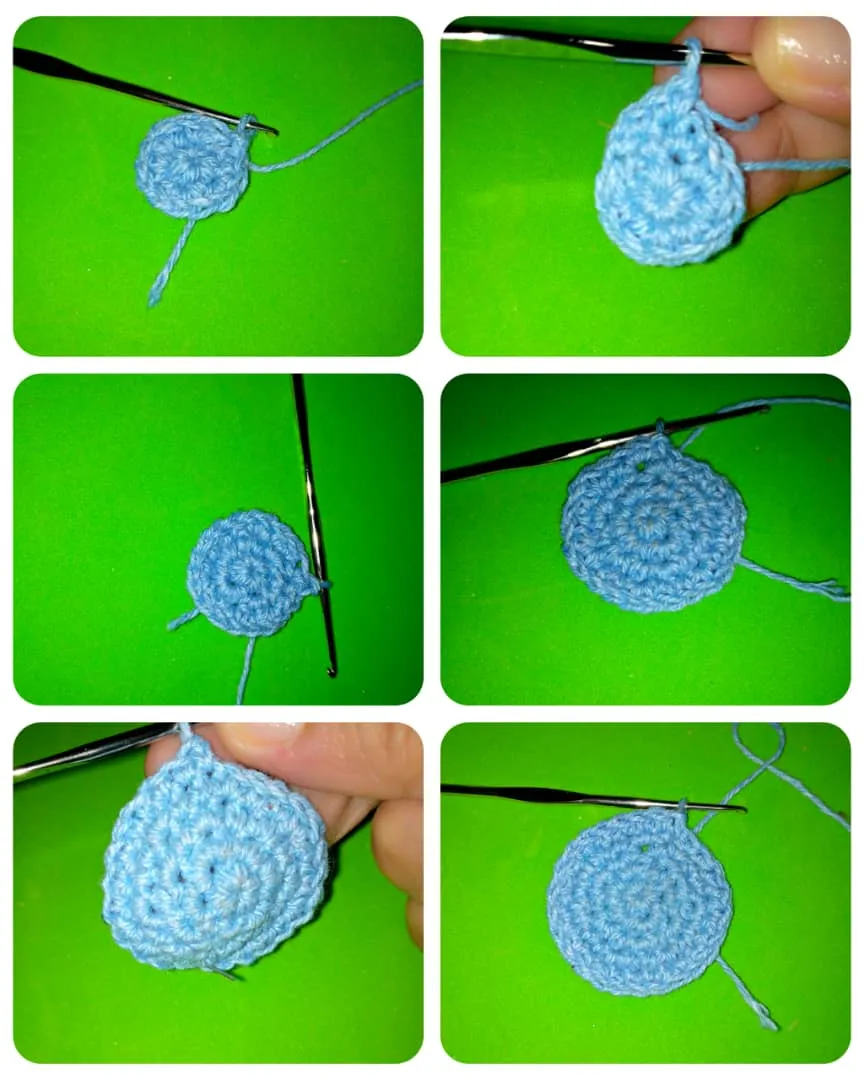
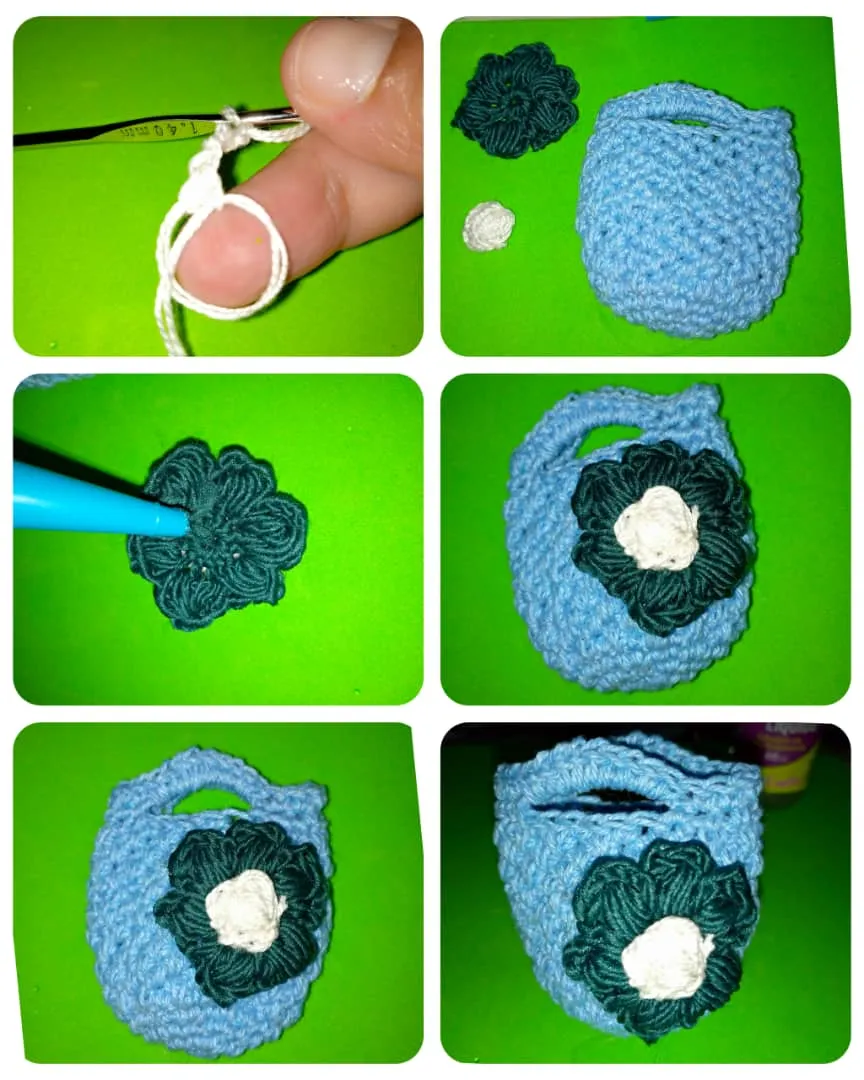
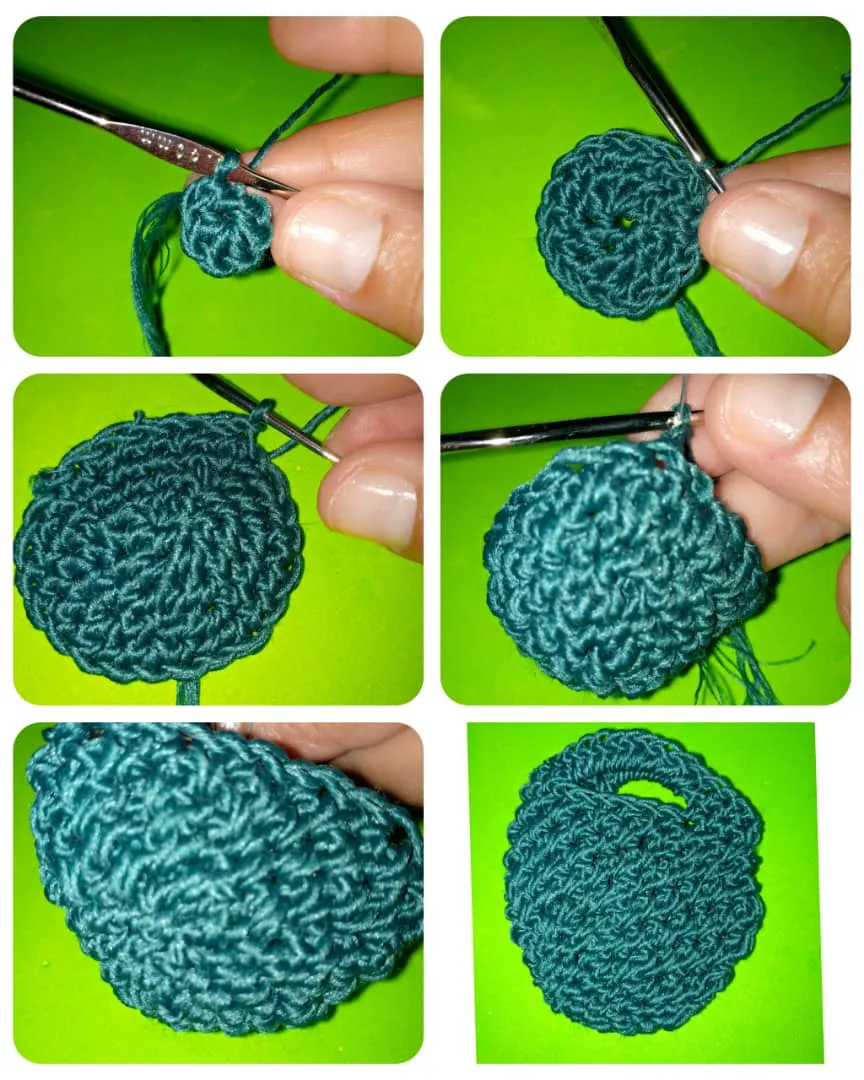
- Lo primero que haremos es un anillo con el dedo índice, enrollamos el hilo en el dedo y con la aguja agarramos una lazada, luego dentro del redondo o anillo colocamos seis puntos bajos,cuando tengamos los seis puntos bajos cerramos con un punto deslizado, el hilo sobrante lo halamos hasta cerrar el círculo y de esta manera hacemos la primera vuelta.
- Para la segunda vuelta ; comenzamos tomando una lazada o una cadena , en cada punto hacer un aumento, aquí tienen que quedar doce puntos bajos en esta vuelta ya que en cada punto debemos colocar dos.Terminar con punto deslizado.
- Para la tercera vuelta, levantamos una cadena , luego colocamos un punto bajo y para el siguiente hacemos un aumento de punto bajo, así vamos a realizar esta vuelta ,al final debemos tener 18 puntos bajos, terminamos con un punto deslizado.
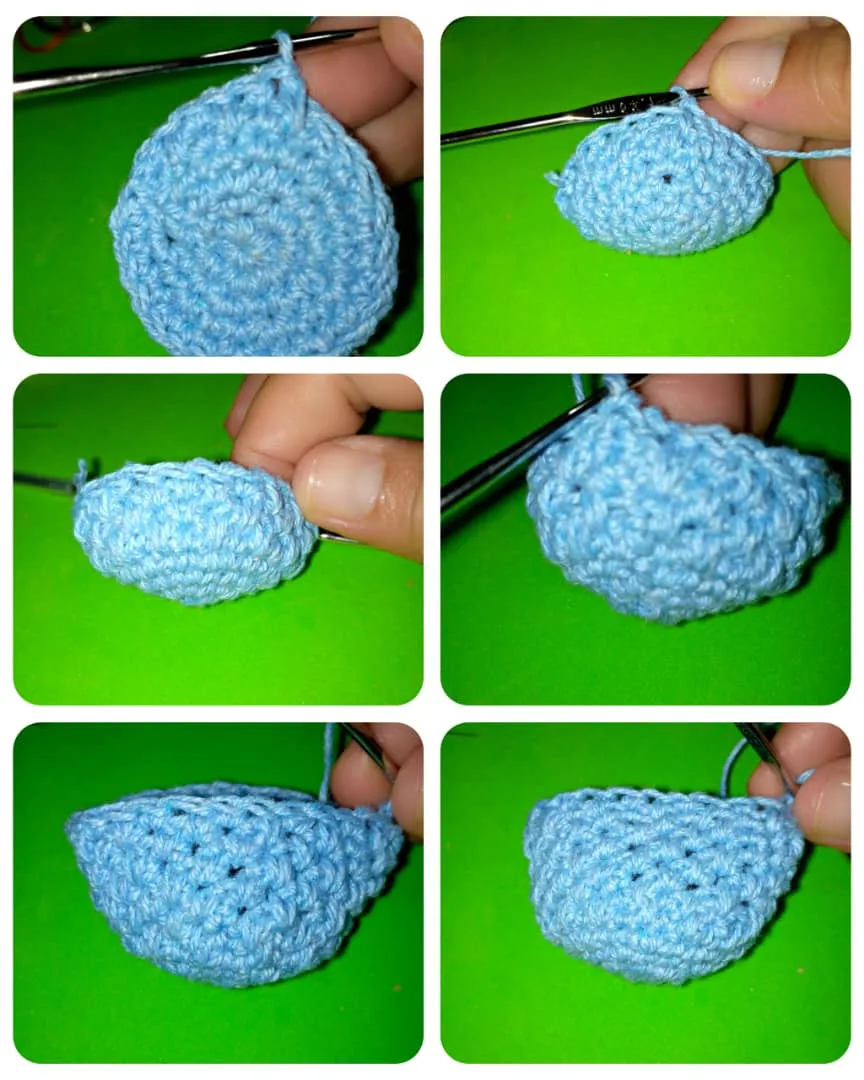
- Cuarta vuelta:Levantamos una cadena , hacemos dos puntos bajos seguido , luego un aumento osea dos puntos bajos juntos, en esta vuelta quedará al finalizar 24 puntos bajos.Terminamos con un punto deslizado.
- Quinta vuelta: Esta la vamos a realizar igual que la vuelta número cuatro, haciendo dos puntos bajos seguidos un aumento.Terminamos con un punto deslizado.
- Vuelta número 6: Levantamos una cadena ,aquí realizaremos el punto espiga, hacemos un punto bajo en el siguiente punto y el otro punto bajo lo hacemos en la hilera o vuelta número 4,continuamos haciendo el otro punto bajo en la hilera 5 y el siguiente punto bajo lo hacemos en la hilera 4, así de esta manera trabajamos esta vuelta .
- Para la vuelta número 7: comenzamos levantando una cadena, en el punto siguiente hacemos un punto bajo en la hilera número 5 y luego en la hilera 6, así vamos a realizar toda la vuelta, podemos observar lo hermoso que es este punto espiga,
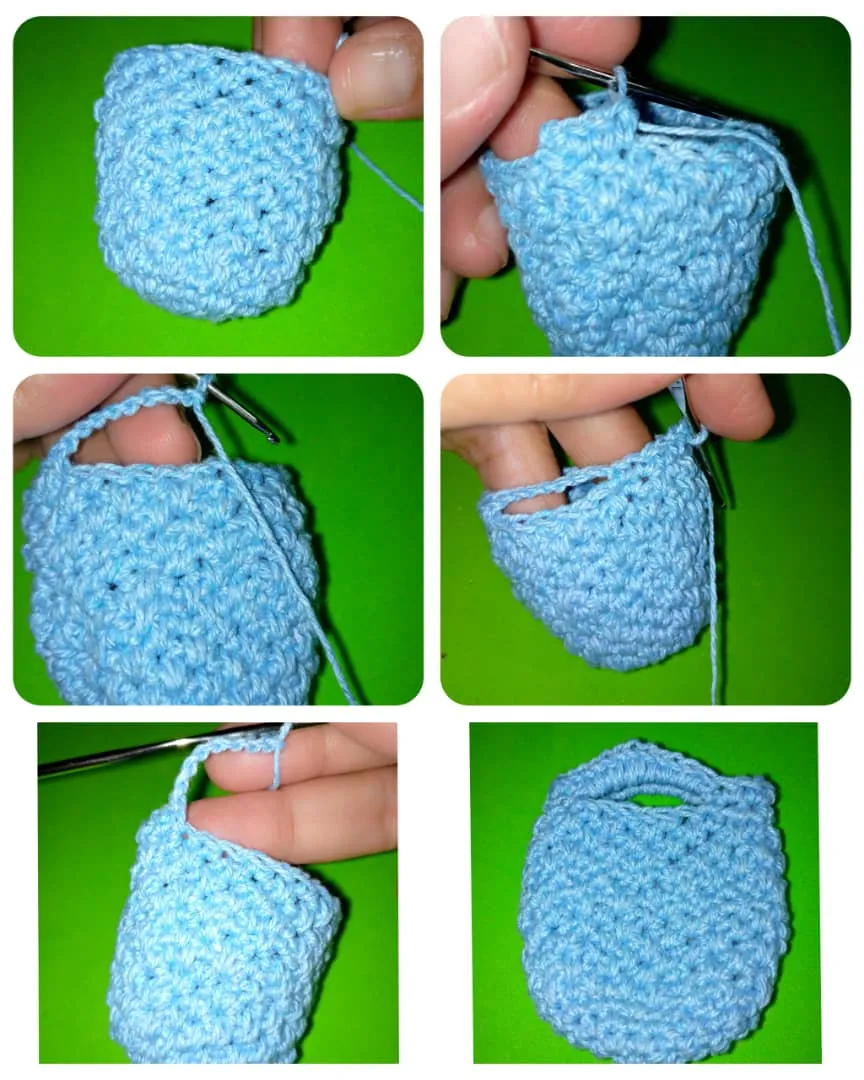
- De esta manera vamos a tejer hasta llegar al punto 12, hacemos una como la vuelta 6 y otra como la vuelta 7
- Terminamos con la vuelta 12 igual que hicimos la vuelta 6.
- Ahora para hacer las asas del bolso, esta es la vuelta 13, hacemos una cadena, un punto bajo en el punto siguiente , luego 5 puntos bajos más, teniendo un total de 6 puntos bajos , ahora realizamos una cadena de 8 y la introducimos en el punto 7 , Luego introducimos 3 puntos bajos consecutivos y cerramos la vuelta con un punto deslizado.
- La última vuelta 14, realizamos una cadena , luego tres puntos bajos consecutivos y dentro de la cadena que forma la asa hacemos 10 puntos bajos, seguido 6 puntos bajos y 3 puntos bajos para cerrar y terminar con un punto deslizado.
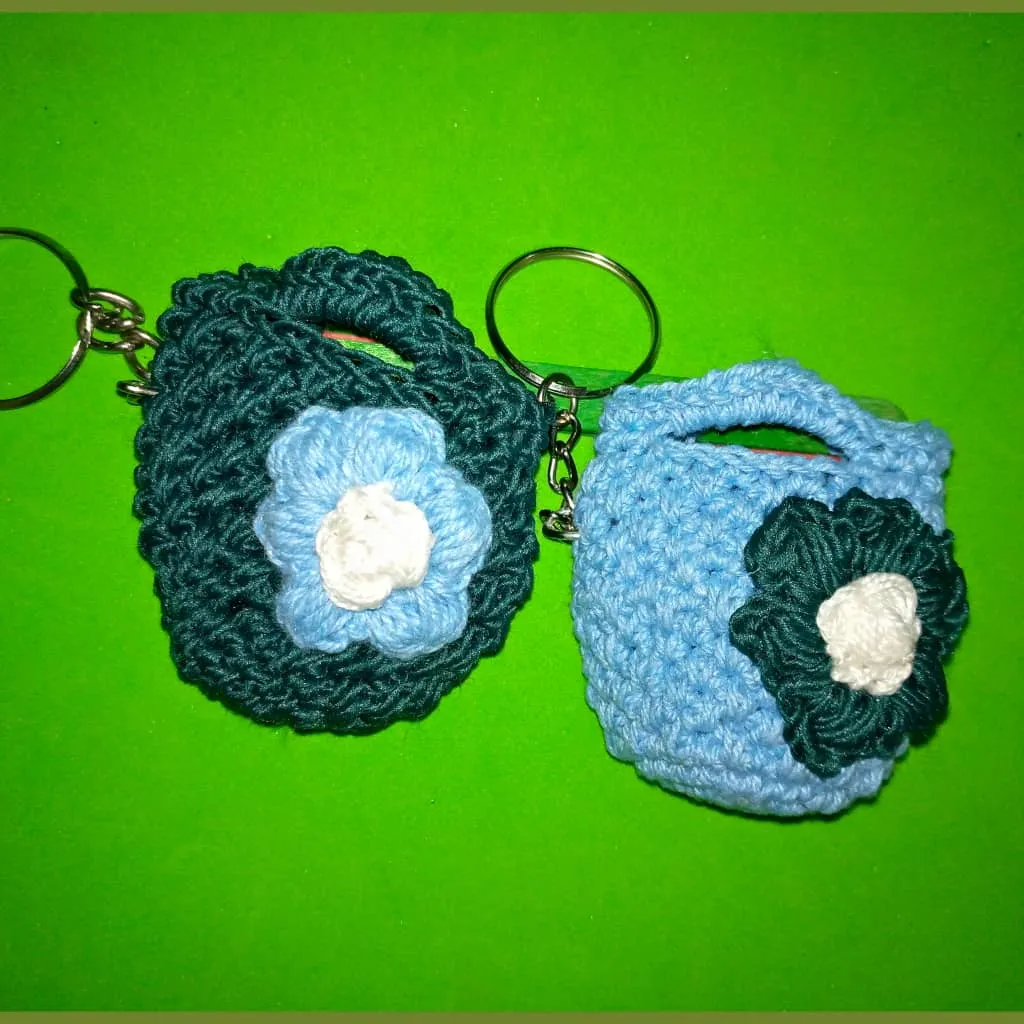
- Aquí podemos observar lo hermoso que quedó el bolsito.
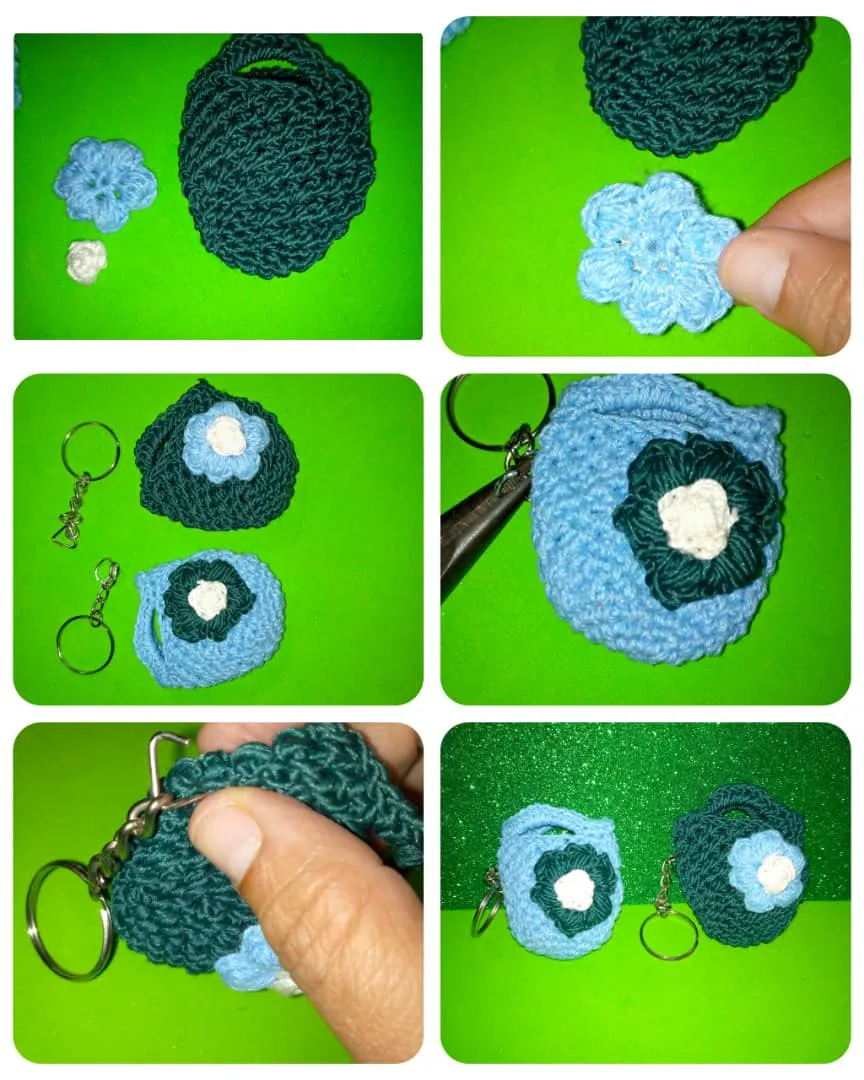
- Para hacer la flor , hacemos un anillo y dentro de él , colocamos 6 puntos bajos, cerramos el círculo, ahora realizaremos el punto puff.
- El punto puff está compuesto de varios puntos medios sin terminar, así haremos 6.Luego terminamos con tres cadenas y lo cerramos con un punto deslizado
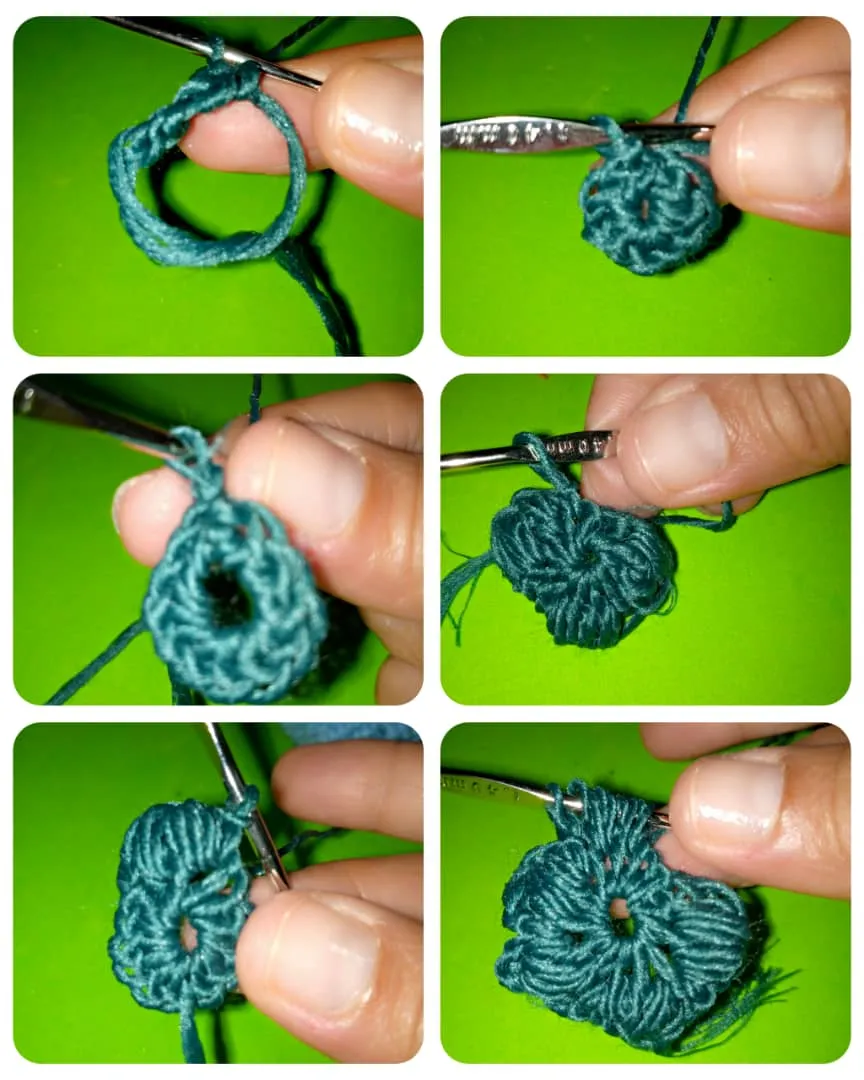
- Para terminar de hacer lo de adentro de la flor haremos de la misma manera el punto puff , pero solamente uno.
- Aquí como realizamos el otro bolsito de la misma forma que el primero.
- Ahora con silicona líquida pegamos la flor al bolsito y con la pinza colocamos el llavero.
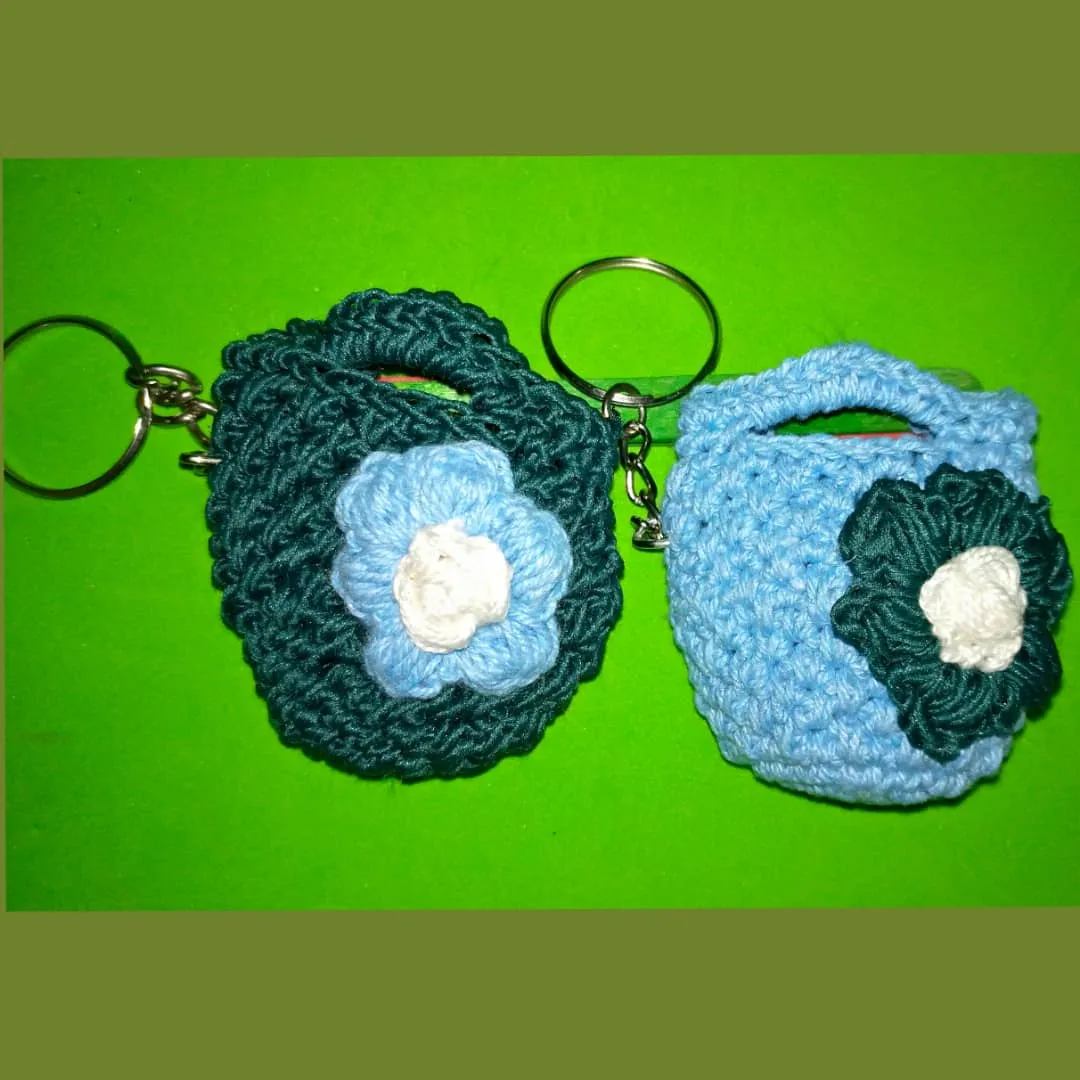
Miren el resultado final del hermoso llavero de bolso a crochet.
Espero sea de su agrado, hasta la próxima.
Las fotos son mías, tomadas con teléfono Infinix , editada con incollage y traducida con DEEPL.
ESPAÑOL
Welcome to my blog!
Very good morning friends of this beautiful community #hivediy, I hope you are well, God bless you and give you lots of health. May these Christmas days be conducive to meet with our families, leave the rancor, hatred or any difference, let's start the new year forgiving and loving each other, that helps us to have peace in our hearts.
Today I want to show you through a tutorial , how to make a nice keychain shaped crochet purse , very easy to do , you just have to be willing to work and you will achieve it.
The materials for the realization of the crochet keychain bag are the following:
- White, blue and green knitting yarn.
- Needle or crochet hook.
- Liquid silicone.
- Tweezers.
- Scissors.
- 2 key rings
Here I will show you the step by step for the realization of the crochet keychain bag:
- The first thing we will do is a ring with the index finger, we roll the thread on the finger and with the needle we grab a loop, then inside the round or ring we place six low stitches,when we have the six low stitches we close with a slipped stitch, the remaining thread we pull it until we close the circle and in this way we make the first round..
- For the second round ; we start by taking a loop or a chain, in each stitch make an increase, here there must be twelve single crochet stitches in this round because in each stitch we must place two.
- For the third row, we lift a chain, then we place a single crochet and for the next one we make a single crochet increase, this way we are going to make this row, at the end we must have 18 single crochets, we finish with a slip stitch.
- Fourth row: We raise a chain, we make two single crochet stitches in a row, then an increase or two single crochet stitches together, in this row we will have 24 single crochet stitches at the end of this row, we finish with a slip stitch.
- Fifth row: This one we are going to make the same as in row number four, making two single crochets followed by an increase.We finish with a slip stitch.
- Row number 6: We pick up a chain ,here we will make the herringbone stitch, we make a single crochet in the next stitch and the other single crochet we make in row or row number 4,we continue making the other single crochet in row 5 and the next single crochet we make in row 4, in this way we work this row.
- For row number 7: we start by lifting a chain, in the next stitch we make a single crochet in row number 5 and then in row 6, in this way we are going to make the whole row, we can observe how beautiful this herringbone stitch is,
- In this way we are going to knit until we get to the 12th stitch, we make one like the 6th row and another like the 7th row.
- We finish with row 12 just like we did in row 6.
- Now to make the handles of the bag, this is row 13, we make a chain, a single crochet in the next stitch, then 5 more single crochets, having a total of 6 single crochets, now we make a chain of 8 and introduce it in stitch 7, then we introduce 3 consecutive single crochets and close the row with a slip stitch.
- The last row 14, we make a chain, then three consecutive single crochets and inside the chain that forms the handle we make 10 single crochets, followed by 6 single crochets and 3 single crochets to close and finish with a slip stitch.
- Here we can see how beautiful the bag is.
- To make the flower , we make a ring and inside it , we place 6 low stitches, we close the circle, now we will make the puff stitch.
- The puff stitch is composed of several unfinished half stitches, so we will make 6.Then we finish with three chains and close it with a slipped stitch.
- To finish making the inside of the flower we will make the puff stitch in the same way, but only one.
- Here how we make the other bag in the same way as the first one.
- Now with liquid silicone we glue the flower to the bag and with the clamp we place the keychain.
Look at the final result of the beautiful crochet bag keychain.
I hope you like it, see you next time.
The photos are mine, taken with Infinix phone , edited with incollage and translated with DEEPL.