( ENG)
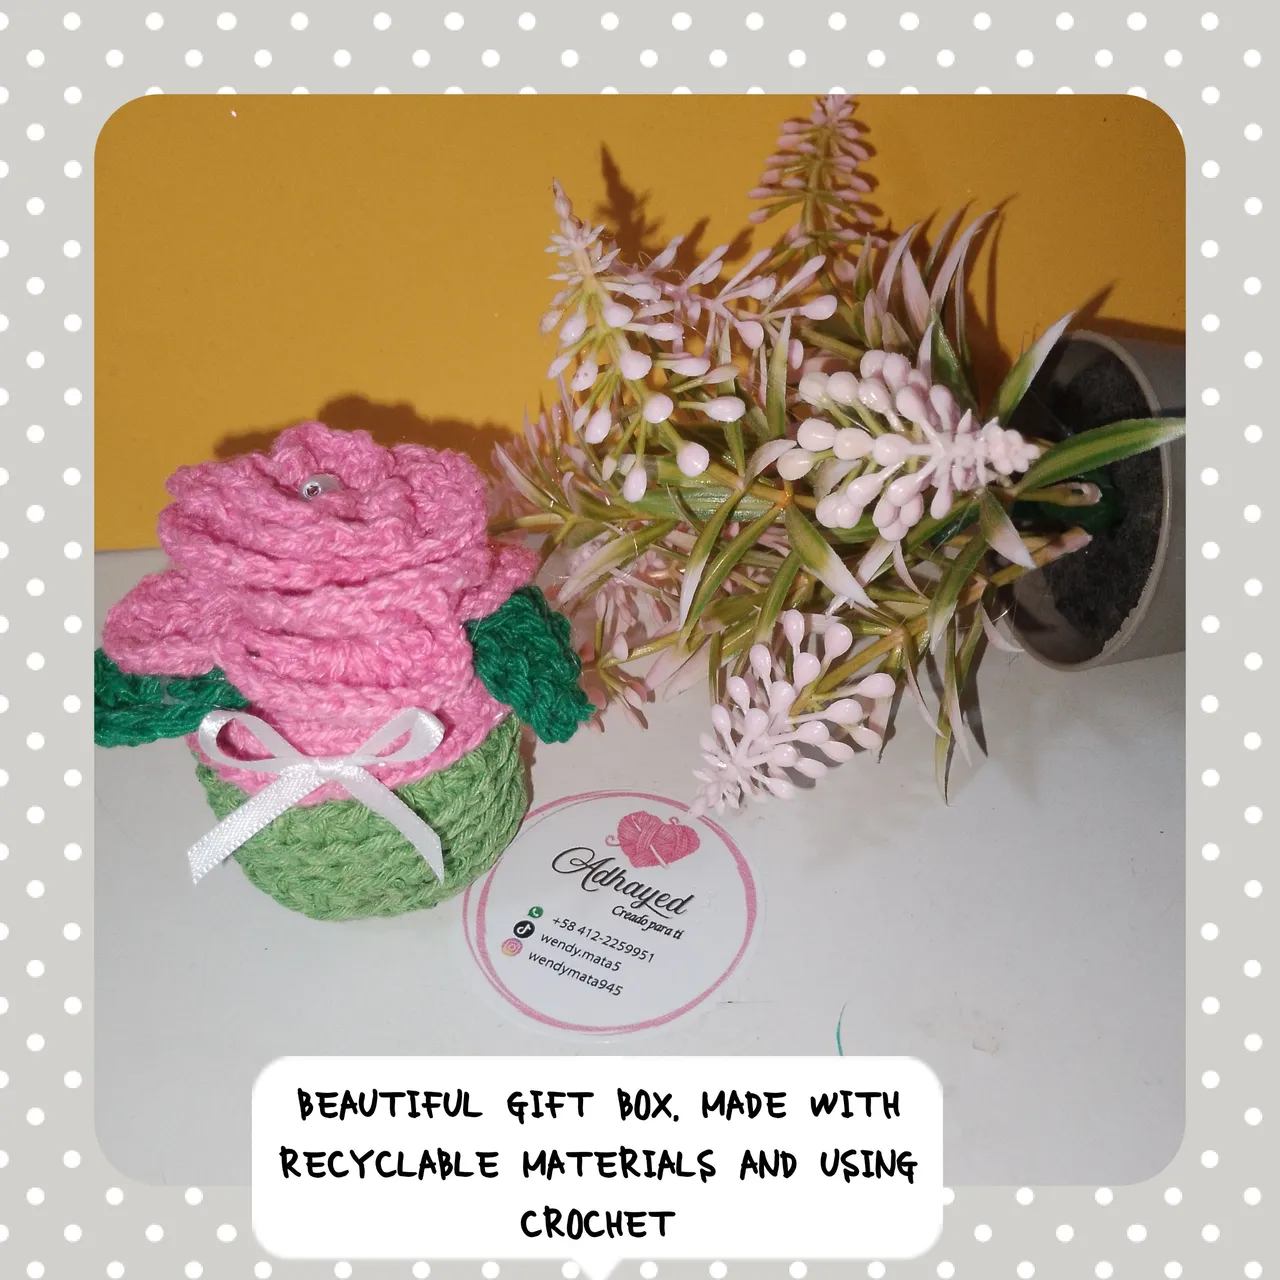
Hello everyone, I wish you are well, full of healthy and energies, positive and creative, today I please, after a while, be with you in, @diyhub. Step on this occasion, to show them, a very beautiful and easy, step by step, how to make a beautiful and delicate, gift box, count use, the technique of recycling and crochet, ideal, to give a present at a special moment. Without further ado the invitation is to follow them and show them, the simple step by step.
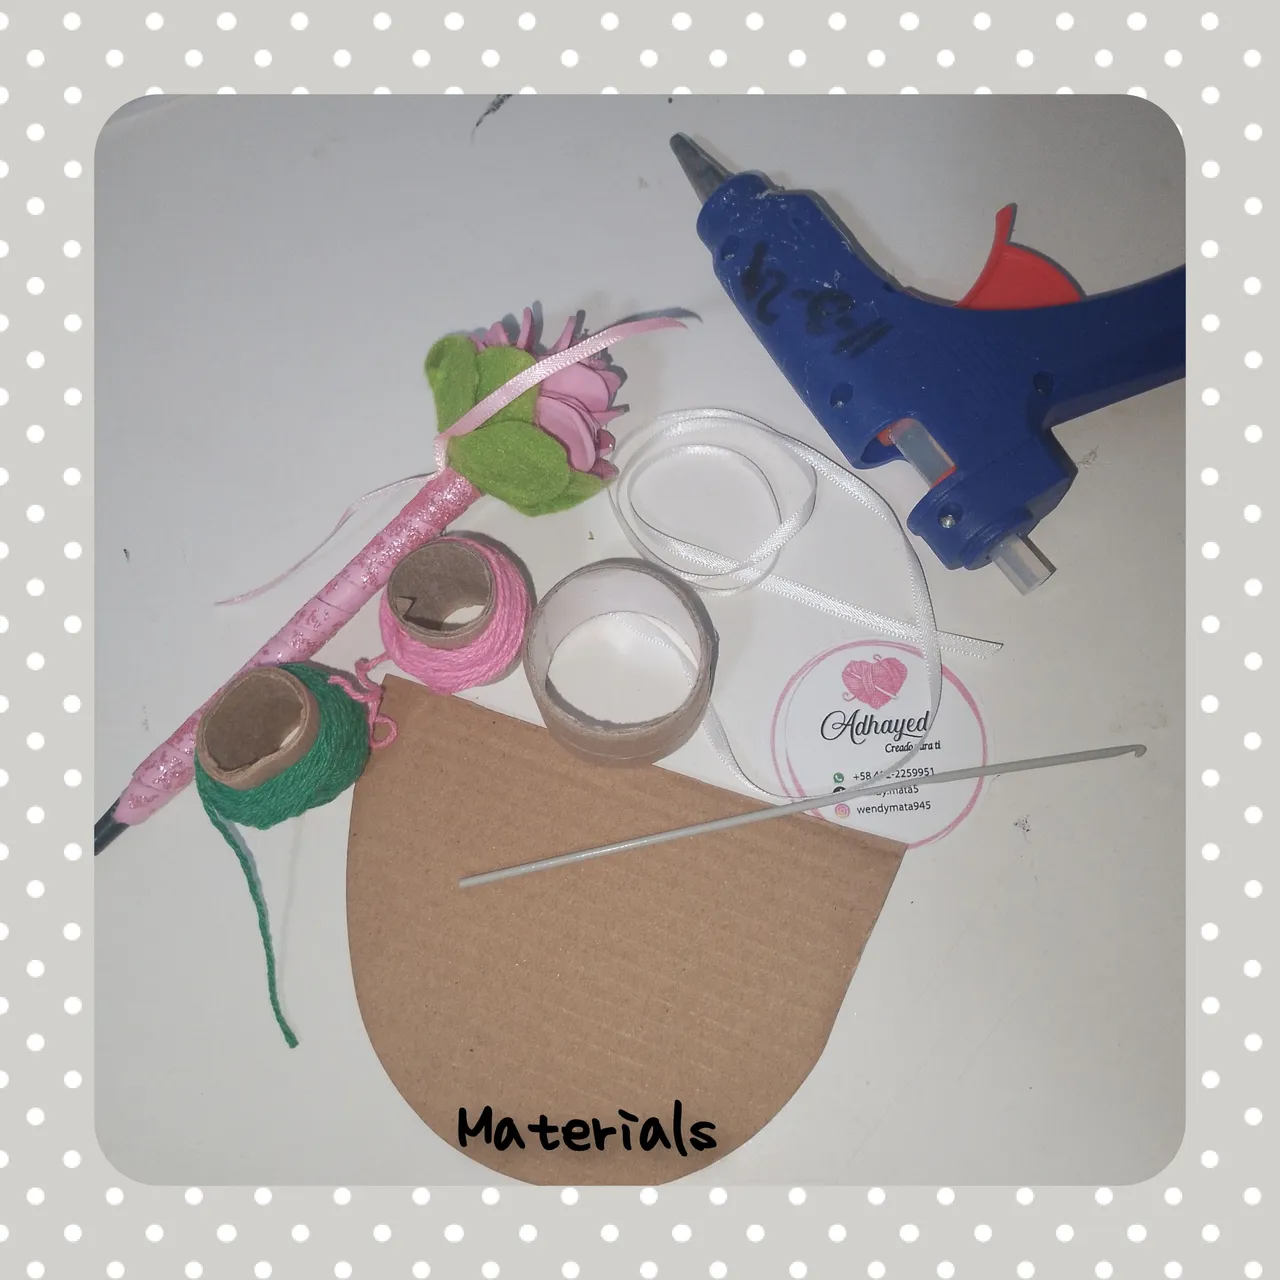
Materials used in the process, creative:
. Threads to weave, colors (green, light and dark. Pink)
. Needle to weave.
. White pearls.
. Glue.
. Cardboard tube
. Piece of cardboard.
. Pencil to mark.
. Scissors.
. Thin white tape.
Steps to follow.
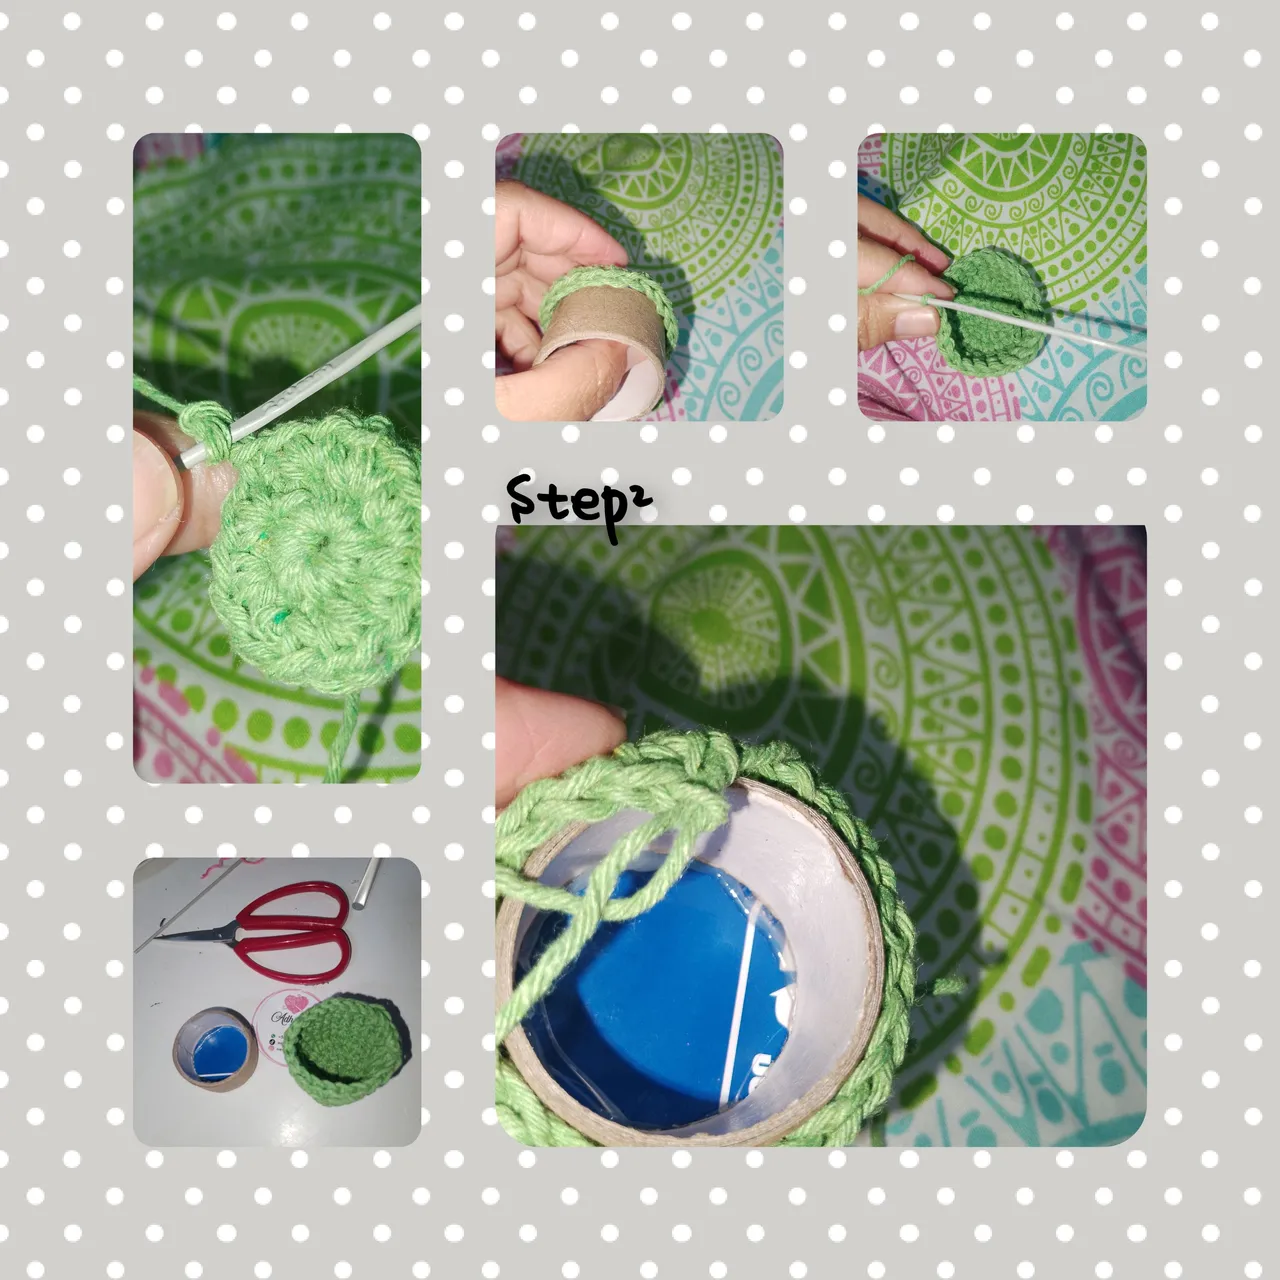
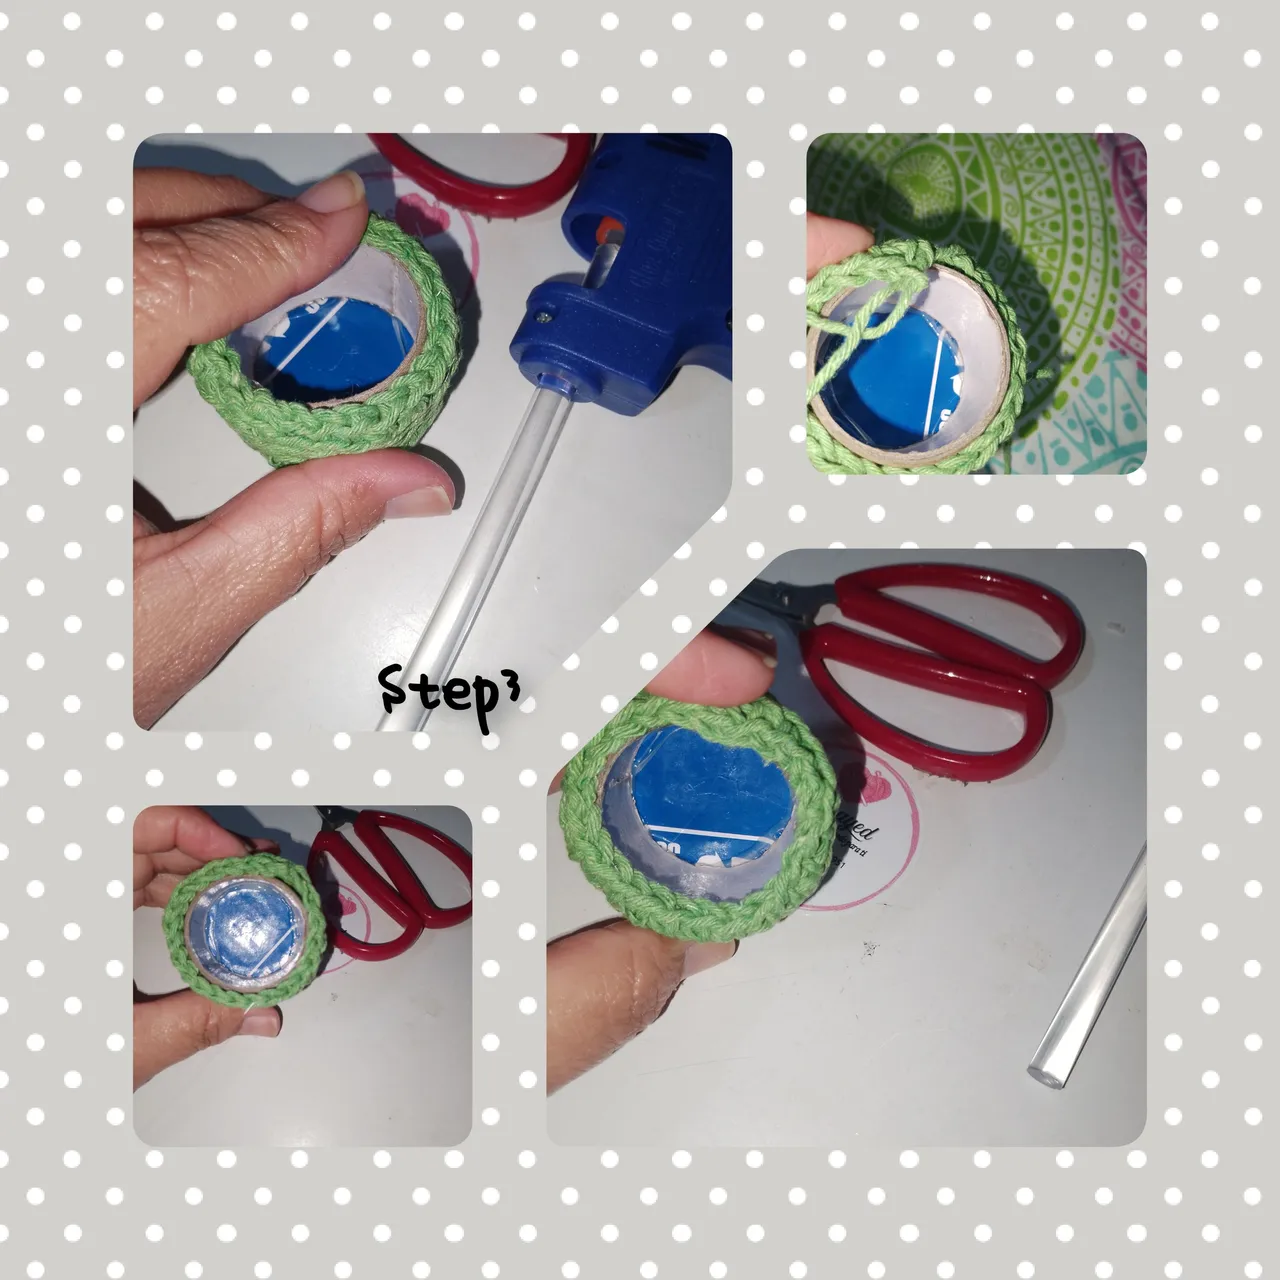
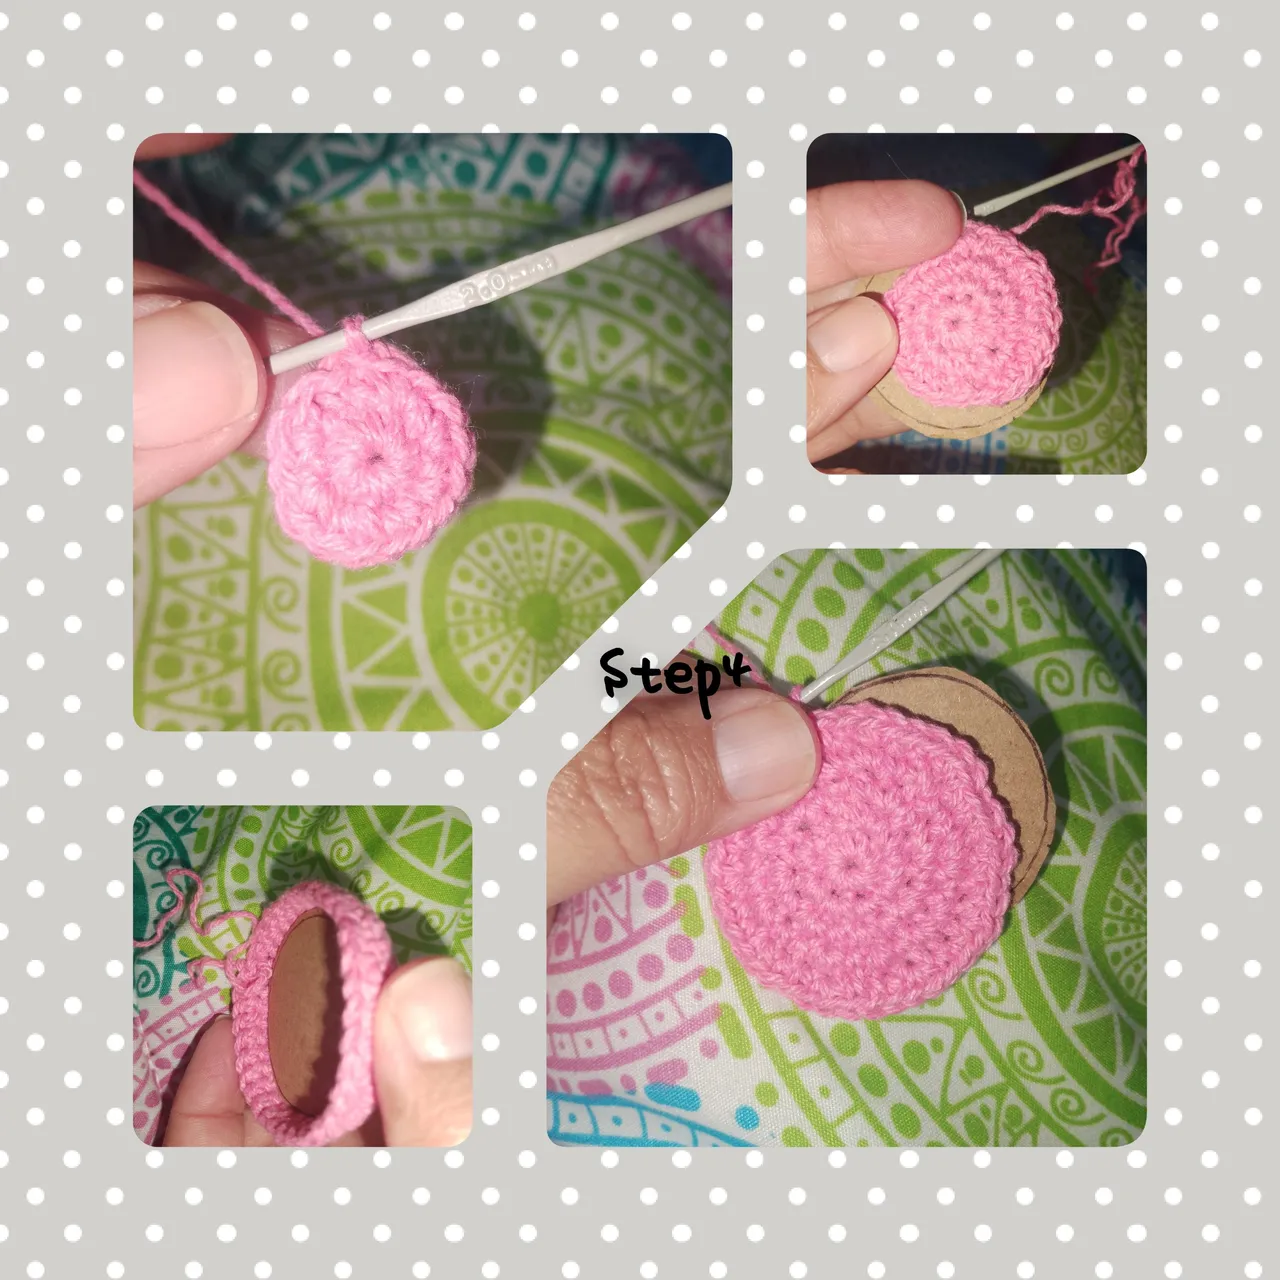
1.) Using, the small cardboard tube, Marco, with the pencil two circles, taking as reference one of the holes, of El Tube, after that, cut, with scissors. Marco and cut, two circles of equal size. To one of the circles, silicone applied and hit the tube ... I reserve the next, for the lid.
2.) Using the green thread, I make a magical ring and inside it, weigh eight media points, then weigh, eight increases, then weave in the next past, an increase after a half point. Reaching the size of the circle. Tejo, six, turns without increasing, par height, and reaching a little more the size of the tube.
3.) To continue, he applied glue and introduced the tube, when I was fixed. He also applied glue to the shore and covered the edge.
4.) To cover the lid, of the small box, I repeat the process of making the bottom of the box, short the thread leaving a thread of thread, long enough. Achieved the objective of covering the lid, weighing two more turns.
Done, this, I put the cardboard circle glue and fix.
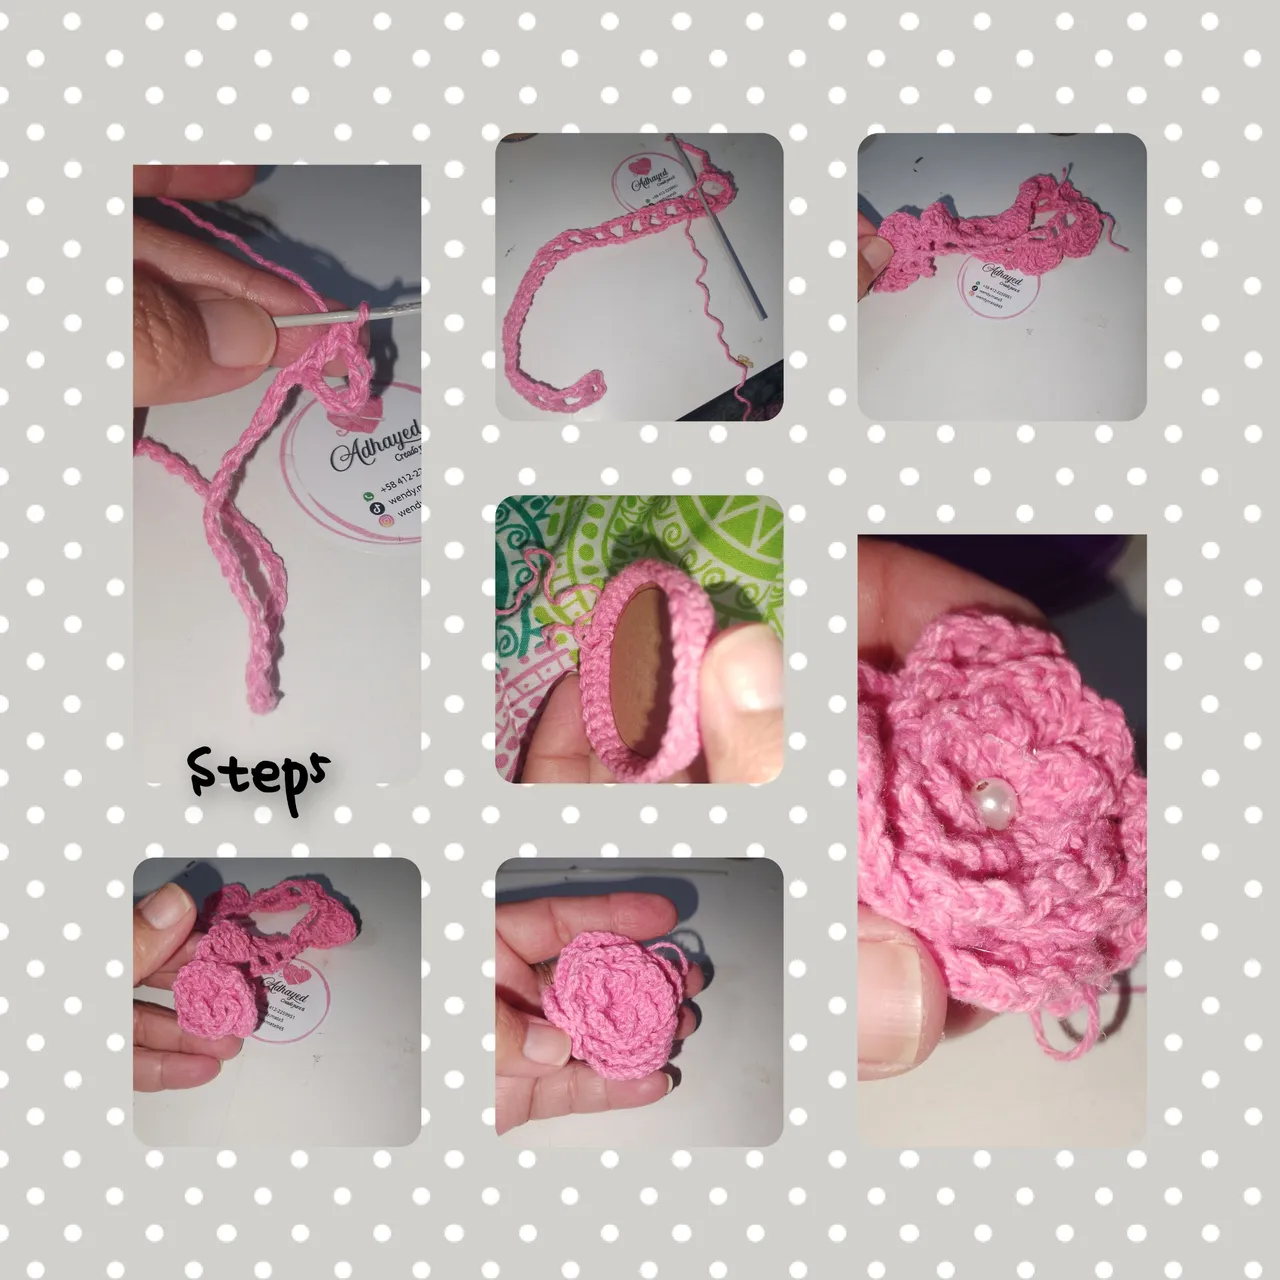
5.) Weed using the pink thread, seventy points chains, I lift two points chains and leave two points, chains, weigh a high points. Similarly, we have the entire route. I give a new pass, I turn to the fabric and in each chain space, weave a high point and aChain, I will repeat in the first six spaces, and the following, spaces double points, always separated by chain points. Applying silicone, I will turn, from the beginning of the fabric and formed a beautiful pink, then hit the pearl in the, the pearl center.
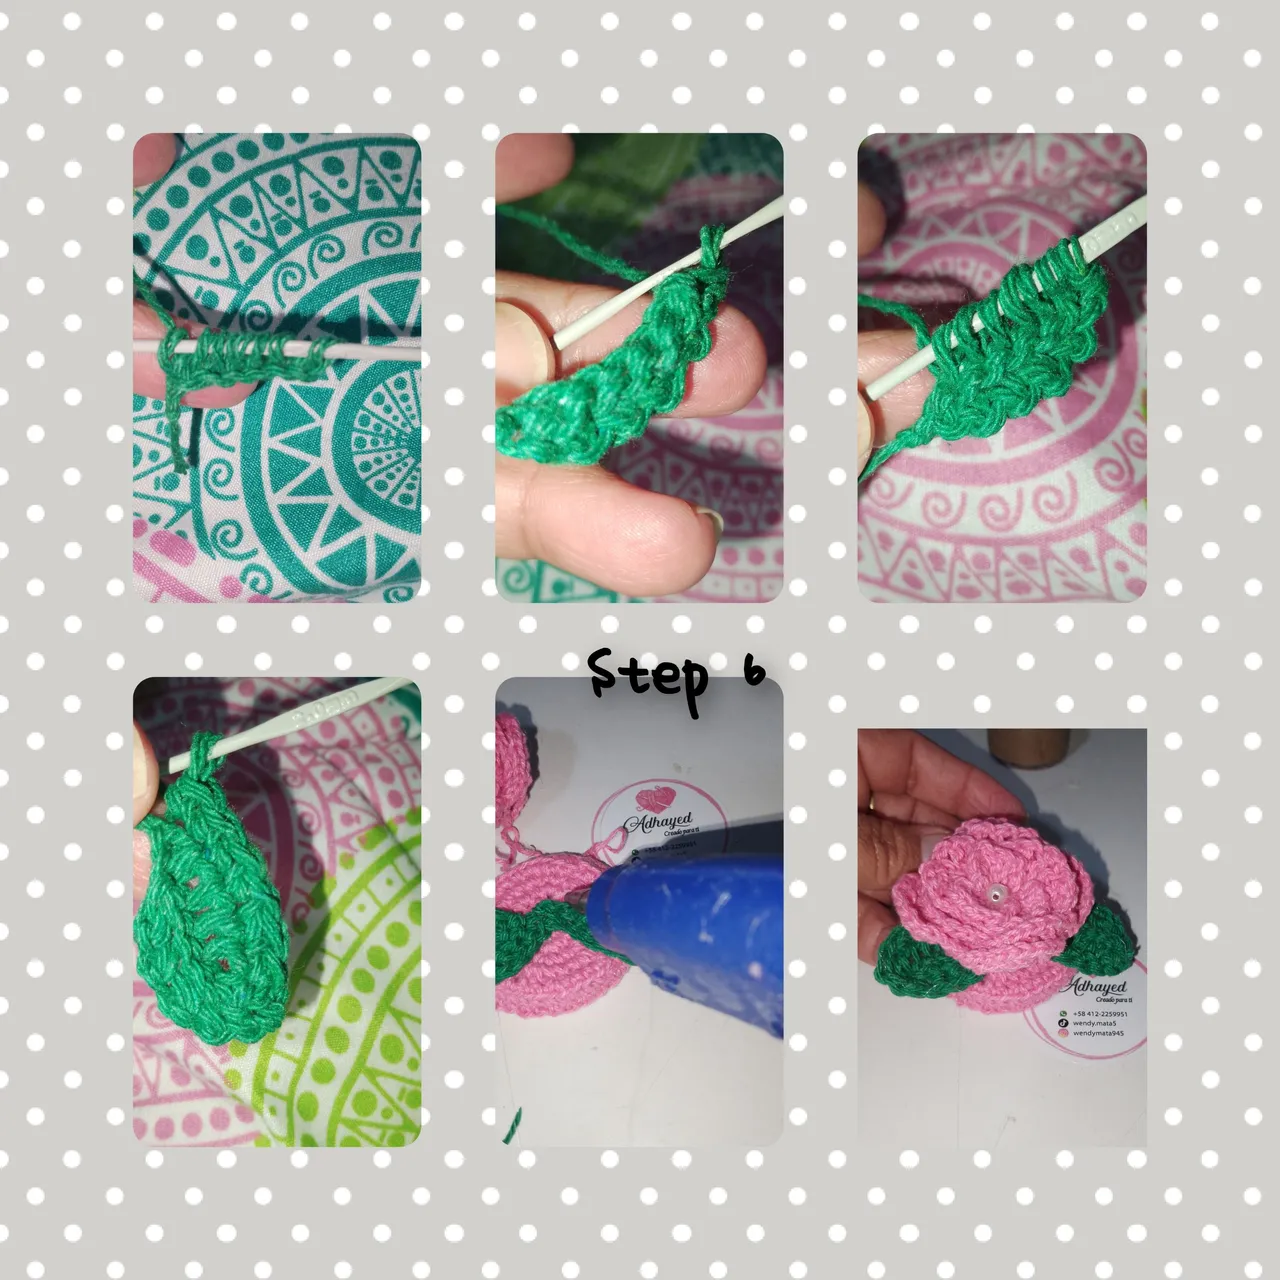
6.) Two leaves, and continue, hitting the leaves on the lid and on it the flower. The following will be, set the lid to the small box, for this, we have three sliding points, and so you can upload and lower the small lid of the box. Finally, I make a small loop and hit the front of the box.
. All the photos are of me property.
. Use colorless.
. Use language translator.
Grateful as always for having followed me until the end, it will be until a next opportunity.
(Esp)
Hola a todos, deseo se encuentren bien, llenos de mucha salud y energías, positivas y creativas, hoy me complace, luego de un tiempo, estar con ustedes en, @diyhub. Paso en esta ocasión, a mostrarles, un muy bonito y fácil, paso a paso, de como realizar una hermosa y delicada, cajita de regalo, conde uso, la técnica de reciclaje y crochet, ideal, para dar un presente en un momento especial. Sin más la invitación es a seguirles y les muestro, los sencillos paso a paso.
Materiales usados en el proceso, creativo:
. Hilos para tejer, colores ( verde, claro y oscuro. Rosado)
. Aguja para tejer.
. Perlas de color blanca.
. Pegamento.
. Tubo de cartón.
. Trozo de cartón.
. Lápiz para marcar.
. Tijeras.
. Cinta delgada de color blanco.
Pasos a Seguir.
1.) Usando, el pequeño tubo de cartón, marco, con el lápiz dos círculos, tomando como referencia uno de los orificios, de el tubo, luego de ello, recortó, con las tijeras. Marco y recortó, dos círculos de igual tamaño. A uno de los círculos, aplicó silicón y pego el tubo...reservo el siguiente, para la tapa.

2.) usando el hilo de color verde, hago un anillo mágico y dentro de el, tejo ocho medios puntos,luego tejo, ocho aumentos, seguidamente, tejere en la siguiente pasada, un aumento luego de un medio punto. Alcanzando el tamaño de el círculo. Tejo, seis, vueltas sin hacer aumentos, par dr altura, y alcanzar un poco más de el tamaño de el tubo.
3.) Para continuar, aplicó pegamento e introduzco el tubo, par que este quedé fijo. Así mismo aplicó pegamento a la orilla y cubro el borde.
4.) para cubrir la tapa, de la pequeña cajita, repito el proceso de elaboración de el fondo de la cajita, corto el hilo dejando un hebra de hilo, suficiente larga. Logrado el objetivo de cubrir la tapa, tejo dos vueltas más.
Realizado, esto, coloco pegamento y fijo el círculo de cartón.
5.) tejo usando el hilo color rosa, setenta puntos cadenas, levanto dos puntos cadenas y dejando dos puntos, cadenas, tejo un puntos alto. De igual forma, tejo todo el recorrido. Doy una nueva pasada, doy vuelta a el tejido y en cada espacio de cadenas, tejere un punto alto y una cadena, repetiré en los seis primeros espacios, y el los siguientes, espacios puntos altos dobles, siempre separados por puntos cadenas. Aplicando silicón, iré dando vuelta, desde el principio de el tejido y formó un hermosa rosa, luego pego la perla en el, centro la perla.
6.) Tejo dos hojas, y continuo, pegando sobre la tapa las hojas y sobre ella la flor. Los siguientes será, fijar la tapa a la pequeña caja, para ello, tejo tres puntos deslizados, y así podrás subir y bajar la pequeña tapa de la cajita. Para finalizar, hago un pequeño lazo y pego en la parte frontal de la cajita.
. Todas las fotos, son de mí propiedad.
. Use incollage.
. Use traductor lenguaje.
Agradecida como siempre por haberme seguido hasta el final, será hasta auna próxima oportunidad.