✨¡Hola amigos amantes de la creatividad! Espero que estén todos bien.✨
🔸Sin más que añadir, a continuación los dejo con el paso a paso:
✨¡Hello friends who love creativity! I hope you are all well.✨
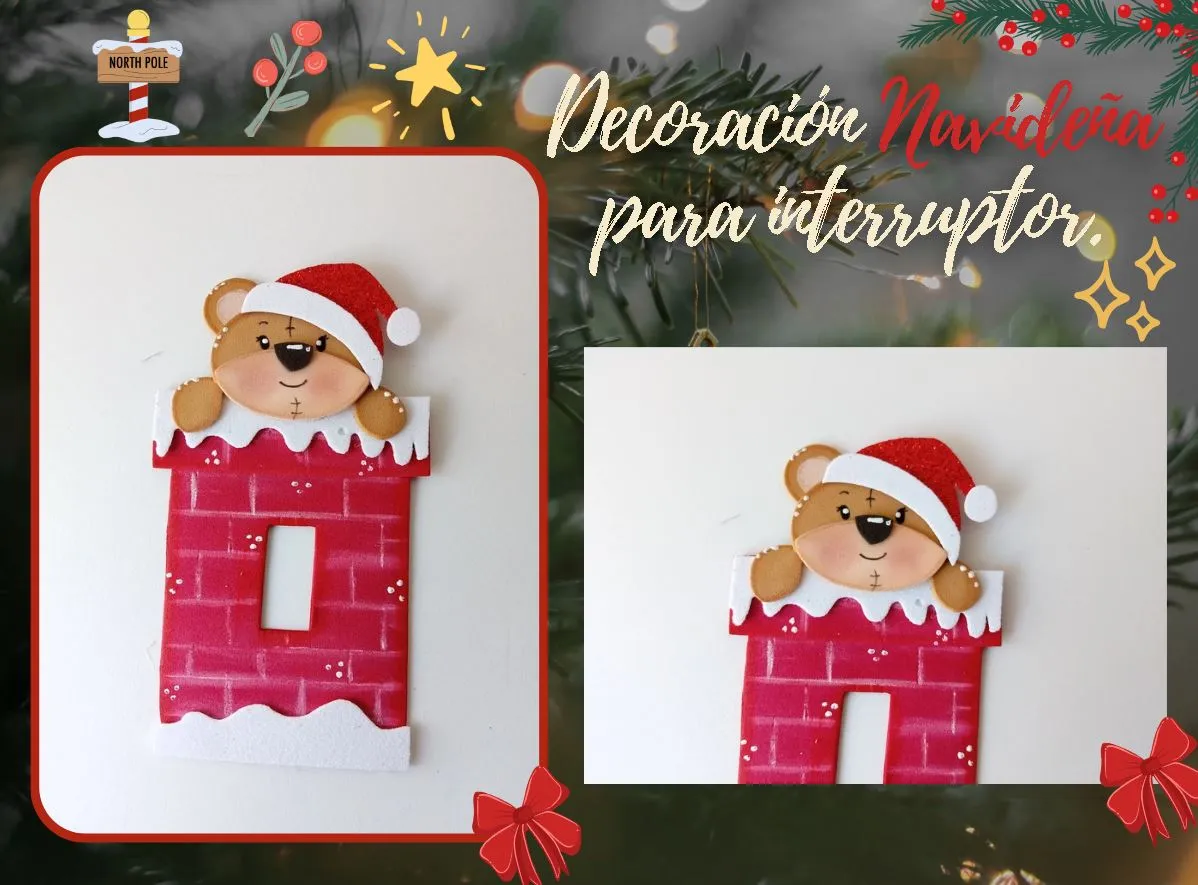
Good afternoon, friends! I hope you are having a great week. For my part, I am happy to stop by here to share a new creation with you. This time I am sharing with you the step by step to make a nice decoration for the light switch with a Christmas theme. That's right, we have already started with my favorite theme of the year, the most beautiful celebration for me, we move on to Christmas decorations. After several days of thinking and looking for ideas, I have a list from now until the end of December of all the creations that I will be sharing with you each week.
This time I wanted to start with decorations that I might leave for later and I know that you want to have the ideas to start making your creations little by little, that is why I thought that something for the light switch would be perfect.
🔸Without more to add, then I leave you with the step by step:
♥️ESPERO QUE TE GUSTE,
¡Empecemos!
♥️I HOPE YOU LIKE IT,
Let's start!

✂️ MATERIALES | ✂️ MATERIALS
- Foami escarchado blanco.
- Foami escarchado rojo.
- Foami rojo, marrón, crema y negro.
- Pinturas y marcadores.
- Hoja blanca.
- Pegamento.
- Tijeras.
- Lápiz.
- White frosted foam.
- Red frosted foam.
- Red, brown, cream and black foam.
- Paints and markers.
- White sheet.
- Glue.
- Scissors.
- Pencil.
🌟 PROCEDIMIENTO | 🌟 PROCESS
✨PASO 1:
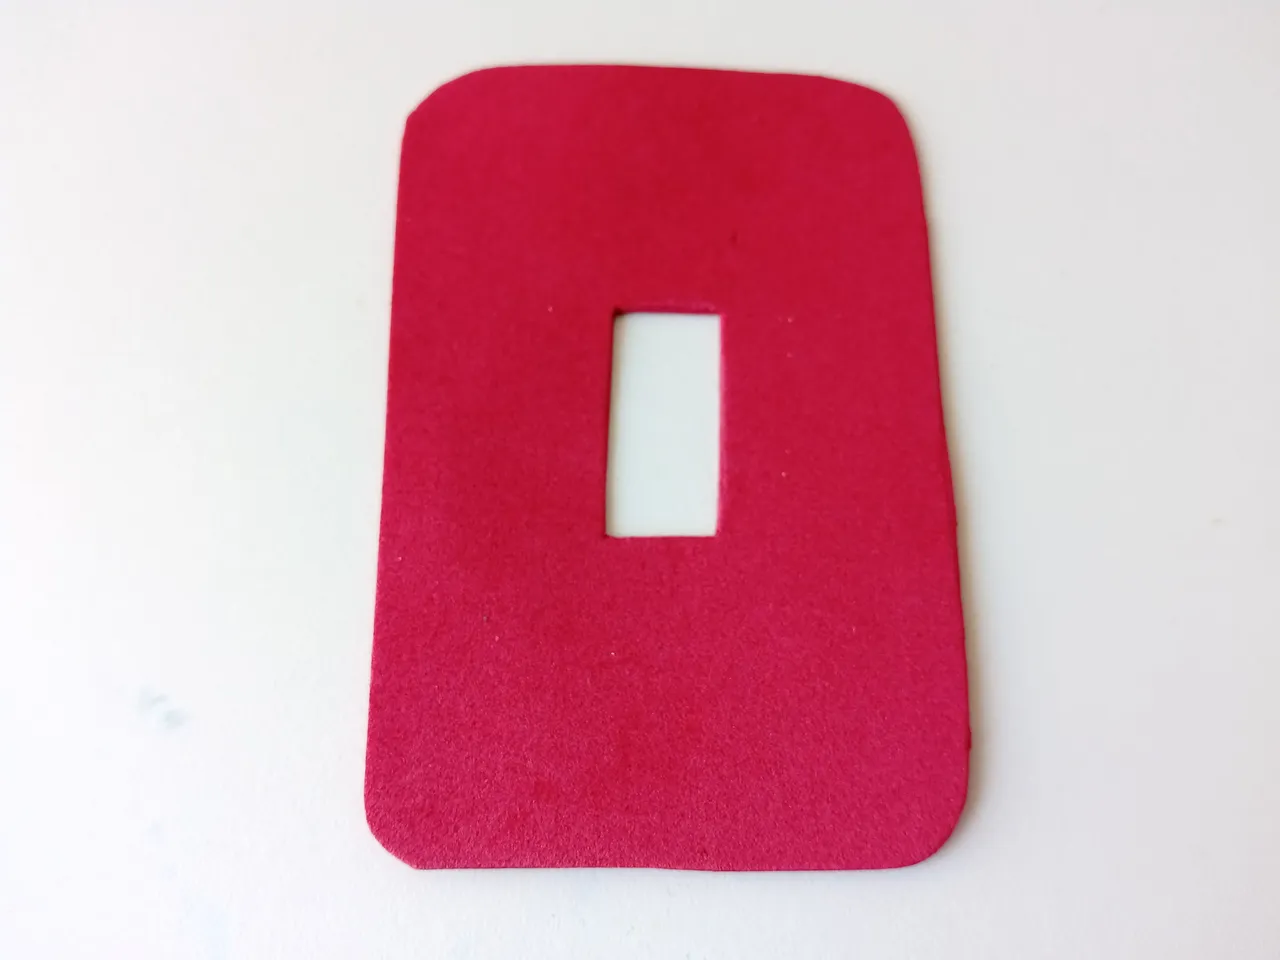
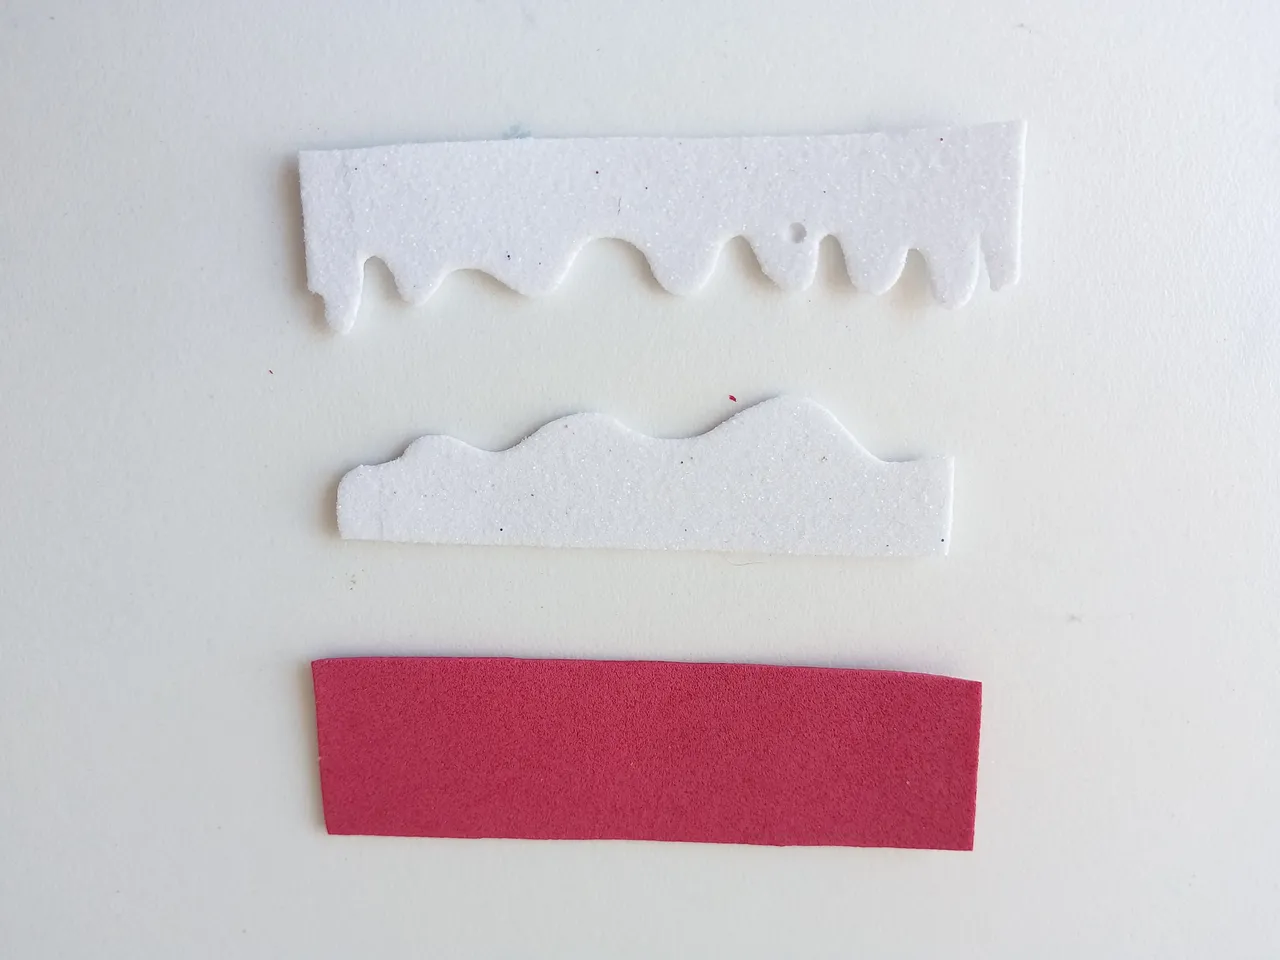
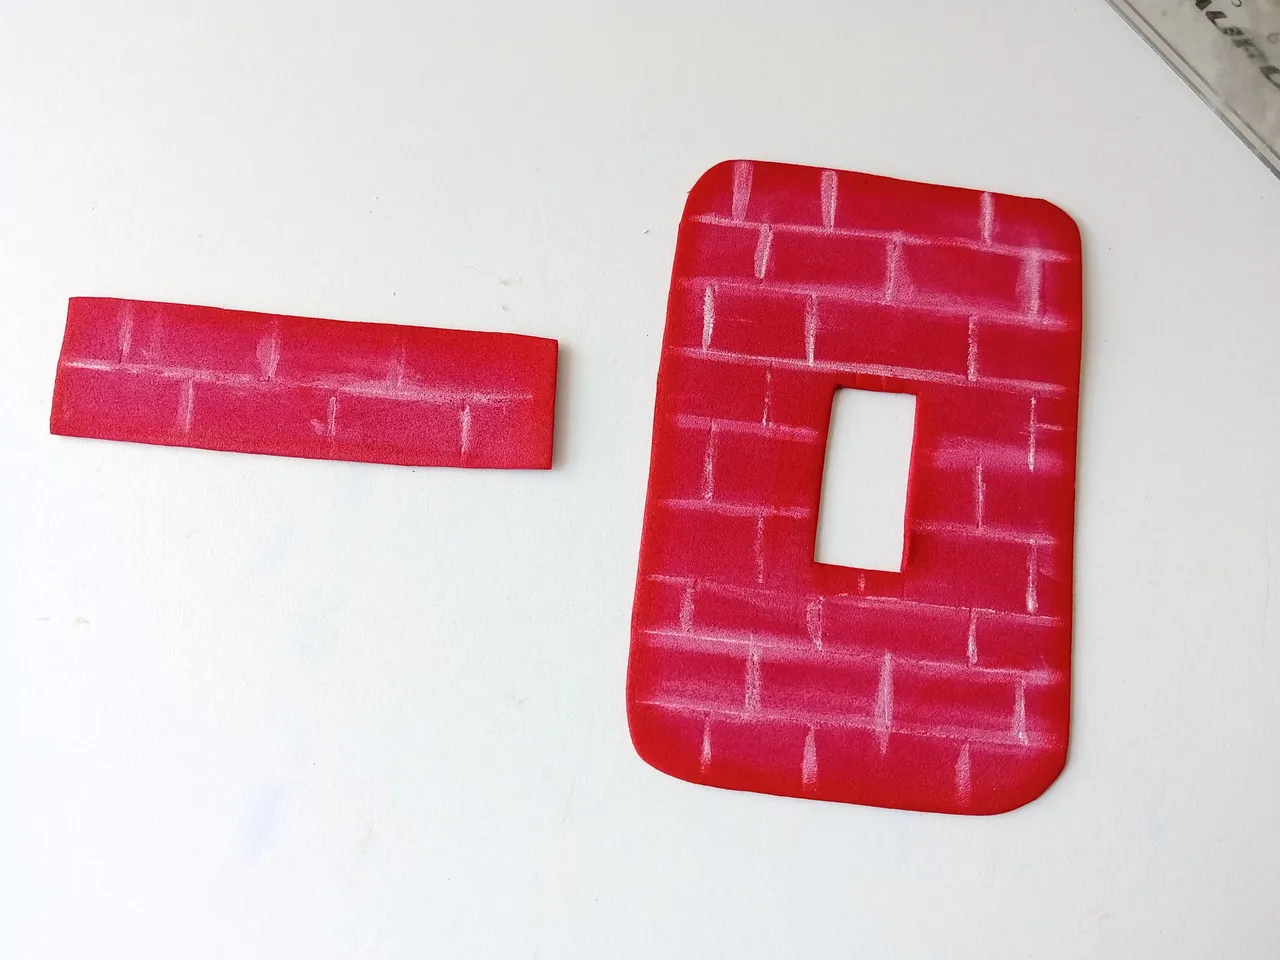
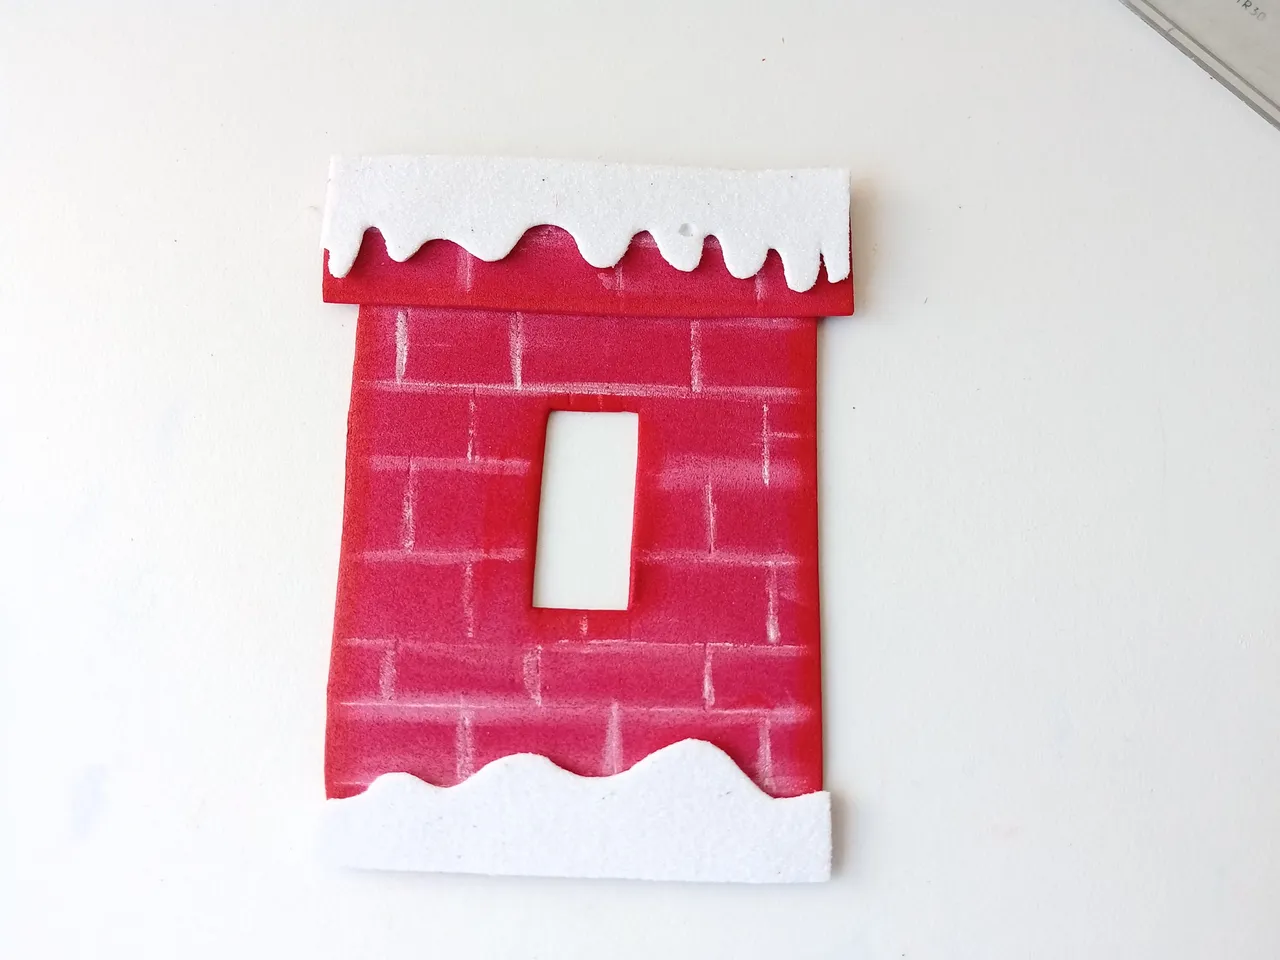
Lo primero que debemos hacer es la base, la cual lleva la forma del interruptor, así que tenemos la opción de tomar las medidas del interruptor y pasarlas a papel, o como en otros casos se puede sacar esta tapa superficial del mismo y calcar tal cual. En mi caso, el interruptor tiene unas medidas de 11.2 cm x 7.5 cm, así que, al tener las medidas, recorté. Adicionalmente, recorté una pieza para la parte superior de la chimenea de 8.5 cm x 2.5 cm en foami rojo y para la nieve una pieza de 8.5 cm y otra de 7.5 cm en foami blanco.
✨STEP 1:
The first thing we need to do is the base, which has the shape of the switch, so we have the option of taking the measurements of the switch and transferring them to paper, or as in other cases we can remove this surface cover and trace it as is. In my case, the switch has measurements of 11.2 cm x 7.5 cm, so, once I had the measurements, I cut it out. Additionally, I cut out a piece for the top of the chimney measuring 8.5 cm x 2.5 cm in red foam and for the snow a piece of 8.5 cm and another of 7.5 cm in white foam.
✨PASO 2:
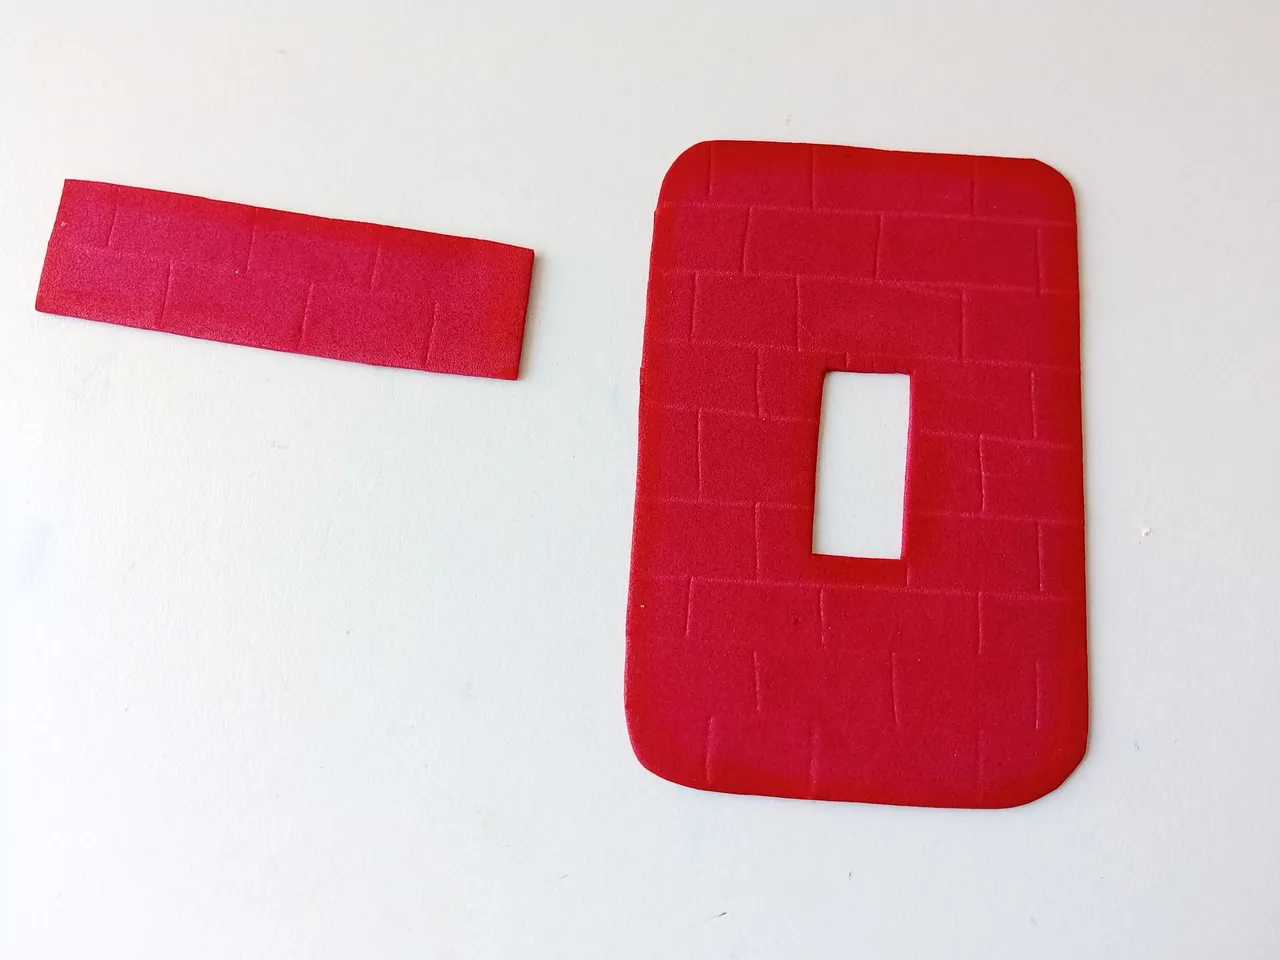
Seguidamente, con ayuda de un palito de altura, comenzamos a trazar las líneas para formar los ladrillos en las piezas de foami rojo, que serán la chimenea. Tomamos pintura blanca con un pincel, pintamos esas líneas marcadas anteriormente y vamos retirando el exceso o difuminando con un pañito. Al estar seco por completo, podemos dar color con pintura o marcador rojo a los bordes y pegamos las piezas hasta formar la chimenea.
✨STEP 2:
Next, with the help of a tall stick, we begin to draw the lines to form the bricks on the pieces of red foam, which will be the chimney. We take white paint with a brush, paint those lines marked previously and remove the excess or blur it with a cloth. Once it's completely dry, we can color the edges with red paint or marker and glue the pieces together to form the chimney.
✨PASO 3:
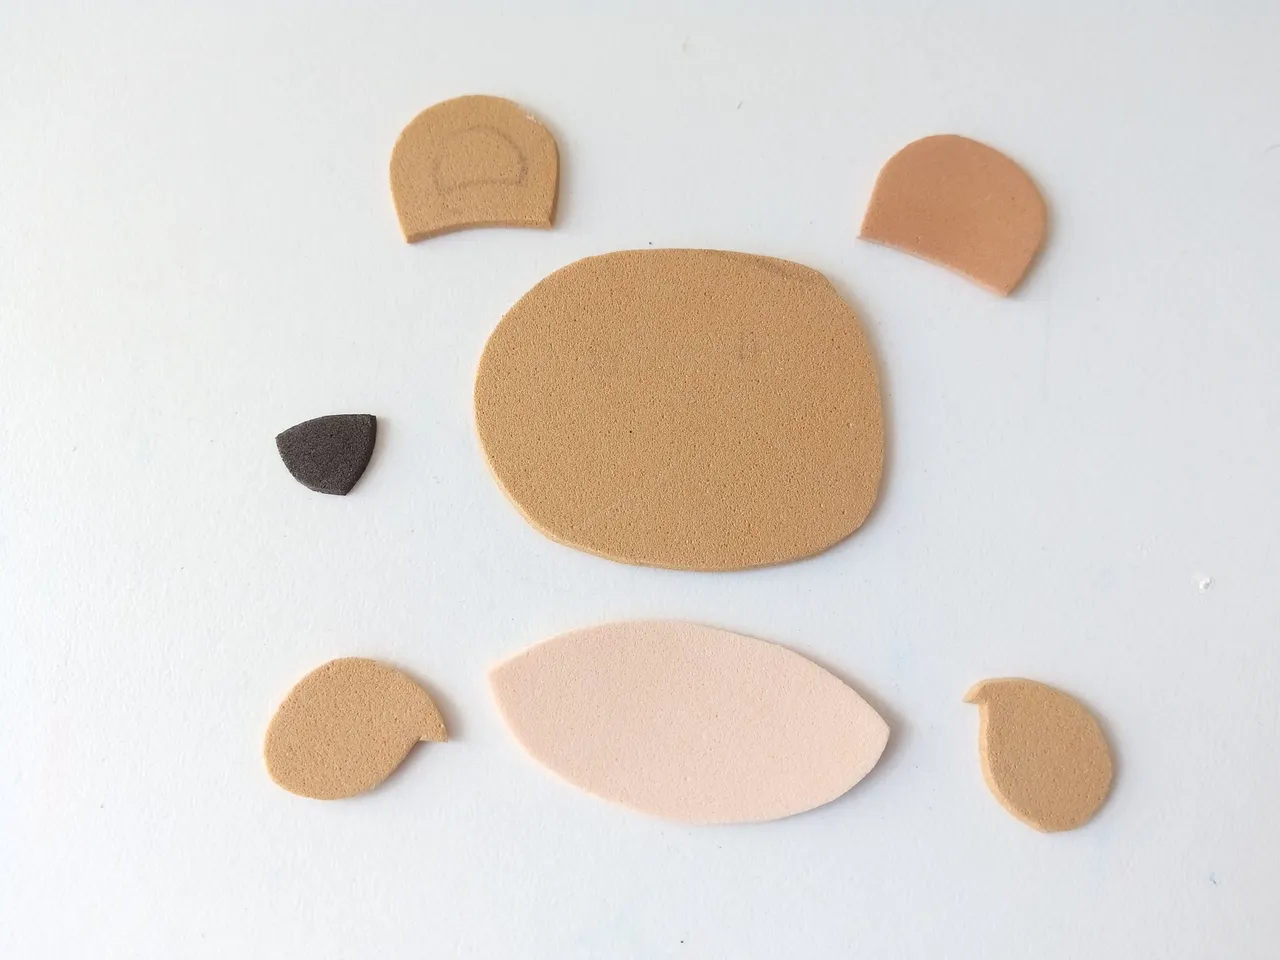
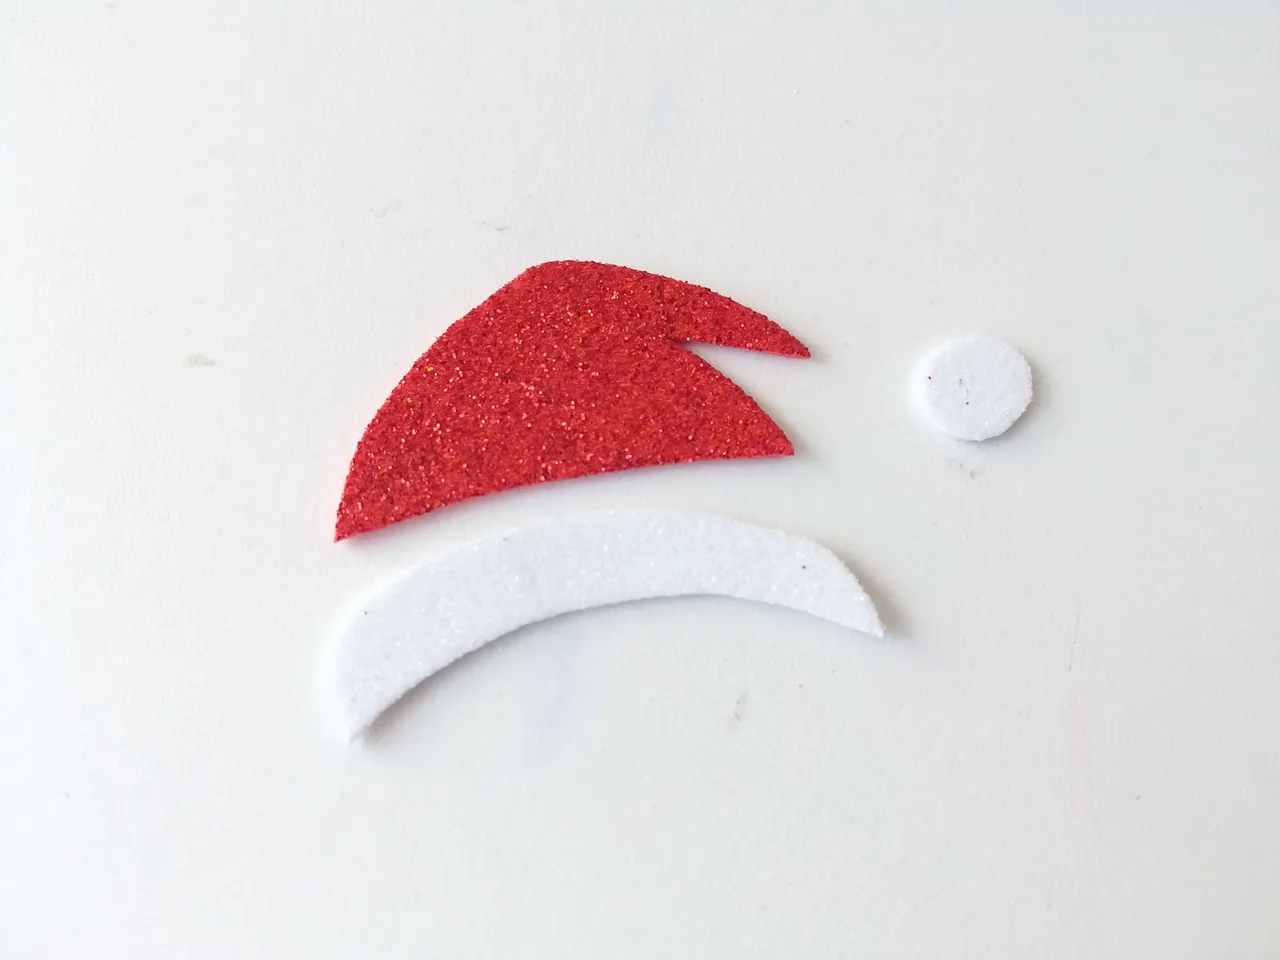
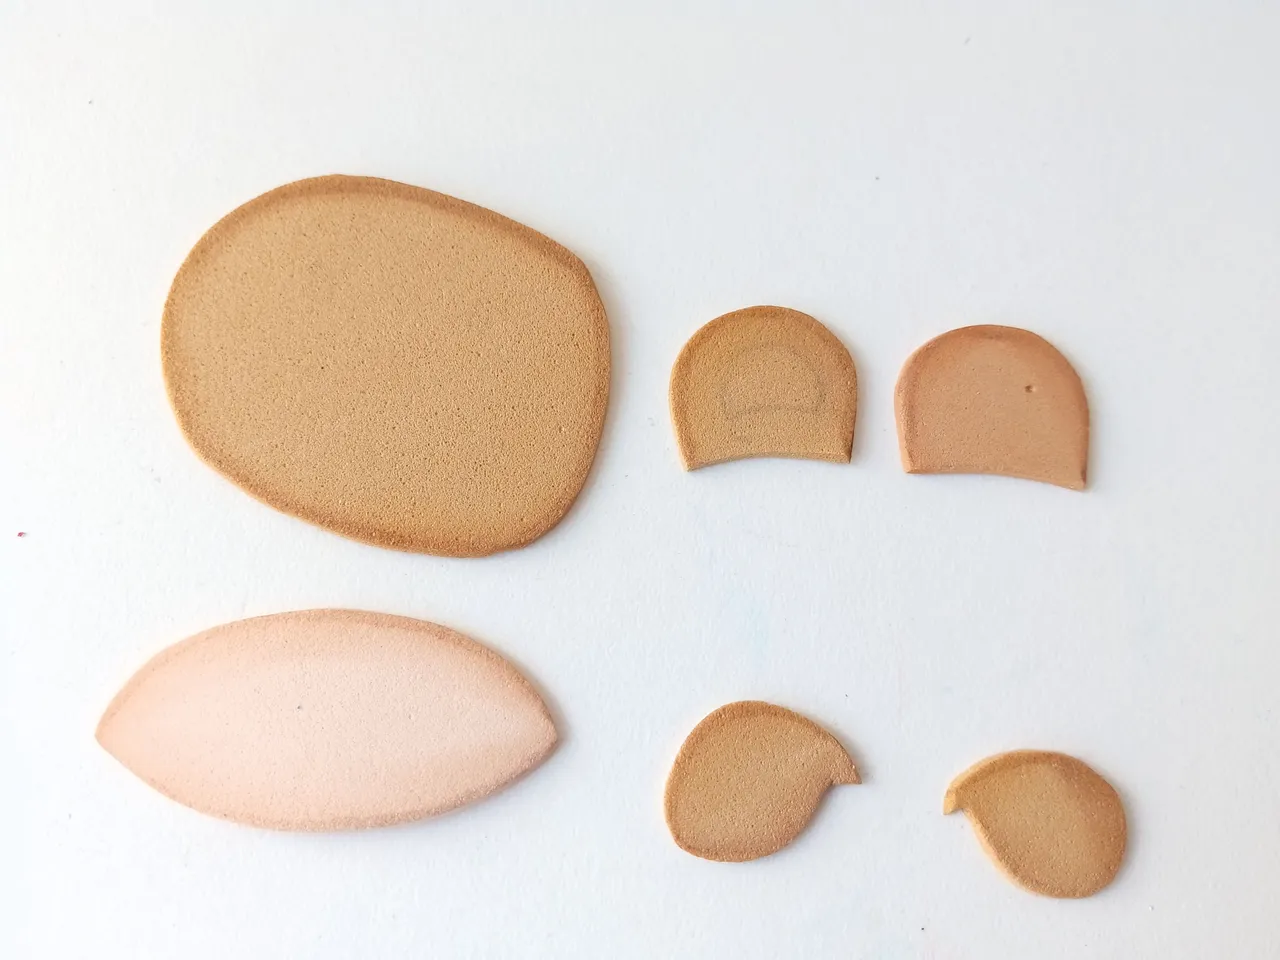
Para la decoración, simplemente dibujamos el patrón del oso en una hoja blanca y transferimos a los colores correspondientes de foami, como explico a continuación: la cabeza, oreja y patas en foami marrón, la mitad de la cabeza en foami crema, nariz en foami negro, gorro en rojo y blanco escarchado.
✨STEP 3:
For the decoration, we simply draw the bear pattern on a white sheet and transfer it to the corresponding colors of foam, as explained below: the head, ear and legs in brown foam, half of the head in cream foam, nose in black foam, hat in red and frosted white.
✨PASO 4:
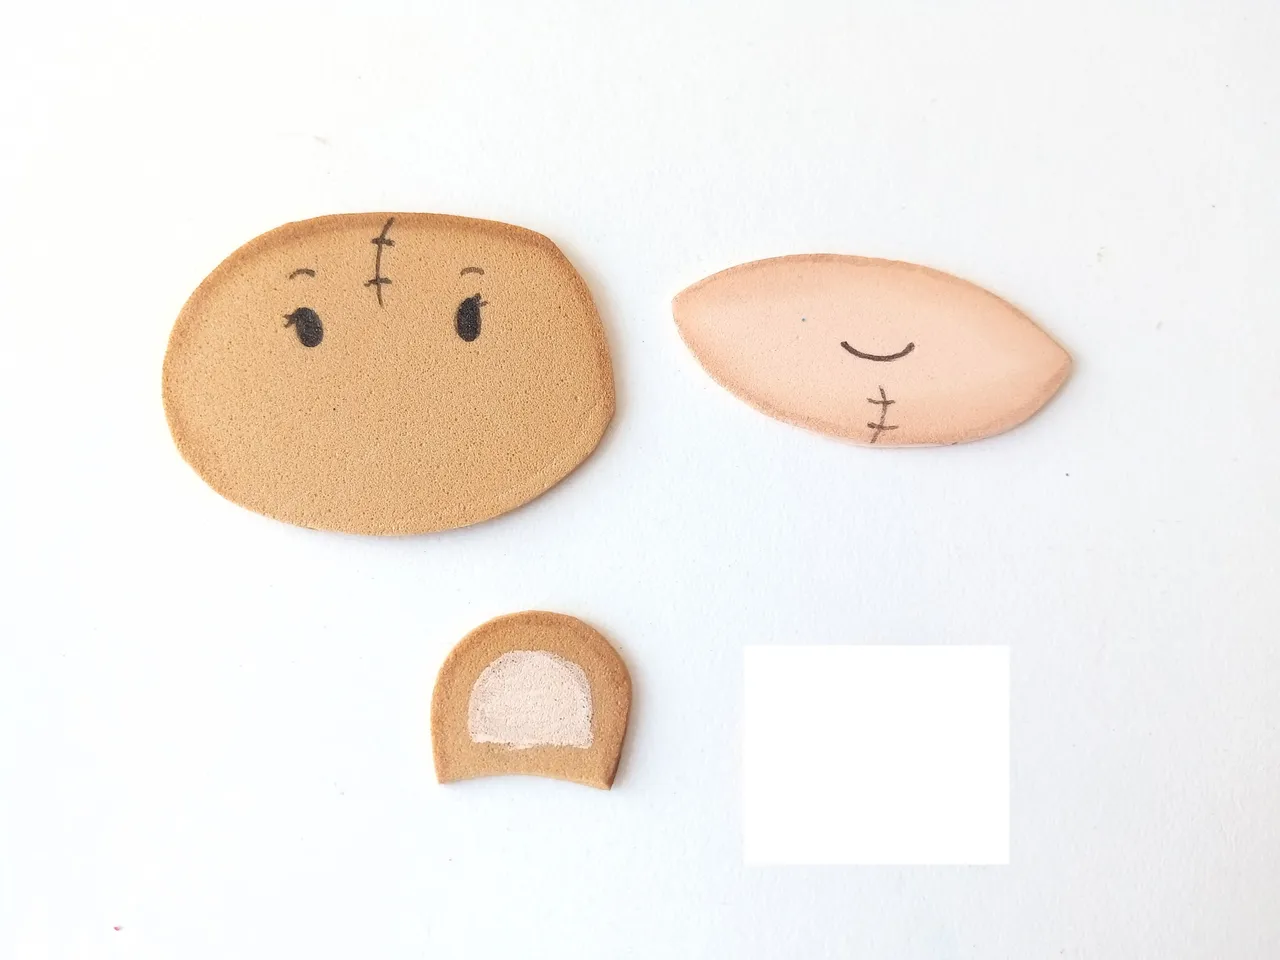
Al tener todas las piezas recortadas, comenzamos a dar color a los bordes con marcadores o con pinturas de un color que hagan contraste con cada una de las piezas de foami liso. Al estar seco, pintamos la parte interna de la oreja, rostro, detalles extras con marcador negro y un poco de rubor o pintura en las mejillas.
✨STEP 4:
Once we have all the pieces cut out, we begin to color the edges with markers or paints in a color that contrasts with each of the pieces of plain foam. Once it's dry, we paint the inside of the ear, face, extra details with black marker and a little blush or paint on the cheeks.
✨PASO 5:
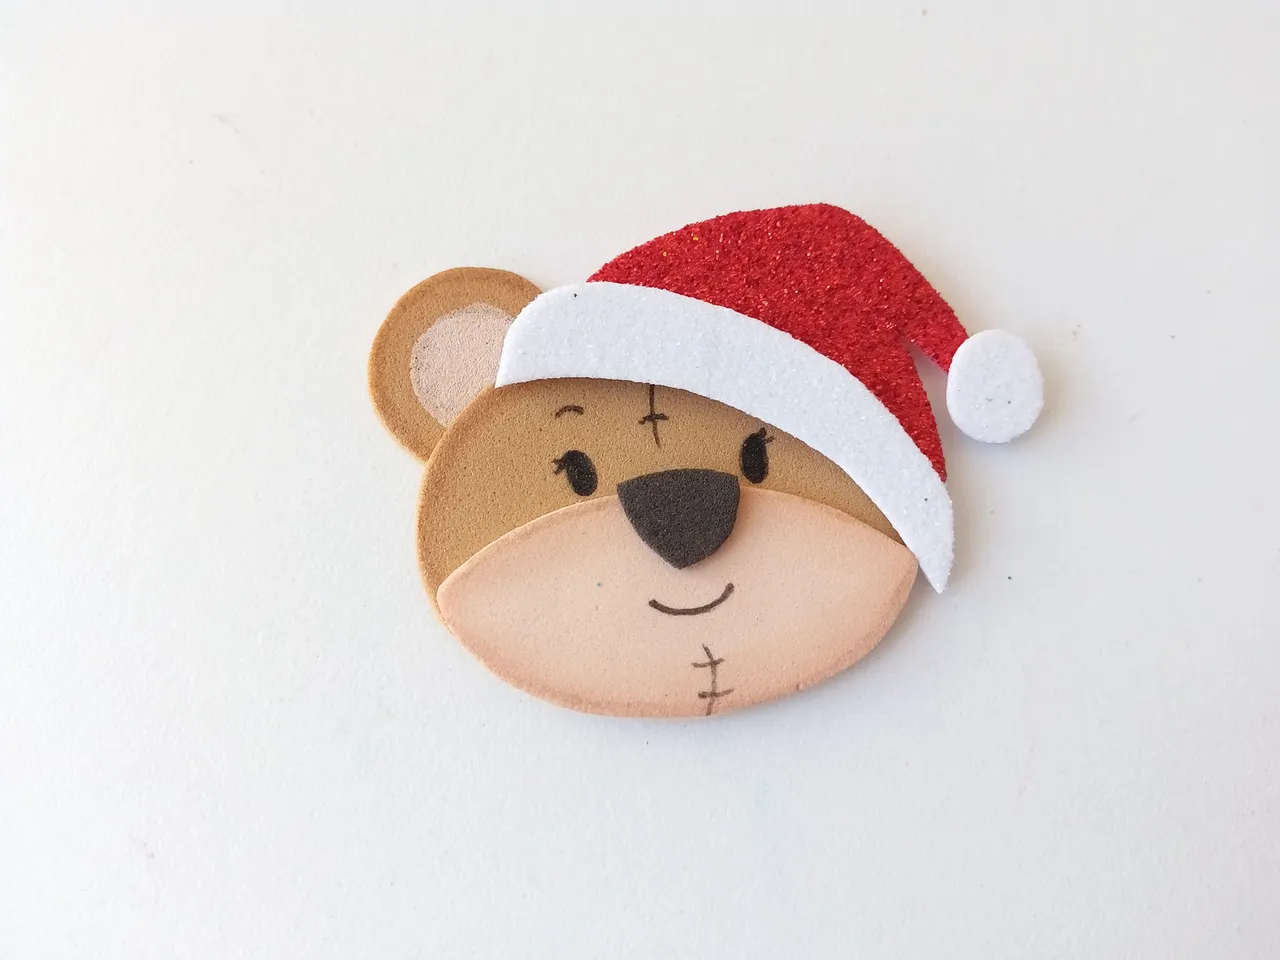
Pegamos todas las piezas hasta formar al oso con su gorro, lo pegamos a la parte superior de la chimenea y las patitas a los lados, pero un poco tapadas con la cabeza. Para finalizar, di detalles de luz con pintura blanca, haciendo algunos puntitos necesarios en la nariz, ojos y para decorar el resto de la decoración.
✨STEP 5:
We glue all the pieces together to form the bear with its hat, we glue it to the top of the chimney and the little legs to the sides, but slightly covered by the head. Finally, I added light details with white paint, making some necessary dots on the nose, eyes and to decorate the rest of the decoration.
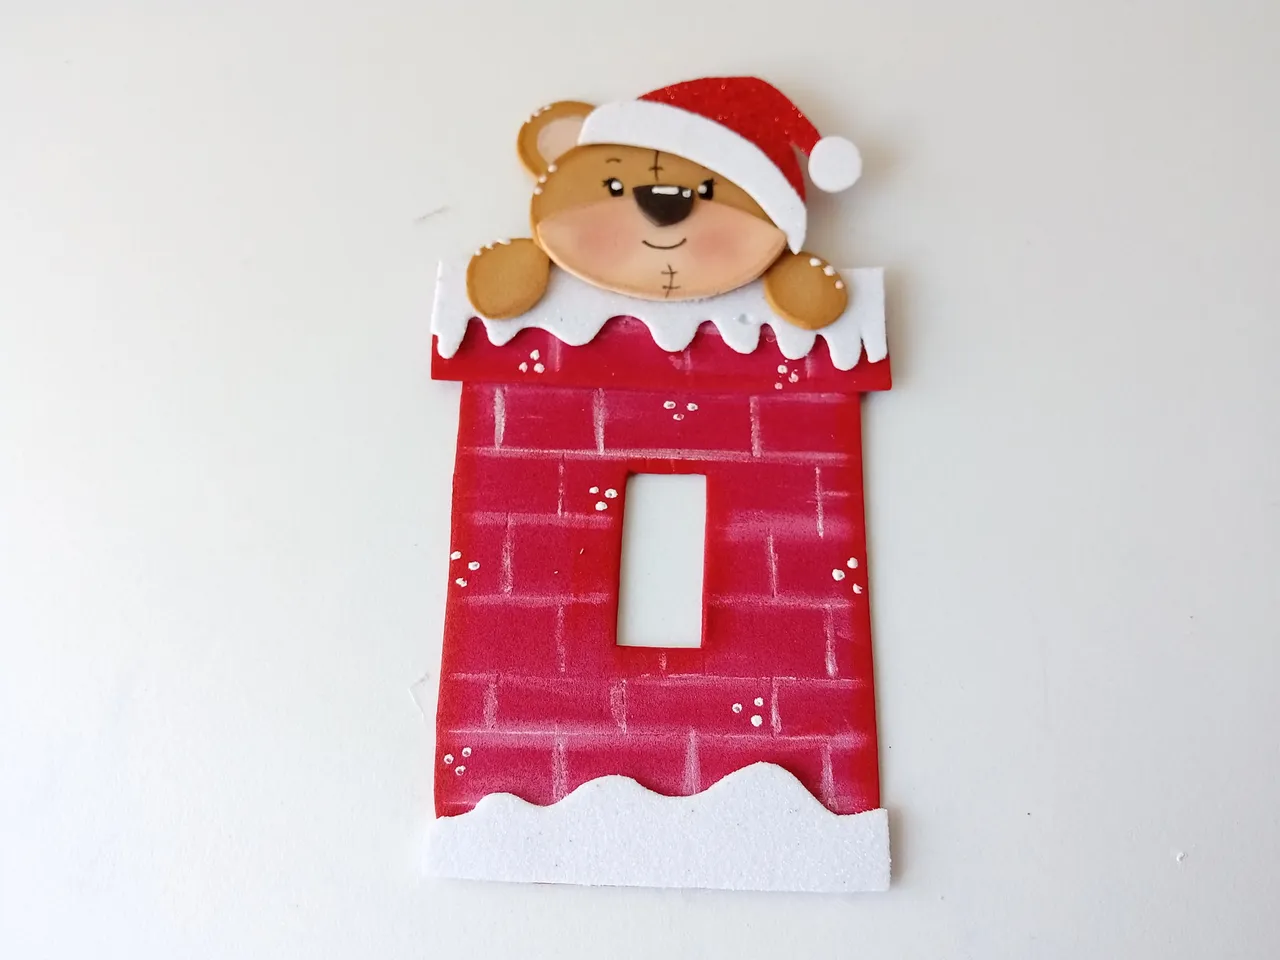
✨This is how you can make this cute decoration for your switches, already with a Christmas theme for those who want to start making their own creations at home. I hope you liked the step by step and are encouraged to make it.
❤️Until the next post.
✨RESULTADO: | ✨RESULT:


Todas las fotografías son de mi propiedad.
Separador y Fotos editadas en Canva
All photographs are my property.
Photos edited in Canva