Today I'm going to give you an in-depth tutorial of how to make a steemit bot in python 3.
This will include : how to vote, comment, post, read posts etc.
I won't cover parts that require a master key (transfers, payments, etc) for two reasons :
1 : If you make a mistake you may give away your master key and we all know how this ends.
2 : Installing the steem library for that is like chewing on glass, it's incredibly complicated for a few reasons (bleeding edge tech and dependency hell).
Anyways let's get started !
Installation
We'll need the piston library to interact with the blockchain :
(note that this tutorial is made for linux, if you're on windows, just skip the apt-get and you should be fine)
sudo apt-get install libffi-dev libssl-dev python-dev
sudo pip3 install piston-lib piston-cli
and you're done.
Getting your posting key
First you need your posting key (or wif key) in order to do things. Use that key and not the master key. it can be found by going into the wallet page, then into the "permission" tab and then clicking on "show private key" next to "posting"
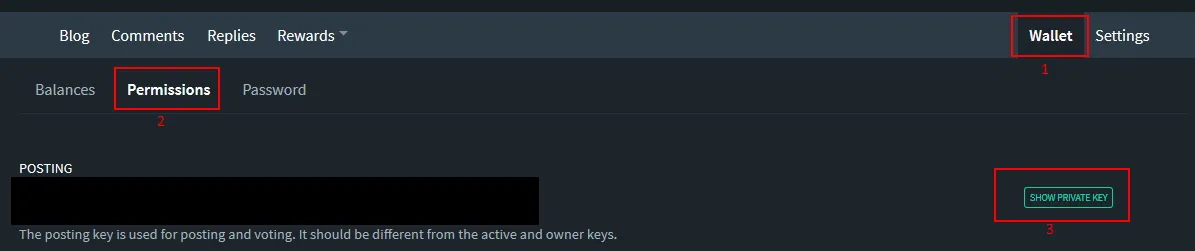
Then copy the key.
Create a post
Creating a post is surprisingly easy :
from piston.steem import Steem
steem = Steem(wif='mypostingkeyhere')
steem.post(title="What an amazing title !",body="What an amazing text ! ", author='mysteemitusernamehere',category='test')
And that's about it !
Now a few notes :
- If you post an article with a title and the post another with the same title, the first post will be edited.
- You can't post more than once every 5 minutes.
- By default the posts are 50% steem dollars 50% steem power, if you want to set your posts to power up, add this parameter : "meta={'percent_steem_dollars': 0}"
This gives us :
steem.post(title="What an amazing title !",body="What an amazing text ! ", author='mysteemitusernamehere',category='test', meta={'percent_steem_dollars': 0})
Create a comment
Creating a comment uses the same function as creating a post :
from piston.steem import Steem
steem = Steem(wif='mypostingkeyhere')
steem.post(reply_identifier='@author/permlink', title="None", body="Wow nice post I'm totally not a bot so upvote me...Right ?", author="mysteemitusernamehere")
reply_identifier is the Identifier of the post to reply to, it takes the form @author/permlink
For instance to comment on my last post : "https://steemit.com/technology/@howo/the-end-of-the-captchas"
You would do
steem.post(reply_identifier='@howo/the-end-of-the-captchas', title="None", body="Wow nice post I'm totally not a bot so upvote me...Right ?", author="mysteemitusernamehere")
Upvoting
Now that we have seen what is a post identifier let's move onto voting :
from piston.steem import Steem
steem = Steem(wif='mypostingkeyhere')
steem.vote(identifier="@author/permlink", weight=100, voter="mysteemitusernamehere")
Note that weight can go from 100 to -100 so you can down vote as well with this function. If you suddenly hate the world and want to down vote everything that you see but doing it manually is too much of a hassle, that's how you do it ;)
Also, you can't vote more than once every 20 seconds, so plan accordingly when destroying the world m'kay ?
Getting posts from an user
Suppose you love someone so much you want to make a bot to recieve a text every time she/he posts, how would you do that ?
Well first we would need to get the content of his blog :
from piston.steem import Steem
steem = Steem(wif='mypostingkeyhere') # using default server
blog = steem.get_blog("hisusername")
The "blog" variable is now an array filled with his 20 last articles, for instance if you run this code with my username (howo) you get this :
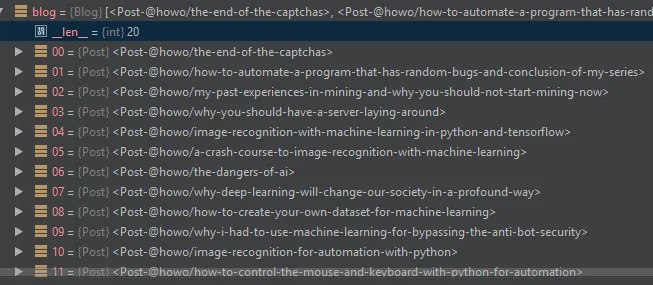
each article is an object with all the data in it (the list was too long so I cut it) :

One interesting variable is the "identifier" variable, because then you can do things with it automatically (comment, vote etc).
So yeah, the stalk thing :
from piston.steem import Steem
import time
steem = Steem(wif='mypostingkeyhere') # using default server
lastarticle = None

while True  :
    blog = steem.get_blog("hisusername")
    if not lastarticle :
        lastarticle = blog[0]
    if blog[0].identifier != lastarticle.identifier :
        print("OMG A NEW ARTICLE I LOVE YOU PLEASE NOTICE ME SEMPAI")
        sendtextorwhaterver(blog[0].body) # send the article's content
        lastarticle = blog[0]
    time.sleep(10)  # let's not refresh every second it would overload things
Getting post from a category
One person is not enough, I love an entire category ! I love science ! I love steemstem (this is an awesome initiative please go there and be awesome with us).
it works the same way as when you query from a person except :
- you have to specify a category (duh)
- And chose what articles you want (new, hot or trending)
from piston.steem import Steem
steem = Steem(wif='mypostingkeyhere') # using default server
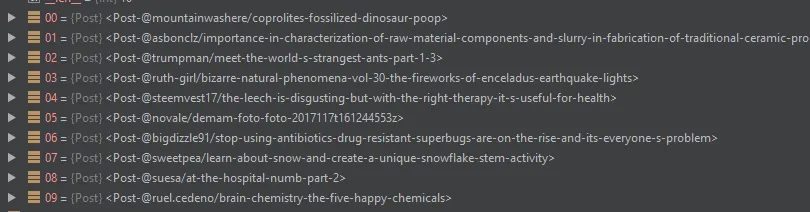
posts = steem.get_posts(limit=10, sort="hot", category="steemstem")
For instance here we query steemstem for his 10 lastest hot posts, and get a great article from @mountainwashere about dino poop. (aaah... science)
if you want to get the "new" articles, you have to put created not new in the category parameter :
from piston.steem import Steem
steem = Steem(wif='mypostingkeyhere') # using default server
posts = steem.get_posts(limit=10, sort="created", category="steemstem")
Conclusion
One big thing is that the library connects directly to a server that is owned by @xeroc
So it will sometimes stop responding, and it can't handle a lot of charge. If you're planning on doing anything big, please install your own node : http://cli.piston.rocks/en/develop/public-api.html#running-your-own-node
The library does a lot of things, but the documentation is a bit lacking or outdated, luckily the code is not lacking in documentation. So the best way to read the documentation is to read the code. so find the steem.py file and read it to see what it can do. If you struggle to find it I've uploaded a gist here :
https://gist.github.com/drov0/9c8ec1c8c38a6ac87e12f136aa53c9b6
or if you're interested, here are a few links to the git and the original post of the creator :
https://github.com/xeroc/piston-cli
All the images are screenshots made by hand.
If you have any trouble don't hesitate to ask for help in the comments :)