
When I came to Steemit, it looked like an awesome site where I can do two things: make a little extra cash… or Steem… and Promote my webcomic. I already post my webcomic to other comic sites throughout the inter webs, but one more place is always better, the more exposure, the better. Like myself, most webcomic creators are making their comic all by themself, so we can only upload 1 -2 pages a week. Because of this one of the most important things about hosting a webcomic is letting your reader get from one page to the next by use of Navigation Buttons. If you don't create these buttons, then it will take too much effort for your reader to get to the next page, or even to find the first page.
Why Not Just Bulk Upload All the Pages at Once?
Now we could do this. We could finish our story, and post it all at once. But in the webcomic world we have to fight for an audience. It's a tough world out there. If we post all of our comic at once, then our readers will read it all at once, then while we are working on our next comic, they will forget about us. Keeping regular updates is one of the most important things for a creator. We want to stay on the minds of our readers. This is also the case with videos, or tv. We don't want to be forgotten. So most webcomic readers understand this, and deal with the one page a week schedule. I know when I read, I'll even wait about a month and read a few pages at a time. Make sense?
How to make the Buttons
To add the buttons to Steemit, it's really pretty simple. First you need your buttons. All your buttons really are, are images. I use one for the "First page," this take the reader to the first page of my comic, in case they are new. I use another for "Previous Page," so the reader can skip back, and I use one for "Next Page," so the reader can read through.
Here are what my buttons look like:


Now all you need is your code. The best way to do the code, is to do it once and then save it as text in a text editor or some other program. I save mine in my Notebook. Your image code will remain the same and you don't have to upload your buttons after the first time. Just copy the button code and paste it into your new blog entry.
The First Button
The First Button will always stay the same. So once you add the code for the "First" button, you shouldn't have to change it; Just copy and paste it… unless of course you change your first page. The code that I use each time for my first button looks like this:

The black text always stays the same. The text in RED, will be replaced with the URL of the page that you want to be the first page. The text in BLUE is the code that Steemit automatically adds when you drop an image into your blog. (This will be your first button)
So here is how to make the "First" button:
1) Drop your first button image into your post.
2) Find your image code.
3) Before your image code type: <a href="
4) Paste: the URL of your first page after that
5) Type a closing quote and a closing "greater than sign" after your URL: ">
6) After your image code type: </a>
Your First Button is done. Here is simplified version of how your code should look:
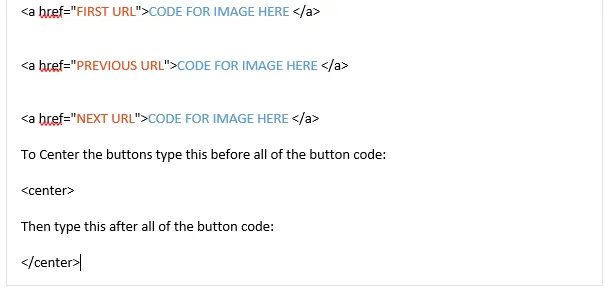
<a href="FIRST URL">CODE FOR IMAGE HERE </a>
The Previous Button

The URL in the "Previous Button" will have to change each time. In the example above, the black text will stay the same, the red text will be replaced, each time, with the previous page's URL. Simple copy the URL from the page you want to direct to, and paste it here. The text in BLUE is the code that Steemit automatically adds when you drop an image into your blog.
So here is how to make the "Previous" button:
1) Drop your "Previous" button image into your post.
2) Find your image code.
3) Before your image code type:  <a href="
4) Copy the URL for the page that you want to be the previous page.
5) Paste: the URL of the previous page after the <a href="
6) Type a closing quote and a closing "greater than sign" after your URL: ">
7) After your image code type: </a>

Your Previous Button is done. Be sure to change the URL on each new page.
Here is simplified version of how your code should look:
<a href="PREVIOUS URL">CODE FOR IMAGE HERE </a>
The Next Button

The "Next Button" is the one that is a bit tricky. Why? Because you haven't posted your next page yet and you don't have a URL to copy. You can always go back and edit your post, but only if you do it within the 7 day window that post remain editable on Steemit.
This is where a little bit of planning will help out.
The URL for your post are based on two things: the first tag you add to your post, and the title of your post.
Here is a break down of a Steemit Post URL:
https://steemit.com / FIRST TAG / @USERNAME / NAME OF POST
Here is an example of one of my post:
https://steemit.com/webcomic/@jonathan-greer/adventures-with-capt-n-heroic-in-the-beginning-a-superhero-webcomic-page-16
FIRST TAG
This is whatever you pick for your first tag. If you edit your post, don't change this tag. To make things easier, I always use "webcomic" as my first tag, but if I decide I want to change it I can always plan ahead for my next post." You can also get to your post by replacing your tag with any of the other tags that you use. (this should stay the same, but may change if you wish)
@USERNAME
This is pretty simple. Simple: it’s the @ sign followed by your username. (this should always stay the same)
NAME OF POST
All spaces are replaced by a dash - and as far as I can tell, any other punctuation is ignored. (notice that the parenthesis in my link example above isn't in the URL (this will always change)
To make things easier for myself, when I title my webcomic post, all I do is change the page number… This way, I can just change the number in the URL here and all is good.
Steps
The steps are pretty much like the other two buttons once you figure out what your next post's URL will be.
So here is how to make the "Previous" button:
1) Drop your "Next" button image into your post.
2) Find your image code.
3) Before your image code type <a href="
4) Copy the URL for the page that you want to be the next page.
5) Make any changes to the "NAME OF POST" section and/or the "FIRST TAG" section in your URL
6) Paste: the new URL after the <a href="
7) Type a closing quote and a closing "greater than sign" after your URL: ">
8) After your image code type: </a>

Your " NEXT" Button is done. Be sure to change the URL on each new page.
Here is simplified version of how your code should look:
<a href="NEXT URL">CODE FOR IMAGE HERE</a>
Here is a screenshot of the code that I copy each time. All I do is change my "PREVIOUS URL" and "NEXT URL" each time I use this snippet of code.
That's about it. Just make sure your buttons are small enough to all fit on one line and do not leave a line break between each button.
Here is a simplified version of all the code, as well as a little way to center your code.
Please let me know if you have any questions... or if you see any mistakes in this post.
Please RESTEEM to help others out.
Thanks again!