Repository
https://github.com/Papabyte/Hardware-cosigner
https://github.com/Papabyte/Byteduino
In response of Byteduino Task Request
What Will I Learn?
- You will learn how to create your own hardware cosigner
- You will learn how hardware cosigner works
Requirements
- Visual Studio Code with Arduino extension
- Any ESP8266 and ESP32 boards, especially NodeMCU
Difficulty
- Intermediate
Description
In this Byteduino tutorial, we will learn how to create your own hardware cosigner for Byteball. This hardware cosigner will provide an extra layer of security so that every transaction will need the consent of the hardware cosigner we build. We also learn how this hardware cosigner works and make a little change on the code.
Installing the dependencies
For the first step, we need to clone the Hardware-Cosigner projects by @papabyte here. After we have clone it, we need to install the depencies that the hardware-cosigner project use. First, we need to install Byteduino library. However, since Byteduino depends on ArduinoJson and micro-ecc, we also need to install both of them.
Register the private key
To create the hardware cosigner and add it as a multi signature wallet, we need to generate the private key first then apply it in the the code/sketch. There are 2 way to generate the private key, one is by visiting this site, the other one is by creating executing the key-generator script which is shipped with Byteduino library.
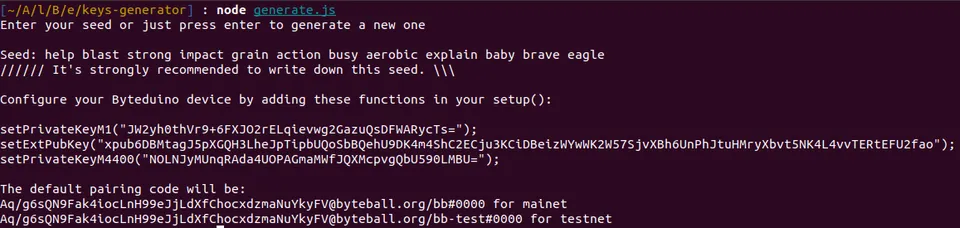
generate.js shipped with Byteduino libraryAfter we have generate our private key, we need to insert it into Hardware-Cosigner code like below. Since in this case we use the testnet wallet, we also need set the hub to point to the testnet which in this case is byteball.org/bb-test. We also optionally can name our device to our liking. Also, don't forget to set the Access Point that we are going to connect to which in this case is WirelessNet.

When we have compile and upload the change into the device, we can now pair it by creating Multisignature Wallet using the pairing code provided by the key generator we executed before.
How the Hardware Cosigner works
This hardware cosigner device connected into 2 things. One is the Byteball DAG network where all Byteball transaction distributed. The other one is the WebApp when we open the IP Address of the device in the Web Browser. In general, the cycle of the hardware cosigner can be separated into 3 parts:
- initialization that happen when the device is power on
- stand by for listening ongoing transaction which happen when we open the IP Address of the device in the Web Browser
- sign/deny the transaction when there is a transaction request
sequence diagram on how the hardware cosigner works
When the hardware-cosigner is power on or the reset button is press, that device will try to connect to the Access Point and print the IP Address into the Serial Port whent it's conncected. After that, it will start the webserver and also connect to the Byteball Hub via secure websocket connection. Finally, when it's connected with the Byteball Hub, it will print the wallet info into the Serial Port.
At the stand by phase (when we open the IP Address of the device in the Web Browser), it will do polling and check the ongoing transaction every 2 seconds. When there is a transaction request, the Deny and Sign button along with the transaction details will open in the WebApp served by the hardware cosigner. When the user click Sign button, it will tell the hardware cosigner to sign and accept the transaction then send it to Byteball DAG. In opposite, when the user click Deny button, it will tell the hardware cosigner to sign and refuse the transaction then send it to Byteball DAG.
Video Tutorial

Curriculum
References
- Byteduino Release Announcement
- Latest Testnet Wallet for Linux 64 bit
- sequence diagram on how the hardware cosigner works