Repository
https://github.com/Dogfalo/materialize
What Will I Learn?
- You will learn how to use collections components to create moderator ranking page.
- You will learn how to integrate the badges with collection component.
- You will learn how to use badge components to create status list.
- You will learn what is new badgecomponent.
- You will learn about the secondary content and collection-item avatar.
Requirements
- Materialize Full Package 1.0.0-beta version.
- Materialize Icon Family CDN.
- Microsoft Visual Studio Code. (or another text editor.)
- A browser for testing.
- XAMPP Control Panel Server.
OS Requirement for Running Materialize
- Linux (64-bit)
- Windows 7 / Windows 8 / Windows 8.1 and Windows 10.
- macOS (64-bit)
Difficulty
- Intermediate
Description
A Small Overview
In this episode of the Materialize Video Tutorial, we focused how we can create moderator ranking page and status list. We used the avatar-content as collections because collections will classify the ranking list we added and it will provide us to add profile avatar in list.
We used collection-item, secondary-content and avatar-content components for each user.
We used collection item as component because this component specifies all the data we added.
After these we used secondary-content because secondary content component is used if a different collection component was previously used. secondary-content component provides us adding buttons with icons to the elements.
After that we used badges because badges are notify us that there are new or not yet seen informations or notifications. We used customizable badges for this tutorial.
Finally, I gave technical information about codes, classes, components and all operations. Our Materialize education series will progress from basic - intermediate to advanced. All the programs described in the video (Materialize CSS, Visual Studio Code, XAMPP Server Control Panel Server) are open source and are all included in the links section of the GitHub repositories (Except XAMPP Control Panel Server). If you wish, you can access the web pages of these programs and download links for Windows from the All of Resources for this Project section.
All of Resources for this Project
- Materialize Main Logo: https://materializecss.com
- Materialize Github Repo: https://github.com/Dogfalo/materialize
- Materialize Documentation: https://materializecss.com/getting-started.html
- Visual Studio Code (VSCode) GitHub Repo: https://github.com/Microsoft/vscode
- Materialize Web Site: http://materializecss.com/
- Materialize Package Download for Windows:
https://github.com/Dogfalo/materialize/releases/ - Visual Studio Code Web Site: https://code.visualstudio.com/
- Visual Studio Code Download Link for Win x64: https://go.microsoft.com/fwlink/?Linkid=852157
- XAMPP Control Panel Server Web Site: https://www.apachefriends.org/en/
- XAMPP Control Panel Server (For Windows) Download Link: https://www.apachefriends.org/download.html
- Materialize Minified Ajax CSS Library: https://cdnjs.cloudflare.com/ajax/libs/materialize/1.0.0-beta/css/materialize.min.css
- Materialize Minified Ajax JavaScript Library: https://cdnjs.cloudflare.com/ajax/libs/materialize/1.0.0-beta/js/materialize.min.js
- Utopian.io Paragraph (About Utopian): https://join.utopian.io/
- My Materialize Image Source:
Summary: Critical Points and Important Points
Creating Introduction Section

We added two titles and two pictures to make the introduction section of our page look good with using simple commands.
We also exported this images to be used in the project to the images folder inside xampp and htdocs folders.
Creating Ranking Section With avatar content and secondary-content
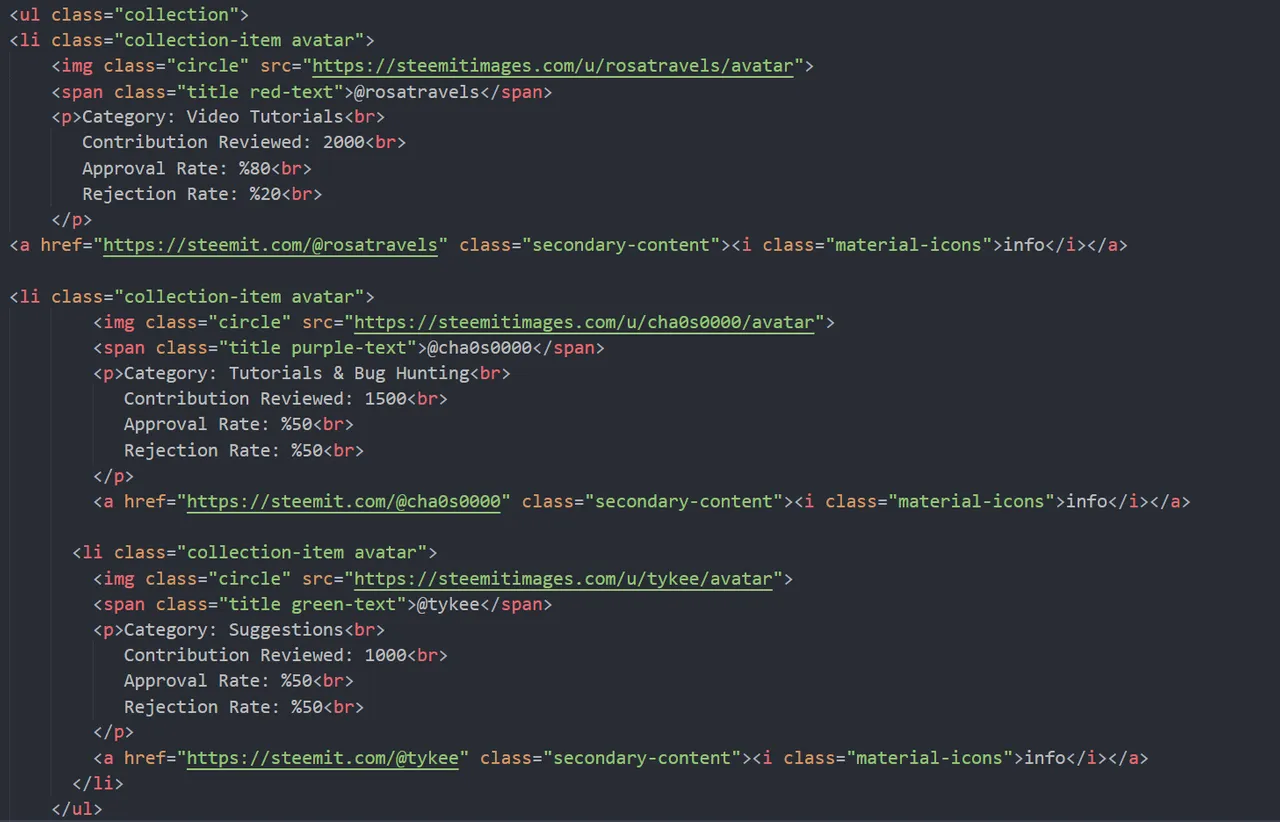
In this section, we defined ul class as collections because we will work with the collection components. After defining ul class we created a li and we defined li class as collection-item avatar this component is our avatar content. We used collection-item because collection-item specifies all the data we added. We added Rosatravels Moderator's Steemit profile image with image source that is a data so we need to use collection item as avatar for each li classes. We also defined span class as title because we want to create moderator's name as colored, The span command is helping us to make the title colorful.
After this operations we created a paragraph for Rosatravels Moderator information.
We defined her Category as Video-Tutorials, Reviewed Contributions Value as 2000, Approval Rate as %80 and Rejection Rate as %20.
We used on a bottom line secondary-content as a class because our first collection content about avatar content.
The secondary-content provides us to creating a button and adding buttons with icons to the elements in the list.
We defined a href as Rosatravels Moderator's Steemit Profile as secondary-content and we added info button with materialize-icon class. When we click on the Rosatravels' information button, this button will redirect us to the Rosatravels' Steemit Profile Page.
After this operations we have added other Moderators to the ranking list with the same codes.
Creating Customizable Badges and Integrating Badges and Collections

Firstly we defined two division classes as collection and badges this operation for integrating badges and collections. We integrated this components with division classesç We also wrote badges and collection components in the same line.
We needed collection-item component because this component provides us creating datas.
We defined our first class about collection-item and our texts are approved and rejected contributions.
After these operations, we started to create our badge with specyfing a href as hashtag (#) (blank), we defined a href as hashtag to make badges are clickable.
On the bottom line, We used new badge as span class because we want to create customizable badge, new badge class is specific component for creating customizable badge.
After, we created span classes as new badge green for approved box and new badge red for rejected box.
And finally we created our data-badge-caption as approved and rejected, 200 - 50 values are approved and rejected contributions values. Them will appear in our little red and green value boxes.
Video Tutorial

The source code and project file for this project can be found here.
Curriculum
Simple Contact Form Without Server and BootstrapCDN
- How to Create a Simple Contact Form Without Using Server and Bootstrap CDN
Full Screen Image Slider with Carousel- How to Create a Full Screen Image Slider Using Carousel with XAMPP Localhost Server From Scratch
Creating Side Navbar- How to Create Side Navigation Bar using Materialize and jQuery Libraries with XAMPP Localhost Server From Scratch
Creating [Navbar] Top Navigation Bar- How to Create Top Navigation Menu (Navbar) using Materialize CSS with XAMPP Localhost Server
Scrollspy Menu- How to Create a Scrollspy Menu using Materialize CSS and jQuery Library with using XAMPP Localhost Server
Parallax Website- How to Create Parallax (Scrolling Image) Website using Materialize CSS and jQuery Library with using XAMPP Localhost Server
Professional Login Form- How to Create a Professional Login Form with using Modal Methods and Localhost Server
Questionnaire Form- How to Create a Questionnaire Form With Using Input Field, Toast, Checkbox and Special Plug-In
Statistics Panel
How to Create a Statistics Panel & Welcome Page with Cards, Footer, Table and Navigation Button