The Challenge
The current Battle Mage Secrets challenge revolves around the LITTLE LEAGUE ruleset, which introduces an intriguing twist. This ruleset stipulates that only Monsters & Summoners with a cost of 4 Mana or less are permissible in battles.
This rule injects a fresh strategic dimension into the gameplay. Typically, the battles under the LITTLE LEAGUE ruleset showcase an assembly of mana-efficient monsters, known for their efficiency in having substantial health or being able to dish out high damages. As a result, the battles governed by the LITTLE LEAGUE ruleset tend to conclude swiftly 😅

The Battle
In my alt account, jimbei, I was able to engage in a battle that involves the LITTLE LEAGUE ruleset during the current Guild Brawls. To get right into the action, the battle link can be found here. Otherwise, do read on as I go into more details regarding the lineup and fight.

Let's kick off by examining the ruleset in play. This battle is marked by the simplicity of having just two rulesets steering the gameplay. The primary spotlight is on the LITTLE LEAGUE ruleset, which we've already dived into comprehensively earlier on. The second ruleset, Up to Eleven, endows all units with the Amplify ability. With a mana cap restriction set at 39, players are limited to utilizing the Fire and Life Splinters exclusively.

As mentioned, this battle took place within a Guild Brawl, introducing supplementary constraints based on the particular fray you engaged in. In my case, I participated in a fray aligned with Diamond League level caps, granting the opportunity to utilize all cards available ✌️

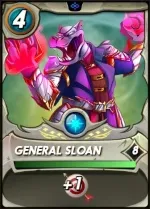
Summoner, General Sloan
Normally, I don't incline toward using General Sloan as my Summoner of choice with the Life Splinter. However, due to the constraints imposed by the LITTLE LEAGUE ruleset, which barred the inclusion of the 6-mana-cost Grandmaster Rathe, my options were limited. Given the monsters I intended to incorporate from the Life Splinter for this specific battle, I decided to opt for General Sloan rather than selecting Tarsha from the Fire Splinter 👊
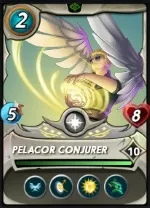
First Position, Pelacor Conjurer
Pelacor Conjurer stands out as an excellent choice for a cost-effective tank in this battle. With a low mana cost of 2, it boasts impressive Speed and Health stats, along with abilities like Magic Reflect, Phase, and Divine Shield, making it a formidable opponent against various enemy monsters. Its abilities, especially Magic Reflect and Phase, become particularly potent when facing Magic-focused opponents, especially under the Up to Eleven ruleset 💪
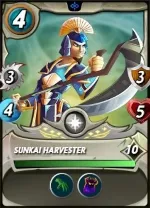
Second Position, Sunkai Harvester
I often wonder why the Sunkai Harvester is underappreciated amongst the Life Splinter as I find myself frequently utilizing it in battles, particularly those governed by the LITTLE LEAGUE ruleset. Thanks to its Reach ability, the monster can effectively attack from the second position, adding to its versatility. Another compelling reason behind choosing Sunkai Harvester for this battle lies in its Oppress ability, which holds the potential to deliver double damage to a target monster with no attacks (e.g. Pelacor Conjurer) 😝
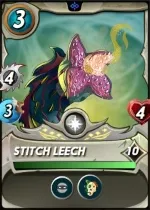
Third Position, Stitch Leech
Strategically positioned in the midfield of the lineup, the Stitch Leech maximizes its Life Leech ability. This placement allows the Stitch Leech to effectively utilize its Sneak ability, enabling it to skillfully infiltrate the enemy's backline and accumulate Health stats through Life Leech. This tactical positioning ensures that when summoned in the first position after the fall of the frontline's monsters, the Stitch Leech can serve as a reliable tanker, thanks to its accumulated Health 😎
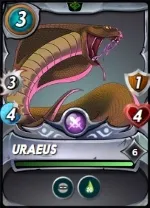
Fourth Position, Uraeus
Uraeus was included in the team selection, chosen to complement the Stitch Leech's assault on the enemy's backline as a key part of the battle strategy. As a member of the Neutral Splinter, Uraeus is a versatile monster often seen in Diamond and Champion League Ranked Battles. Despite its modest mana cost, Uraeus wields considerable strength with 3 Melee damage and the Sneak ability. Notably, its standout capability is its potential to afflict opposing monsters with Poison 😜
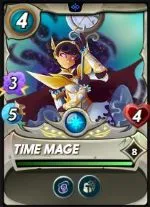
Fifth Position, Time Mage
The Time Mage stands as an exceptional low-cost monster that seamlessly aligns with the parameters set by the LITTLE LEAGUE ruleset. At a mere mana cost of 4, it boasts noteworthy attributes including 3 Magic attack, 5 Speed, and 4 Health. Its Slow debuff ability provides the team with a tactical Speed edge during the battle. Additionally, its Rust ability adds immense value to team compositions by stripping 2 Armor from the opposing lineup 👍
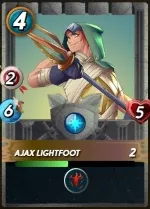
Last Position, Ajax Lightfoot
A Guild Brawl encounter wouldn't be complete without a Gladius Monster, and in this battle, Ajax Lightfoot takes the rear position to leverage its remarkable Speed, enhancing the likelihood of enemies missing their target. Additionally, the +1 Range attack boost from General Sloan further empowers Ajax Lightfoot. In the likelihood where the Bloodlust ability is activated through defeating any target monster, Ajax Lightfoot's overall stats become instrumental in determining the battle's outcome 😇
The Analysis

Considering that only the Fire and Life Splinters were available for selection in this battle, I anticipated my opponent might also choose the Life Splinter, given that Pelacor Conjurer is likely the most effective tanker under the present rulesets. To my surprise, my opponent opted for the Fire Splinter instead. Upon examining the lineup, it became evident that my opponent aimed to boost the team's Speed, intending to swiftly conclude the battle before I could even get going with my attacks.
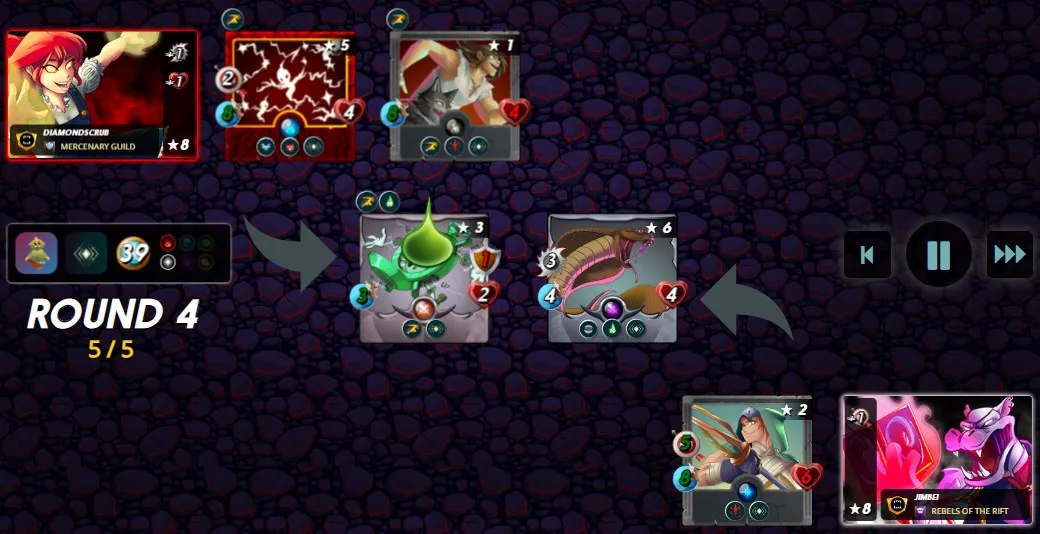
Nonetheless, my lineup was resilient, with Pelacor Conjurer and Sunkai Harvester weathering the initial enemy assault. Subsequently, I retaliated, systematically dismantling the enemy's lineup. The battle remained in close contention, hinging on this pivotal moment (above screenshot) in Round 4 when my Uraeus successfully inflicted Poison on the enemy's Clockwork Aide. Without this occurrence, I could have faced defeat 🤣
Do you guys have any better recommendations for setting up the team in this particular ruleset? Do share them with me in the below comments 😜

If you made it this far, I sincerely appreciate your time and value your encouragement. Please feel free to leave any comments or suggestions so that we can discuss about other strategies. Thinking about giving Splinterlands a try but haven't signed up yet? Feel free to use my referral link: https://splinterlands.com?ref=ak08, and be sure to reach out to me if you have any questions!
Are you interested in reading some of my future writings? Don't forget to follow me! In the meantime, here are some of my most recent blogs if you'd like to view them:
 |  |
 |  |
All banners, dividers card and battle images used in this article are open source and obtained from the Splinterlands team or made by flauwy. Do check out his link for other amazing designs.