
Ruleset Focus

In this week's Battle Mage Secrets, we shall dive into exploring the HOLY PROTECTION ruleset.
The ruleset grants all units the DIVINE SHIELD ability, negating the first instance of damage taken. However, do note that monsters with this ability won't be receiving this ability twice. To optimize this ruleset, it is recommended to fill all 6 slots of your lineup for maximum benefits 😁

Abilities Focus
ARMORED UP ruleset, demonstrating a cohesive link through their association with Armor statistics, be it through buff or debuff mechanics!


the remainder will damage the target's Health

The Battle
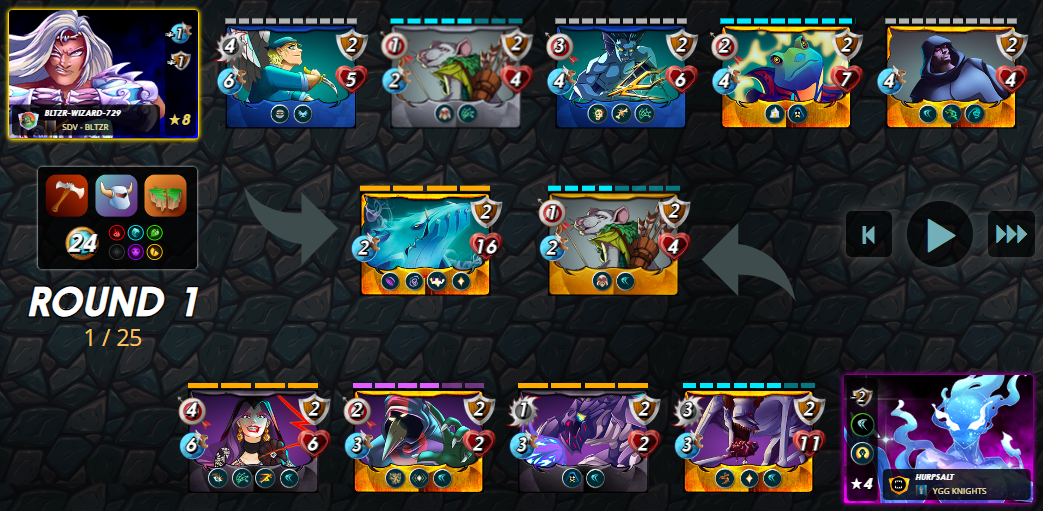
While fulfilling my responsibilities in the Splinterlands scholarship account I have with Balthazar, bltzr-wizard-729, I was able to engage in a battle that involves the ARMORED UP ruleset. To get right into the action, the battle link can be found here. Otherwise, do read on as I go into more detail regarding the lineup and fight.

To begin our analysis, let's dive into the rulesets applied in this battle. First, the Melee Mayhem ruleset grants Melee attacking Monsters the ability to strike from any position within the lineup. Following that, we have the main highlight of this week's challenge, the ARMORED UP ruleset, which has been thoroughly discussed in the preceding sections. Finally, there is the Earthquake ruleset, inflicting 2 Melee damage on Non-flying Monsters at the end of each round. The battle imposes a mana restriction of 24 and prohibits the use of the Life Splinter.

Summoner, Kelya Frendul
Navigating through the diverse range of Splinters available for selection in this battle posed a challenge for me. Despite the numerous options, I gravitated towards my dependable Water Splinter. I believe it offers a diverse array of Monsters that, in my opinion, possess the potential to outperform those of other available Splinters in this particular battle. For my Summoner, I opted for Kelya Frendul, primarily for the valuable +1 Speed and +1 Armor buffs that she bestows upon the team! ✌️
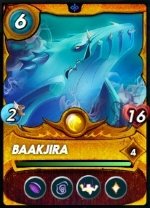
First Position, Baakjira
Baakjira stands out as the indisputable top pick for tanking, particularly in the fiercely competitive Diamond and Champions League! I've strategically chosen to position it as my main tank, establishing a robust setting for my backline units. Baakjira brings forth an impressive array of abilities, including buffs and debuffs such as Slow and Strengthen. Furthermore, its Void ability adeptly diminishes incoming magic damage, complemented by its effective Healing capability! 😇

Second Position, Pelacor Bandit
The Pelacor Bandit emerges as a fantastic cost-effective option in the game, especially when navigating the Earthquake ruleset. Priced at a mere 3 mana, it flaunts commendable stats with 4 Melee attack, 6 Speed, and 5 Health. Its Flying ability elevates its evasion capabilities against both Melee and Ranged attackers. Moreover, the Sneak ability it possesses proves to be an invaluable asset in team compositions, enabling it to swiftly eliminate susceptible enemy backline units! 😛
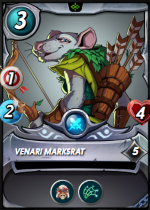
Third Position, Venari Marksrat
With the emergence of the Martyr ability, Venari Marksrat has assumed a pivotal position in my battle strategy. I've strategically slotted it between Pelacor Bandit and Merdhampir, with the anticipation that if it were to be eliminated early (by the opponent or by itself due to the Earthquake damages) in the battle, it would offer a substantial boost to the adjoining monsters. This calculated maneuver aimed to empower my primary attacking units, furnishing them with the edge required to clinch victory in the battle! 🙂

Fourth Position, Merdhampir
Merdhampir stands out as a personal favorite among the Reward Monsters in the Water Splinter. One of its notable strengths lies in its Life Leech ability, enabling it to restore its Health proportionally to the damage it deals to the enemy. This feature allows Merdhampir to effectively endure the Earthquake damages inflicted at the end of each round. Additionally, Merdhampir possesses the Snare ability, which proves valuable in contending with Flying Monsters in the Earthquake battle! 😏
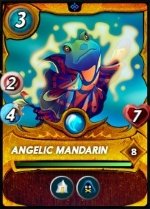
Fifth Position, Angelic Mandarin
Taking on a pivotal role as the rear-guard Healer, the Angelic Mandarin employs its Triage ability, adeptly restoring the Health of backline units, particularly in response to Earthquake damages dealt to all Monsters at the end of each round. Additionally, the incorporation of the Angelic Mandarin aids in diminishing Magic damages from the opponent through its Silence ability, thereby complementing the Void ability of my reliable tank, Baakjira! 😁

Last Position, Chaos Agent
Chaos Agent secured a position in my lineup mainly due to the mana constraints imposed after choosing the key members for my battle strategy. I strategically positioned Chaos Agent in the last slot of my lineup to provide resilience against potential Sneak attacks, particularly from foes like the Pelacor Bandit. Its Dodge ability significantly increase the likelihood of evading incoming enemy strikes. Additionally, its Backfire ability enables it to deal 2 Melee damage to opponents when they miss their attacks! 😆
The Analysis
Considering the diverse range of Splinters available in this battle, the appearance of the Death Splinter caught me by surprise. However, upon scrutinizing my opponent's lineup, I can understand the rationale behind their choice and acknowledge it as a shrewd move, especially given the prevailing rulesets in this battle! 🤔
Opting for the Astral Entity as their Summoner nullified the +2 Armor buff my team received from the ARMORED UP ruleset. Additionally, the opponent strategically utilized the Resurrect ability through their Venari Marksrat, allowing it to trigger a double Martyr boost for its Cursed Windeku! 👍
Despite my team being unable to benefit from the ARMORED UP ruleset buffs, my lineup proved to be significantly superior to the opponent's. I carefully considered navigating the more challenging Earthquake ruleset. The Pelacor Bandit from my team, with its Flying ability, remained unaffected by the Earthquake damages, while Merdhampir sustained itself throughout the match via its Life Leech ability. These two Monsters relentlessly besieged the enemies, ultimately securing my victory in the battle! 🤙
Do you guys have any better recommendations for setting up the team in this particular ruleset? Do share them with me in the below comments 😜

If you made it this far, I sincerely appreciate your time and value your encouragement. Please feel free to leave any comments or suggestions so that we can discuss about other strategies. Thinking about giving Splinterlands a try but haven't signed up yet? Feel free to use my referral link: https://splinterlands.com?ref=ak08, and be sure to reach out to me if you have any questions!
Are you interested in reading some of my future writings? Don't forget to follow me! In the meantime, here are some of my most recent blogs if you'd like to view them:
 |  |
 |  |
All banners, dividers card and battle images used in this article are open source and obtained from the Splinterlands team or made by flauwy. Do check out his link for other amazing designs.